If you’ve ever seen the dreaded WordPress HTTP error message while trying to upload an image to your WordPress site, you know how frustrating it can be. I’ve been there too—and I know how much it can slow you down, especially when visuals are a key part of your blog posts or website design.
But here’s the good news: you can fix it.
In this post, we’ll walk you through the most common reasons behind the WordPress HTTP error and show you simple, practical solutions to get your images uploading smoothly again.
Without further ado, let’s get started.
Table Of Contents
Fixing HTTP Error in WordPress When Uploading Images
There are several reasons why the WordPress HTTP error might occur: it can be due to a temporary server glitch, low memory limits, plugin conflicts, or even incorrect file permissions.
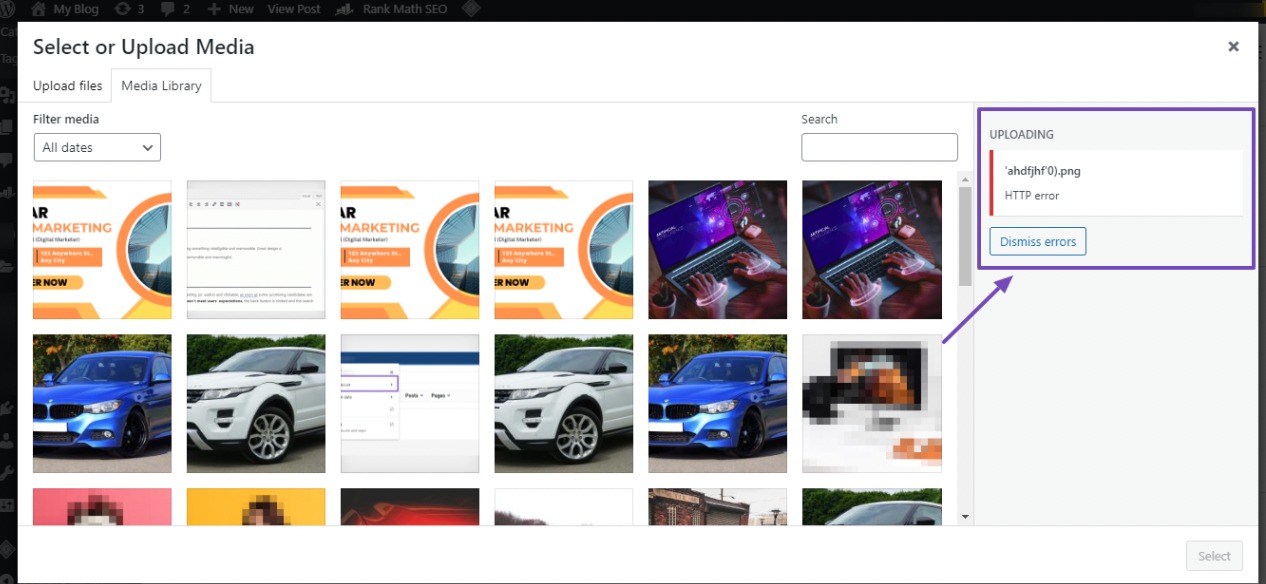
To address this, we’ve compiled different methods to resolve the HTTP error during image uploads on your WordPress website.
Since the cause can vary depending on your setup, it’s best to go through each method step by step—one of them is likely to do the trick.
1 Verify if the Error is Temporary
Sometimes, the HTTP error in WordPress is just a temporary glitch, not a serious issue. Before diving into complex fixes, try these quick steps:
- Refresh the page and attempt to upload the image again.
- If the error persists, wait a few minutes, then try uploading the file once more.
Temporary server issues, like high traffic or low resources, can sometimes cause upload errors. If you’re using a reputable hosting provider, these kinds of problems are often resolved automatically in the background.
Also, don’t rule out your browser. A brief disconnection or an outdated cache might be to blame. Here’s what you can do:
- Clear your browser’s cookies and cache.
- Try a different browser—for example, switch to Firefox, Safari, or Edge if you’re using Chrome.
If none of these quick fixes work, the issue may be more persistent. In that case, move on to the next steps to troubleshoot further.
2 Check File Size and Format
Another common cause of the HTTP error in WordPress is the image’s file size or format. By default, many hosting providers set a maximum upload limit, usually around 2MB. If your image is larger than this limit, WordPress may block the upload and show the HTTP error.
The error can also occur if the file is in an unsupported format or has a problematic filename.
Here’s what you can do to fix it:
- Compress the image to reduce its file size. You can use tools like Imagify or install a WordPress image optimization plugin.
- Convert the file to a supported format—WordPress works best with JPEG, PNG, or GIF.
- Rename the file to remove any special characters (like apostrophes, commas, or semicolons). Use only letters, numbers, dashes, or underscores.
Once you’ve made these changes, try uploading the image again. If the issue was related to file size or format, this should resolve it.
3 Disable Plugins and Themes
In many cases, the WordPress HTTP error is caused by a conflict between plugins or between your theme and a plugin, especially after installing or updating something recently.
If you recently added or updated a plugin, start here:
- Navigate to Plugins → Installed Plugins.
- Deactivate the most recent plugin.
- Try uploading your image again.
If the upload works, you’ve found the issue. You can now update, adjust the settings, or replace the plugin with a compatible alternative.
If you’re not sure which plugin might be causing the issue, or if the error happened without recent changes, use the Health Check & Troubleshooting plugin. This tool helps you test for conflicts safely without affecting your live site.
Install and activate the Health Check & Troubleshooting plugin. Refer to our dedicated tutorial on installing WordPress plugins.
In your WordPress dashboard, navigate to Tools → Site Health → Troubleshooting. Click Enable Troubleshooting Mode.
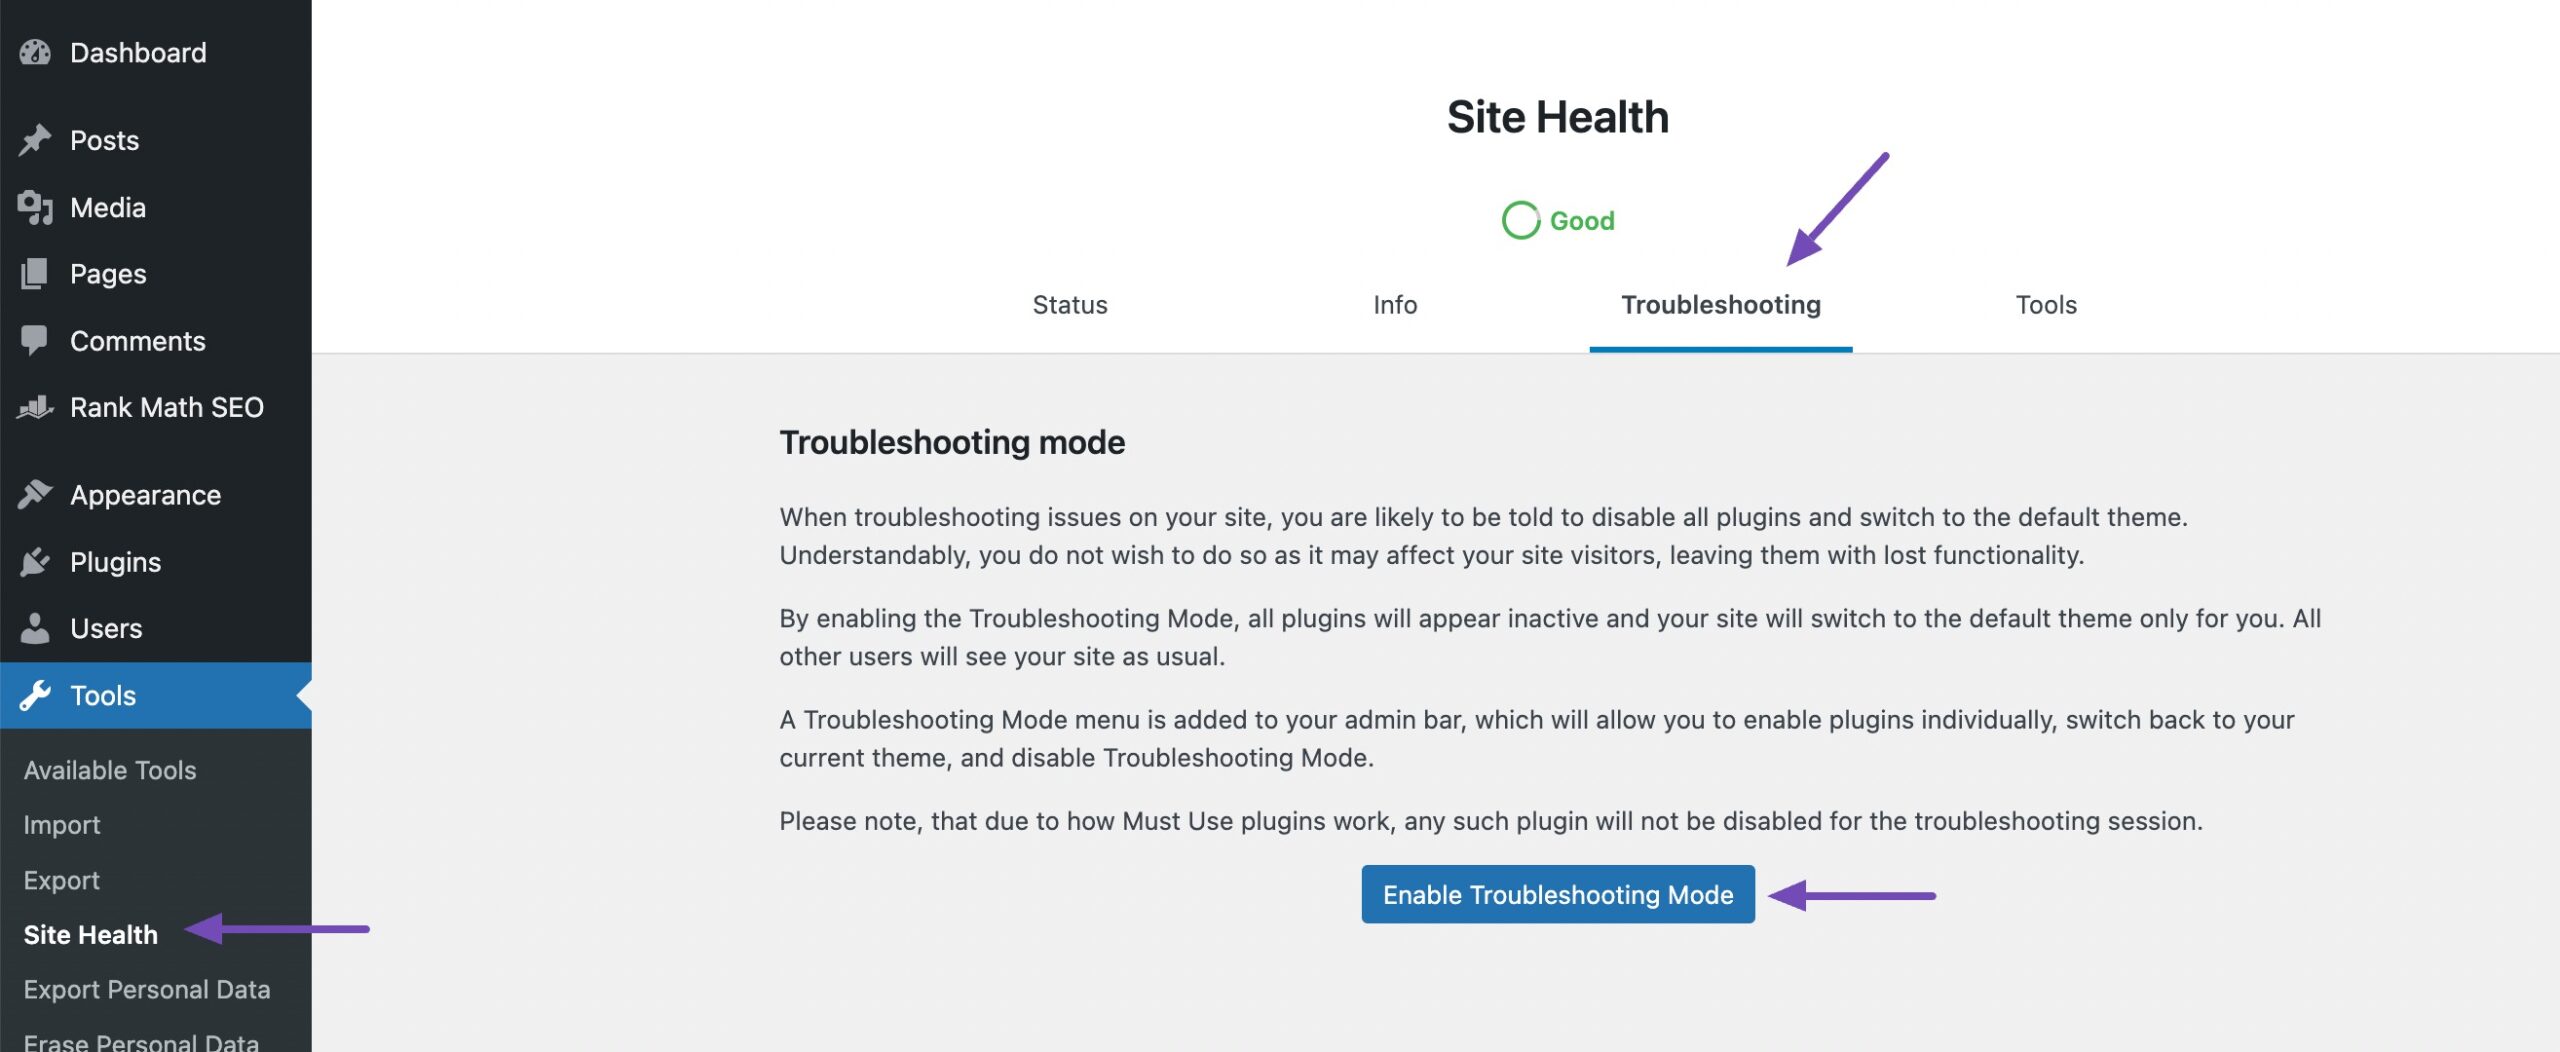
WordPress will temporarily switch to a default theme and disable all plugins—just for you. Your visitors will still see your site as normal.
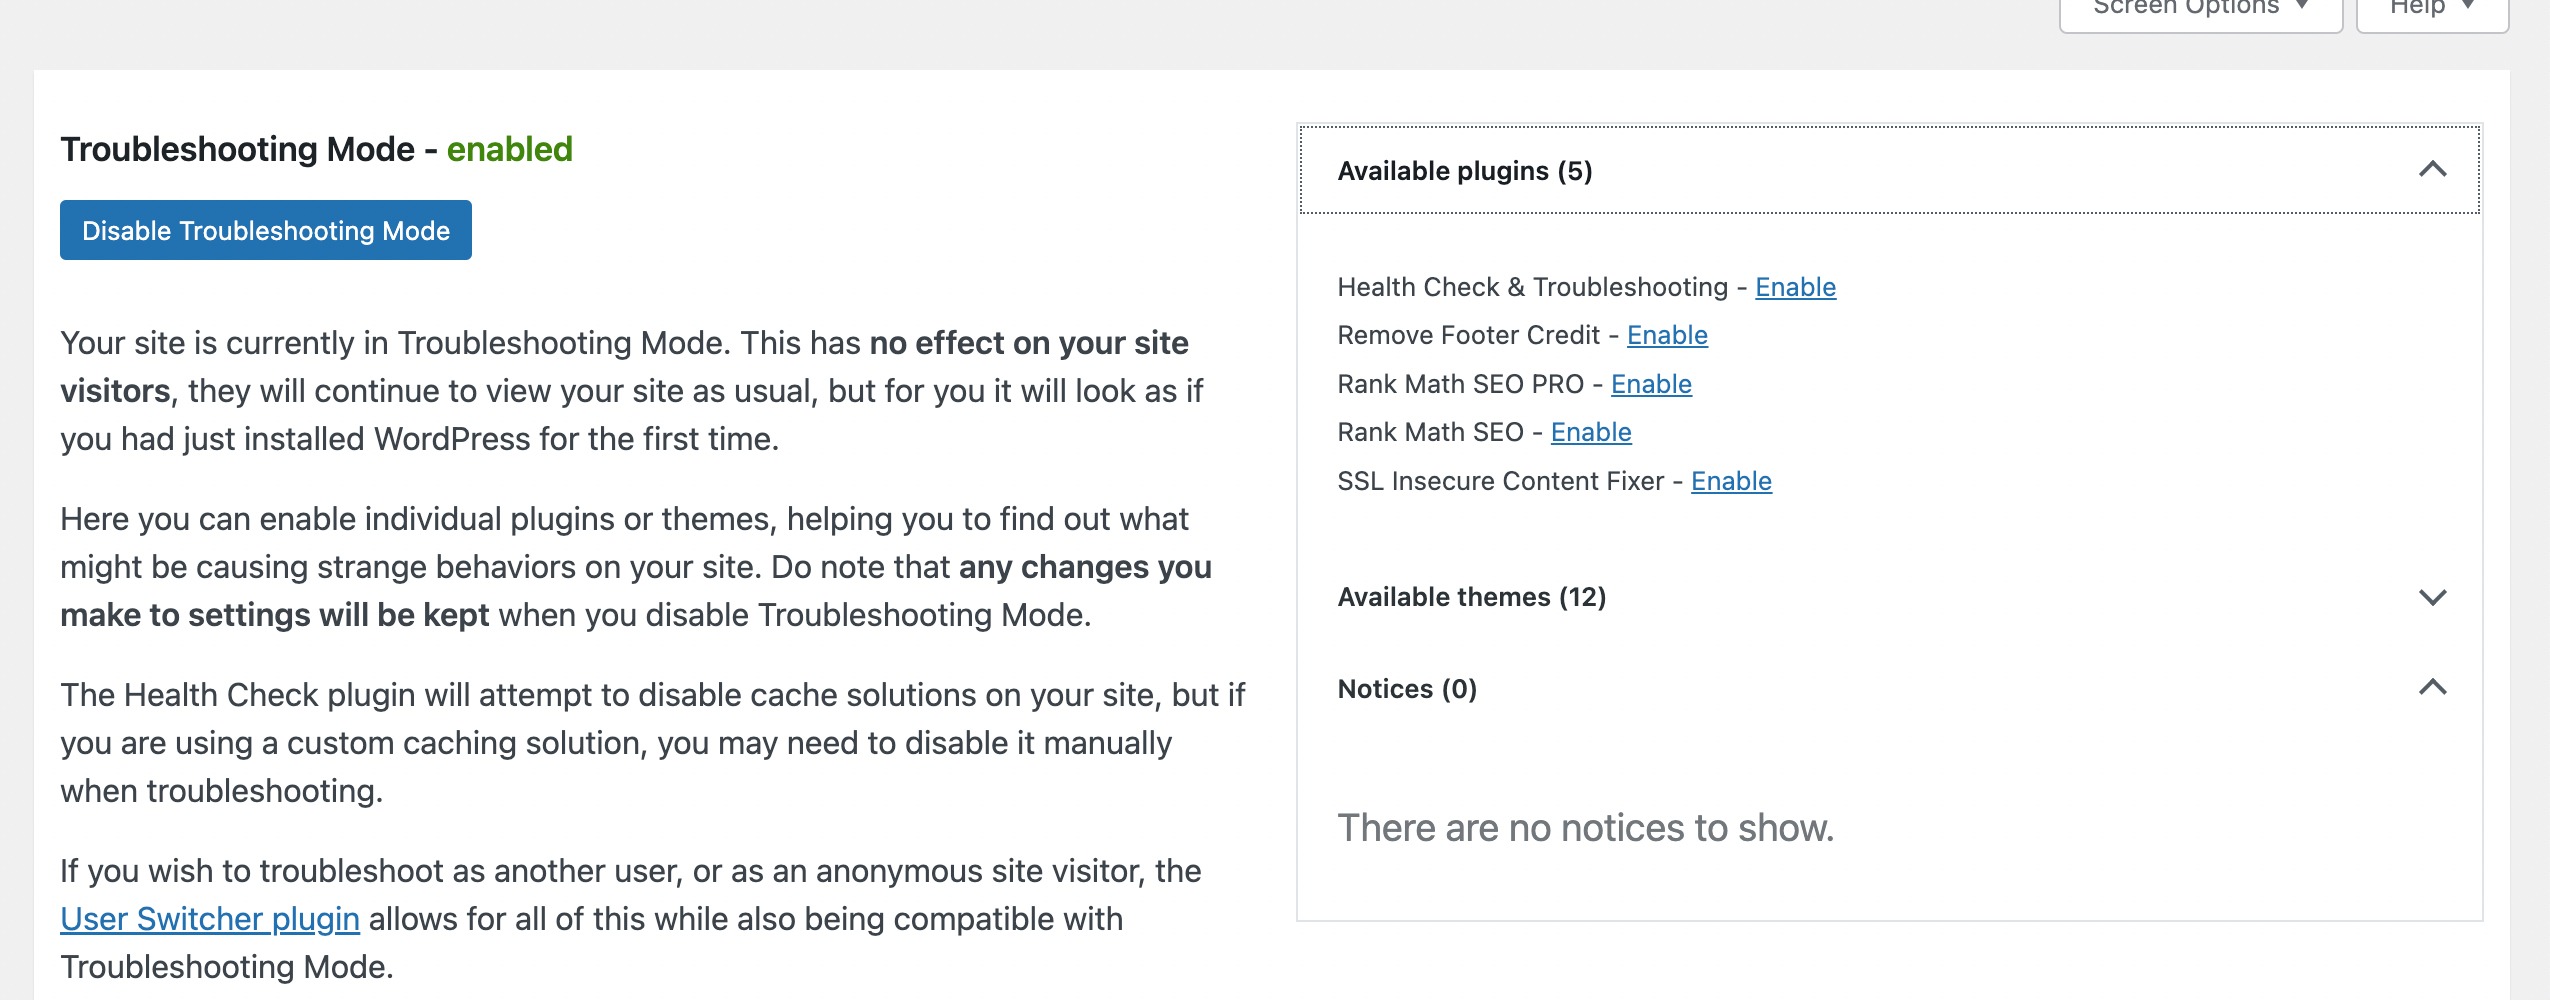
Try uploading an image. If it works, start re-enabling your plugins one by one, testing each time you activate a plugin.
If the error returns, the last plugin you activated is likely the culprit. Do the same with your theme, switch back from the default theme and check if it triggers the error.
Once you’ve found the plugin or theme causing the issue:
- Update it to the latest version.
- Review its settings—some plugins may interfere with image uploads.
- Contact the plugin or theme developer for support.
- Consider switching to an alternative if the issue isn’t resolved.
Finally, disable Troubleshooting Mode to return your site to normal.
4 Increase Server Memory Limit
If your server doesn’t have enough memory allocated to WordPress, you might run into an HTTP error while uploading images. Fortunately, increasing the PHP memory limit is a simple fix.
To resolve this issue, you can enhance the PHP memory limit by modifying your website’s wp-config.php file.
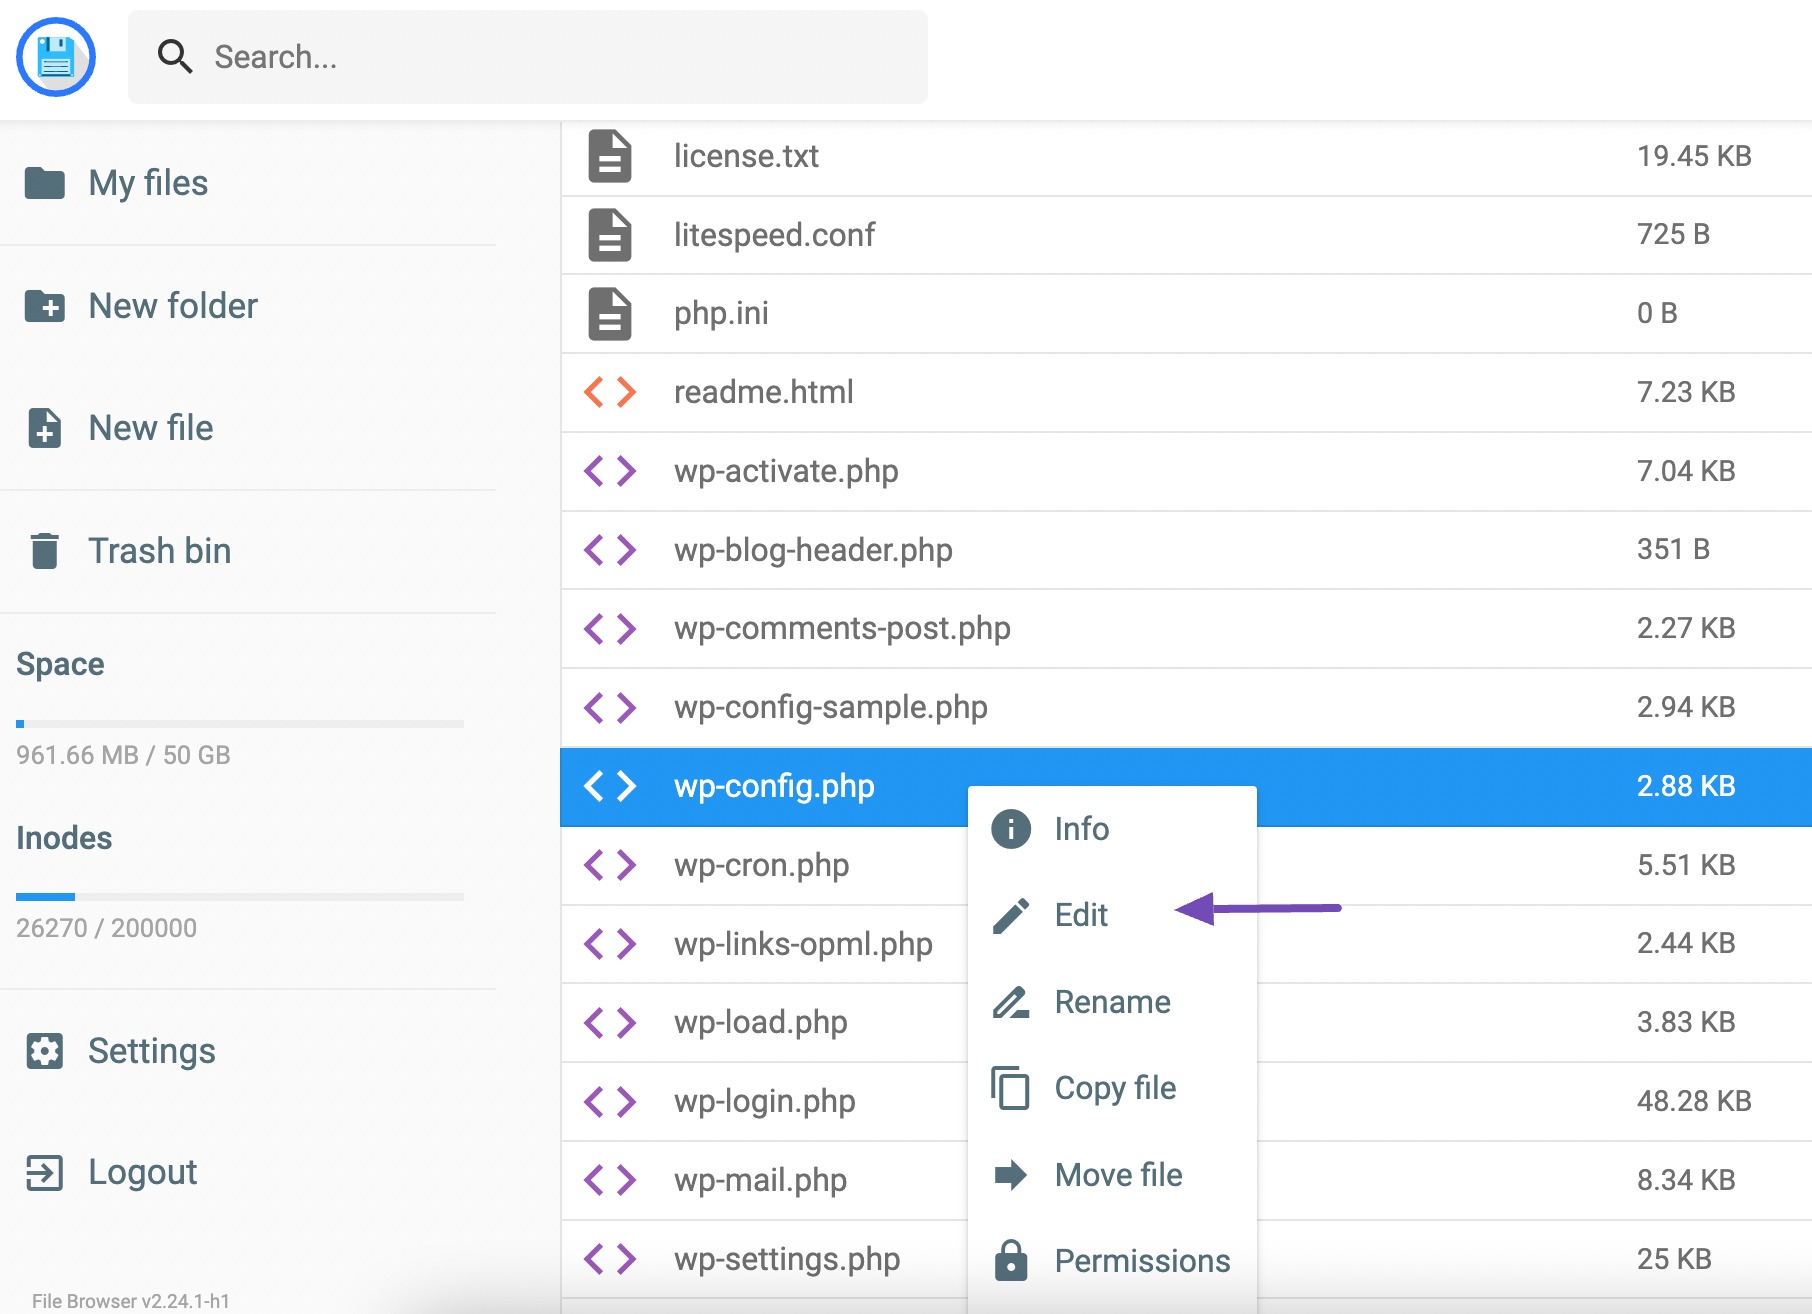
Access your site’s files using an FTP client or the File Manager app in your web hosting panel. Navigate to the public_html directory.

Once there, locate the wp-config.php file, right-click, and choose the Edit option, as shown below.
Next, insert the following code into the editor.
define('WP_MEMORY_LIMIT', '256M');Always back up your site before making changes to core files, just to be safe.
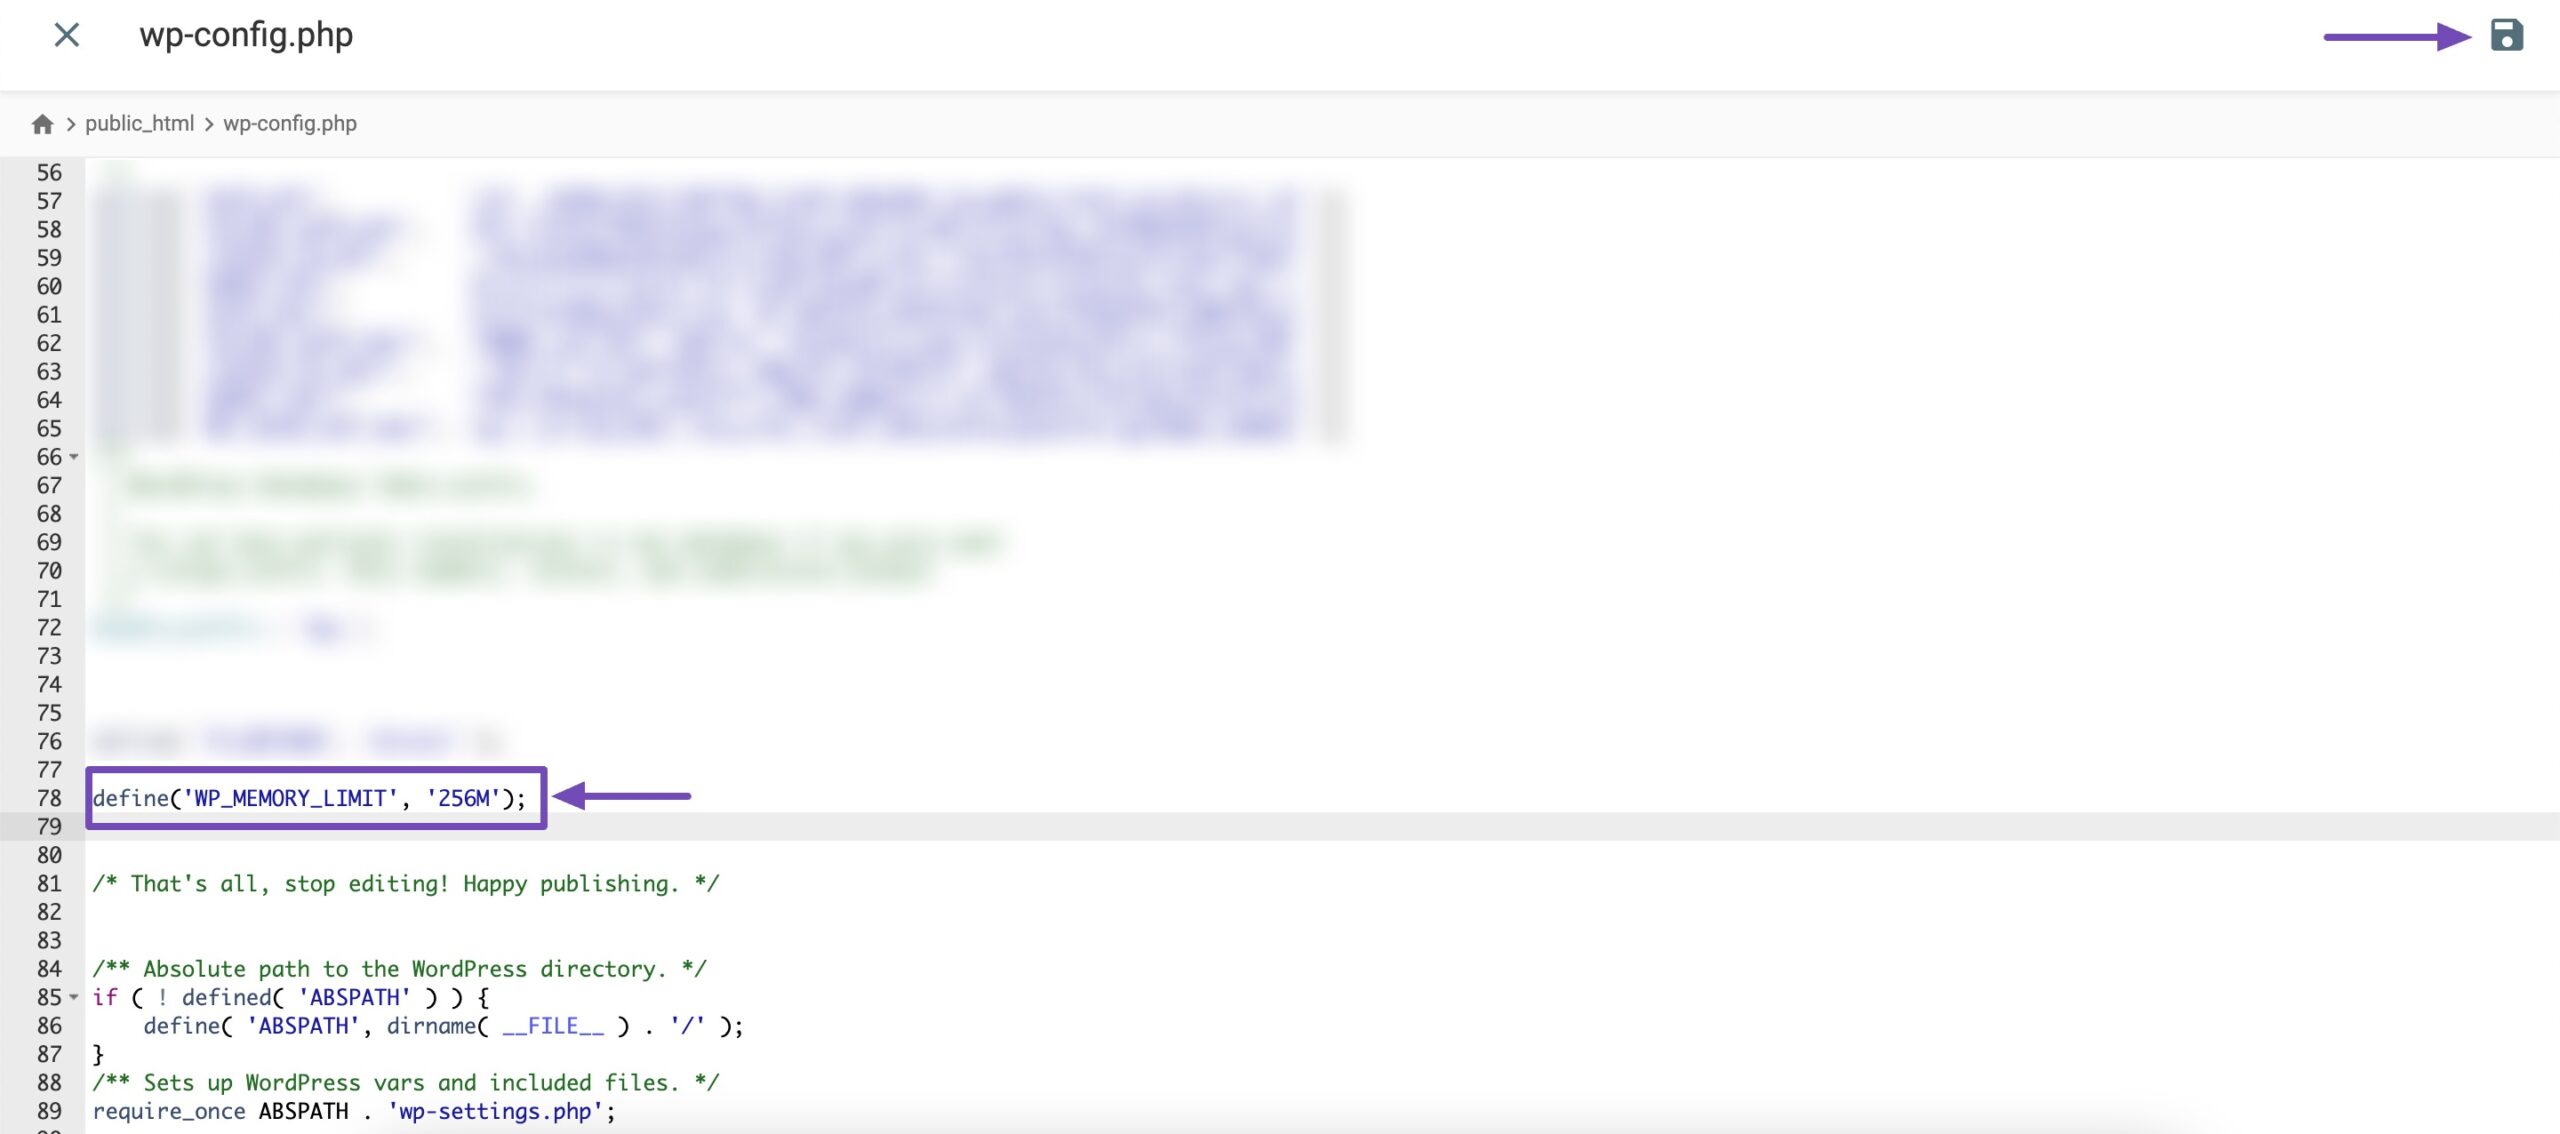
This code increases the WordPress memory limit to 256MB, sufficient to fix any memory limit issues. Don’t forget to save your changes. If the upload works now, the issue was related to insufficient memory. If not, continue with the next solution below.
5 Change the Image Editor Library Used by WordPress
WordPress uses PHP libraries to handle image processing, primarily the GD Library and Imagick. It chooses between them based on availability on your server.
However, Imagick can sometimes run into memory limitations, which may trigger HTTP errors during image uploads. If that’s the case, switching WordPress to use the GD Library by default can help fix the issue.
To make this change, simply add the following code snippet to your WordPress theme’s functions.php file. If possible, use a child theme to avoid losing changes during theme updates.
function wpb_image_editor_default_to_gd( $editors ) {
$gd_editor = 'WP_Image_Editor_GD';
$editors = array_diff( $editors, array( $gd_editor ) );
array_unshift( $editors, $gd_editor );
return $editors;
}
add_filter( 'wp_image_editors', 'wpb_image_editor_default_to_gd' );
If the upload works, the problem was likely caused by Imagick’s memory usage. If the error still appears, simply remove the code from your functions.php file and move on to the next method.
6 Editing .htaccess to Fix the Imagick Issue
On many shared hosting environments, the Imagick image processing library can run into problems because of server restrictions on how many threads it’s allowed to use. This can sometimes lead to an HTTP error when uploading images in WordPress.
You can resolve this by limiting Imagick to use a single thread.
To address this issue, add the following code to your .htaccess file:
SetEnv MAGICK_THREAD_LIMIT 1Save the changes and try uploading the image again.
You can easily edit .htaccess file using Rank Math. To edit your .htaccess file, navigate to Rank Math SEO → General Settings → Edit .htaccess. If this section is not available on your website, then ensure that you’ve switched to the Advanced Mode in Rank Math.
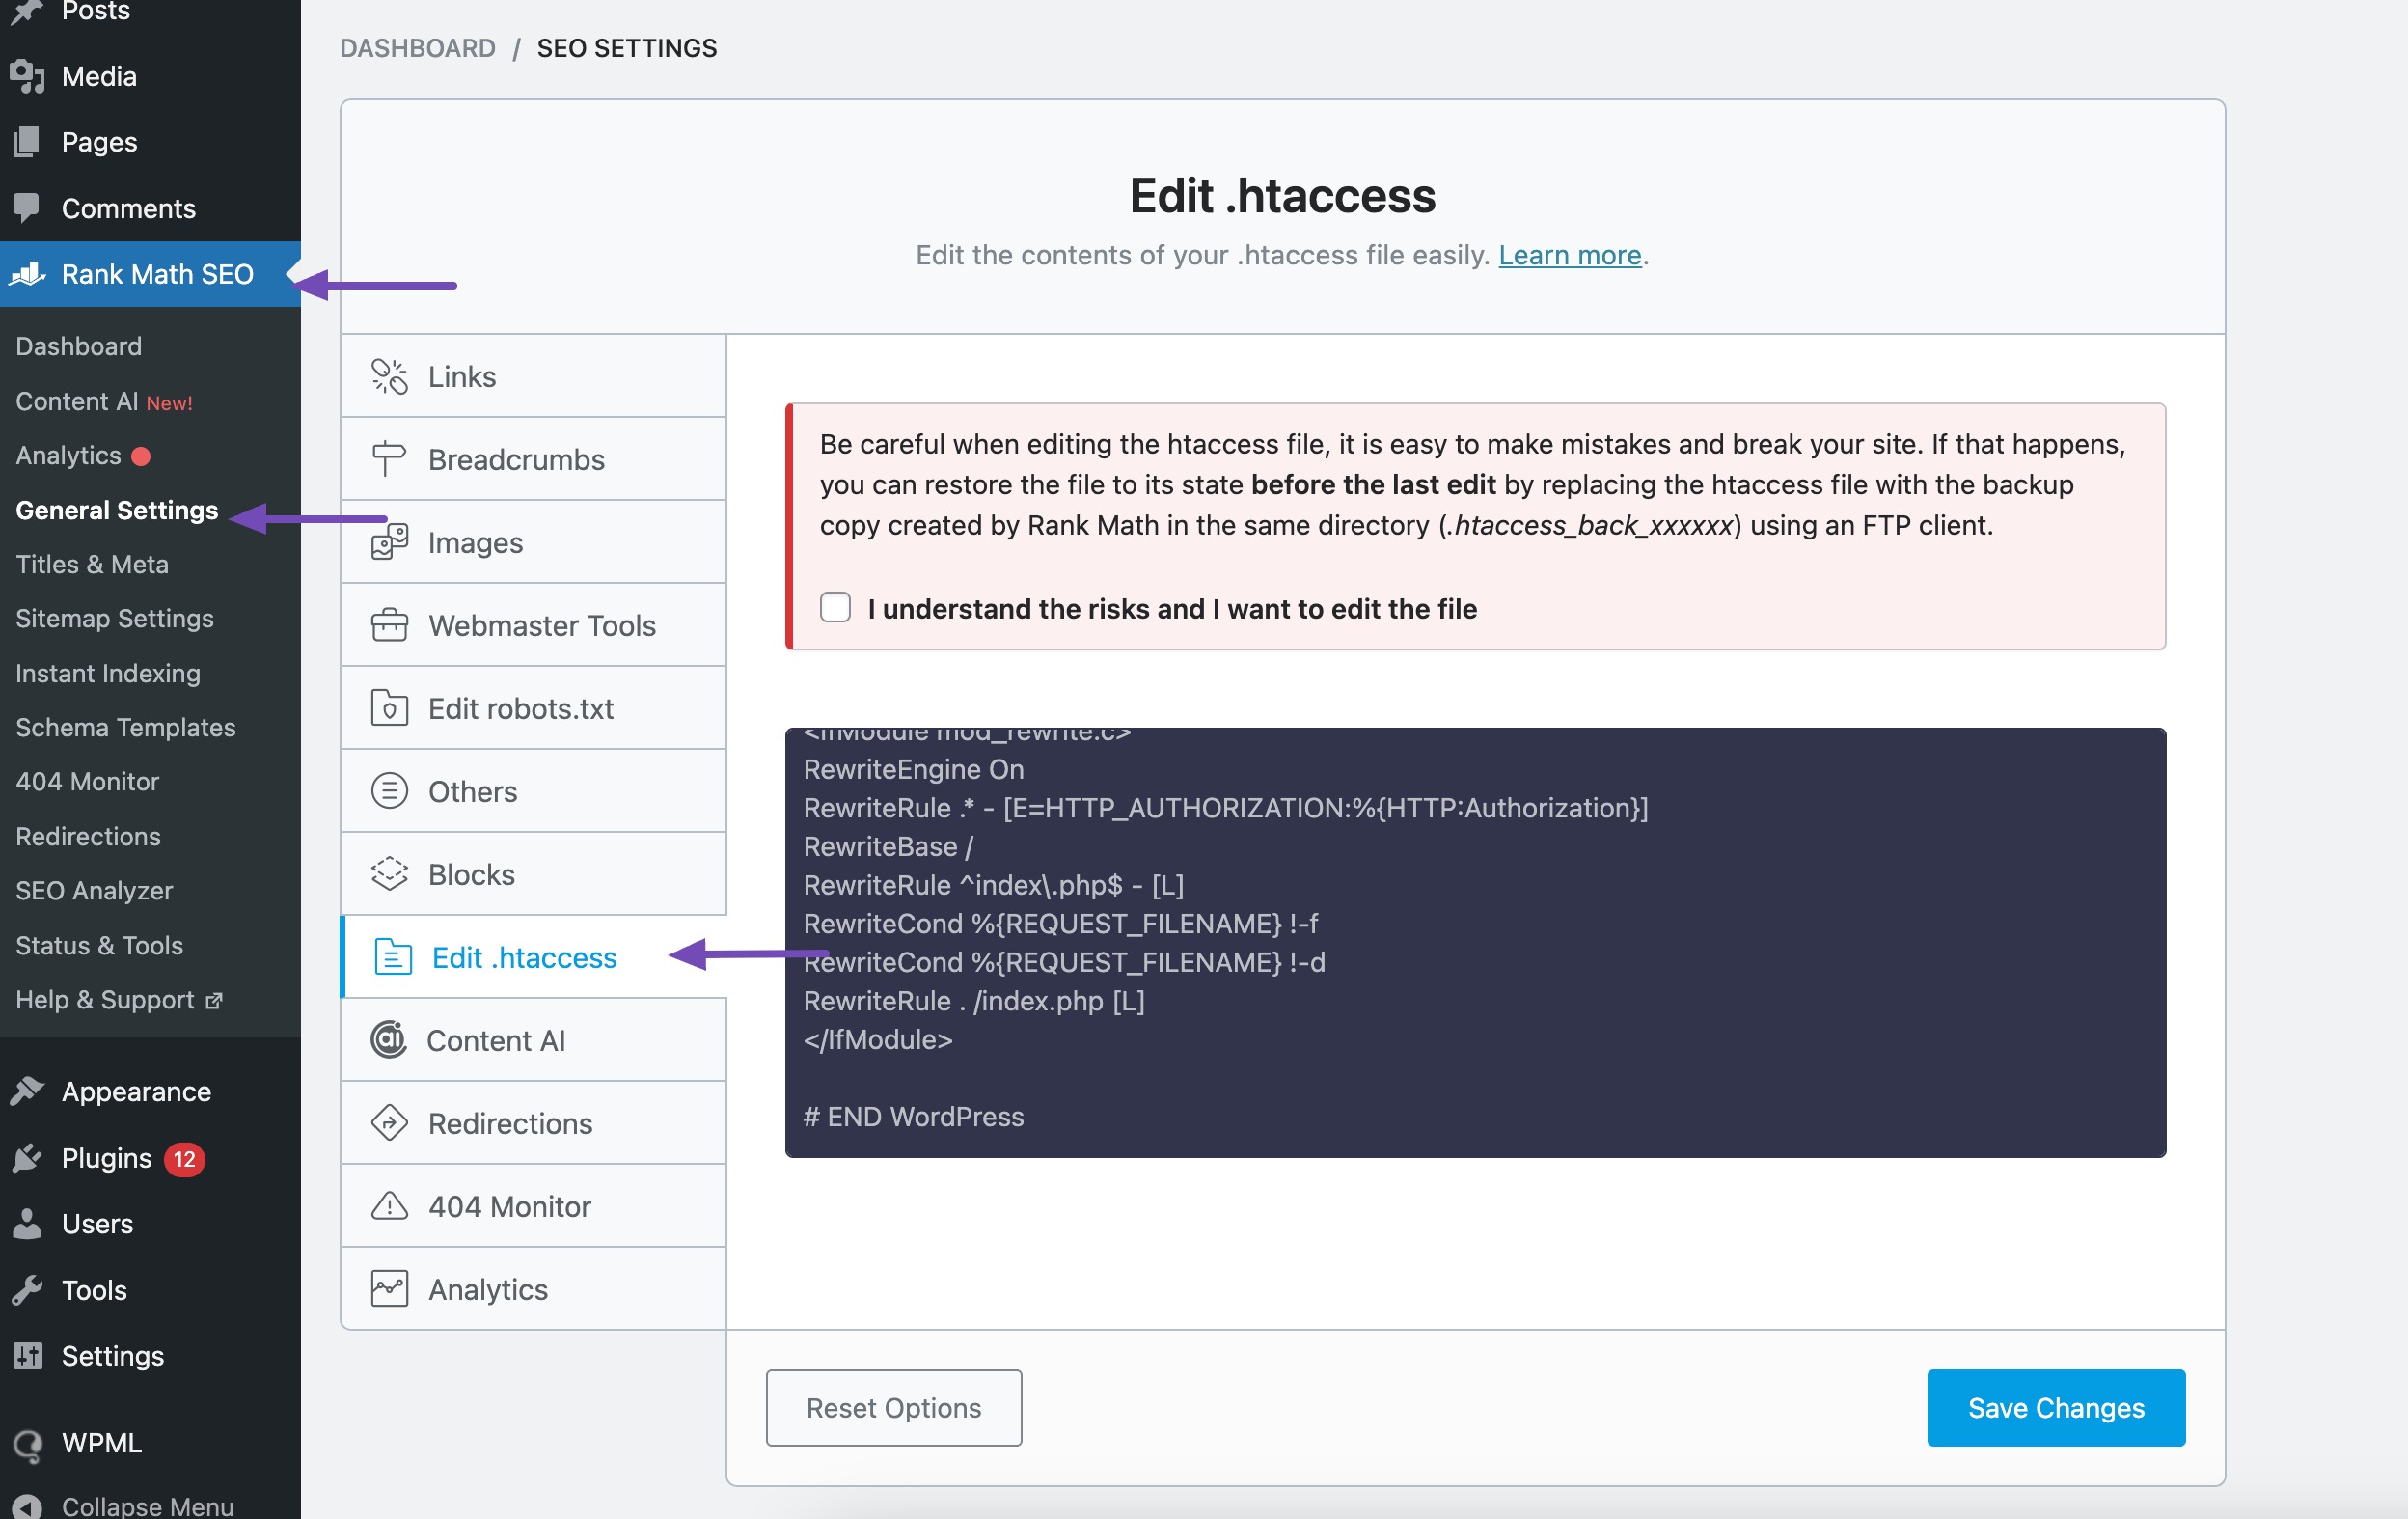
If you want to edit the .htaccess file, click the checkbox below the text. The text area below will become active, and you can edit your .htaccess file and add the code as shown below.
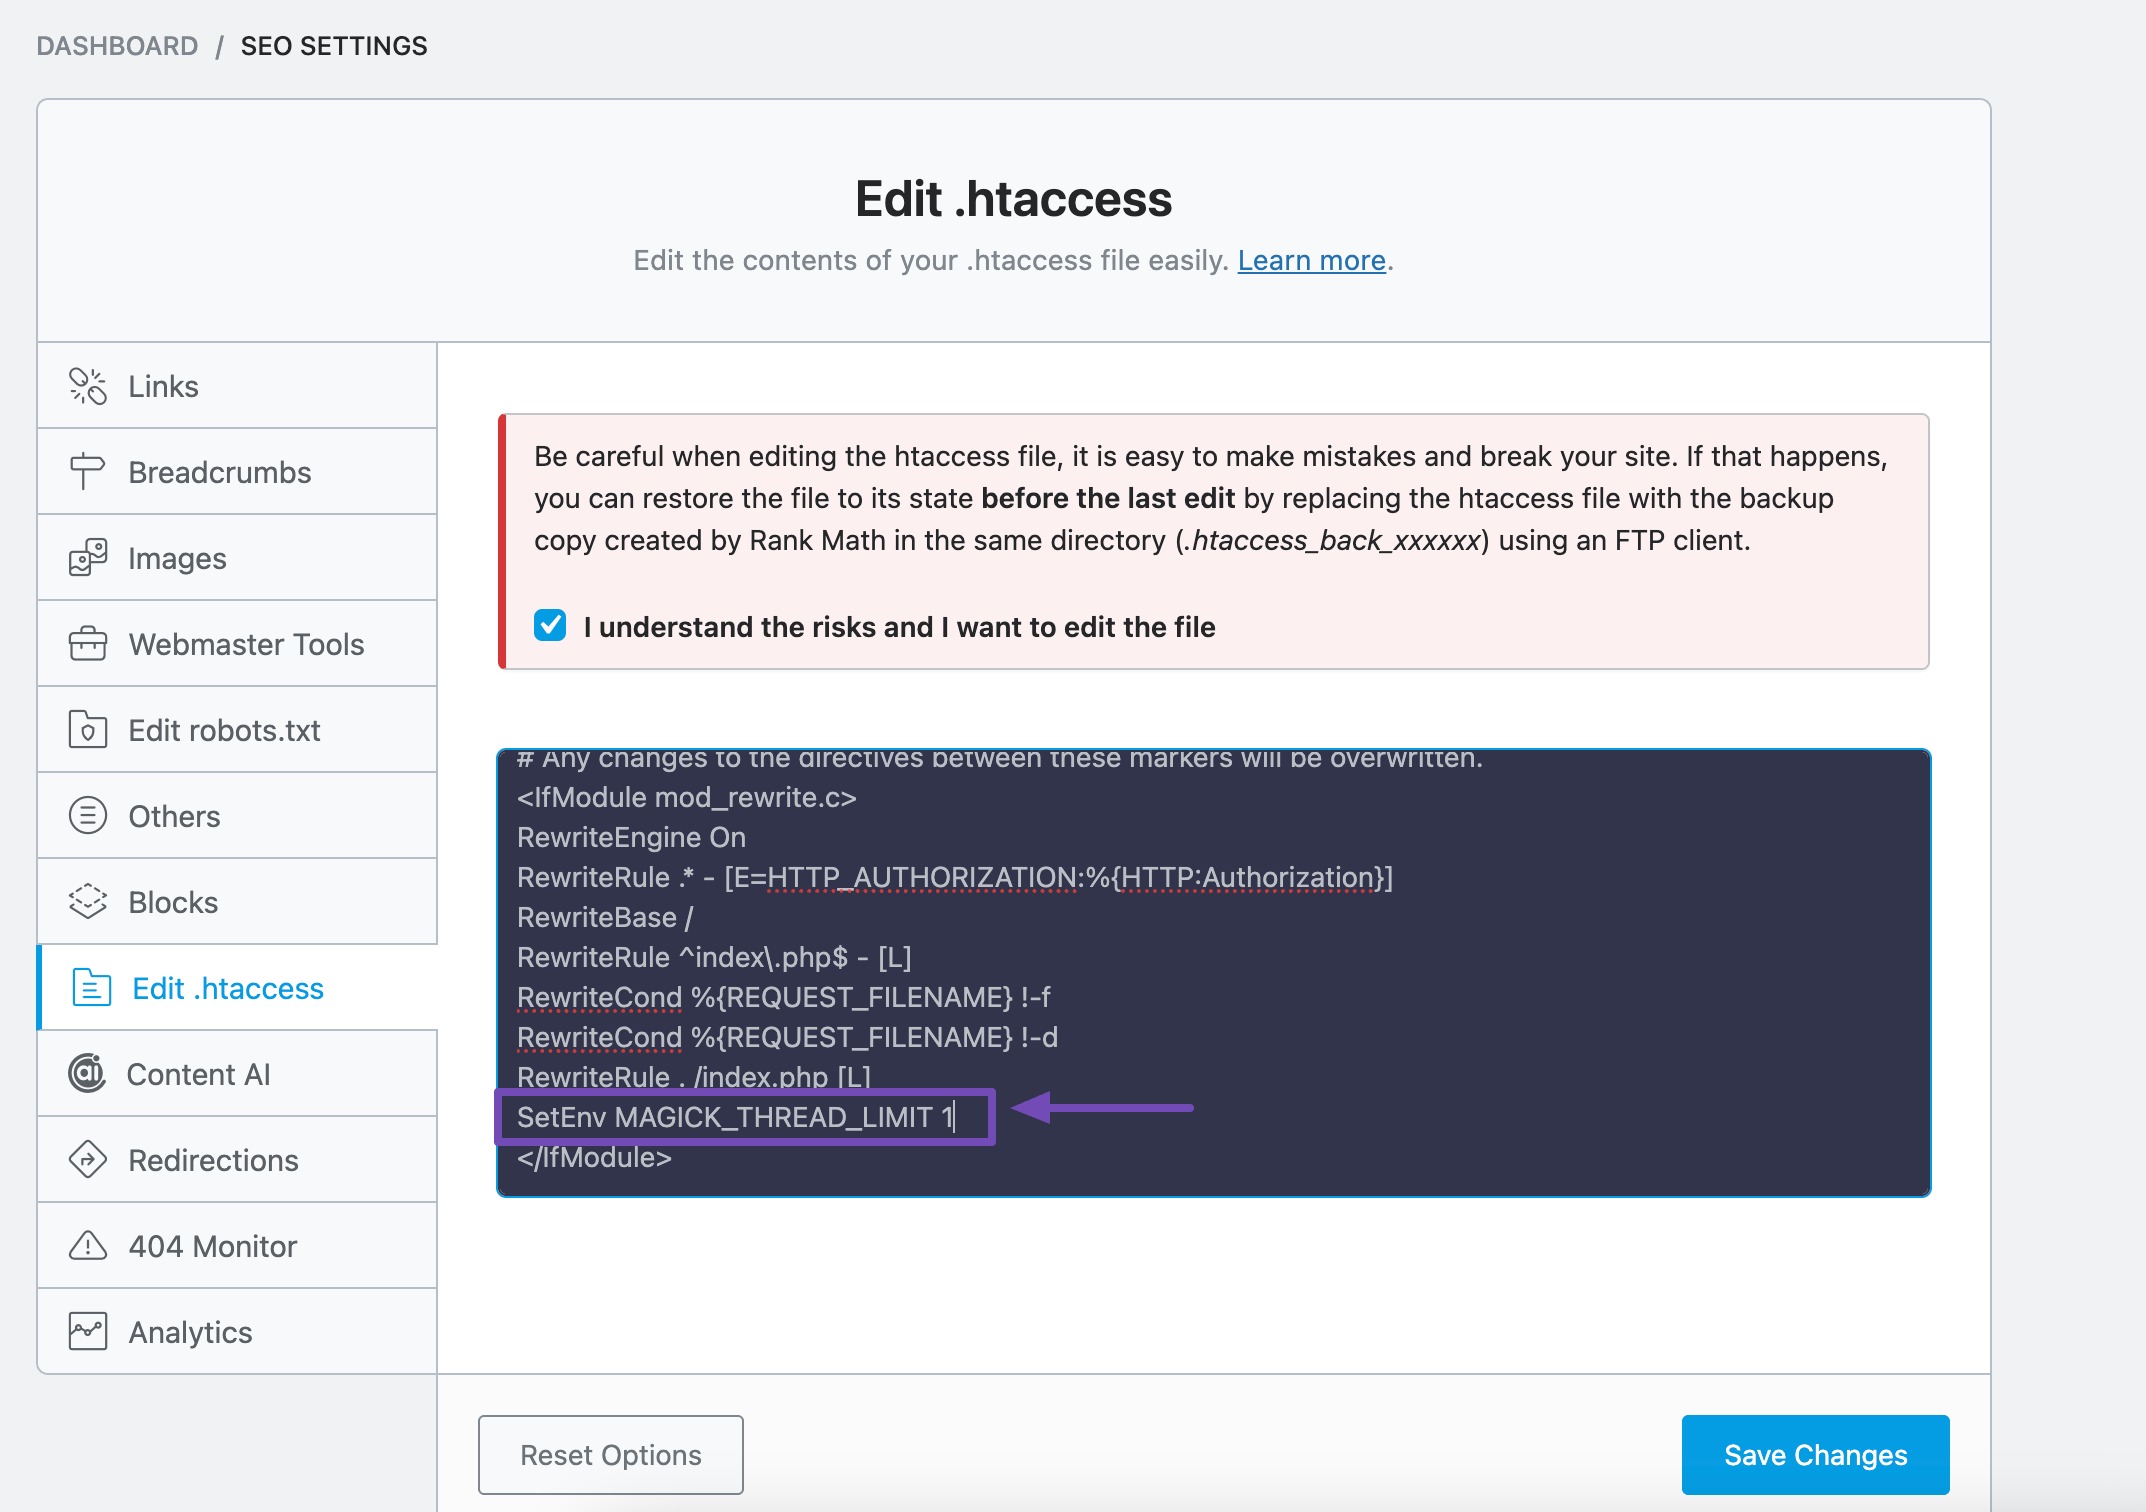
Once done, click on the Save Changes button and clear your site cache. You can use the htaccess tester tool to debug and ensure that the rewrites are correct before adding them to the .htaccess file.
Note: Be careful when editing the .htaccess file. A small error can cause your site to crash or display server errors. Always create a backup of the file before making changes. If you’re unsure, consider contacting your hosting provider for help.
7 Check Your PHP Version
Your PHP version can directly affect how WordPress functions, including media uploads. If your hosting provider is running an outdated or unsupported PHP version, it can be the reason you’re seeing the HTTP error.
WordPress recommends using PHP 7.4 or higher for better performance and compatibility.
Luckily, checking and updating your PHP version is quick and easy. If you’re not sure how to do it, check out our step-by-step tutorial on how to update your PHP version in WordPress.
8 Contact Your Hosting Provider
If you’ve tried all the previous steps and the HTTP error still isn’t resolved, it’s a good idea to reach out to your hosting provider’s support team.
In fact, if you’re not comfortable troubleshooting on your own, you can contact them before attempting any fixes. They have the tools and access needed to identify server-side issues that might be affecting image uploads—such as memory limits, permission problems, or misconfigured settings.
A quick support ticket or chat could save you time and help get your WordPress site back to normal faster.
Conclusion
Running into the WordPress HTTP error while uploading images can be frustrating, but the good news is, it’s usually fixable with a few simple steps.
Whether you adjusted your PHP version, switched to the GD Library, edited your .htaccess file, or contacted your hosting provider, each fix brings you closer to a smoother experience.
Take it one step at a time, and remember to keep your site environment up to date. That way, you’ll avoid these hiccups in the future and get back to what matters—publishing great content.
If you like this post, let us know by Tweeting @rankmathseo.