
If you’re running a single website, monitoring your site’s SEO performance is definitely a bit more straightforward. But, as you grow and eventually manage a network of affiliate websites or run an SEO agency with several websites under your belt, then going through each site to check their stats would be a hassle every day. Thankfully, Rank Math understands your day-to-day concern with SEO, and we’ve got a Client Management dashboard right inside your Rank Math Account Area.
In this knowledgebase article, we’ll discuss the features available in the Client Management dashboard and how you can configure them.
Table of Contents
1 How to Access the Client Management Dashboard?
The Client Management dashboard lets you monitor the SEO performance of all your websites with Rank Math installed & activated. If you haven’t installed Rank Math yet, you can get started with a Rank Math PRO plan of your choice and then proceed with installing and activating the plugin on your website.
Once your website is connected with your Rank Math PRO account, head over to the Rank Math website and log in to your account area.
In your Account Area, navigate to the Websites section as shown below.
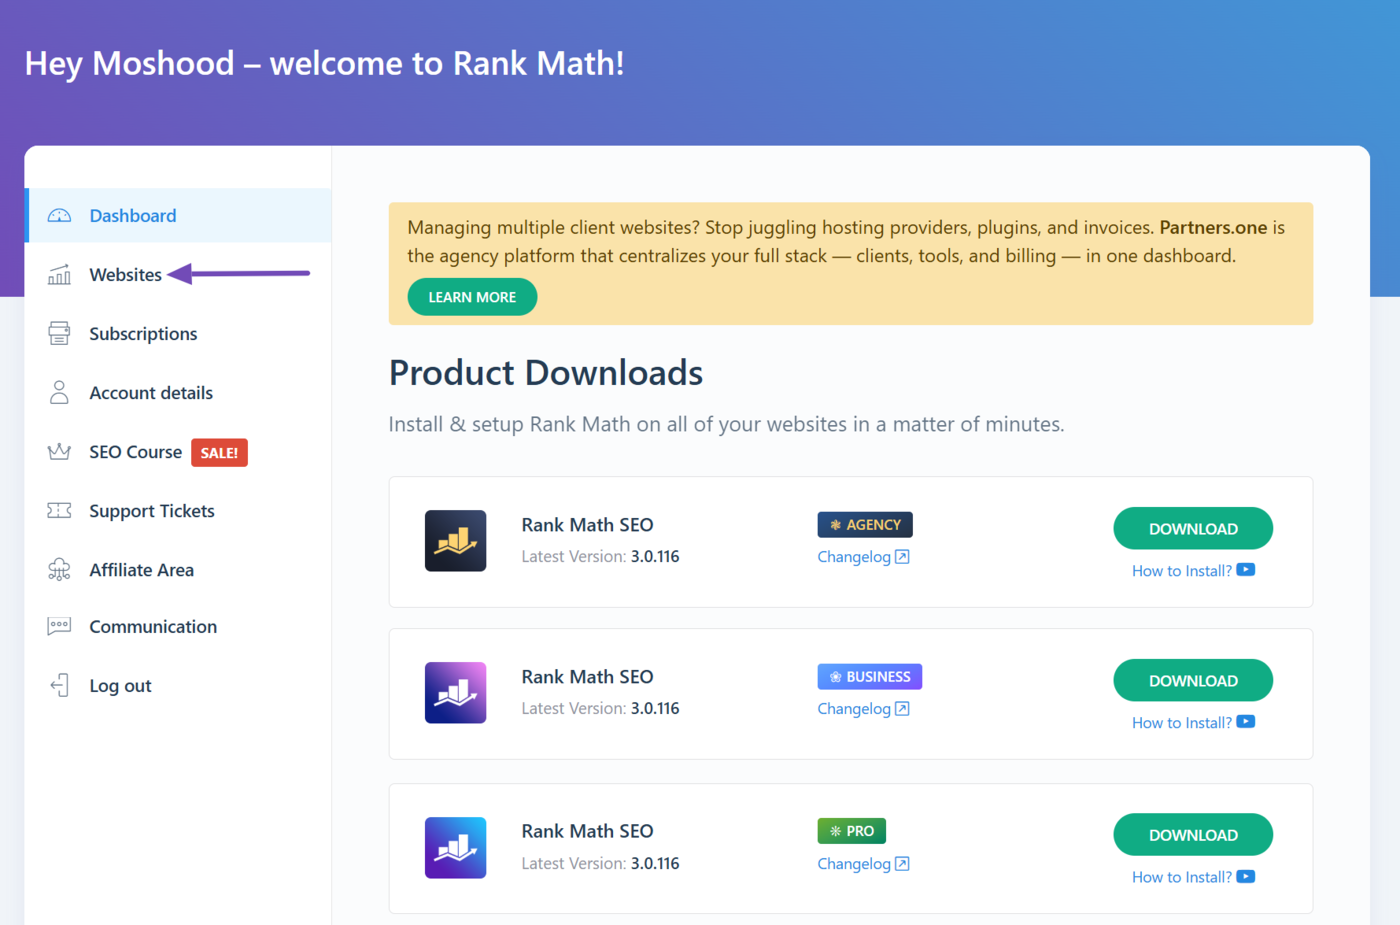
This brings you to our Client Management dashboard available within the Rank Math account area. The Client Management dashboard might look so compact, but it has a lot of useful features.
Now let us look at each one of them.
2 See All Connected Websites
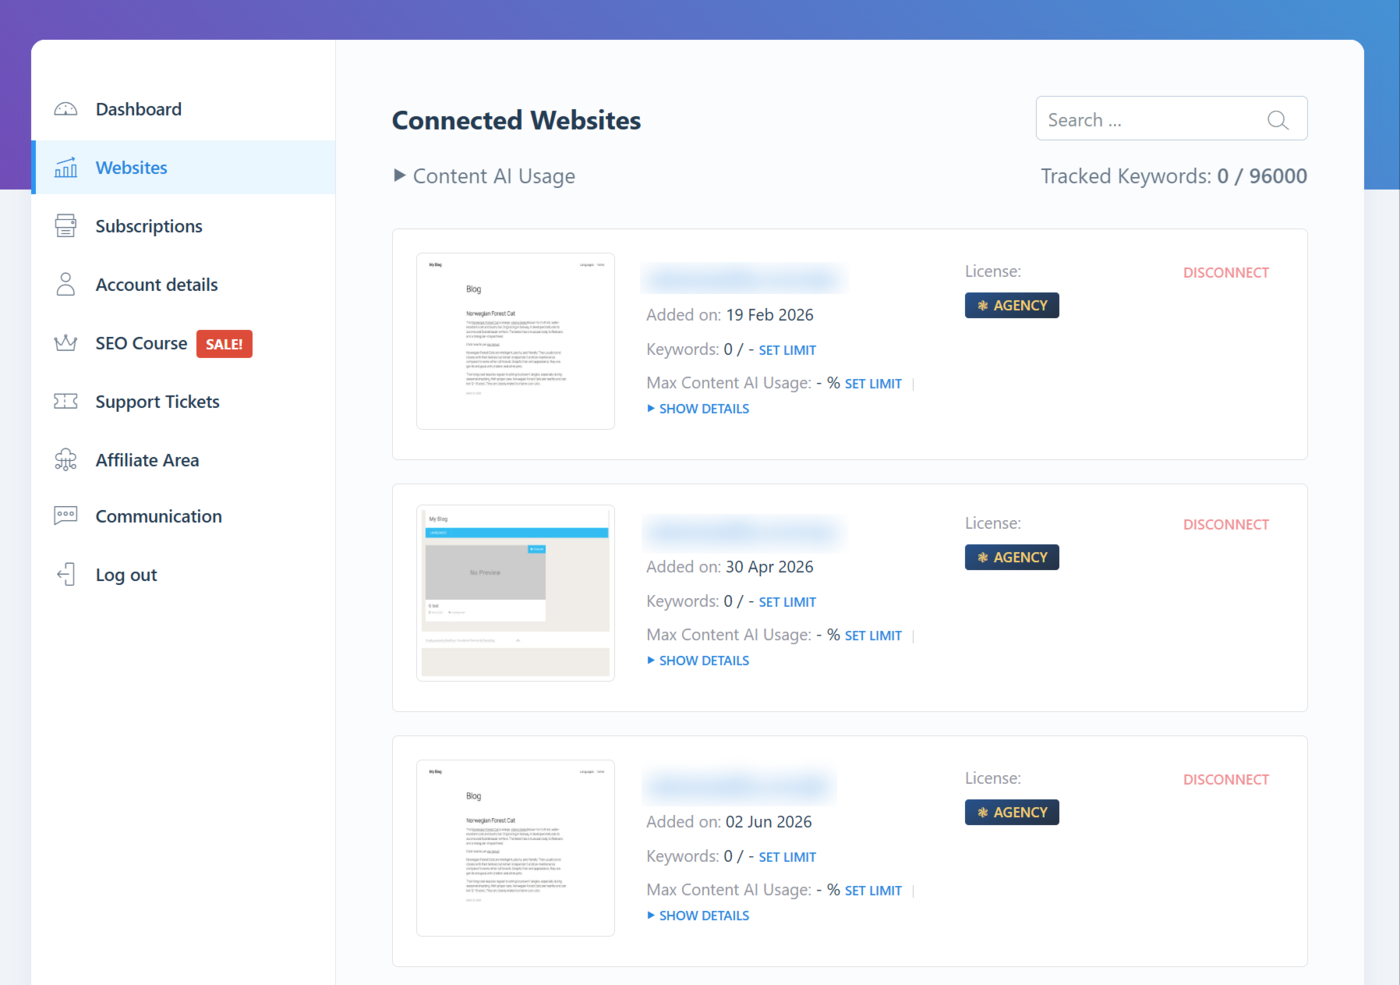
As you can see from the above image, the Client Management dashboard lists down all the websites connected with your Rank Math account in one place, giving you a bird’s eye view of all your websites. Given that you can activate your Rank Math PRO on practically unlimited websites, this feature would be really appreciated when you start adding more websites to your Rank Math account.
2.1 Search Websites
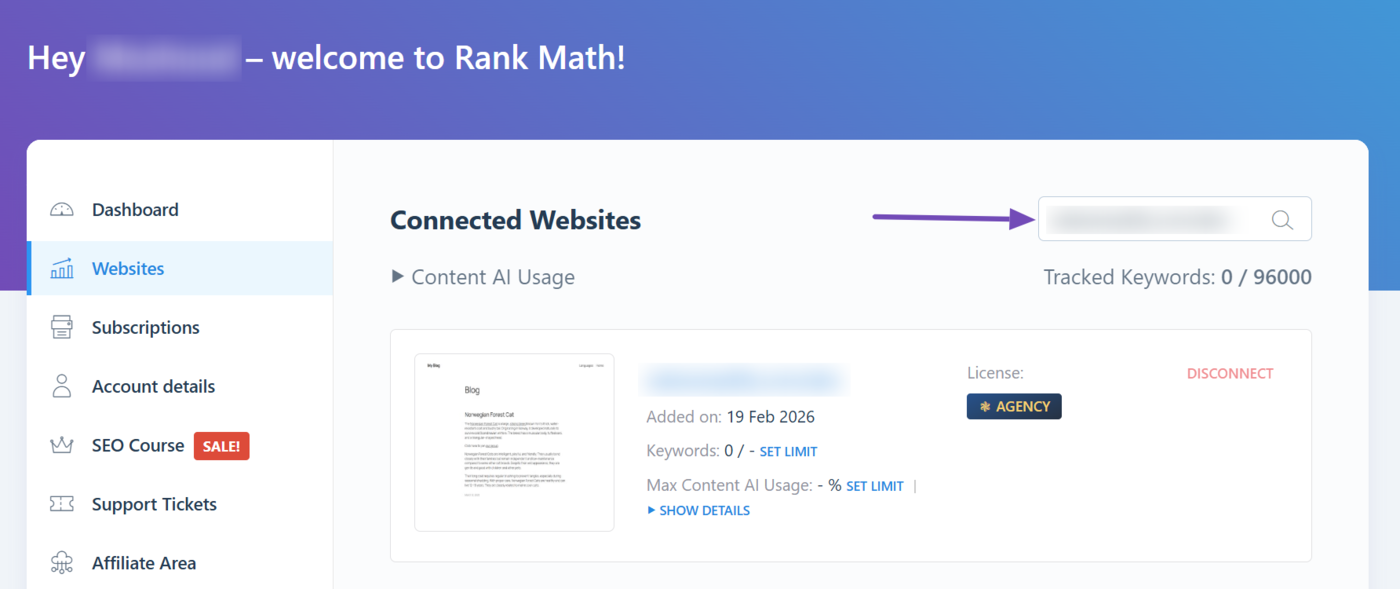
When you’ve too many websites to manage, scrolling all through the list to find a specific website would be difficult at times. A search bar is made available at the top of the dashboard to help you quickly find your website from the list of sites. Just enter the domain name fully or partially, Rank Math will find and bring it to your notice.
3 Monitor Stats
The key purpose of having a Client Management dashboard is to monitor the traffic stats and no. of ranking keywords for all your websites in one place.
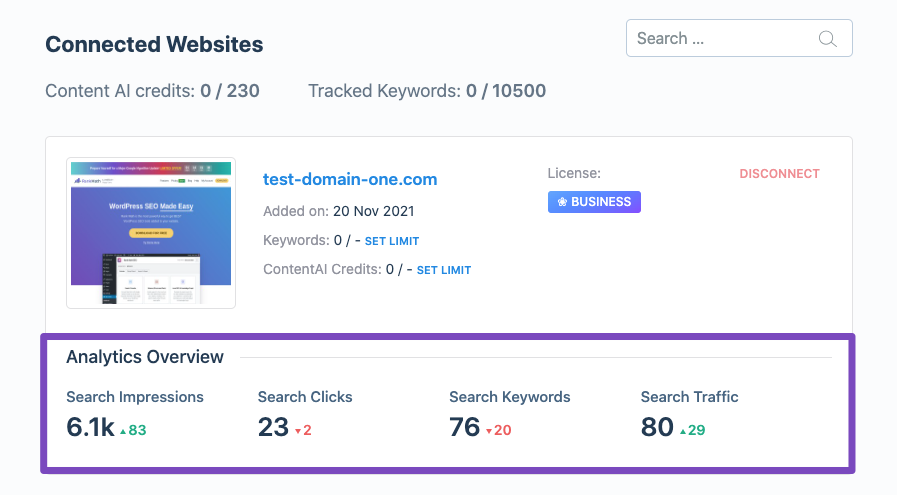
As you can see, the dashboard gives you the Analytics overview of each website. In addition, it compares the performance with the previous time period to give you a quick understanding of whether your website’s traffic is improving or declining.
The metrics shown here are the same as displayed at Rank Math SEO → Analytics inside the WordPress admin area of your individual sites. You can also choose the websites’ stats you wanted to see here in the dashboard with:
3.1 Monitor SEO Performance Business
This option is available only for Business and Agency users. By enabling/disabling the Monitor SEO performance option in the individual sites, Business and Agency users can choose their websites to display stats in the Client Management dashboard.
To access this option, navigate to WordPress Dashboard → Rank Math SEO → General Settings → Analytics. As you scroll down the Analytics settings, you can find the option to enable/disable Monitor SEO Performance. If you’re making any changes to this option, don’t forget to Save Changes.
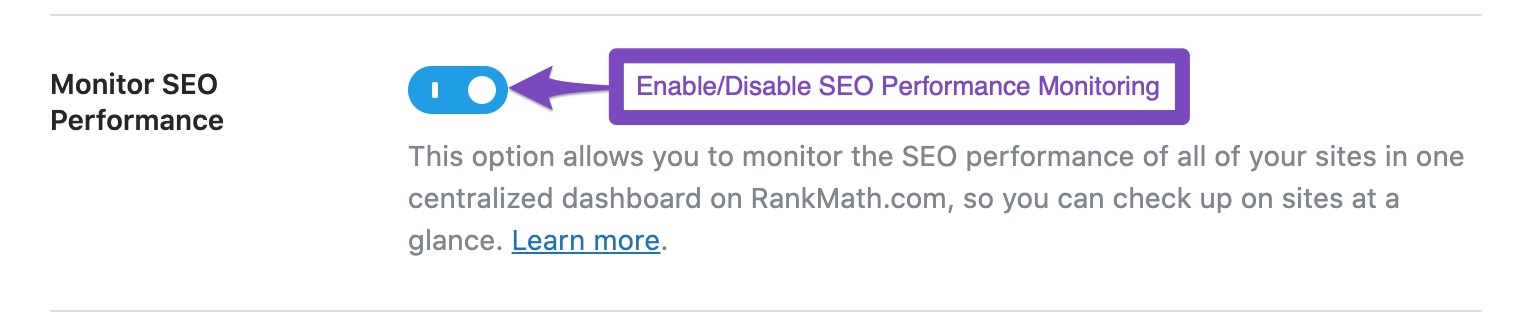
Note: Once you’ve enabled this option, it may take up to 24 hours for the data to be displayed in the Client Management dashboard.
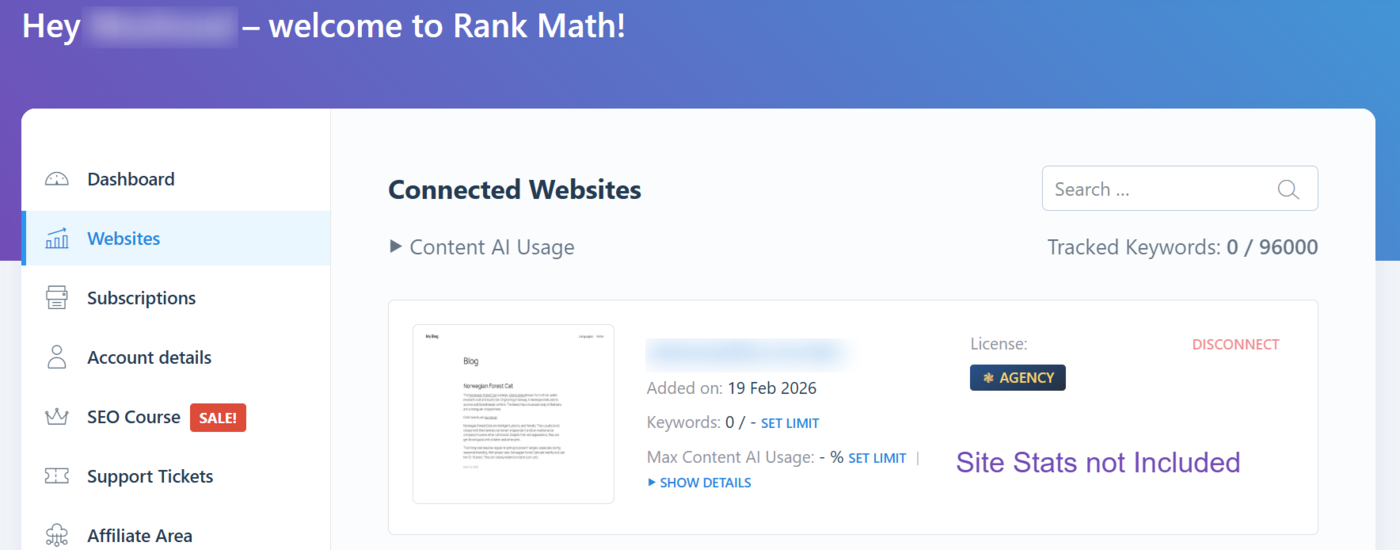
If the option is disabled for a specific website, then the site stats will not be included under the respective website, as shown below.
3.2 Display Analytics Stats
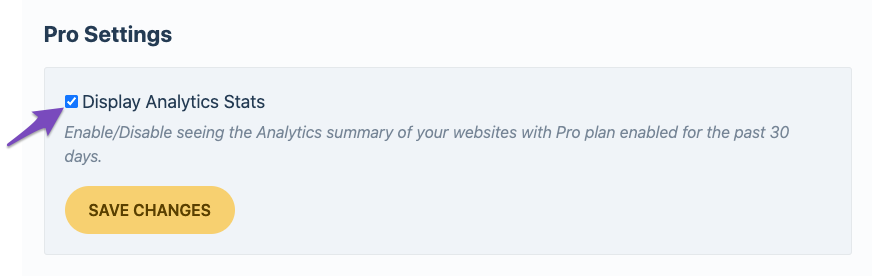
While Business and Agency users get to choose the specific websites to monitor the stats, PRO users can enable/disable the analytics stats for all their websites in one go. The option to enable/disable Display Analytics Stats is available only for PRO users.
And the option is available on the same page as your Client Management dashboard, just under the list of all your connected websites.
4 Disconnect Websites
The Client Management dashboard also lets you disconnect your website’s access to your Rank Math account. Suppose, if you no longer wanted to monitor the performance of your previous client, disconnecting your Rank Math account access is easy to do here as you don’t even have to log in to your client’s website.
With that said, you should also be aware of the changes that would happen when you disconnect your website.
4.1 What Will Happen If You Disconnect a Website?
As soon as you disconnect a site, it loses access to some of the Rank Math features until they’re activated once again with a Rank Math license.
You should be expecting changes such as:
- Keyword suggestions from Google will no longer appear when you start typing in the focus keyword of your post.
- Rank Math SEO Analysis will not run to identify the basic SEO issues hindering your site’s organic traffic.
- Advanced analytics module will not be available to track pages and keyword rankings.
4.2 How to Disconnect a Website?
If you want to disconnect a website, click the Disconnect button available against the website.
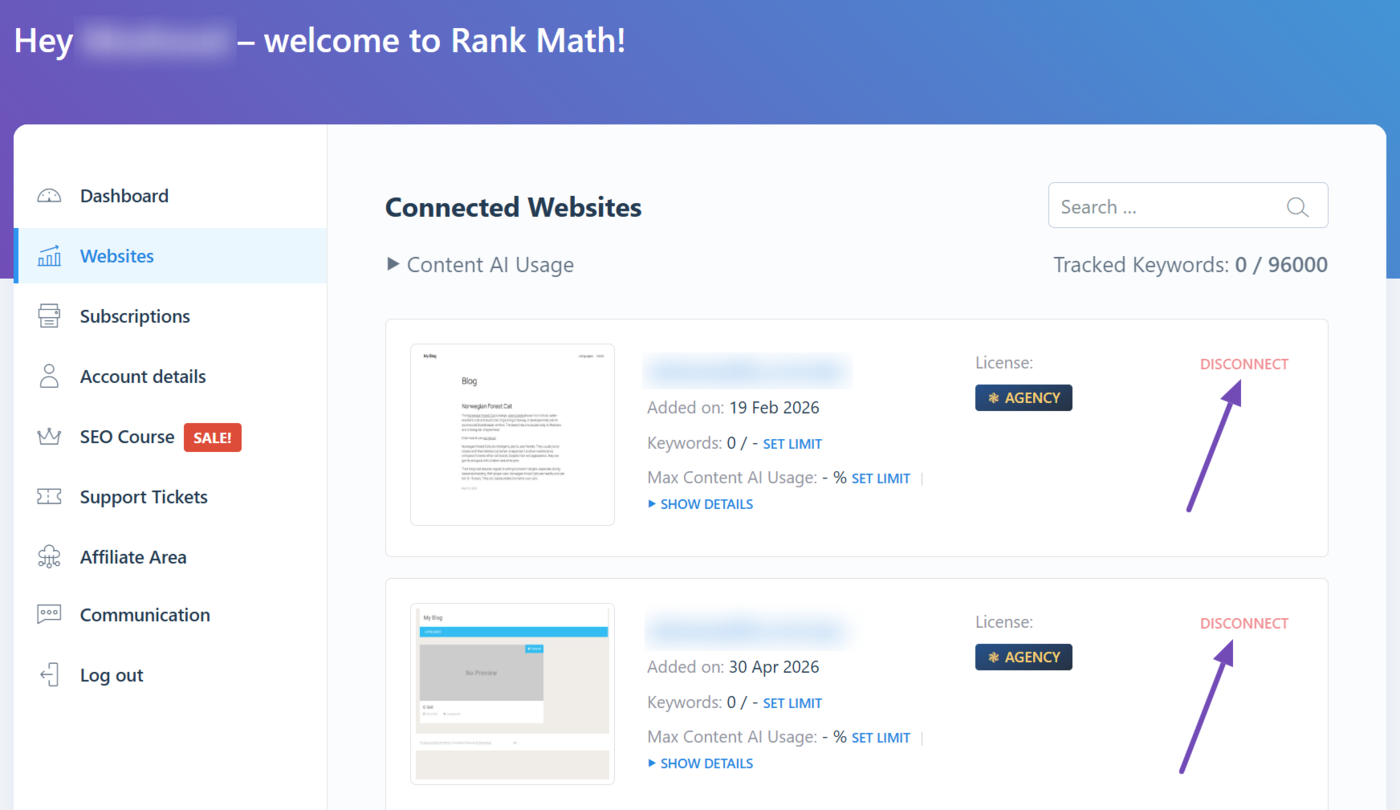
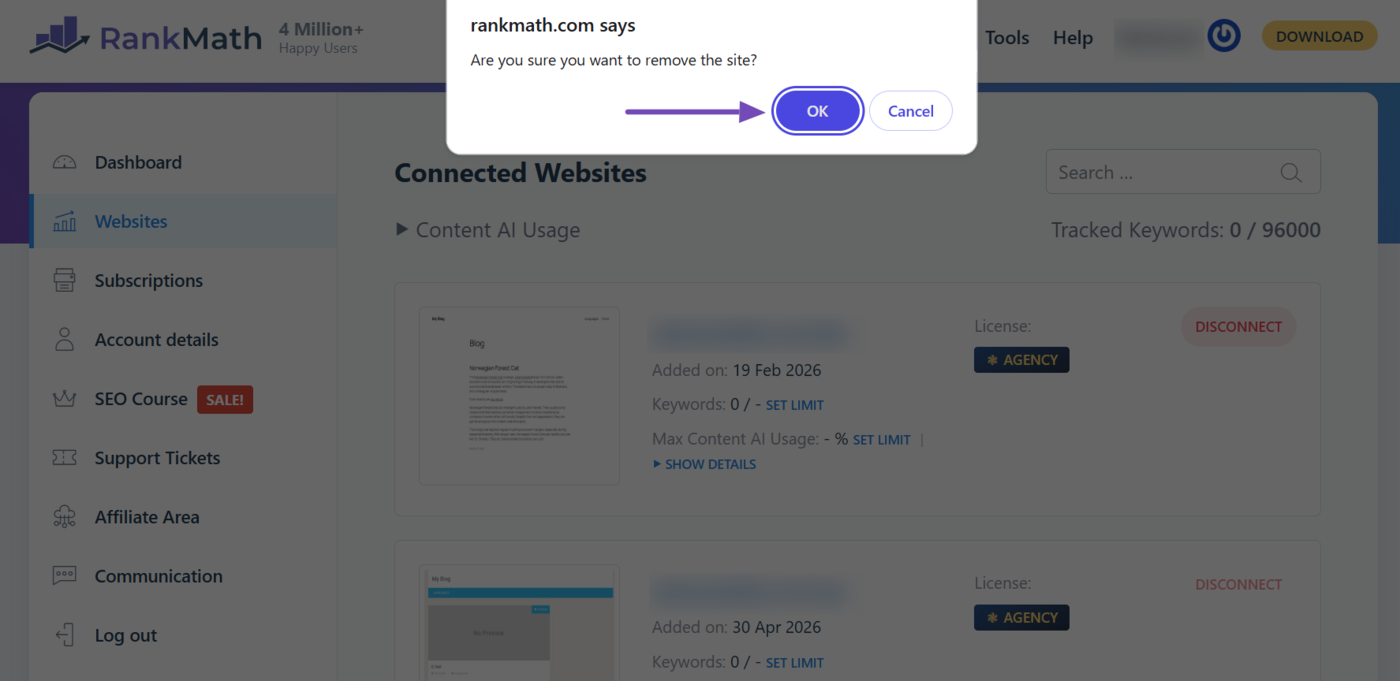
Now, you’ll be prompted with a confirmation message. Click OK.
5 How to Set a Keyword Limit? Business
The Client Management dashboard also makes it easy to manage your allocated keywords quota to ensure they’re within limits. This feature is currently available only for Business and Agency users.
5.1 Set Keyword Limit for a Site
To set the keyword limit for a website, click the Set Limit option against the website.
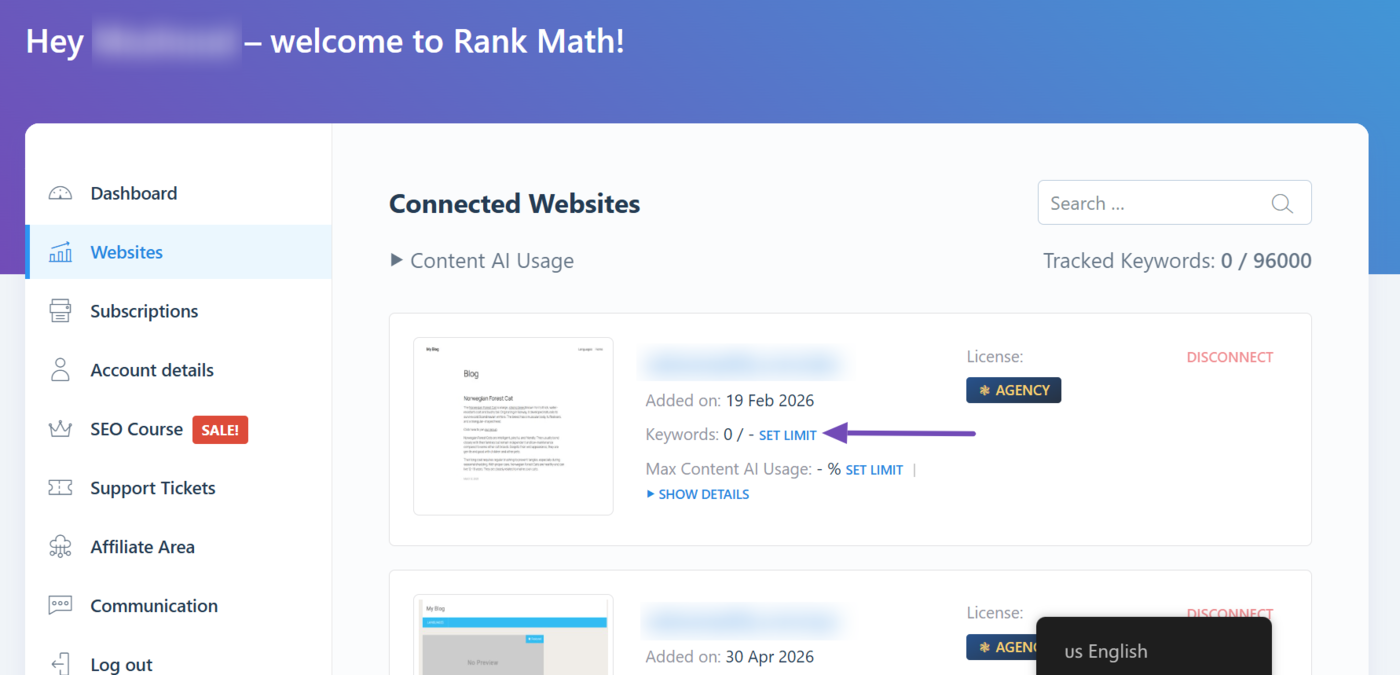
Once done, enter the keyword count and click the Save button.
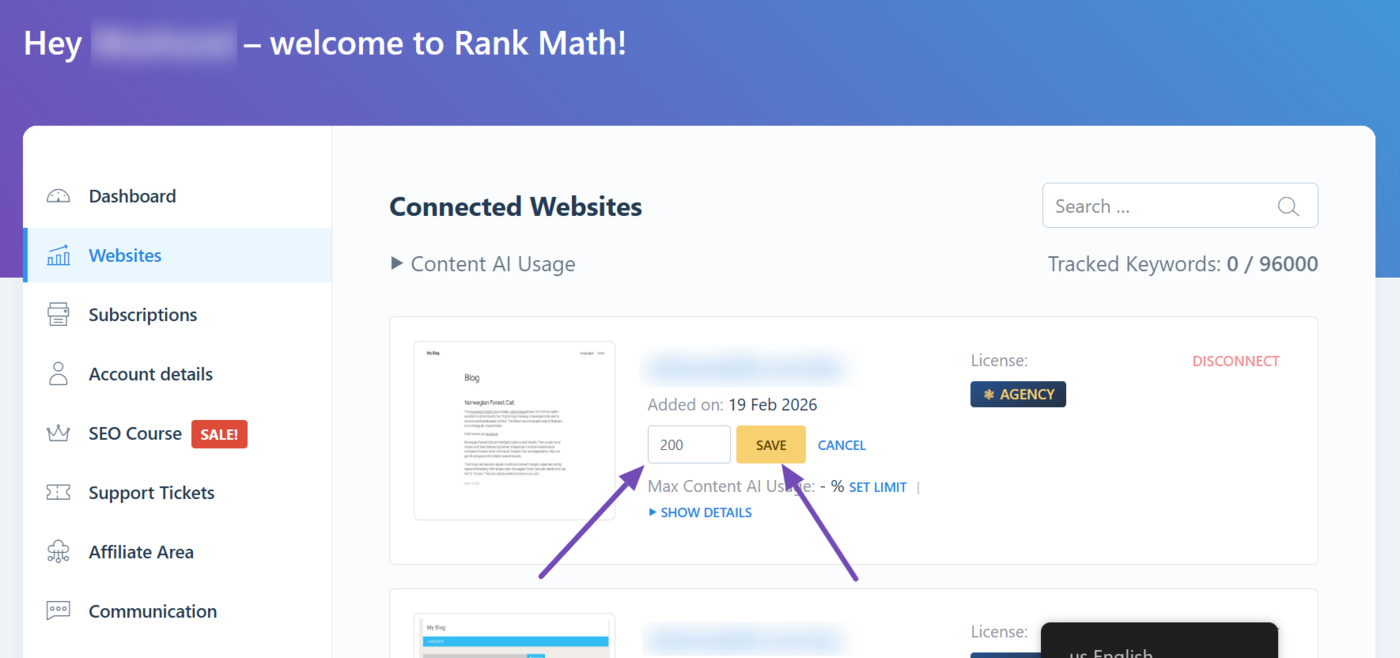
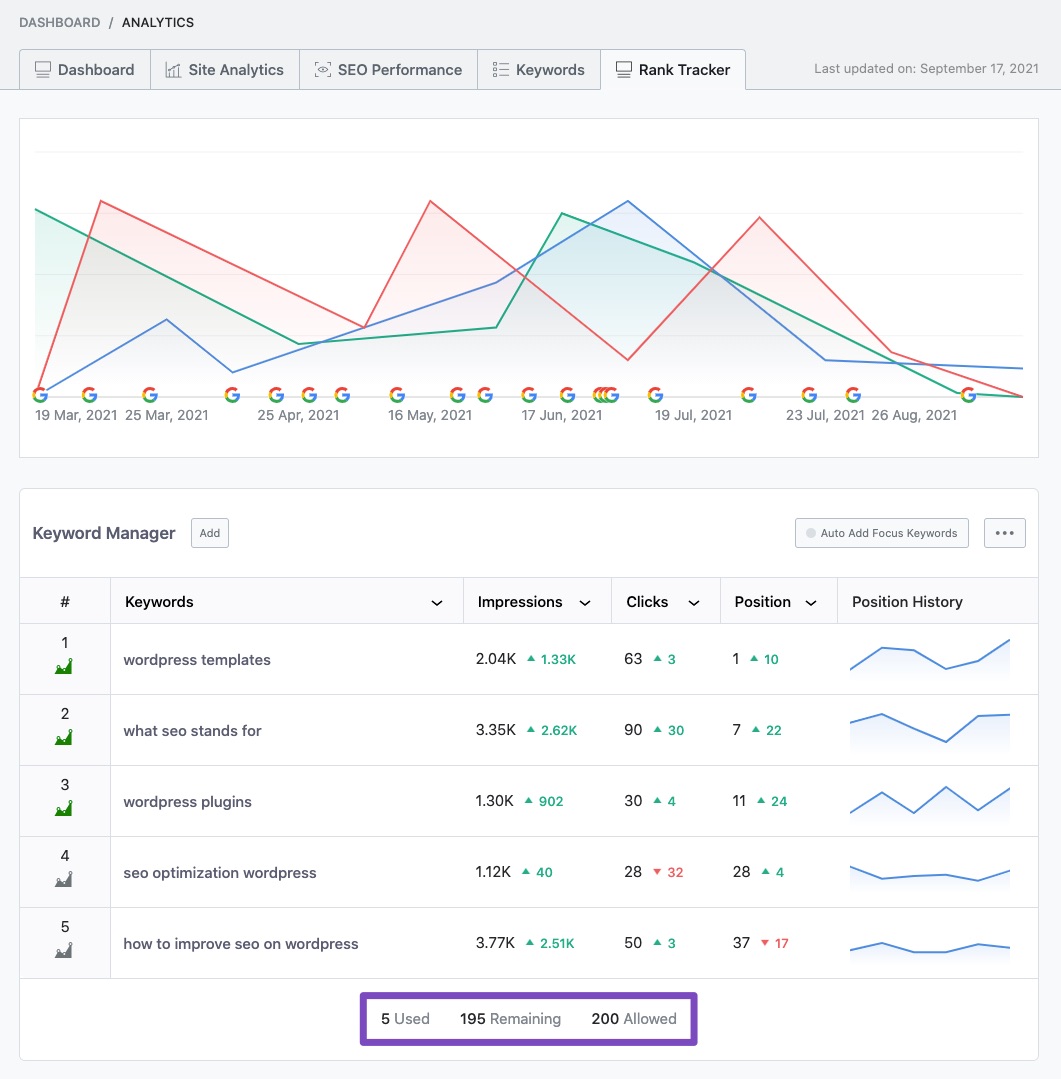
As soon as you set the keyword limit in the Client Management dashboard, the changes will be reflected in the WordPress dashboard of your website. Navigate to Rank Math SEO → Analytics → Rank Tracker, and you can find the new keyword limit being set.
5.2 Set a Default Keyword Limit
To set a default keyword limit, scroll down to the Business/Agency settings in the Client Management dashboard. Then enter your default keyword limit in the Default Tracked Keywords Limit field and click the Save Changes button underneath the settings.
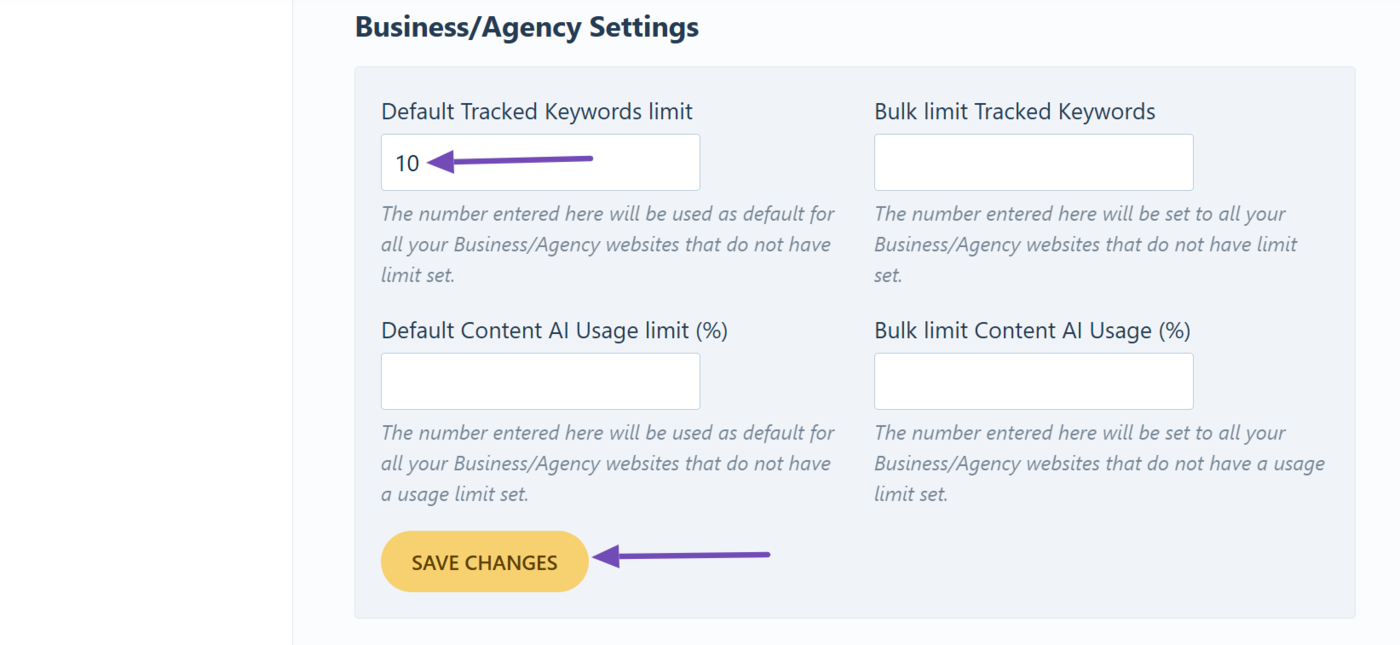
These limits will not apply to existing sites and any new website connected with your Business/Agency license will have this default keyword limit set automatically.
5.3 Set Keyword Limit in Bulk
When you have hundreds of sites connected with your Business or Agency license without a keyword limit set, then manually adding a keyword limit will become tedious. The Bulk limit tracked keywords field in the Business/Agency Settings will let you set a keywords limit in bulk.
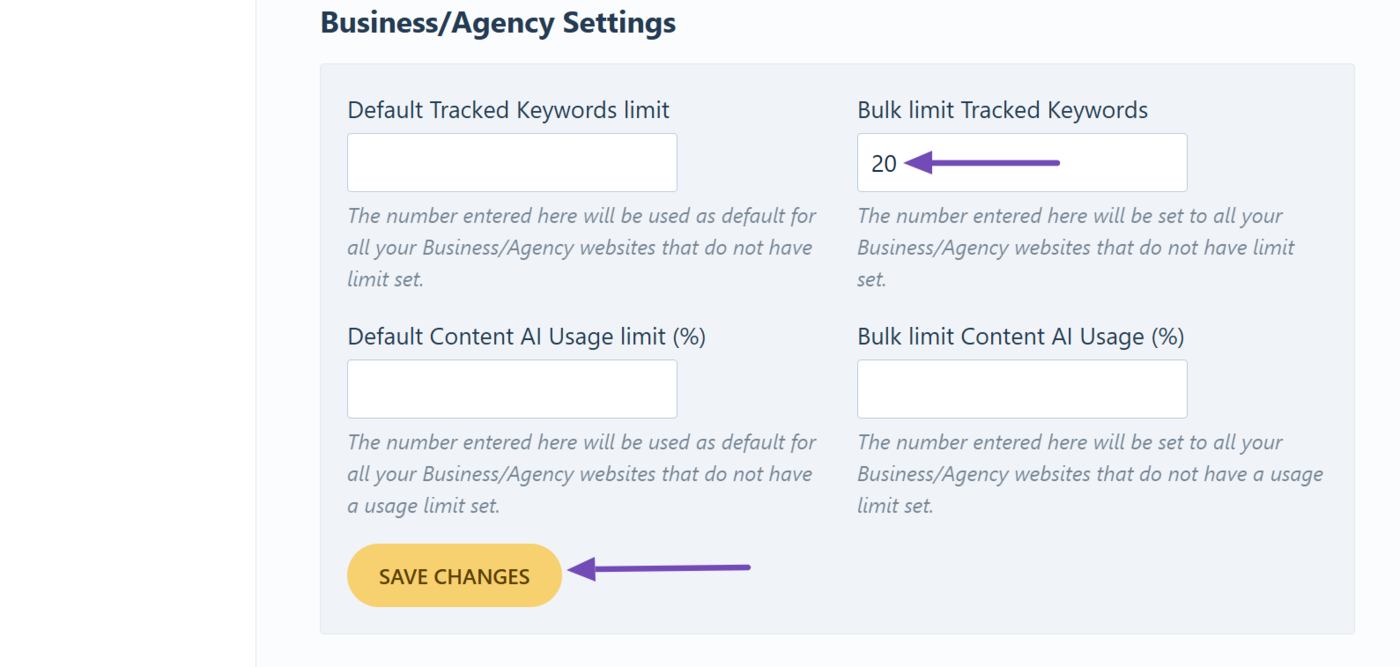
However, these limits will not apply to websites where the keyword limit has been set already.
6 How to Assign Content AI Usage Limits Business Content AI
From the Client Management dashboard, Business and Agency users can also assign Content AI usage limits to their connected websites. This ensures any client/website under your Business account will not exceed the allowed usage.
At the top of the page, you will notice the Content AI Usage dropdown. Click on it.
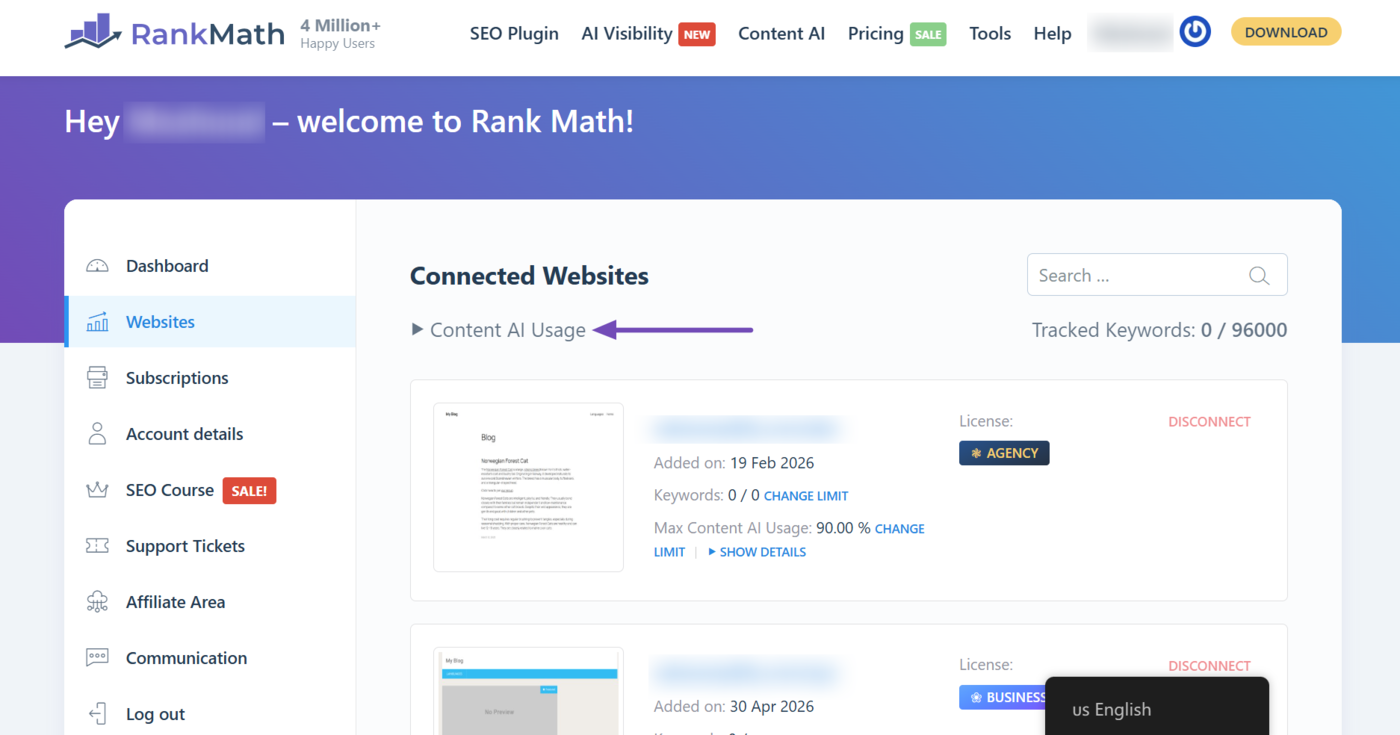
It will reveal how much of your Content AI plan you’ve used, how much you have left, and your plan’s reset date, as shown below.
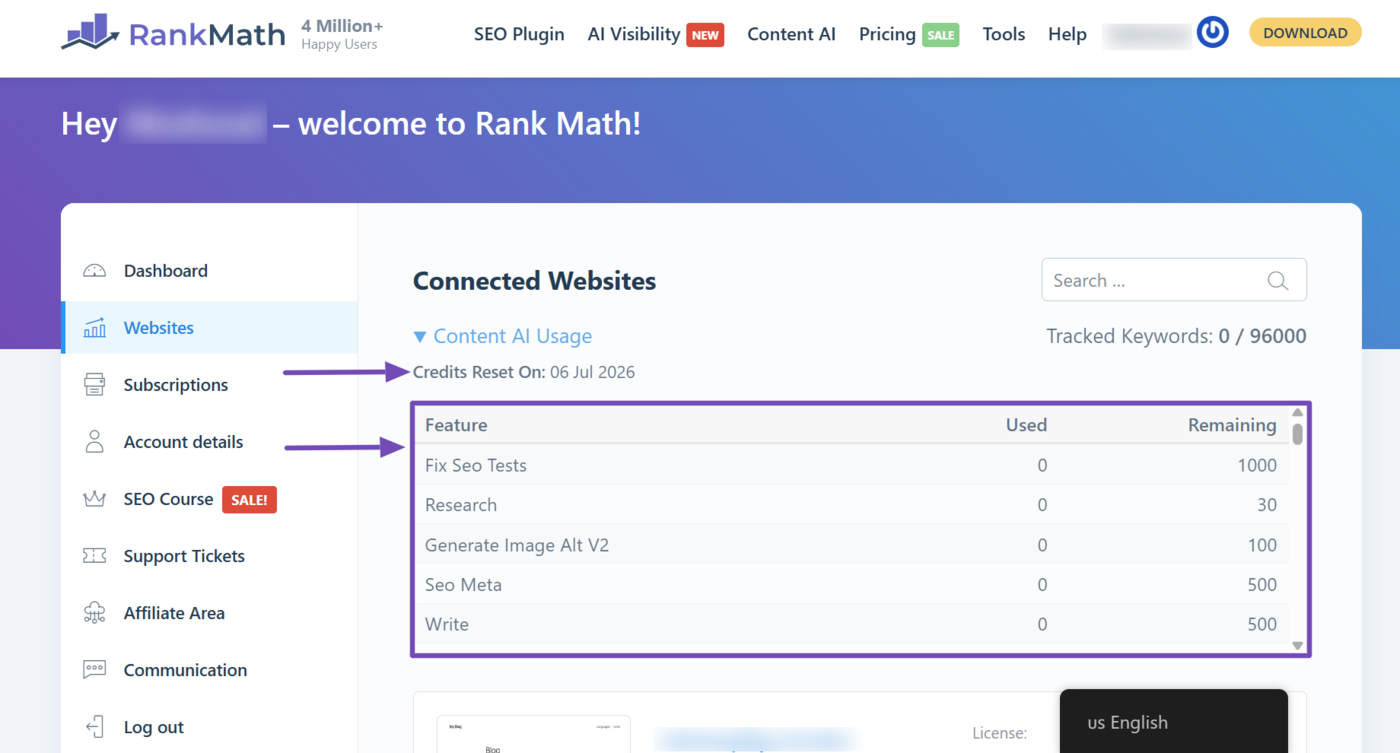
Note: Only Business or Agency users with an active Content AI subscription can assign usage limits. If you want to assign usage limits for brands tracked with AI Visibility, you also need a Content AI Creator or Expert plan, as only these plans support tracking multiple brands.
6.1 Set Content AI Usage Limit for a Site
To set the Content AI usage limit for a website, click the Set Limit option against the website’s ‘Max Content AI Usage’ option, as shown below.
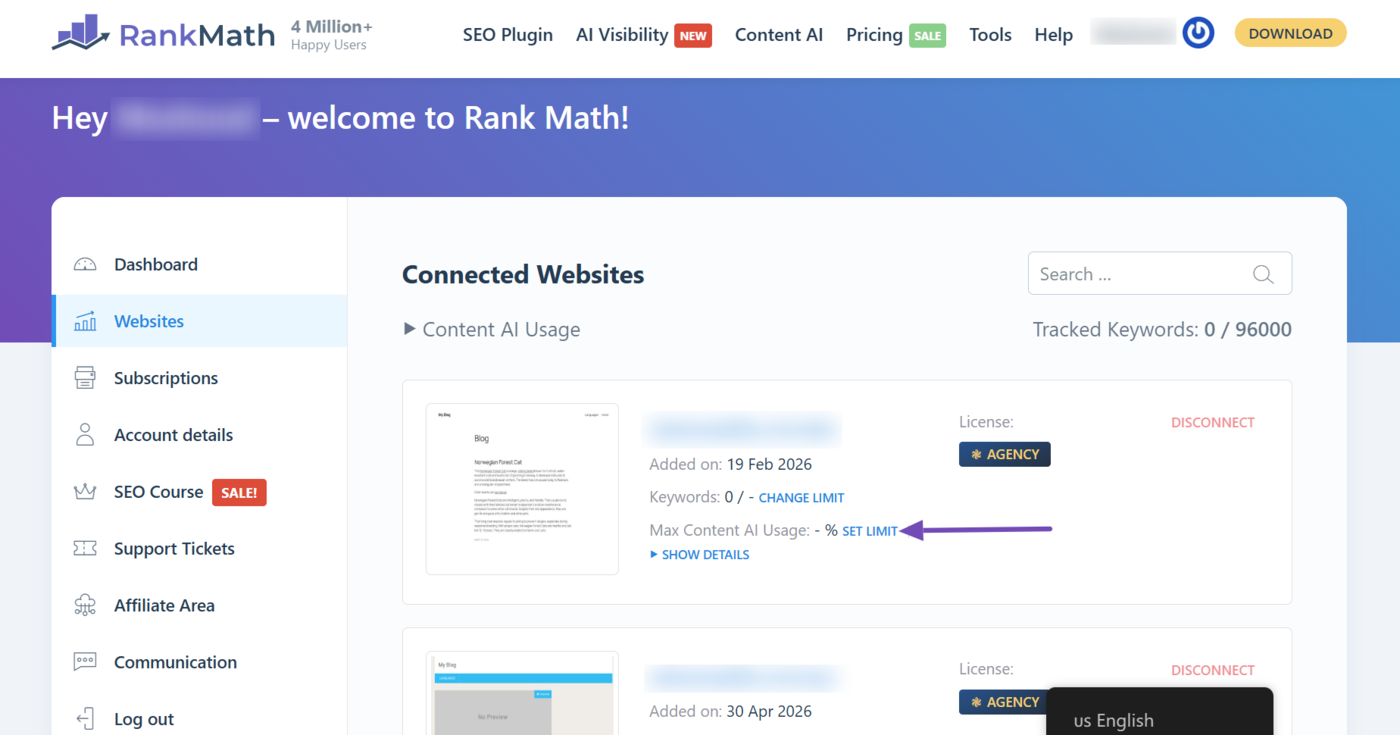
Once done, you’ll be able to set the usage limit. Enter a percentage between one and 100, and click the Save button.
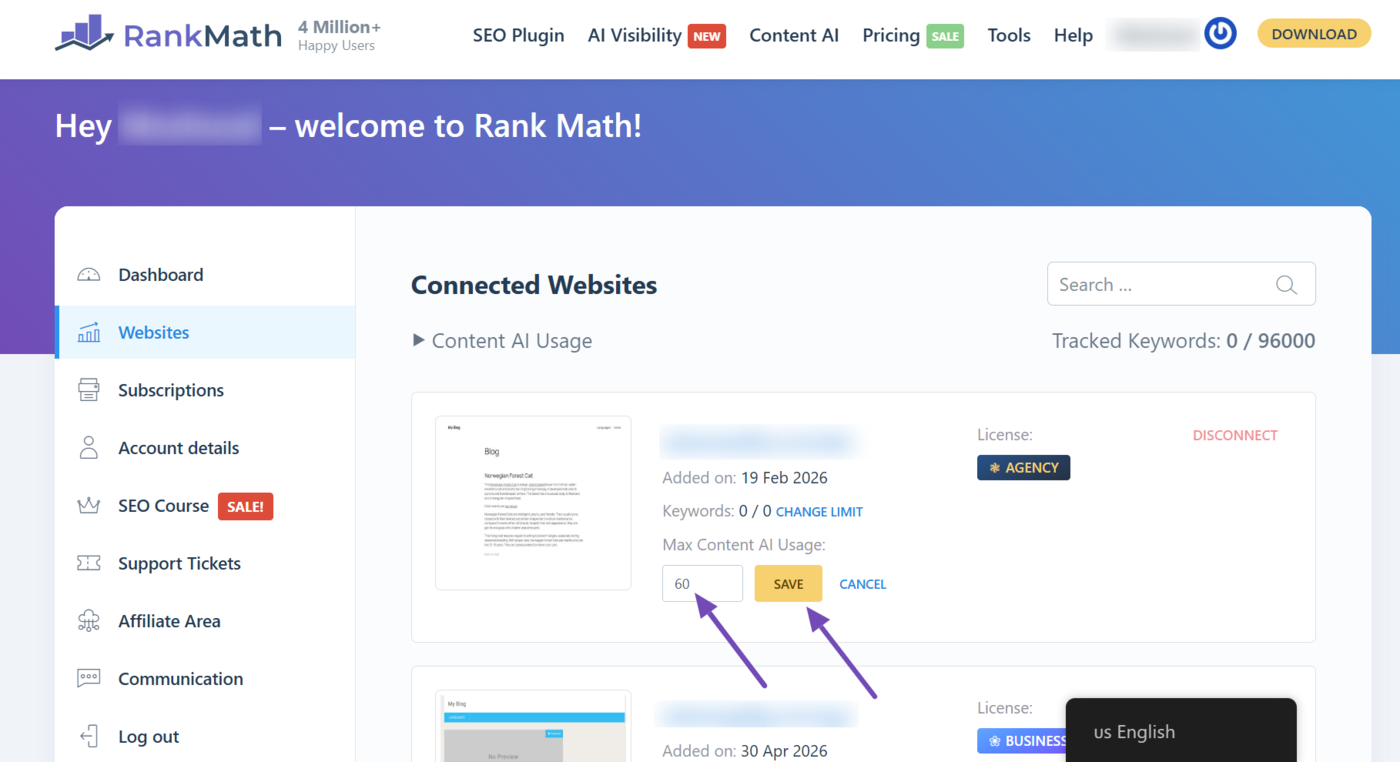
You can click Show Details to view the usage limits of specific Content AI tools and features.
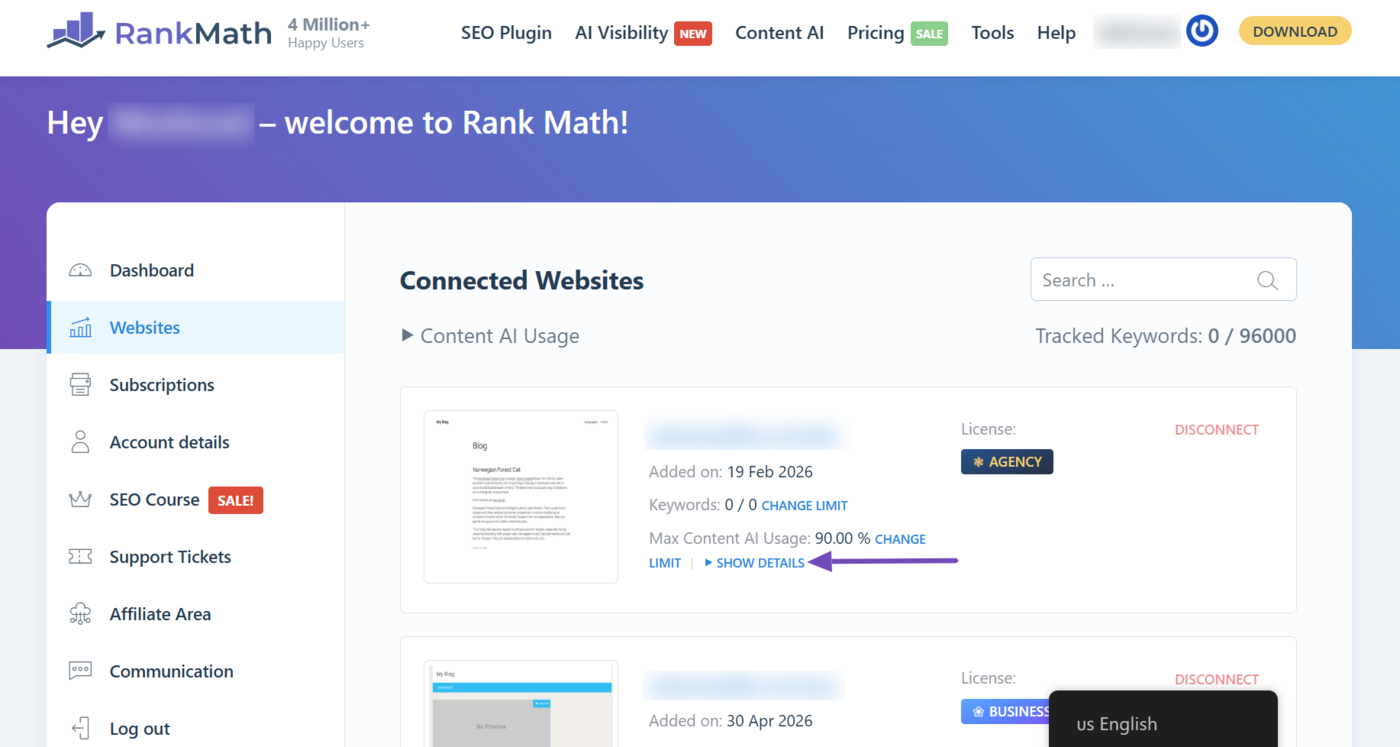
Once done, the usage limits for individual Content AI features and tools will be displayed to you, as shown below.
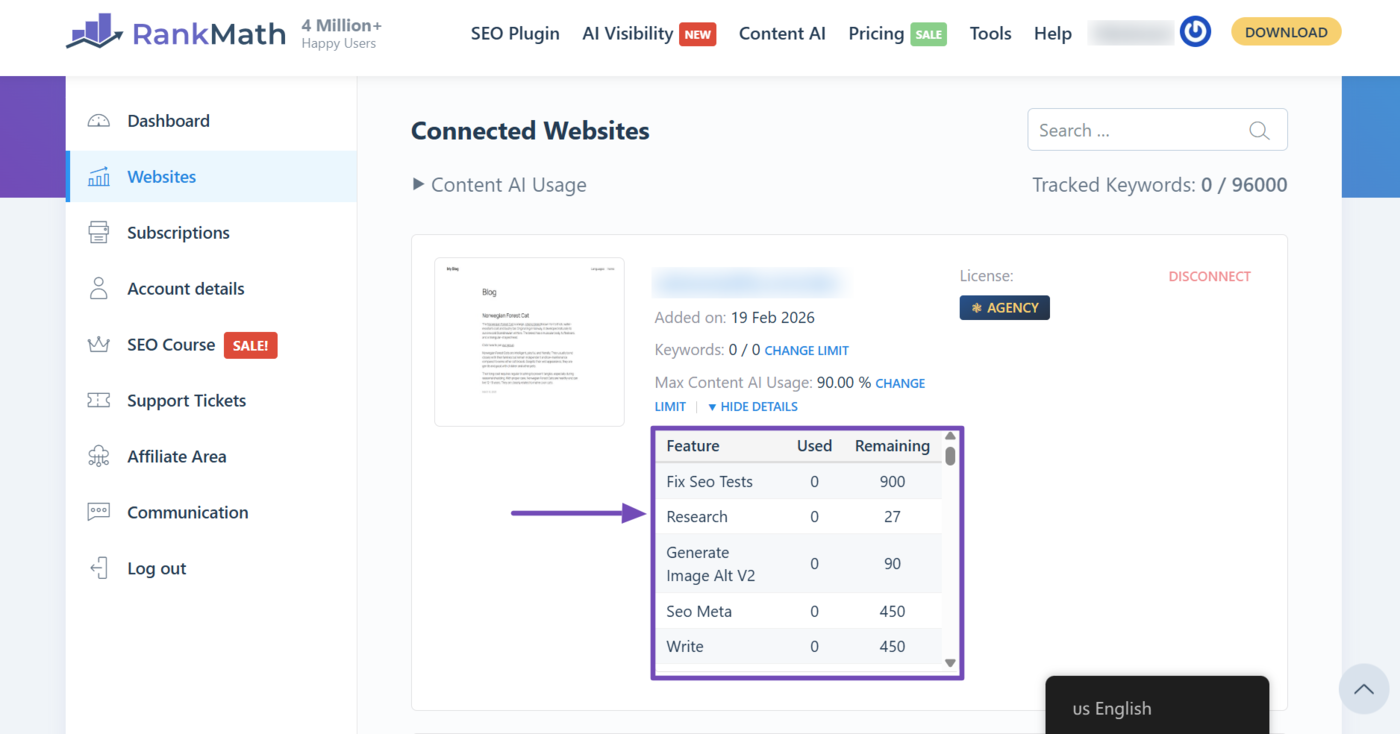
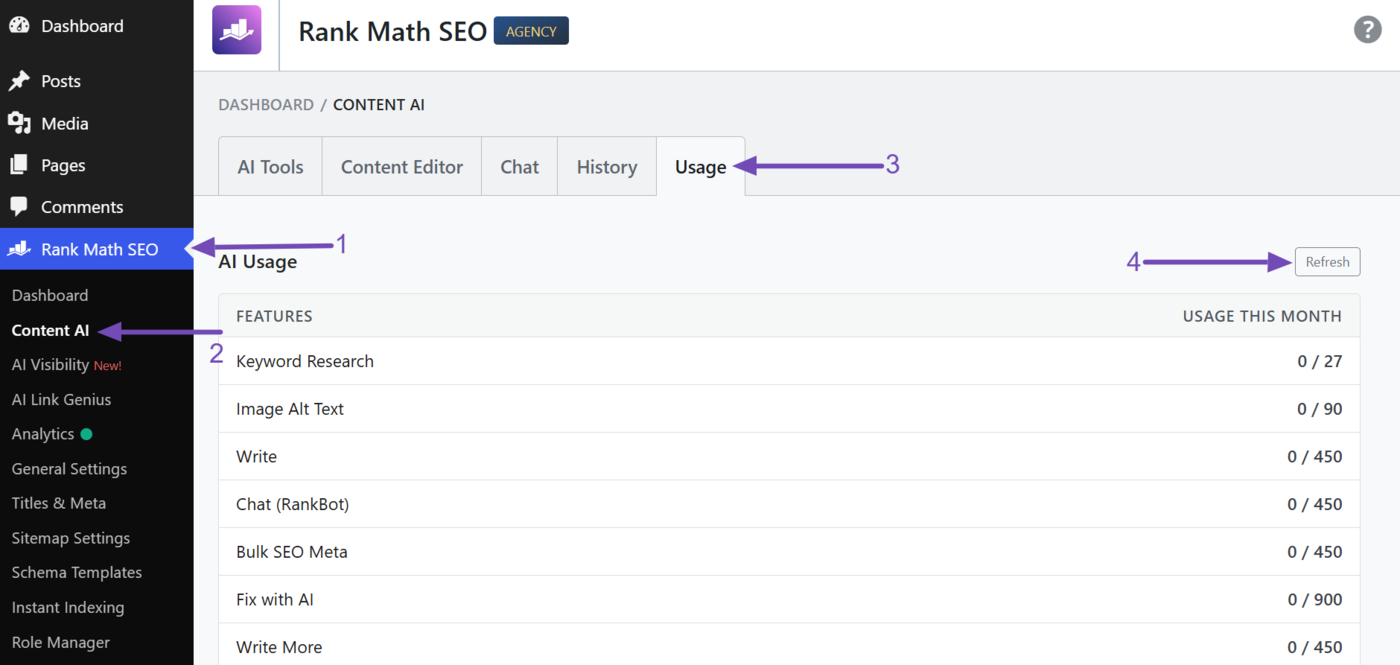
The usage limit is also available when you navigate to Rank Math SEO → Content AI → Usage from your WordPress admin dashboard. Once there, you should click Refresh to ensure your latest usage limits are displayed.
Note: If you cannot find the Content AI option, ensure the Content AI module is enabled. You can do so by clicking Rank Math SEO from your WordPress dashboard and enabling the Content AI module.
6.2 Set Default Content AI Usage Limit for Sites
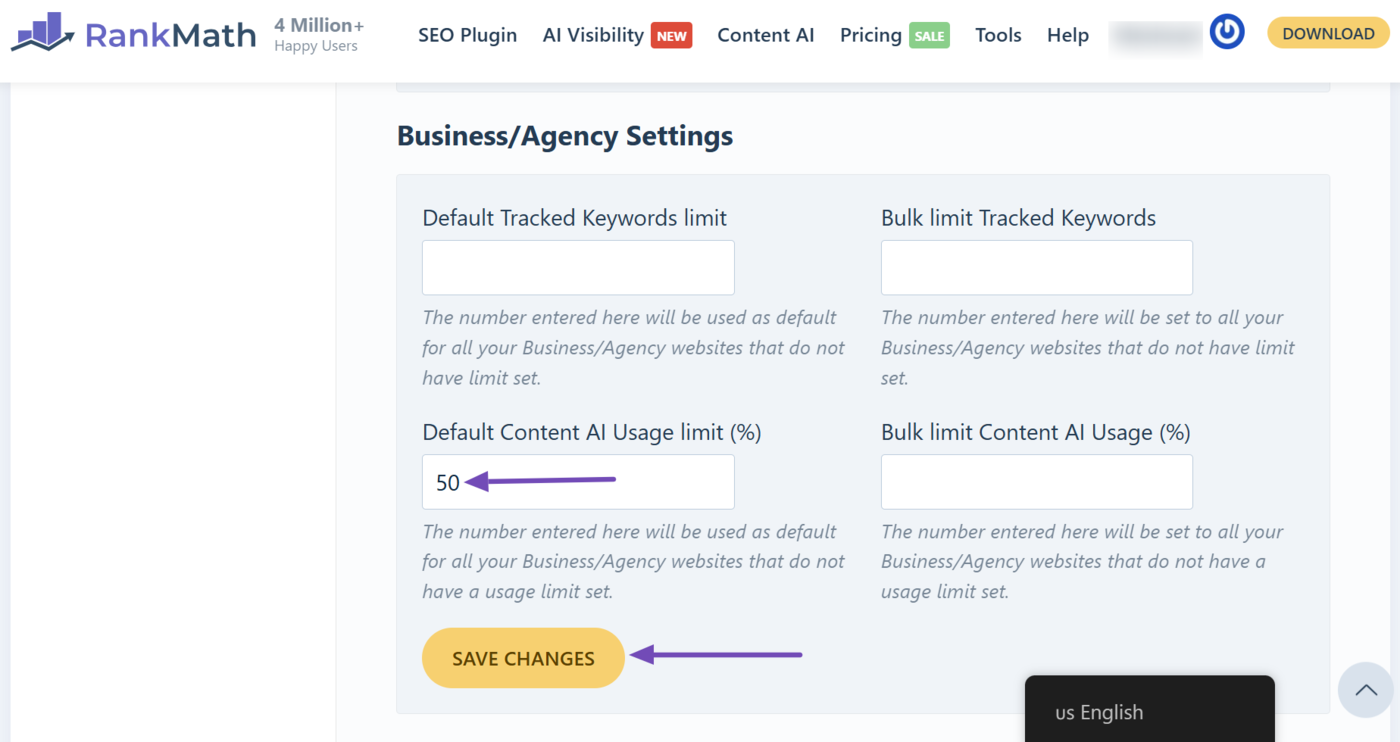
To set the default Content AI usage limit for any site connected with your Business or Agency license, use the Default Content AI Usage limit option available under the Business/Agency Settings.
Once you’ve set the default Content AI usage limit, don’t forget to click the Save Changes button.
Note: This option only applies to new sites connected to your Business or Agency license. It does not affect sites already connected to your account.
6.3 Bulk Set Content AI Usage Limit
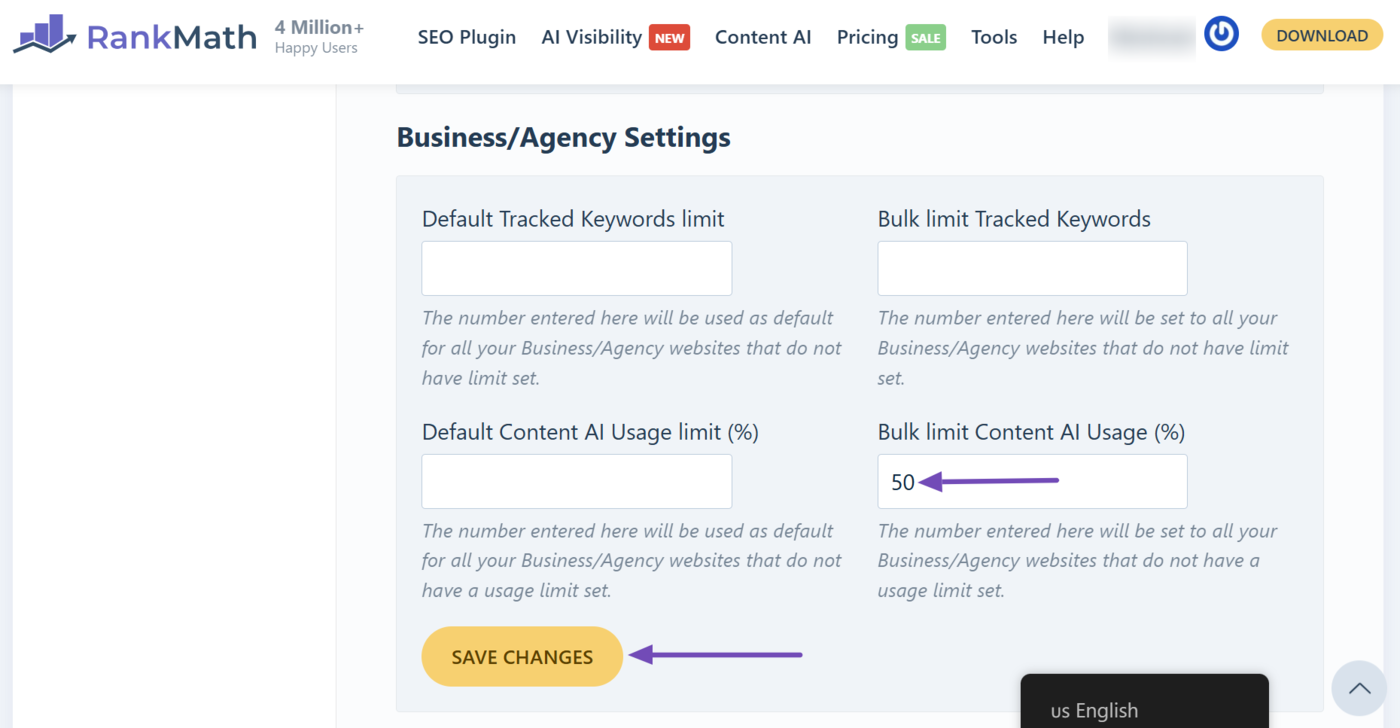
While the previous option lets you set a default limit for new sites, the Bulk limit Content AI Usage option will let you set a usage limit for existing sites that don’t have any Content AI usage limit set. Once you’ve added a limit, click the Save Changes button for the changes to reflect.
Note: This setting only applies to existing websites that do not have a Content AI usage limit.
7 How to Assign AI Visibility Tracking Limits Content AI
The Client Management dashboard also lets you assign the maximum number of brands that a site can track using AI Visibility. This option is only available to Business and Agency users.
To set an AI Visibility brand tracking limit for a website, click Set Limit next to the site’s AI Visibility Brands option.
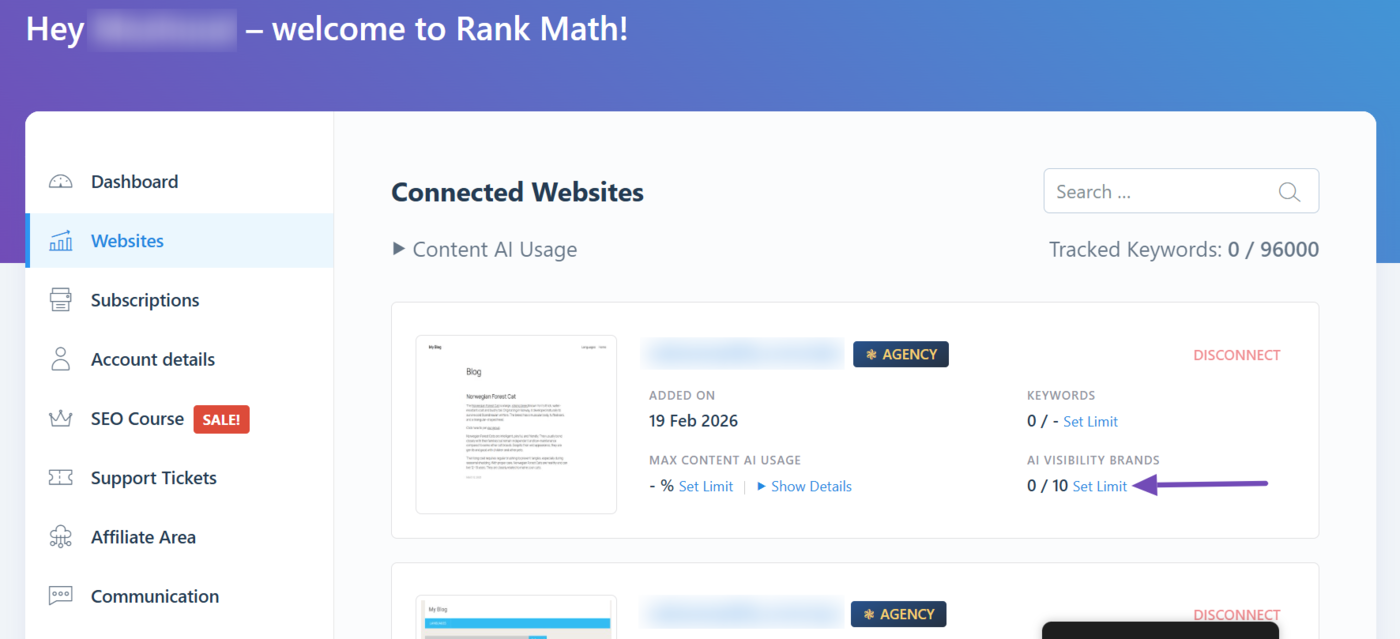
Next, enter the maximum number of brands the site can track. The maximum limit you can assign depends on your Content AI plan:
- Creator: Up to 10 brands
- Expert: Up to 50 brands
In this example, we’re using the Creator plan, so we can assign up to 10 brands across all our sites. Enter the maximum number of brands you want the site to track, then click Save.
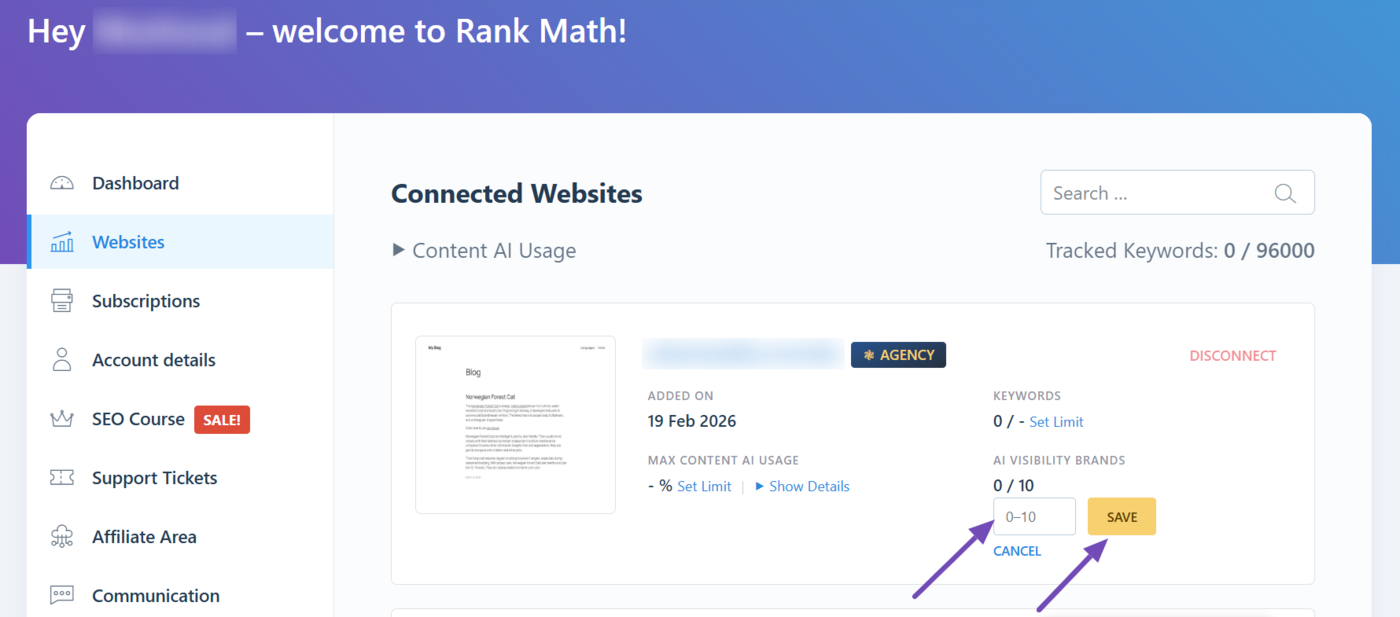
And, that’s it. We hope the article has covered everything about the Client Management dashboard and the various settings available to configure. If you still have any questions about using the Client Management dashboard, feel free to reach out to our support team, and we’re always here to help.