In this tutorial, we are going to discuss the General Tab in Rank Math’s Meta Box. In a previous article, we gave you an overview of the Meta Box and its sections, and here we discuss the General Tab in detail.
The General Tab is the first tab in the Rank Math meta tabs, and by default, you won’t see any of the tabs. To view them, you have to click the Rank Math icon on the top-right of the screen.

That will open the Rank Math menu, where you will be able to access all the meta tabs, including the general tab, which will be selected by default. Here is what you will see when you open Rank Math.
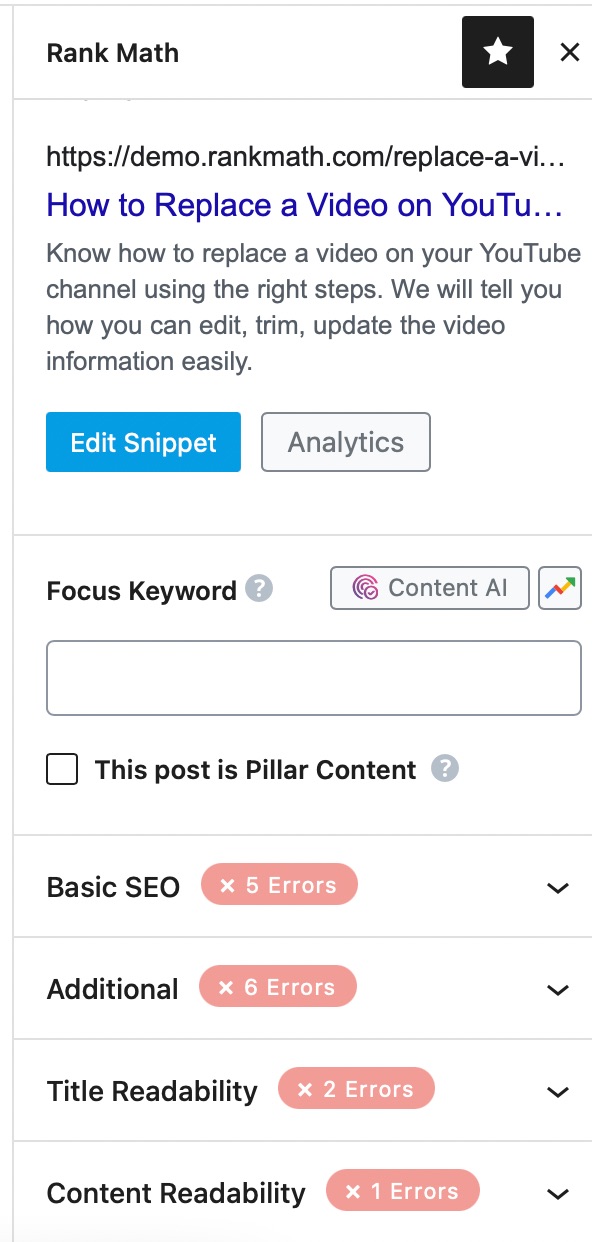
As you see, there are distinct sections inside the General settings, and you will need to understand each of them to utilize Rank Math’s prowess fully. Here is a list of all the sections inside the General Tab.
Table of Contents
Let’s discuss each of the sections one by one.
1 The Preview Section
The first section in the General Tab is the preview section, which aims to accurately represent how your post/page will appear in the search results and when shared on social media. The default view doesn’t do much justice, and you won’t find any insights by simply looking at it.
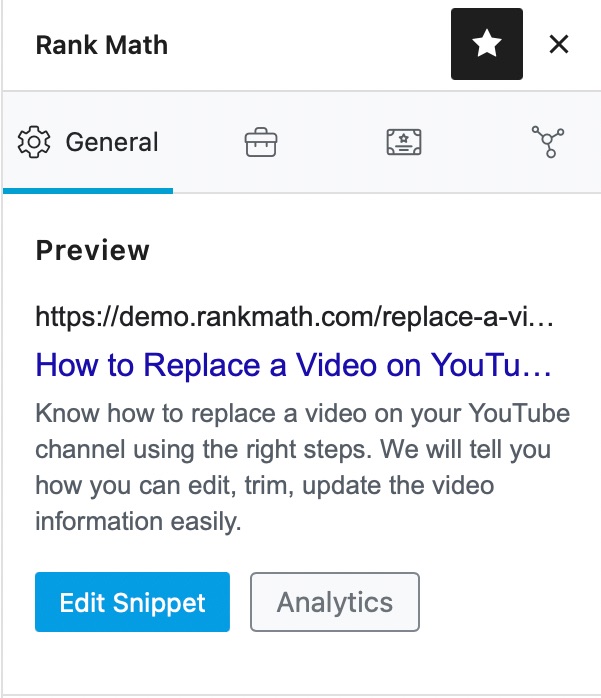
To use the preview section to its full potential, click the Edit Snippet icon to open the preview window.
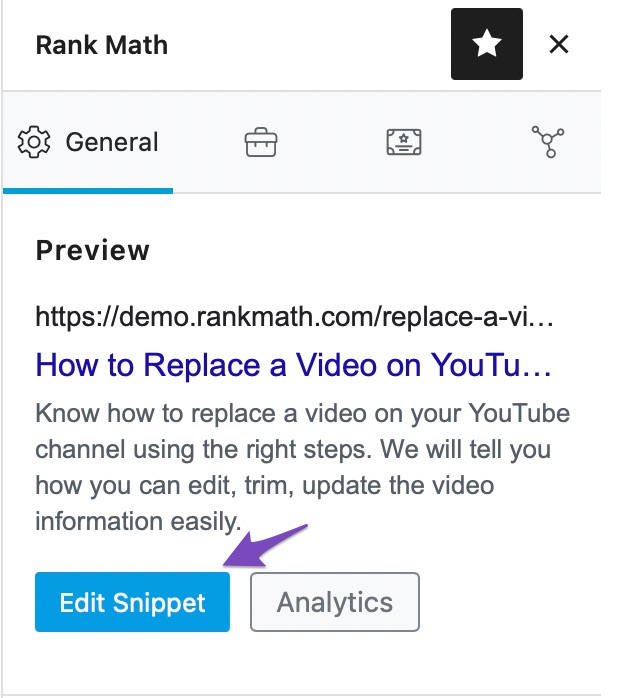
This is how the preview section will look. There are many sections in the editor, and we will explain how to use all of them one by one.
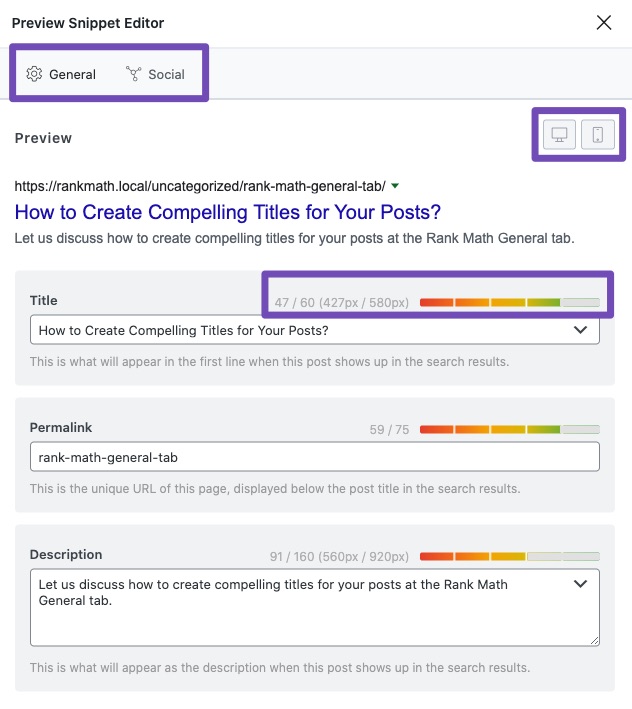
As you can see, there are 2 tabs in the preview section itself—one for search and one for social media. We will cover them both, starting with the search section (called the General section in the editor).
1.1 SEO Title, Permalink, and Description
This section fulfills 2 purposes. It lets you change the metadata for the post you are working with, and it also lets you preview your changes in real-time. You can visualize your changes across desktop and mobile search results, which lets you optimize your metadata for the majority of your traffic.
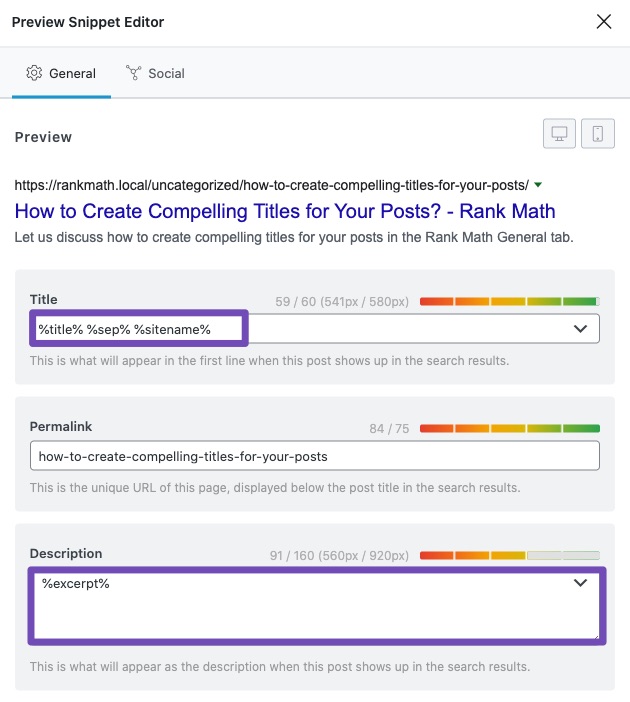
If you noticed the image above, a lot of the metadata is already filled in by Rank Math. These are default values that Rank Math recommends, and you can change them inside your settings. Once you do, new posts will inherit the new defaults. And as you can see, you can override these settings on a per-post basis.
So what do you do in the search preview section? You can enter a compelling title, permalink, and description for your post. These factors affect your search rankings, but more importantly, they impact your click-through rate (CTR). A high CTR is important if you want to win more traffic from the competition.
To edit any of the fields, you can simply start typing in the changes you want. But, before you do, you need to understand the concept of variables.
1.2 The Dynamic Variables
You might have noticed weird-looking code in the title field before you start editing it. Here is a reminder.

No, that’s not an error or a bug! It is the default title format that Rank Math will use, represented by variables.
Before you zone out, let us give you some context.
Whenever you write a post, you have to create a meta-title and a meta-description for it apart from the WordPress Title. Most of the time, your WordPress title is already optimized (thanks to Rank Math’s recommendations), and you just paste the same title to your meta title and make some minor changes. That’s a lot of wasted effort for just a meta-title.
Wouldn’t it be nice if you could tell Rank Math,” Hey Rank Math, take my WordPress title, add my default separator character to it, and then add my site name to it, and make that my meta title?”
That’s exactly what the variables do. In fact, that is the exact thing the default variable configuration accomplishes.
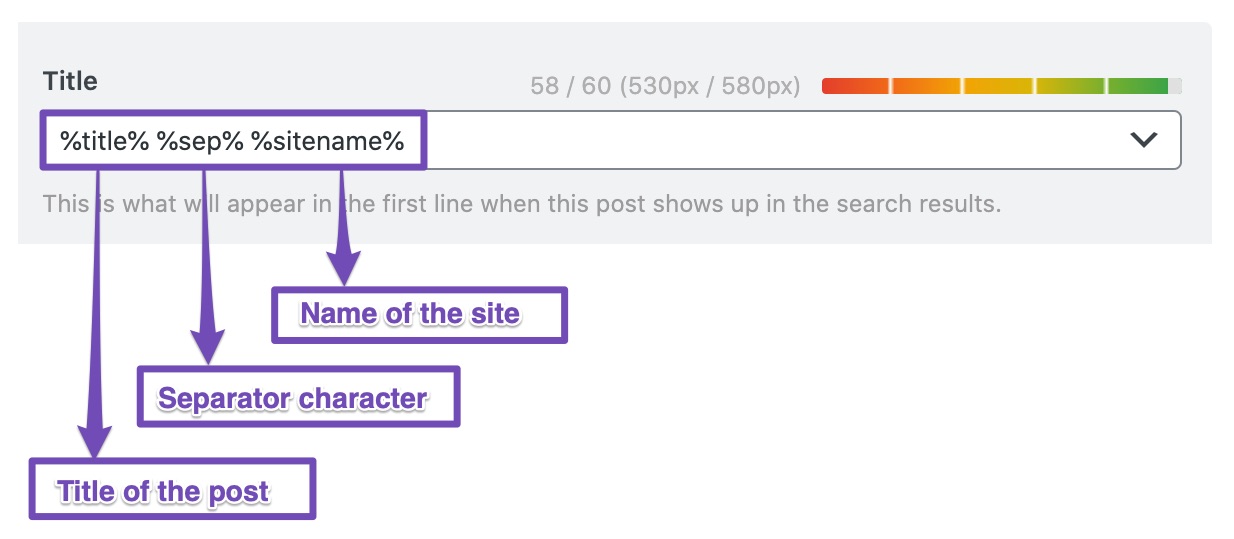
That is the power of variables. Once you start using them, the manual way of writing your meta-titles will feel inefficient. All you have to do is set it up once, and then Rank Math will take care of the field automatically.
There are two important things to know about variables.
First, if you set up a title format using variables in the post, then it will not reflect in other posts. That is because the settings in a post affect the post only. If you’d like to set a permanent template using variables, you’d have to do it in Rank Math’s Titles and Meta Settings. Even there, you’d have to set them up for your pages, posts, and other custom posts like your forums, topics, products, etc.
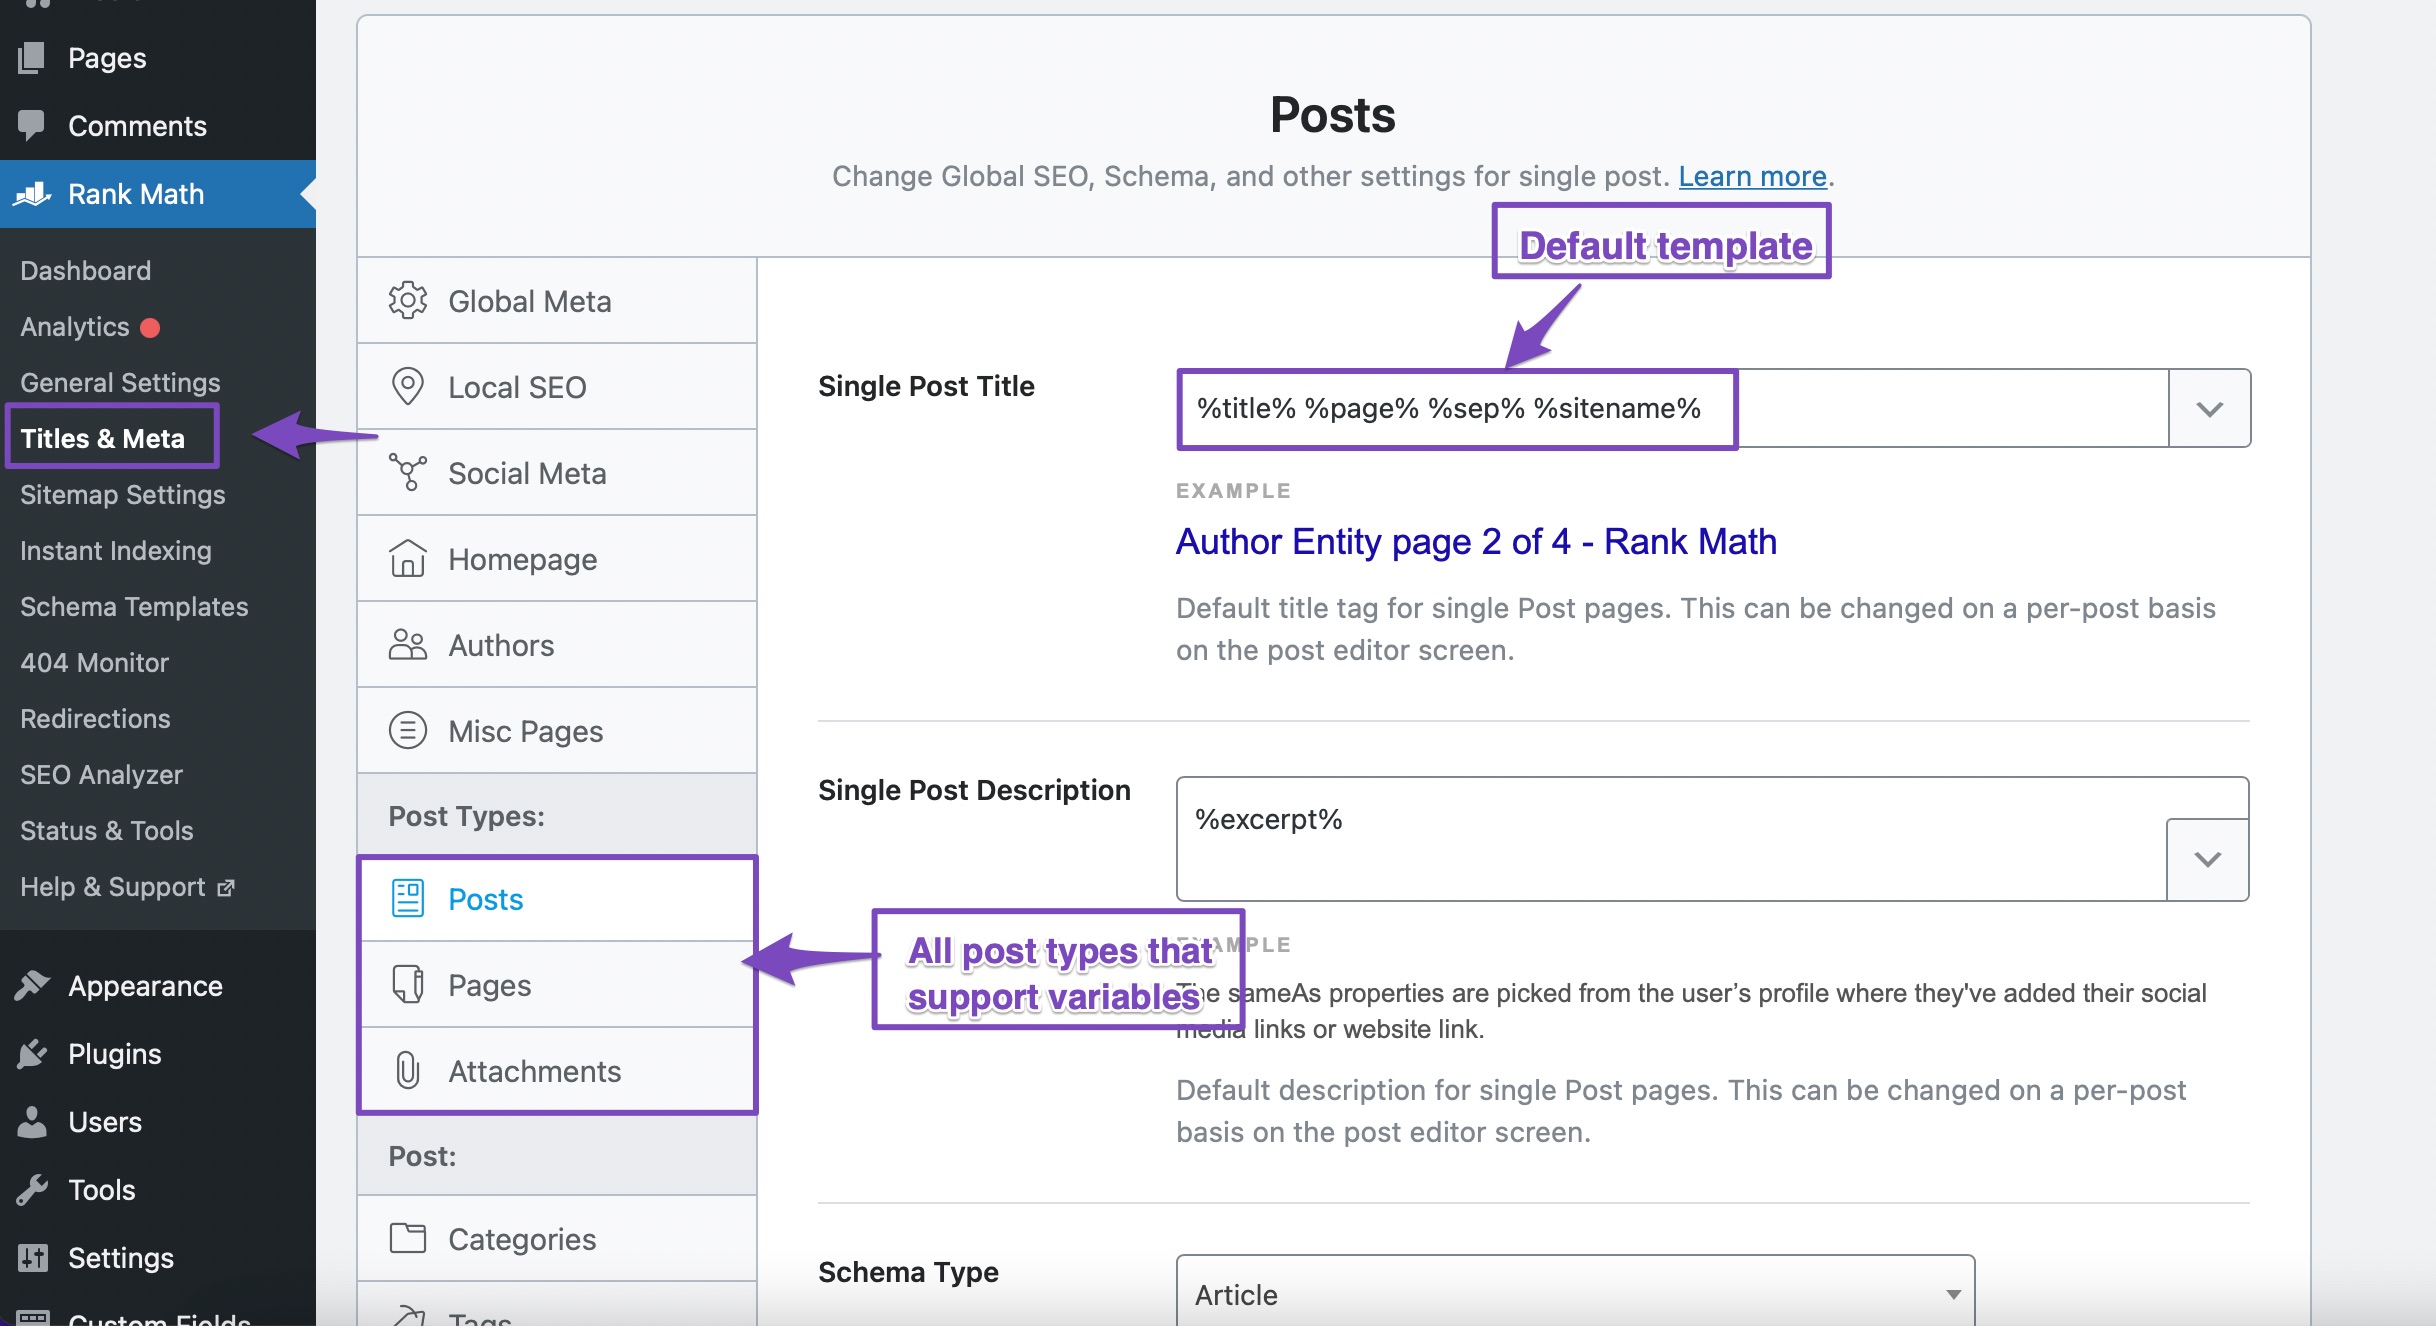
Please note that you will only see the post types that you have enabled on your website. For example, you will see Products in the Post Types section only when WooCommerce is installed on your website.
Second, not all fields support variables. Even in the meta box, you’d see that the meta-title and meta-description support variables, but the URL does not.
1.3 What Variables Are Supported
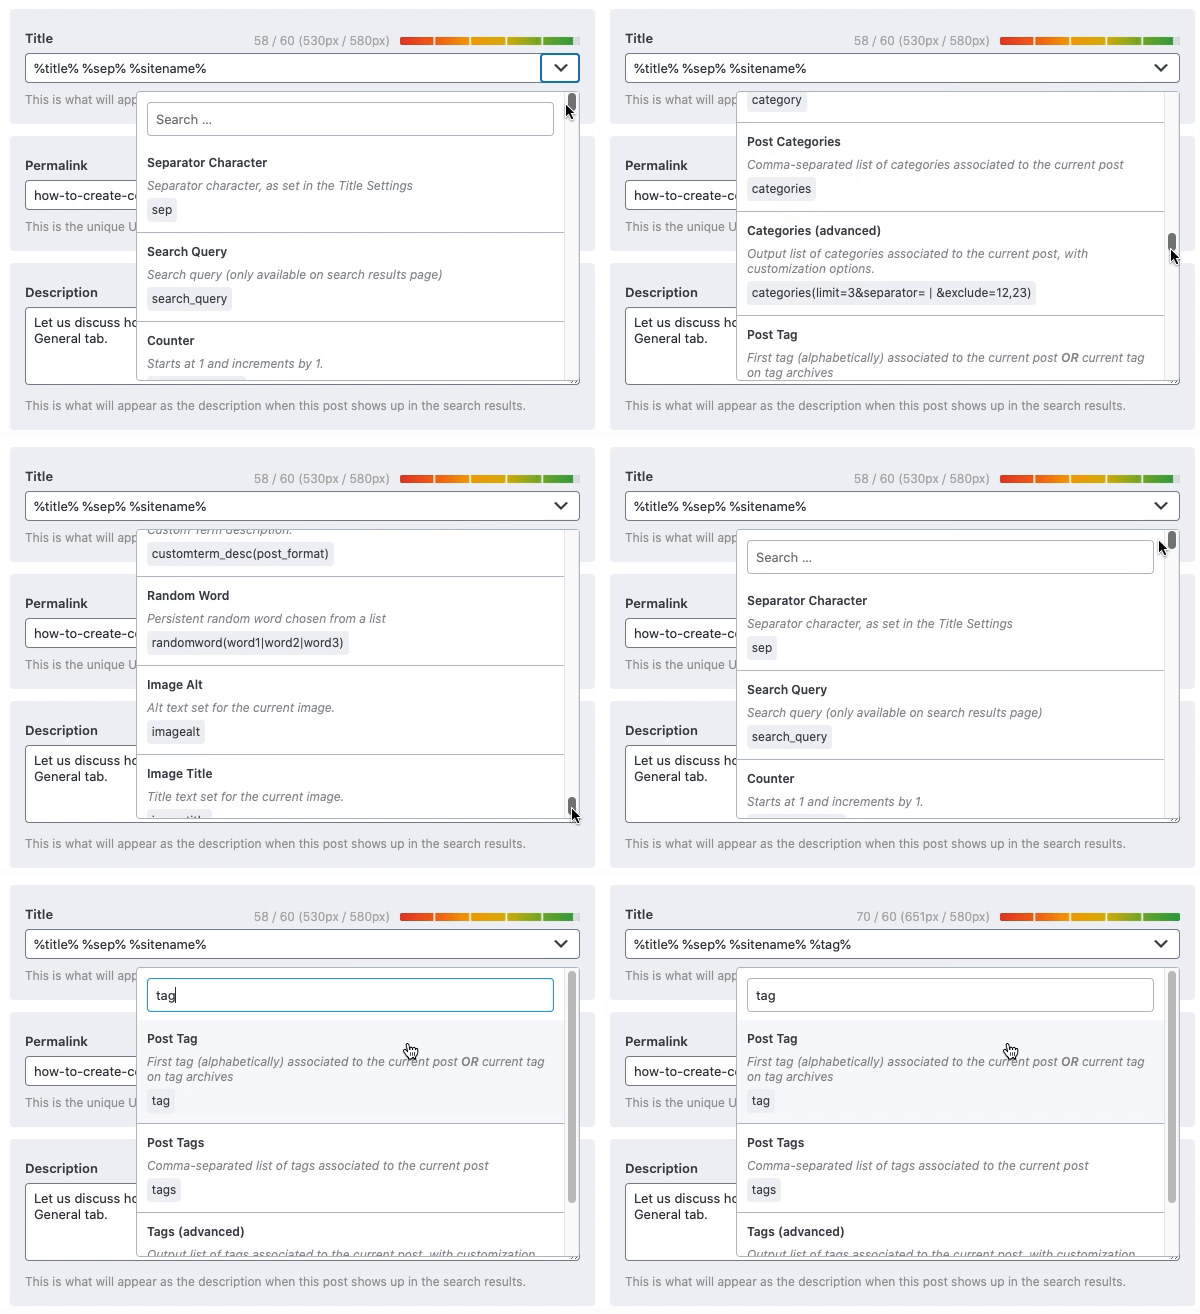
To make it easy for you to access and preview the variables, we’ve included the variable navigator alongside the field editing area. Click the drop-down button at the end of the text area to see all the variables available to you.

There are a lot of variables available to be used. You can either scroll to find the variable you want to use or type in a few characters to filter the results. Here is an example.
1.4 Writing a Compelling Title, Permalink, and Description
Now that you understood variables, it is time to create compelling metadata for your post. The rules are simple. Your title should include some important keywords and compel the user to click your website’s link without being clickbait. You can combine the use of variables and regular text to create a high-performing title. Let us take an example.
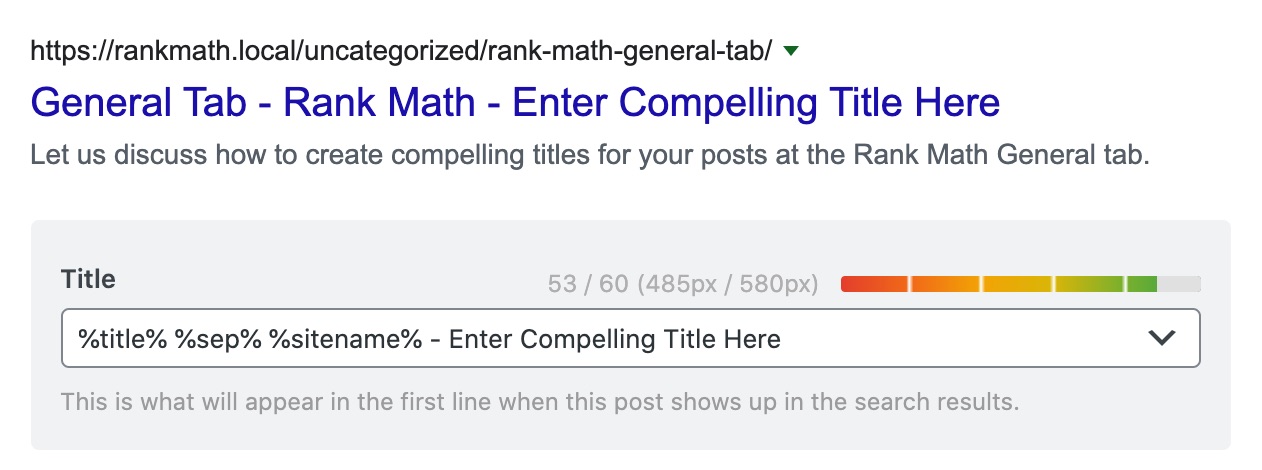
You’ll notice that Rank Math is guiding you to create a meta title of the perfect length in a couple of ways. The first is the length bar, and the second is the pixel measurement.

The length bar is pretty simple to follow. If your title is too long or short, it turns red. When the title is of an appropriate length, it turns green. It makes it easy to quickly see if your title is of an appropriate length.
The pixel measurement takes a more granular approach. It shows you the exact number of pixels that your title will take on the search results and recommends the ideal length based on that.
Now, you might be thinking, why is there a need to include the pixel-based checker when you have the length-based checker present already. There is an explanation.
The search results are competitive; you already know that. You have to push every advantage that you get, which includes writing good titles and descriptions for your posts.
Now, Google doesn’t consider the number of characters when it decides to keep a title or trim it, it uses pixels. Think about it, desktops and mobile screens have almost fixed aspect ratios, respectively, and the pixel approach makes for a standard length.
What you might not have noticed is that the pixel-width of a sentence changes depending on the type of characters used—some are wider than others. That means 2 sentences with the same number of characters can have different pixel-widths. That is why there is a need for pixel-based checker as well.
The way we do it is also pretty cool. We take the title from the post (after replacing the variables with their actual values) and generate an invisible title using the font-family Google uses in the search results. Then, we measure the width of that title to determine what leeway you have with your title.
Tl;dr version: See if your title is of the appropriate length with the length bar and optimize it precisely with the pixel width checker.
1.5 Previewing Your Metadata
Once you’ve optimized your title, URL, and description, the next step is to preview them. Hey, but isn’t there a preview already available? Yes, it is, but there are a few other options in the preview to discuss.
Notice the two icons on the top right of the preview options? These supercharge the preview window even further.
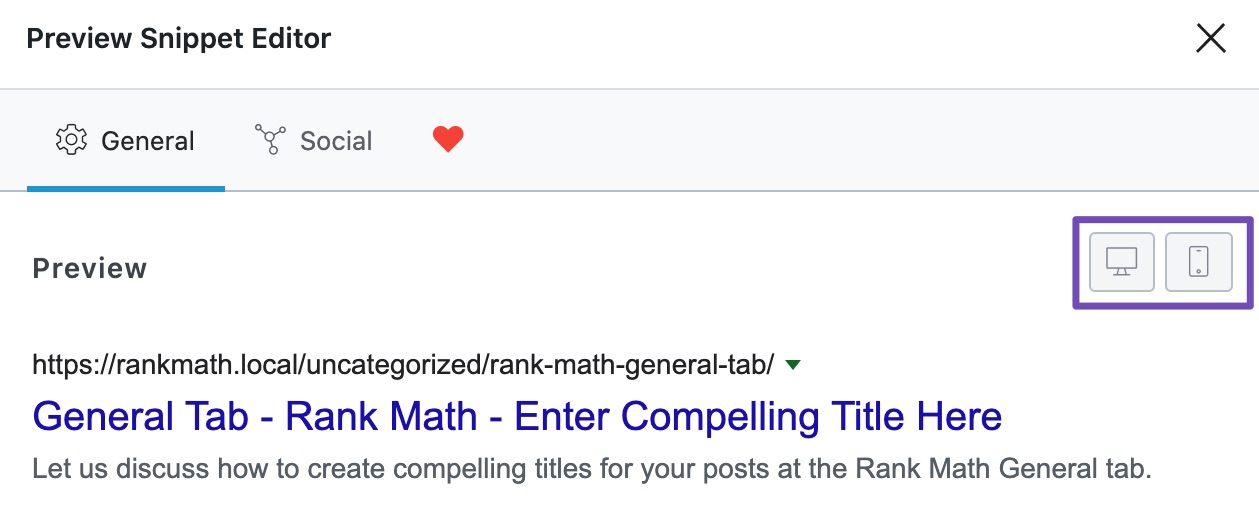
As you probably guessed, the icon that looks like a computer helps you see a desktop preview, while the other icon is for the mobile preview. Let us click the computer icon and see the desktop preview.
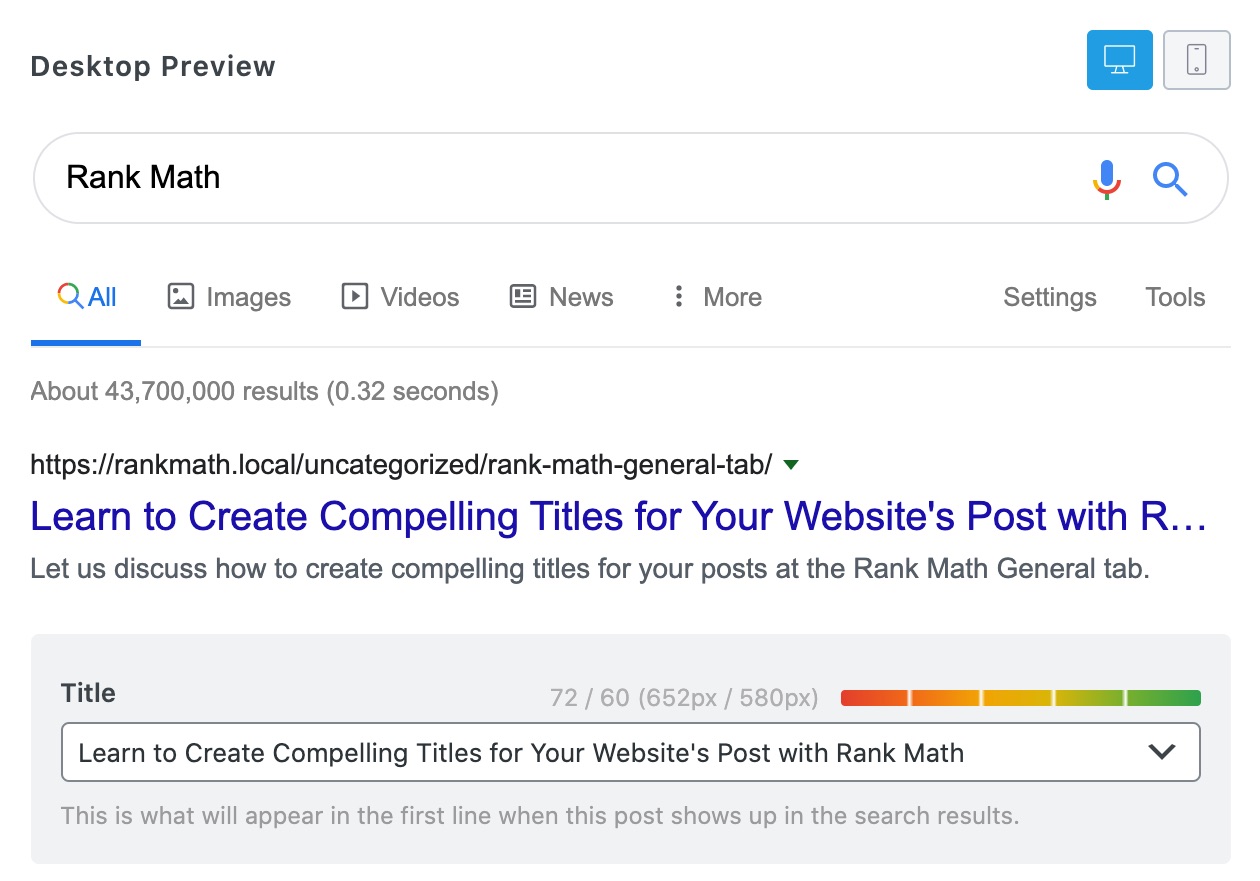
We created a new title just for this example, and as you can see, it is a bit too long, which you can tell by the clipping in the preview as well as the pixel calculator. Let’s fix that, so it fits.
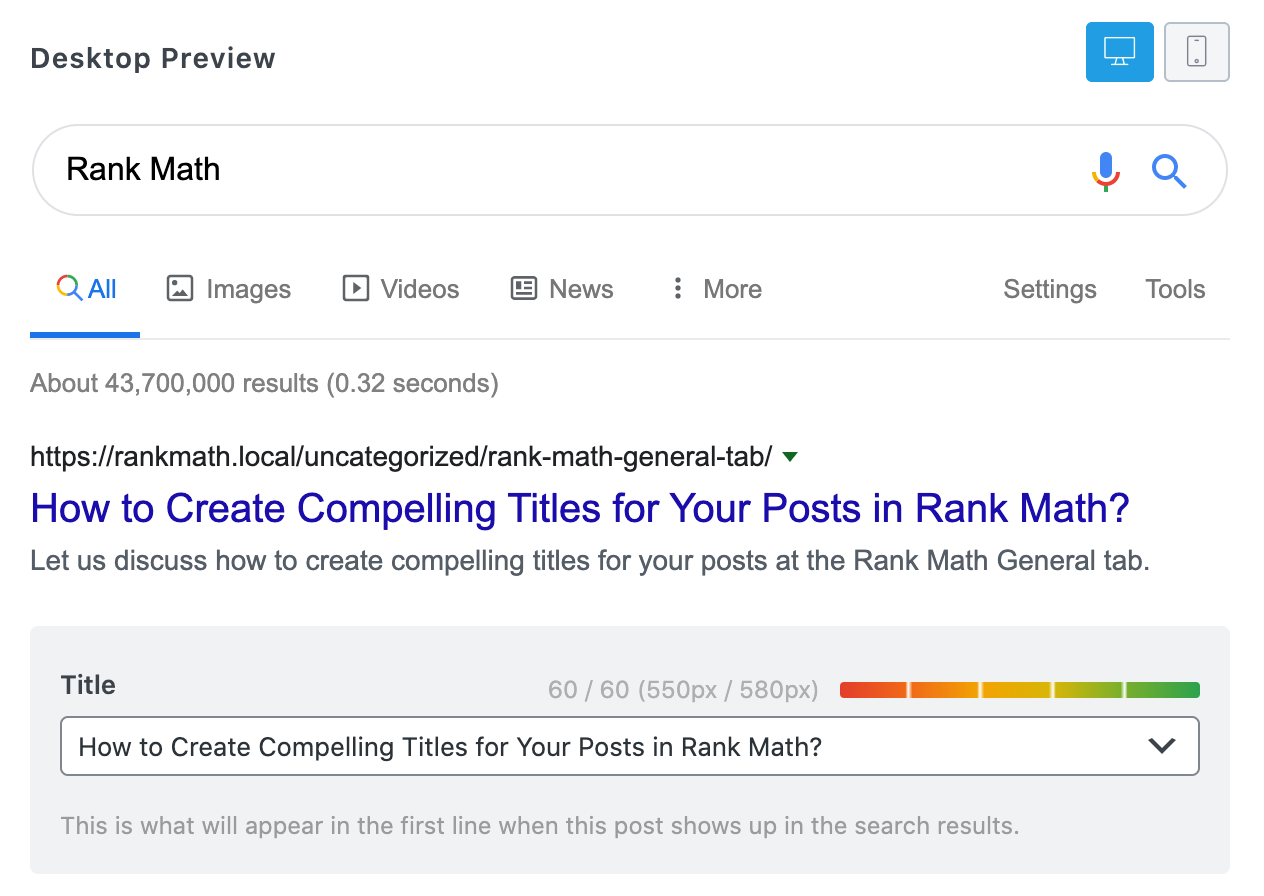
That’s much better. If you notice, the number of characters and the pixel width is within the limit, and we can be sure that our title will not be clipped.
But we’re not done. We still have to check out the mobile phone preview. Let us do that by clicking the phone icon.
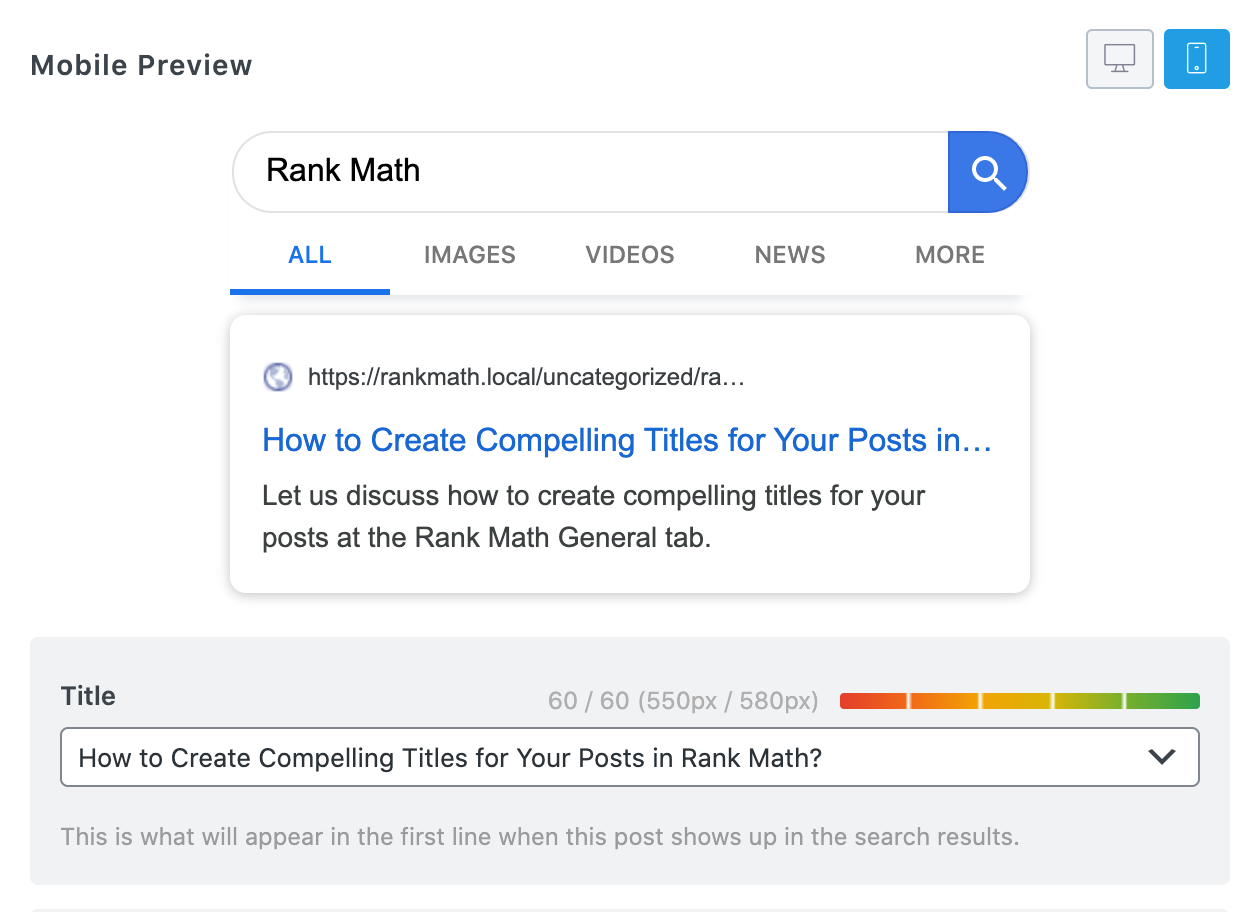
As you see, the title clips on mobile results, but there was no warning by the pixel calculator. That is because the pixel calculator only works for desktop results for now. Ultimately, the meta for the post has to be the same for desktops and mobile devices, and Google trims them on its own.
So your role is to make sure that the metadata looks good on both desktops and mobile devices. Sometimes you won’t be able to make it work 100% as the overall pixel width on mobile phones is significantly smaller, and that is ok. Remember, these are not just your problems; your competition faces the same issues.
Once you optimize your title, you can exit the preview mode by clicking the mobile icon again.
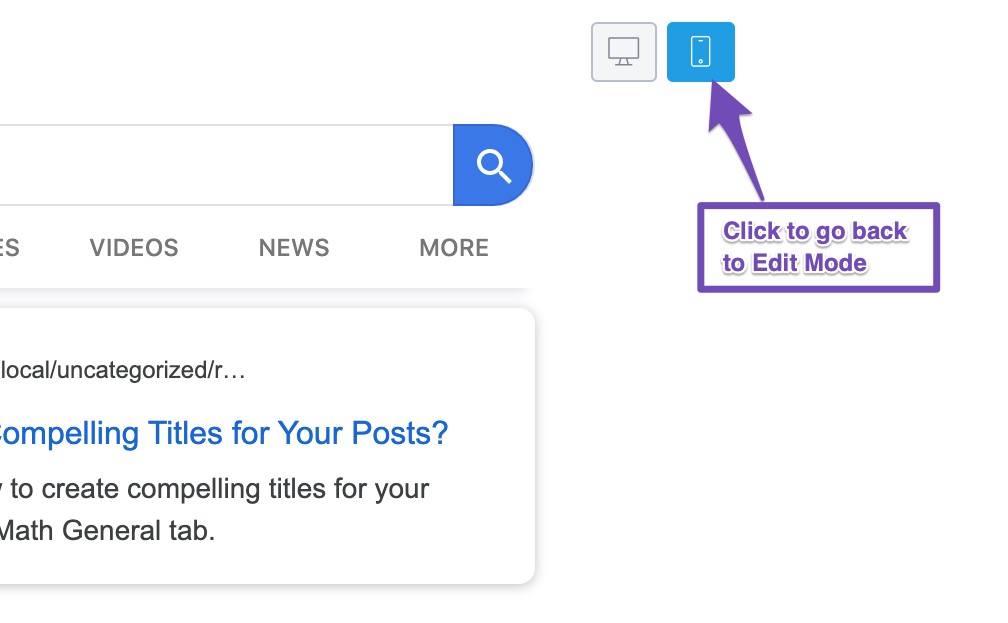
1.6 Social Preview Section
Click the Social tab to switch to the social preview section.
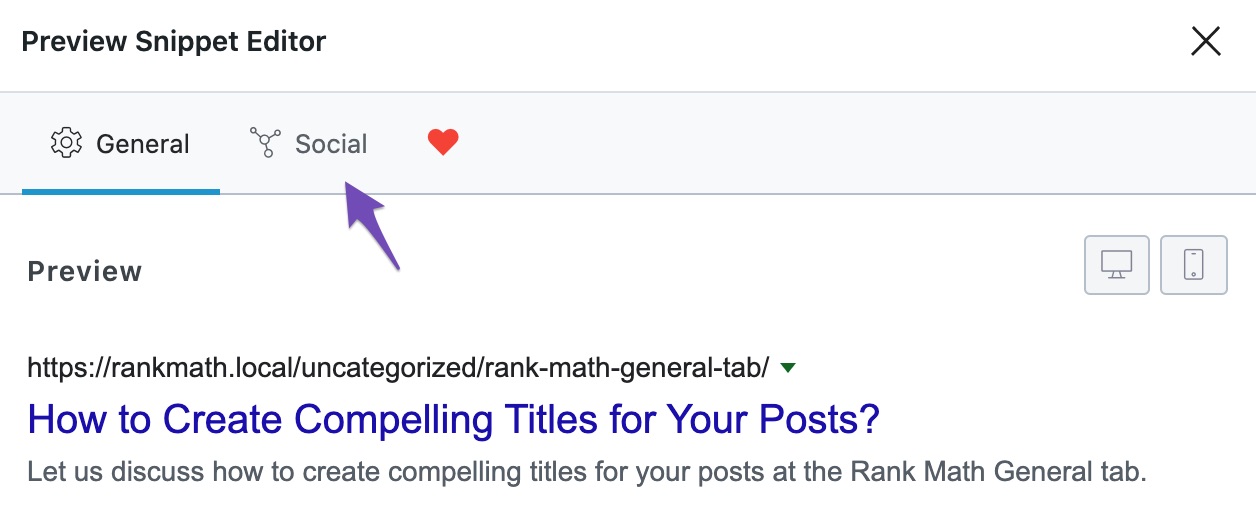
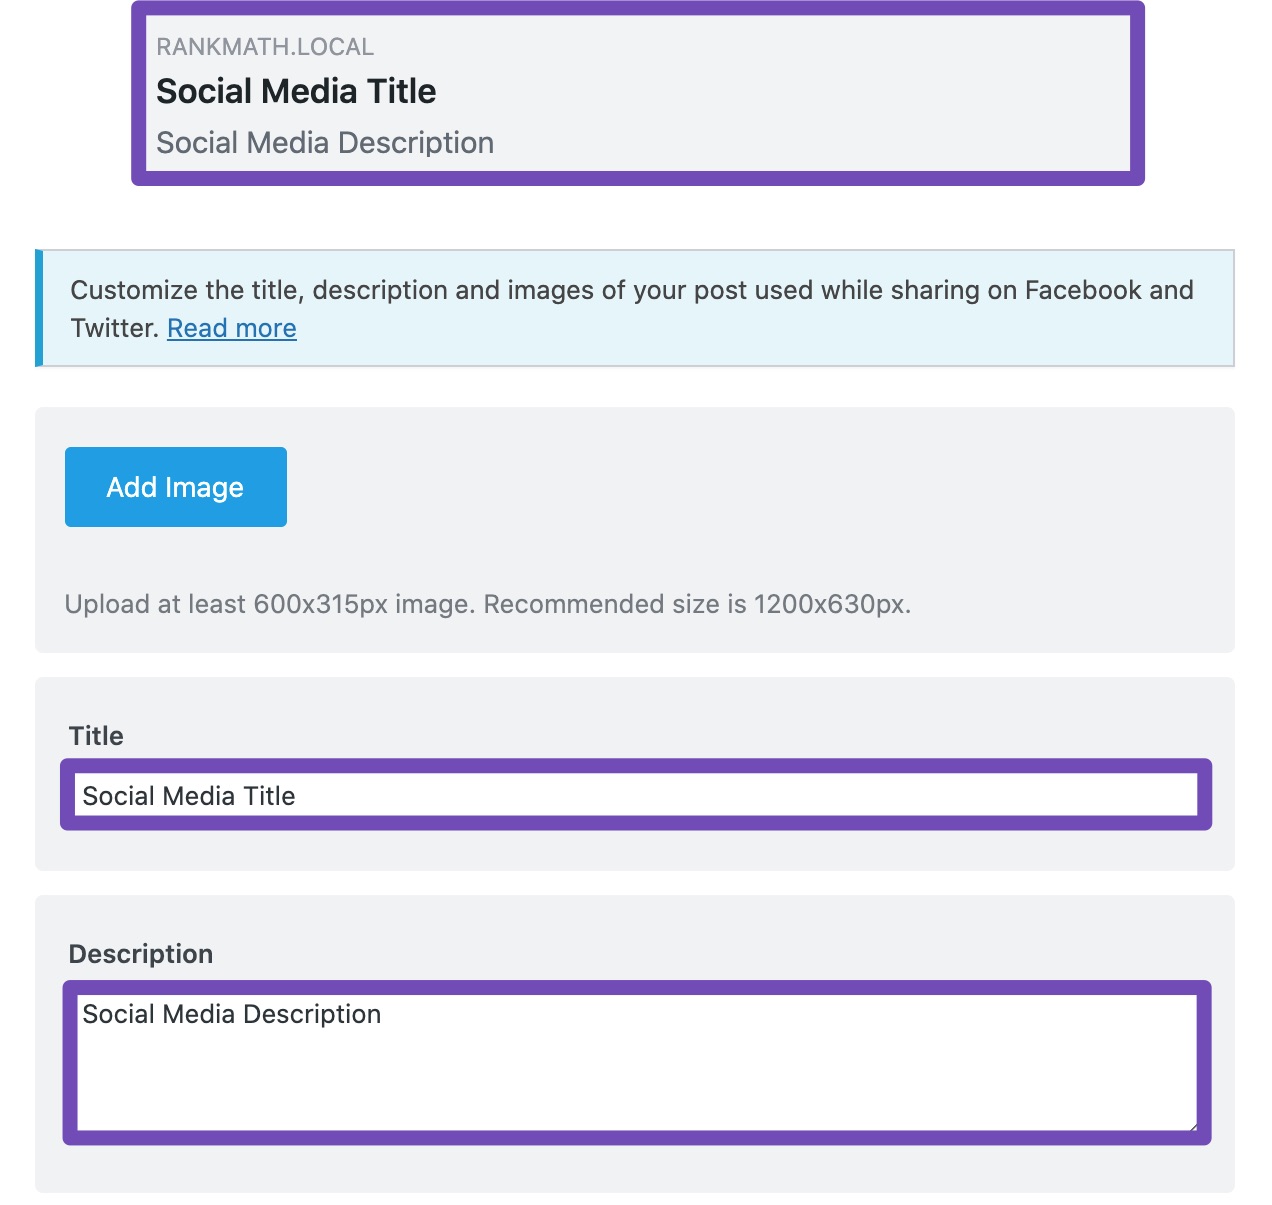
As you probably might have guessed already, the social preview section lets you preview your posts for social media. Currently, we support Facebook and Twitter, and Facebook is selected by default. Here are all the options you will see for the Facebook preview.
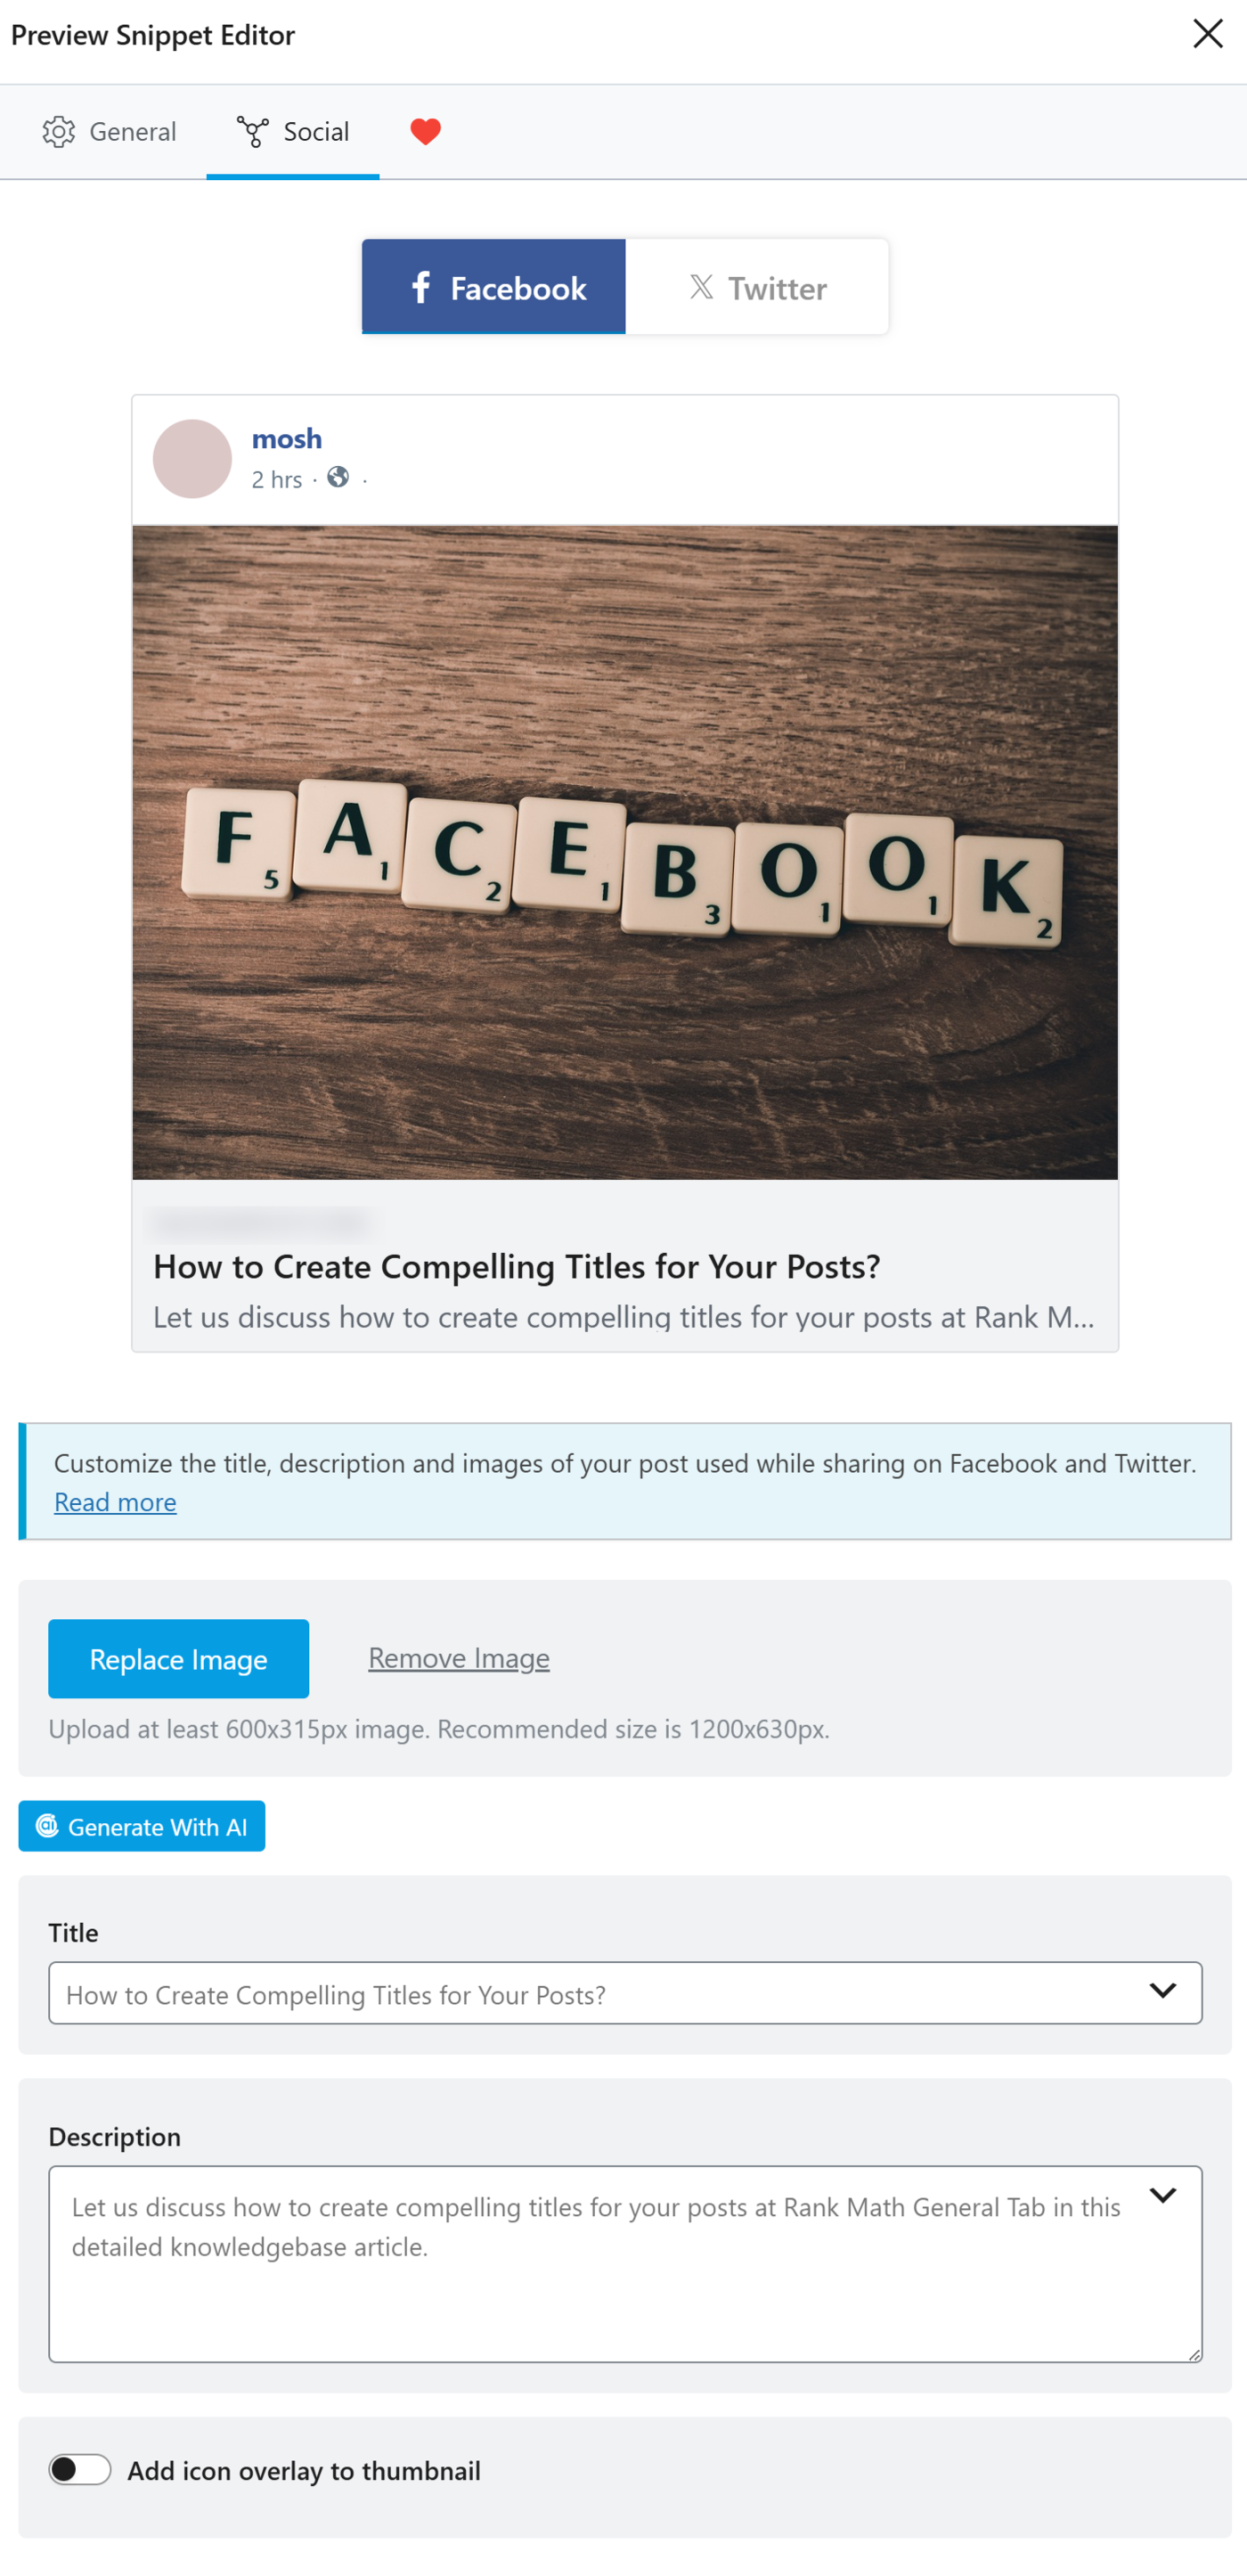
As you can see, you can preview and customize the cover image, the title, and the description of your post. The difference is that this information will be used on social media, not search engines. Let us upload a cover image to make the preview look a bit better. You can do the same by clicking the add image button in the settings if you haven’t already set a featured image like us.

That’s better. Now let us discuss the options in the Facebook sharing tab. There are 3 options to understand.
The Title is where you can enter a title for the video, and in the description field, the description. The title and description are automatically pulled from the general tab, but you can customize them. The idea is, people on social media have a very different mindset than people on search engines, and the same titles might not work on both.
Similar to what you see in the general section, the title will update in real-time to reflect the title that you create.
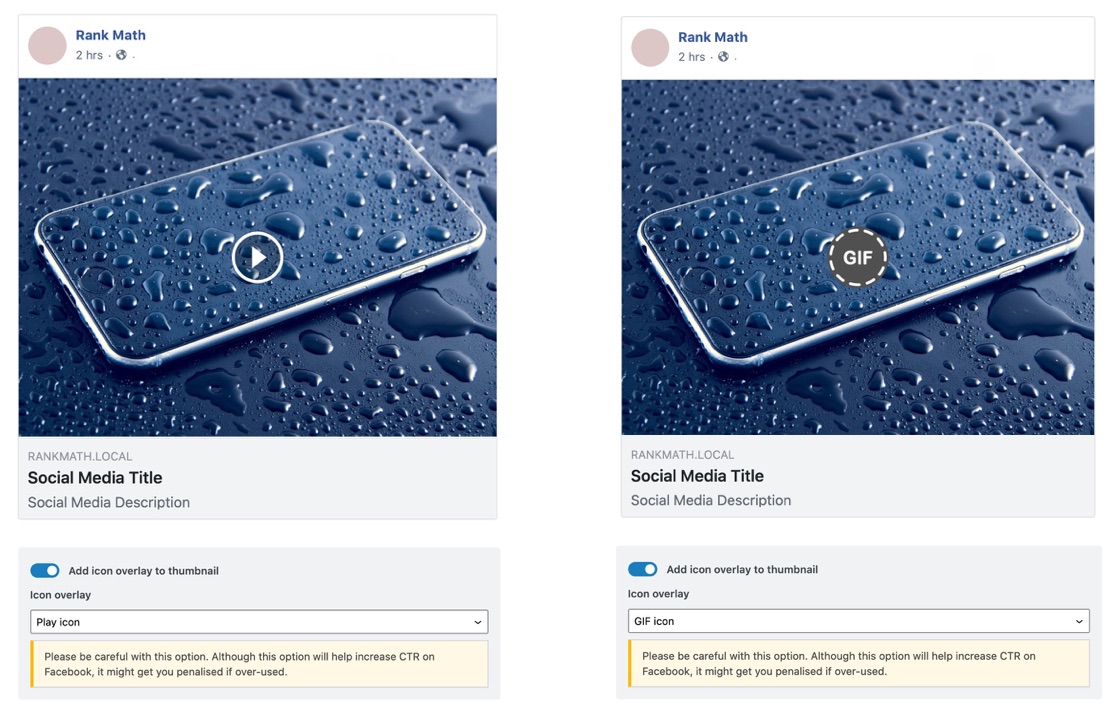
The last option lets you add an overlay to your image. Fair warning. We do not recommend that you use it on every video, as it can give you great results in the beginning. But, that can change quickly, and Facebook might not like it too. Once enabled, you have the option for adding a video playback overlay or a GIF icon overlay on top of your featured image. Here is how that looks.
1.7 Twitter Preview
The Twitter preview is quite similar to the Facebook preview, and here is how it looks.
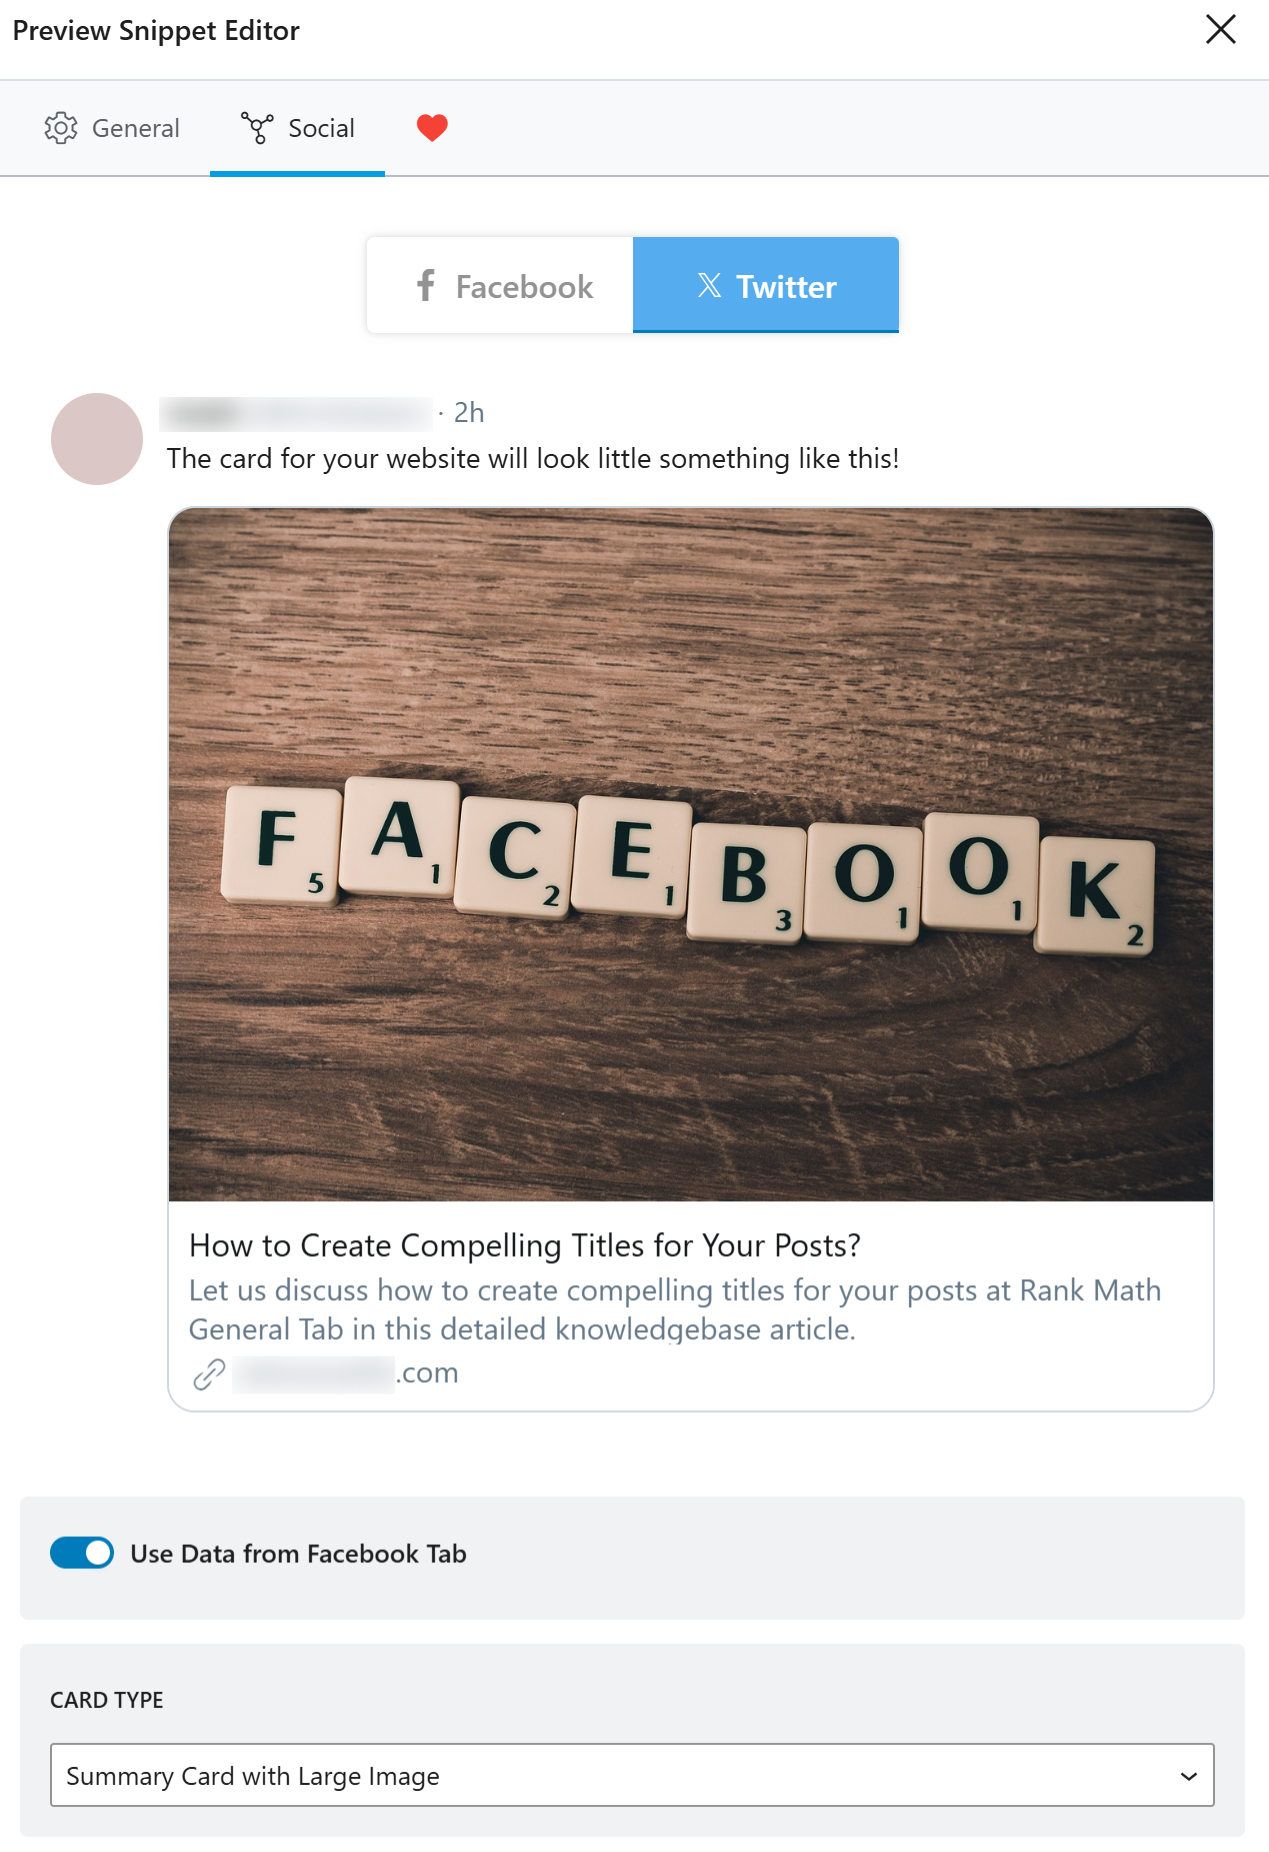
The simplest way to optimize for Twitter is to enable the Use Data from Facebook Tab. For the cases where you want to optimize them separately, you can disable the option and enter a separate title and description for them or upload a different image with an icon overlay to the thumbnail.
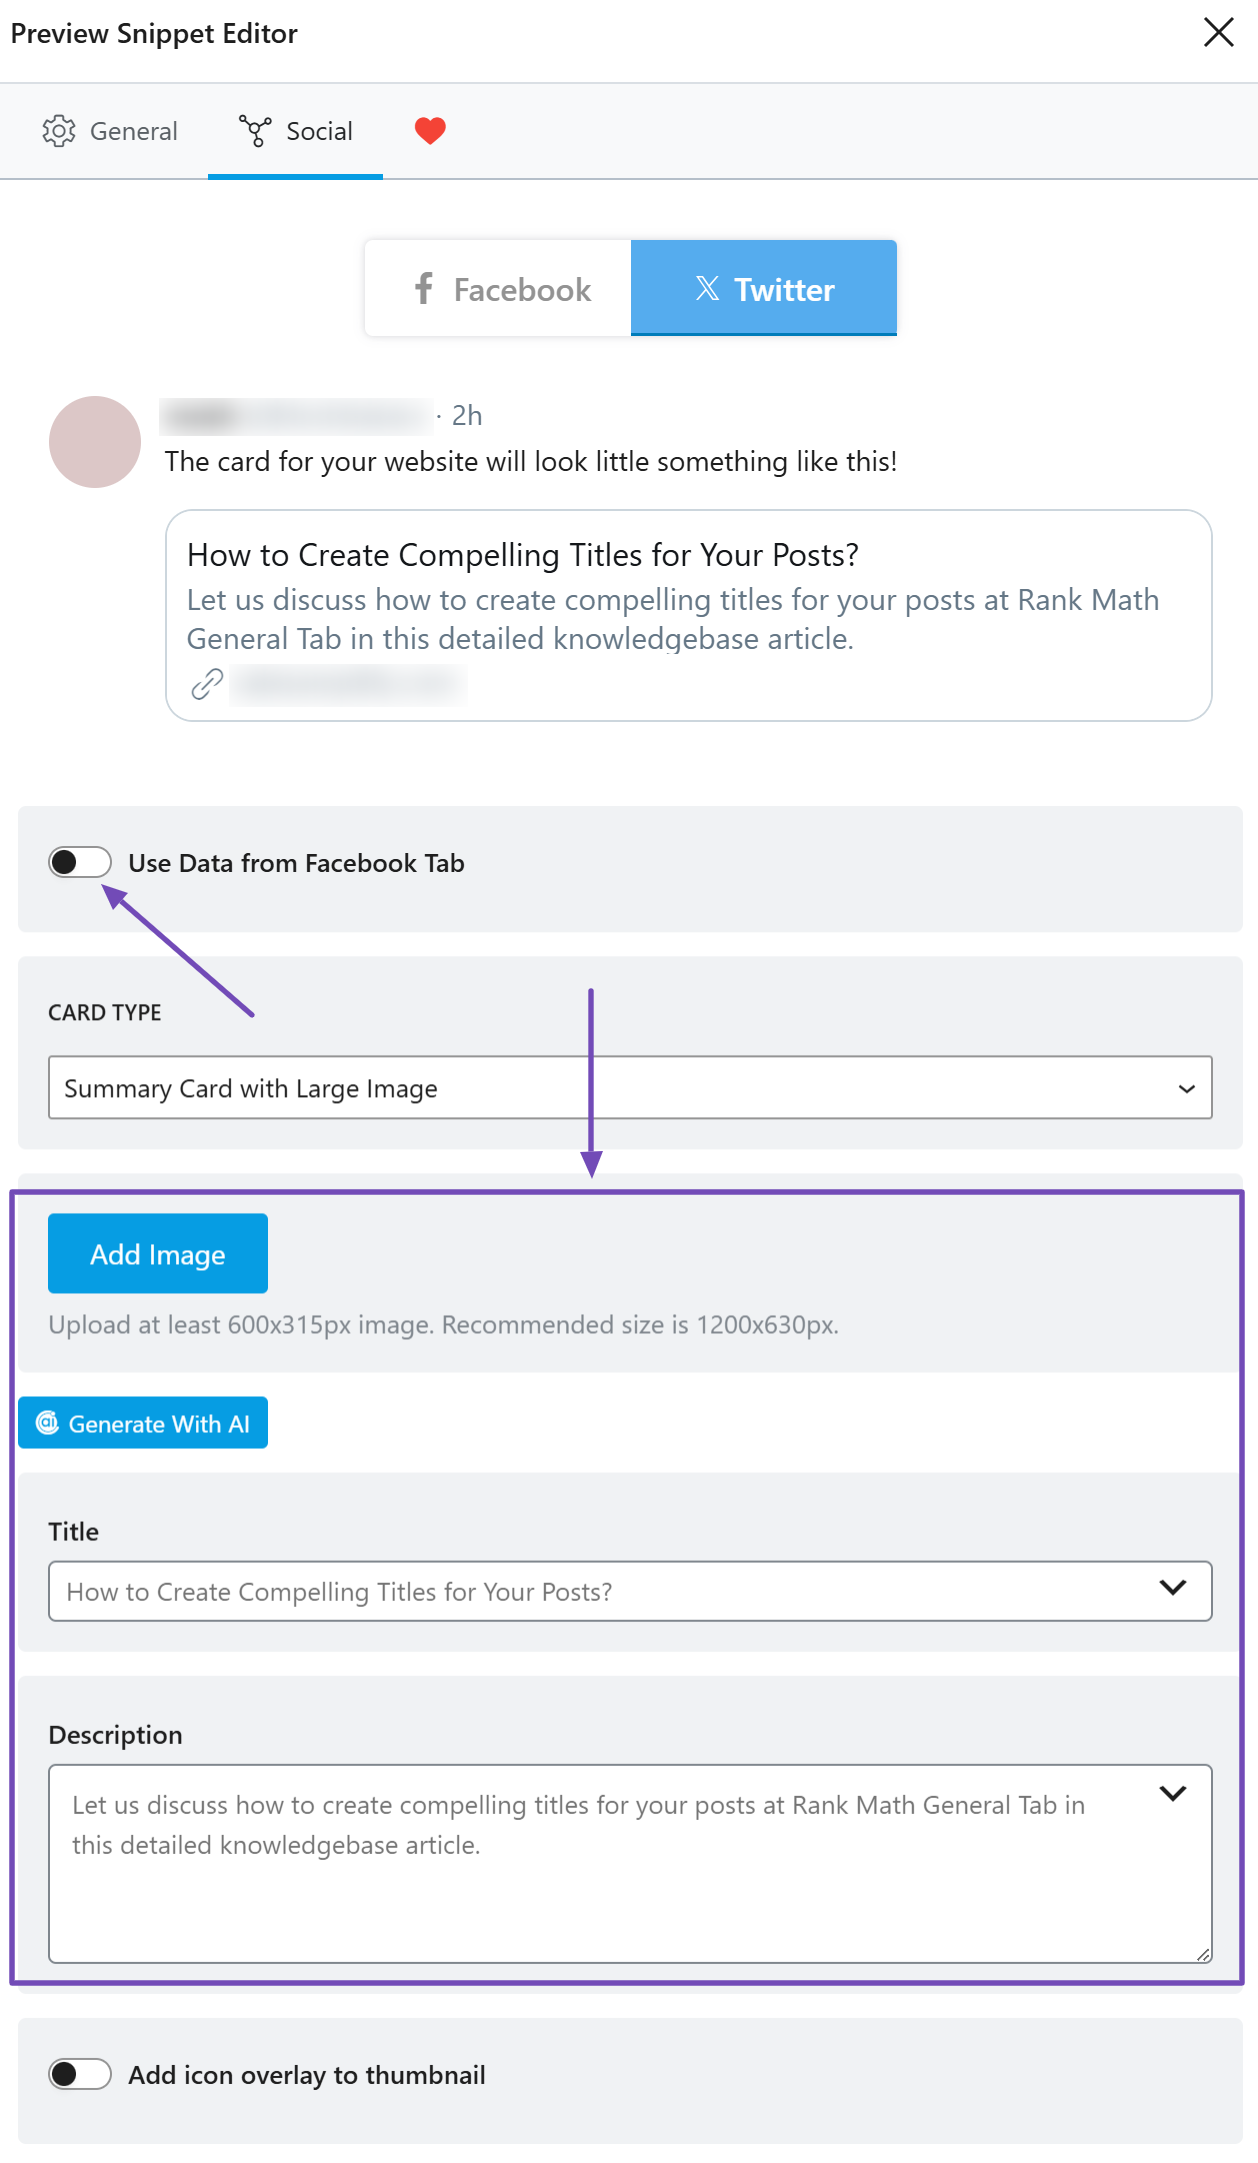
Another difference is that Twitter supports different types of cards for sharing, and you can see all the supported options in the drop-down.

We’ve covered these options in detail when we cover the social meta setup, so we won’t repeat them here. Also, if you’re wondering if you have the option of overlaying an icon on Twitter images, then yes, you do. If you enable the option in Facebook sharing, it will be enabled for Twitter as well.
1.8 Analytics Report
While updating your post, you can also check your post index status, search traffic, and performance with a single click.
Note: To view the Analytics option in your meta box, ensure your site is connected with Analytics and you’ve Role Manager capabilities to access Analytics. Also, make sure you’ve published the post.
You can track the overall performance by clicking on the Analytics button.
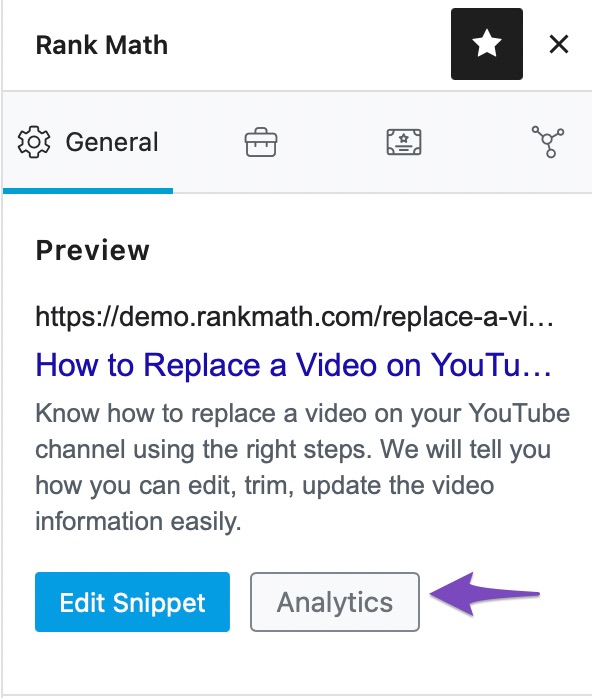
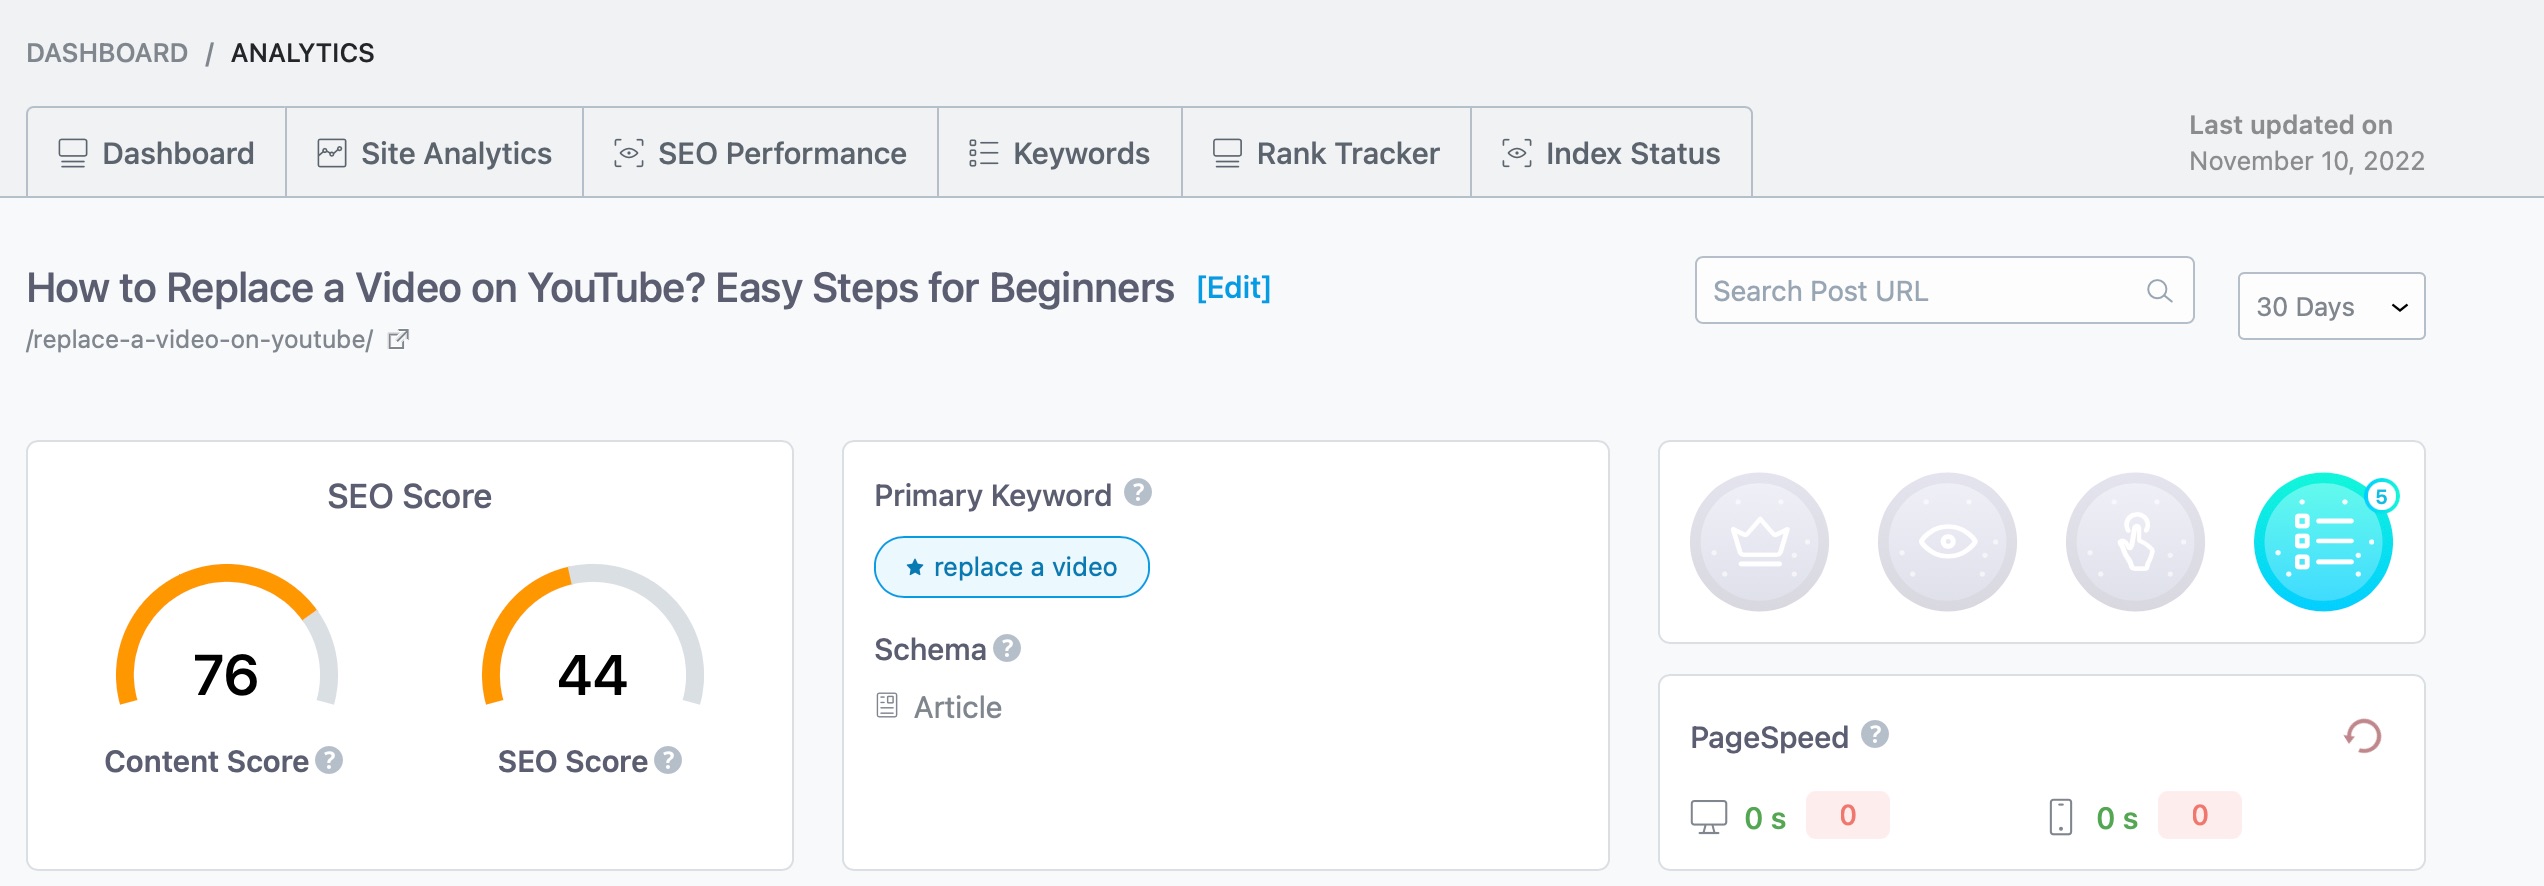
On clicking the Analytics button, you’ll be redirected to Rank Math’s Analytics dashboard and you’ll be able to glance your website’s current state with respect to organic traffic, as shown below.
2 The Focus Keyword Section
Focus keyword(s) are words or phrases that your post is about. In essence, they are the core-topic that your post is about.
By adding relevant keywords in the Focus Keyword section, you can unleash Rank Math’s content analysis power. When you do this, Rank Math analyzes your post’s content and gives you specific, actionable advice on how to optimize your post for search engines.
Rank Math lets you add up to 5 focus keywords per post if you connect with a Rank Math account and activate your copy of Rank Math. Activation is free, just like Rank Math, and it is purely done for analytic purposes and to enable an important feature which we’re going to mention soon. If you haven’t connected your Rank Math account with your website, we highly recommend that you do so.
It’s important to know that the focus keywords that you enter in this section are not communicated to Google or affect your external SEO efforts. Instead, they are used internally and by Rank Math to optimize your on-page SEO for this page.
2.1 Picking Good Focus Keywords
Picking out good keywords is an art and a science. It’s an essential process in SEO; that is why we wrote an entire guide about it. We recommend that you read our guide if you’re new to keyword research and then begin the process of adding focus keywords to your posts.
To add focus keywords to your posts, you just have to type the keyword or phrase in the focus keyword section. Press the Enter key to finalize the keyword.
If you connect your Rank Math account as we recommended, you should be able to add more focus keywords the same way, and also see Google suggestions alongside the focus keywords just as you type the focus keywords in. Here is how it looks.
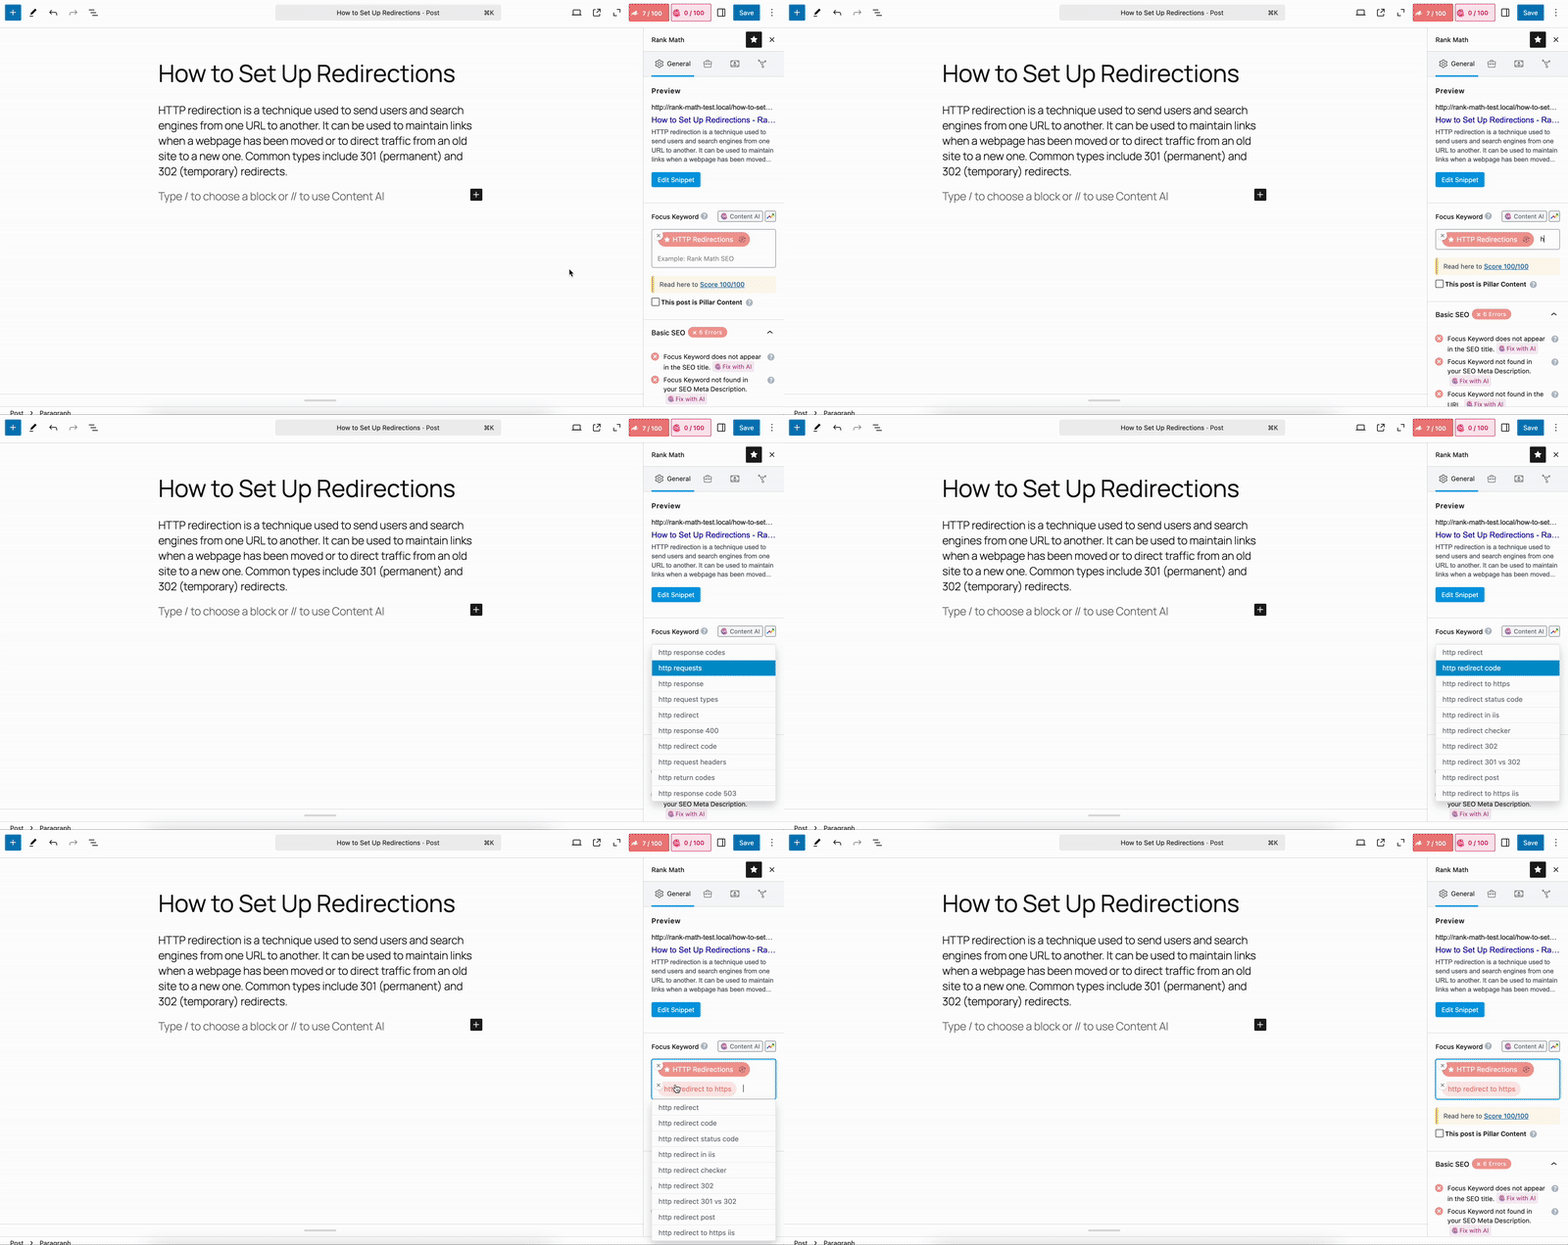
Obviously, the suggestions should only supplement your own keyword research. Always consider the search volume, the competition, and your website’s authority before making a keyword decision.
2.2 Choosing a Primary Focus Keyword
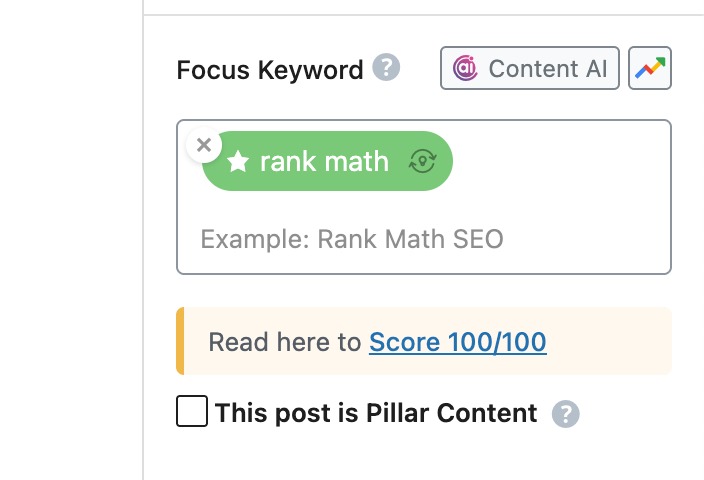
As we mentioned, Rank Math lets you use one or more focus keywords (if you connect your Rank Math account). When you add more than one focus keyword, the first keyword that you add becomes the primary focus keyword, which is denoted a star icon next to it. Have a look at the primary focus keyword in the image below.
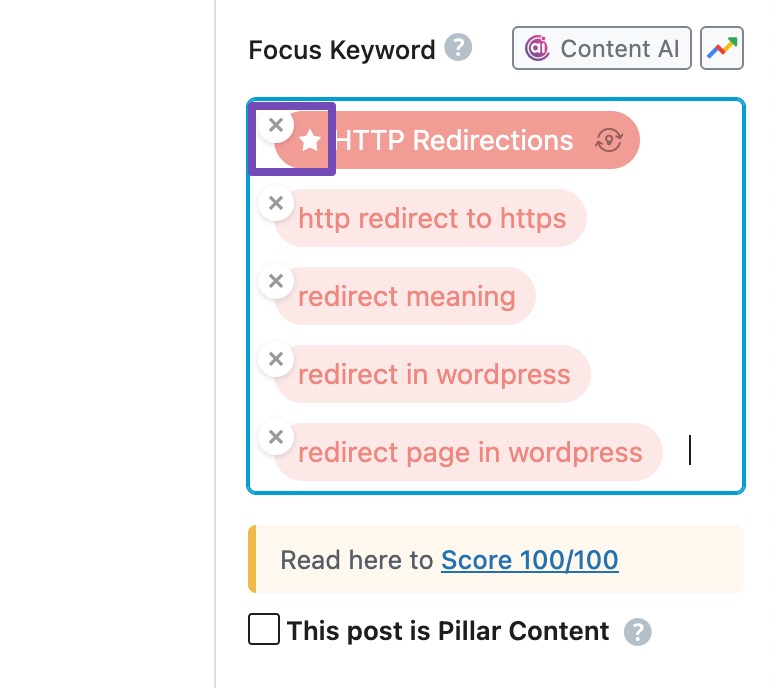
The primary focus keyword should be the most important keyword out of the bunch. It should be the keyword that you care most about ranking. In other words, the focus keyword should be “need to have” while others can be “good to have”. If you’d like to learn more about focus keywords and how to optimize your post for multiple keywords, we recommend that you read out guide on how to score 100/100 with Rank Math. It has all that information, and much more.
Currently, the first keyword that is present in the focus keyword list is considered the primary focus keyword, and Rank Math PRO users have the ability to reorder them simply by dragging and dropping the keywords in the desired position.
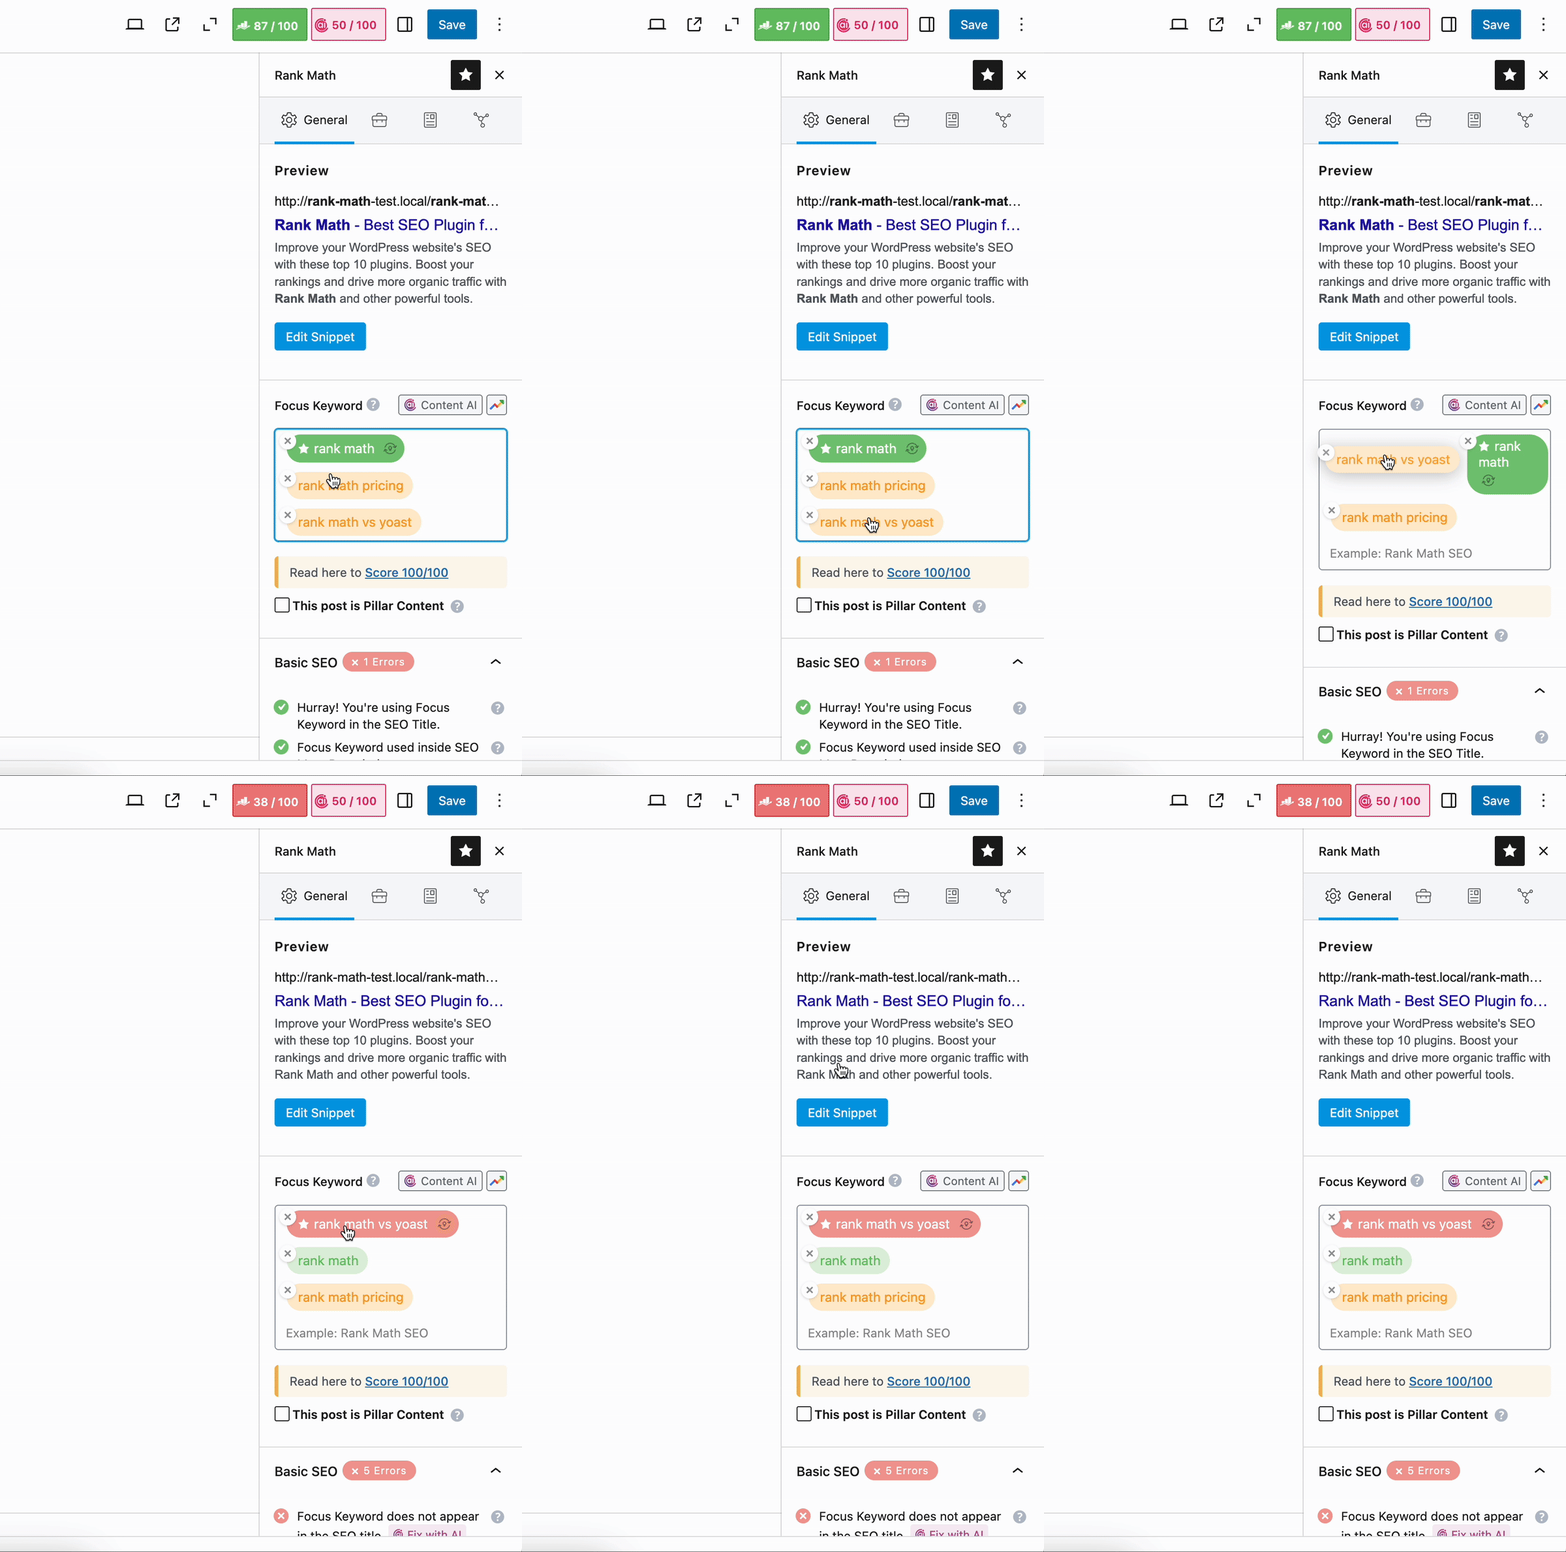
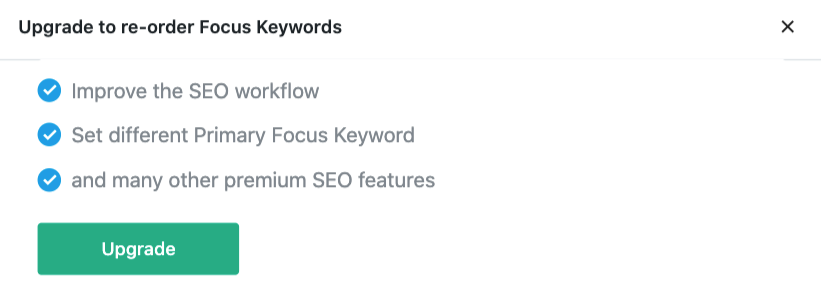
If you’re using the free version of Rank Math, while trying to reorder focus keywords, you will see a popup notice instead as shown below, since this feature is available only in the PRO version of Rank Math.
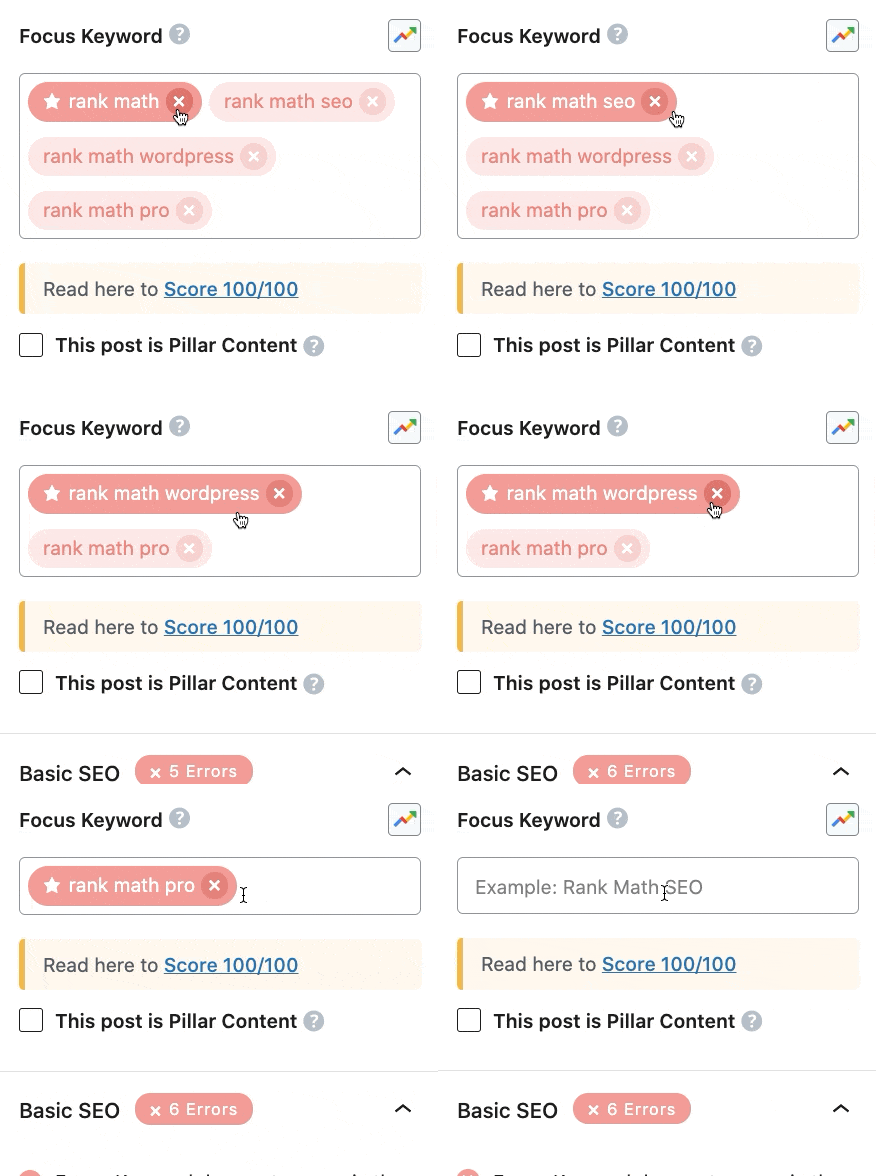
So, in the Free version, if you want to change the primary focus keyword, you might have to delete everything and add the list of focus keywords again.
2.3 Google Trends PRO
Rank Math makes it possible to add multiple focus keywords, but which keyword would you set as the primary focus keyword?
Ideally, it should be the core topic and the one that most people are looking for in the search. To help you stop this guesswork, Rank Math PRO includes a Google Trends tool alongside the focus keywords section.
When you open the Google Trends tool, you can notice your focus keywords being imported here, so you can check the search trends for keywords and even compare them.
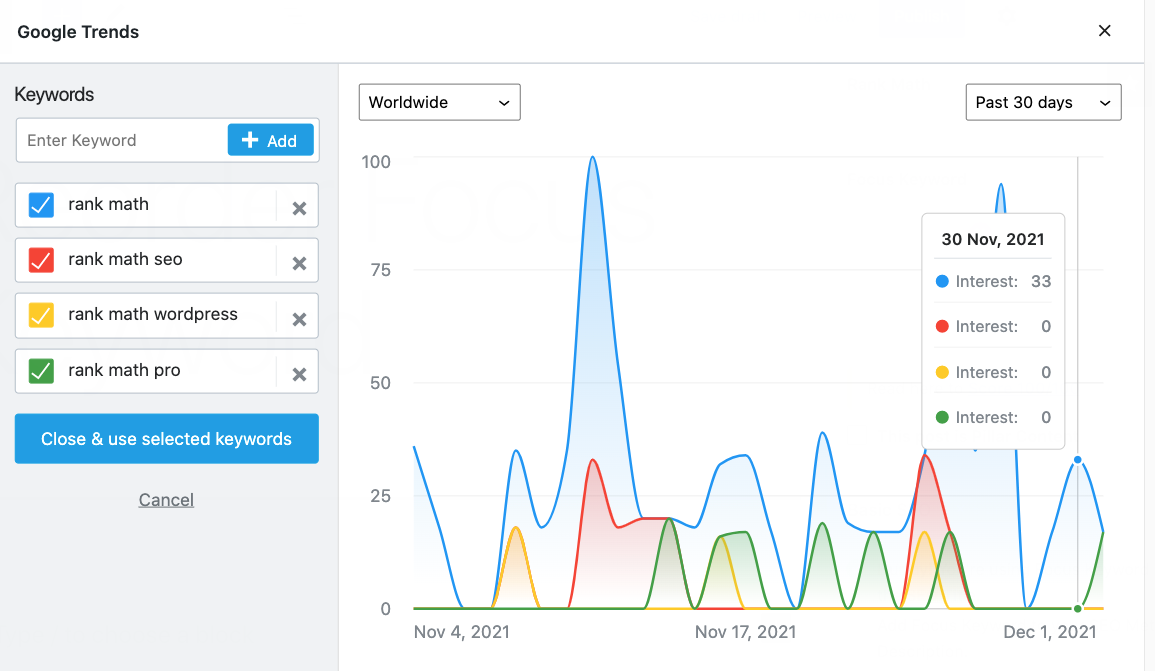
While this isn’t a substitution for a dedicated keyword research tool, the idea is to make your job easy in comparing your target focus keywords.
3 “This post is a Pillar Content” Checkbox
This option lets you set your post as a “Pillar Post.” The idea behind pillar posts is that they form the basis of your blog. Just as a building needs pillars to stand on, your blog or website would also stand on pillar content.
So what is pillar content?
The closest we can describe pillar content is to call it evergreen content. Once you write it, it should answer a question that your niche will have for years to come, and it should answer it in sufficient detail. For example, if you had a photography blog, a pillar post on your website could be “What is white balance?”. It’s a question most amateur photographers have and definitely search for.
All niches have questions like these, which can be answered once and they (hopefully) bring you traffic for eternity. The best part about a pillar post is that the answer to the question rarely changes. So if you’ve produced a good piece of content, you might never have to update it again.
So, what does the checkbox do? It helps you mark any piece of content on your website as pillar content. And what does that achieve? When you mark a piece of content as pillar content, Rank Math helps you rank that post in search engines by reminding you to link to it from other posts.
Let us take the photography example again. If you create a pillar post on white balance, then anytime you mention white balance on your website, Rank Math will remind you to link to your original post. The suggestion appears in the Link Suggestion section, which should be present with the document settings in the block editor, and as a floating widget in the classic editor.
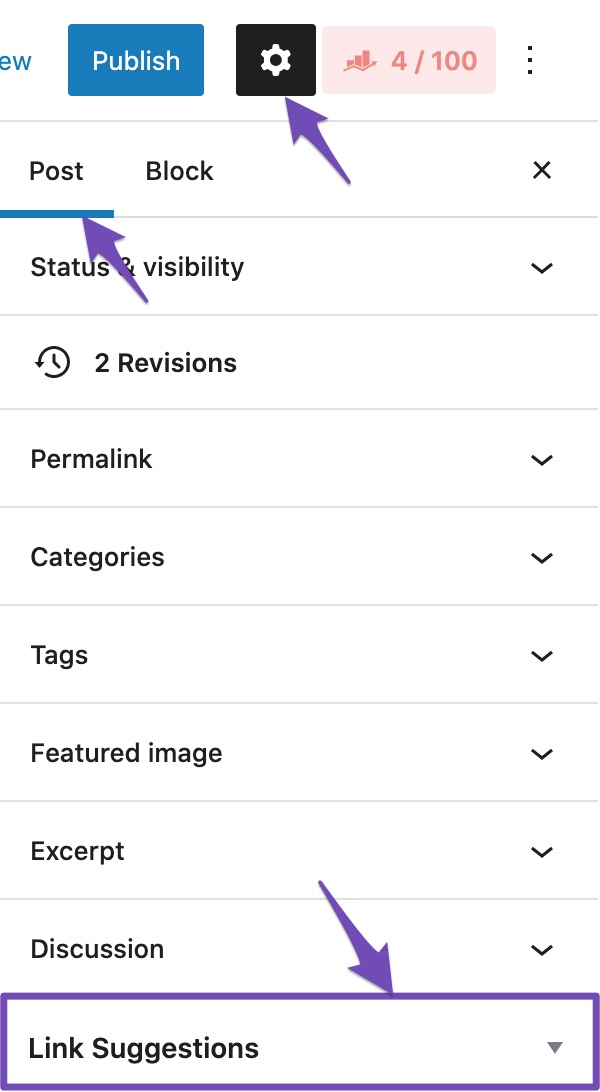
You might be thinking that this feature is underwhelming, as all, it does it remind you to link to your post, and you might be right.
But, you shouldn’t look at the amount of effort you put in, but the results that they get you. We’ve seen that the simple act of linking to your posts with the most long-term traffic potential can mean the difference between a lot of traffic and mediocre traffic. And, the additional benefit of ranking evergreen topics is that they also tend to pick up links passively, bringing you more traffic. With these benefits, you can probably see why this tiny feature can bring in big results.
4 Content AI
By now, you’d have identified the primary focus keyword to target, but what should you cover in your content to rank better?
Our Content AI is here to help. If you had enabled the Content AI module in Rank Math, you will be able to access the Content AI from the Focus Keyword section.
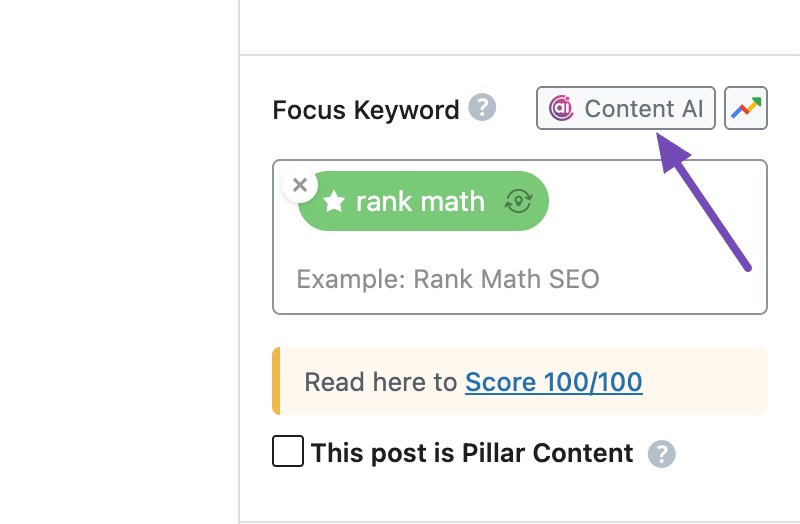
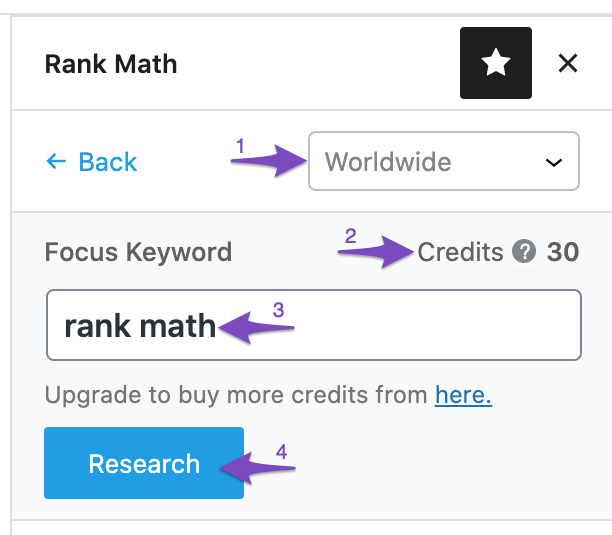
You might be wondering the Content AI panel has got only a few options and how it could help. But when you tell Content AI, which country you’re targeting and the focus keyword you want to target, our AI will analyze the existing articles ranking for the keyword and uses our proprietary algorithm to offer you relevant suggestions.
For the keyword we’ve researched, Content AI has retrieved useful insights and compared them with our own content. And here is an overview of that comparison.
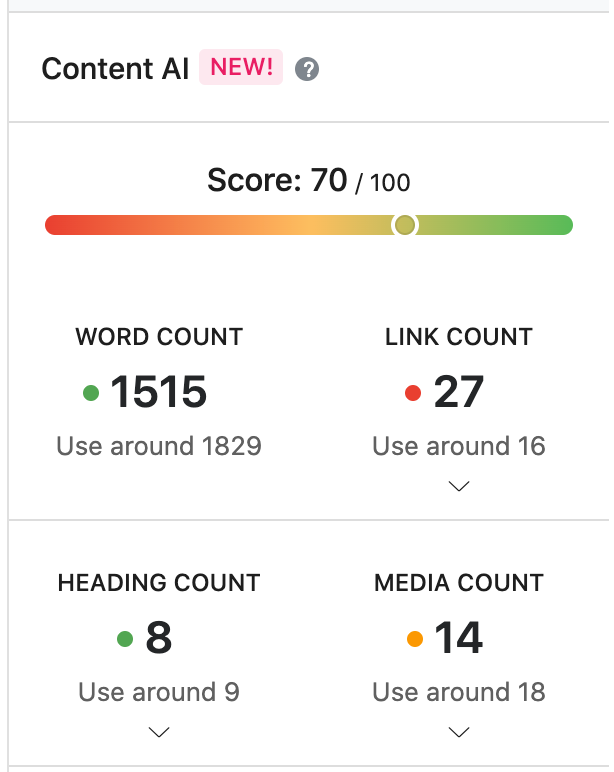
Let’s try to understand what they mean:
- Score – An overview of how well your content has fared/optimized against our metrics on a scale of 100.
- Word Count – What’s your current word count against the most optimal word count for this focus keyword?
- Link Count – How is your link pattern compared to your competitors ranking for this keyword?
- Heading Count – How many headings your content has compared to our AI-suggested count? Further breakdown of headings is also available.
- Media count – How many images and videos are present in your content against the suggested numbers?
The core idea here is not just to compare your articles with others, but to put together the best possible content on the topic, and if you’re falling short, you could take our suggestions and improve them. Let’s look at the other suggestions as well.
4.1 Keyword Suggestions
The Keywords tab is one of the three tabs you’ll see in the Content AI panel. You might be wondering that we have already identified focus keywords, but then why Content AI is suggesting keywords again?
While the keywords we have identified with Google auto-suggested keywords based on what people are frequently searching for, content AI is suggesting the keywords that existing ranking articles are using in their copy. You can filter the Use Keyword in option to figure out what keyword you should be using in your Content, Heading, SEO Title, and SEO Description.
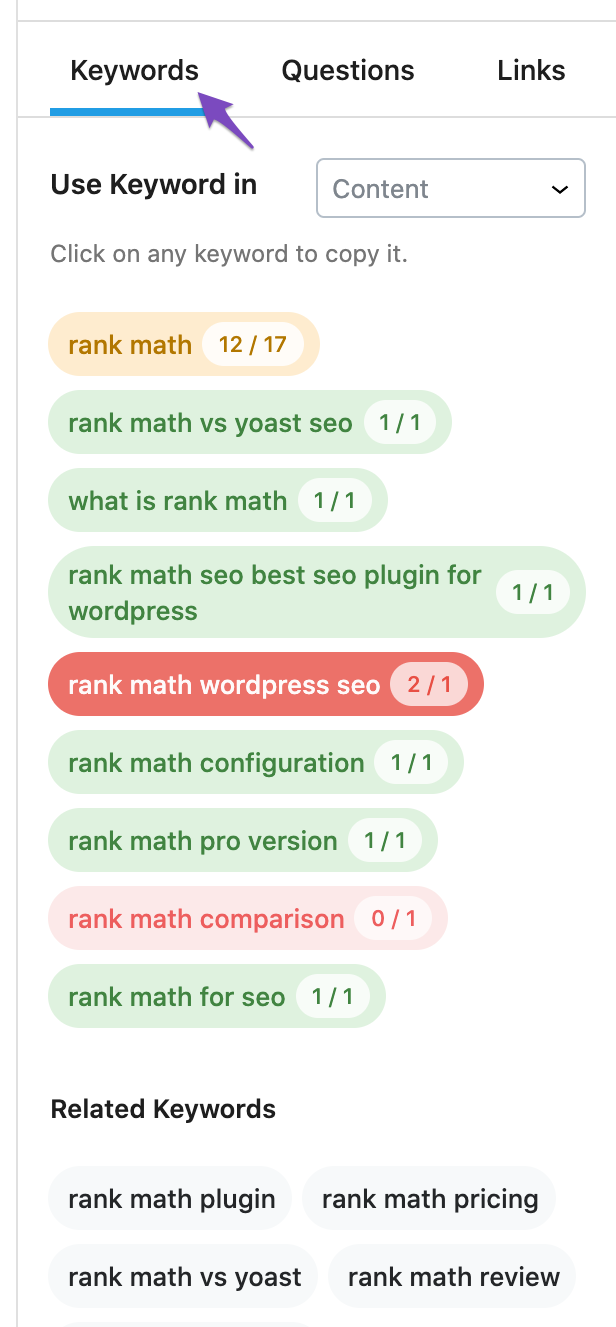
You can simply click the keyword to copy and use them in your content, but do not overdo it. The goal here is to use these keywords data in a smart way by naturally adding them to your content. Stuffing keywords will not help you but instead cause adverse effects in rankings and with your reader’s experience.
4.2 Questions Suggestions
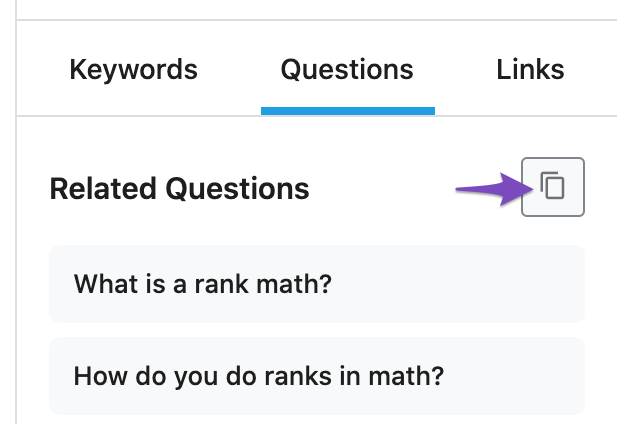
The next tab you’ll find is Questions. If you’re falling short of the headings to cover, the questions tab is here to help you with. Our Content AI has analyzed relevant questions for the focus keyword and suggests them here.
You can cover these questions as dedicated headings inside your content or use our FAQ Block if you’re using the WordPress Block Editor. Simply, click the Copy button that you can find at the top of the Questions tab and now you can paste them inside your content.
4.3 Link Suggestions
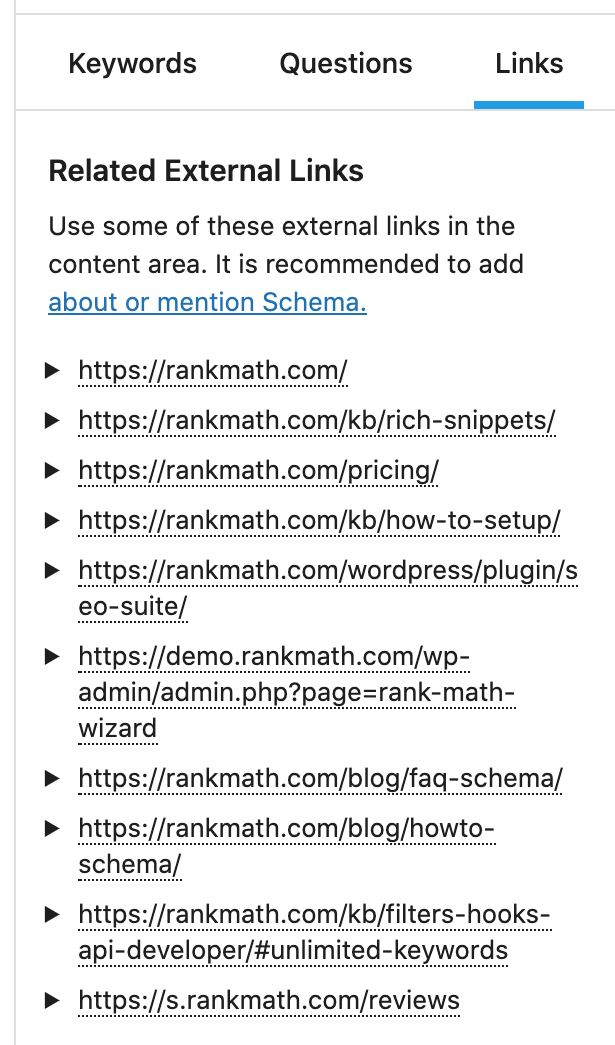
The last tab here suggests external links that you could add inside your content. Rank Math PRO users can make it even easier for search engines by clearly structuring them with About or Mention Schema.
5 Content Analysis
The next section in the meta box is the content analysis section. You might be wondering that we have already run through Content AI for a series of optimizations and we’ve another section to analyze our content.
It’s worth noting that AI is helping 34% of users generate more creative content ideas, and 44% spend less time on planning.
While Content AI includes suggestions on putting together the best possible content around the focus keyword, our Content Analysis tests run through standard SEO checks to identify any issues.
As you type in your content and set a couple of focus keywords, Rank Math gets to work and analyzes your content in the background. The analysis is quite extensive and results in many recommendations. To make the recommendations easy to understand and follow, they have been divided into four distinct sections.
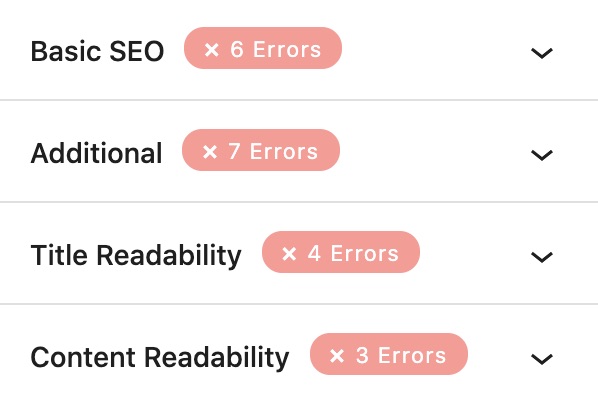
Before we jump in and discuss each section, we should tell you that we’ll be giving just a brief overview of the recommendations in this section, and not take a deep dive. That’s because this is more of an introduction post for the Meta Box, rather than a tutorial on optimizing your content. The good news is that we have a separate, complete guide on the very topic of using the Meta Box and optimizing your post. It’s linked right here. We suggest that you check that out as well. Let us now get into each section individually.
5.1 Basic SEO
As the name suggests, the Basic SEO section performs basic SEO tests on your content and gives you recommendations to optimize your content. If you have any sort of SEO experience, you might not need to reference this section at all. In that case, you can use this as a checklist to make sure you don’t miss anything. Rank Math is used by users of all skill level, so we have to include recommendations for everyone. Also, if you don’t get the basics right with SEO, higher-level optimizations are not going to move the needle a whole lot. Here are all the recommendations that you will see in the Basic SEO section.
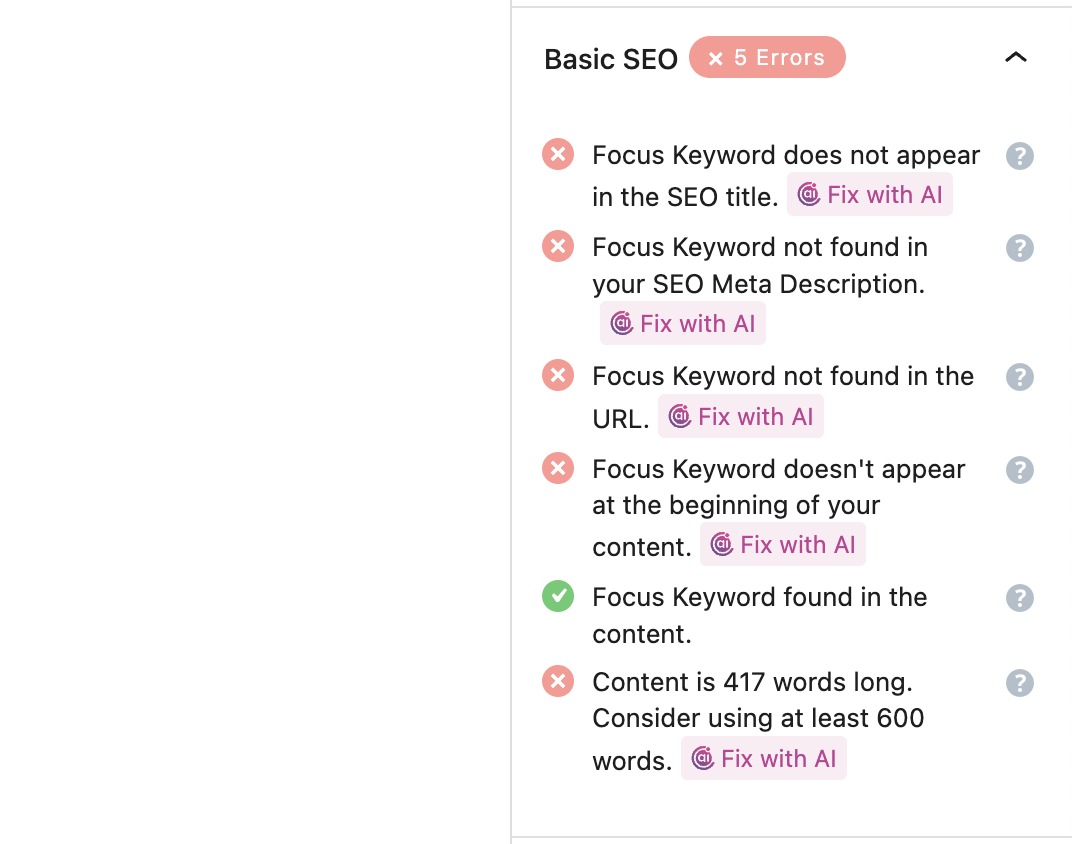
In simple terms, Rank Math checks for the following.
- Presence of the focus keyword in the title
- Presence of the focus keyword in the description
- Presence of the focus keyword in the URL
- Presence of the focus keyword at the beginning of your content
- Presence of the focus keyword elsewhere in the content
- Total content length
5.2 Additional SEO
The Additional SEO tips are similar to the toppings on a pizza. You can have a great pizza without the toppings, but toppings just take the taste to another level.
Similarly, the Additional SEO tips give your content the edge it needs to beat other websites in the SERPs with the power of on-page SEO. Here are all the tests that Rank Math performs in the Additional SEO tests.
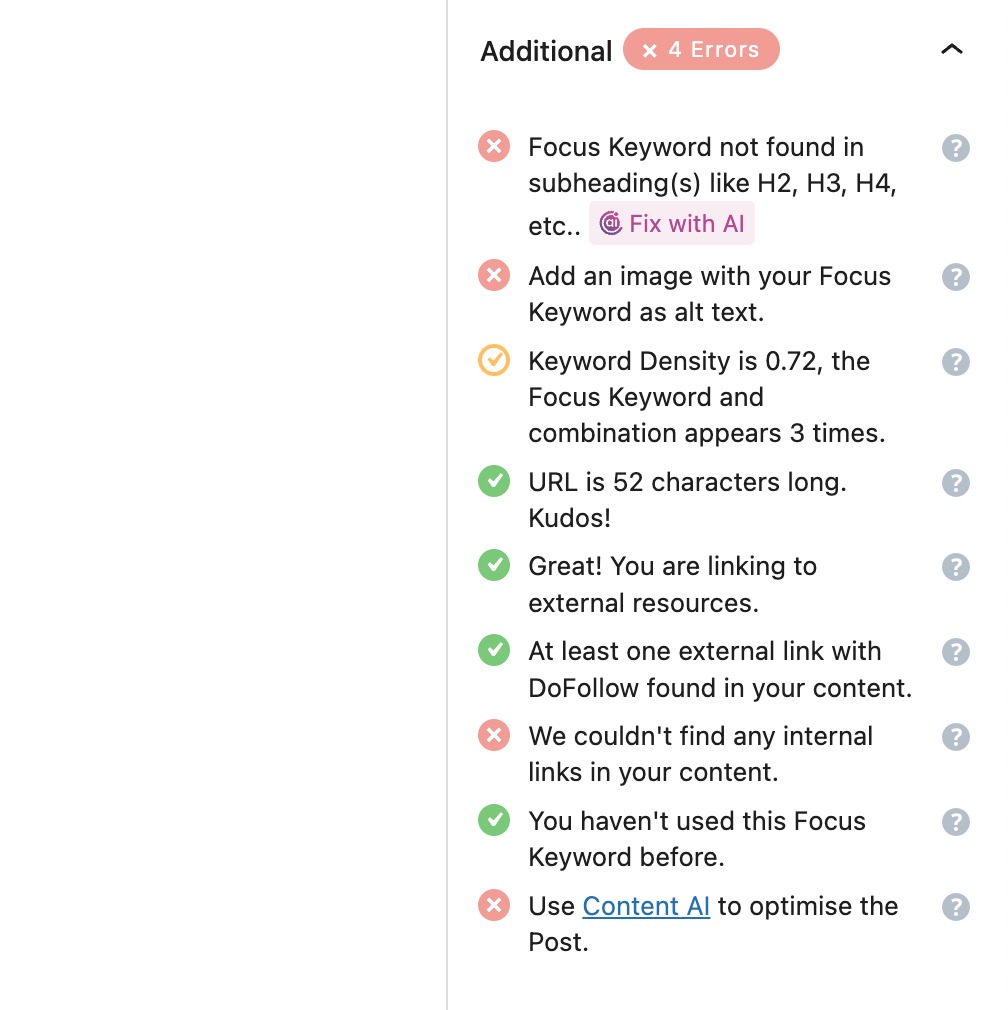
In simple terms, Rank Math is checking for:
- Presence of Focus keyword in internal headings
- Presence of Focus keyword in image alt text
- Focus keyword density
- URL length
- Links to external resources
- Links to external resources with a no no-follow (a regular link) tag
- Presence of internal links
- If you’ve used this focus keyword before
Some of these tests are used directly for SEO benefit, while some of them are aimed at the user experience and provide indirect SEO benefits.
5.3 Title Readability
Many people don’t realize it, but the title of your article is as important as the article, sometimes even more important. That is because a majority of your audience will read the title, but they might or might not read the article. In the advertising industry, it is common to say that you’ve 50 cents of your dollar when you’ve written your headline. That means they spend as many resources creating the headline as they spend on the actual ad. Surprising, isn’t it? Even popular web publications meticulously test 10 or more headlines for each article they put out. Headlines are just so important.
That is why we’ve dedicated an entire section in the SEO tests that tests your headline for maximum impact. Rank Math analyzes your titles and gives you suggestions to make your title more click-worthy. Here are all the tests that you’ll see.
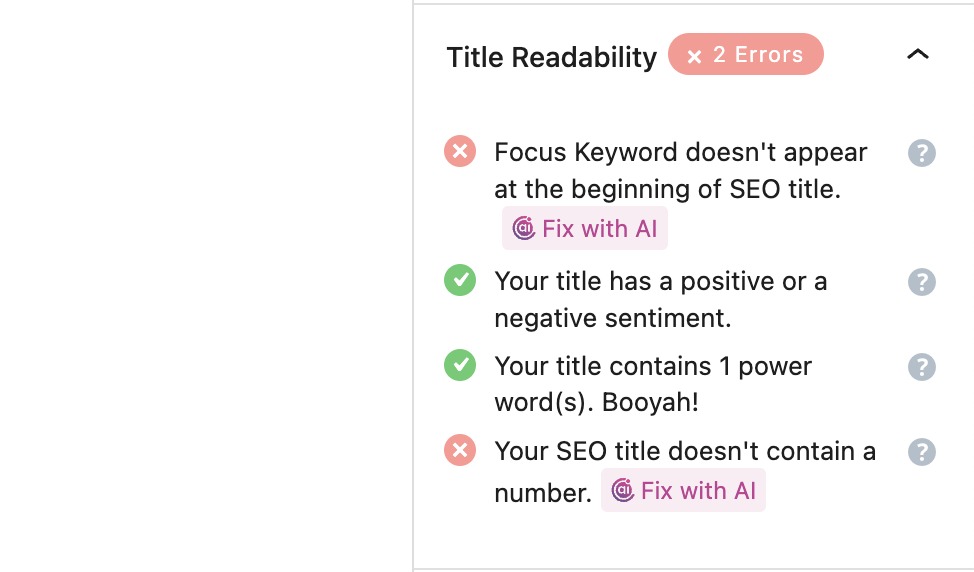
Of course no tests can replace the human touch, but these tests will serve as a baseline, after which you can test your headlines further to improve your results.
5.4 Content Readability
After you’ve attracted a visitor with your title, the next step is to engage them with your content. Keeping visitors on your page is as important as getting them there, as Google sees the time spent on-site as a quality signal. If a user visits your website, reads the content, and then reads a few more articles, that’s a sign that your website is high quality, and Google will reward you for that. Contrary to that, if a visitor comes to your website and jumps back to the SERPs immediately, that’s a sign that your content is not valuable and Google will punish you for that. Note that Google has said many times that they don’t use these metrics to rank websites, but many SEO veterans have experienced otherwise.
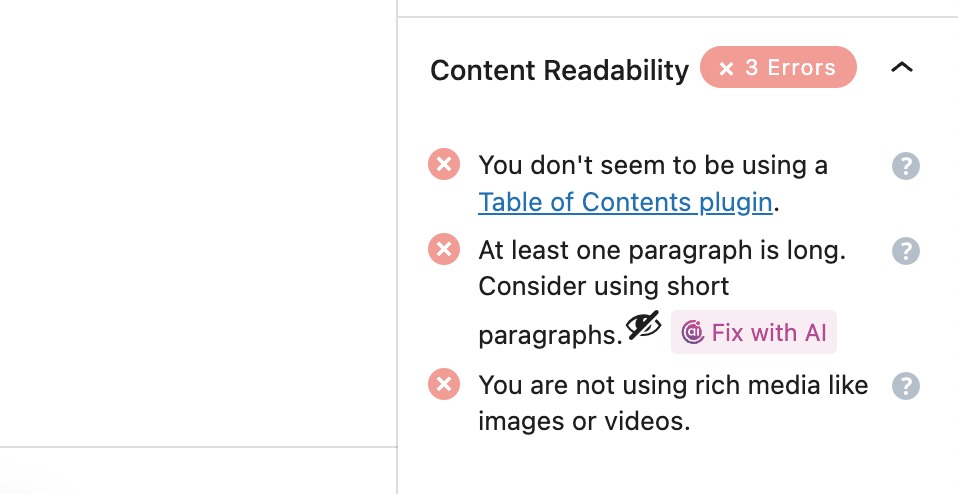
Rank Math analyzes your content and gives you specific suggestions for your content length, readability, and more. Here is a preview of all the recommendations.
6 Final Words
We hope that we were able to explain all the options in the General Tab of Rank Math’s Meta Box. There are plenty of options, and we would recommend that you take your time to understand them fully before you decide to use them.
After you’ve mastered the options, the next step is to implement the knowledge you’ve gained to write a fully optimized post on your website. To help you with that, we’ve created a dedicated resource that will take you through each of the content recommendations, and teach you how to optimize your post a 100%, step by step. It is aptly called how to score 100/100 in Rank Math, and we highly recommend that you check it before you write any post.
As always, if you run into problems, then we are here to help. For any issues, small or big, feel free to get in touch with the support staff over at Rank Math’s Forum or ask your questions in the Facebook Group.