When you run a website of any considerable size, updating and writing meta descriptions directly in WordPress can be time-consuming, to say the least. So, let’s take a look at how easy Rank Math makes it to efficiently bulk edit all of your page, post, and custom post type SEO meta…
Table of Contents
1 Bulk Editing in Your WordPress Admin Area
To bulk edit posts right inside your WordPress admin area, you can follow the exact steps discussed below.
1.1 Enable Bulk Editing
At first, navigate to Rank Math SEO → Titles & Meta → Posts inside your WordPress dashboard. Scroll down the page to find the Bulk Editing option and enable the option as shown below (if not enabled already).

1.2 Navigate to the Posts Section
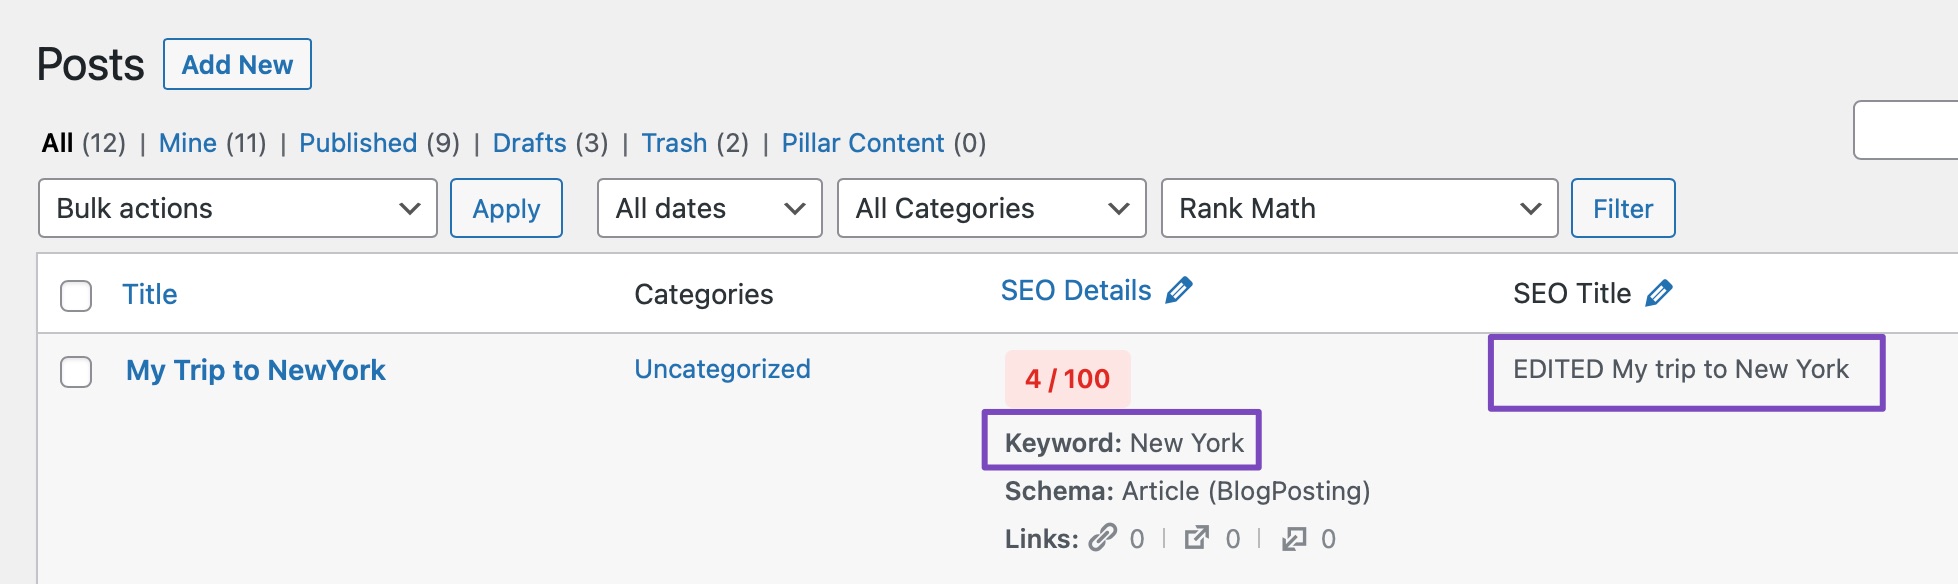
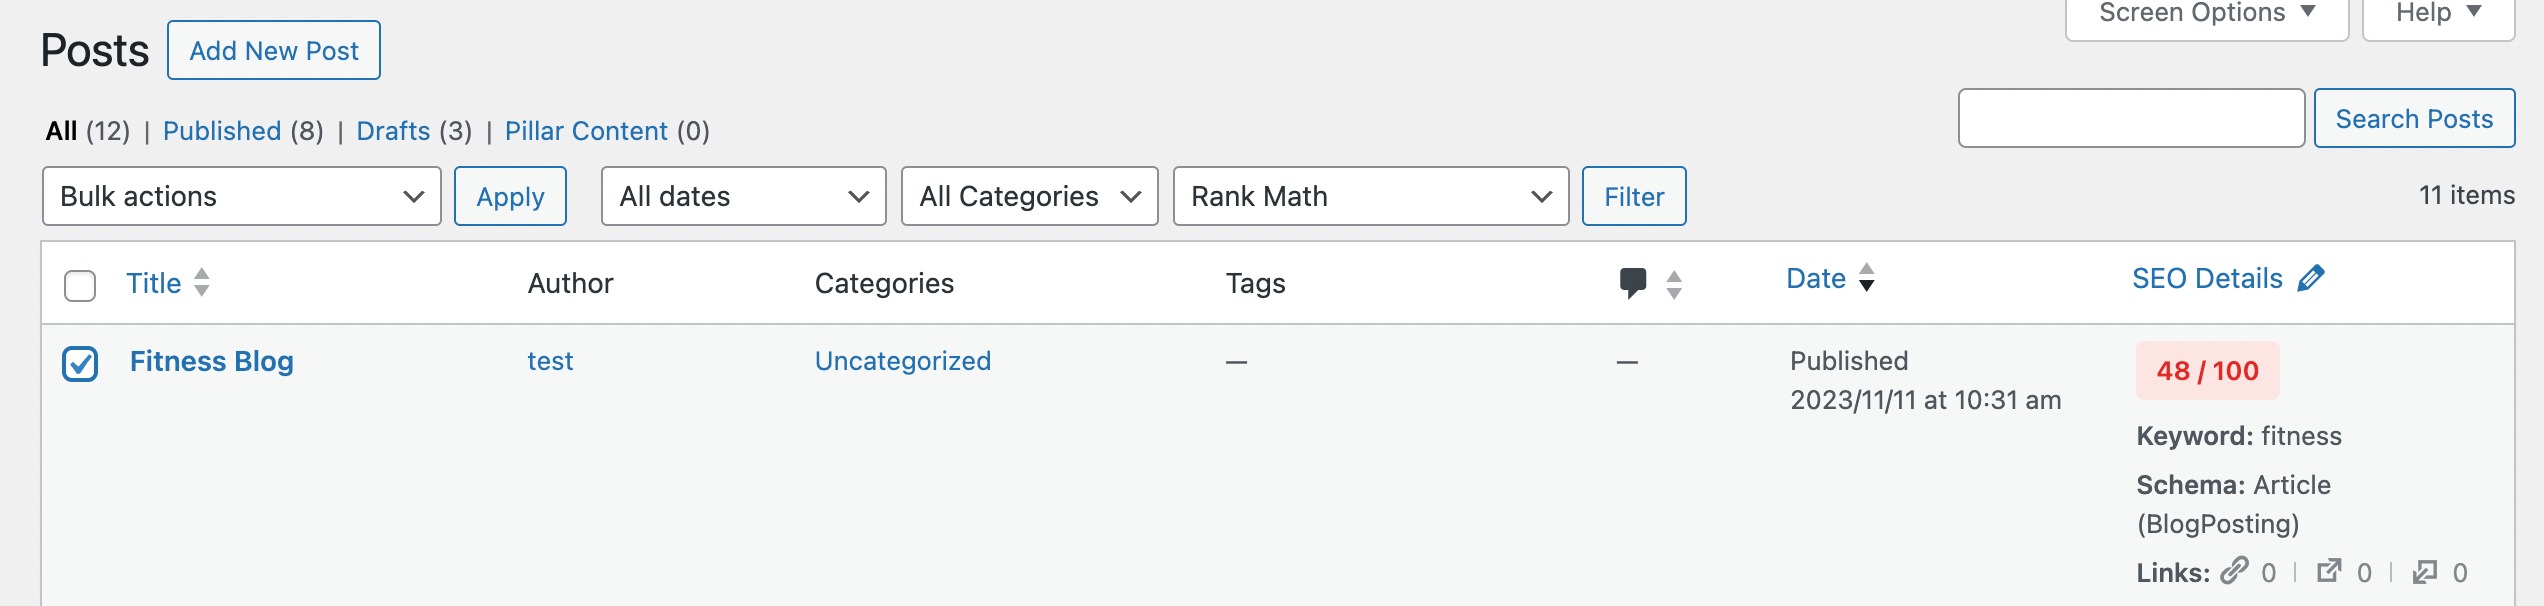
Now navigate to WordPress Dashboard → Posts.
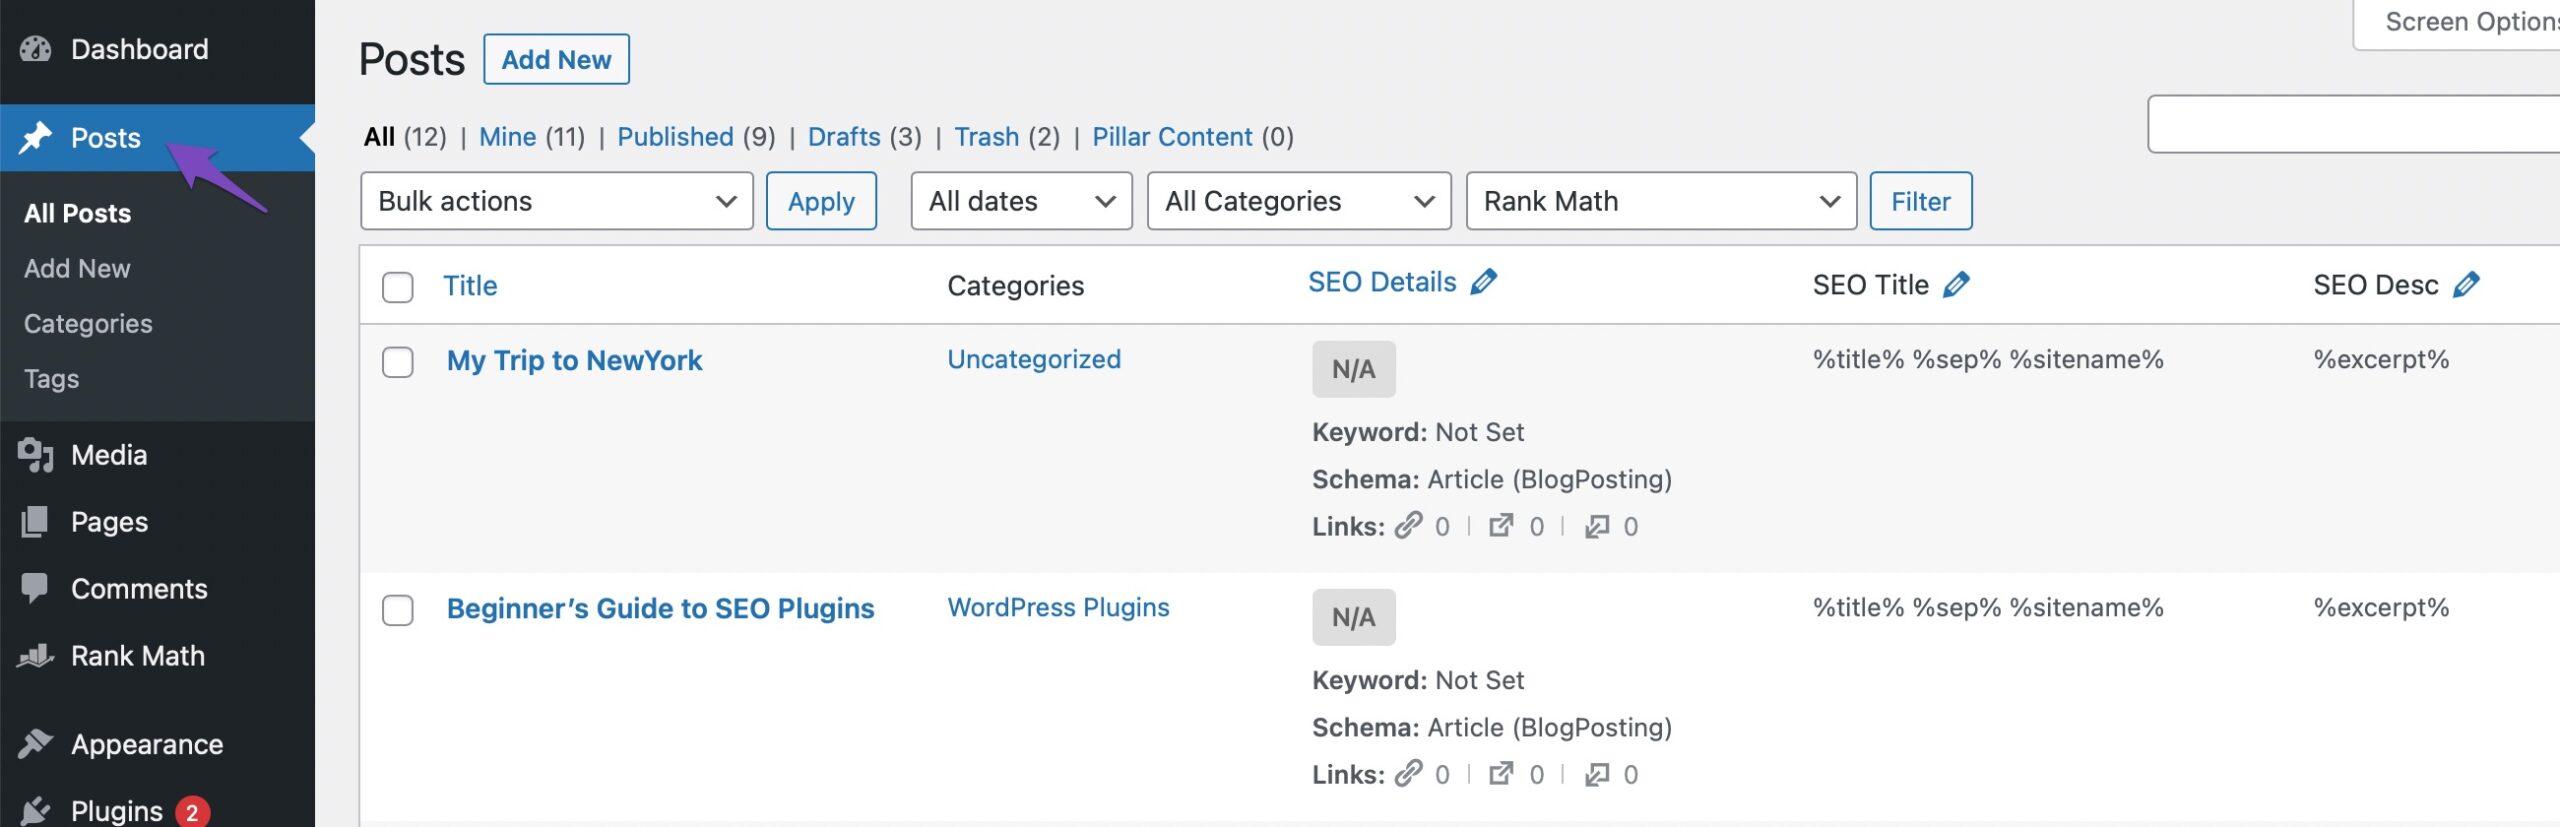
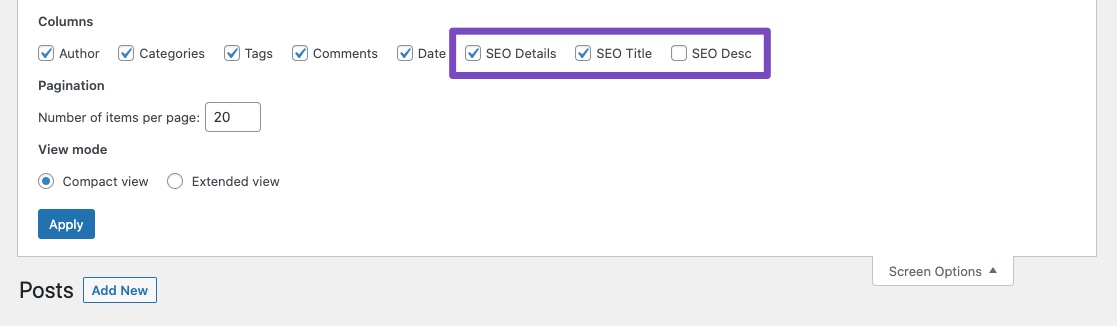
In the Posts screen, check if the SEO columns (SEO Details, SEO Title, and SEO Desc) are visible. In case, if these columns are not displayed, then click the Screen Options at the top of the page. Here you would be able to select the Columns to display.
- SEO Details – lets you edit the focus keyword of the post
- SEO Title – lets you edit the SEO title of the post
- SEO Desc – lets you edit the SEO description of the post
Select the columns that you need to edit and then click Apply button for the changes to reflect.
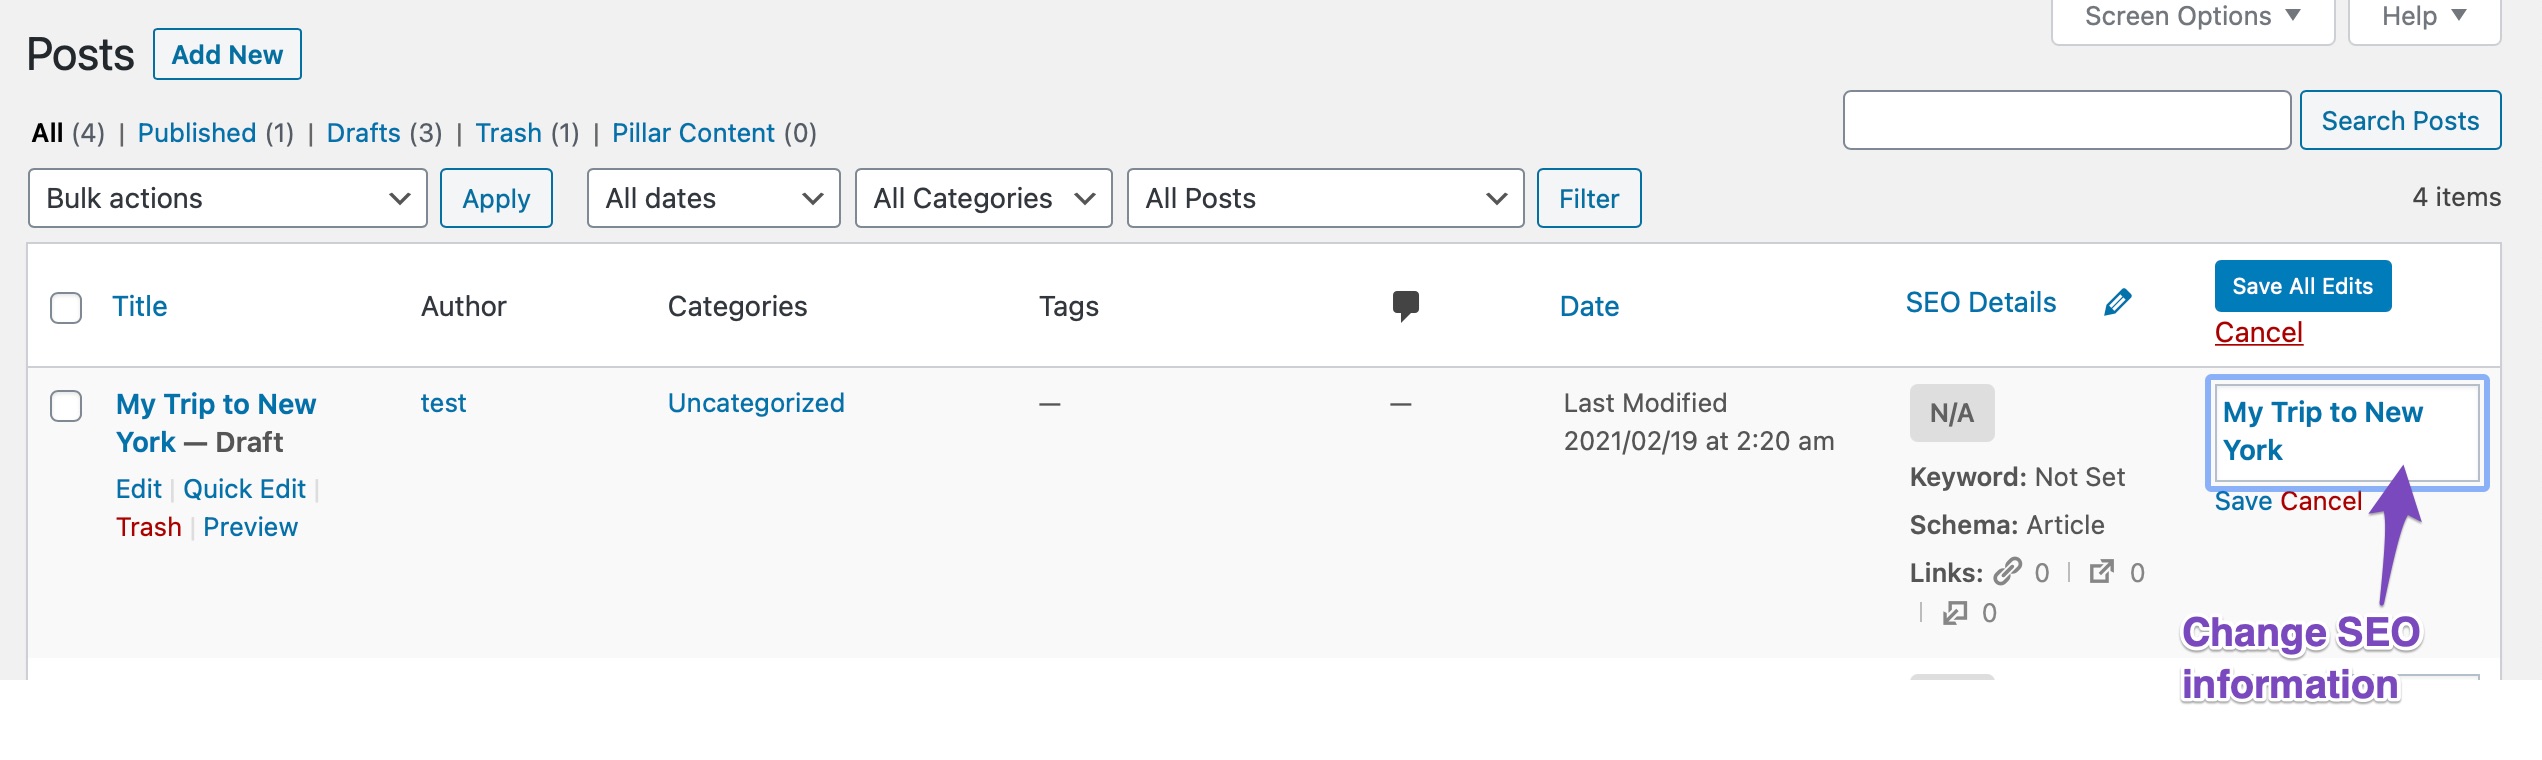
1.3 Edit SEO Metadata
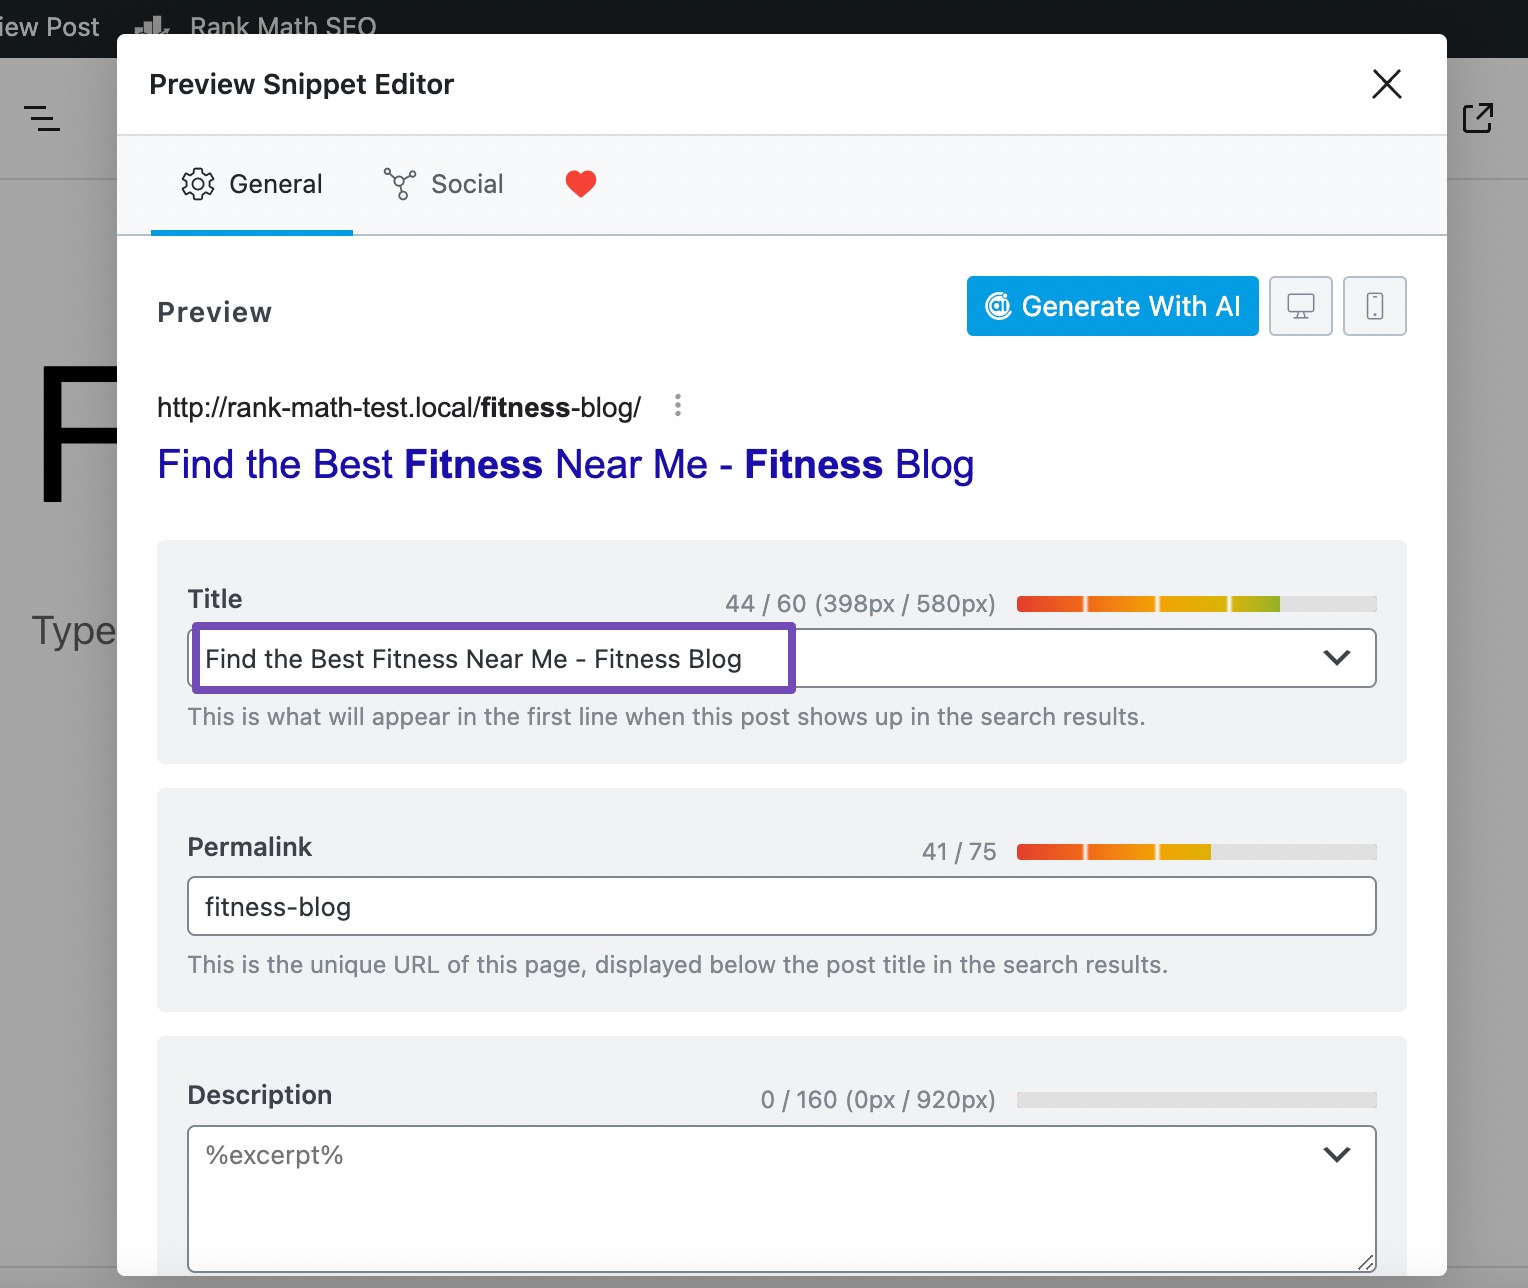
To change the SEO metadata for your posts, click the pencil icon at the top of the column to edit the column data. Now you’ll be able to edit the data for the posts as shown below.
Once you have made the changes, click on Save All Edits.
2 Bulk Editing Options in Google Sheets (or Excel) PRO
In case, if you want to scale up the process of editing SEO metadata using Excel or Google Sheets, you can follow the exact steps discussed below.
2.1 Export Metadata to a CSV File
Navigate to Rank Math SEO → Status & Tools → Import & Export inside your WordPress admin area. Under the CSV File section, navigate to the Export CSV tab.
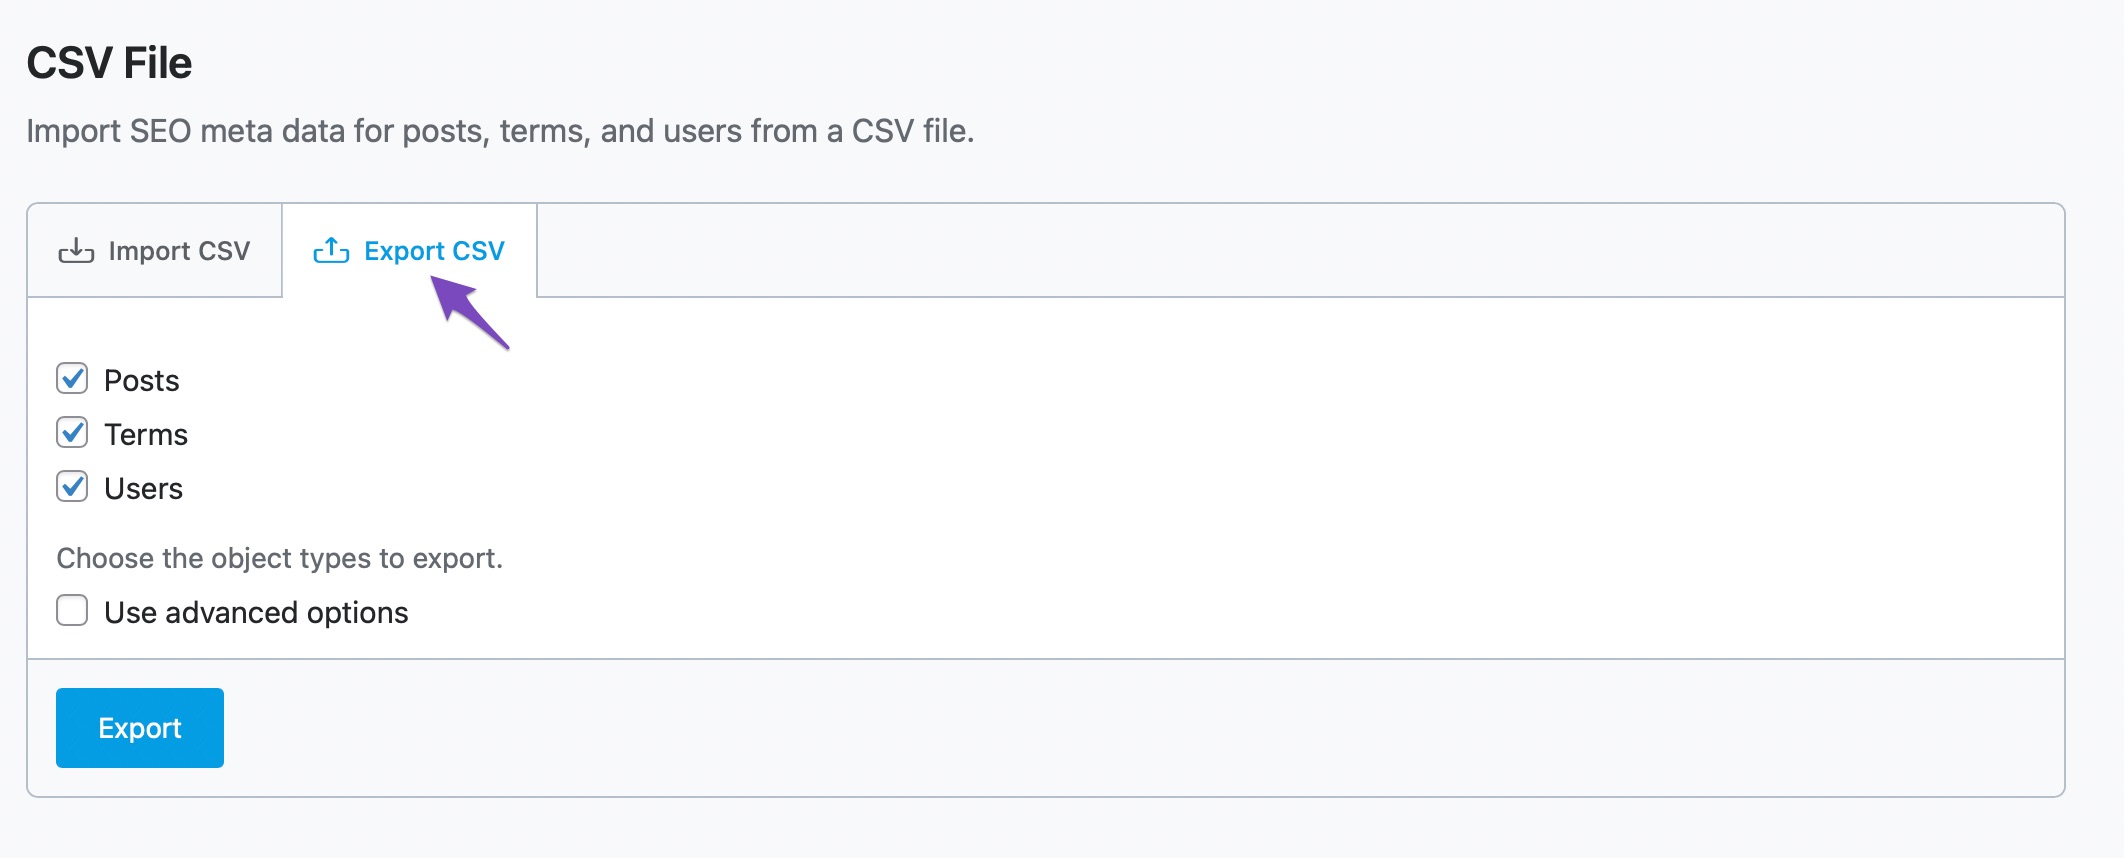
Here you can find the SEO metadata for posts, terms, and users. To edit the SEO Title, Description, and other metadata related to posts, you only need the Posts metadata (marked by 2). Hence you can unselect the Terms and Users (marked by 3 and 4).
When you select the Use advanced options (marked by 1), the Posts metadata option will be expanded, and now you will be able to select the specific post types to be exported, as shown below.
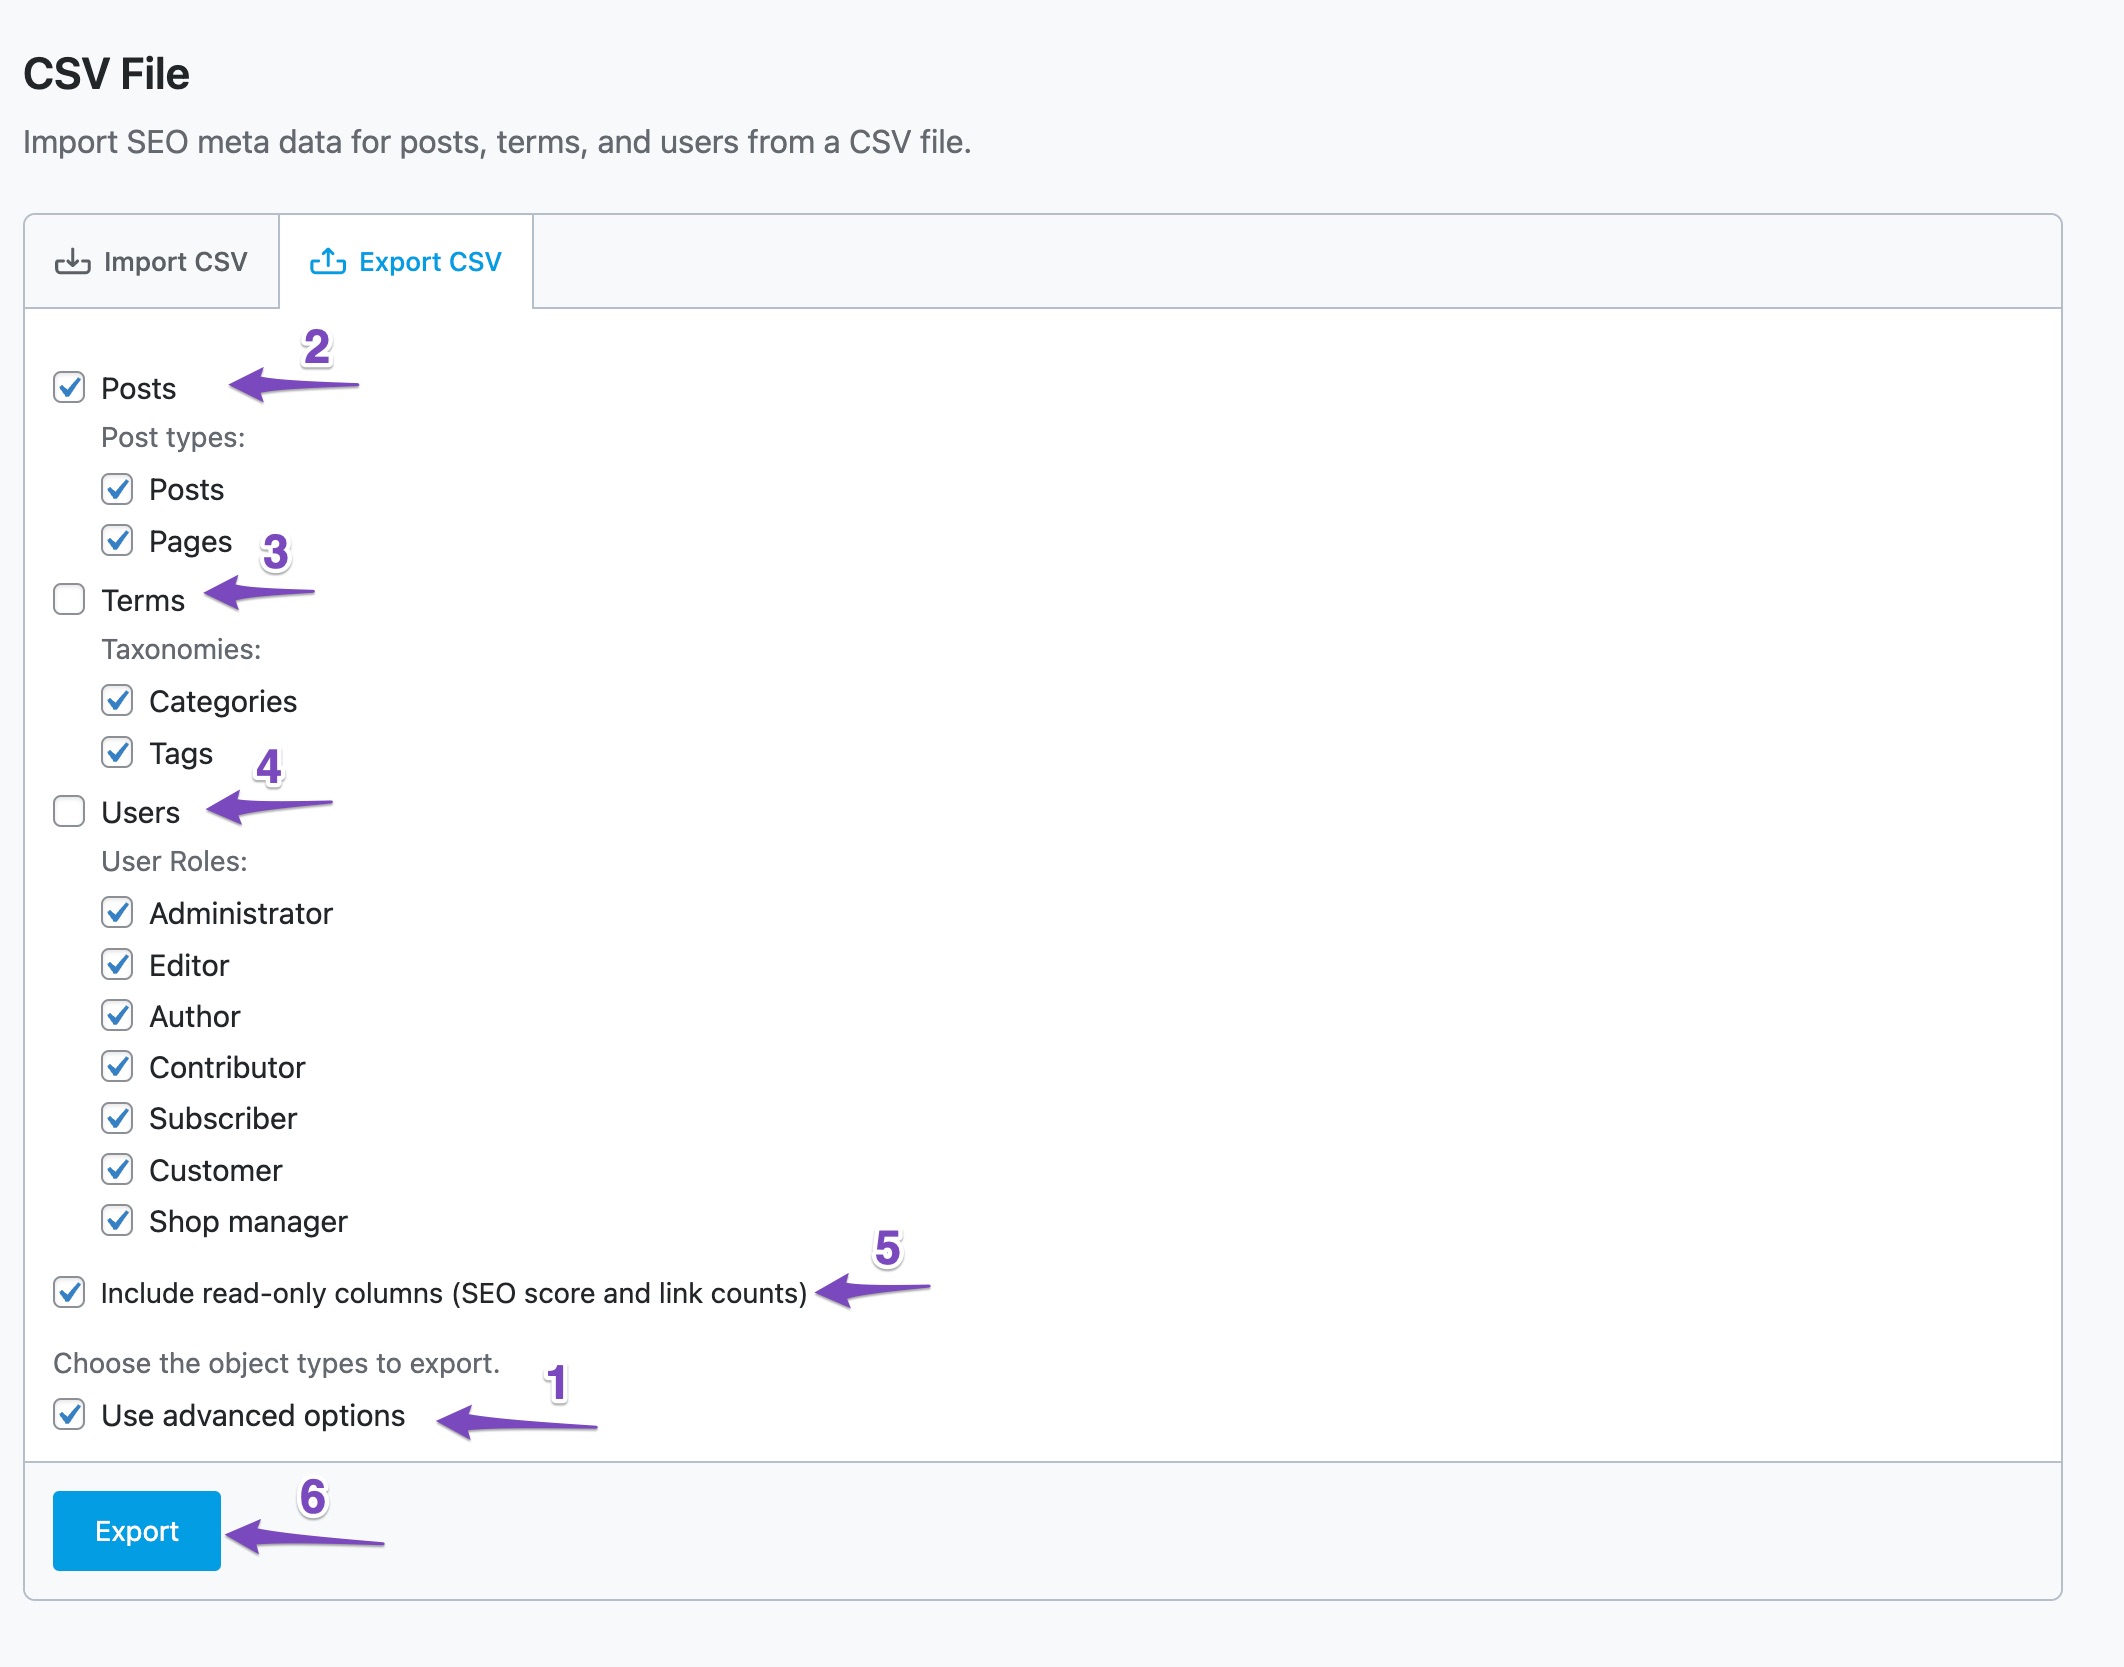
Note: You can notice one more checkbox under this section (marked by 5) — Include read-only columns (SEO score and link counts). When this option is selected, Rank Math will include the SEO score and link counts in the CSV file. These are read-only data, meaning, you cannot edit them using CSV, but to use them only as guidance.
Once you’ve selected the metadata to export, click the Export button (marked by 6) to download the CSV file to your computer.
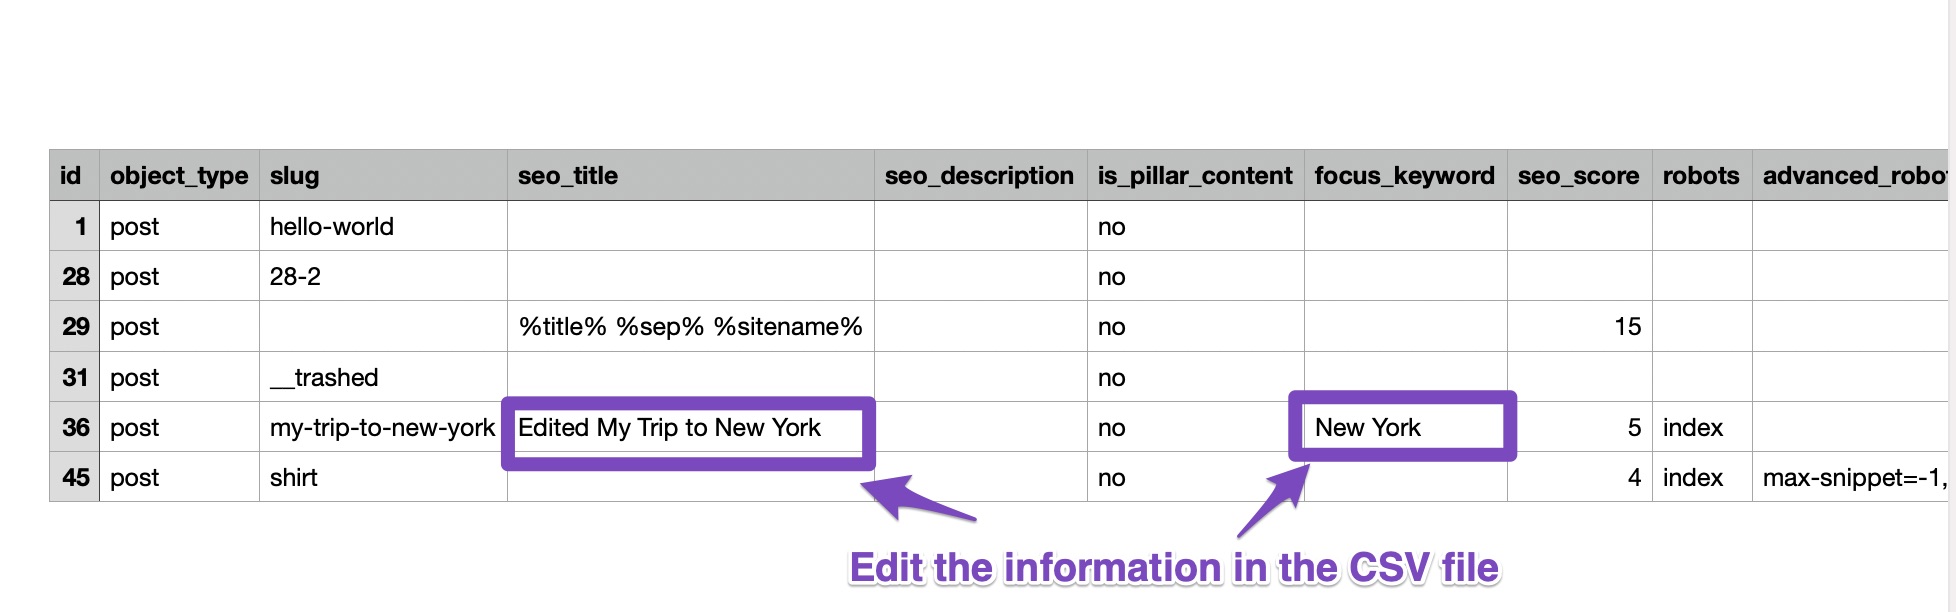
2.2 Edit Metadata in the CSV File
Now open the CSV file in any spreadsheet editor of your choice. We recommend using Google Sheets for this to make the process a bit easier and have a central file that multiple people can contribute to.
You can find a number of columns available to edit the metadata related to your posts (we would discuss these columns in detail shortly). Once you’ve made the necessary changes, export/save the spreadsheet as a CSV file.
2.3 Import the CSV File
Now that you have modified the post metadata in the CSV file, you’ll need to import it back to your website for the posts to be updated.
Note: We recommend you to save a database backup with the Export CSV option (exactly the same way as we’ve shown earlier to download the CSV file), just before you upload the edited CSV back. So, in case, if the import has malformed or resulted in a loss of data, you can always restore your data with this backup.
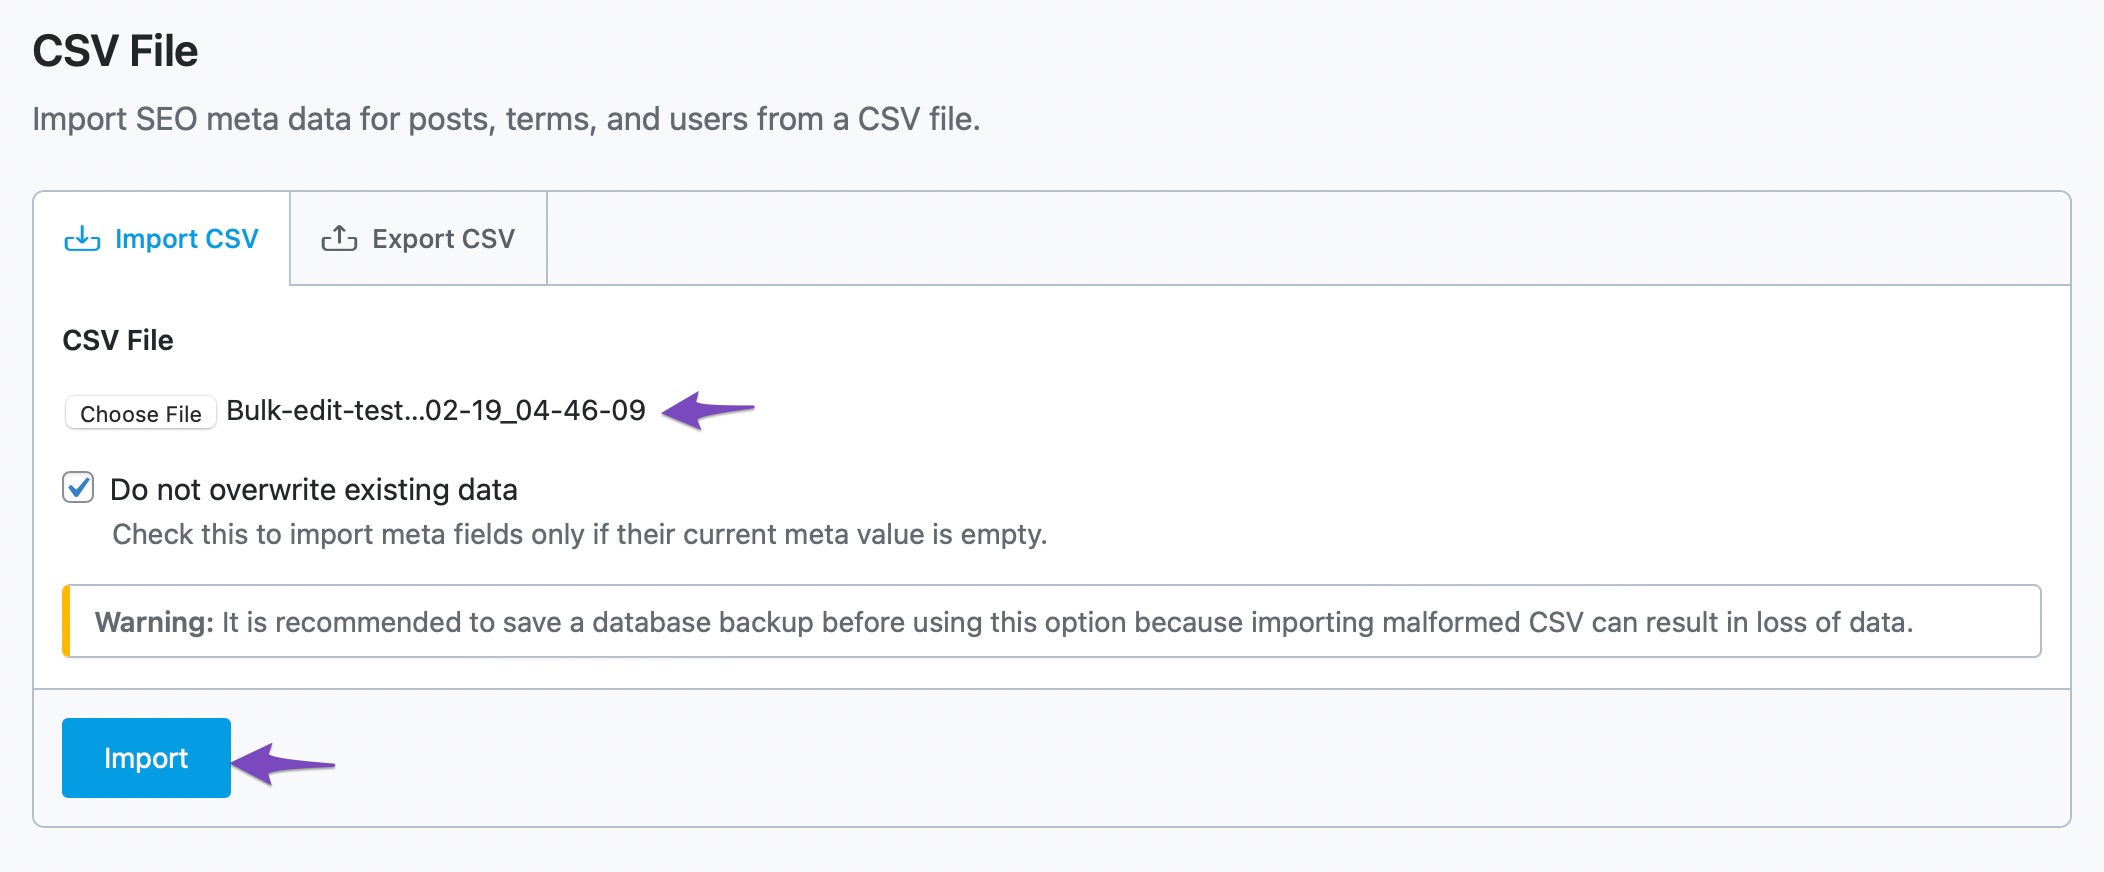
To import the CSV file, navigate to the Import CSV tab under Rank Math SEO → Status & Tools → Import & Export. Click the Choose File button and select the edited CSV file.
In case, if you’re adding only adding new data to your posts with this CSV file, select Do not overwrite existing data checkbox. Now Rank Math will import meta fields only if the current meta value is empty. This way, you can ensure that the meta fields with existing values will not be affected.
Finally, choose the Import option.
2.4 Check the SEO Metadata
Once you have imported the CSV file, make sure that all the changes you have made are reflected in your posts. You can check them in your posts screen as shown below:
3 Editing Metadata in CSV File
Now that we’ve covered how to export/import data to a CSV file, let us discuss all the columns (metadata) that are available in the CSV file.
3.1 Slug
slug – This column includes the slug (permalink) of your posts and is available to edit. Once the CSV file with the edited slug is uploaded, the post slug will be changed, and WordPress will automatically create a redirection. So in case, if your visitors land on the old URL before the slug was changed, they will be redirected to the new URL.
Precaution: If WordPress fails to create redirects while changing slugs for some reason, you can configure Rank Math to do that. To set up automatic post redirection, navigate to Rank Math SEO → General Settings → Redirections and enable the Auto Post Redirect option.
3.2 SEO Title
seo_title – This column includes the SEO Title set for the posts. You can also make use of Rank Math supported variables to reference the SEO title.
If you leave a cell blank, then the SEO Title for the post will be set to the default SEO Title template. The default title template for the posts can be set under Rank Math SEO → Titles & Meta → Posts → Single Post Title.
3.3 SEO Description
seo_description – This column includes the SEO Description (meta description) you’ve set for your posts and supports the usage of variables as well.
If you leave a cell blank, then the meta description for the post will be set as per the default description template. The default description for the post can be set under Rank Math SEO → Titles & Meta → Posts → Single Post Description.
3.4 Is Pillar Content
is_pillar_content – This column lets you set whether the post is pillar content. You can set it to either one of the below options:
- yes – sets the post as a pillar content
- no – sets the post is not a pillar content
If you leave the cell blank, then the post will be set to the default value, meaning, the post will not be set as pillar content.
3.5 Focus Keyword
focus_keyword – This column includes the focus keyword(s) set for the posts. If you do not wish to set a focus keyword for the post, then leave the field blank. If you are adding multiple focus keywords to a post, then be sure to separate them with a comma. For example,
SEO, search engines, Search Engine Optimization
3.6 SEO Score
seo_score – This column displays the SEO Score. For example, the SEO score can be 49/100. This column is read-only, hence trying to make changes to fields in this column will not reflect on the post.
3.7 Robots
robots – This column includes the robots meta set for the posts. A blank cell indicates that the robots meta is set as per the default robots meta. You can configure the default robots meta under Rank Math SEO → Titles & Meta → Post Robots Meta.
In case, if you wish to set a custom robots meta for a post using CSV, then the acceptable values are:
- index – the meta directive to let the search engine know the post can be indexed
- noindex – the meta directive to let the search engine know the post shall not be indexed
- nofollow – the meta directive instructs search engine not to follow the links in this post
- noarchive – the meta directive instructs search engine not to cache the post
- noimageindex – the meta directive to prevent search engines from indexing the images in this post
- nosnippet – the meta directive is used to restrict search engines from displaying snippet for this post
If you’re adding multiple robots meta to a cell in this column, then make sure to separate them with a comma. For example,
index,nofollow,noarchive
Caution: Add either index or noindex, but not both. In case, if you accidentally include both index and noindex in a cell, then Rank Math will set the same for the post, eventually, your post will not be indexed in search results.
3.8 Advanced Robots
advanced_robots – You can add the advanced robots meta for your posts in this column. The available advanced robots meta directives are:
- max-snippet – the meta directive lets you set the maximum number of characters to be shown in the snippet of your page in search result. “-1” means unlimited.
- max-video-preview – the meta directive lets you set the maximum number of seconds for the video snippet in search results. “-1” means unlimited.
- max-image-preview – the meta directive lets you set the maximum size for the image preview in search results. The accepted values are large, standard and none.
You can add values to the advanced robots settings for max-snippet, max-video-preview, max-image-preview as shown below:
max-snippet=-1, max-video-preview=-1, max-image-preview=large
3.9 Canonical URL
canonical_url – This column includes the canonical URL for the posts. If a post has a canonical URL pointing to another URL, you can add it to the corresponding cell in the column, else leave the cell blank.
3.10 Primary Term
primary_term – This column holds the primary term for your posts. A primary term is helpful when a post is already associated with more than one taxonomy term. To set a primary term, enter the slug of the term you want to set as the primary term.
The primary term you’ve chosen should be associated with the Primary taxonomy you’ve set under Rank Math SEO → Titles & Meta → Posts. Else the primary term will not be set.
For example, if your Primary Taxonomy is set to categories, but you’ve added the slug of a Tag, then Rank Math would not set the primary term you’ve chosen.
3.11 Schema Data
schema_data – This column contains the JSON-LD Schema data associated with your post. Here is an example of the Schema data that would be present under this column in the minified format:
{
    "BlogPosting": {
        "metadata": {
            "title": "Article",
            "type": "template",
            "shortcode": "s-6130d16c7959d",
            "isPrimary": "1",
            "enableSpeakable": "disable"
        },
        "image": {
            "@type": "ImageObject",
            "url": "%post_thumbnail%"
        },
        "headline": "%seo_title%",
        "description": "%seo_description%",
        "keywords": "%keywords%",
        "@type": "BlogPosting",
        "author": {
            "@type": "Person",
            "name": "%name%"
        },
        "datePublished": "%date(Y-m-dTH:i:sP)%",
        "dateModified": "%modified(Y-m-dTH:i:sP)%"
    }
}
PRO Tip: If you need to replace Schema properties in bulk, then you can take advantage of the Find & Replace option in spreadsheets instead of opening each post in WordPress editor, finding and changing their individual value.
3.12 Social Facebook Thumbnail
social_facebook_thumbnail – This column includes the thumbnail to be displayed when the post is shared on Facebook.
If you leave the cell blank, then the post would use the featured image as the Facebook sharing thumbnail. If you haven’t set the featured image for the post, then Rank Math would consider the fallback thumbnail, if you’ve set any under Rank Math SEO → Titles & Meta → Global Meta → OpenGraph Thumbnail.
3.13 Social Facebook Title
social_facebook_title – This column includes the title to be displayed when the post is shared on Facebook.
If you leave a cell blank, then the post would use the SEO Title as the Facebook sharing title.
3.14 Social Facebook Description
social_facebook_description – This column includes the description to be displayed when the post is shared on Facebook.
If you leave a cell blank, then the post would use the meta description as the Facebook sharing description.
3.15 Social Twitter Thumbnail
social_twitter_thumbnail – This column includes the thumbnail to be displayed when the post is shared on Twitter.
3.16 Social Twitter Title
social_twitter_title – This column includes the title to be displayed when the post is shared on Twitter.
If you leave a cell blank, then the post would use the SEO Title as the Twitter sharing title.
3.17 Social Twitter Description
social_twitter_description – This column includes the description that will be displayed when the post is shared on Twitter.
If you leave a cell blank, then the post would use the meta description as the Twitter sharing description.
3.18 Redirect To
redirect_to – This column includes the URL where the post should be redirected to. If the content has been moved, then add the destination URL for the redirection in the corresponding cell, else leave the cell empty.
In case, if the redirection is of the type 410 Content Deleted or 451 Content Unavailable for Legal Reasons, then you don’t need to enter the redirection URL.
3.19 Redirect Type
redirect_type – If the post has to be redirected to a different URL or the content is unavailable, then enter the redirection type here (enter only the redirection code). The acceptable values for Redirect Type are:
- 301 – this redirection is used if the content has been permanently moved
- 302 – this redirection is used if the content has been moved temporarily
- 307 – this redirection is also for temporary redirection, but technically a bit different
- 410 – if the content has been deleted, then you can set this redirection
- 451 – if the content is not available for legal reasons, then you can set this redirection
4 Bulk Editing Metadata Using Content AI Content AI
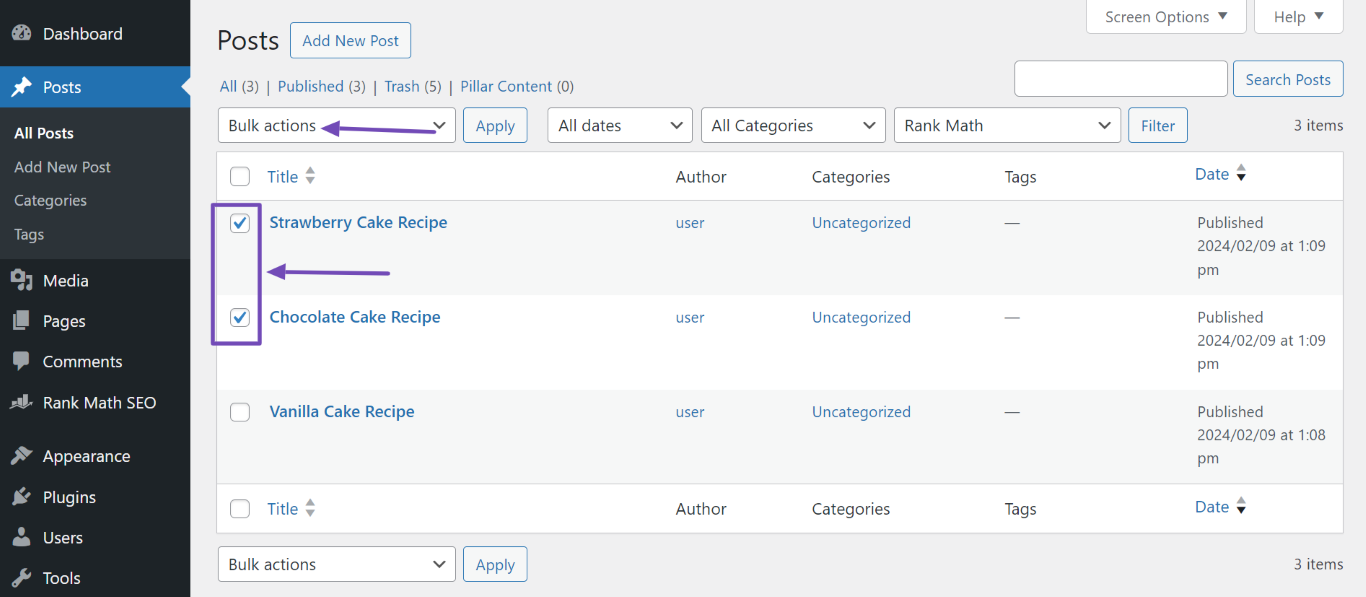
You can utilize the power of Content AI to simplify and speed up the process of generating SEO meta for your posts, pages, categories, and tags. To generate SEO meta for your posts and pages, head to WordPress Dashboard → Posts or Pages, as shown below.
Note: If you exhaust your feature usage limits, you can easily subscribe to a Content AI plan that aligns with your requirements.
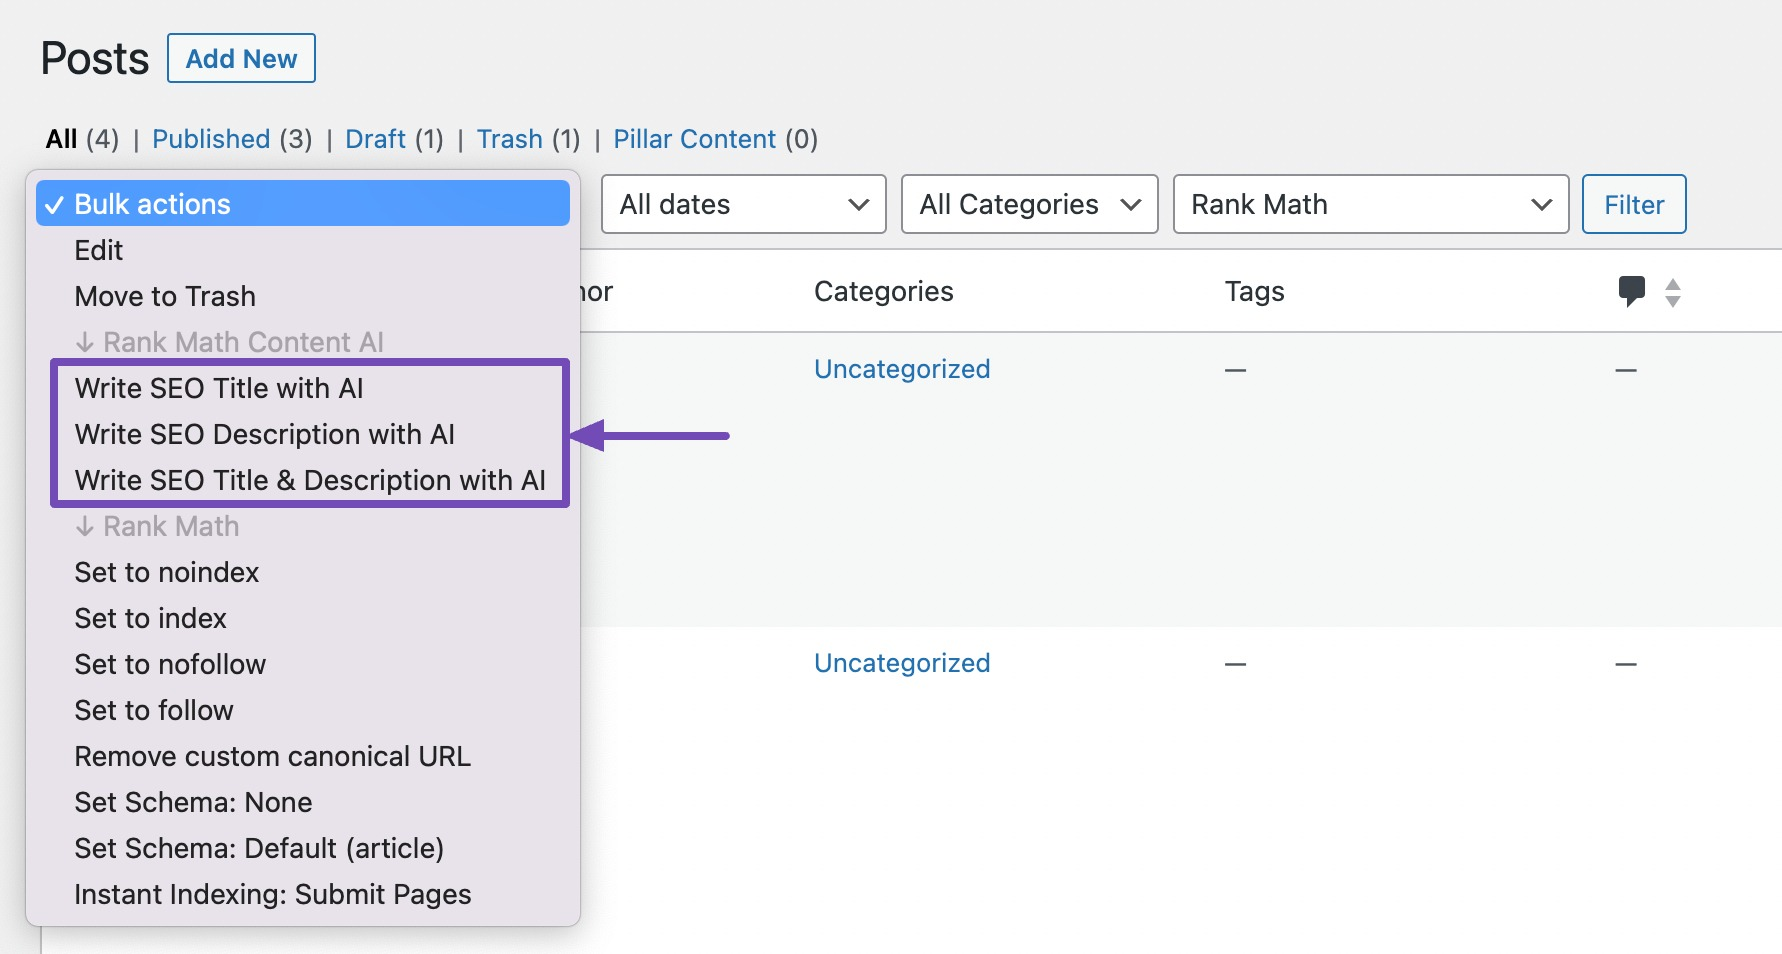
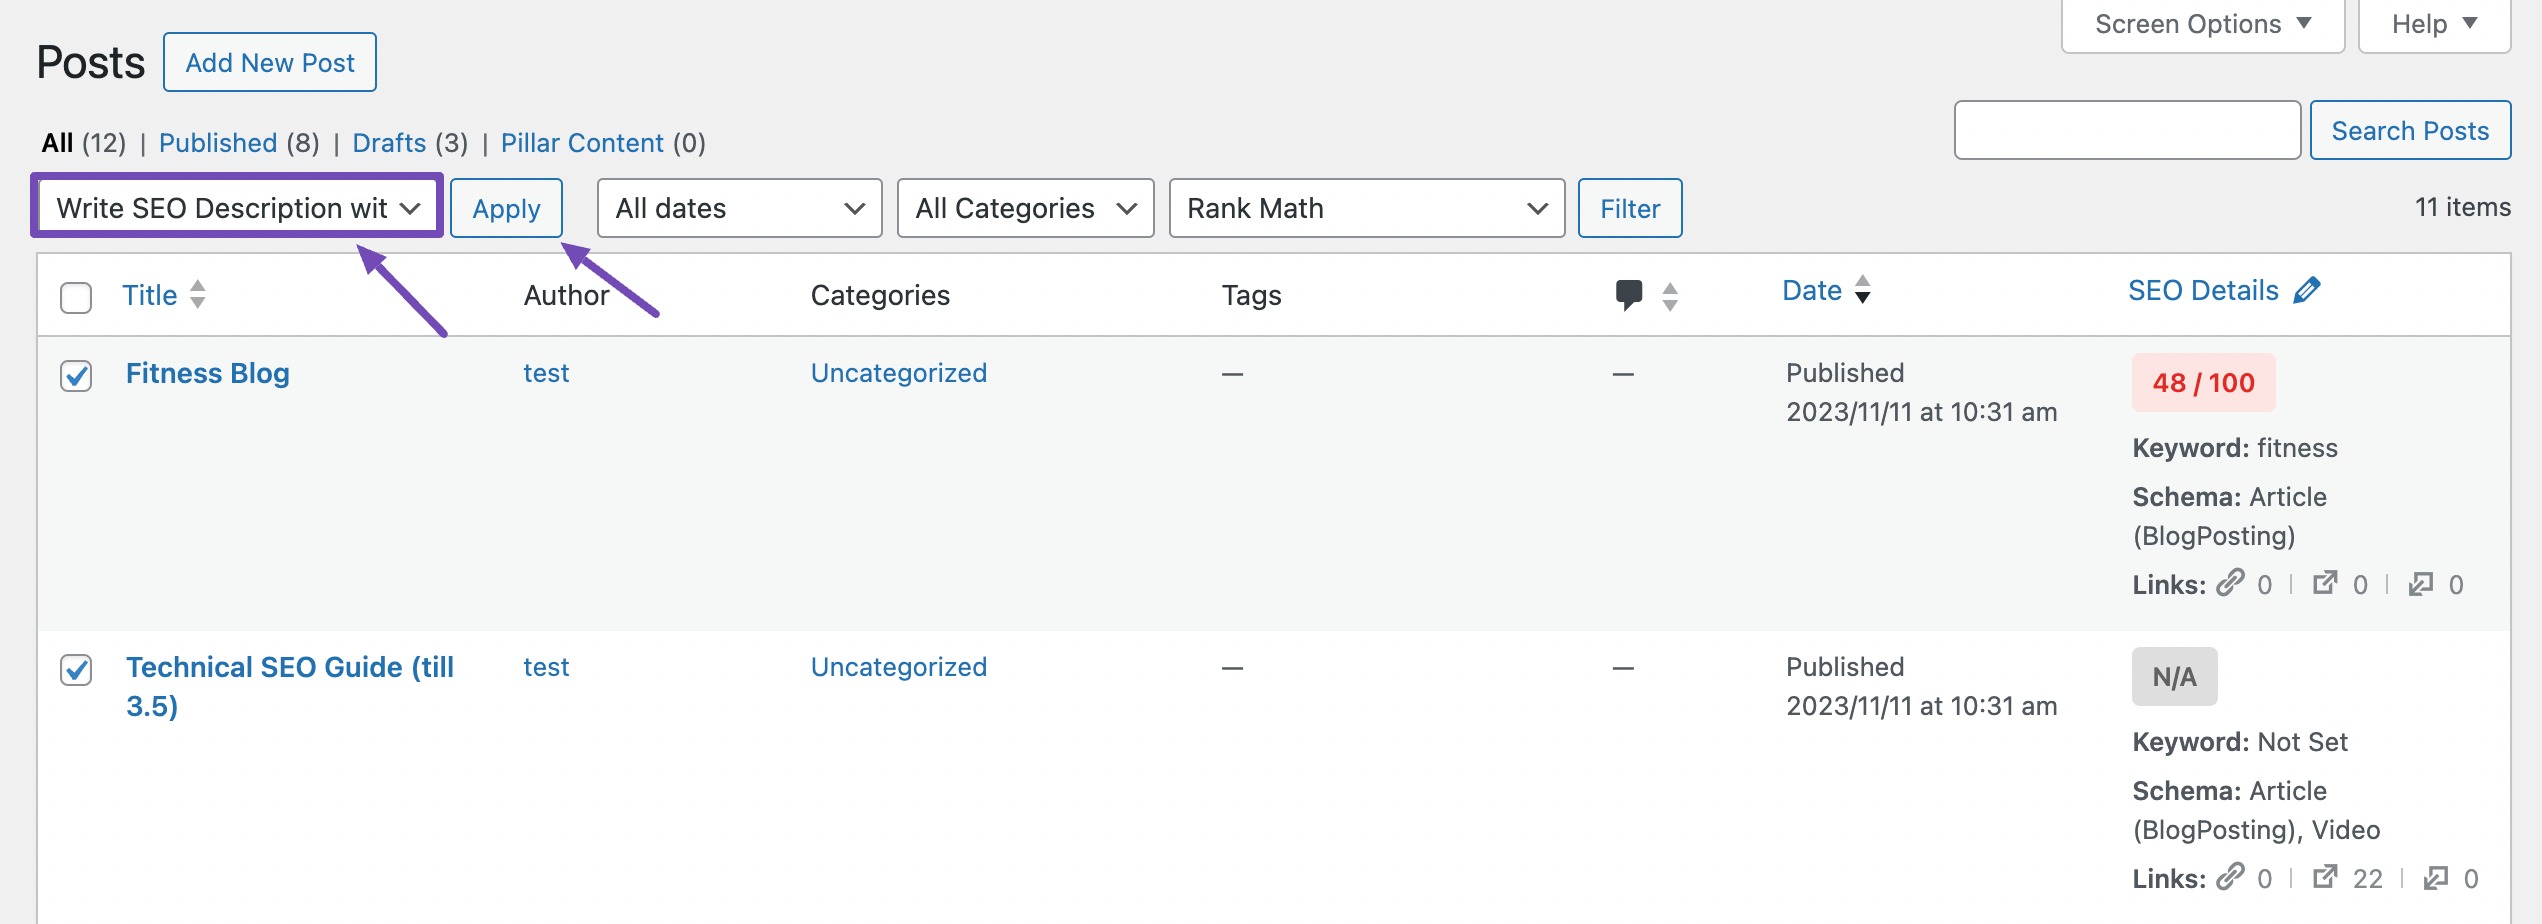
Next, select the posts or pages you’re looking to bulk generate the SEO meta for and click Bulk actions.
In the Bulk actions menu, you’ll notice three options under Rank Math Content AI:
Write SEO Title with AI — Generate SEO titles only
Write SEO Description with AI — Create SEO descriptions only
Write SEO Title & Description with AI — Create both SEO titles and descriptions
We will now go through the available options one by one.
4.1 Write SEO Title with AI
You can use this option to generate SEO titles for your posts. To do so, select the posts you wish to generate the SEO title.
Next, select the Write SEO Title with AI option from the drop-down menu and click Apply.

Content AI will begin generating your SEO meta. In the meantime, it will display a ‘Bulk editing SEO meta started’ message, as shown below.

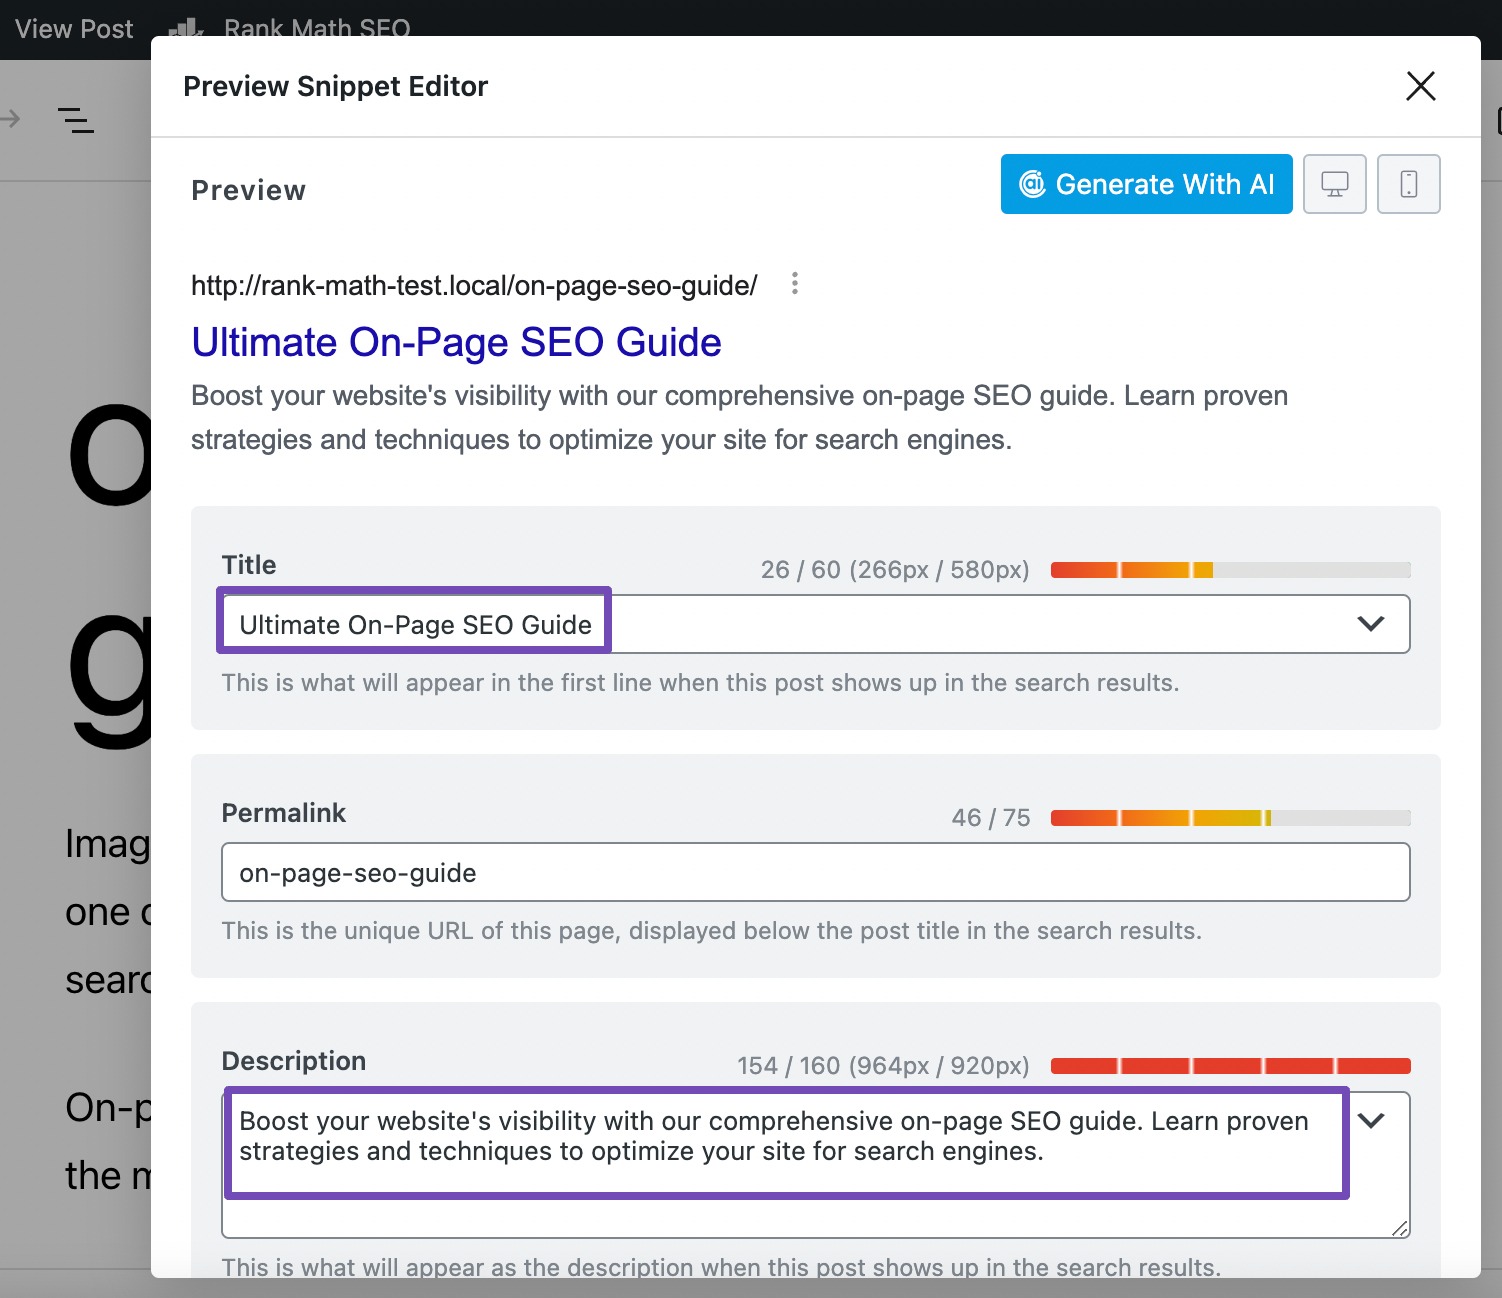
After a few seconds, refresh the page, and your SEO title will be edited. You can visit the post and check the SEO title for your post.
4.2 Write SEO Description with AI
You can use this option to generate SEO descriptions for your posts. To do so, select the posts you wish to generate the SEO descriptions.
Next, select the Write SEO Description with AI option from the drop-down menu and click Apply.
Content AI will begin generating your SEO meta. In the meantime, it will display a ‘Bulk editing SEO meta started’ message, as shown below.
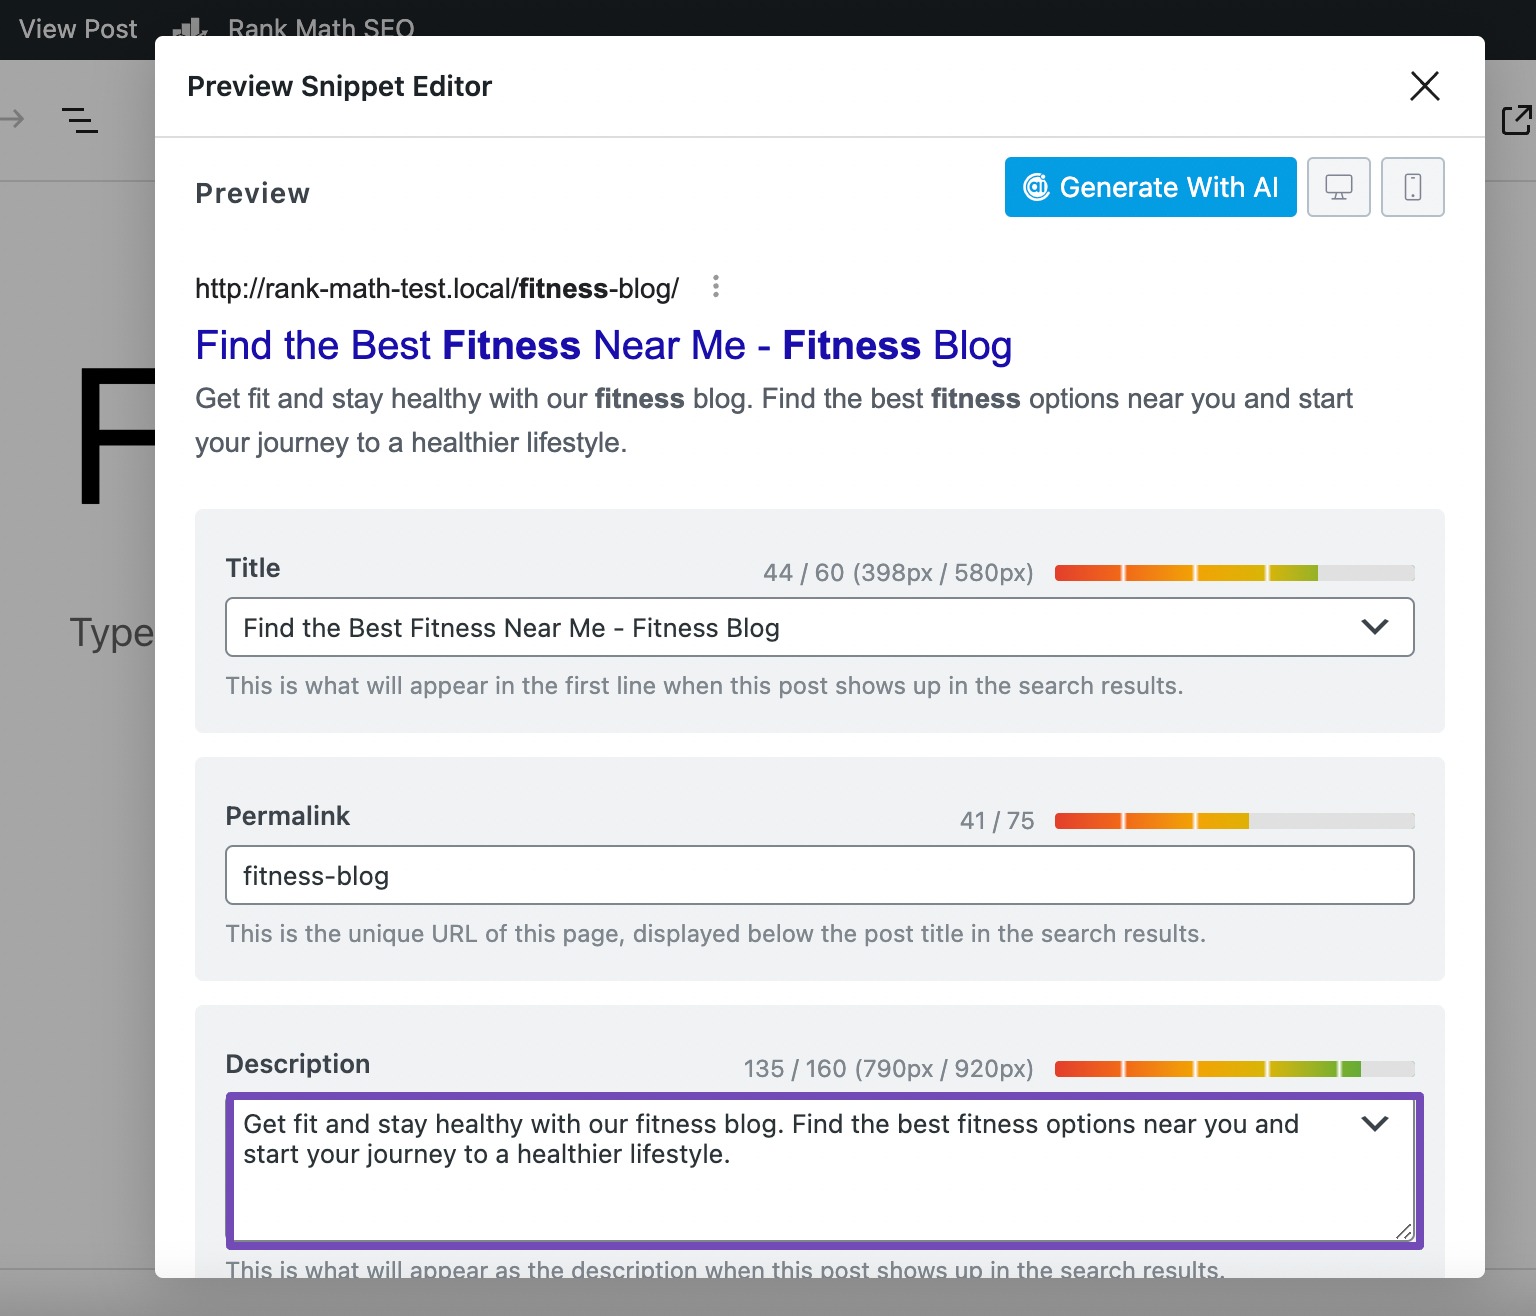
After a few seconds, refresh the page, and your SEO description will be edited. You can visit the post and check the SEO description for your post.
4.3 Write SEO Title & Description with AI
This option can generate SEO titles and descriptions for your posts. To do so, select the posts for which you wish to generate the SEO title and descriptions.
Next, select the Write SEO Title & Description with AI option from the drop-down menu and click Apply.
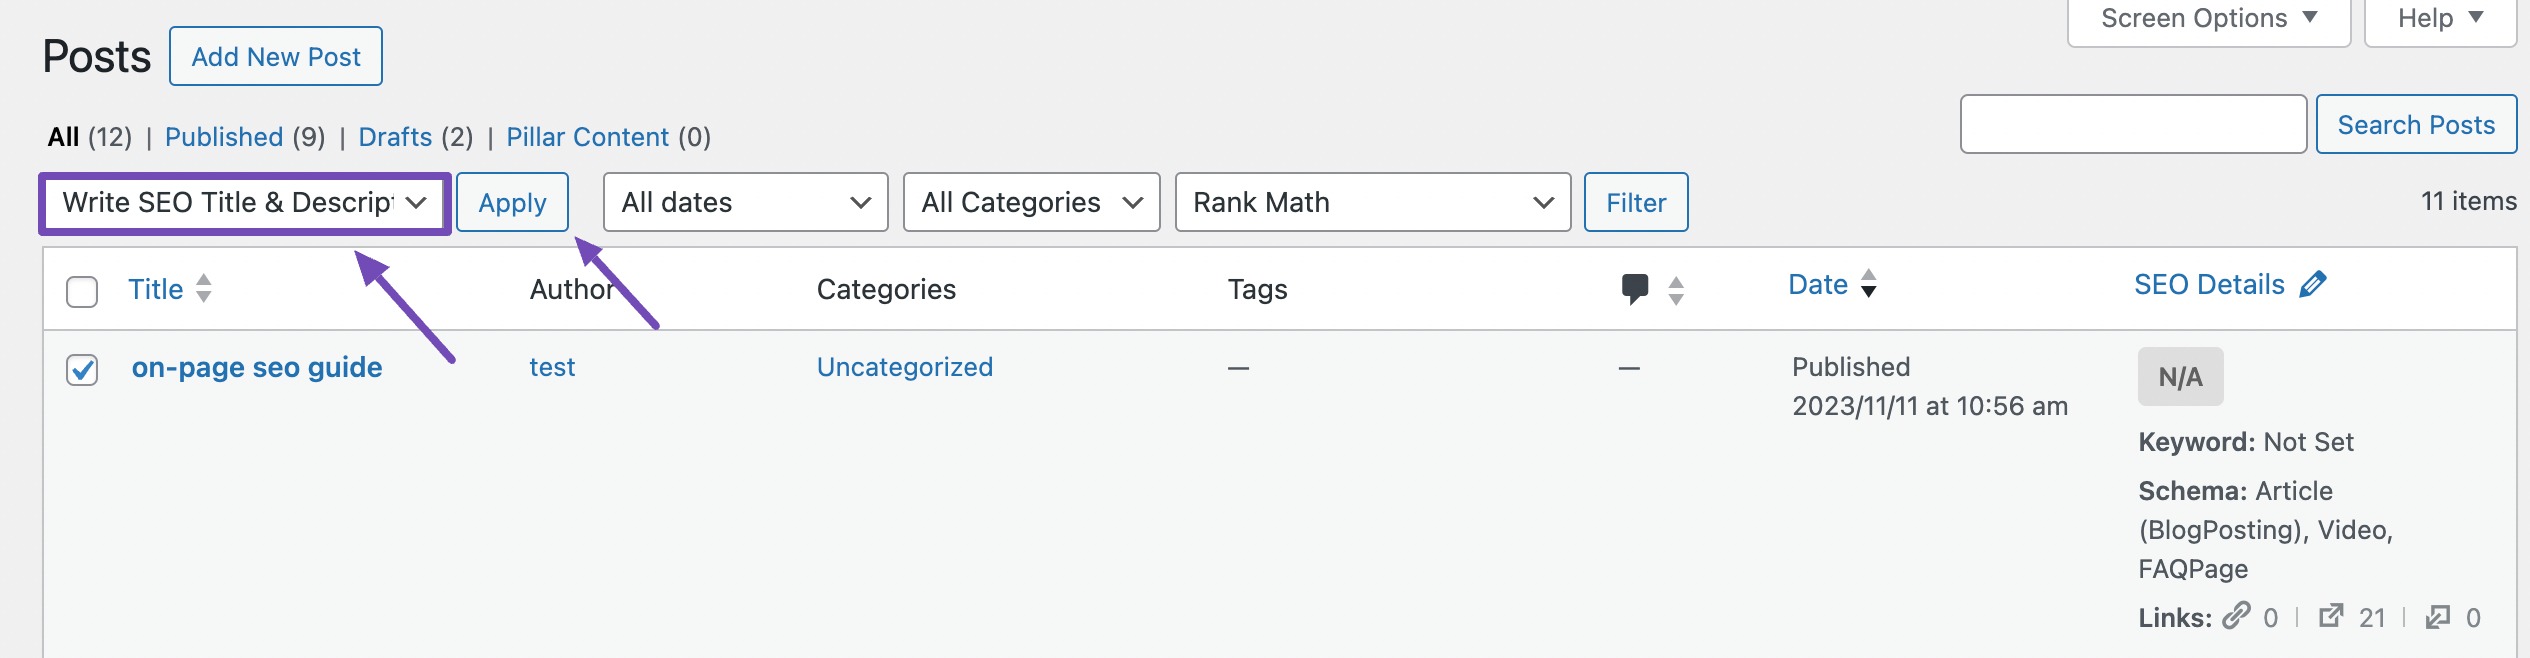
Content AI will begin generating your SEO meta. In the meantime, it will display a ‘Bulk editing SEO meta started’ message, as shown below.
After a few seconds, refresh the page, and your SEO title and description will be edited. You can visit the post and check the new SEO title and description for your post.
And, that’s it! Rank Math has made it very easy for you to bulk edit your SEO metadata. Rank Math’s bulk editing feature lets you update all your post’s titles, descriptions, robots meta, etc., in bulk, saving you an unbelievable amount of time and allowing you to operate at scale. We strongly recommend you to install Rank Math as it’s more like a “Swiss Army Knife” – dozens of specific tools bundled together into a single package.
If you have any questions about bulk editing your SEO meta (titles, descriptions, and all of the options outlined above) – feel free to reach our support team, who are always more than happy to help.