If you’ve ever customized your WordPress theme, you know how frustrating it can be to lose all your changes after an update. That’s where a child theme comes in.
By creating a child theme, you can safely make changes to my site without touching the original (parent) theme. This way, your work stays intact no matter how many times the theme is updated.
In this post, I’ll walk you through the steps to create a child theme in WordPress, from setting up the necessary files to activating your customized design.
So, without further ado, let’s get started.
Table Of Contents
1 What is a Child Theme in WordPress?
A child theme in WordPress is a theme that inherits the design and functionality of another theme, called the parent theme, while allowing you to make your own customizations. Instead of editing the parent theme directly, you create a child theme where you can safely add or change styles, layouts, and features.
The main benefit of a child theme is that your changes won’t be lost when the parent theme is updated. The parent theme handles the core design and features, while the child theme contains only the modifications you’ve made. This makes it a safe and flexible way to customize your site.
2 What is a Parent Theme in WordPress?
A parent theme in WordPress is a fully functional theme that provides the design, features, and core code that a website runs on. It’s the main theme that contains all the necessary files, templates, and styles to make your site work.
When you use a child theme, it depends on the parent theme to function. The parent theme handles the heavy lifting, like layouts, stylesheets, and features, while the child theme only adds or overrides specific parts. Without the parent theme, a child theme won’t work.
In simple terms, the parent theme is the foundation, and the child theme is the custom layer you put on top to make the site your own.
3 Why Use a Child Theme?
There are a few key reasons to use a child theme rather than modifying a theme directly:
- Creating a child theme protects your modifications from being overwritten when the parent theme is updated.
- It keeps parent and child theme files separate. This helps avoid confusion since files are organized.
- Multiple child themes can be used for different purposes, like changing styles or functionality. But note that a website can have only one active theme at a time.
- It’s also a great way to start developing a new full WordPress theme.
Note: Extensive customizations in a child theme can lead to management issues. For larger projects, creating a full/parent theme based on the original theme is often better than continuing to modify the child theme.
4 Pre-Requisites for Creating a Child Theme
Before you create a child theme, you’ll need to make sure a few things are in place.
First, you should already have WordPress installed and running, along with the parent theme you want to build your child theme on.
It also helps if you’re familiar with a little HTML, CSS, and PHP. You don’t need to be an expert, you just need to be comfortable tweaking code and pasting snippets when needed.
I also suggest practicing in a local development environment. You can either set up a test site with dummy content or move a copy of your live site to a local server. This way, you can safely test your child theme before applying it to your real site.
And one more important step, always keep a backup of your website. If something goes wrong, you’ll be able to restore it quickly without stress.
Once you have these things ready, you’re all set to create your child theme. In this guide, I’ll be using the Twenty Twenty-Four default WordPress theme as an example.
5 Creating a Child Theme in WordPress
Now that you understand the concept of child themes, let’s delve into creating a child theme in WordPress.
5.1 Creating a Child Theme Using a Code
First, access your WordPress installation via FTP or a File Manager provided by your hosting control panel. Navigate to the wp-content/themes directory and create a new folder with a unique name for your child theme.
For this tutorial, I’ll use the name “mtschild” for the child theme folder.

This directory acts as the primary storage space for your child theme components.
Inside the child theme folder, create a new file titled style.css. This file will contain the essential details for recognizing and activating your child theme. Open the style.css file and insert the subsequent code:
Theme Name: MTS Child Theme
Theme URI: https://www.mythemeshop.com/
Description: Child theme for the Twenty Twenty-Four Theme
Author: MyThemeShop
Author URI: https://www.mythemeshop.com
Template: twentytwentyfour
Version: 1.0.0
Text Domain: mtschild
This code tells WordPress that your child theme is based on a specific parent theme. Replace “MTS Child Theme” with the name you want for your child theme, and update the template field with the folder name of the parent theme.
Next, you need to ensure your child theme uses the styles from the parent theme. To do this, you have to enqueue (load) the parent theme’s stylesheet.
To load the stylesheet, open the functions.php file in your child theme’s folder (create one if it doesn’t exist) and add one of the following code snippets.
If the parent theme doesn’t load any stylesheets, use the following code to load style.css through functions.php:
<?php
add_action( 'wp_enqueue_scripts', 'mts_child_theme_enqueue_styles' );
function mts_child_theme_enqueue_styles() {
wp_enqueue_style( 'mts_child_theme-style', get_stylesheet_uri() );
}
This code can also function if the parent theme solely loads its stylesheet.
However, if the parent theme solely loads the active theme’s stylesheet, you must additionally enqueue the parent theme’s stylesheet via functions.php using the code below:
<?php
add_action( 'wp_enqueue_scripts', 'mts_child_theme_enqueue_styles' );
function mts_child_theme_enqueue_styles() {
	wp_enqueue_style( 'mts-child-theme-parent-style', get_parent_theme_file_uri( 'style.css' ) );
}
For the Twenty Twenty-Four theme used in this guide, I’ll apply the first code since the theme doesn’t load any stylesheet at all.
Remember to start with the <?php tag when adding the code. Modify these codes as per your requirements, especially where the theme name mts_child_theme is utilized.
Once you’ve completed the steps above, log back into your WordPress dashboard and proceed to Appearance → Themes. Hover over the child theme and click the Activate button.
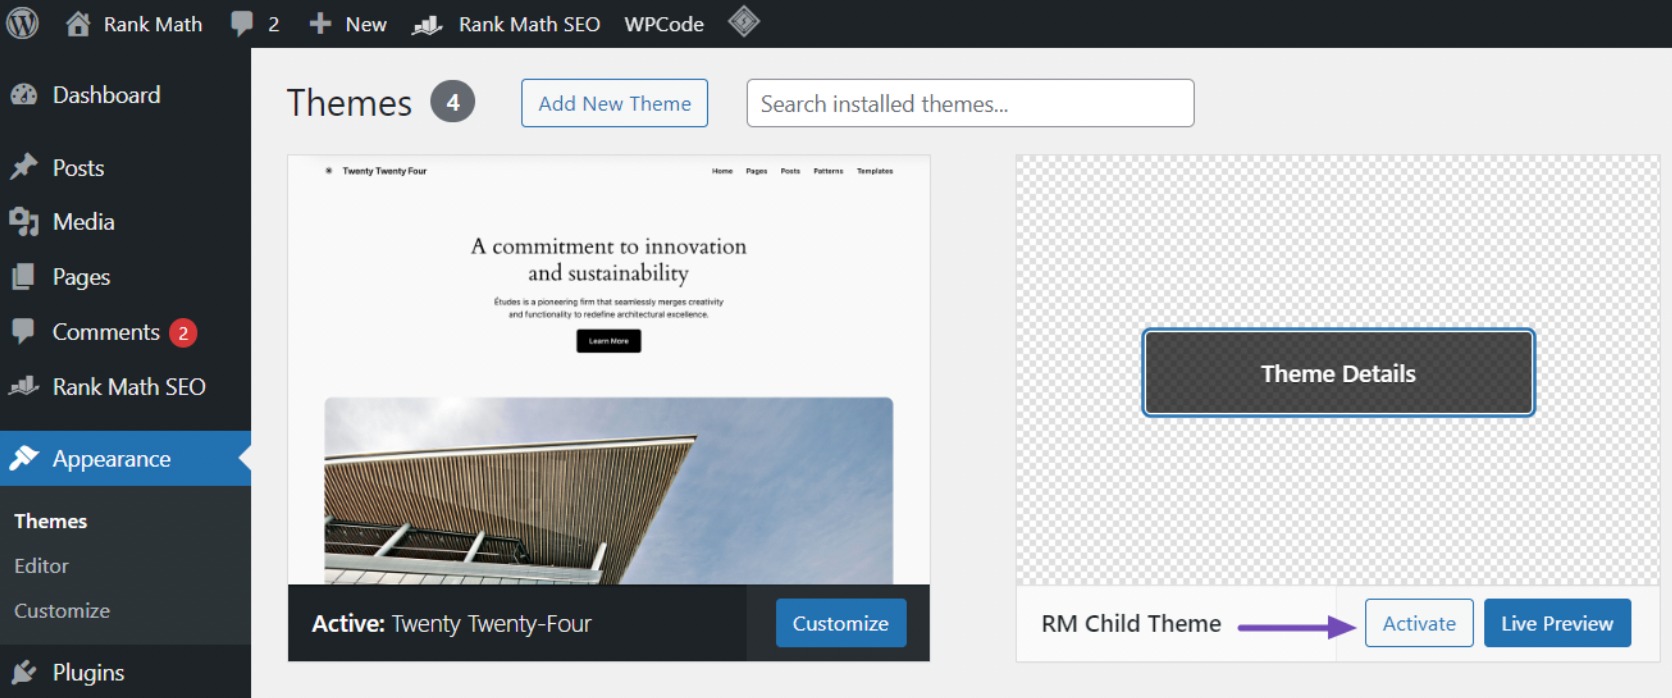
Since you haven’t made any changes to your child theme yet, your website will maintain the functionality and appearance of its parent theme.
However, I’ll guide you on customizing the child theme to prepare you for further modifications.
This is the manual process of creating a child theme using code in WordPress. If this method seems complex, you can explore the plugin approach we’ll cover in the next section.
5.2 Creating a Child Theme Using a Plugin
Creating a child theme using a plugin is simple and easy. First, you need to install and activate the Child Theme Configurator plugin. For more details, see our step-by-step guide on how to install a WordPress plugin.
Once the plugin is activated, go to the WordPress dashboard and navigate to Tools → Child Themes.
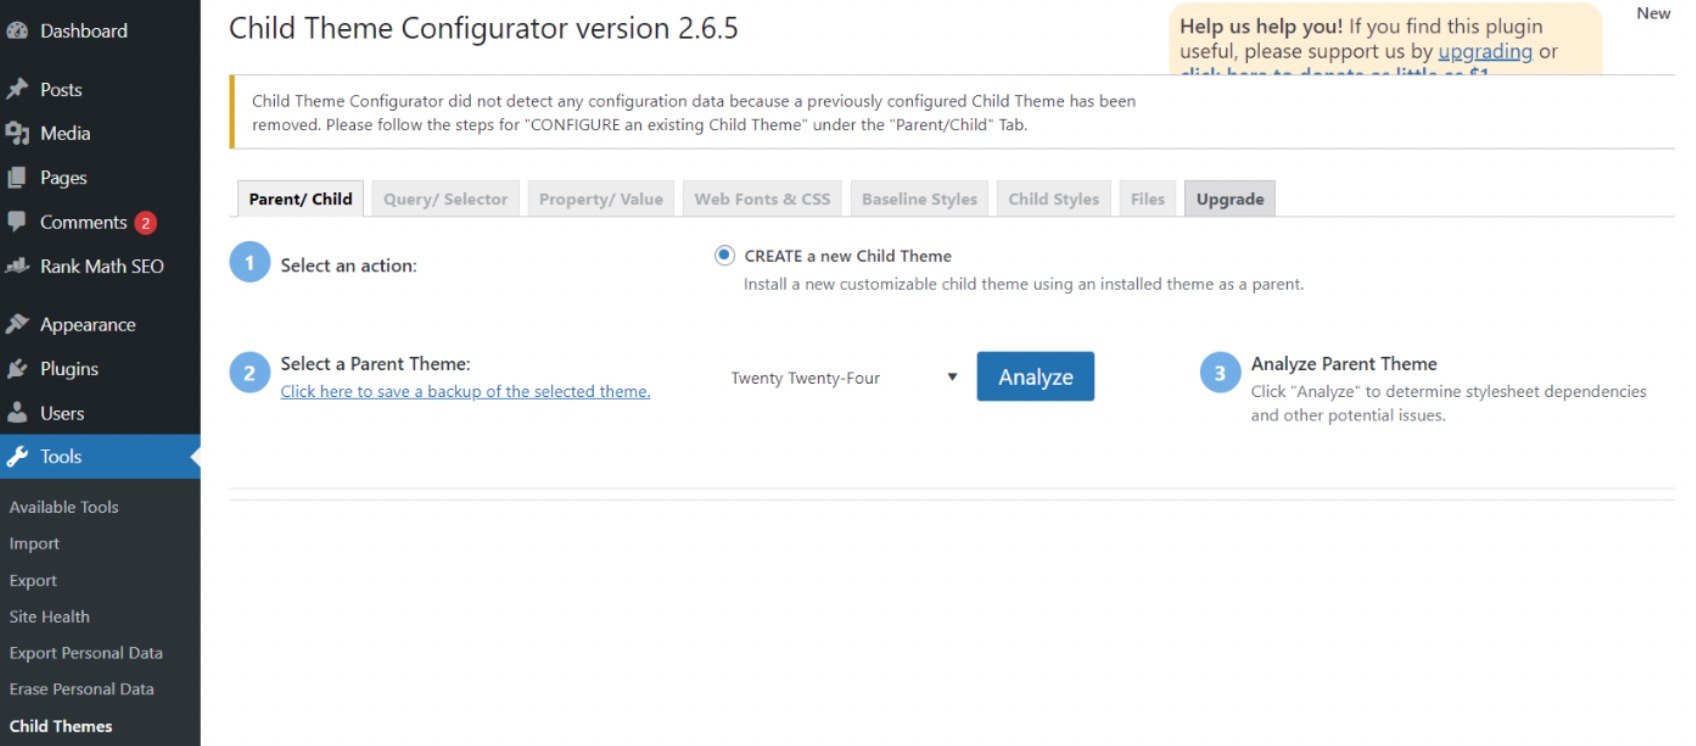
On the Select a Parent Theme tab, choose the parent theme from the dropdown menu to create the child theme. Typically, the active theme on your site is preselected.
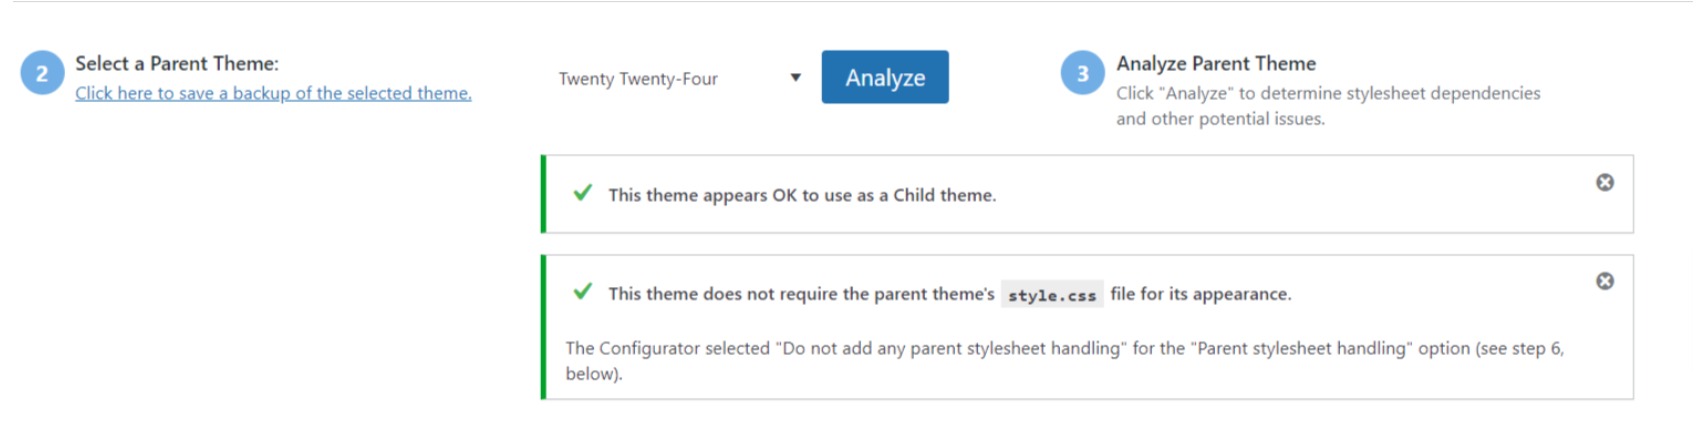
Next, click on the Analyze button. The plugin will scrutinize the selected parent theme to determine whether it can generate a child theme and whether it requires its style.css file for appearance.
Next, assign a name to your child theme. You can tailor the stylesheet, functions, and other configurations to your liking.
However, refrain from altering the settings until you reach section 7.
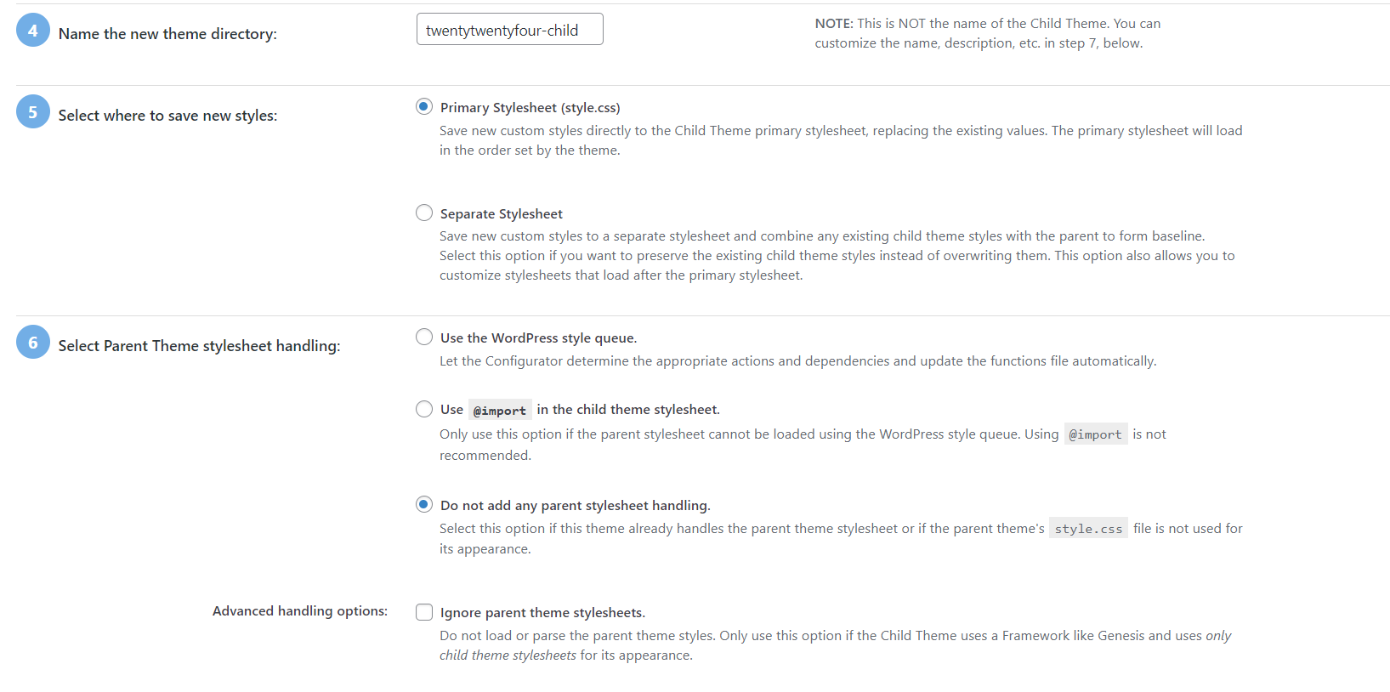
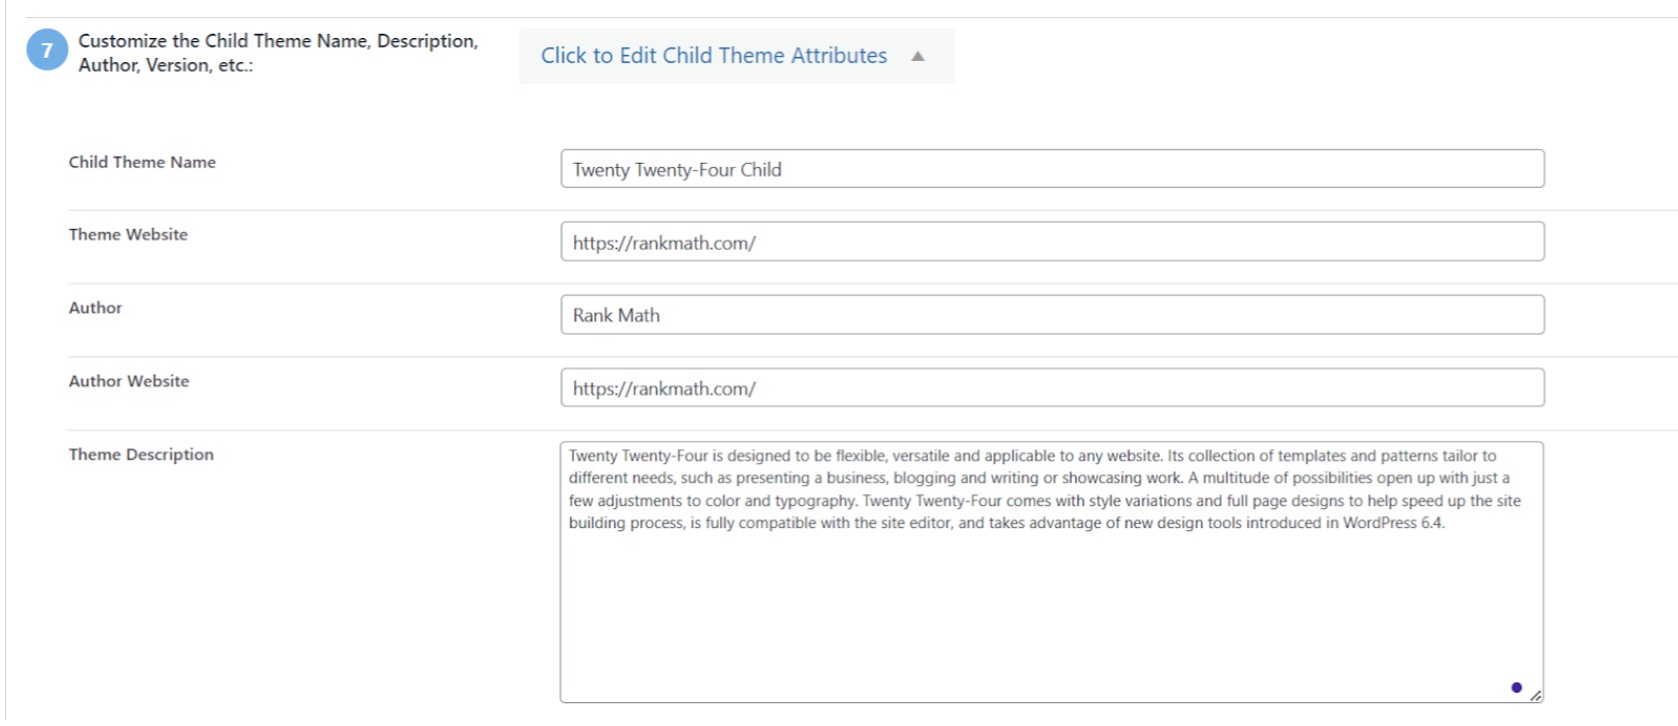
In section 7, click the Click to Edit Child Theme Attributes.
From there, you can input the details of your child’s theme.
You may lose the parent theme’s menus and widgets when manually creating a child theme.
However, the Child Theme Configurator plugin can transfer them from parent to child themes.
If you wish to proceed with this, mark the checkbox in Section 8. Finally, click the Create New Child Theme button to create the child theme.

Upon completion, the plugin will create a folder for your child theme containing essential style.css and functions.php files for future customization.
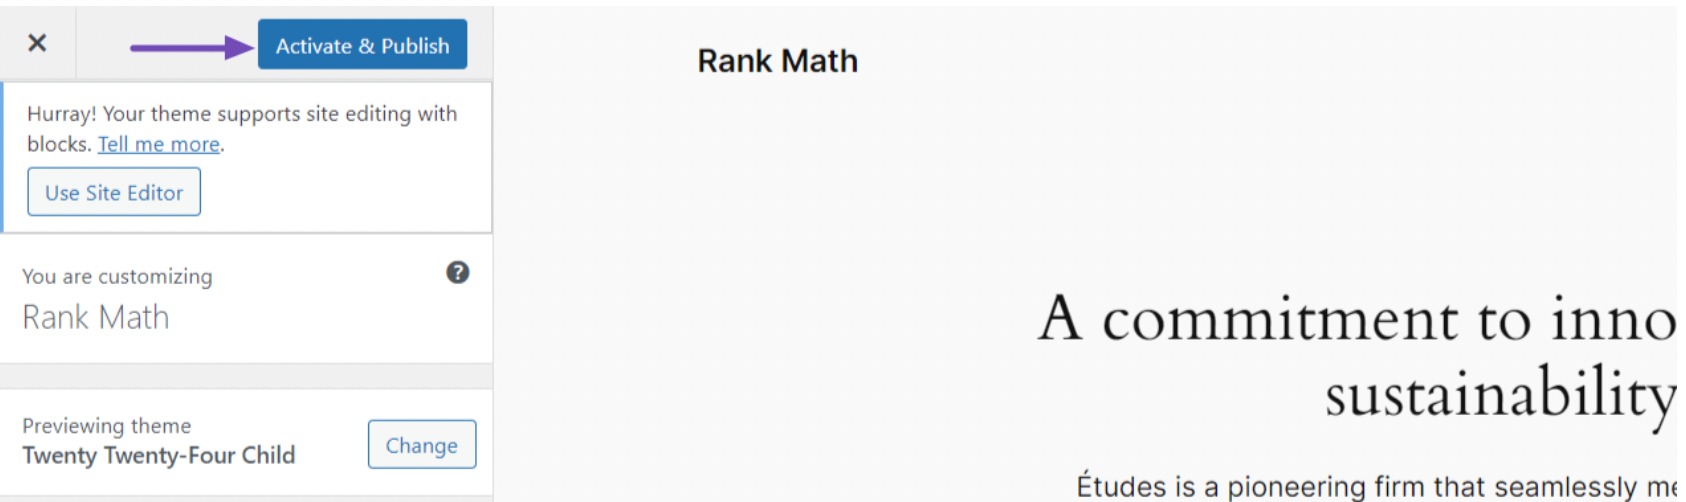
Before activating the theme, preview it by clicking the “Preview your child theme” link at the top of the screen to verify its appearance and ensure it doesn’t affect your site adversely.

After verifying everything is functioning correctly, click the Activate & Publish button. This will make your child theme live on your website.
Once you’ve activated your child theme on your website, it’s time to start customizing it. I’ll cover this in the next section.
6 How to Customize Your Child Theme
Before delving into customization, identify the elements of your website you wish to modify, such as styles, templates, functions, widget areas, or custom page templates.
Having a clear vision of your objectives will streamline the customization process. There are various methods to customize your child’s theme, including:
6.1 Customizing Styles With CSS
Your child theme’s style.css file serves as a platform for tweaking the look of your website. Here, you can insert custom CSS rules to alter or enhance the parent theme’s styles.
Before proceeding, a basic understanding of HTML and CSS is necessary.
You can effectively utilize your browser’s Inspect tool or directly copy styles from the parent theme’s style.css file.
To access the CSS codes of a webpage using your browser, simply right-click on the page and select Inspect from the options that appear. This tool displays the CSS style codes, allowing you to pinpoint the elements you wish to modify.
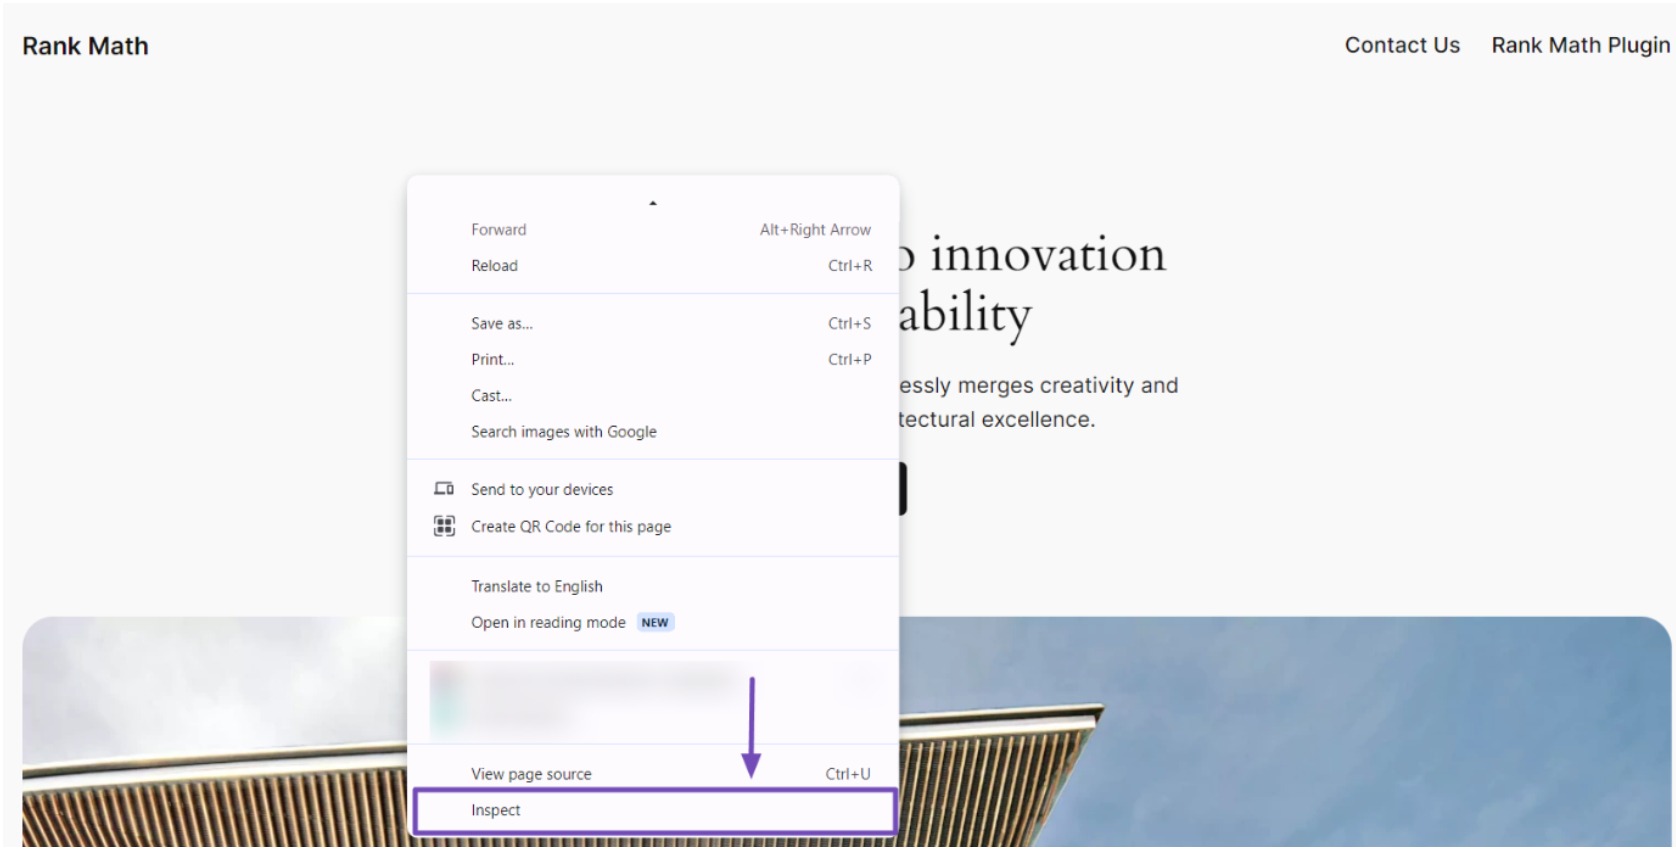
When you right-click and select “Inspect,” your browser screen will bifurcate, displaying the HTML and CSS for the page.
Depending on your browser settings, the HTML and CSS details may appear either on the right side or at the bottom of the screen.
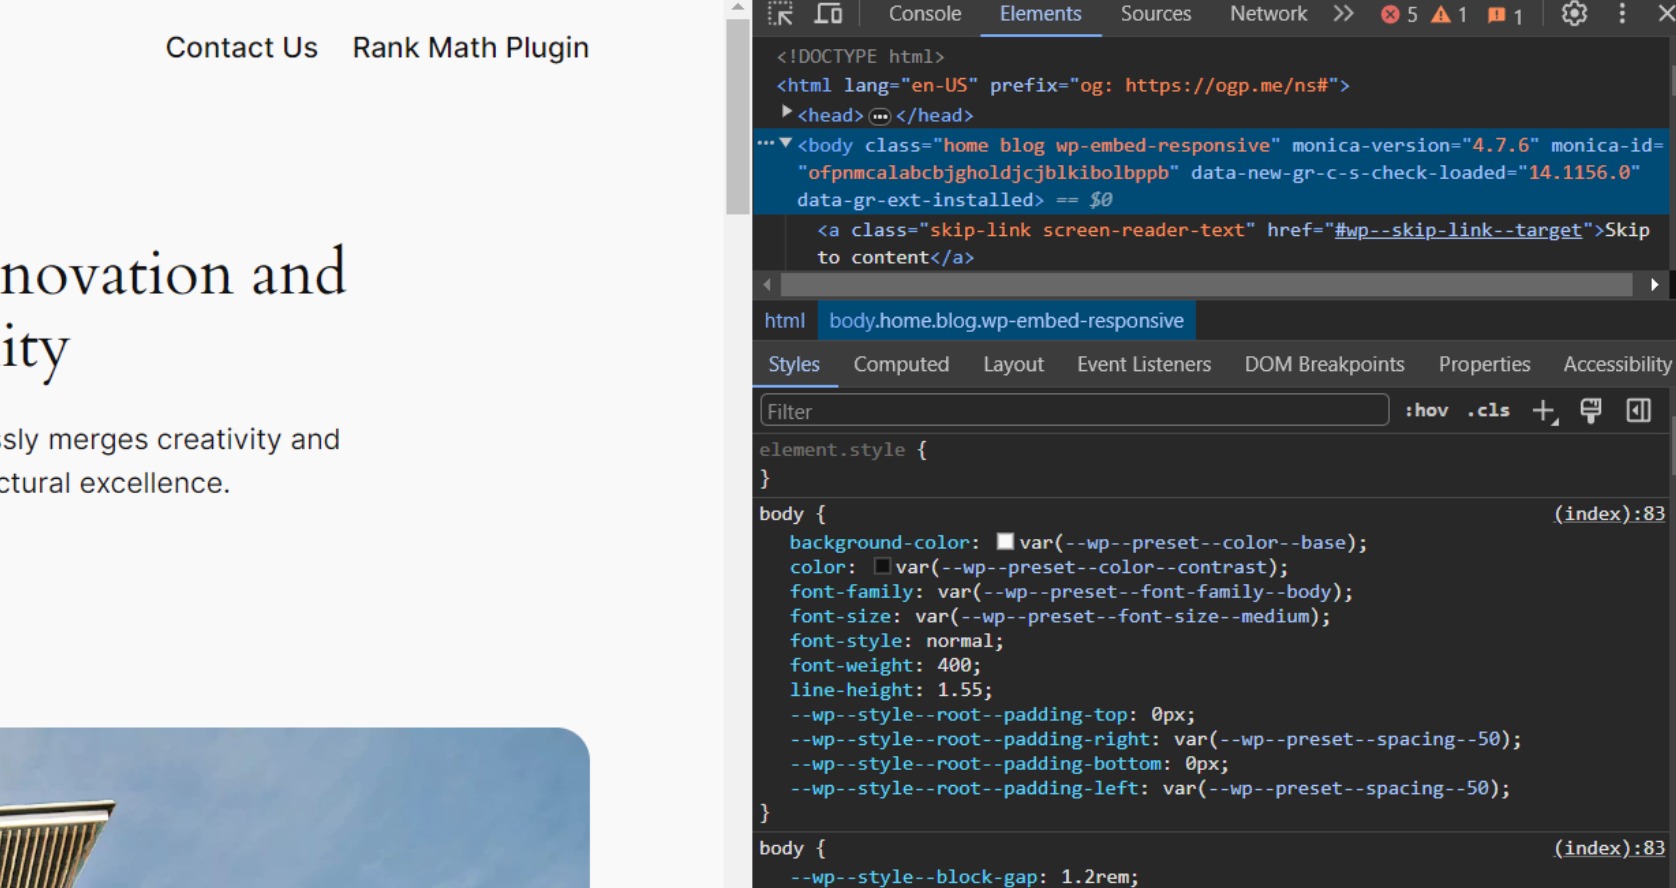
As you hover over various HTML lines, the Chrome inspector will highlight them in the Elements tab and display the corresponding CSS rules related to the highlighted element.
You can experiment by editing the CSS directly to preview how it will appear. For instance, if you wish to alter the background color of the default homepage of the Twenty Twenty-Four theme from #f9f9f9 to #6841ea.
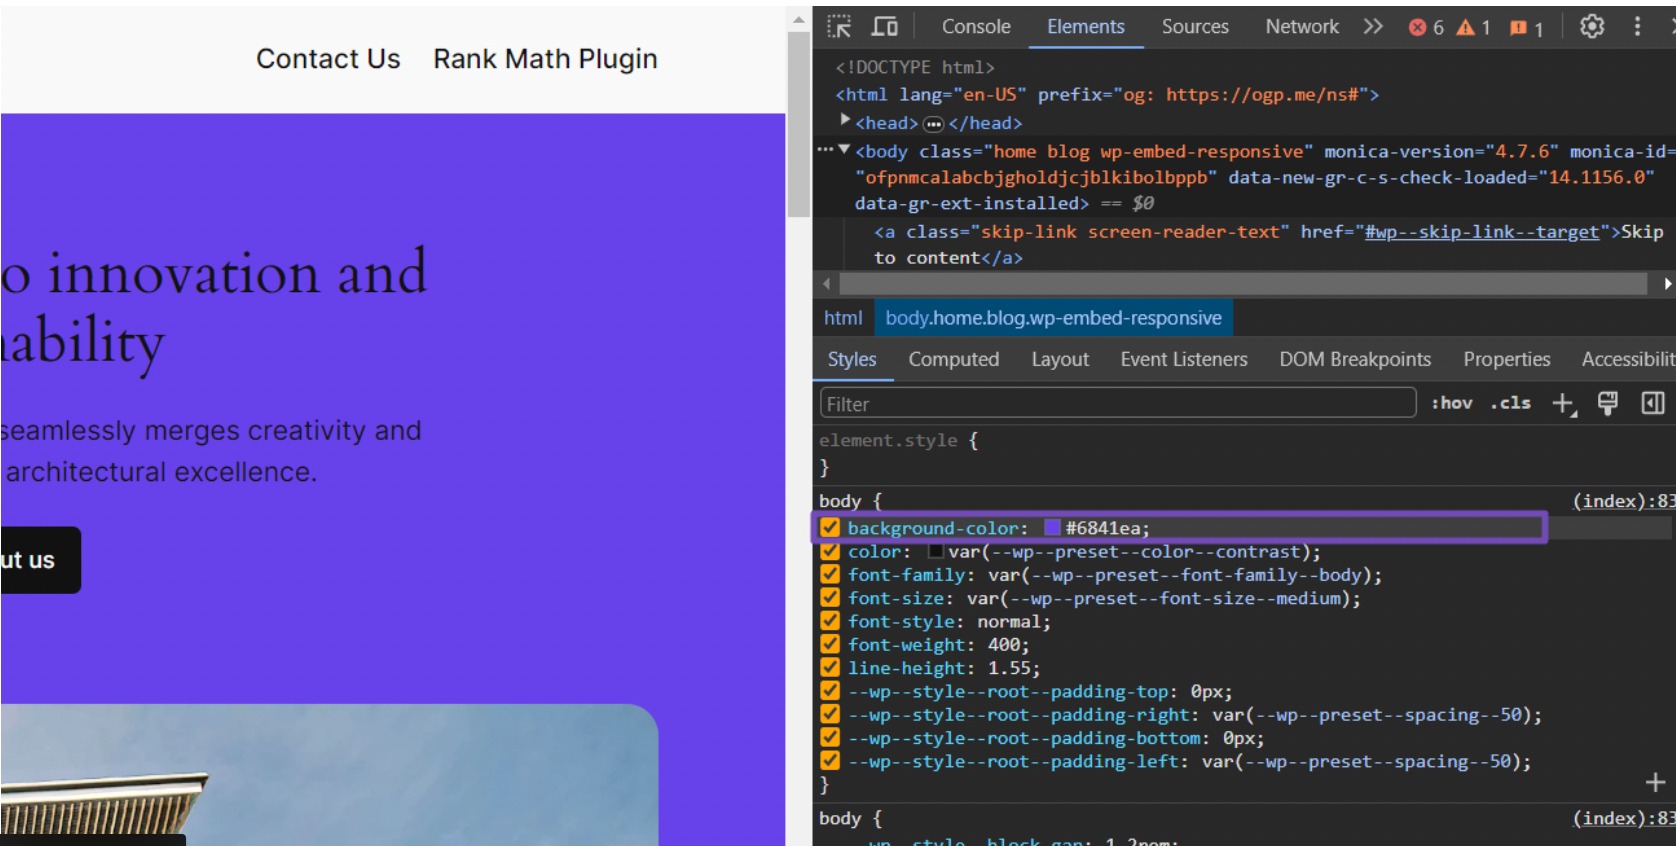
Once you adjust the background color in the browser inspector, the alteration is temporary. To make it permanent, you must transfer this CSS rule to your child theme’s style.css file:
body {
background-color: #6841ea;
}
After inserting the code, remember to save your modifications. You can replicate this process for any other web page element you wish to customize.
For example, let’s say you want to modify the colors on your website. We can provide you with some CSS codes that will allow you to do so.
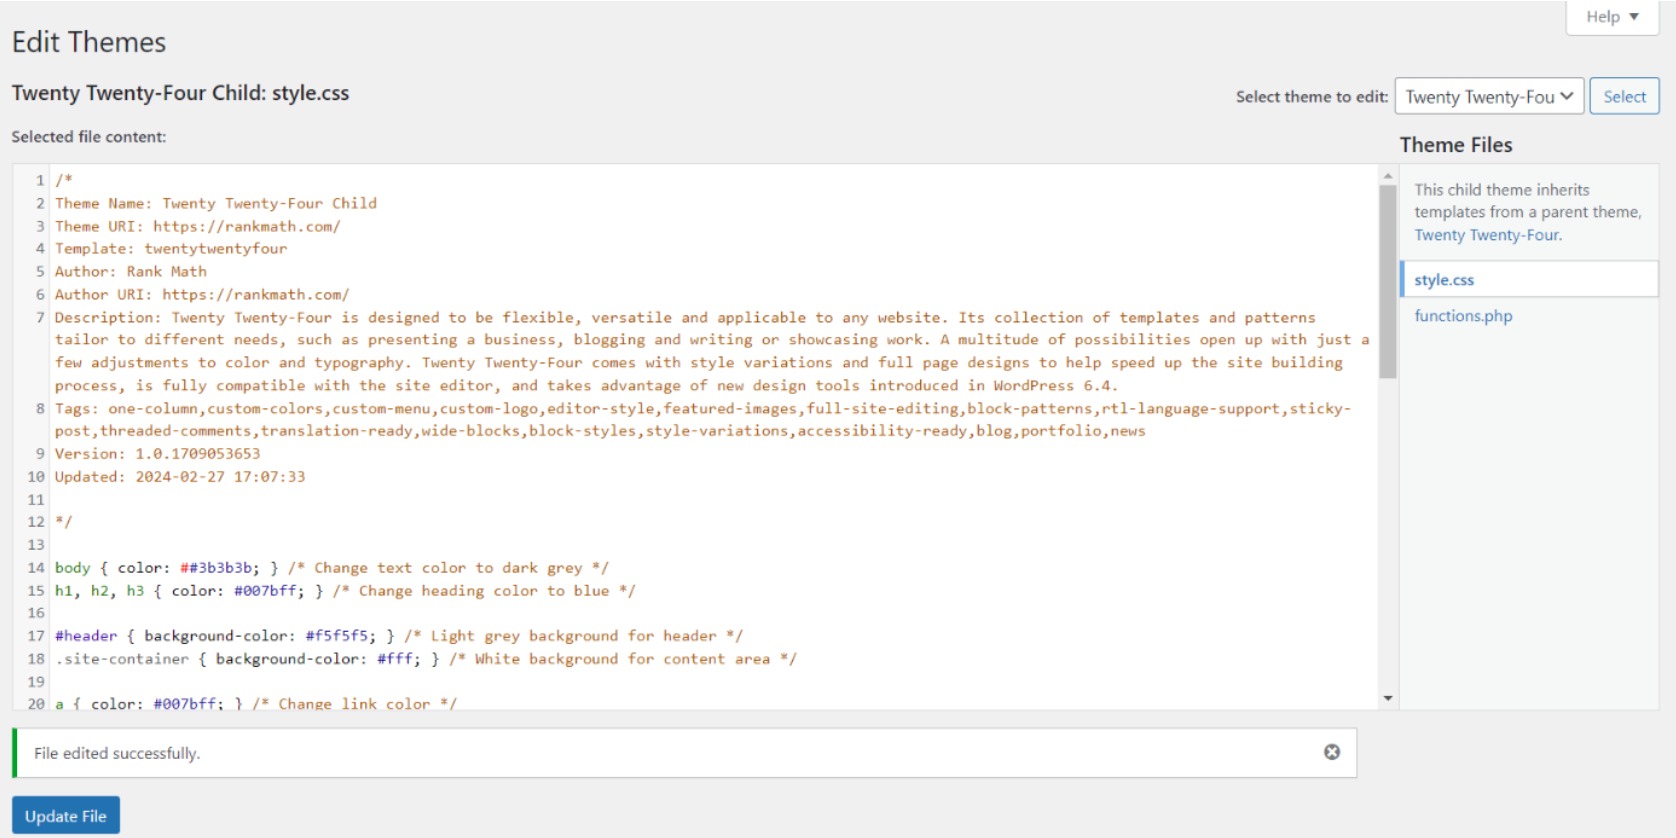
To change the text color to dark grey, add the following code to your CSS file:
body { color: #3b3b3b; } To change the heading color to blue, use the following code:
h1, h2, h3 { color: #007bff; }For the background color of the header, use the following code:
#header { background-color: #f5f5f5; } /* Light grey background for header */And for the content area, use this code to set the background color to white:
.site-container { background-color: #fff; } You can copy these CSS styles to the style.css file of your child theme either through your website’s child theme directory or from your WordPress dashboard.
When you add your CSS code, it will resemble this format:
After saving your changes, try refreshing your website page. If the changes do not appear, clear your browser cache to ensure you view the latest version of the CSS.
6.2 Overriding Template Files
While CSS customization controls your website’s appearance, child themes offer a more robust feature: overriding template files.
This advanced capability enables you to reshape the layout and structure of your website’s pages and elements. However, exercise caution as it demands a deeper understanding of WordPress templating, HTML, and PHP.
To override a template, copy the original .php file from the parent theme folder into your child theme, keeping the exact filename.
For instance, to override header.php, copy the header.php file from the /parent-theme/ directory and paste it as header.php in the /child-theme/ directory.
You can now edit the header.php in your child theme.
Some common templates to override:
- header.php – Contains <header> tag and site branding, navigation, etc.
- footer.php – The closing <footer> tag and markup.
- page.php – Default template for pages.
- single.php – Template used for single posts.
- index.php – Homepage template.
For example, you can modify footer.php by displaying a custom copyright for your site:
<!-- Modified child footer.php -->
<footer>
<p>© <?php echo date('Y'); ?> My Company</p>
<?php if ( is_active_sidebar('footer-1') ) : ?>
<?php dynamic_sidebar('footer-1'); ?>
<?php endif; ?>
</footer>6.3 Extending Functionality
The functions.php file in the child theme lets you introduce new PHP functions, hooks, filters, and code to expand upon the parent theme’s default features.
This flexibility empowers you to register custom post types, incorporate custom widgets, create new shortcodes, enqueue additional scripts, and more.
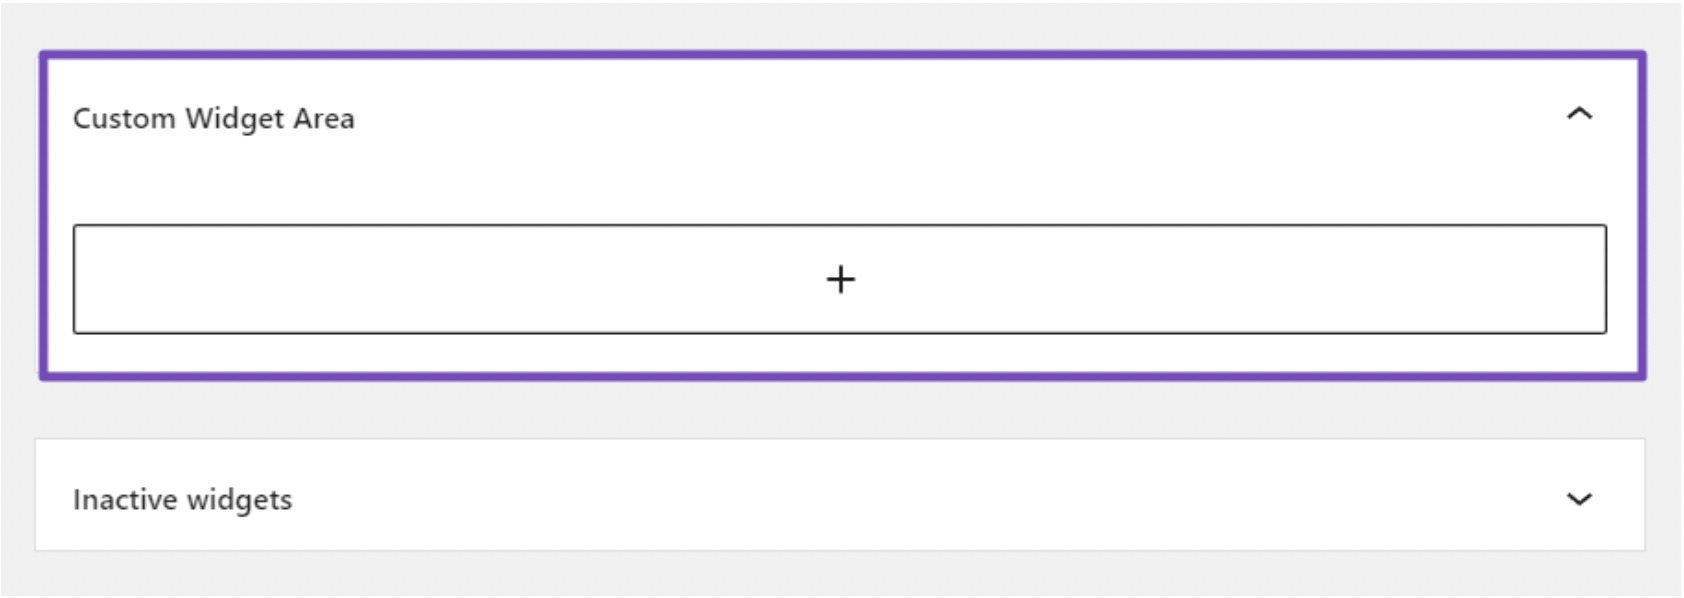
For instance, if you desire a dedicated section on your WordPress site for custom widgets, utilize the following code snippet to establish a widget area named “Custom Widget Area”:
function register_custom_widget() {
    register_sidebar( array(
        'name'          => 'Custom Widget Area',
        'id'            => 'custom_widget_area',
        'description'   => 'Add widgets here to appear in the custom widget area',
        'before_widget' => '<div id="%1$s" class="widget %2$s">',
        'after_widget'  => '</div>',
        'before_title'  => '<h2 class="widget-title">',
        'after_title'   => '</h2>',
    ) );
}
add_action( 'widgets_init', 'register_custom_widget' );
After saving this code in your child theme’s functions.php file, navigate to your WordPress site and access Appearance → Widgets. You will notice that the “Custom Widget Area” widget is available for use.
7 Frequently Asked Questions
What happens if I forget to activate my child theme?
If you forget to activate your child theme, your WordPress site will continue using the parent theme, and your customizations won’t take effect. Always ensure that the child theme is activated to see your modifications.
Is it possible to revert to the parent theme if something goes wrong with the child theme?
Absolutely. If issues arise or customizations don’t work as expected, you can simply switch back to the parent theme. The child theme serves as a flexible space for experimentation without affecting the original design.
Do I need to copy all files from the parent theme to the child theme?
No, you only need to copy the files you want to modify in your child theme. WordPress will automatically use the files from the child theme instead of the parent theme for those specific templates.
How do I ensure my child theme remains compatible with future parent theme updates?
Regularly check for updates in the parent theme and review its documentation and changelogs. If updates introduce changes, adjust your child theme accordingly to maintain compatibility. Always use version control for easy tracking.
Can I still update the parent theme after creating a child theme?
Yes, you can update the parent theme without affecting your child theme. Updates to the parent theme will not overwrite the customizations you made in the child theme.
Is it possible to create multiple child themes for a single-parent theme?
Yes, you can create multiple child themes for a single-parent theme, each with its own set of customizations and modifications. But you can only activate one theme at a time.
Do I need coding knowledge to create a child theme?
While coding knowledge can be helpful, it is not always necessary to create a child theme. You can start with simple modifications and gradually learn more advanced techniques as you gain experience.
8 Conclusion
Creating a child theme in WordPress is one of the best ways to customize your site without worrying about updates erasing your hard work. It might feel tricky at first, but every mistake is just a chance to learn, and fixing them is usually as simple as starting fresh.
With a little patience, you’ll see how much flexibility a child theme gives you to shape your site the way you want, while keeping the parent theme stable and secure.
I hope this guide has helped you get started, now it’s your turn to try it out and see the difference on your own WordPress site.
Tweet me @rankmathseo and let me know how it worked out for you!