WordPress is a powerful content management system (CMS) that offers many flexibility and customization options.
However, sometimes, the default posts and pages may not meet your needs.
That’s where custom post types come in – they give you the key to showcase unique content just how you want it.
In this step-by-step post, we will walk you through creating a custom post type, explain the benefits, and help you display them like a pro.
So, without further ado, let’s get started!
Table Of Contents
1 What is a Custom Post Type?
A custom post type is a way to define a new type of content in WordPress. By default, WordPress comes with several post types, such as
- Posts
- Pages
- Attachments
- Revisions
- Navigation menus
- Custom CSS
- Changesets
However, you can create a custom post type that will allow you to register a new content type with its data fields, editing interface, display options, and permalink structure.
For example, you may want a custom post type for testimonials, with fields for a quote, author name, and company. Or you can choose a custom event post type with fields for date, location, image, etc.
With custom post types, you can create your content types with unique attributes and taxonomies.
2 Why Would You Want to Create a Custom Post Type?
Here are a few more reasons you might want custom post types in WordPress:
- To organize different types of content on your website.
- To have more control over the display of your content.
- To enable different sets of features for different types of content.
- To create a unique layout or functionality for a specific type of content.
- To improve the user experience by making finding and navigating content easier.
- To customize the WordPress admin panel for different types of content.
- To enhance the SEO of your website by structuring your content in a more meaningful way.
3 Custom vs. Default WordPress Post Types
Now that we’ve covered the basics let’s look at the differences between custom and default WordPress post types.
| Custom Post Types | Default Post Types |
| Created by the user | Predefined by WordPress |
| Can have unique attributes and taxonomies | Limited to pre-existing attributes and taxonomies |
| Provides flexibility and customization | Limited customization options |
| Allows for unique templates and layouts | Limited template options |
| Can be used for specific content types | General-purpose content types |
| Requires coding or plugin installation | Built-in functionality |
| Requires manual setup and configuration | Ready to use out of the box |
| Enhances user experience with structured content | Standard formatting for content |
4 How to Create a Custom Post Type in WordPress
You can create a custom post type with the help of a plugin, or you can manually create one.
Let’s explore both methods in detail.
4.1 Create a Custom Post Type Using a Plugin
Using a plugin to create custom post types offers a convenient solution for those who prefer not to modify code or seek a quicker and simpler method.
To begin, install and activate the Custom Post Type UI plugin. You can find detailed instructions on how to install a WordPress plugin in our step-by-step guide.
Once activated, access the CPT UI → Add/Edit Post Types section from your WordPress dashboard. This will direct you to the ‘Add New Post Type’ tab.
Within this tab, you can start customizing the Basic settings. Here, you can specify the custom post’s URL, consisting of alphabetic or numeric characters.
You’ll also need to provide plural and singular menu names for your custom post type.
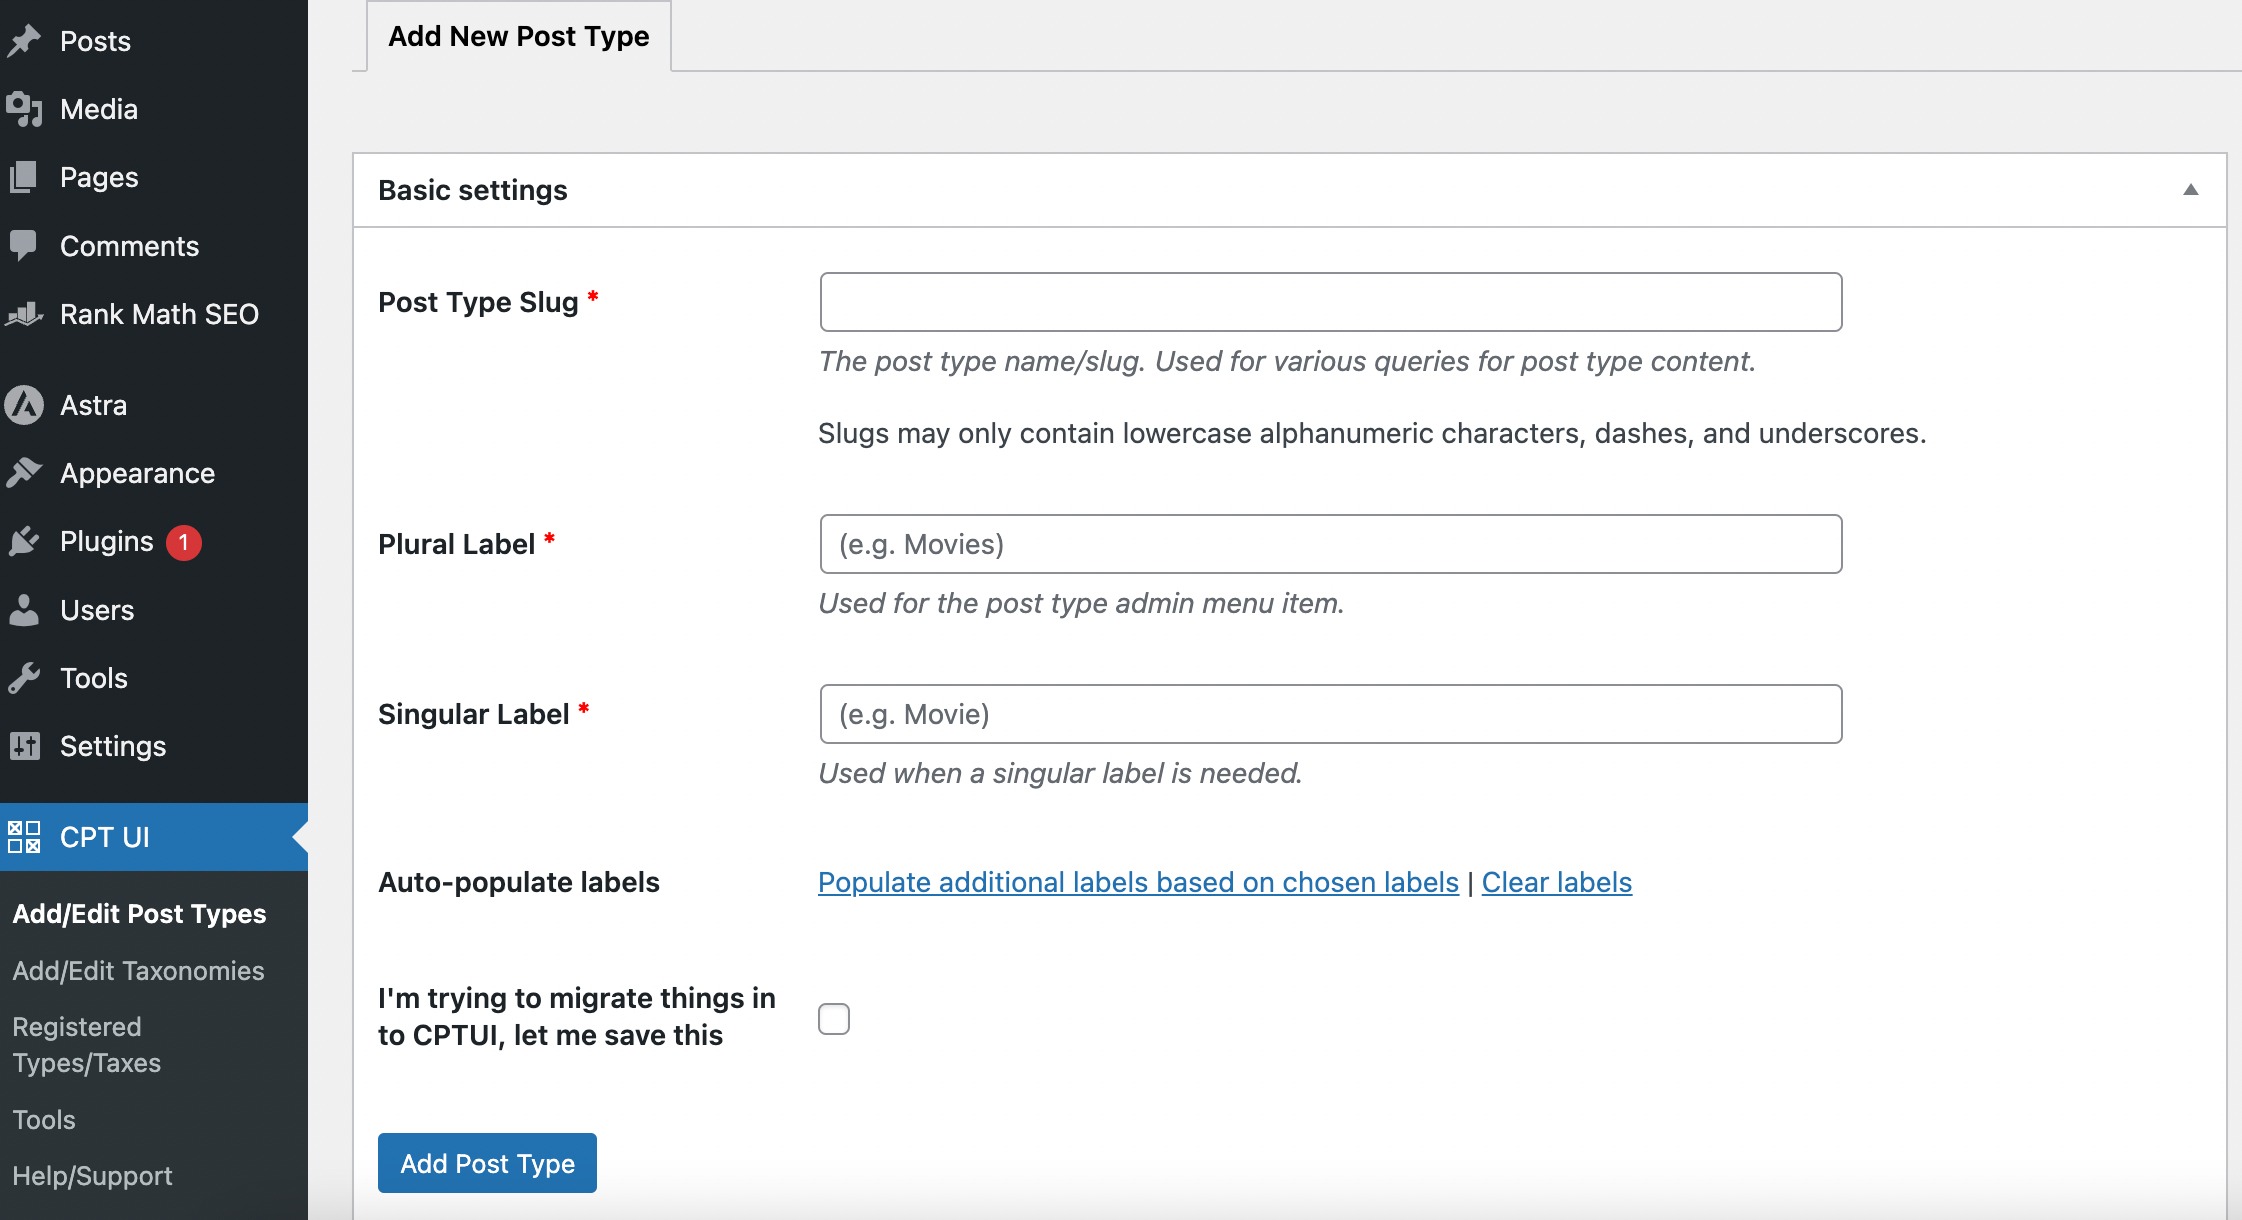
You can click the Populate additional labels based on chosen labels link if desired. This automatically fills in the additional label fields below, saving you time.
Next, you can save your changes by clicking the Add Post Type button or proceed to the following setting, the Additional Labels section.
If you didn’t use the Auto-populate labels feature, you can manually enter a description for your post type and provide other labels.
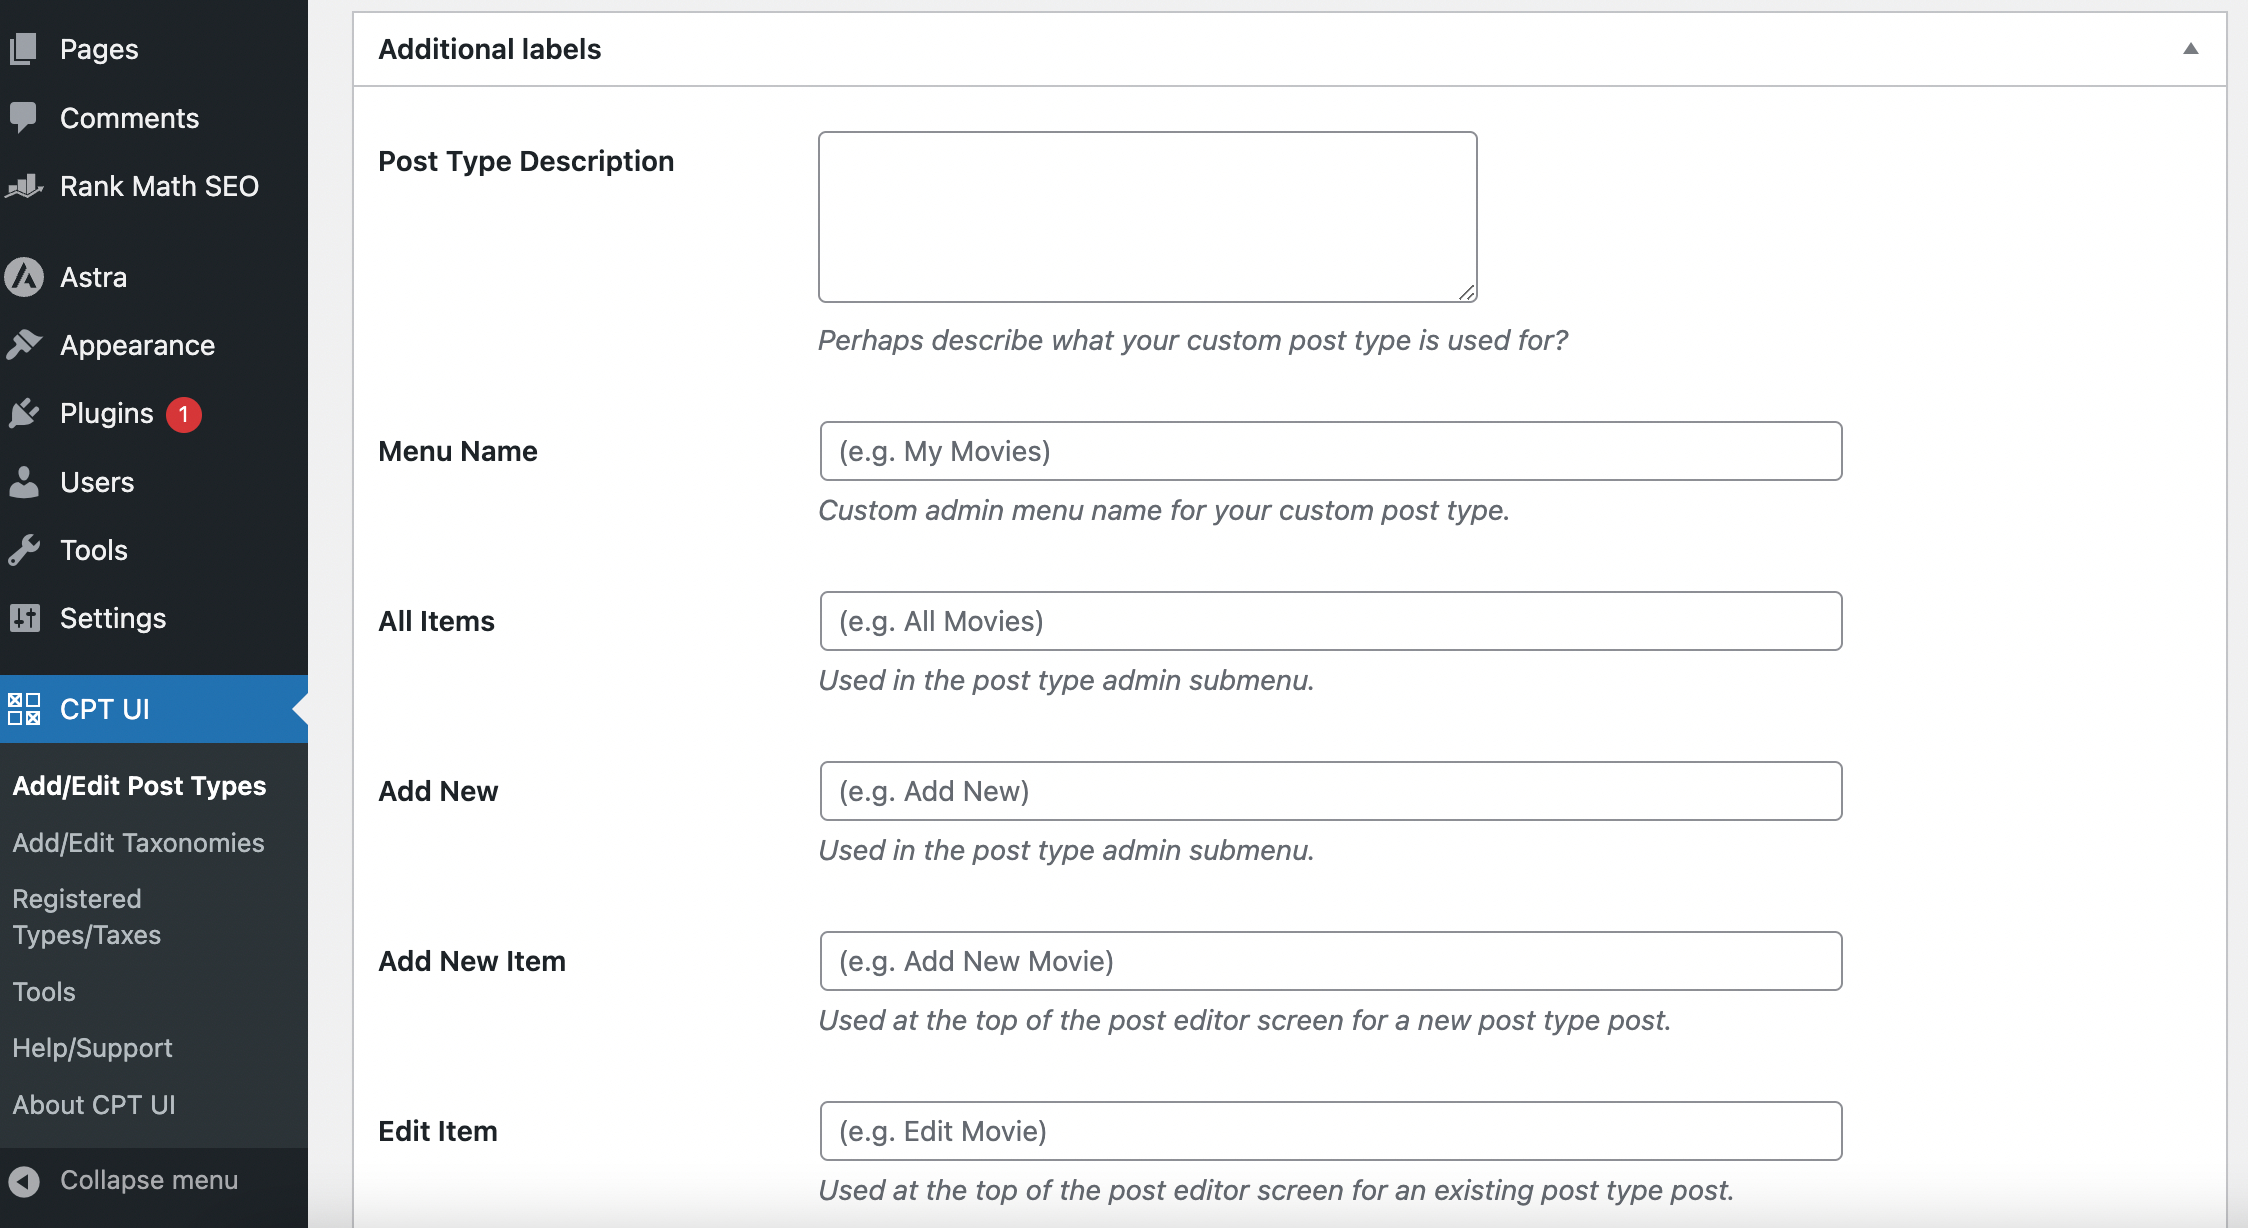
These labels will be used throughout the WordPress user interface when managing content within the designated post type.
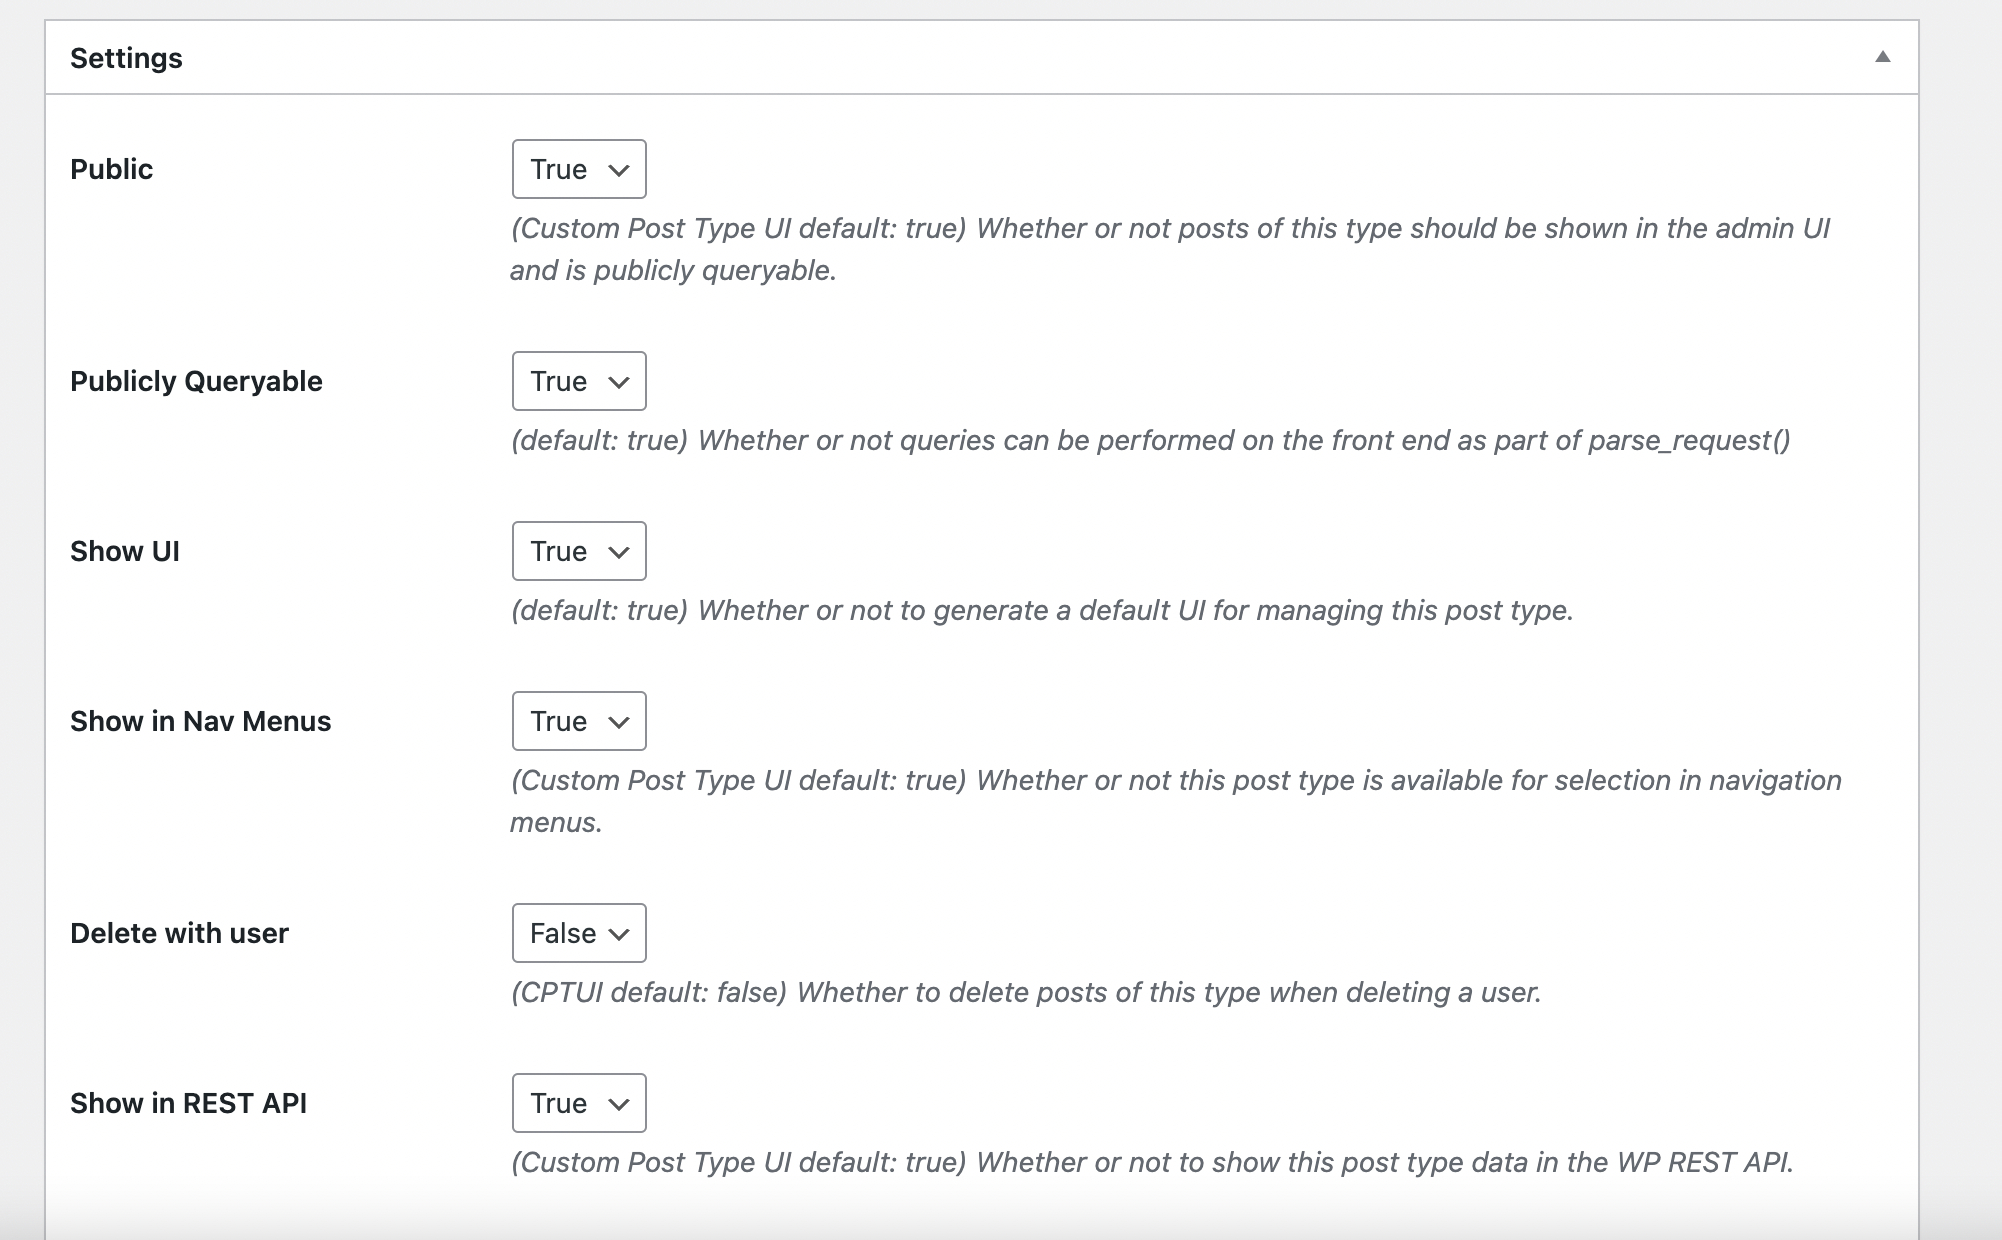
Moving on to the general settings, this is where you’ll configure the attributes and structures for your custom post type. A brief description accompanies each option to help you select appropriately.
In the final section of the settings, you’ll see the support and taxonomy options. Check the boxes for the features you want your custom post type to support, and repeat the process in the Taxonomies section.
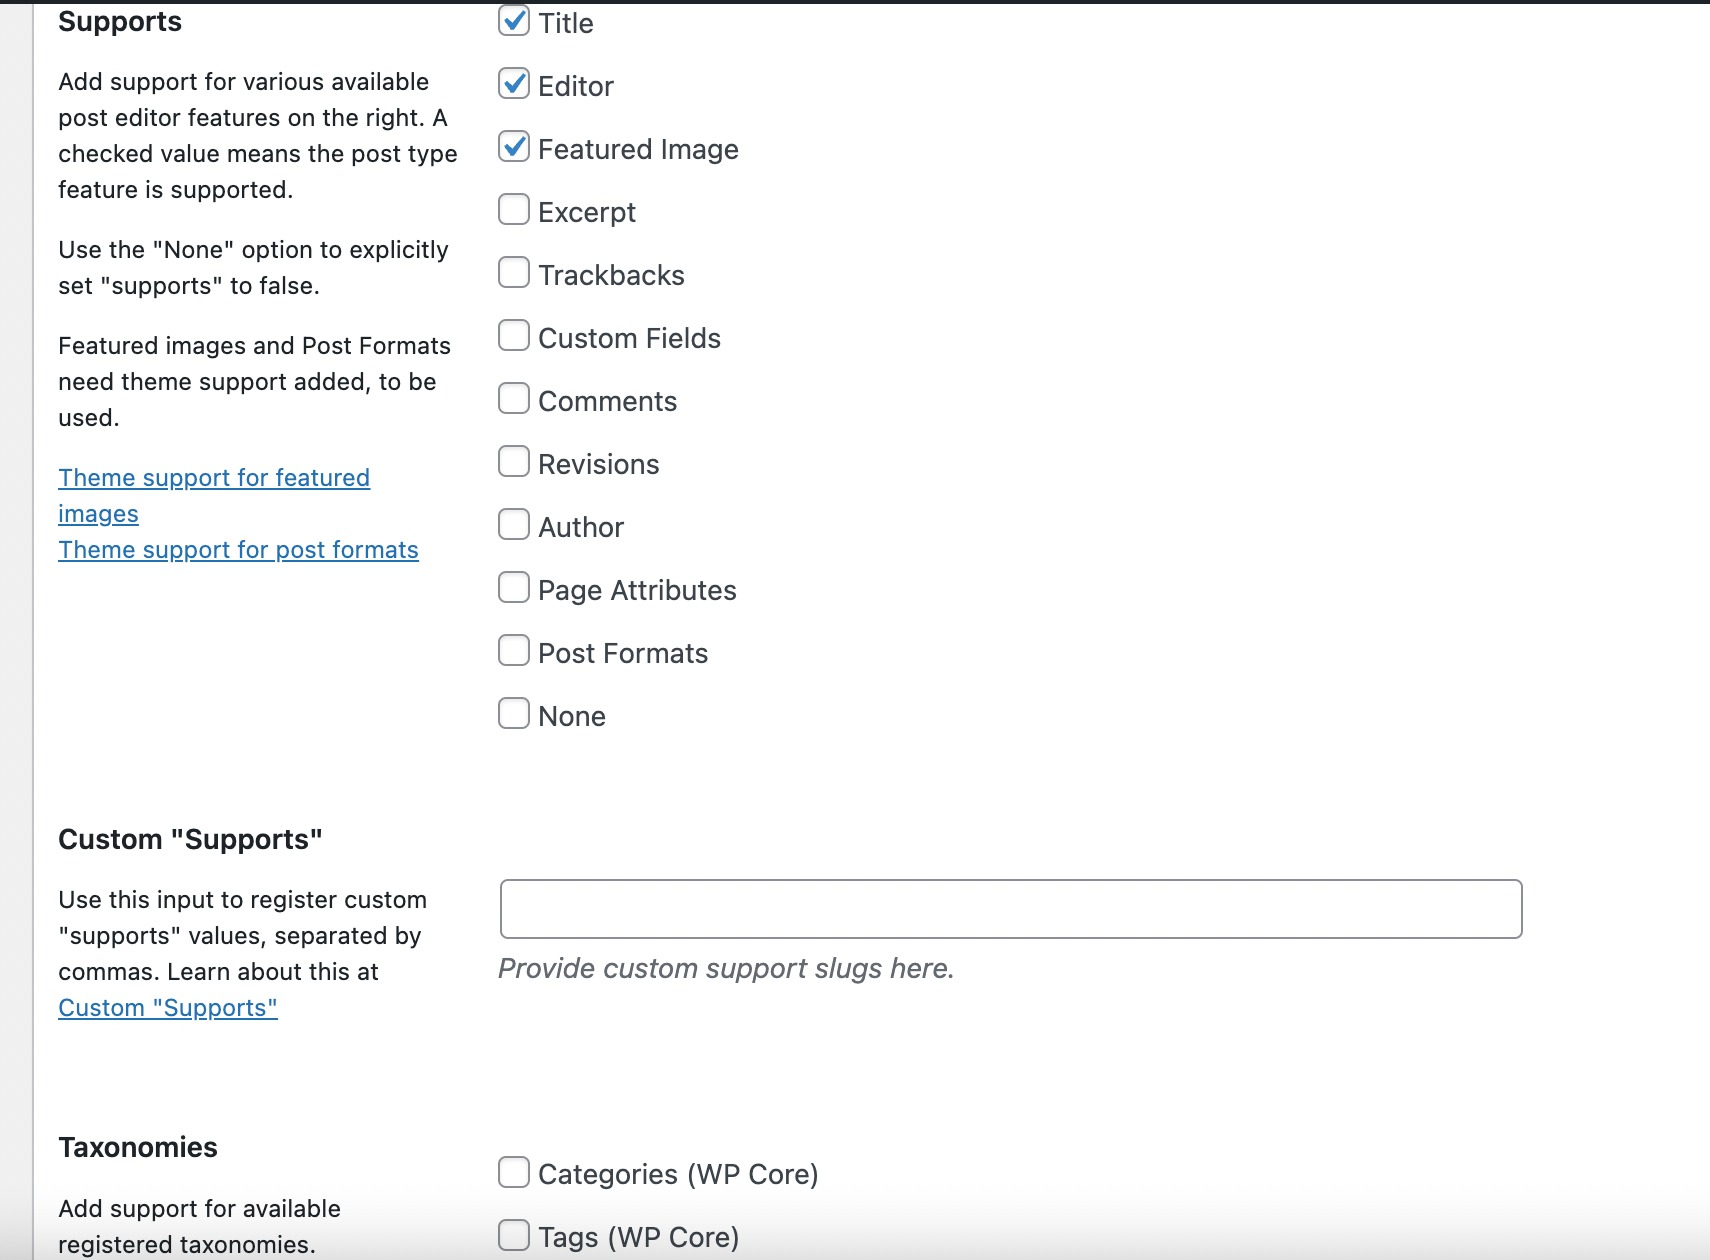
Once you’re happy with your settings, click the Add Post Type button to save your changes.
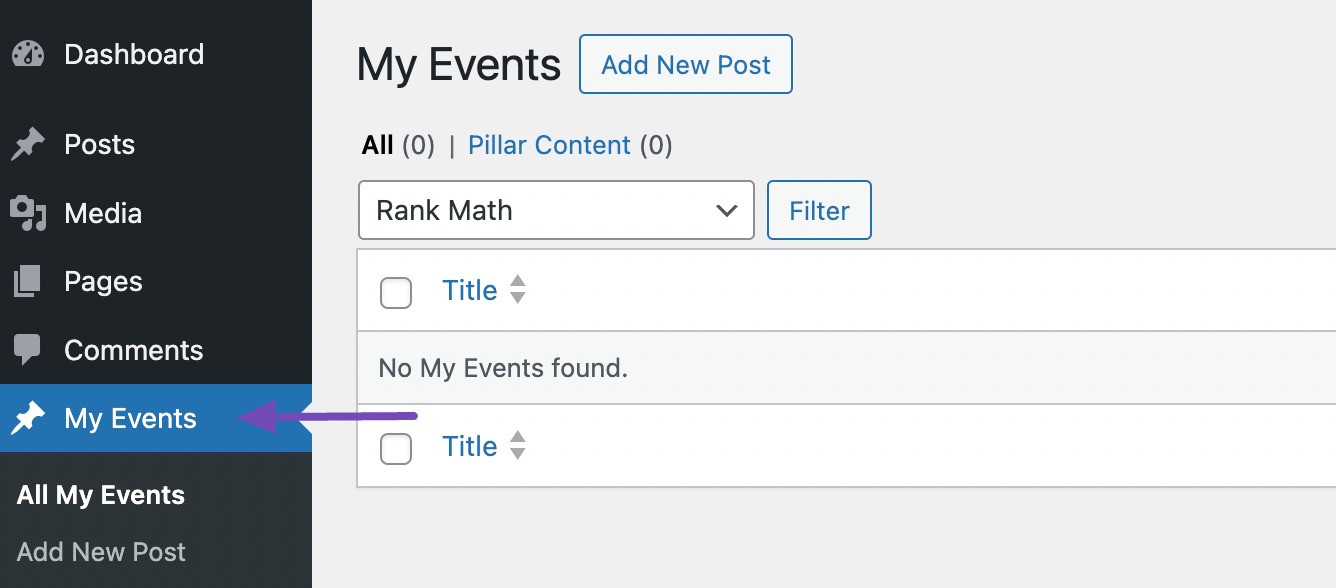
After saving, you’ll notice your newly created custom post type displayed as one of the menu items in WordPress, as shown below.
Now, let’s discuss the manual method.
4.2 Creating a Custom Post Type Manually
If you prefer manually creating a custom post type, it involves editing your theme’s functions.php file.
Typically, you can access the functions.php file by accessing your WordPress installation’s files via FTP or the WordPress dashboard.
However, since you can lose the code after updating your theme, it is recommended to use a WordPress snippet plugin like WPCode.
To proceed, you’ll need to install and activate the WPCode plugin.
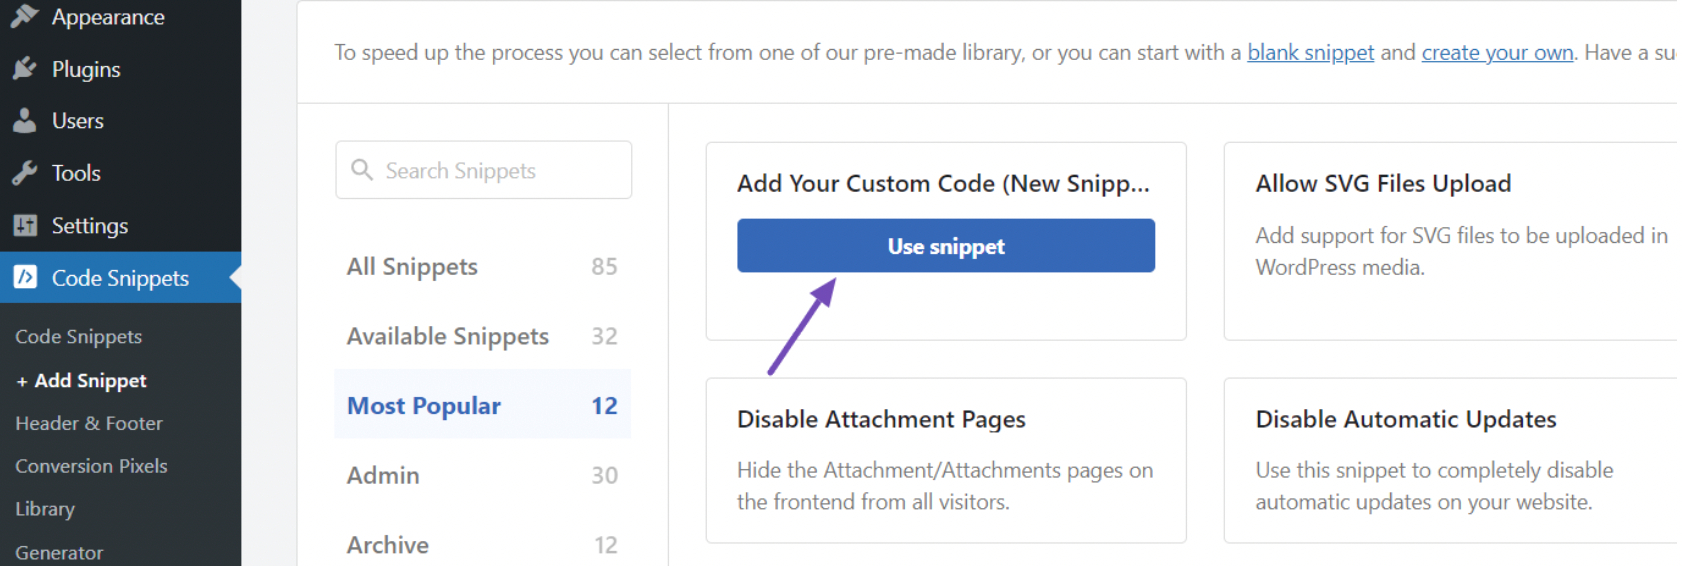
Once activated, go to Code Snippets → Add Snippet in your WordPress dashboard. Hover your mouse over ‘Add Your Custom Code (New Snippet),’ then click the Use Snippet button.
This will take you to the ‘Create Custom Snippet’ page. Next, give your snippet a title, toggle the switch to Active, and then change the code type to PHP Snippet, as illustrated below.
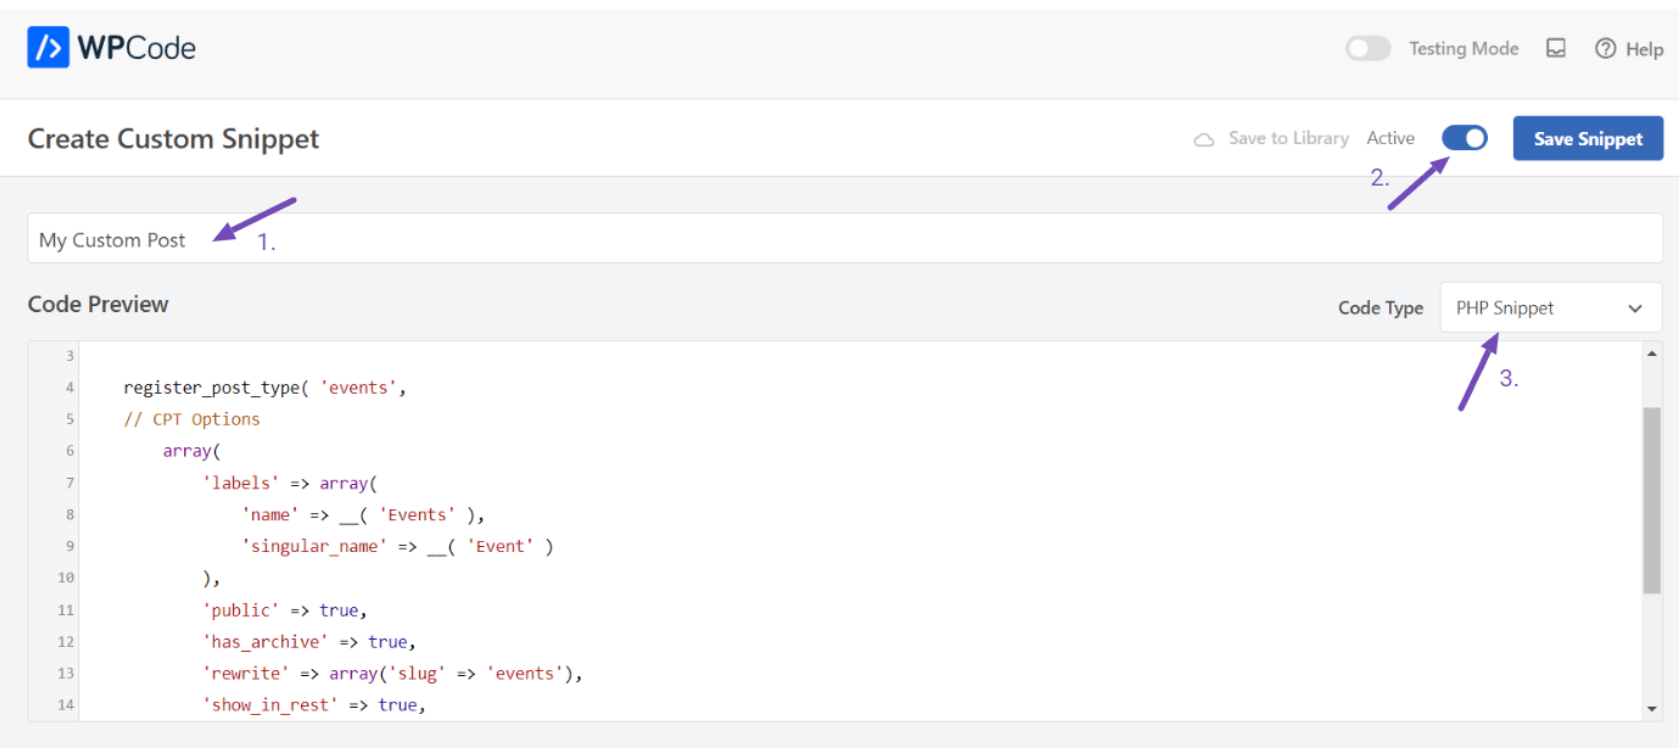
After that, paste the following code into the ‘Code Preview’ area.
// Function to register our custom post type
function create_posttype() {

    register_post_type( 'events',
    // CPT Options
        array(
            'labels' => array(
                'name' => __( 'Events' ),
                'singular_name' => __( 'Event' )
            ),
            'public' => true,
            'has_archive' => true,
            'rewrite' => array('slug' => 'events'),
            'show_in_rest' => true,

        )
    );
}
// Hook our function to 'init'
add_action( 'init', 'create_posttype' );
The code provided creates a basic custom post type named ‘Events’ that will be displayed in your admin menu and is compatible with any theme.
If you only need a simple custom post type, you can replace ‘events’ and ‘Events’ with your desired slug and CPT name, then click the Update button.
However, if you require additional options for your custom post type, you can use the following code instead of the previous one.
This code enhances the ‘Events’ custom post type with various options, including support for revisions, featured images, custom fields, and the association with a custom taxonomy named ‘location.’
/*
* Creating a function to create our custom post type
*/

function custom_post_type() {

  // Set UI labels for Custom Post Type
  $labels = array(
    'name' => _x( 'Events', 'Post Type General Name', 'astra' ),
    'singular_name' => _x( 'Event', 'Post Type Singular Name', 'astra' ),
    'menu_name' => __( 'Events', 'astra' ),
    'parent_item_colon' => __( 'Parent Event', 'astra' ),
    'all_items' => __( 'All Events', 'astra' ),
    'view_item' => __( 'View Event', 'astra' ),
    'add_new_item' => __( 'Add New Event', 'astra' ),
    'add_new' => __( 'Add New', 'astra' ),
    'edit_item' => __( 'Edit Event', 'astra' ),
    'update_item' => __( 'Update Event', 'astra' ),
    'search_items' => __( 'Search Event', 'astra' ),
    'not_found' => __( 'Not Found', 'astra' ),
    'not_found_in_trash' => __( 'Not found in Trash', 'astra' ),
  );

  // Set other options for Custom Post Type
  $args = array(
    'label' => __( 'events', 'astra' ),
    'description' => __( 'Event listings', 'astra' ),
    'labels' => $labels,

    // Features this CPT supports in Post Editor
    'supports' => array( 'title', 'editor', 'excerpt', 'author', 'thumbnail', 'comments', 'revisions', 'custom-fields', ),

    // Taxonomy associated with this CPT
    'taxonomies' => array( 'location' ),

    /* A hierarchical CPT is like Pages and can have
       Parent and child items. A non-hierarchical CPT
       is like Posts.
    */
    'hierarchical' => false,

    'public' => true,
    'show_ui' => true,
    'show_in_menu' => true,
    'show_in_nav_menus' => true,
    'show_in_admin_bar' => true,
    'menu_position' => 5,
    'can_export' => true,
    'has_archive' => true,
    'exclude_from_search' => false,
    'publicly_queryable' => true,
    'capability_type' => 'post',
    'show_in_rest' => true,
  );

  // Registering the Custom Post Type
  register_post_type( 'events', $args );

}

/* Hook into the 'init' action so that the function
   containing our CPT registration is not
   unnecessarily executed.
*/

add_action( 'init', 'custom_post_type', 0 );
In this code, the hierarchical custom post type value is set to false. To make the custom post type display like pages instead of posts, you can change this value to true.
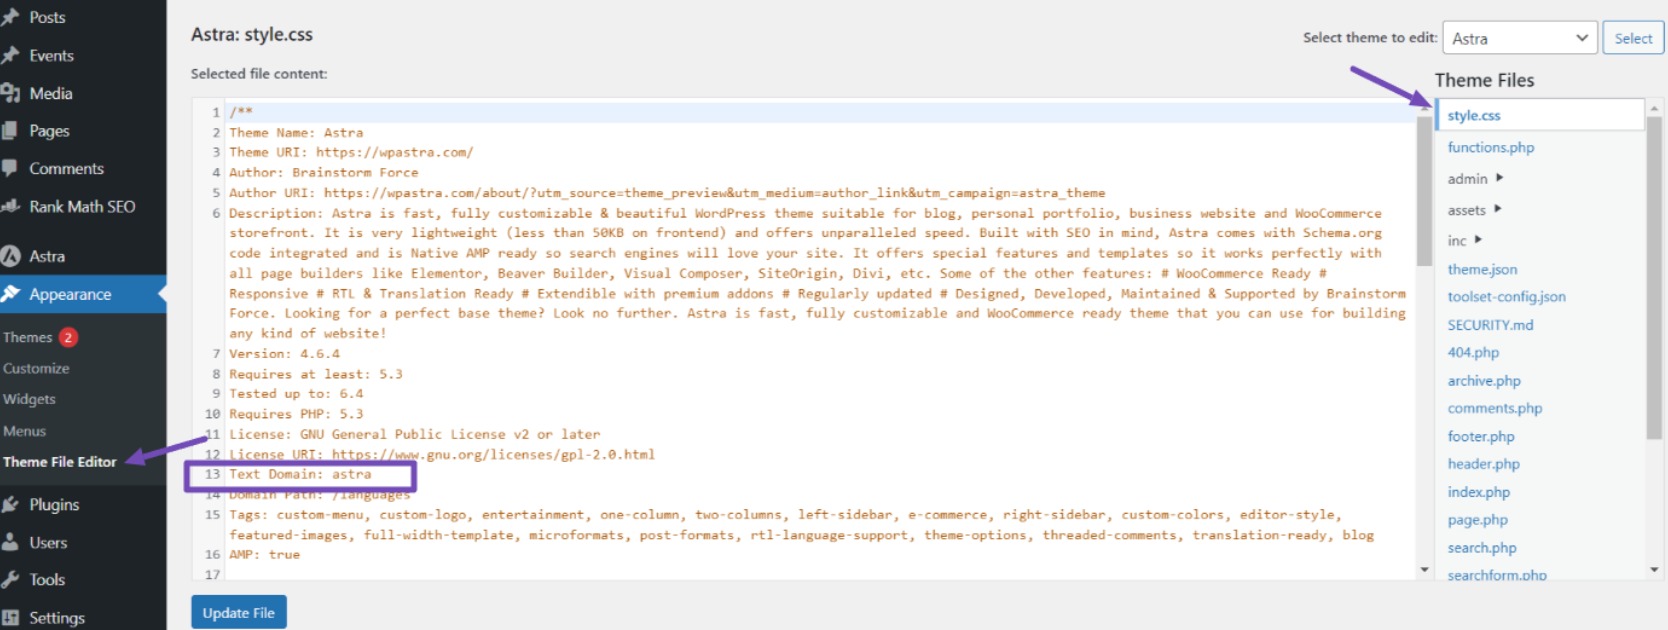
The text domain used in the code is ‘astra.’ So, to use your theme’s text domain if it supports translation, go to Appearance → Theme File Editor in the admin panel.
As shown below, navigate to style.css to see your theme’s text domain.
Remember to keep the code you want active in the WPCode plugin and click the Update button after making changes.
Note: Avoid combining two snippets that register the same custom post type, which causes WordPress errors. For additional post types, create a new snippet for each one.
5 Conclusion
Adding custom post types to your WordPress website can significantly improve its functionality and organization.
Following the steps in this guide, you can easily create custom post types that cater to your specific needs.
Here are some tips to help you:
- Keep your audience in mind when designing custom post types. Ensure they are easy to locate, navigate, and understand.
- Don’t hesitate to experiment with different configurations to find what works best for your website.
- Before applying any code to your live website, it’s recommended to test it on a staging environment to avoid potential issues.
- Always back up your website before making any changes to ensure you can restore it if needed.
With this, you can elevate your WordPress website to new heights with effort and experimentation.
If you found this post helpful, please share your feedback by Tweeting @rankmathseo.