When you think about SEO, chances are you focus on keywords, backlinks, or content length, but what about your images?
If you’re uploading pictures straight from your camera roll or stock library without optimizing them, you’re missing out on a big opportunity in 2026.
Images aren’t just there to make a page look pretty; they play a key role in how fast your site loads, how accessible it is, and whether your content shows up in Google Images or not. And the good news? You don’t need to be a developer to get this right.
In this post, I’ll walk you through how to optimize images so that they not only look great but also bring in more search traffic. You’ll see exactly what you can do, from choosing the right format to writing effective alt text, to make your images work harder for your SEO.
So, without any further ado, let’s get started.

- Why Are Images So Important?
- What is Image SEO?
- How to Optimize Images for Search
- Name All Image Files Appropriately
- Use Descriptive Image Alt Text & Captions
- Optimize Image Dimensions and File Size for Faster Load Times
- Create an Image Sitemap and Get Your Images Indexed Faster
- Use a Content Delivery Network to Serve Images
- Apply Suitable Schema Markup (for recipes, products, and videos)
- Lazy Load Your Images
- Use Responsive Images
- Optimize For Visual Search
- Test and Monitor Image SEO Performance
- Frequently Asked Questions
- Image SEO – After Action Report & Next Steps
1 Why Are Images So Important?
Be honest, would you really want to read a long article without a single image? Probably not.
Without visuals, even the best-written content can feel flat and forgettable. I’ve noticed that when I add charts, graphics, or screenshots, my content instantly feels more engaging and easier to understand, and you’ve likely experienced the same when reading other blogs.
Images do more than just break up text. They make your content more shareable, linkable, and persuasive. Think about it: would you rather share a plain wall of text or a post with visuals that tell the story at a glance?
Optimized images can bring in traffic from Google Images, improve your rankings by boosting engagement, and even help your site load faster when compressed correctly. Plus, alt text makes your content more accessible, which search engines also take into account.
That’s why I recommend adding images wherever they make sense. Ask yourself, What would I expect to see if I landed on this article? For example, it might seem ironic to include images in a post about image SEO, but without them, you probably wouldn’t stick around until the end.
2 What is Image SEO?
Image SEO is the process of optimizing your visual content so that search engines can understand it, and so your readers actually enjoy it.
When you take the time to optimize images, you make your website faster, more accessible, and more visible in Google Images. That means more visitors can discover your content, not just through text search, but also through the images you use.
Here’s a quick bit of context: back in 2018, Google removed the View Image button from Google Image Search after a dispute with Getty Images.
Why does that matter to you? Because ever since then, searchers are far more likely to click through to a website to view an image rather than just opening it directly. In fact, some websites reported a traffic boost of over 30% from Google Images after that change.
The takeaway?
Image SEO isn’t just a nice-to-have, it’s an opportunity. If you optimize your images correctly, you can attract new visitors, improve engagement, and give your site an edge in search results.
3 How to Optimize Images for Search
So, let’s get into the practical steps you can take to optimize your images and start driving more traffic from search.
3.1 Name All Image Files Appropriately
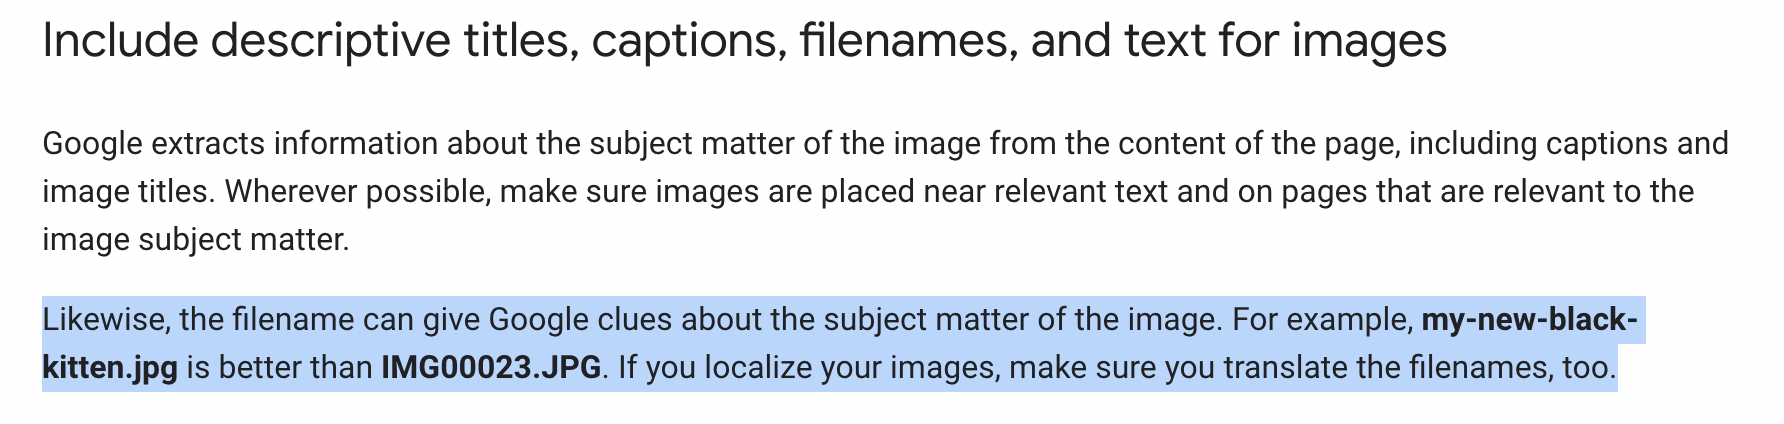
Before you upload an image, take a moment to give it a clear, descriptive name. Google has said for years that filenames help them understand what an image is about. For example:
my-new-black-kitten.jpg – GoodIMG00023.jpg – Bad
You can see how the first one instantly gives context, while the second tells Google nothing.
One mistake I see often is when most of them copy images straight from Word or PowerPoint. That’s how you end up with filenames like word-image-1.jpg, which doesn’t help you or your readers.
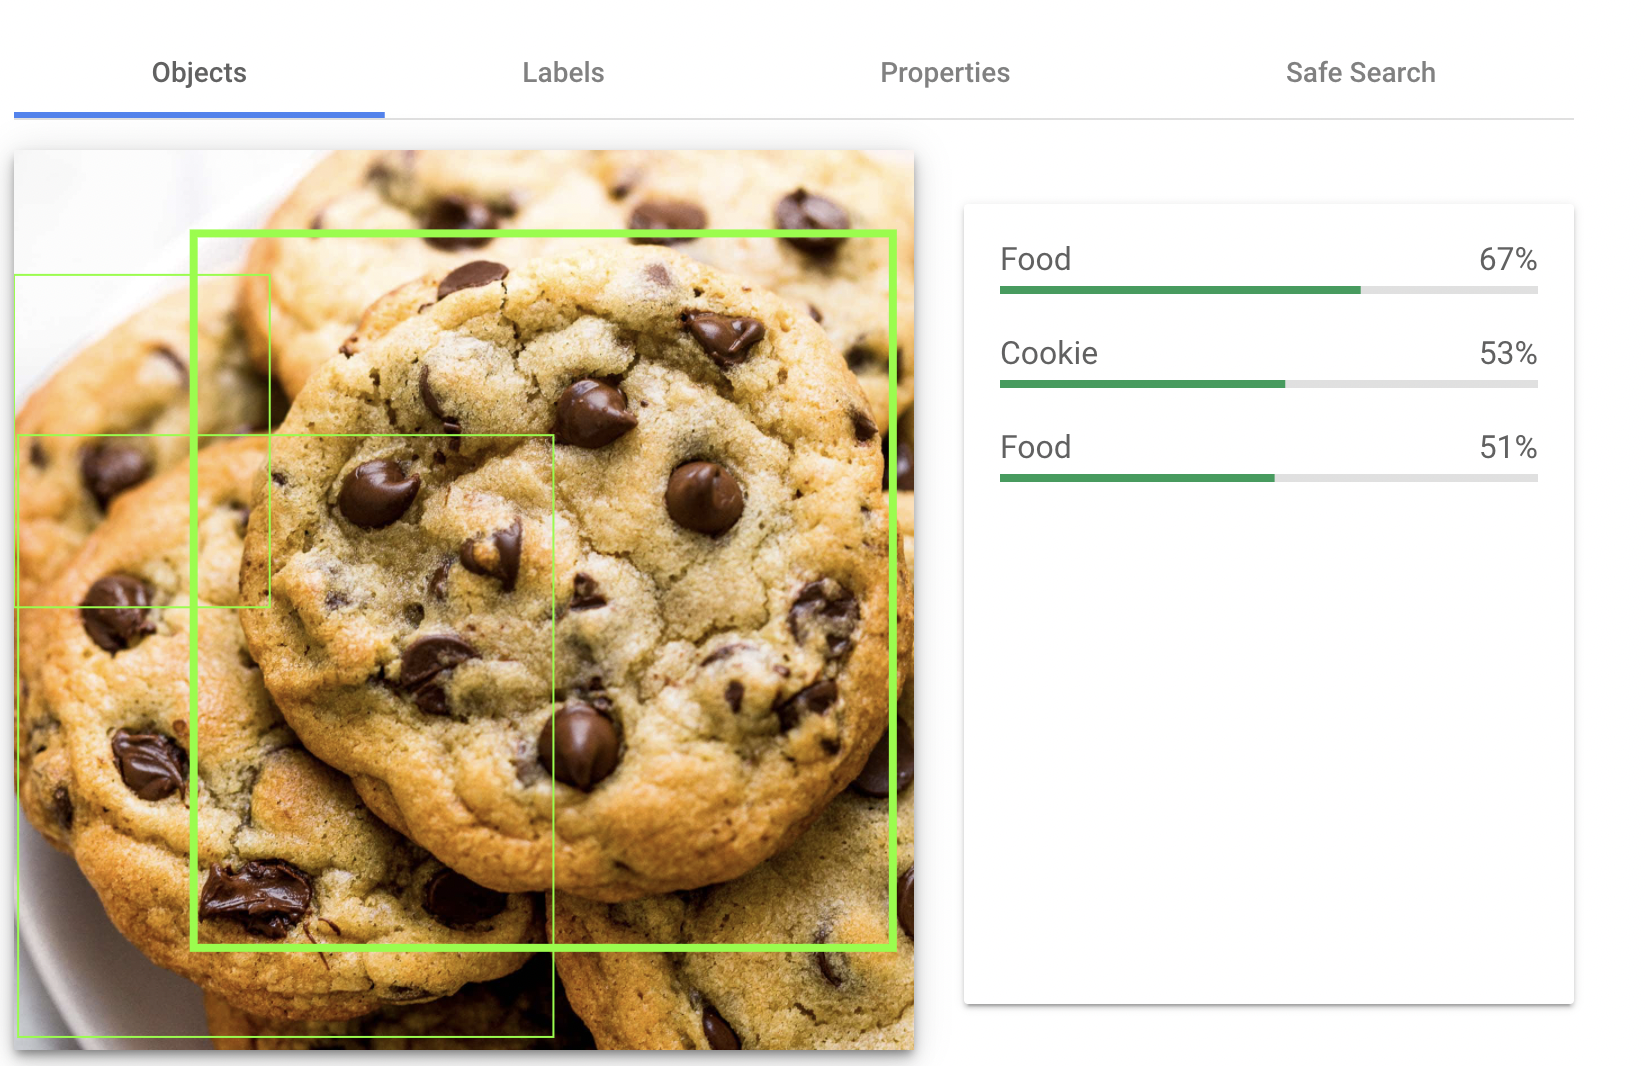
Even though Google’s AI can often recognize what’s in an image, it’s not perfect. If a clear photo of a cookie can still confuse the system, then giving your file a name like chocolate-chip-cookie.jpg is an easy way to help.
Don’t overdo it. Adding extra words just to squeeze in more keywords (chocolate-chip-cookie-cookies-baking.jpg) looks unnatural and won’t help. Keep it simple, descriptive, and relevant. Try to use dashes and not special characters.
Before you hit upload, rename your image with a short phrase that describes what’s actually in it.
3.2 Use Descriptive Image Alt Text & Captions
Let us discuss in detail about alt text and image captions.
What Are Alt Tags and Alt Text?
Alt text (short for “alternative text”) is a short description of an image. You don’t usually see it on the page itself, but screen readers use it to describe images to visually impaired users, and search engines use it to better understand what’s in the picture.
Alt text gives both visitors and search engines context. If the image fails to load, visitors still know what should have been there.
Google’s official guidelines include an example of the HTML syntax for alt text, shown below:
<img src="puppy.jpg" alt="Dalmatian puppy playing fetch"/>
Fortunately, Rank Math actually makes it possible to automate the alt text process. Missing alt attributes can automatically be added using various different variables such as their file name (which as covered earlier should be manually set to be something suitable as well anyway), etc.
And, Rank Math changes the image alt text value on the frontend of your website (i.e. without changing the value that’s stored) so that if at a later date you wish to again alter the alt text and set something manually, this can be done.
The same goes for image captions:

Important Note: The added captions to the images are also added dynamically. That means Rank Math adds the caption to the images while the page loads, not before that. In other words, if you check your images from the WordPress media gallery, you will not find the captions added there, but you will find them on posts, pages, etc.

Simply choose your caption format, and let Rank Math do the heavy lifting…
You can also use our Content AI to generate alt text for your images in WordPress. When you upload an image to your Media Library, simply click the Generate Alt button next to the Alt Text field, and the AI will generate an alt text for you, as illustrated below.
If you’re a Rank Math PRO user, you can generate alt text bulk directly from your Media Library or Post/Page Editor. For more details, refer to our guide on using Content AI to generate alt text for your images in WordPress.
How to Optimize Image Alt Text (Alt Tags) for Better Image SEO
Writing alt text doesn’t have to be complicated. Just look at your image and describe it in a clear, specific way.
- Be relevant, accurate, and write for user accessibility (and SEO)
- Be descriptive and specific
- Use keywords naturally if they fit, don’t stuff them.
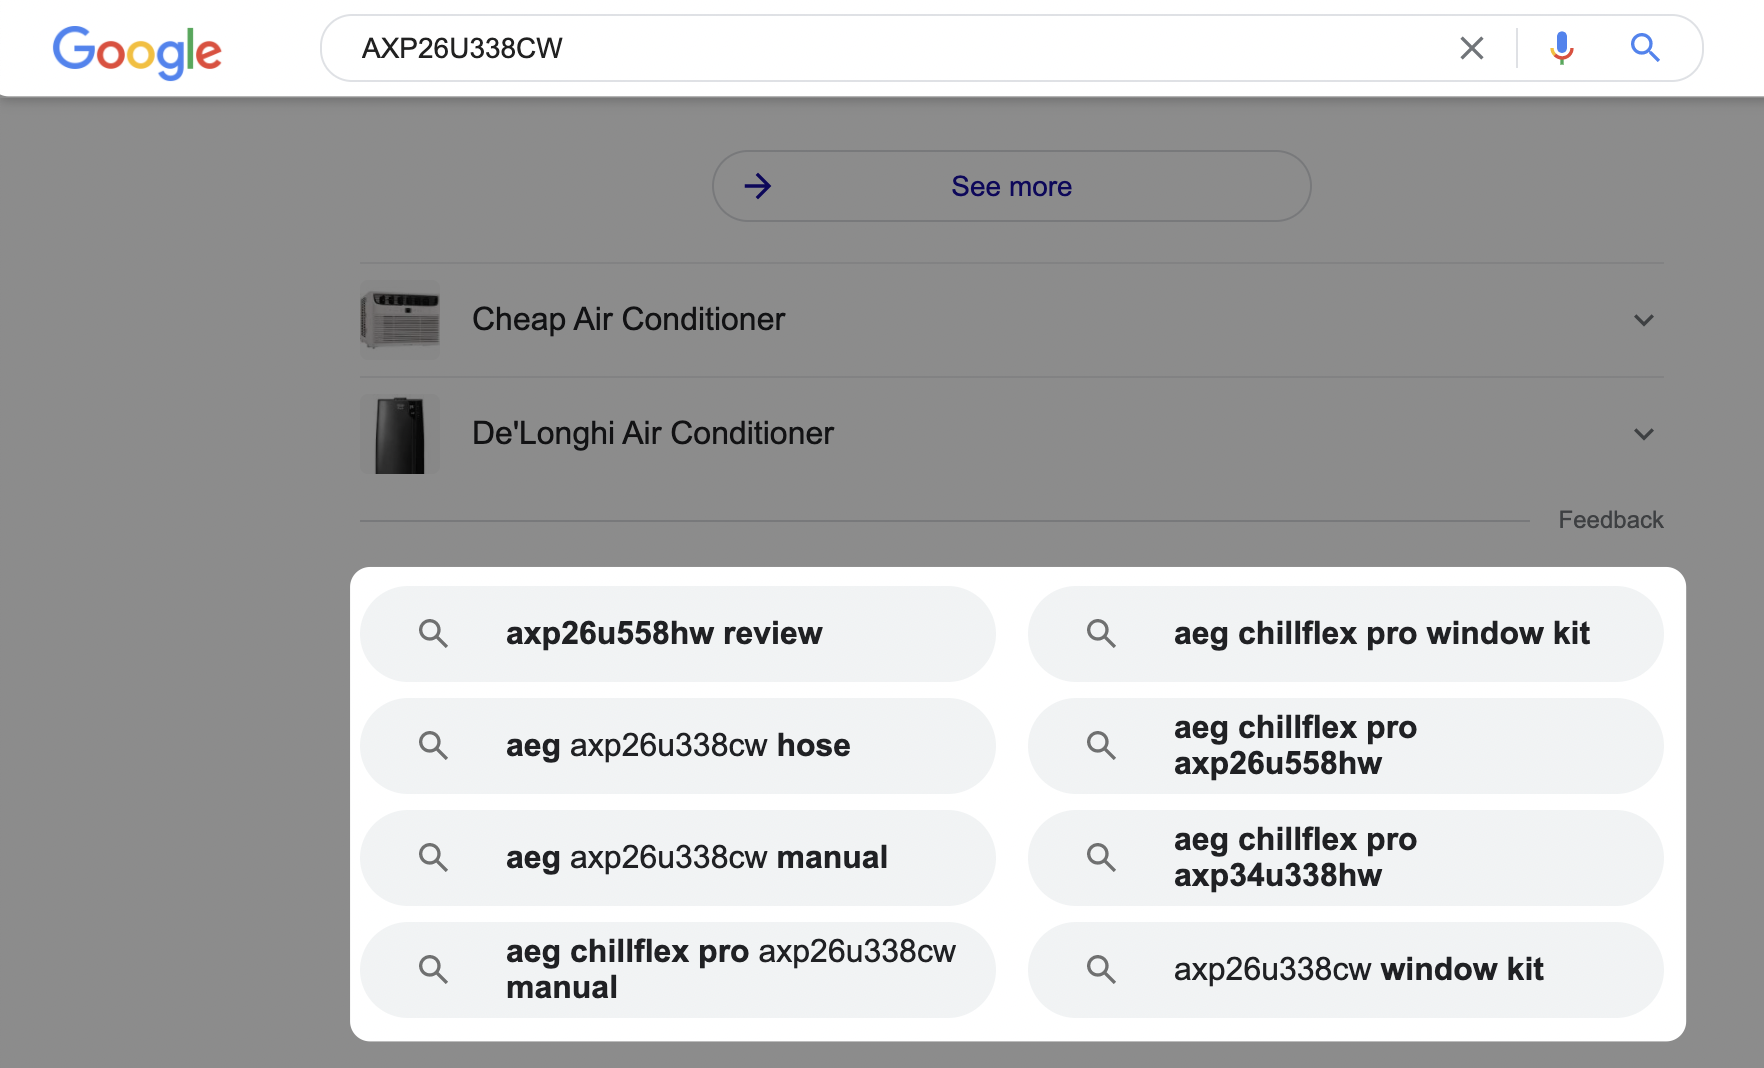
If you’re working with product photos, it’s also smart to include details like model numbers or product IDs (e.g., alt="Clogau Celebration Pendant 3SMP5") because that’s how many visitors search.
So, let’s run through some examples of the alt text we’d use for a couple of images:
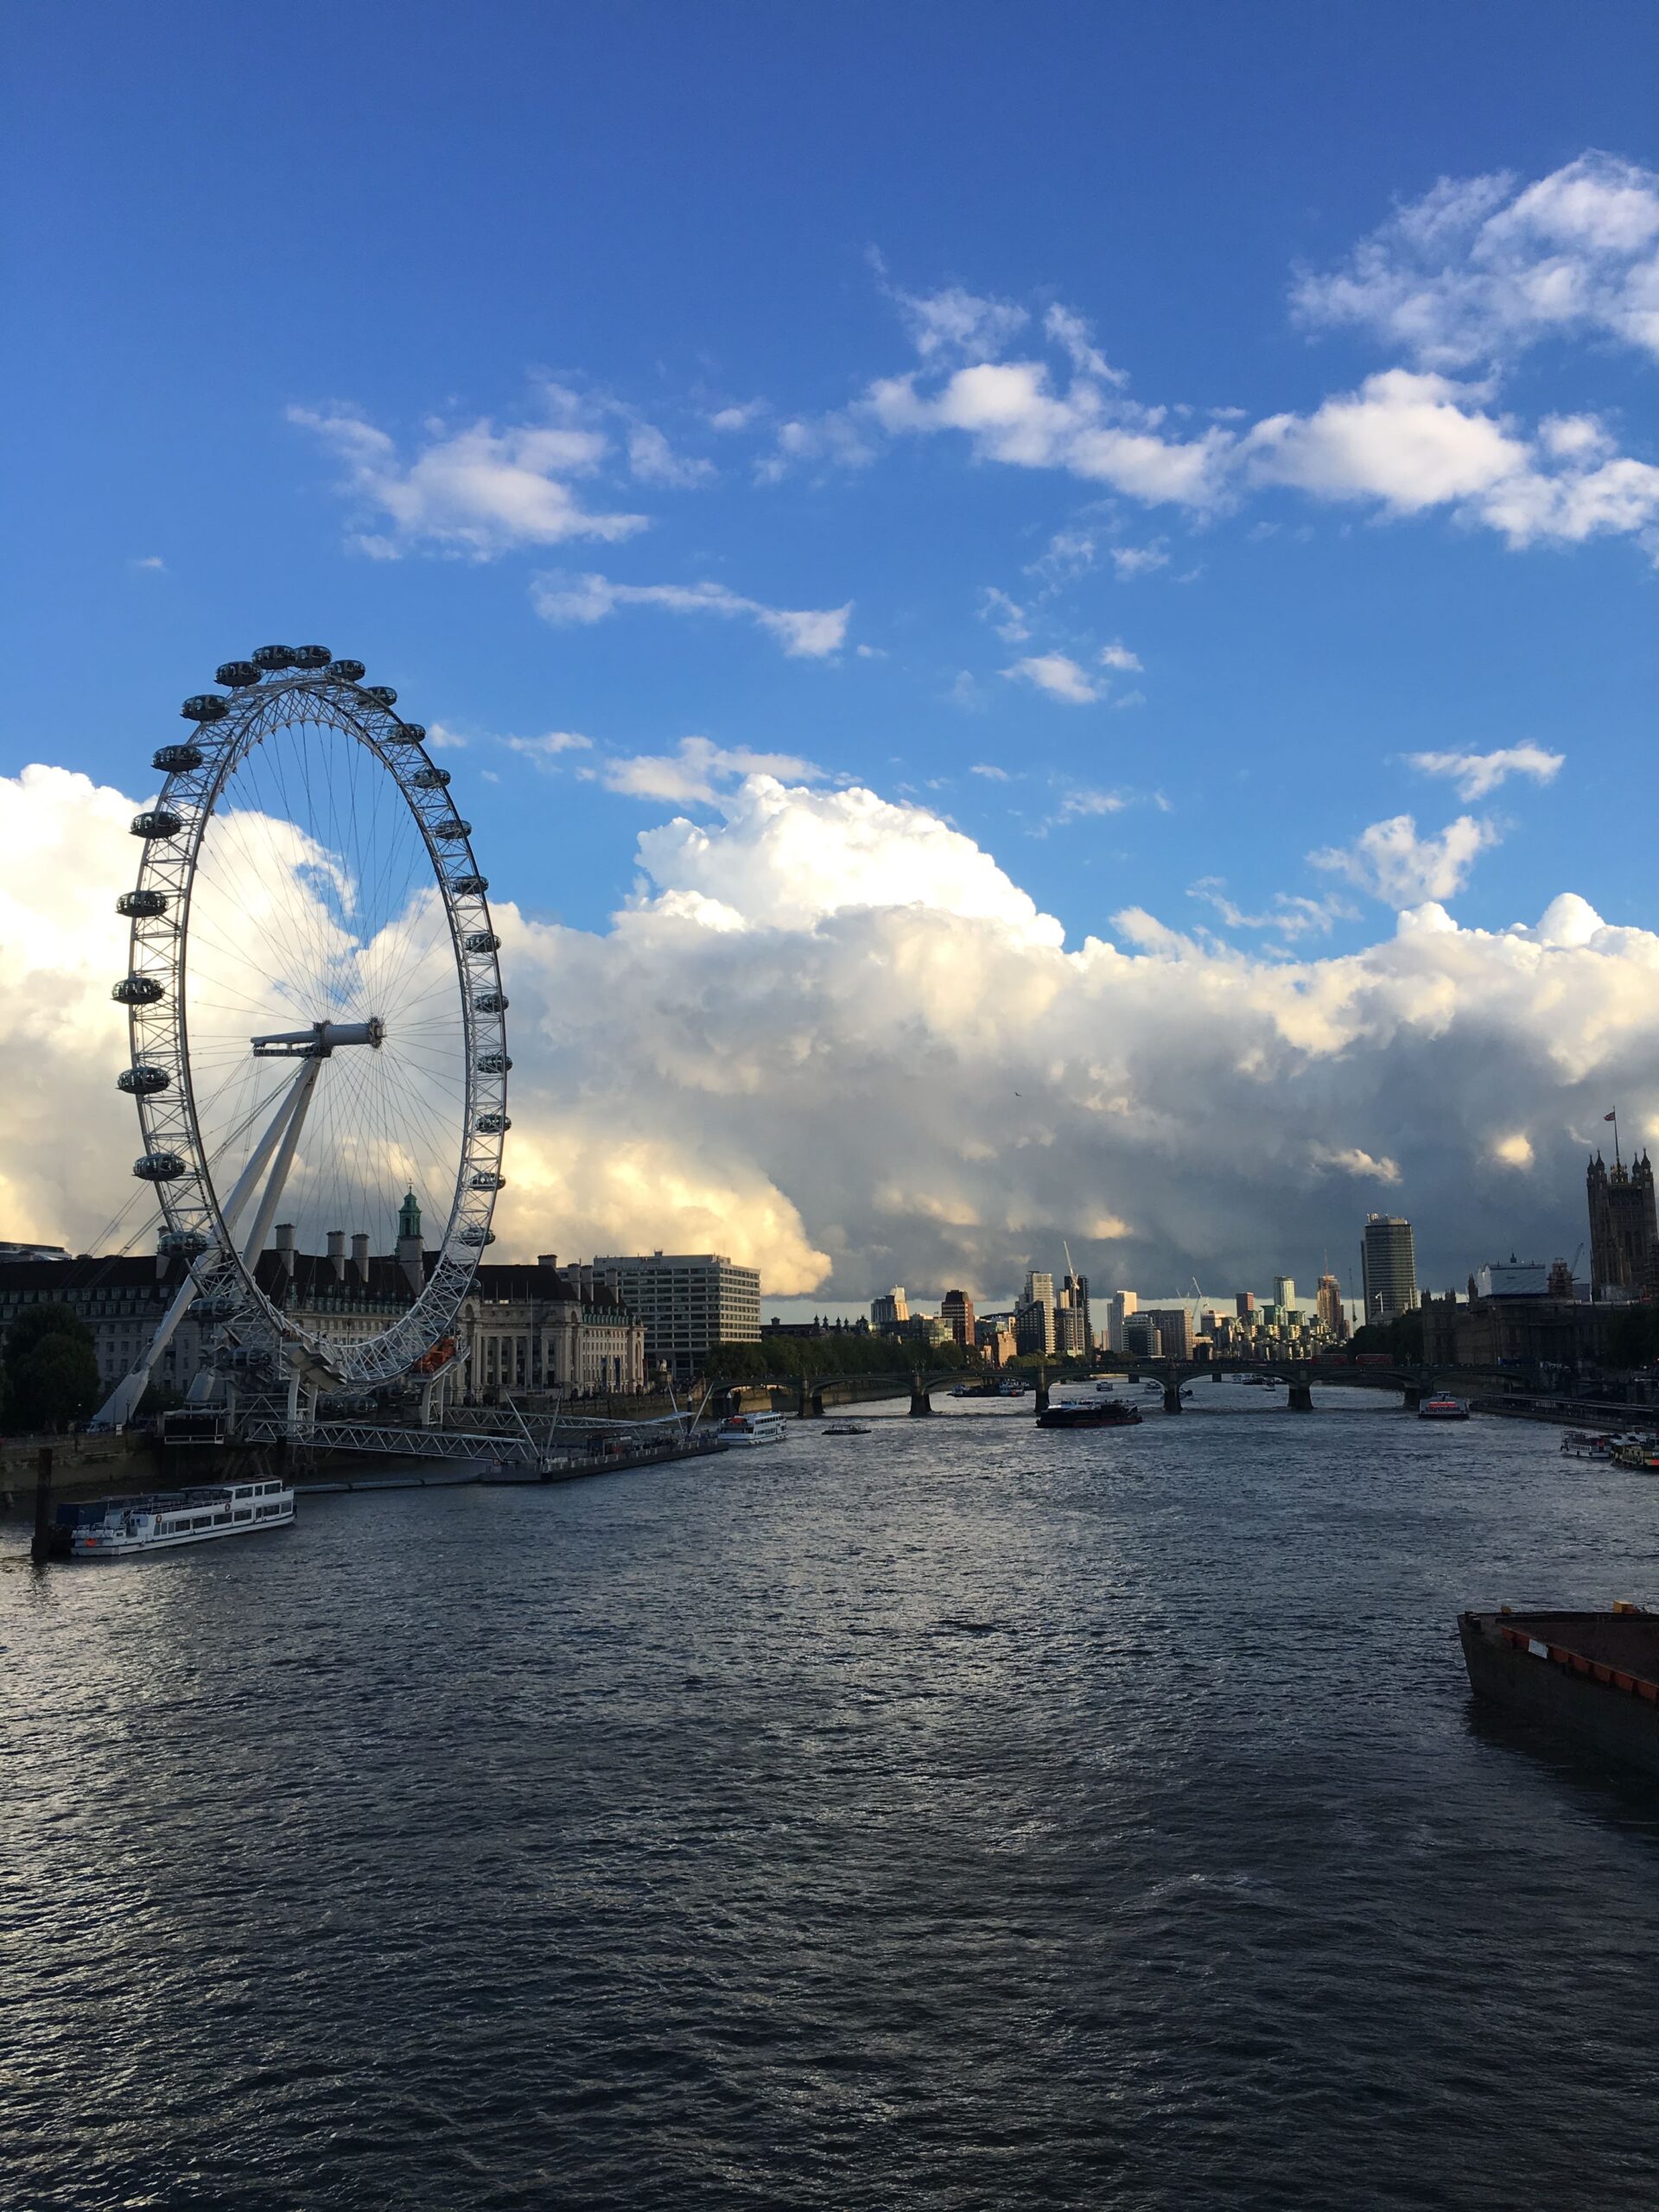
For the more decorative photographs you use in your content, our advice is always to consider their context. The image below is entirely and wholly random to this piece of content. For example, in the context of this post – this photo a member of our team took in London over a year ago has no real place apart from an example.
So, we might add it using the image file name London-eye-photograph-example.jpg and the alt text London Eye Photograph Example.
Simply because the observation wheel you see on the left is called the London Eye, and in the context of this article, it is an arbitrary photograph example. The potential for this to have an impact on the ranking of this post is not something you would be able to attribute, but it still forms a part of image SEO as we want to help make it easy for both the visually impaired as well as search engines to understand the content of images.
And last but not least, for screenshots, like this one we’re about to use in the next section of this post, we again try to be as helpful as possible in the context of why we inserted the image. This is a screenshot of the WordPress Block editor that demonstrates how to add a caption to an image.
Therefore, we’d advise using the file name: add-image-captions-wordpress.jpg along with the alt text: How To Add Image Captions in WordPress since this is clearly indicative of what is being showcased in the image.
Adding Captions to Images on Your Website
Captions appear directly under your images, and they are visible to readers. Google has said it uses captions along with surrounding text to understand the context of an image.

You don’t need a caption for every photo, especially if it’s decorative, but adding one can help when:
- You’re citing the source of an image.
- You want to explain or highlight something in the picture.
- You’re showing a screenshot (e.g., “How to add captions in WordPress”).
Think of captions as an extra layer of clarity for both your readers and search engines.
3.3 Optimize Image Dimensions and File Size for Faster Load Times
When it comes to image SEO, speed matters. Slow-loading pages hurt both your rankings and your visitors’ patience. That’s why you need to think about two different things when optimizing images:
- Image dimensions (the width and height of the image)
- File size (how much space the image takes up in kilobytes/megabytes)
Get Your Image Dimensions Right
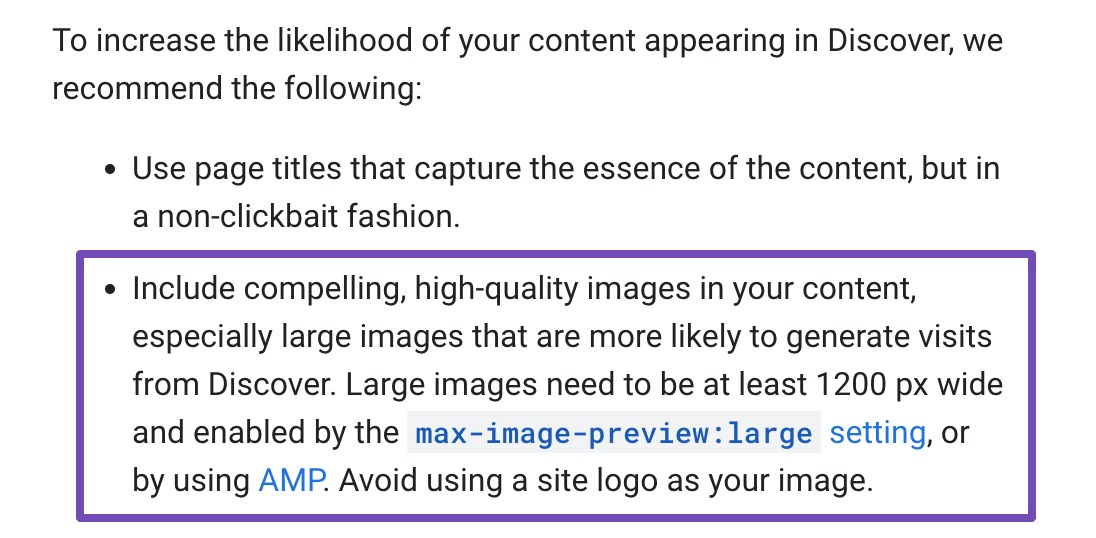
Google recommends using images that are at least 1200px wide if you want them to appear in places like Google Discover. At the same time, you don’t want to upload unnecessarily large images.
For example: if you upload a 2000px-wide image but only display it at 600px on your page, visitors will still download the huge file, wasting bandwidth and slowing your site. Instead, resize images to the maximum size they’ll actually be displayed.
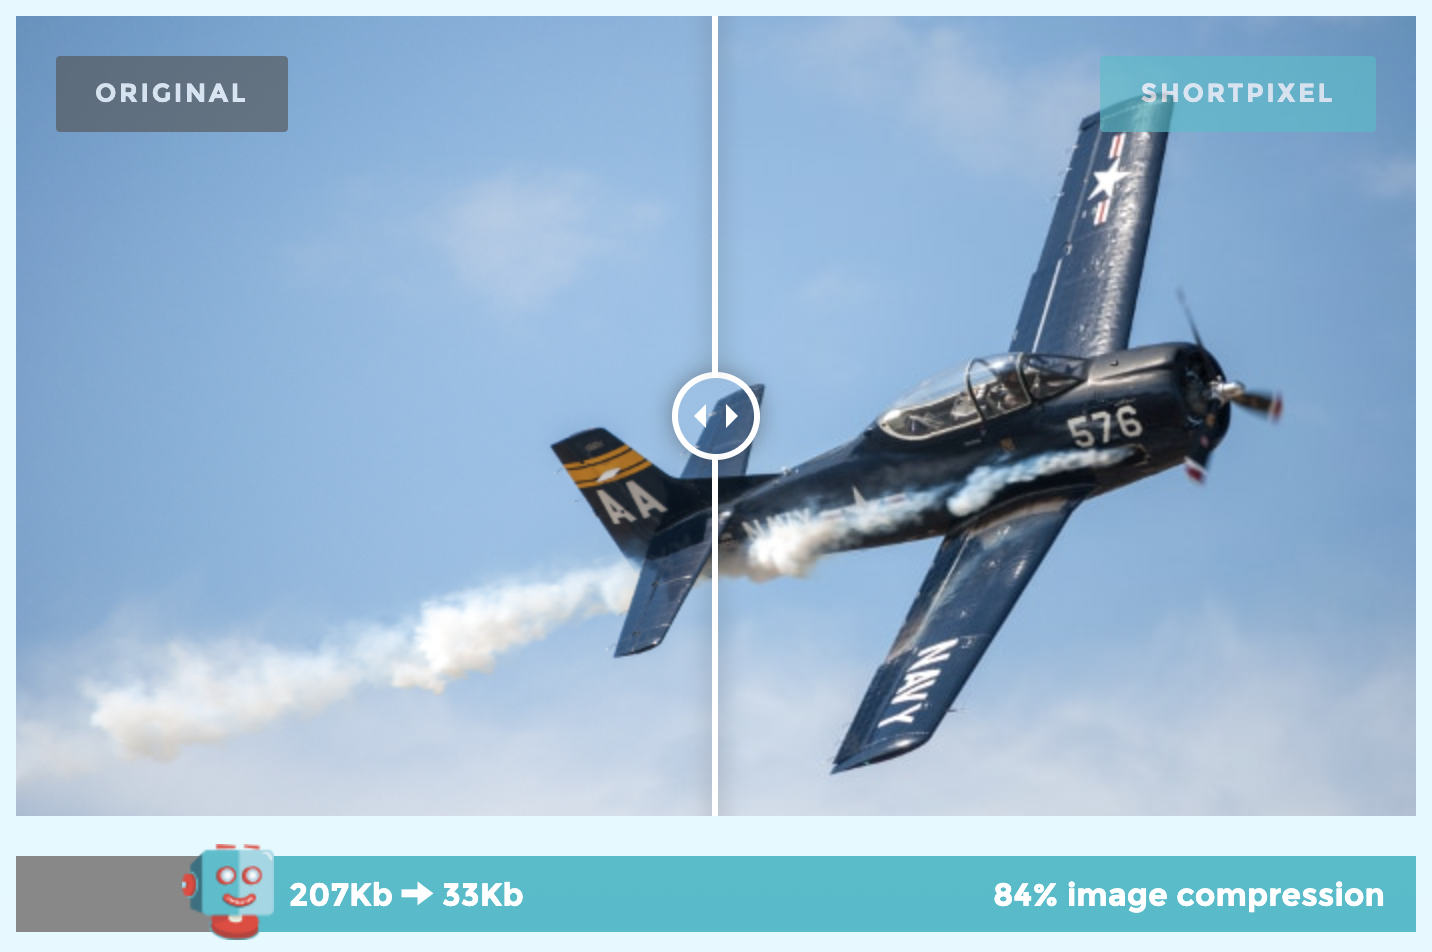
Keep File Sizes Small Without Losing Quality
As a rule of thumb, try to keep images under 70 KB whenever possible. That’s usually the sweet spot between looking sharp and loading fast.
To reduce file size, there are several free and open-source tools you can use:
For software you install and run locally on your computer, our go-to recommendation is ImageOptim (available for Mac only, so if you’re a Linux or Windows user, here are some alternatives). It’s incredibly simple: just drag and drop your image, and it will optimize the file in its original location.
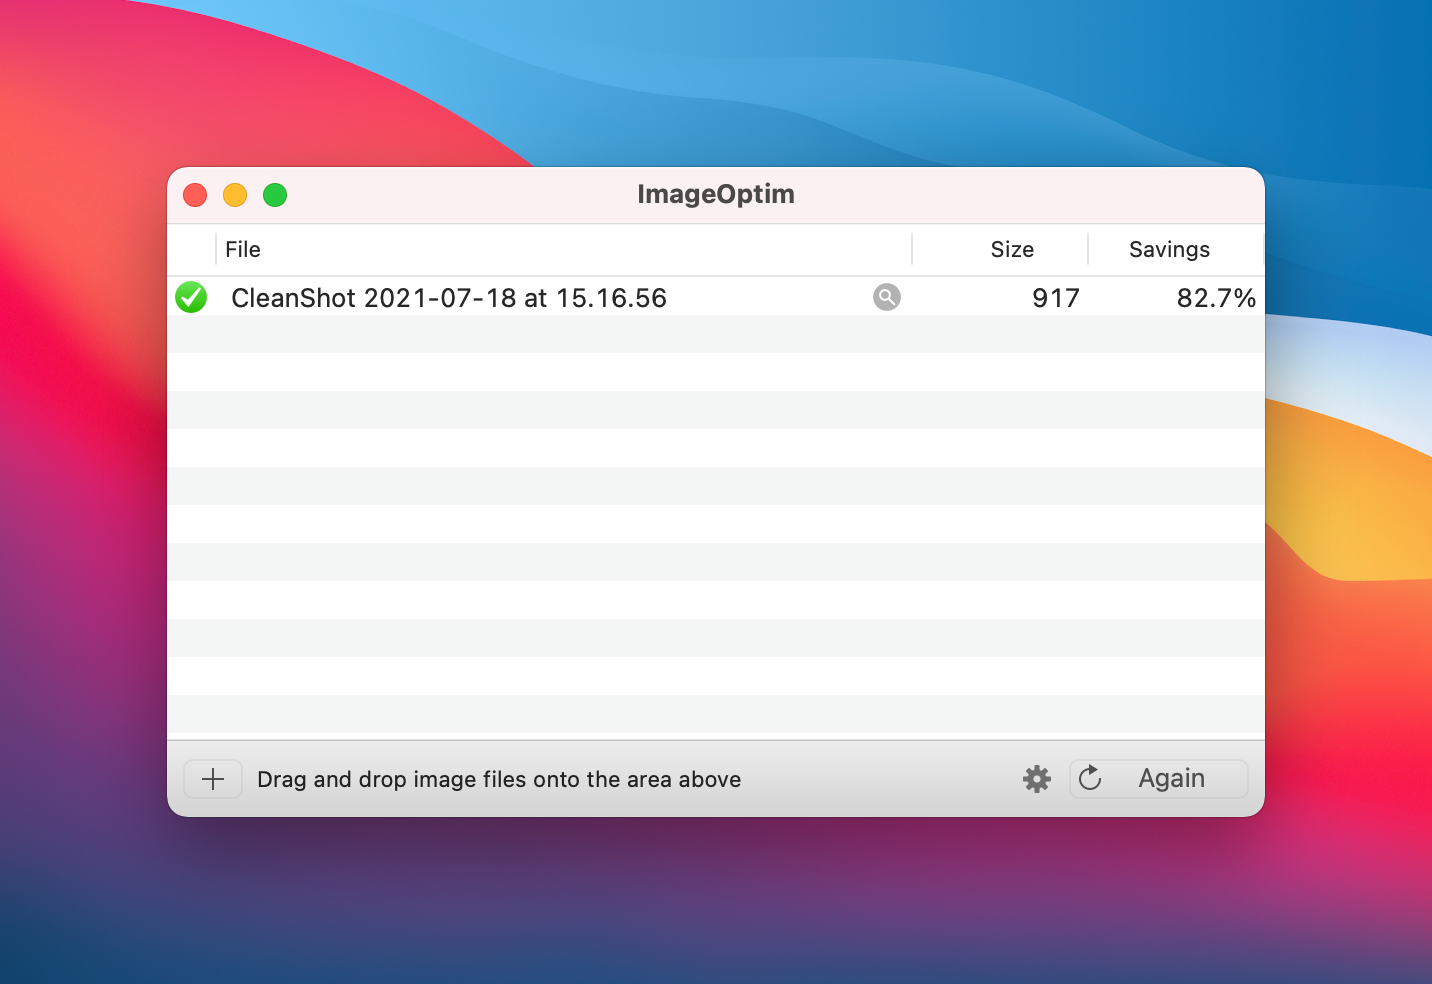
ImageOptim also supports GIF optimization and allows you to customize the compression settings according to your needs.
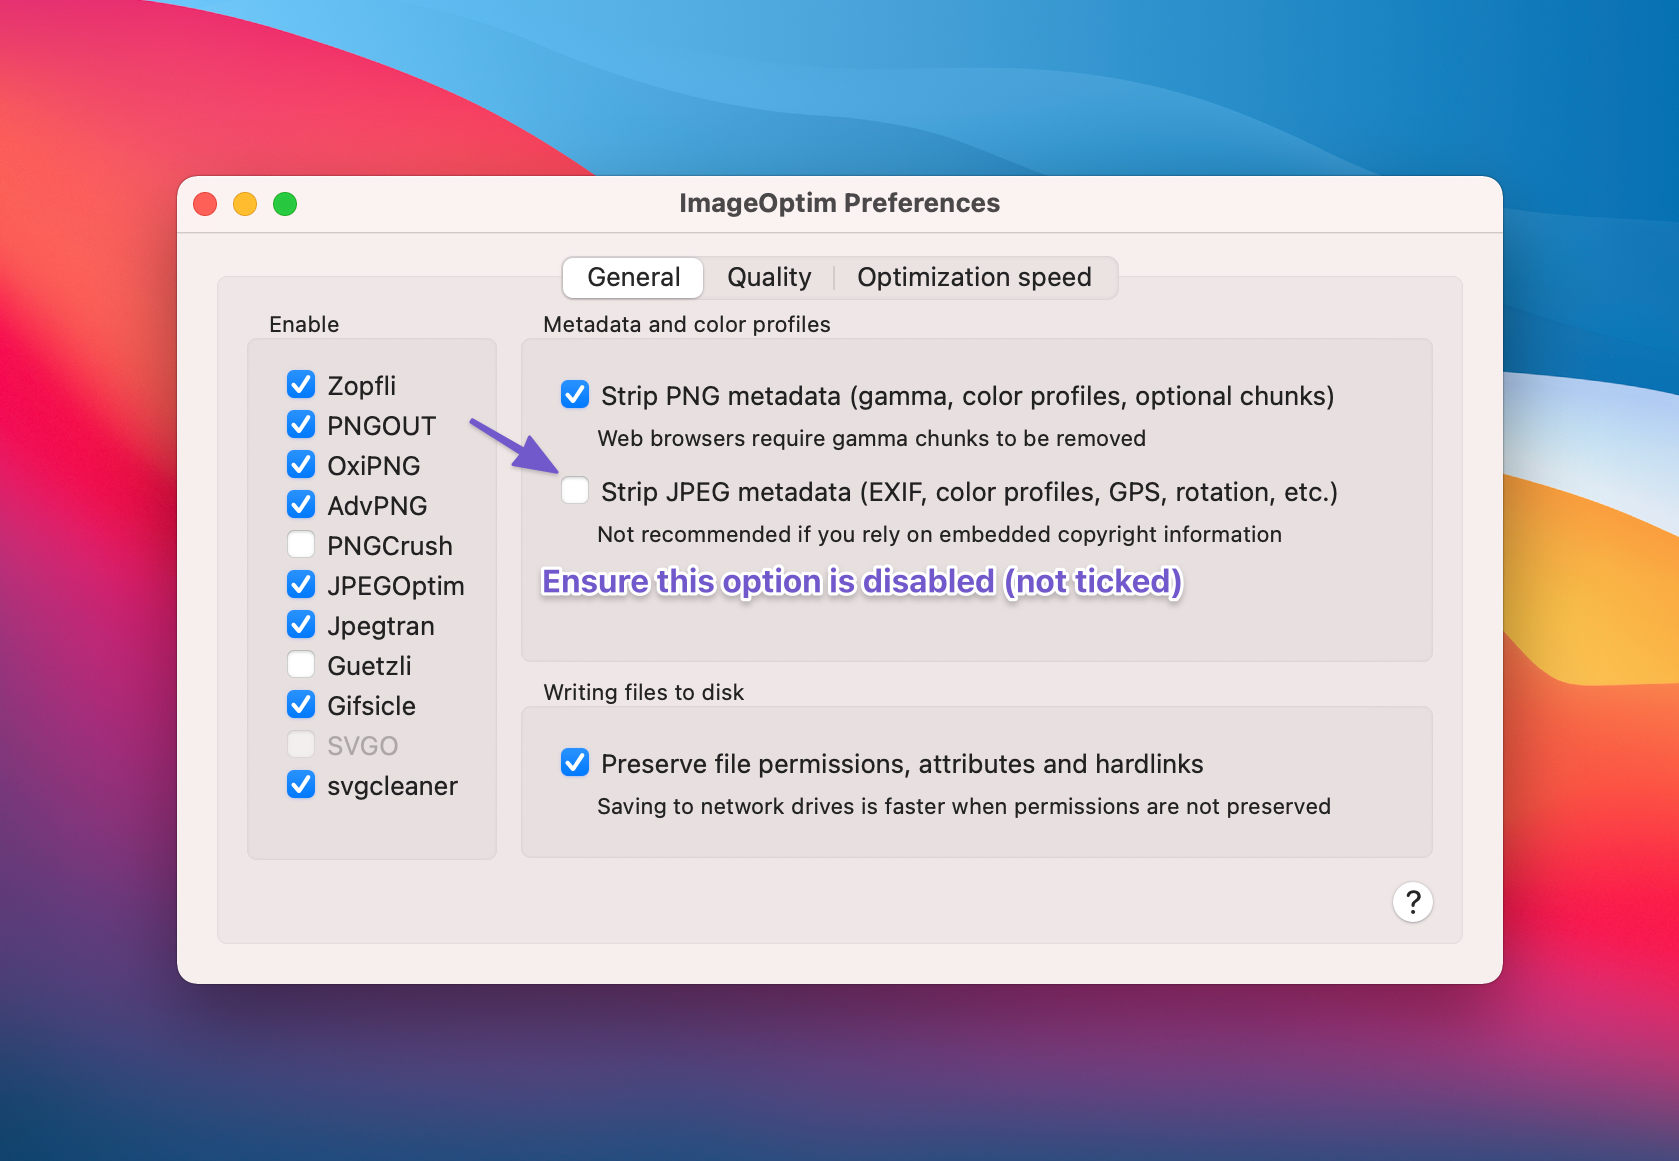
One important setting to adjust is stripping EXIF data from your images. Google has stated that they may use EXIF data as a ranking factor for Google Images.
While stripping EXIF data can be useful for reducing file size, it’s important to note that Google might use this information in some cases.
That being said, in the long term, doing this manually is quite time-consuming. Even if it’s only a couple of seconds per image, in a year, you’ll spend hours locally organizing images and dragging them into these tools.
Simply put, when you’re ready to automate the entire process, if you already use the leading content management system (WordPress), here are some really solid solutions. Most notably, WP Smush, ShortPixel & Imagify.
These plugins also help ensure that your site is serving scaled images (responsively), meaning that if you upload an image that’s 1080px wide and someone views it on a mobile device that is evidently less than 1080px wide, it wouldn’t load the full 1080px image (which is what would otherwise happen and waste bandwidth). Manually, this can be achieved using srcset. Learn more here.
3.4 Create an Image Sitemap and Get Your Images Indexed Faster
If you want your images to show up in Google Images, you need to make sure search engines can actually find them. That’s where an image sitemap comes in.
Just like a regular sitemap helps Google discover and crawl your website pages, an image sitemap tells Google more about the images on your site. By including image details and URLs, you make it easier for search engines to index them, which can boost your chances of getting traffic from Google Images.
These are the tags that you can use in image sitemaps:
| Tag | Required | Description |
| <image:image> | Yes | Encloses all information about a single page. Each <url> tag can contain up to 1,000 <image:image> tags. |
| <image:loc> | Yes | The URL of the image. In some cases, the image URL may not be on the same domain as your main website. This is perfectly fine as long as both domains are verified in the Google Search Console. If, for example, you use a content delivery network such as Google Sites to host your images, make sure that the hosting site is verified in GSC. |
Make sure your robots.txt file doesn’t block Google from crawling any images you want indexed.
If you’re using WordPress with Rank Math SEO, you don’t have to worry much. Rank Math automatically adds your images to your sitemap based on your settings, which saves you the hassle of doing it manually.
Note: Images used as CSS backgrounds (e.g., in <div> elements with background-image) are not included in the sitemap, as Google and other search engines do not index them.
3.5 Use a Content Delivery Network to Serve Images
When someone visits your site, all the content is pulled from your server. If your server is far from the visitor, loading times increase, especially for images. That’s where a Content Delivery Network (CDN) helps.
A CDN is a group of servers located around the world. Instead of loading images from your main server every time, the CDN delivers them from the server closest to your visitor.
For instance, if your site is hosted in London but someone visits from Australia, the images won’t load all the way from London. Instead, they’ll load from a nearby CDN server in Australia. This makes your site faster and gives visitors a smoother experience.
There are tons of options out there, notably:
- Cloudflare
- Amazon CloudFront
- Google Cloud CDN
Personally, I recommend starting with Cloudflare. It’s beginner-friendly, has a free plan, and doesn’t create messy URLs. That’s important because Google recommends keeping your image URLs consistent.

It’s best to serve images from your own domain or subdomain rather than switching URLs every time you change CDN providers.
The good news? Cloudflare makes this easy. Since it also acts as a DNS provider, your image URLs stay the same, which means you don’t have to worry about broken links or losing SEO value when optimizing your images with a CDN.
3.6 Apply Suitable Schema Markup (for recipes, products, and videos)
We’ve covered Schema markup extensively in previous articles on our blog, but a quick recap & for those unfamiliar, Schema is what makes search results like this possible:
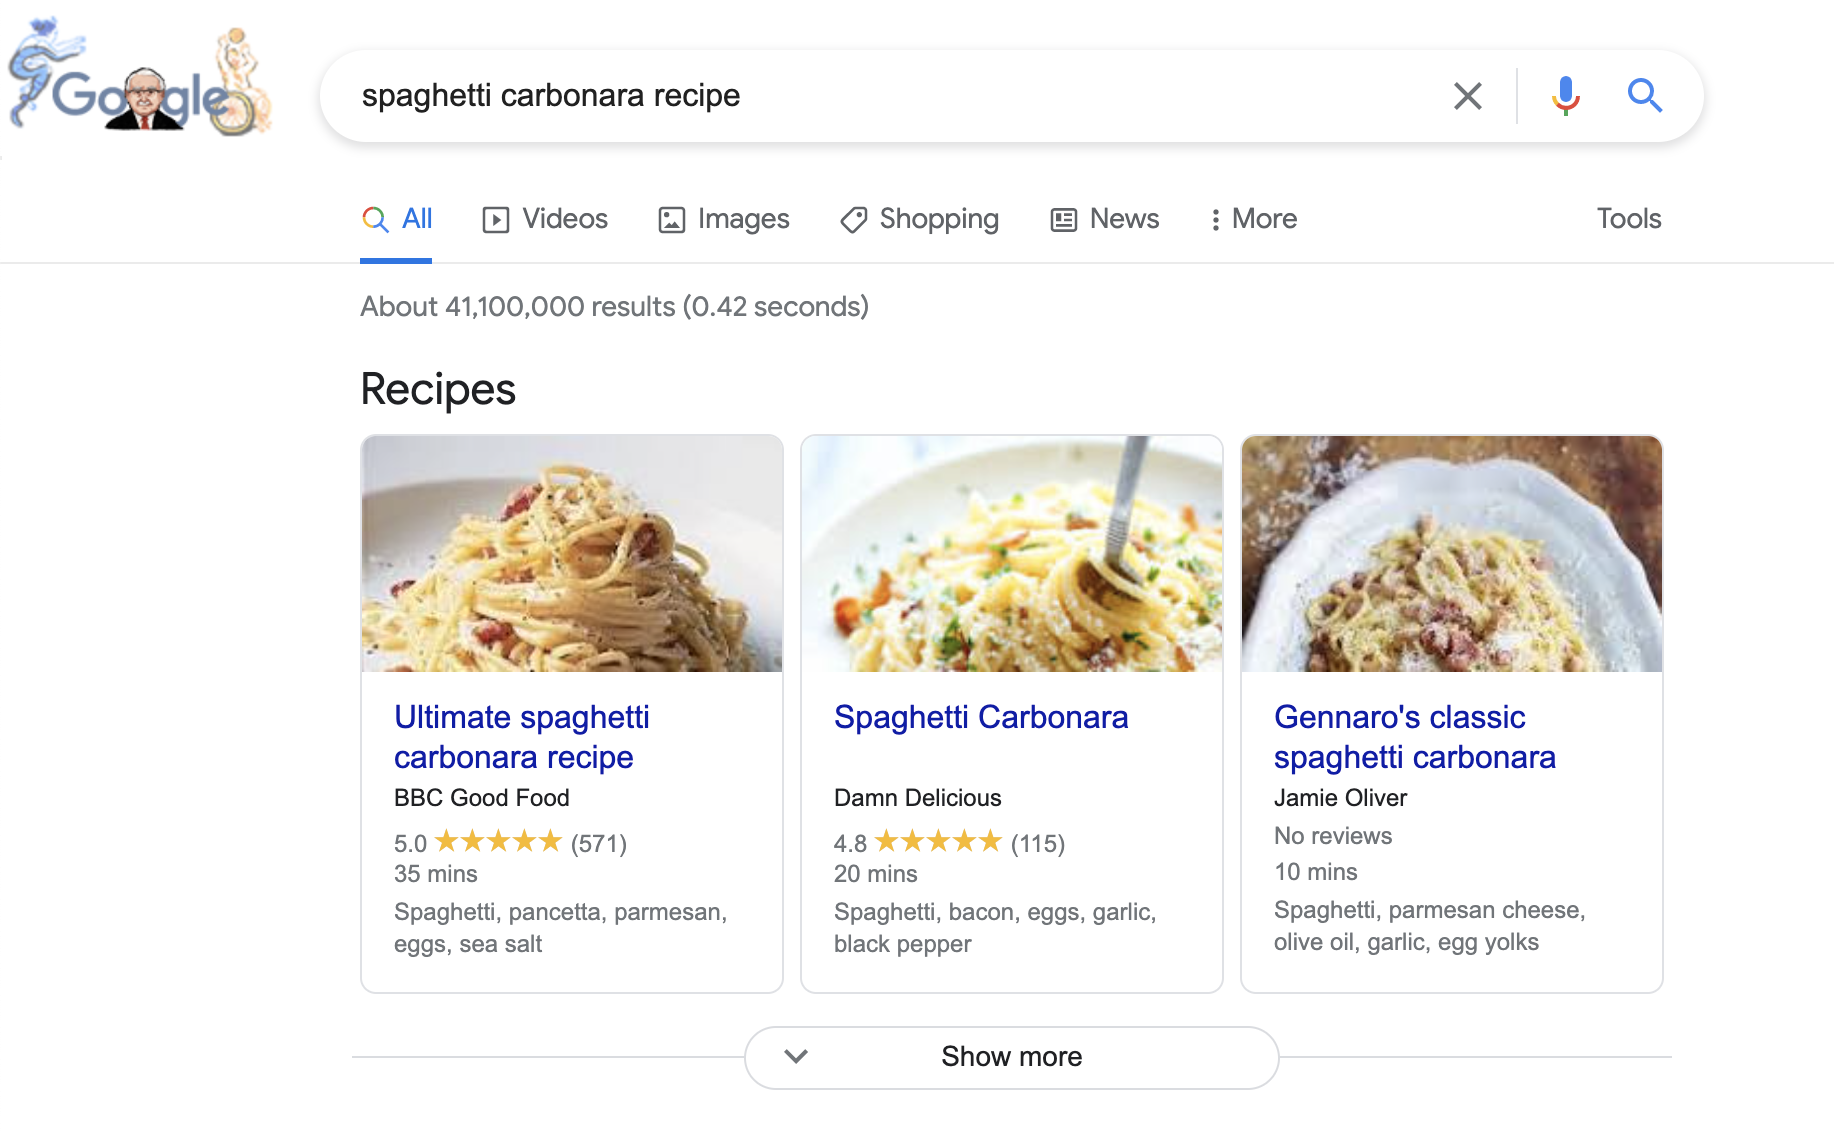
But what does this have to do with image SEO?
Schema markup helps search engines understand the content on your pages, and it can directly improve how your images appear in search results. When you add the right Schema, Google can display special badges on your images in Google Image Search, especially on mobile. These badges make your images stand out and tell users exactly what type of content they’ll find.
Here’s what these look like:

Learn more about Badges in Image Search here.
Right now, Google supports badges for recipes, videos, products, and animated images (GIFs). If your content fits one of these categories, here’s how you can make your images eligible:
- Recipe Schema – Add this to recipe pages so your images can show a recipe badge.
- Video Schema – Use this on pages with video content to help Google display a video badge.
- Product Schema – Apply this to product pages so images can include product information in search.
By applying the right Schema, you’re giving Google the context it needs to highlight your images and attract more clicks.
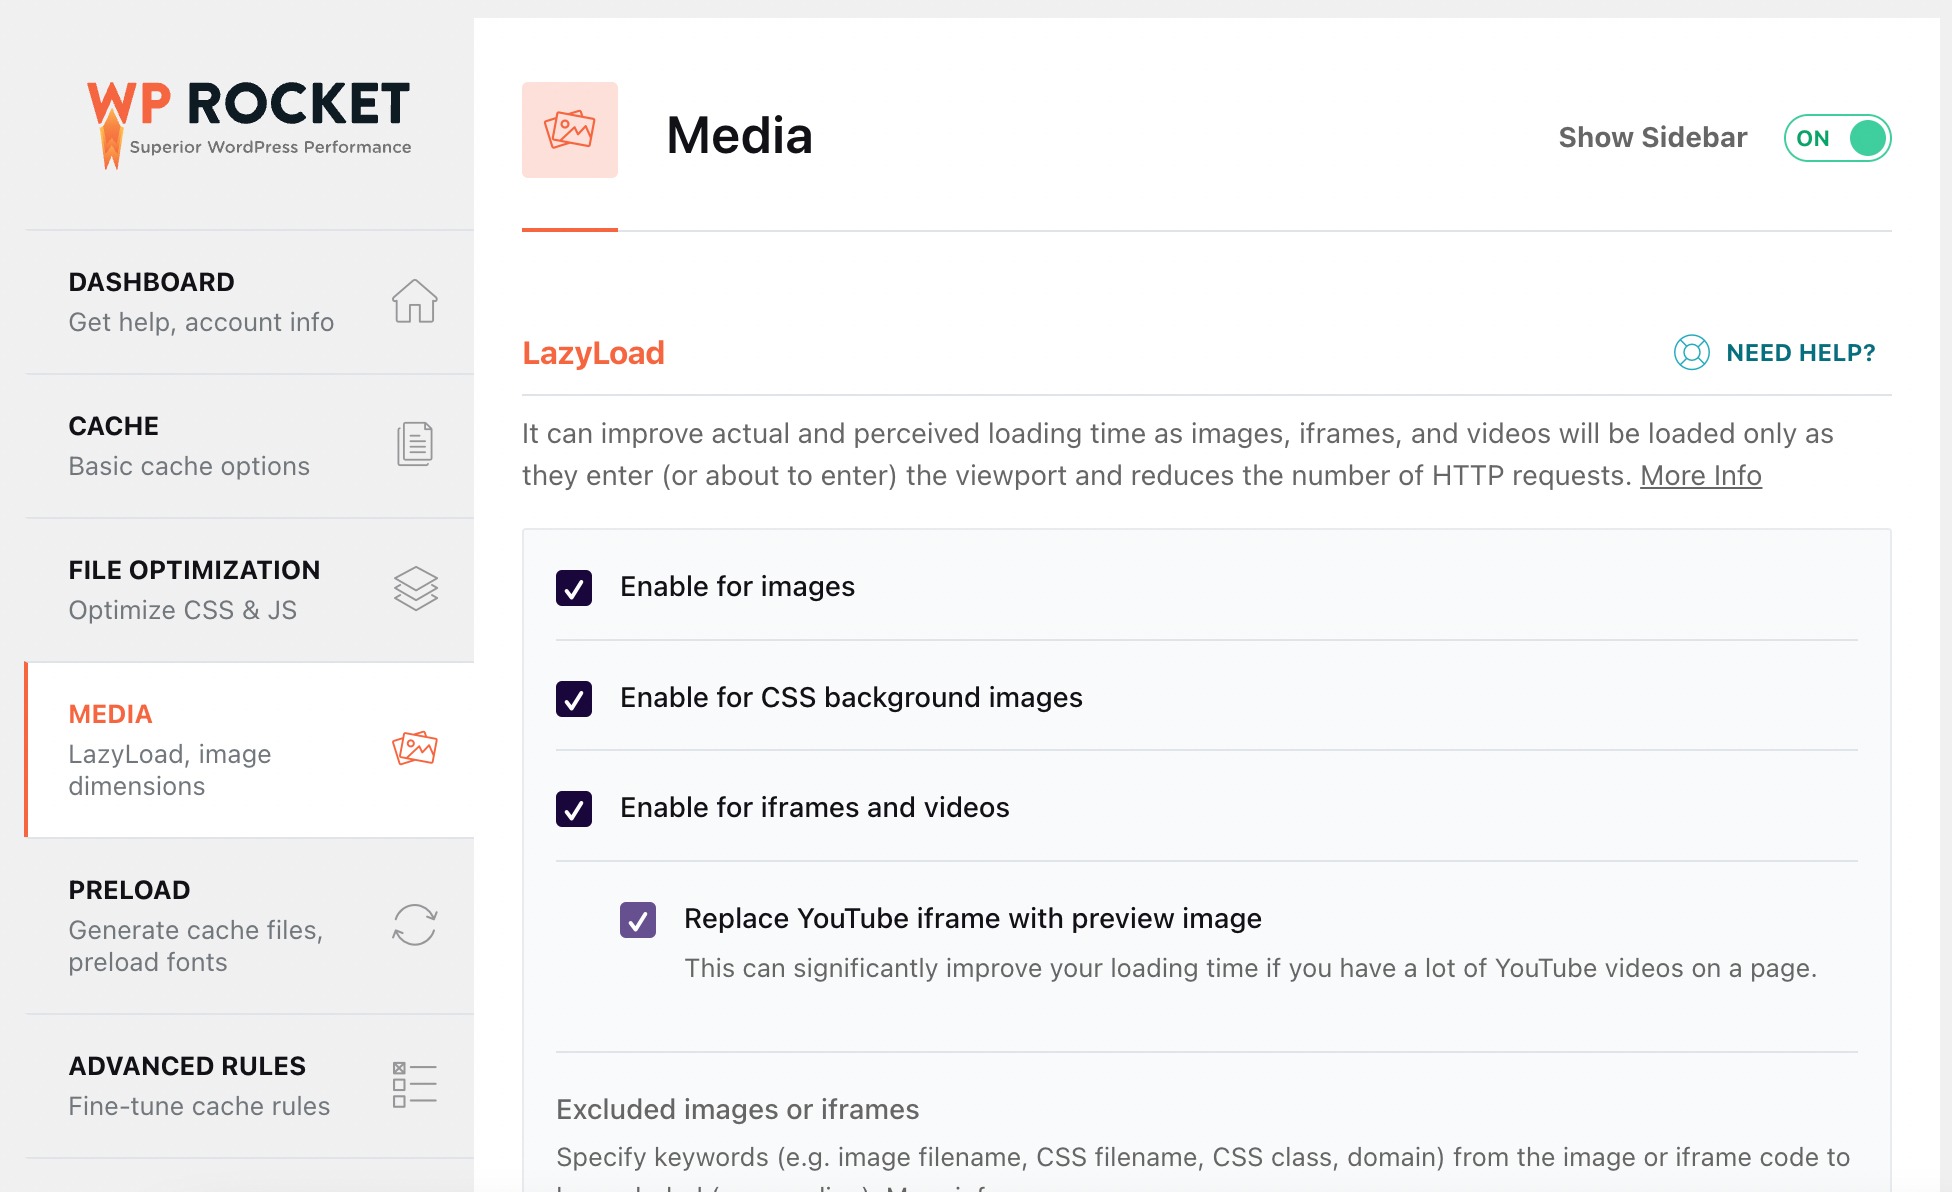
3.7 Lazy Load Your Images
If you have a lot of images and long content on your site, lazy loading can make a big difference. Instead of loading every single image when someone first opens your page, lazy loading only shows images when they’re about to come into view as the user scrolls.
This approach makes the communication between your site and the server much more efficient. As a result, your pages load faster, visitors aren’t left waiting, and you give them a smoother browsing experience.
Here’s the best part: if you’re running WordPress 5.4 or newer, lazy loading is already enabled by default for your images. That means you don’t have to install a separate plugin just to get the basic benefits.
But if you want to take it further and apply lazy loading to other elements like iframes, videos, or background images, then a plugin such as WP Rocket can help. It’s no surprise that 89% of respondents use a performance optimization tool, with WP Rocket being the top choice, trusted by 56%, as per our survey report.
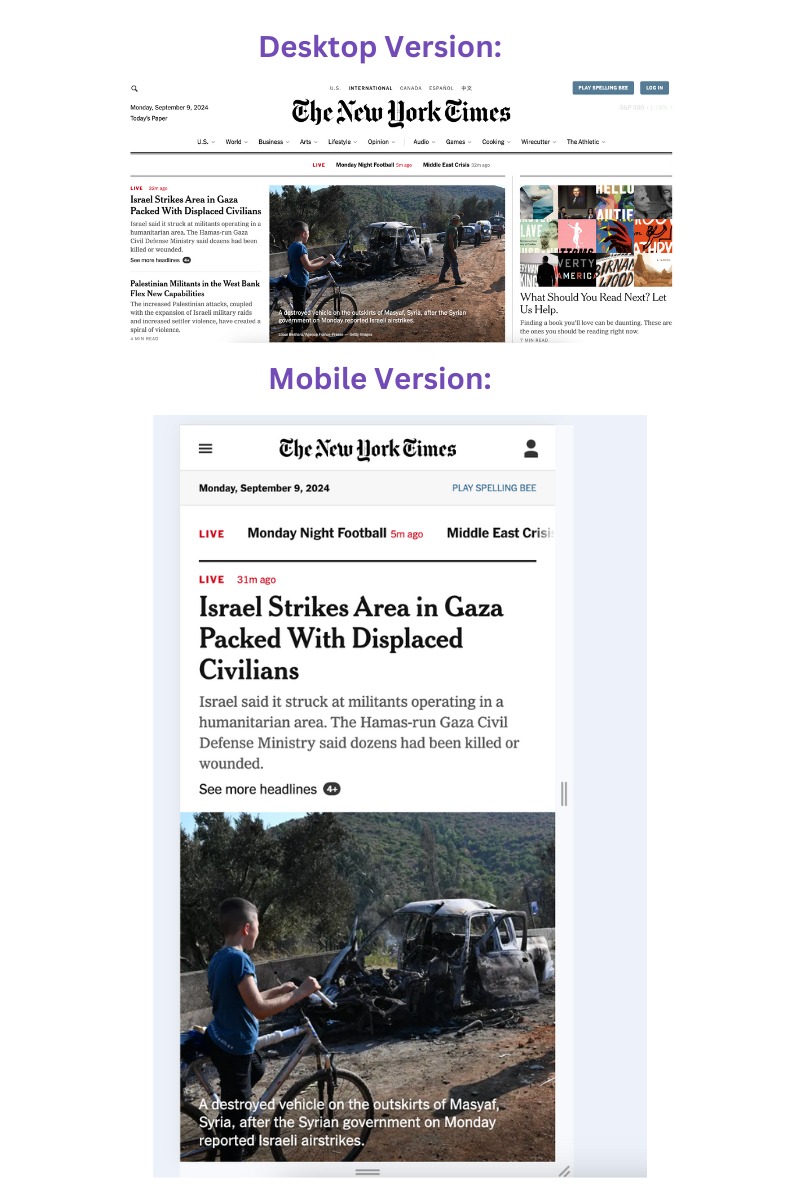
3.8 Use Responsive Images
Using responsive images ensures that your site looks good and loads fast across different devices. On a desktop, a larger, higher-resolution image can be displayed for clarity. On mobile, the same image can be shown in a smaller or zoomed-in version, so it doesn’t slow the page down with unnecessary file size. This balance improves both user experience and page load speed.
If you’re using WordPress, the good news is you don’t have to do much. WordPress automatically generates different image sizes when you upload a picture and serves the right one depending on the device. That means your images are responsive by default.
Still, it’s useful to understand what’s happening behind the scenes. Responsive images typically use the srcset and sizes attributes in HTML. These let browsers decide which version of your image to load based on screen width. For example, a phone might load a 400px-wide image, while a desktop screen loads a 1200px-wide version.
Here are a few extra steps you can take:
- Upload images at sensible dimensions: Don’t upload a 4000px-wide photo if your site’s content area is only 1200px wide.
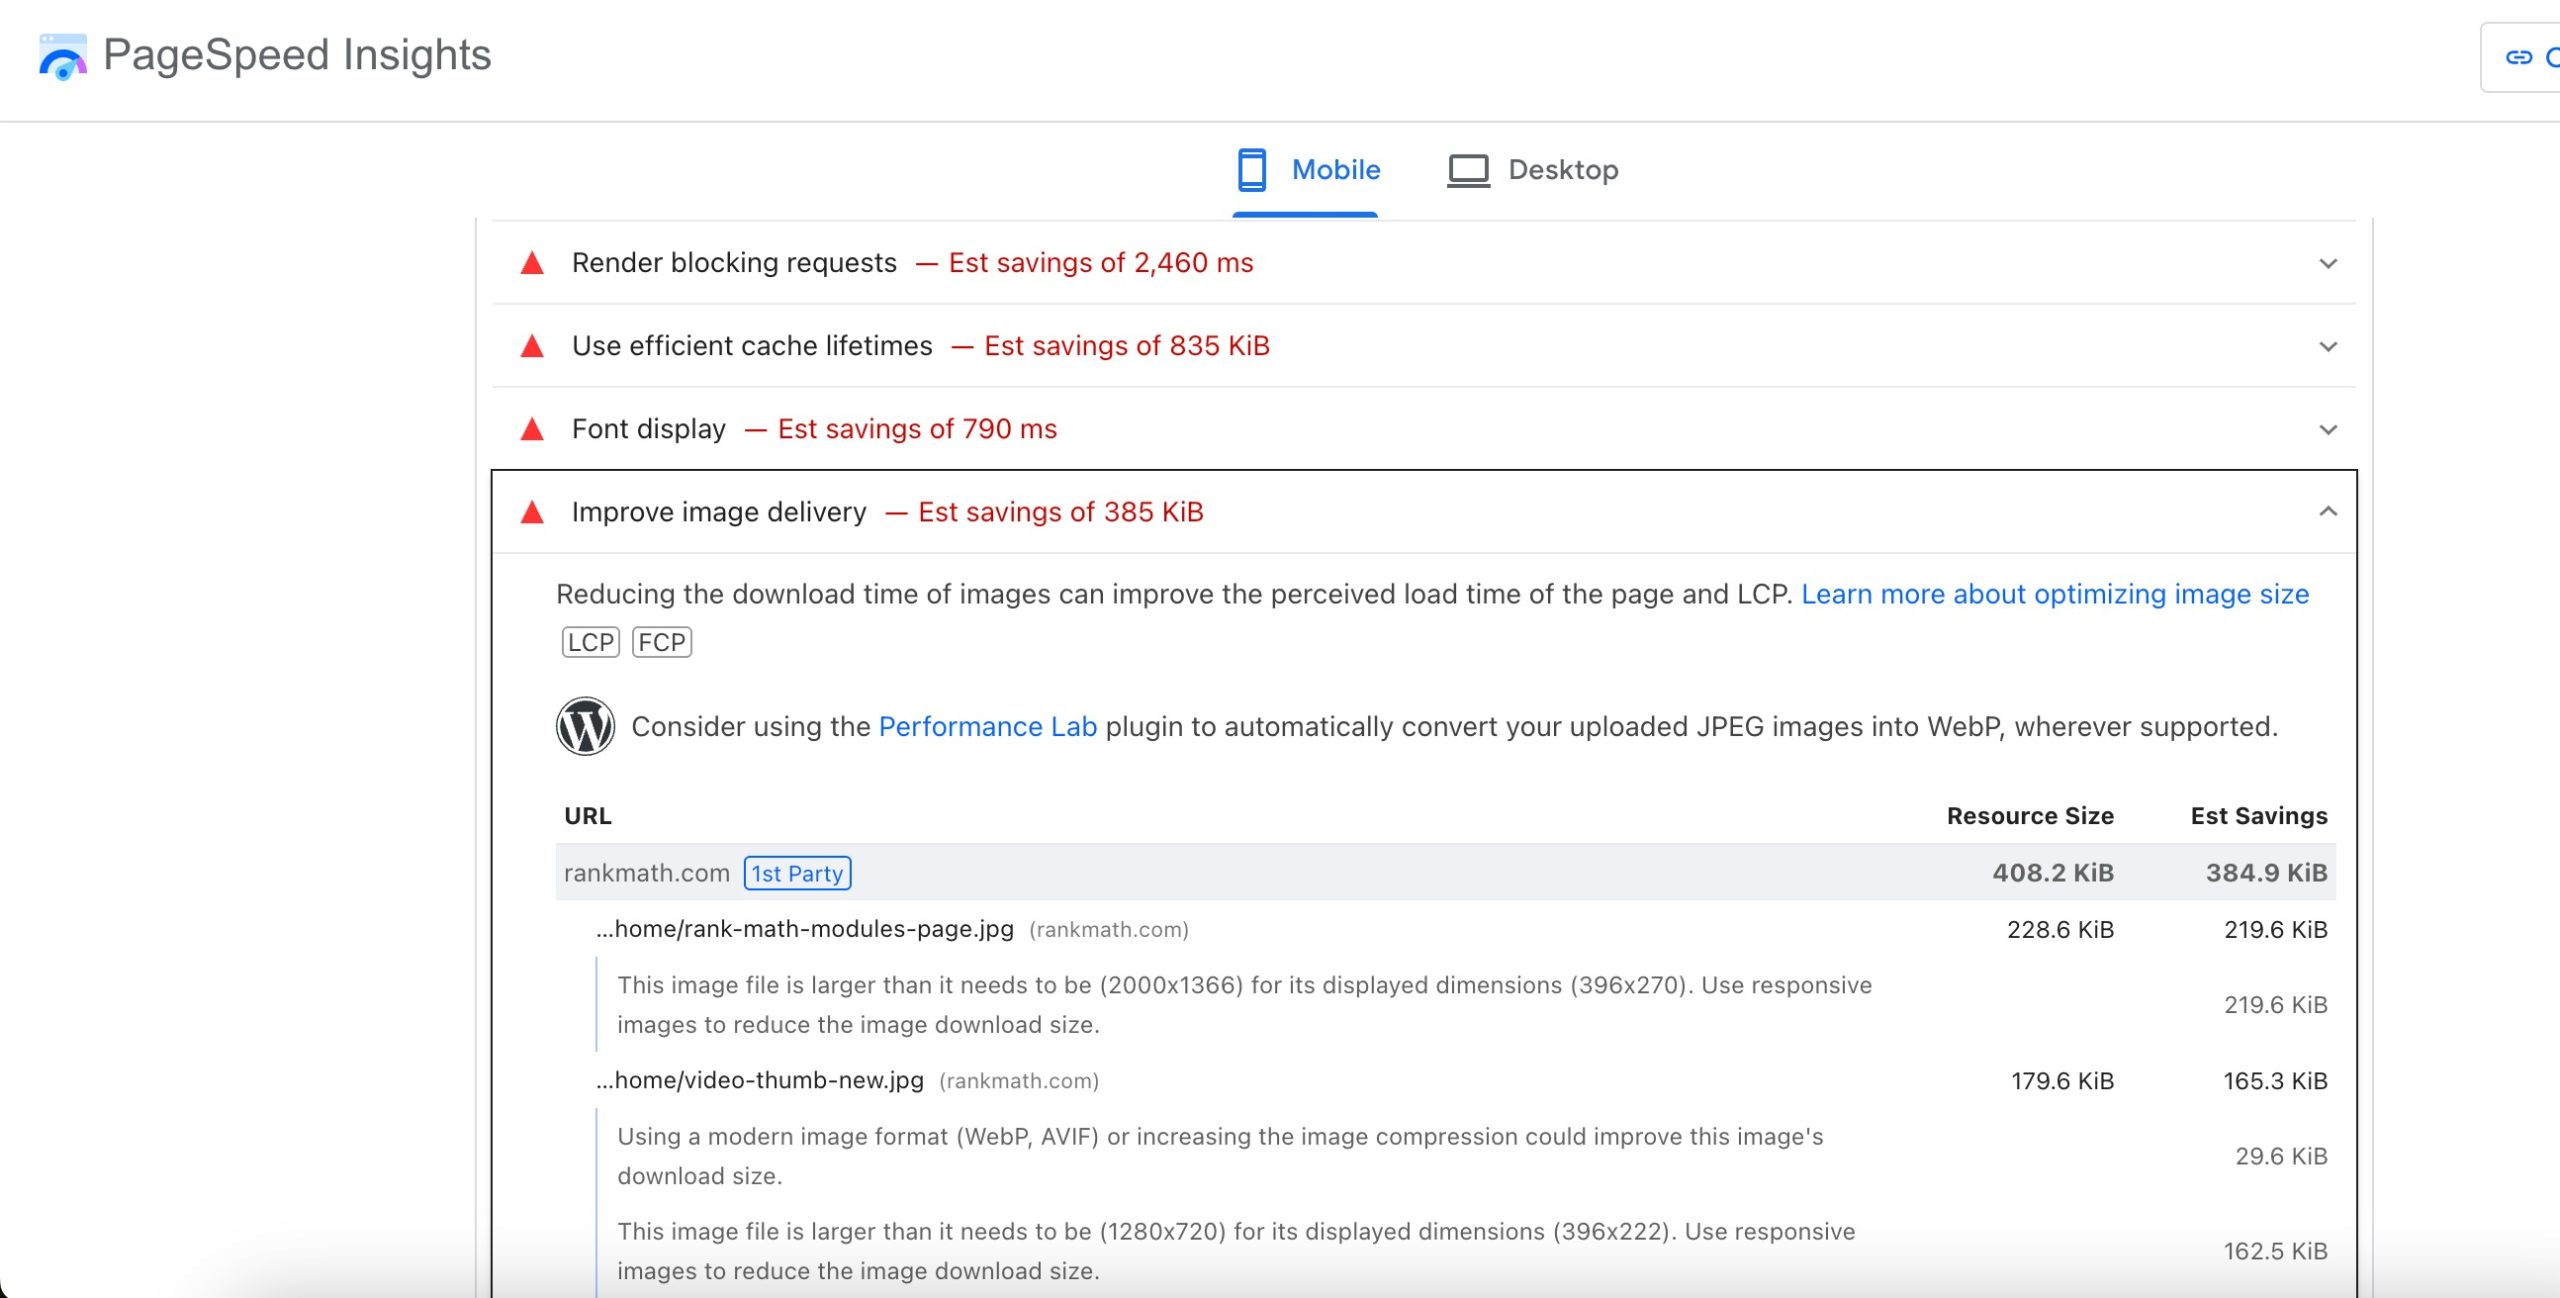
- Test your site speed: Use Google’s PageSpeed Insights to see how your images affect performance. It will also suggest if your images need better optimization.
- Check how images appear on devices: Preview your site on mobile, tablet, and desktop to make sure your responsive images load properly and aren’t blurry or stretched.
- Consider modern formats: Pair responsive images with WebP or AVIF formats for even smaller file sizes without losing quality.
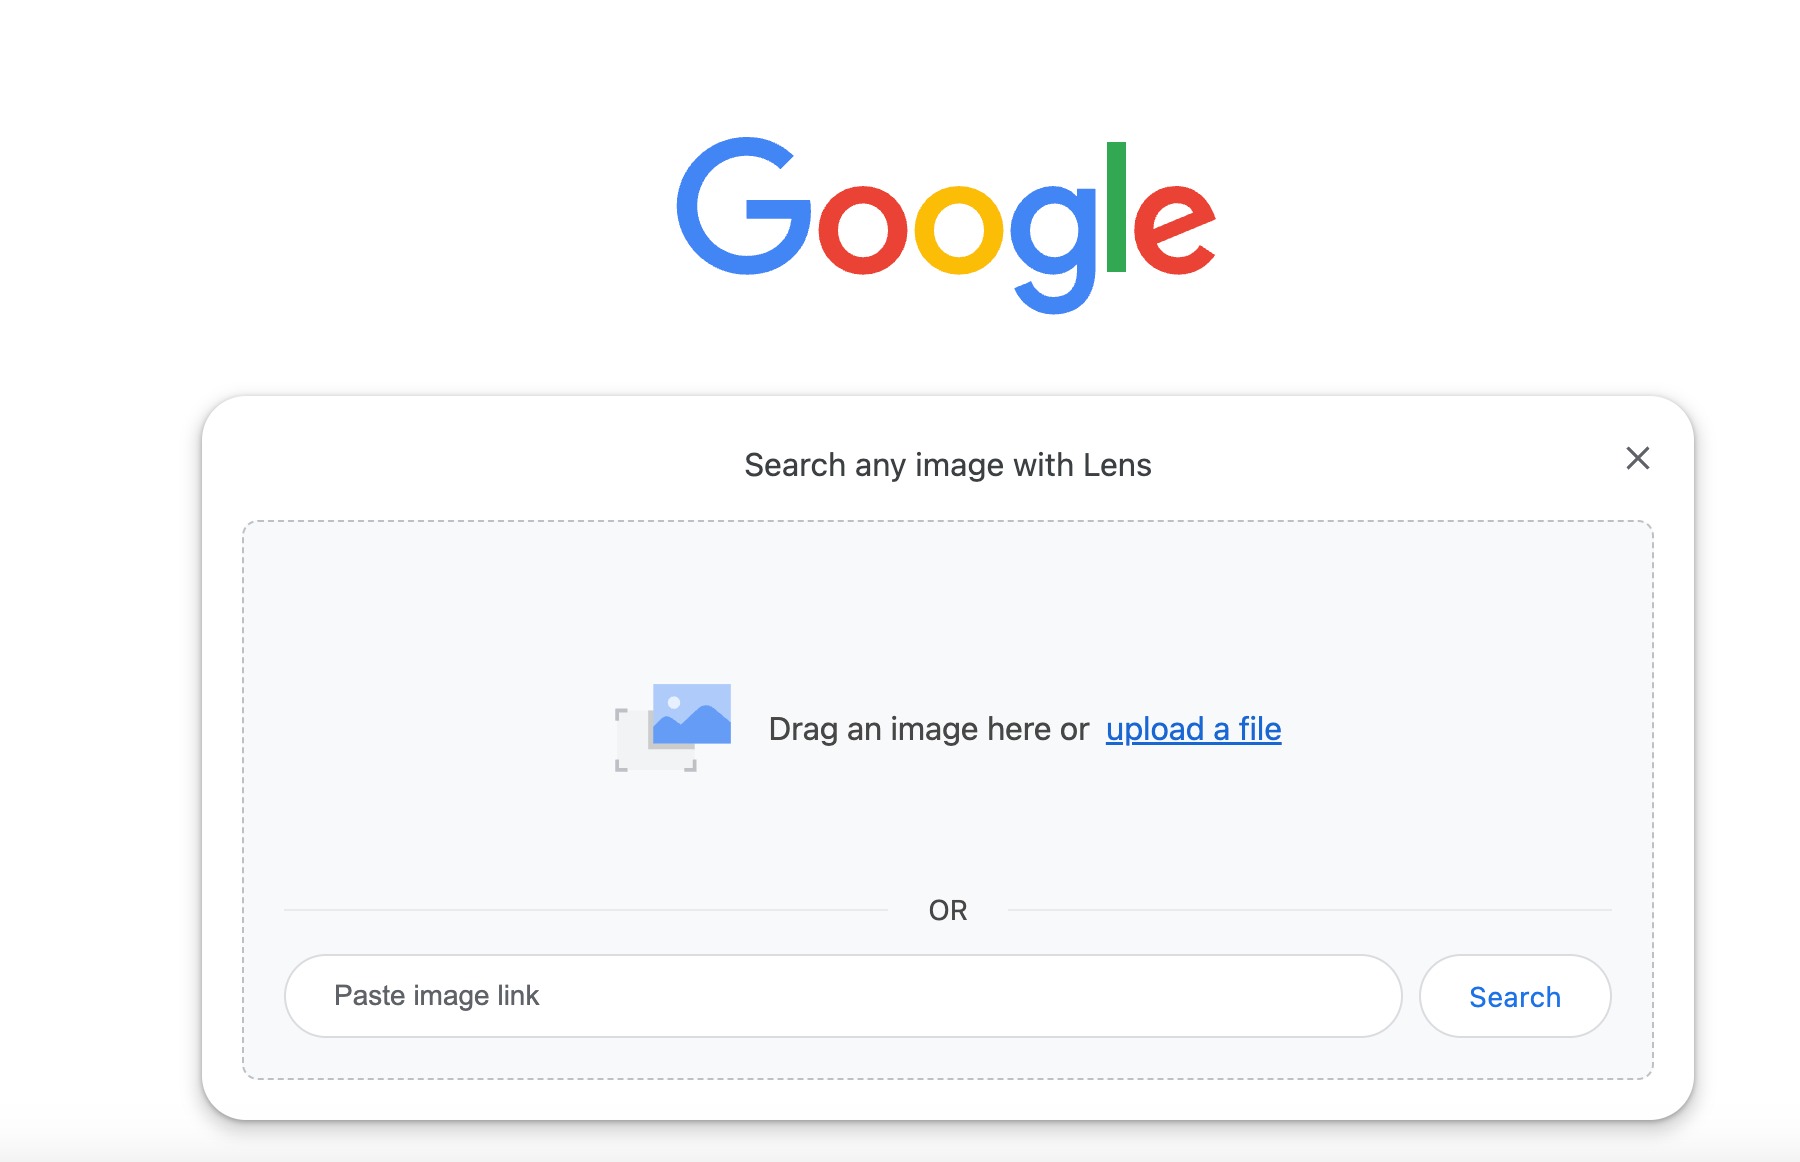
3.9 Optimize for Visual Search
Visual search is becoming a major SEO trend, thanks to tools like Google Lens and other AI-driven search engines. Instead of typing a query, visitors can now snap a picture of an object and instantly get related results. That means your images aren’t just visuals anymore, they’re searchable assets.
Optimizing for Google Lens or visual search is easier than you think. If you follow the image optimization tips I’ve shared for WordPress, you’ll already be well on your way to showing up in visual search results.
3.10 Test and Monitor Image SEO Performance
Once you’ve optimized your images, the job isn’t finished. Image SEO isn’t something you do once and never look at again; you need to test, monitor, and adjust.
You can start with tools like Google PageSpeed Insights or Lighthouse to check how your images affect page load speed. These tools will point out if your images are too large, if they could be compressed further, or if lazy loading is working as expected.
By checking these reports regularly, you can spot problems before they hurt your rankings. For example, if your clicks from image search suddenly drop, you’ll know it’s time to recheck file names, alt text, or structured data.
4 Frequently Asked Questions
Does image file size affect SEO?
Yes. Large image files slow down page load speed. Compress images without losing quality to improve performance and Core Web Vitals.
Should I include images in my XML Sitemaps?
Yes, including images in your XML sitemap helps search engines discover them and improves the chance they appear in image search results.
Should I optimize thumbnails?
Yes. Thumbnails appear in listings and previews, making them small and optimized speeds up page load and enhances user experience.
How often should I revisit image SEO?
Review image optimization whenever you upload new media, update templates, or notice performance issues.
5 Image SEO – After Action Report & Next Steps
Image SEO takes some effort, but as you’ve seen, it’s one of the most rewarding ways to boost your site’s visibility. In this post, I’ve walked you through the most important steps you can take to make your images work harder for search and for your visitors.
Of course, what we covered here is only the beginning. How effective your image SEO is will also depend on the images you choose to use. Here are two simple but powerful guidelines I recommend you keep in mind:
- Skip generic stock photos – They rarely add value and can make your site feel less authentic.
- Choose images that serve your visitors – Every picture should help someone who lands on your page, whether by clarifying an idea, showing a product, or making the content more engaging.
Now it’s your turn. Take these steps, start applying them to your own site, and see the difference.
And if you have more questions about image SEO that you’d like me to cover, feel free and let me know by tweeting @rankmathseo. 💬