Have you ever tried uploading an image to your WordPress site only to be met with an error message or a broken thumbnail?
It’s annoying, especially when visuals play such a big role in engaging your audience and making your content stand out.
The good news is that most image upload issues in WordPress are caused by simple problems like incorrect file permissions, plugin conflicts, memory issues, etc, and they can be fixed quickly.
In this article, you’ll learn the most common issues of image upload errors and how to fix them with ease.

So, without further ado, let’s get started!
Table Of Contents
1 Common WordPress Image Upload Errors and Their Fixes
Beautiful, attention-seeking images are an integral part of almost any website. Product images are especially significant for generating sales in an e-commerce site since they allow customers to see what they’re buying.
Nothing is worse than spending 10 minutes trying to find that perfect image for your blog post or your e-commerce site, you go to upload it, and bam, you suddenly greet a very vague error such as An error occurred in the upload. Please try again later.

Failure to upload images is one of the most common image issues in WordPress. These image upload issues can be triggered due to a wide range of factors.
Let us now look at the common image upload issues and how you can quickly resolve them and get back to uploading the media on your site.
1.1 Change File Permissions
One of the most common problem is incorrect file permissions.
WordPress cannot read or upload your files to the hosting server due to incorrect file permissions. When uploading an image file, you may receive the following error: Unable to create directory wp-content/uploads/2022/14. Is its parent directory writable by the server?
Another sign of this issue is that your images may not appear in the media library. You can then change the file permissions and solve the image upload issue.
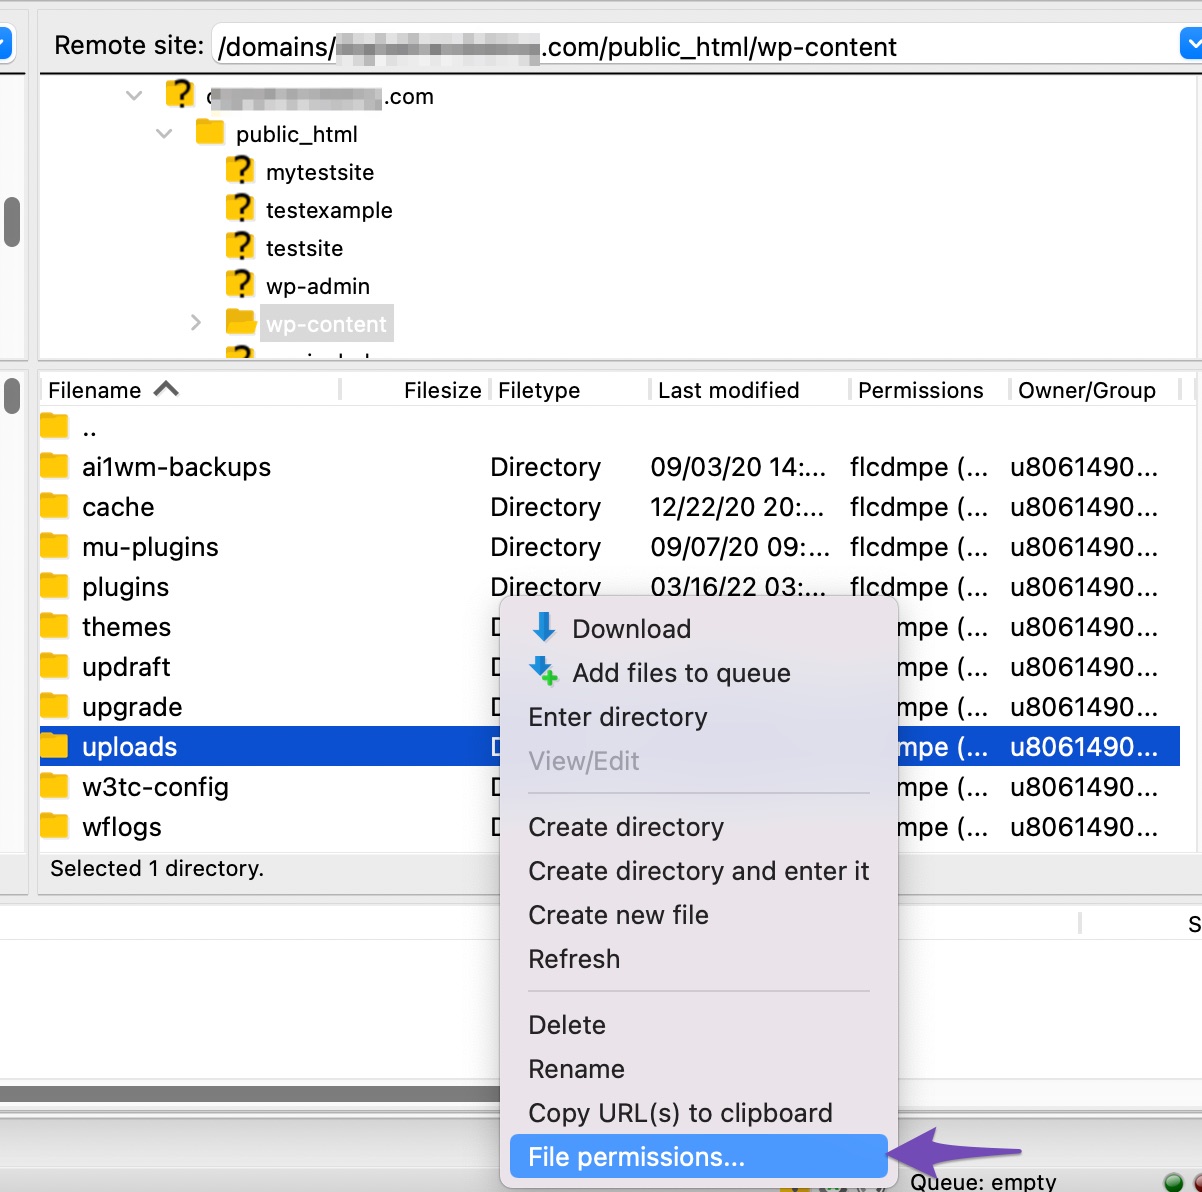
To change the file permissions, connect your website through FTP. Navigate to the /wp-content/ folder. Inside, you’ll find the uploads folder, where all your media uploads are stored, including images. Right-click on the uploads folder and select File permissions, as shown below.
Type 744 into the number value box and check the box next to the option Recurse into subdirectories. Now select the radio option that says ‘Apply to directories only.’
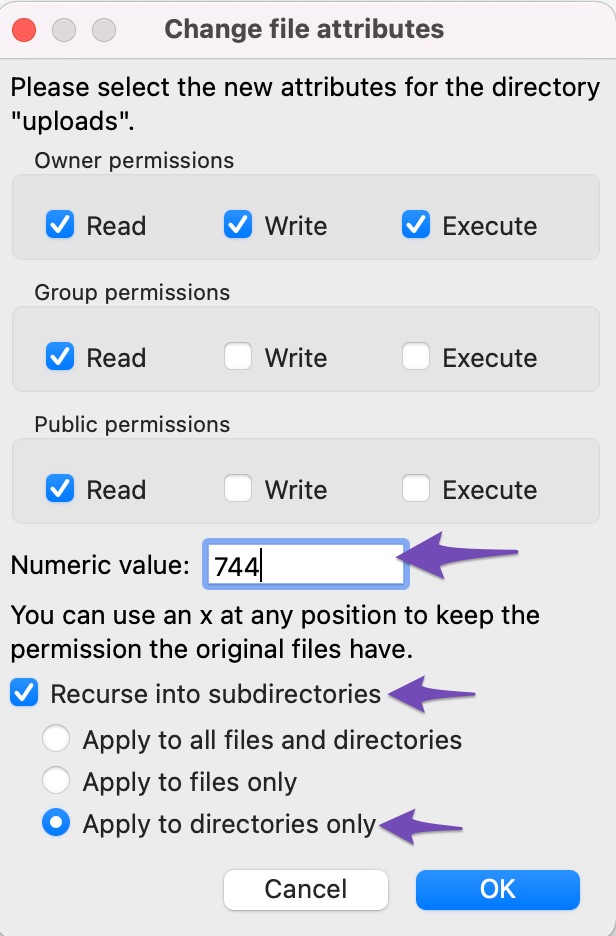
To save your changes, click the OK button. Your FTP client will now apply the file permissions for the directories. If this doesn’t work, set the value to 755 and try again.
Next, you’ll need to set file permissions for all the files in the uploads directory.
To do so, right-click the uploads directory and select the File permissions option from the menu. Change the numeric value to 644 in the file permissions dialogue box.
Check the box next to Recurse into subdirectories. Lastly, you need to select the radio option that says Apply to files only. To save your changes, click the OK button.
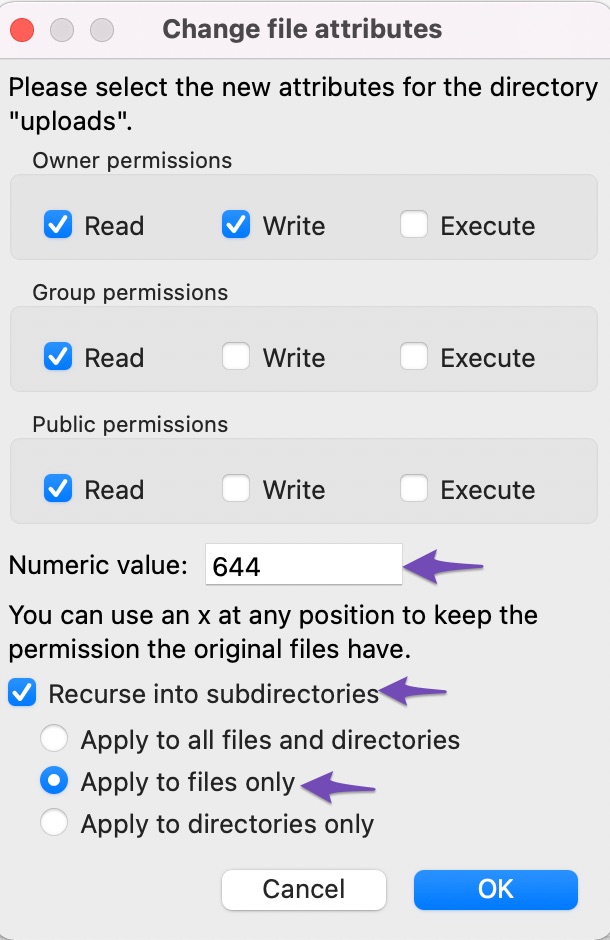
All files in the uploads folder will now have their permissions changed by the FTP client. You can now return to your WordPress admin area and attempt uploading the images once more. This should solve the image upload issue on your site.
1.2 Rename the Image
If you’re only experiencing trouble with a single image, start by looking at the file’s name. The WordPress uploader may have problems uploading your image if you use special characters ($, *, &, #) or accent letters (ñ, á, é). Rename the image with the correct file name and upload it again.
1.3 Resize the Image
It’s also possible that the image is too big, both in terms of dimensions and file size. You can try reducing the size by using image compression tools. But if you regularly encounter this problem, you can raise the limit by adding code to the site’s php.ini file.
upload_max_filesize = 128M
post_max_size = 128M
max_execution_time = 300
Firstly, locate the php.ini file. In most cases, you’ll find the file in the root directory of your website, labelled public_html. You can check this by logging into your hosting account and using cPanel’s File Manager or FTP to access your files.
If the file does not exist, you can create a blank php.ini file using a plain text editor like notepad, add the above code snippet, and upload it to your website.
1.4 Clear the Cache
If you’re using a caching plugin like WP Rocket or W3 Total Cache, clearing the cache might be all you need to fix your image upload issues. If you think that caching could cause the error, your steps will depend on your chosen caching plugin.
For example, if you’re using the WP Rocket plugin, you can clear the cache by selecting WP Rocket → Clear cache from your WordPress toolbar.
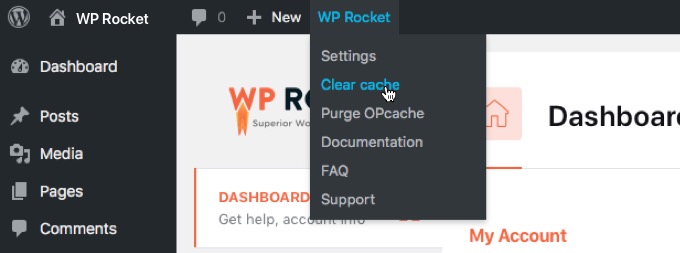
If you’re not sure how to clear the cache in your specific plugin, the plugin’s Settings menu is usually a good place to start. For further information, you can visit the developer’s official documentation.
1.5 Deactivate Your Plugins
Plugins are the bread and butter of the WordPress system. If you’re using any plugins, it’s always worth trying disabling them one at a time to see if it fixes your image upload issue.
To deactivate the plugins, navigate to Plugins → Installed Plugins from your WordPress dashboard to deactivate the plugins. Select the plugins from the list and choose the Deactivate option from the drop-down menu. Then click on the Apply button as shown below.

If this does not solve the problem, get in touch with the plugin developer to see if they can help you fix the image upload issue on your site.
1.6 Switch to a Default Theme
Another option is to back up your website and switch to a default theme for a short period of time. If your image uploads properly, the issue is most likely with your current theme.
To further troubleshoot the image upload issue on your site, contact the theme developer.
1.7 Increase the PHP Memory Limit
When you try to upload an image, you can get an HTTP error from WordPress. Low server resources or unusual traffic might also cause this error. As a result, waiting a few minutes before attempting to re-upload the image is always a good idea.
If the problem persists, you may have reached the WordPress memory limit. You can increase the amount of memory by connecting your site using FTP. To fix this, increase the limit to 256MB by adding the following code snippet to your wp-config.php file.
define('WP_MEMORY_LIMIT', '256M');Try uploading the file again and your image upload issue should be resolved.
1.8 Try the Browser Uploader
If you’ve tried all of the above ways and still experiencing problems, you can use the built-in file uploader in your browser. Unlike the WordPress image uploader, the browser uploader does not support multiple file selection or drag and drop. However, it can be a beneficial workaround when you need to upload an image quickly.
Navigate to Media → Add New from your WordPress dashboard to use the image uploader. Select the browser uploader link and click on Choose File.
This brings up the file selection dialogue, where you can upload the image as usual. If this fix is successful, you should try uploading an image using the WordPress standard image uploader to determine if your image upload issue has been solved.

1.9 Switch the Browsers
When using Google Chrome, users occasionally report HTTP problems. Changing browsers may assist you in determining whether or not the problem is due to your website.
If you can upload the file in another browser, you should contact your chosen platform’s support to figure out what’s causing the problem.
1.10 Check the PHP Version
Check the PHP version of your site. WordPress officially recommends PHP 8.3 or higher, while it will also function with previous versions.
You can check the version by navigating to Tools → Site Health from your WordPress dashboard.
Click on the Info tab and select the Server section, and you’ll be able to find your server details.
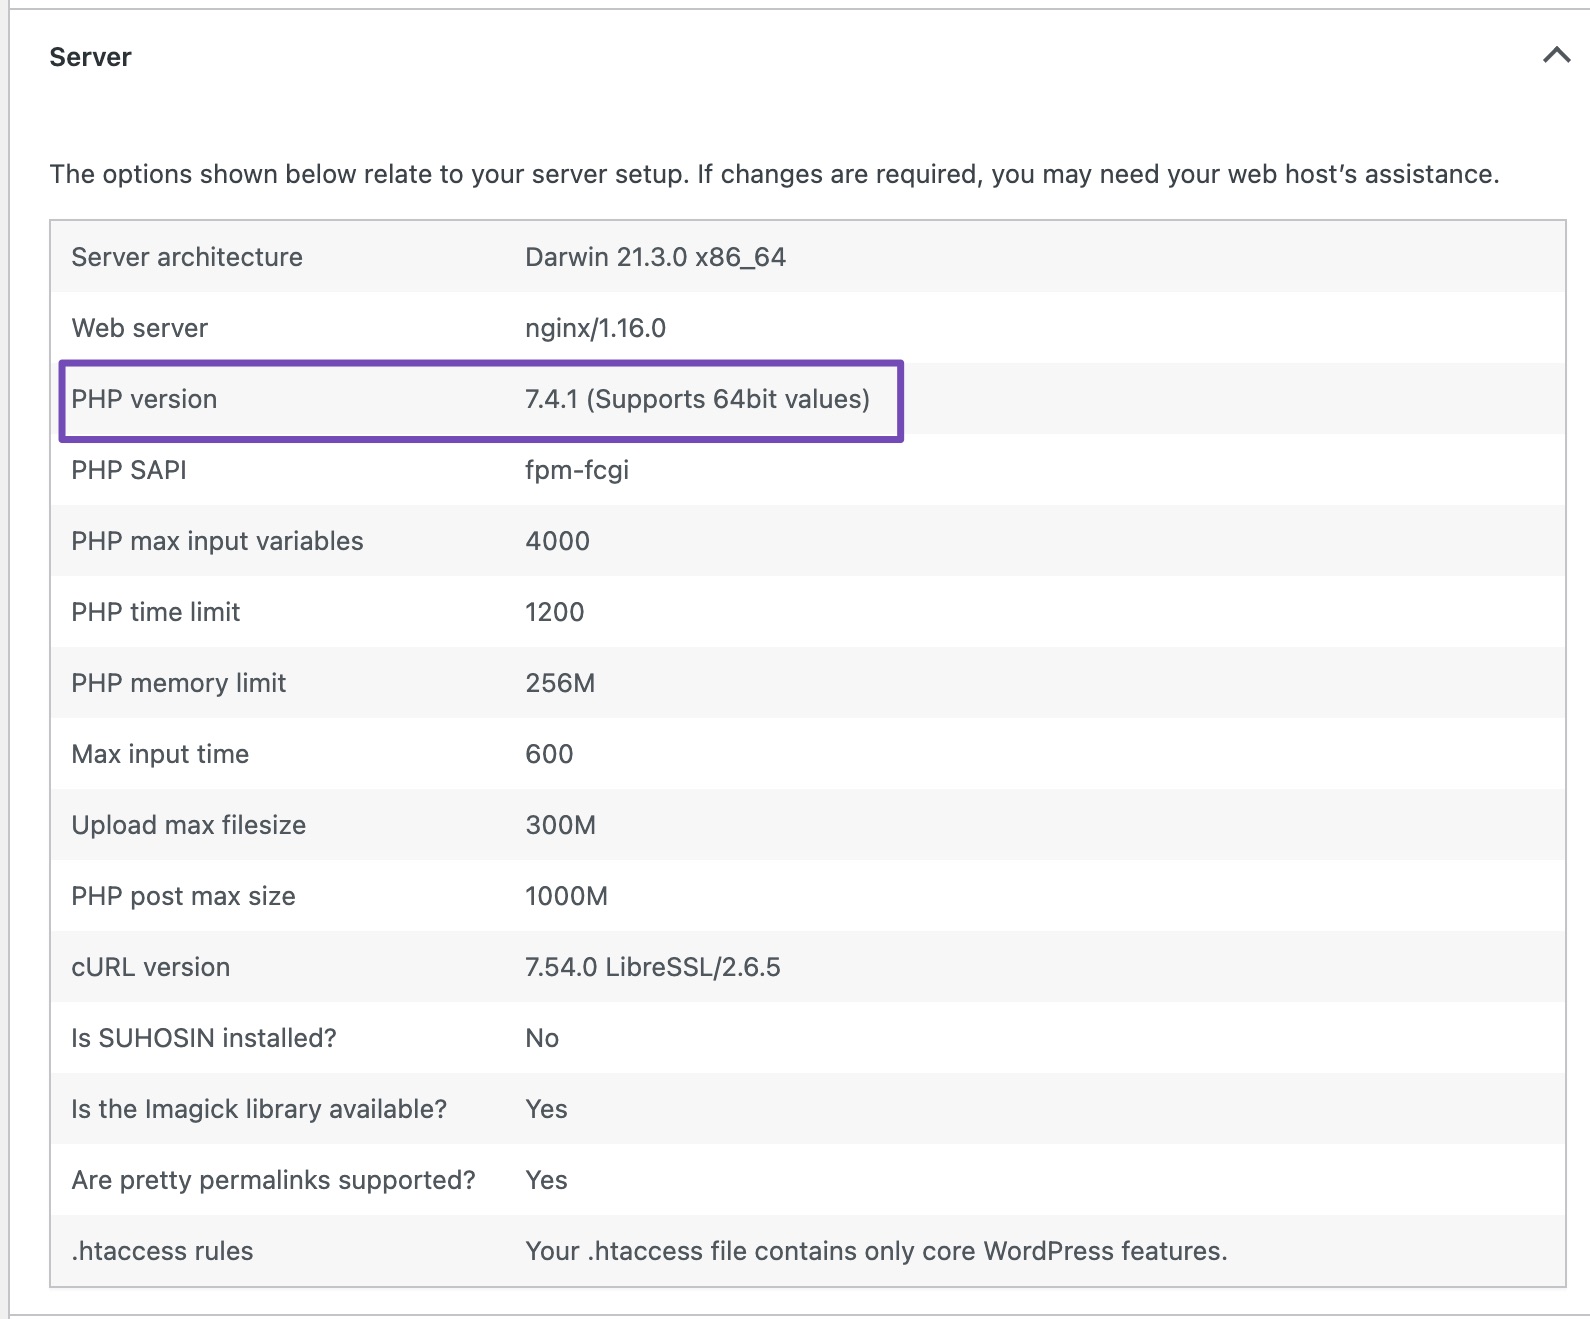
You can update the PHP version from your hosting dashboard and then try uploading the image. Your image upload issue should disappear once you’ve updated the PHP version.
2 Conclusion
If you create content frequently, you’ll most certainly encounter the image upload error eventually (or other HTTP error codes and status codes). Hopefully, one of the methods listed above should work for you, and you should be back on track with your media uploads.
Have any additional questions about the image upload issues you’d like us to cover in this post? Let us know by tweeting @rankmathseo. 💬
