At some point, you might decide that a page on your WordPress site is no longer needed. Maybe it’s outdated, no longer relevant, or was just a test page you created while setting things up.
Whatever the reason, it’s completely normal to remove pages as your website grows and changes. I’ve done it myself more times than I can count; sometimes to clean up clutter, and other times to improve navigation or make room for better content.
In this post, we’ll show you exactly how to delete a page in WordPress without overcomplicating the process.
So, without any further ado, let’s get started.
Table Of Contents
- Why Would You Want to Delete a WordPress Page?
- When You Should Not Delete a WordPress Page
- Steps to Delete a WordPress Page
- Alternatives to Deleting a WordPress Page
- Redirecting Deleted Pages for SEO Purposes
- Post-Deletion SEO Considerations
- Using HTTP 410 for Faster Deletion from Google’s Index
- Frequently Asked Questions
- Conclusion
1 Why Would You Want to Delete a WordPress Page?
Before we get into the steps, it helps to know when deleting a page makes sense. Here are a few common reasons:
- You created a page by mistake and no longer need it.
- The content is outdated, inaccurate, or irrelevant.
- You’re cleaning up similar or duplicate pages to keep your content more organized.
- The page doesn’t align with your site’s privacy policy or terms of use.
- It’s causing technical issues or conflicting with other parts of your site.
Whatever the case, removing unnecessary pages can help you keep your website clean, user-friendly, and easier to manage.
2 When You Should Not Delete a WordPress Page
Not every page should be removed, even if it looks outdated. Deleting a page that ranks well, has backlinks, or gets regular traffic can hurt your SEO. You might lose valuable rankings, create broken links, and frustrate users who land on a missing page.
Sometimes, older pages still bring in steady visitors or hold link equity. In these cases, it’s often better to update or repurpose the content instead of deleting it outright.
Before you decide to remove a page, take a moment to review its performance. Tools like Google Analytics and Google Search Console can show you whether the page still gets traffic or ranks for important keywords. That way, you can make an informed decision that won’t accidentally hurt your site.
3 Steps to Delete a WordPress Page
Now, let’s explore the steps to delete a WordPress page.
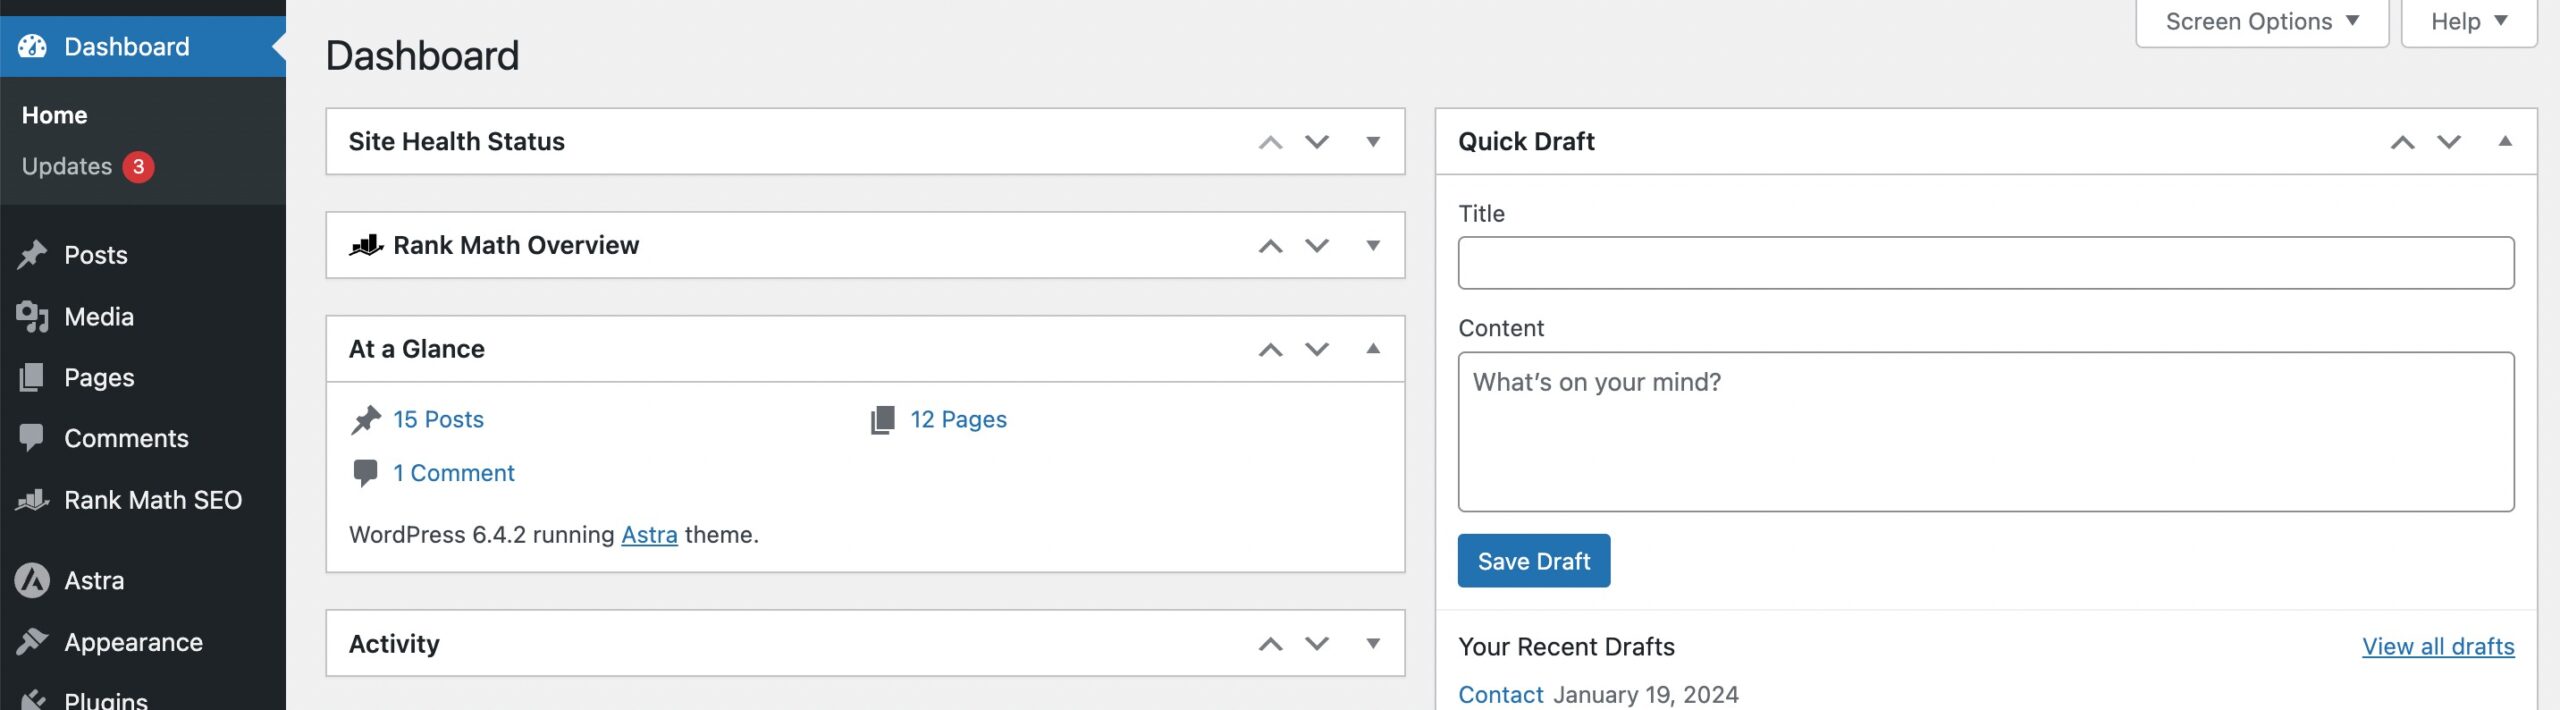
3.1 Log in to Your WordPress Dashboard
To begin, log in to your WordPress admin area by entering your username and password. Once logged in, you will be directed to your WordPress dashboard.
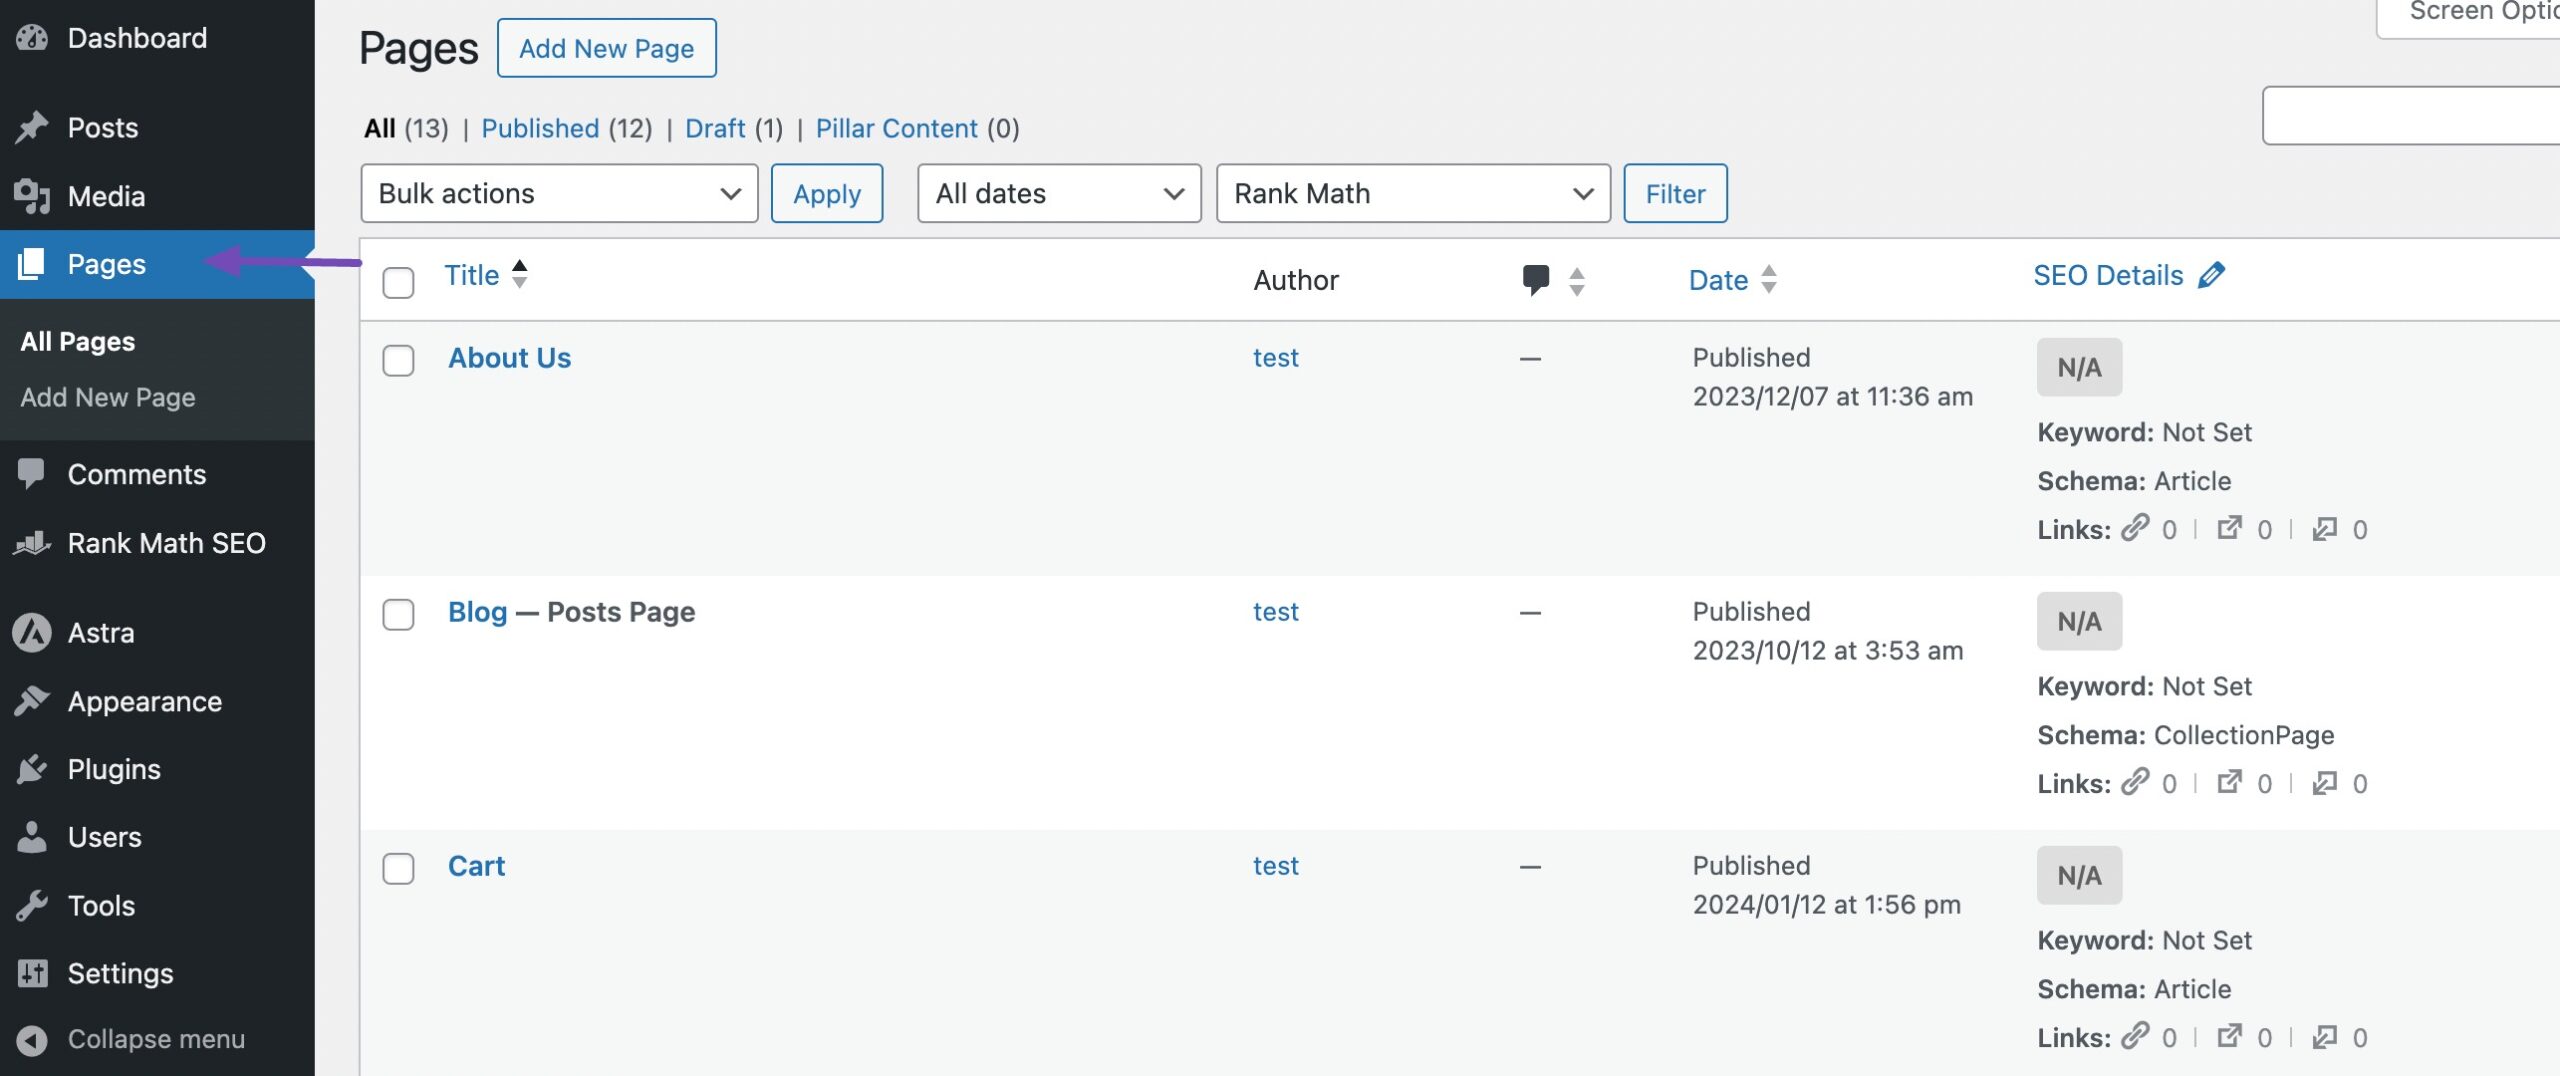
3.2 Navigate to the Pages Section
In the left-hand menu, find and click Pages. This will show you a list of all the pages you’ve created on your site.
3.3 Delete the Page
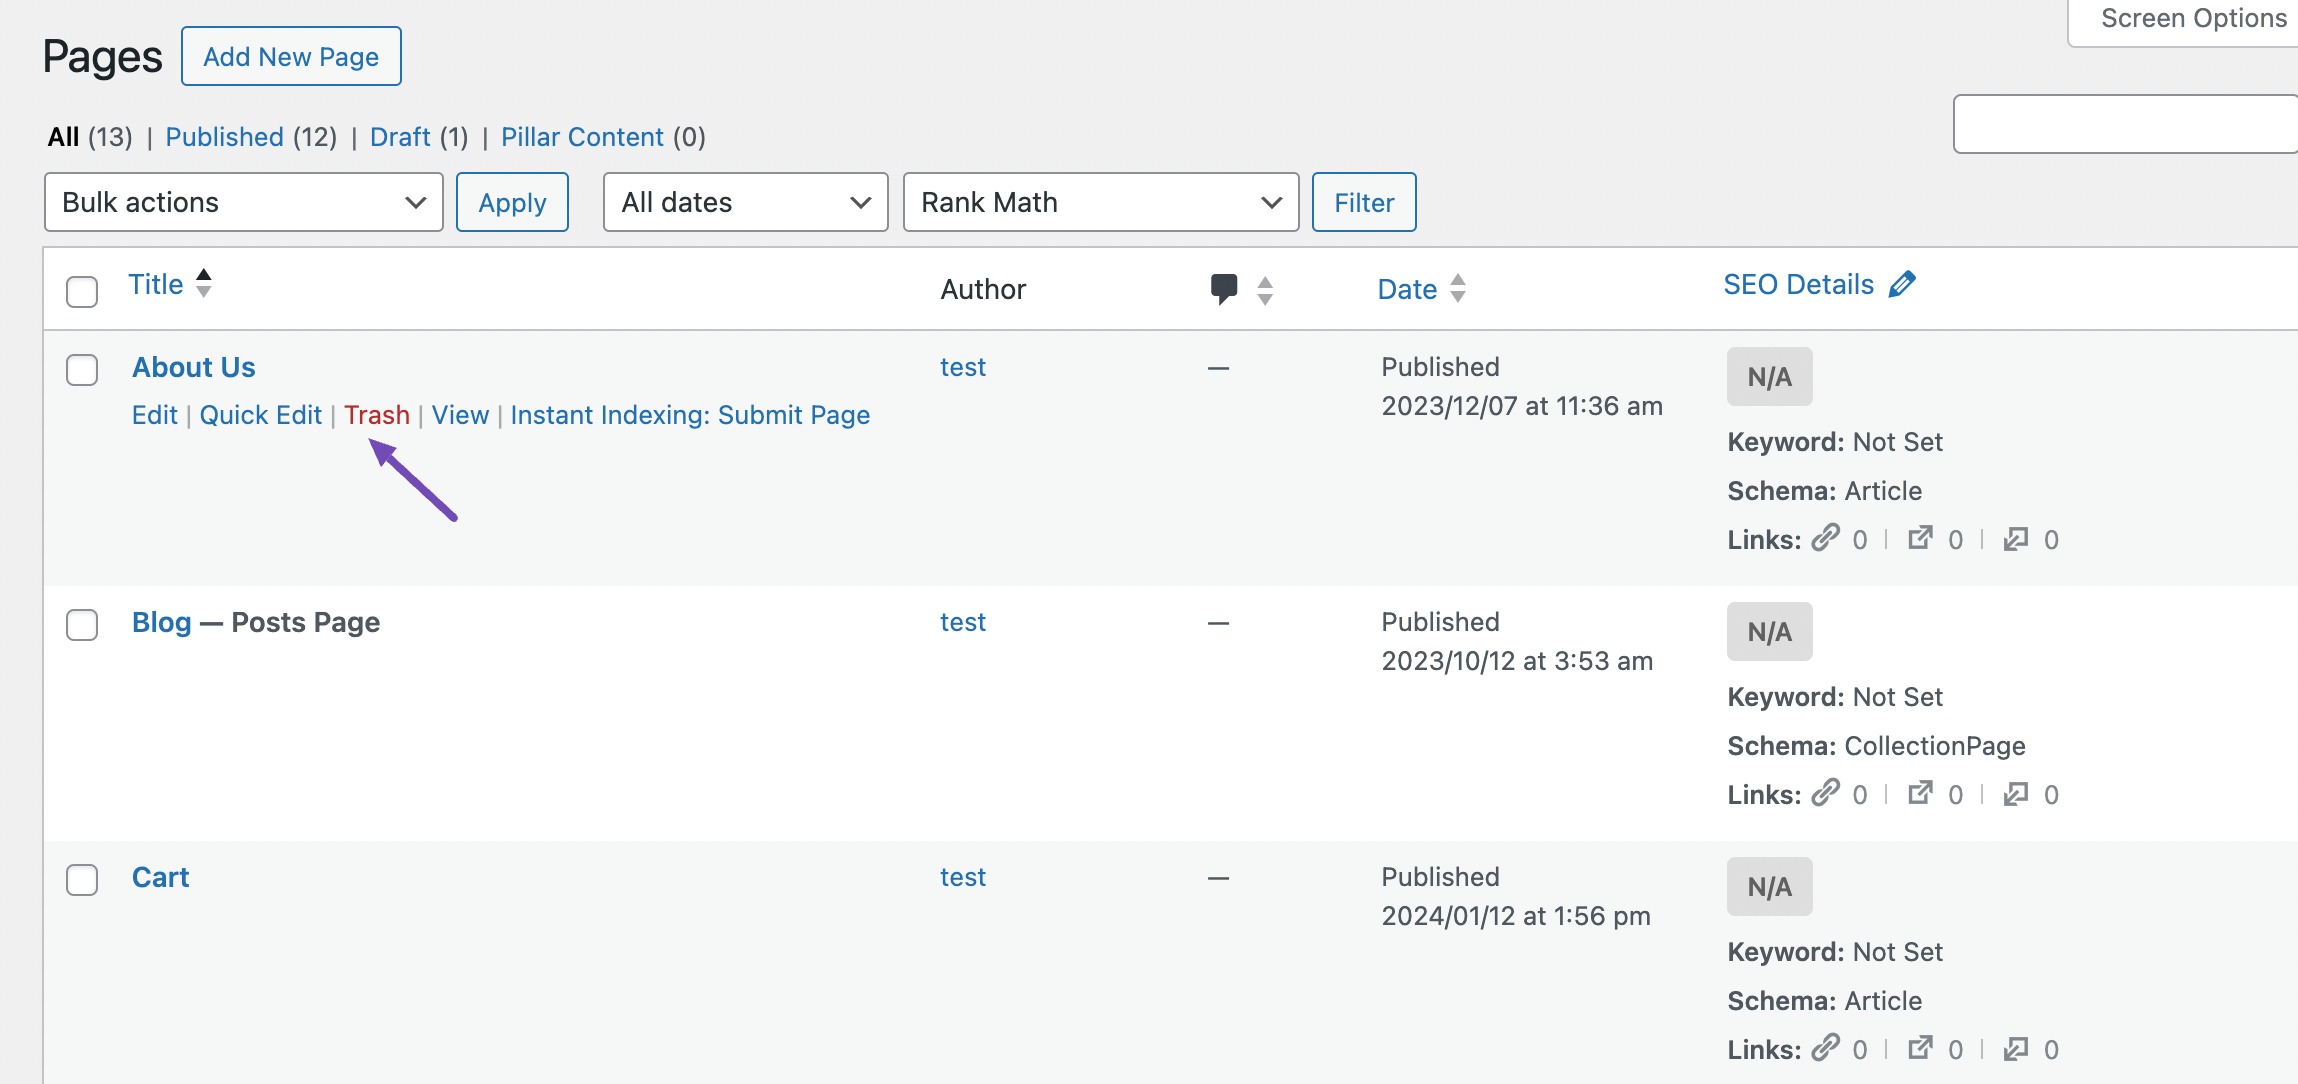
Scroll through the list or use the search bar to find the page you want to delete.
When you hover over the page title, you’ll see a few options appear beneath it; click Trash to delete the page.
If you want to delete multiple pages at once, just select the checkboxes next to the pages, choose Move to Trash from the Bulk Actions dropdown, then click Apply.
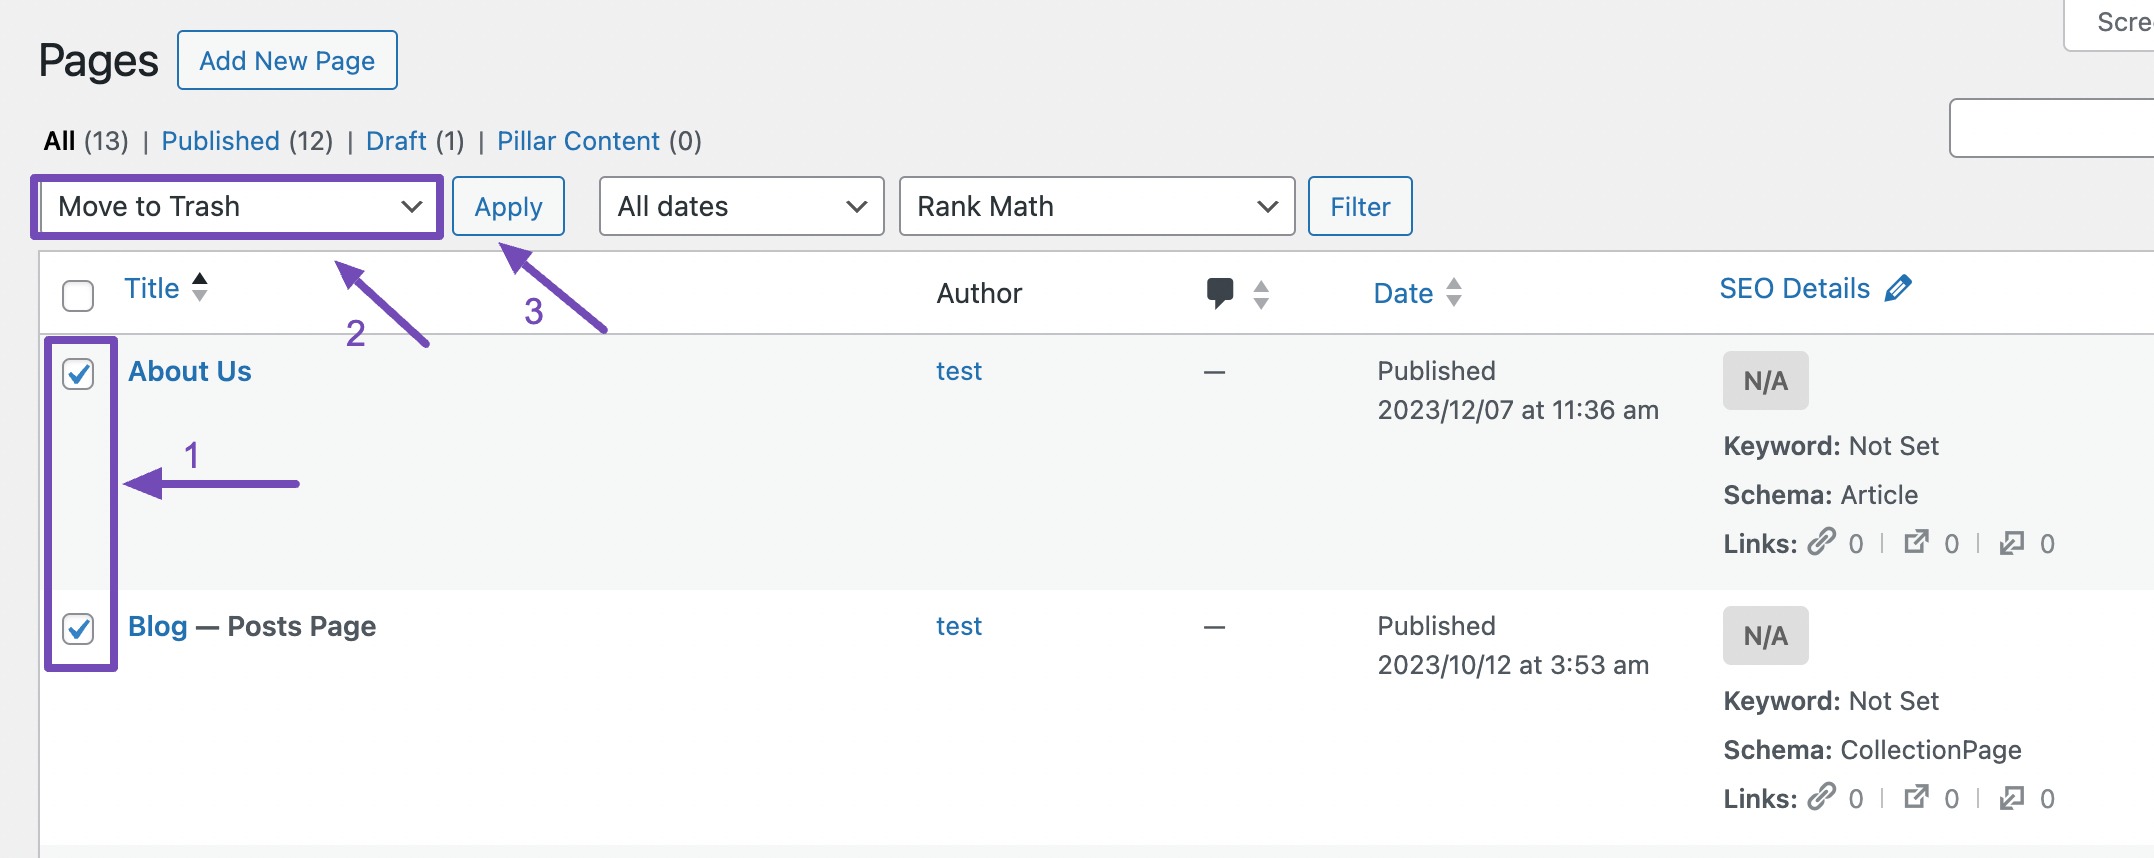
You can also delete a page from its editing screen. Open the page, and you’ll find the Move to Trash link, click it to delete the page.
Note: This doesn’t permanently delete the page; it just moves it to the trash for now.

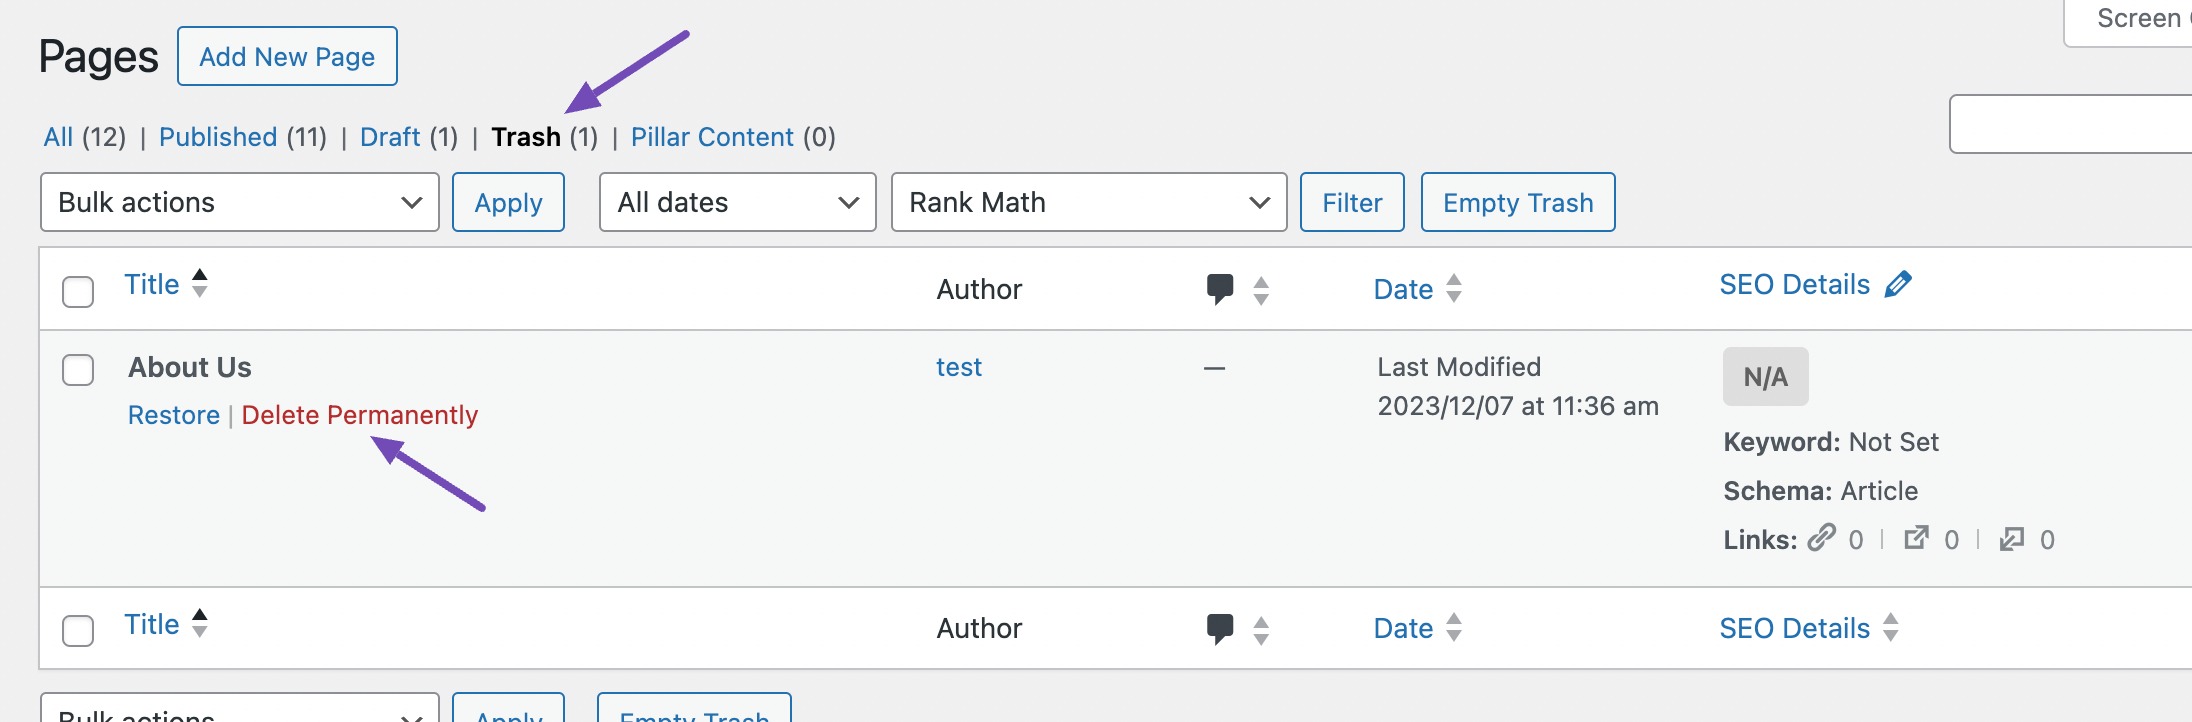
3.4 Empty the Trash (Optional)
If you’re sure you won’t need the page again, you can permanently delete it. Go to the Trash tab, hover over the page, and click Delete Permanently.
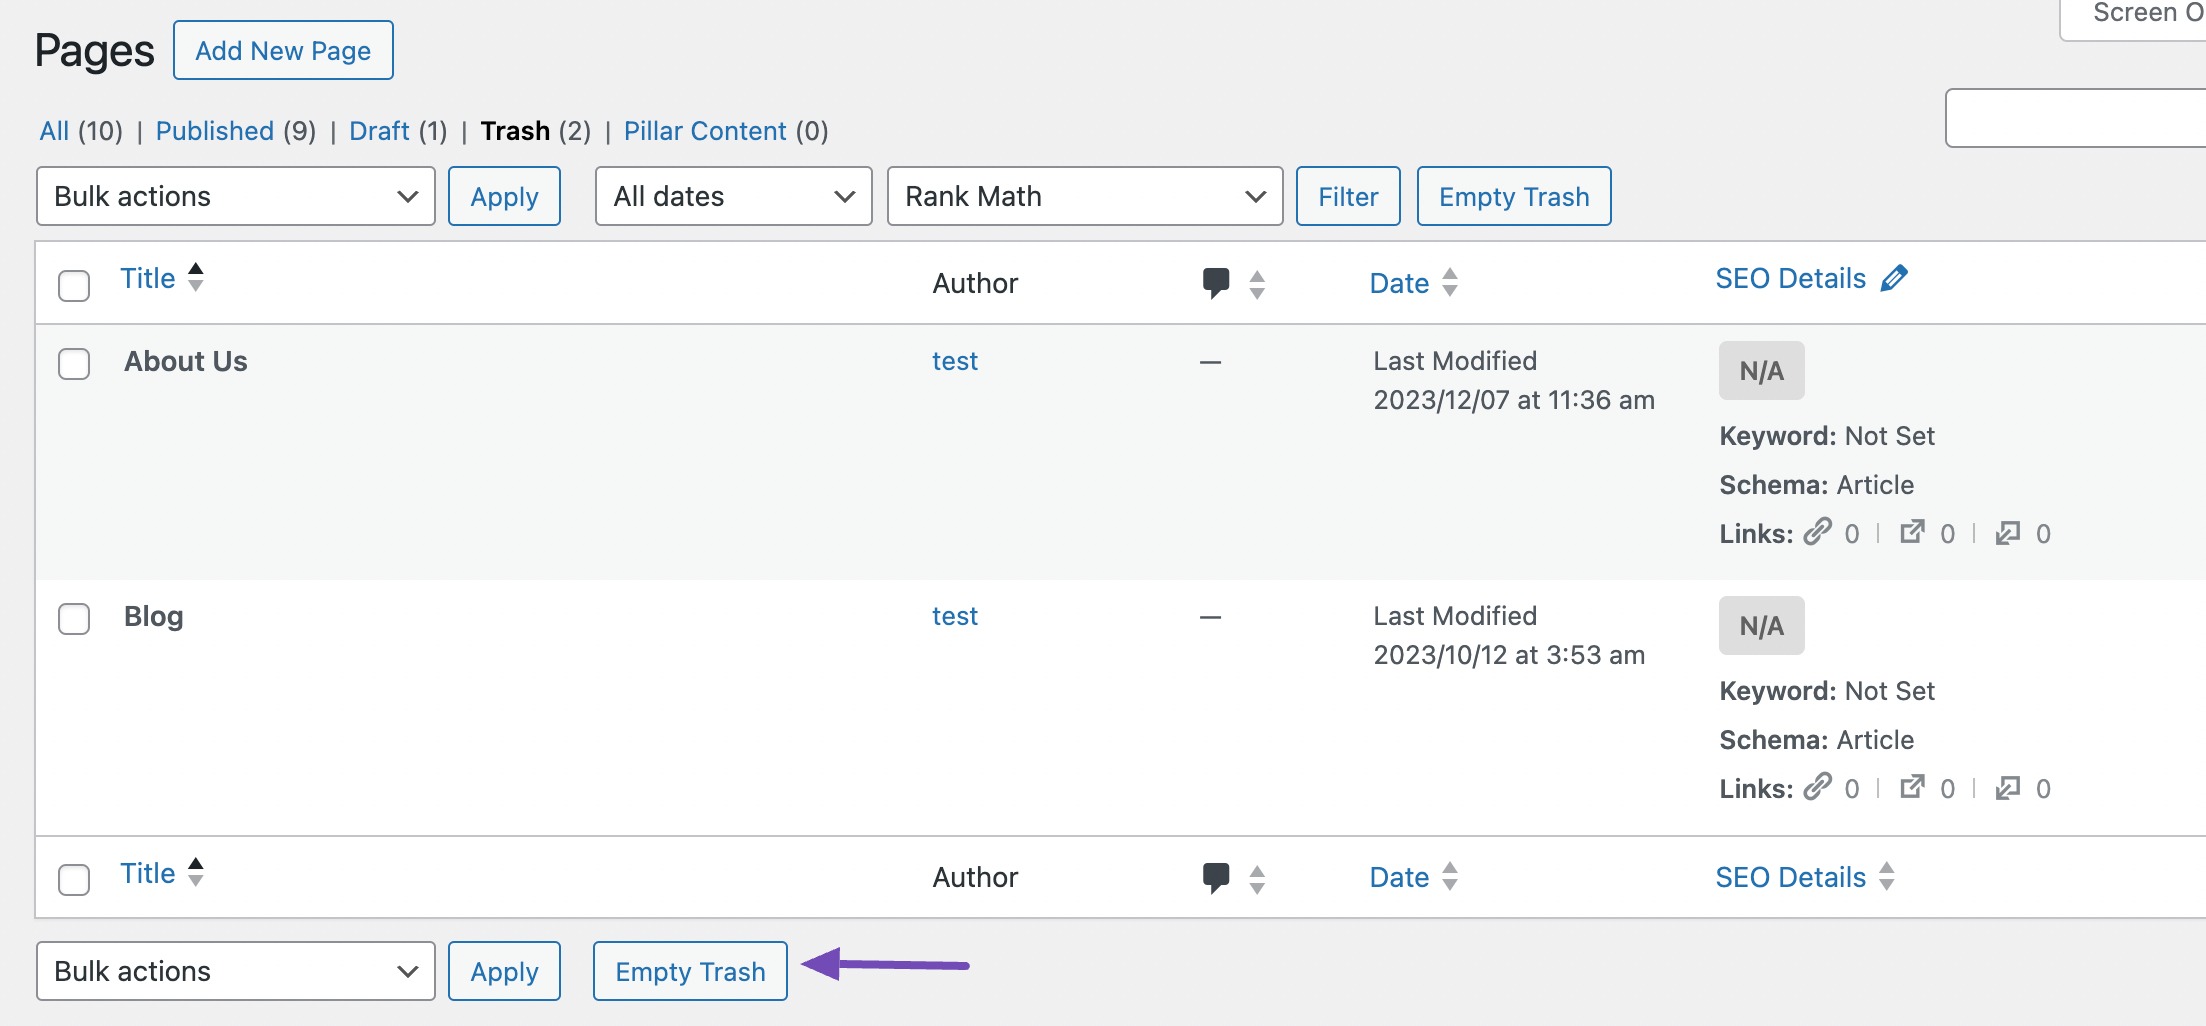
To delete all the pages in the trash at once, click the Empty Trash button below the pages.
However, once a page is deleted from the trash, it cannot be recovered, so be sure to double-check before proceeding with the deletion.
4 Alternatives to Deleting a WordPress Page
Before you delete a WordPress page, it’s worth considering a few alternatives. In many cases, removing a page entirely might not be the best option, especially if it still gets traffic, has backlinks, or offers useful content.
Below, we’ve listed a few ways you can handle such pages without losing their SEO value or frustrating your visitors.
4.1 Update and Repurpose Content
If the page feels outdated but still has potential, try updating it instead of deleting it.
You can refresh the information, add new data, or expand the content to make it relevant again, especially for evergreen topics.
Another option is to repurpose the content into a new format. For example, you might turn a blog post into a video, an infographic, or a downloadable guide. This helps reach new audiences while keeping the value of the original page intact.
For instance:
Let’s say you published a blog post titled Top SEO Trends for 2025. Now that it’s outdated, you might be tempted to delete it. But instead, you can:
- Update the post with insights for the current year (Top SEO Trends for 2026),
- Add new stats, expert quotes, or case studies,
- Or repurpose it into a short video or carousel for social media.
This way, the content stays relevant, continues to rank, and may even perform better with the refresh. Instead of removing the page, think of it as an opportunity to improve or reuse what you already have.
Refer to our dedicated tutorial on repurposing content to get the most out of it.
4.2 Noindex Low-Value Pages
Some pages aren’t great for SEO but are still useful for your site, like outdated product listings, temporary announcements, or seasonal promotions.
Rather than deleting them, you can apply a noindex tag. This tells search engines not to include the page in search results, while still keeping it live for users who need it.
Implementing noindex through our SEO plugin Rank Math ensures that such pages are effectively excluded from search engines while remaining available for internal navigation.
To do so, navigate to your post editing screen, and in the Advanced tab of the Rank Math meta box, select the No Index option, as shown below.
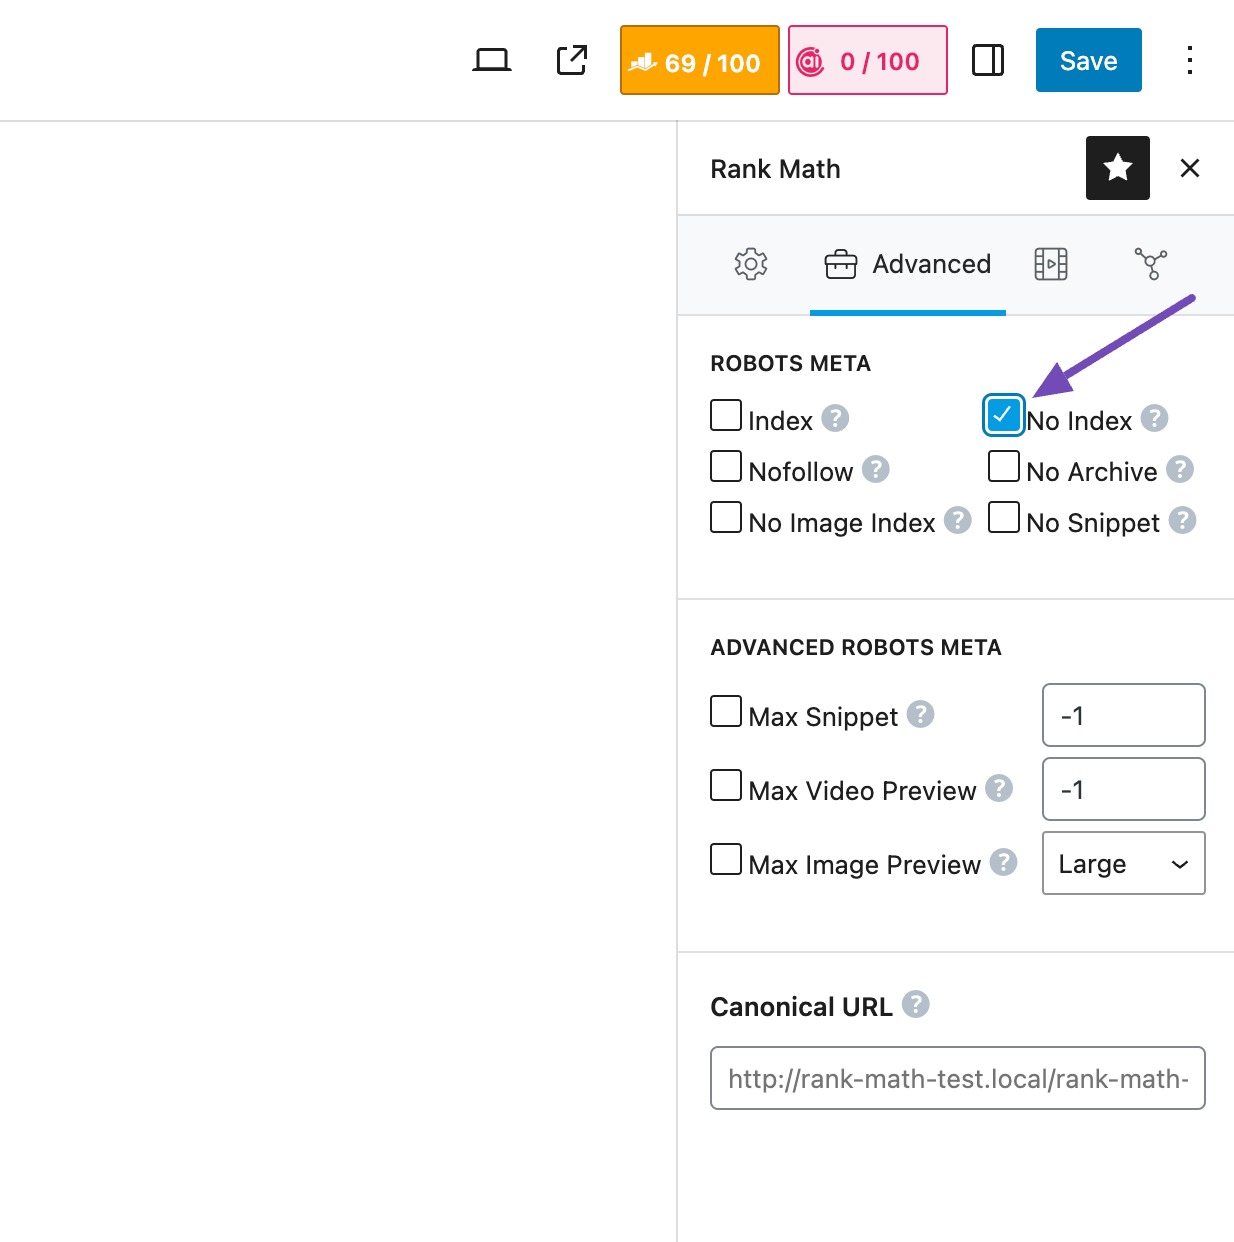
This approach helps reduce clutter in search results without losing important internal content.
4.3 Merge Similar Pages & Use Redirects
If you have multiple pages covering the same or very similar content, it’s a good idea to combine them into one comprehensive page.
Once you’ve merged the content, it’s important to set up 301 redirects from the old pages to the new one. This way, anyone visiting the old URLs gets automatically sent to the updated page, and search engines pass along the SEO value (or link equity) to the new version.
We’ll now discuss in detail how you can easily redirect URLs with the help of the Rank Math plugin.
5 Redirecting Deleted Pages for SEO Purposes
With the redirection feature in the Rank Math SEO plugin, you can effortlessly redirect deleted pages to an existing live page, maintaining the link value and ensuring a seamless user experience.
If Rank Math is active on your site, you’ll often see a prompt after deleting a page, asking if you’d like to redirect it. You can either create a redirect to a newer version of the content or point it to a relevant existing page.
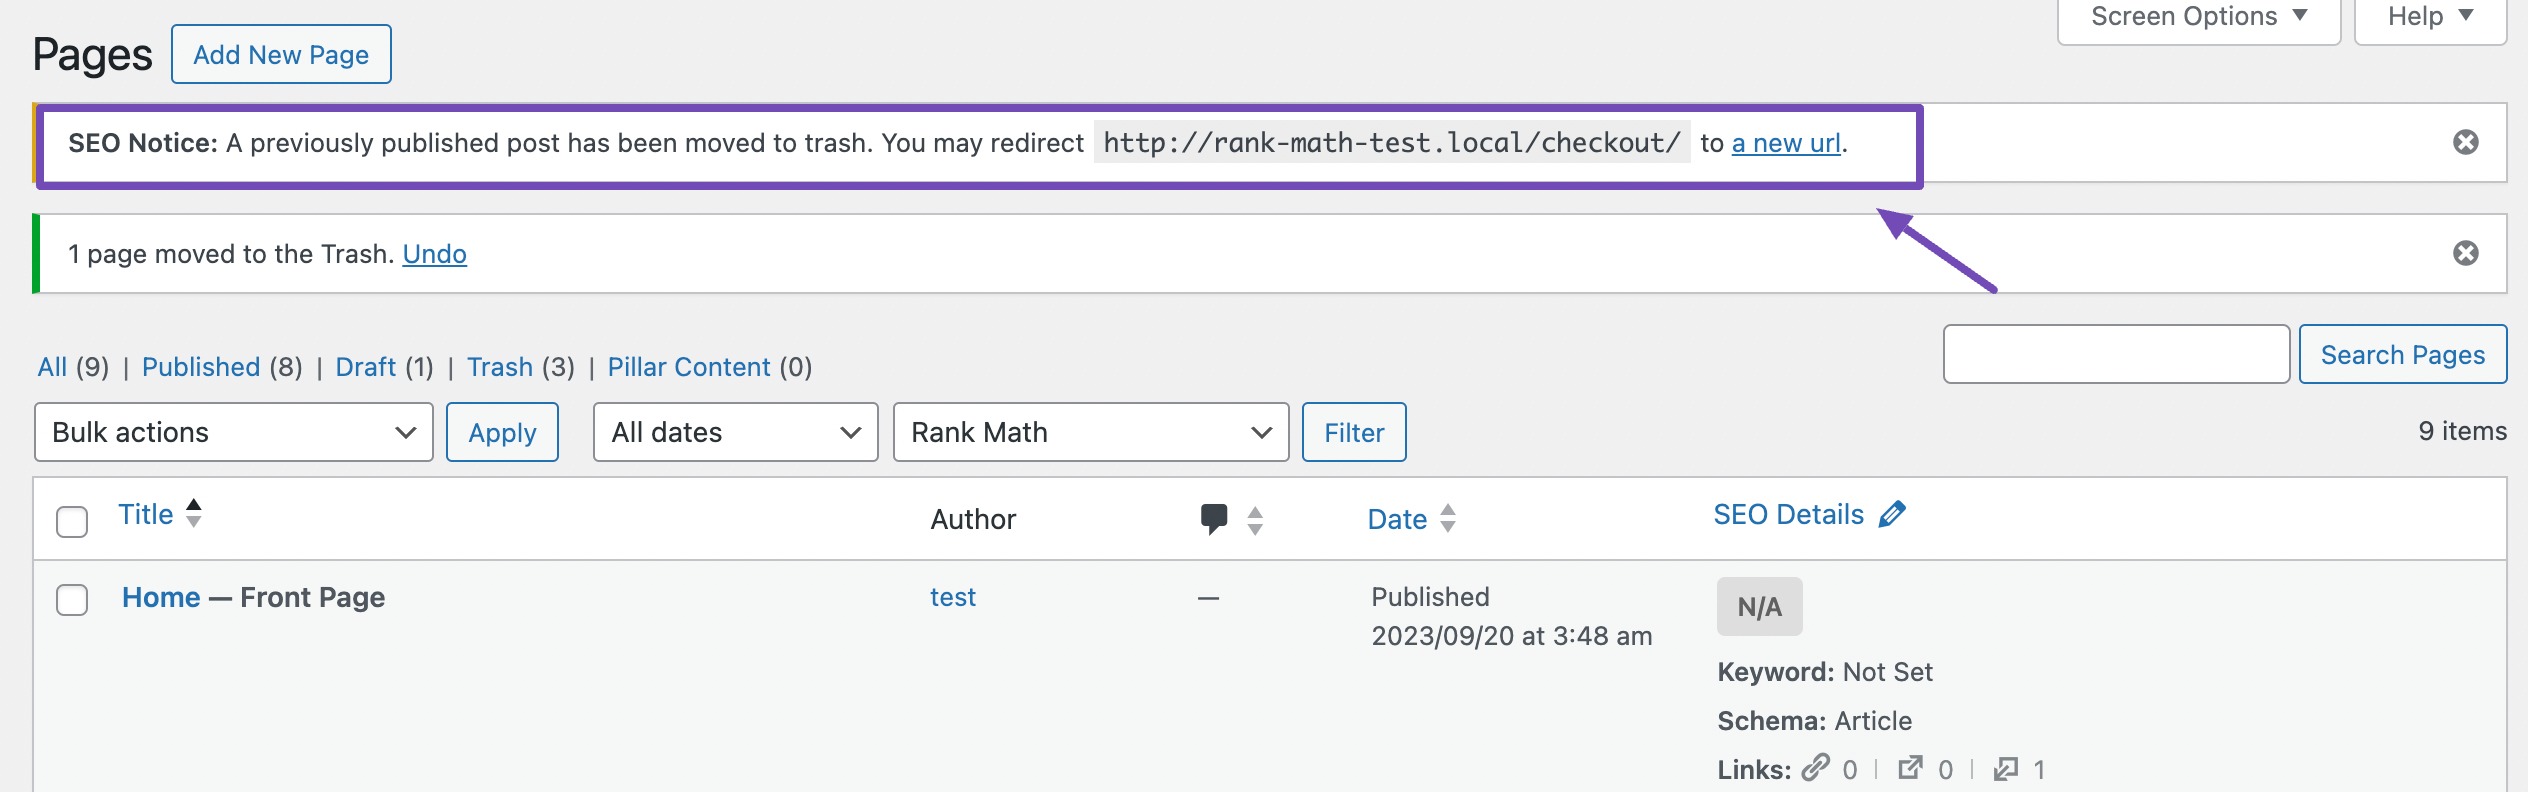
The new URL can be a fresh or improved version of the deleted content or the original to eliminate duplication.
Click the a new URL link in the notice to access the redirections feature and make the necessary adjustments.
Let’s explore how this process works.
5.1 Install and Configure Rank Math SEO Plugin
To begin, install and activate Rank Math SEO in your WordPress dashboard. Refer to our step-by-step guide on how to install the Rank Math plugin.
Once activated, ensure you complete the setup wizard and configure the plugin on your website.
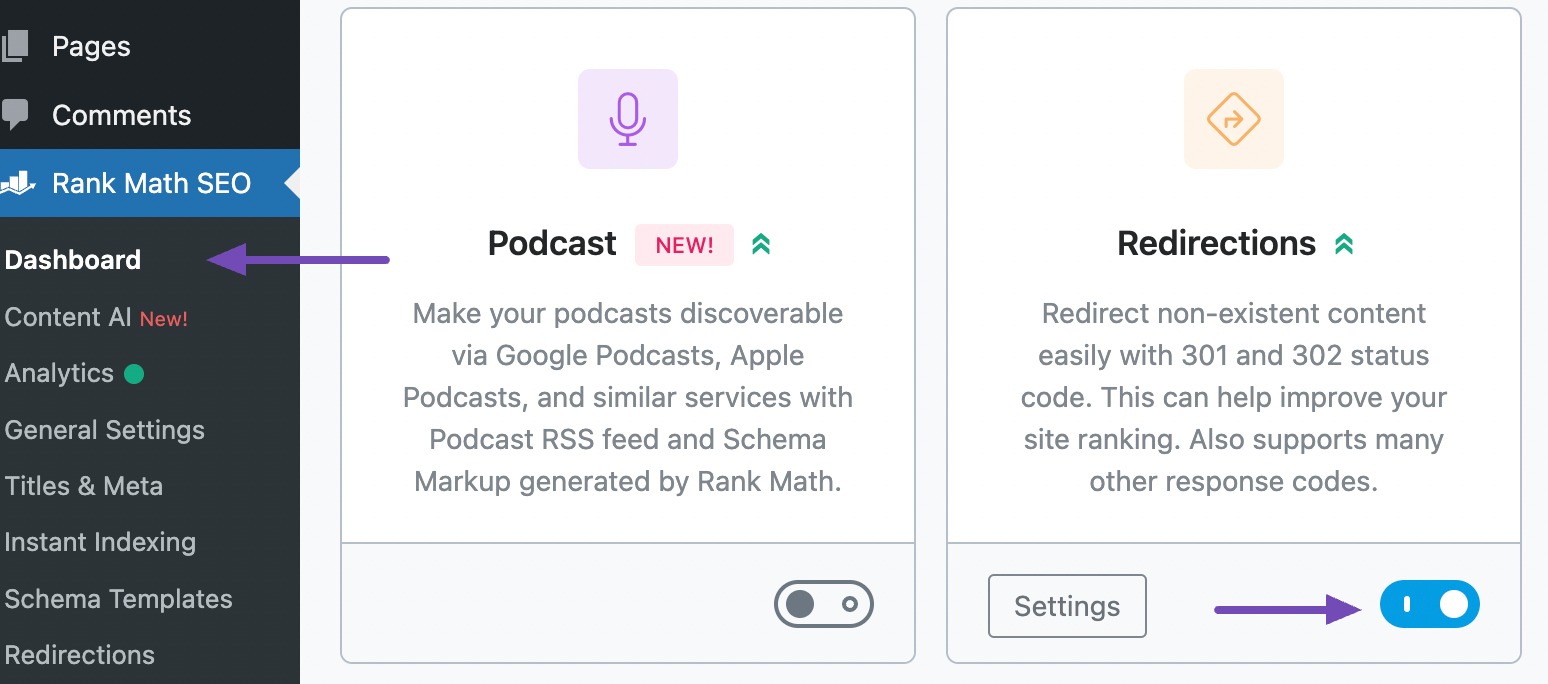
5.2 Enable the Redirections Module
Before using the redirection features, you need to enable them. To do so, navigate to Rank Math SEO → Dashboard from your WordPress dashboard and enable the Redirections module, as shown below.
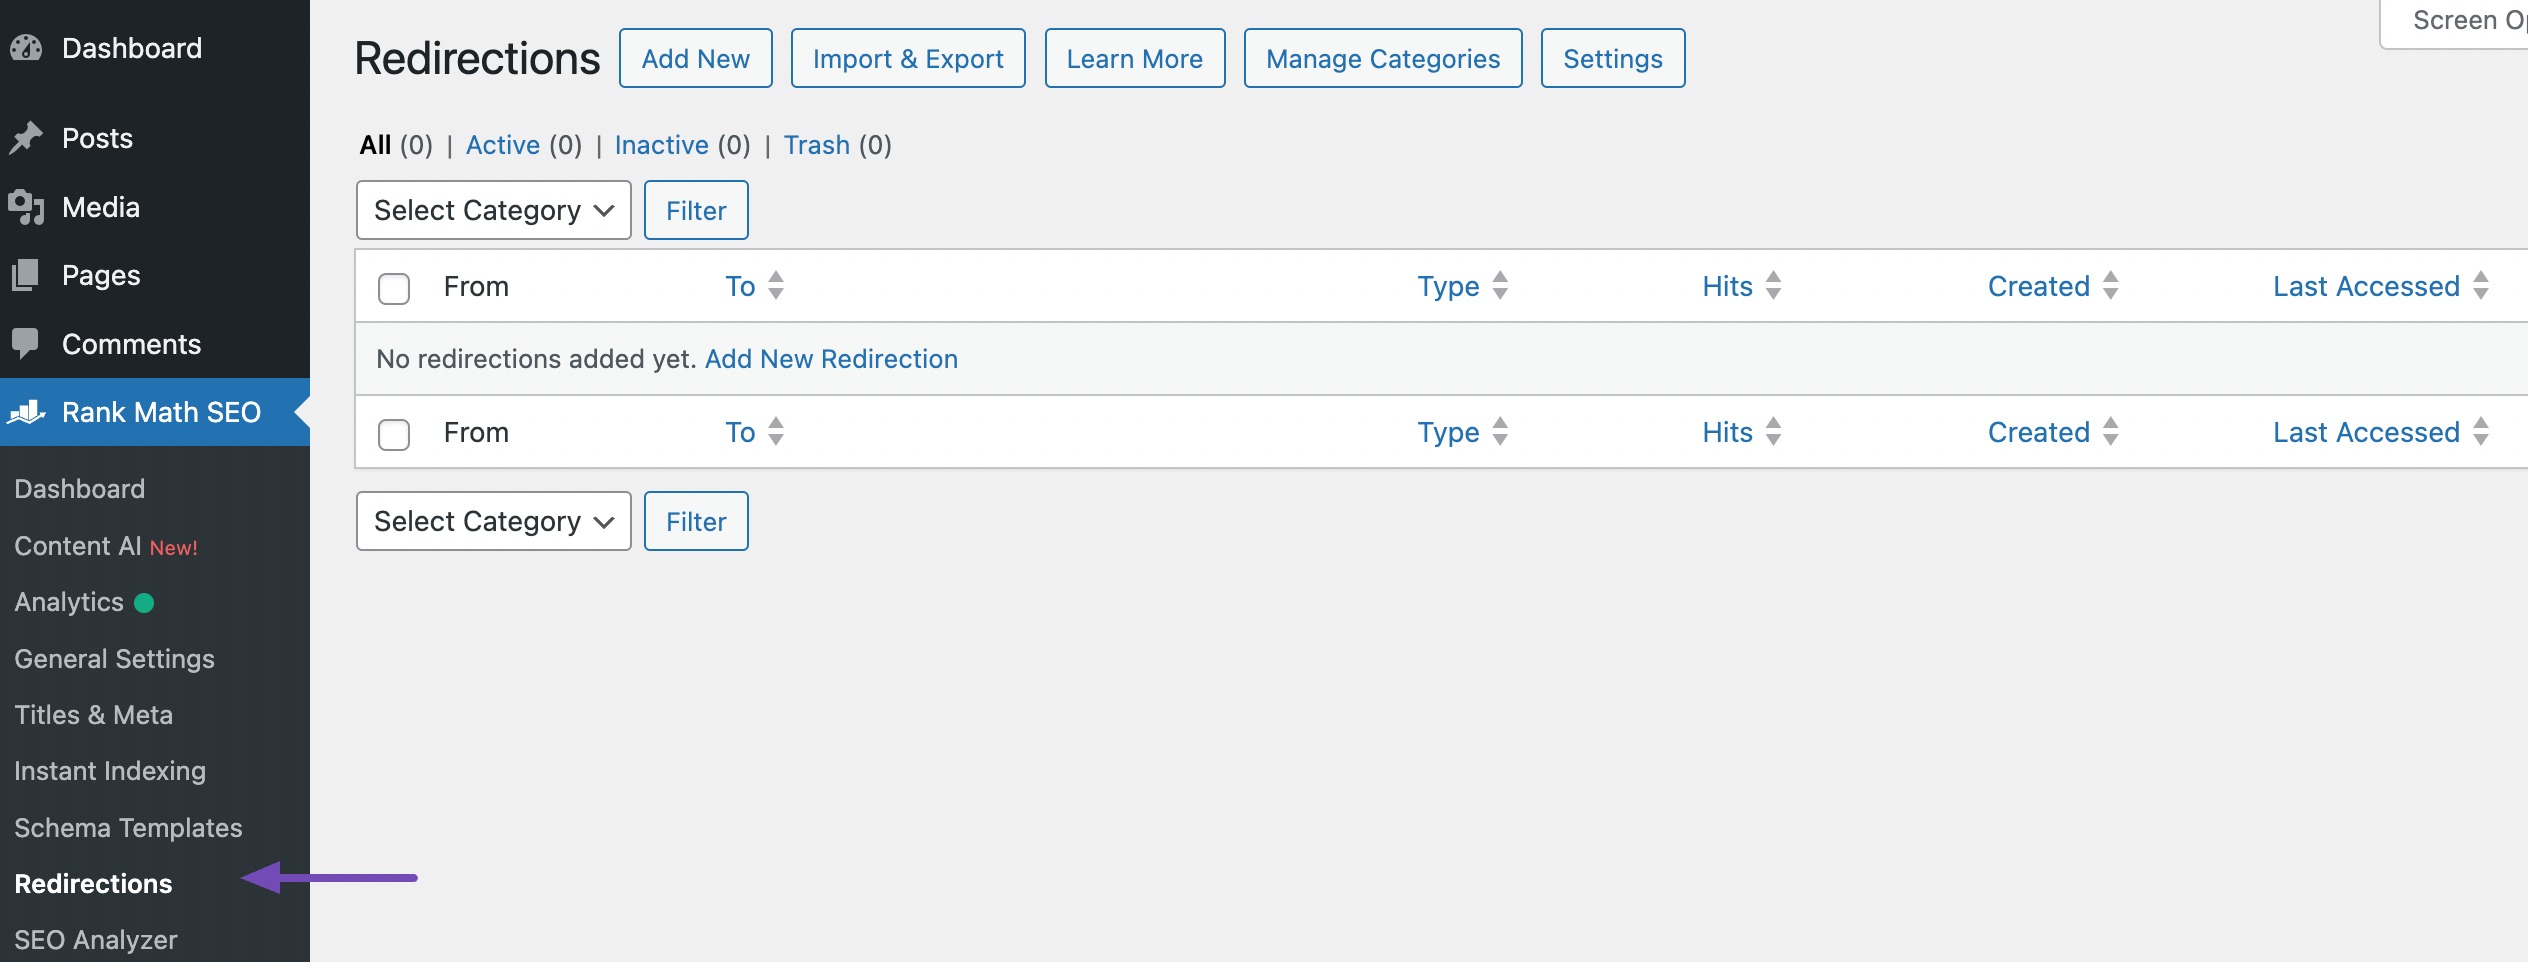
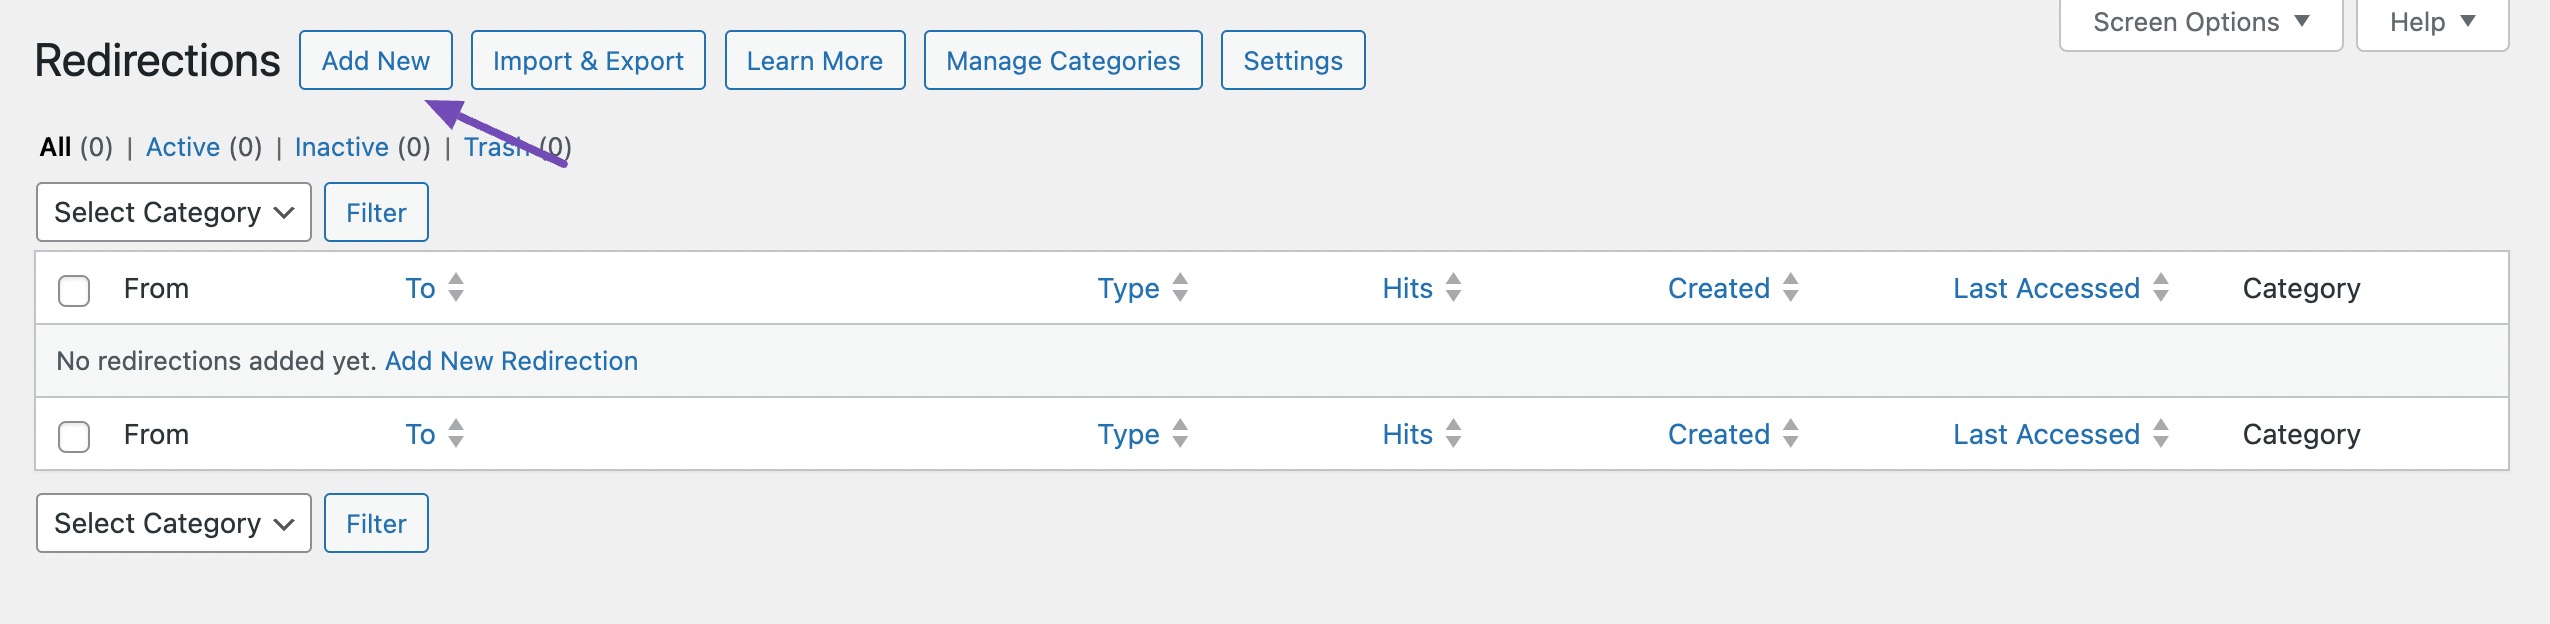
5.3 Access the Redirections Page
Once you’ve activated the Redirection Module, you’ll find it in the left-hand sidebar under Rank Math SEO. To access the redirection page, simply click on Redirections, as shown below.
5.4 Add a New Redirection
On the redirection page, click the Add New button to set up your redirect.
- Source URL: Enter the path of the deleted page. For example, if the deleted page was
https://example.com/about-old, enter/about-old. - Destination URL: Enter the full URL of the page you want to redirect users to, such as an updated version or a closely related topic (e.g.,
/about). - Redirection Type: Choose 301 Permanent Move to let search engines know the page has permanently moved.
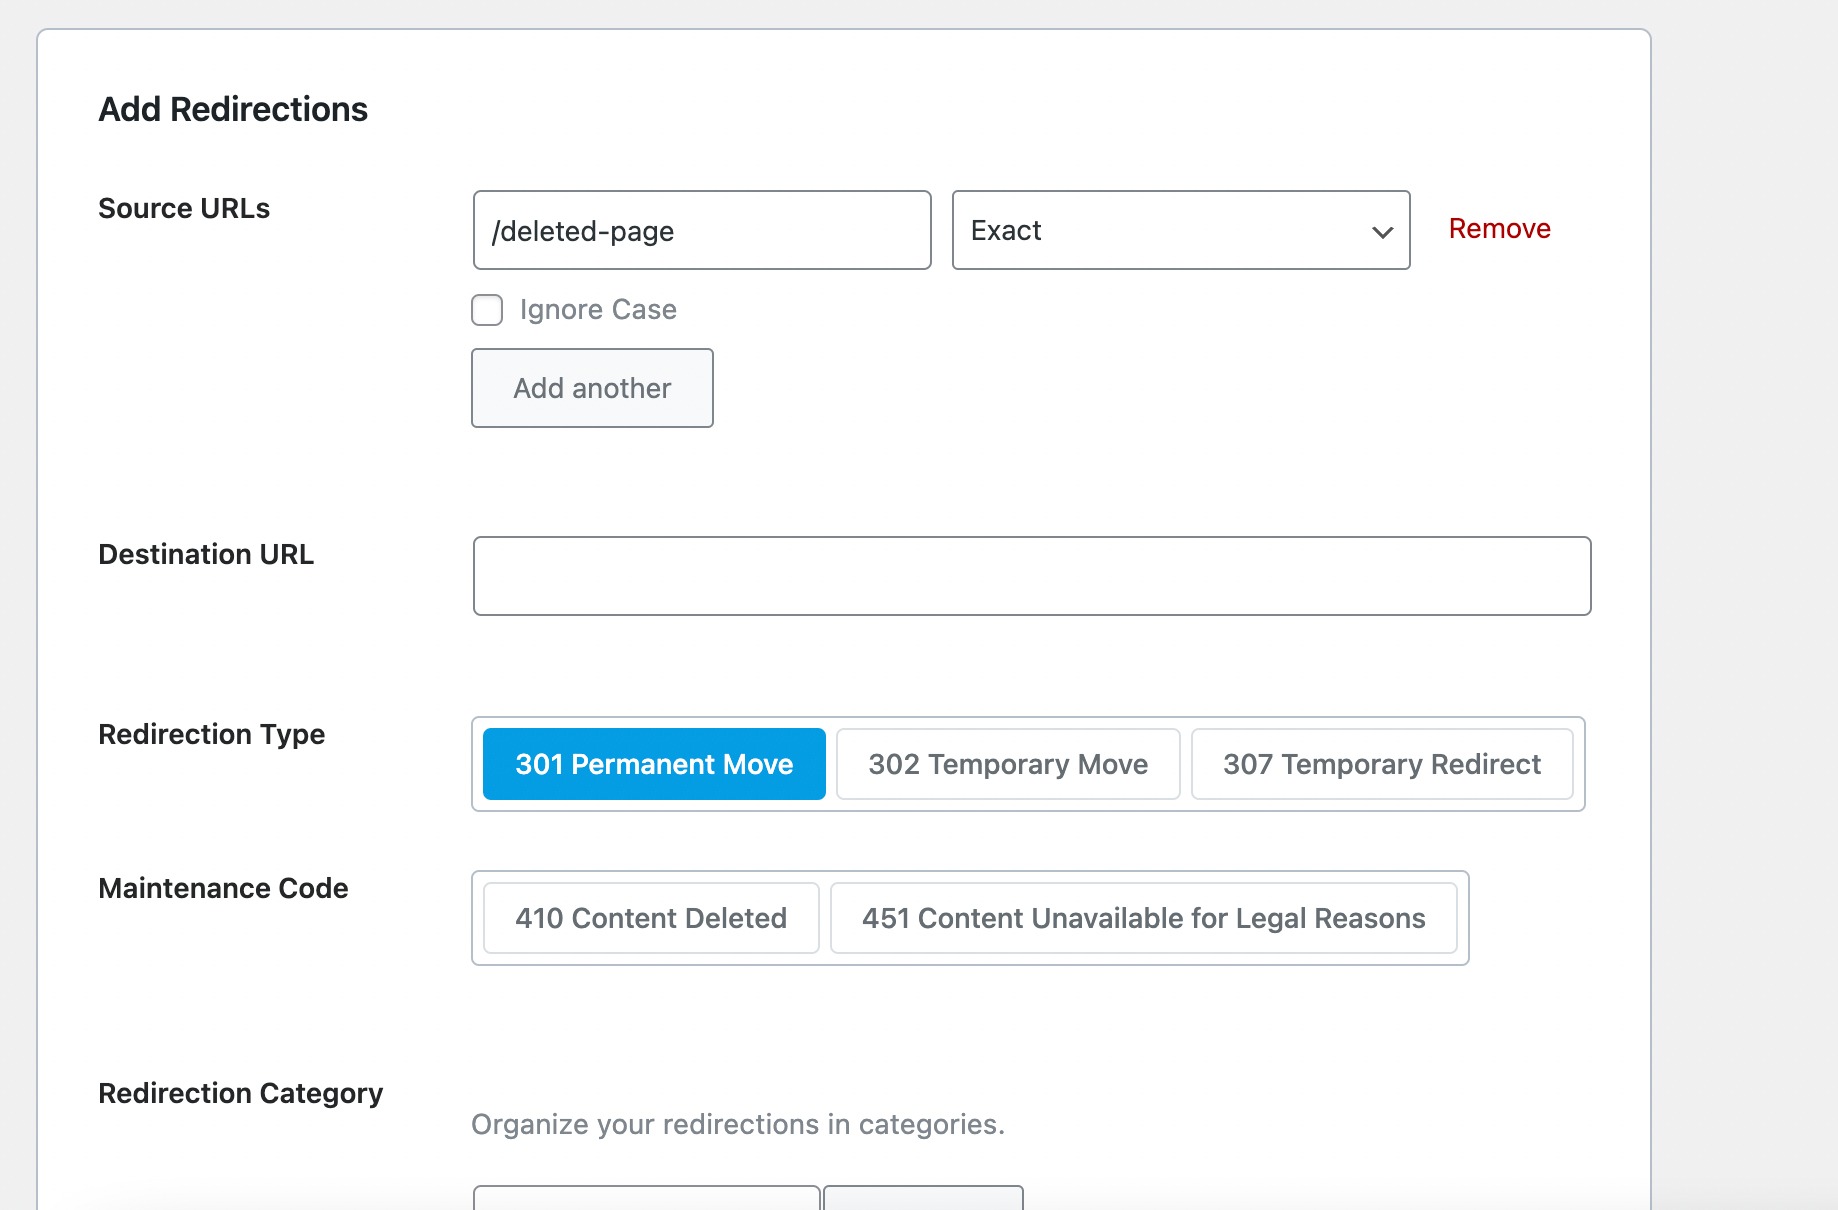
You can also configure optional settings like redirect category, status, and schedule based on your needs. Once done, click Add Redirection to save your changes.
6 Post-Deletion SEO Considerations
Even after you delete a WordPress page, it might still show up in search results for a while. That’s because search engines don’t update their index immediately; they revisit (or “recrawl”) your site periodically to pick up changes.
In the meantime, anyone who clicks a link to that deleted page may see a 404 Not Found error. That’s not just frustrating for users; it can also hurt your site’s credibility and SEO performance.
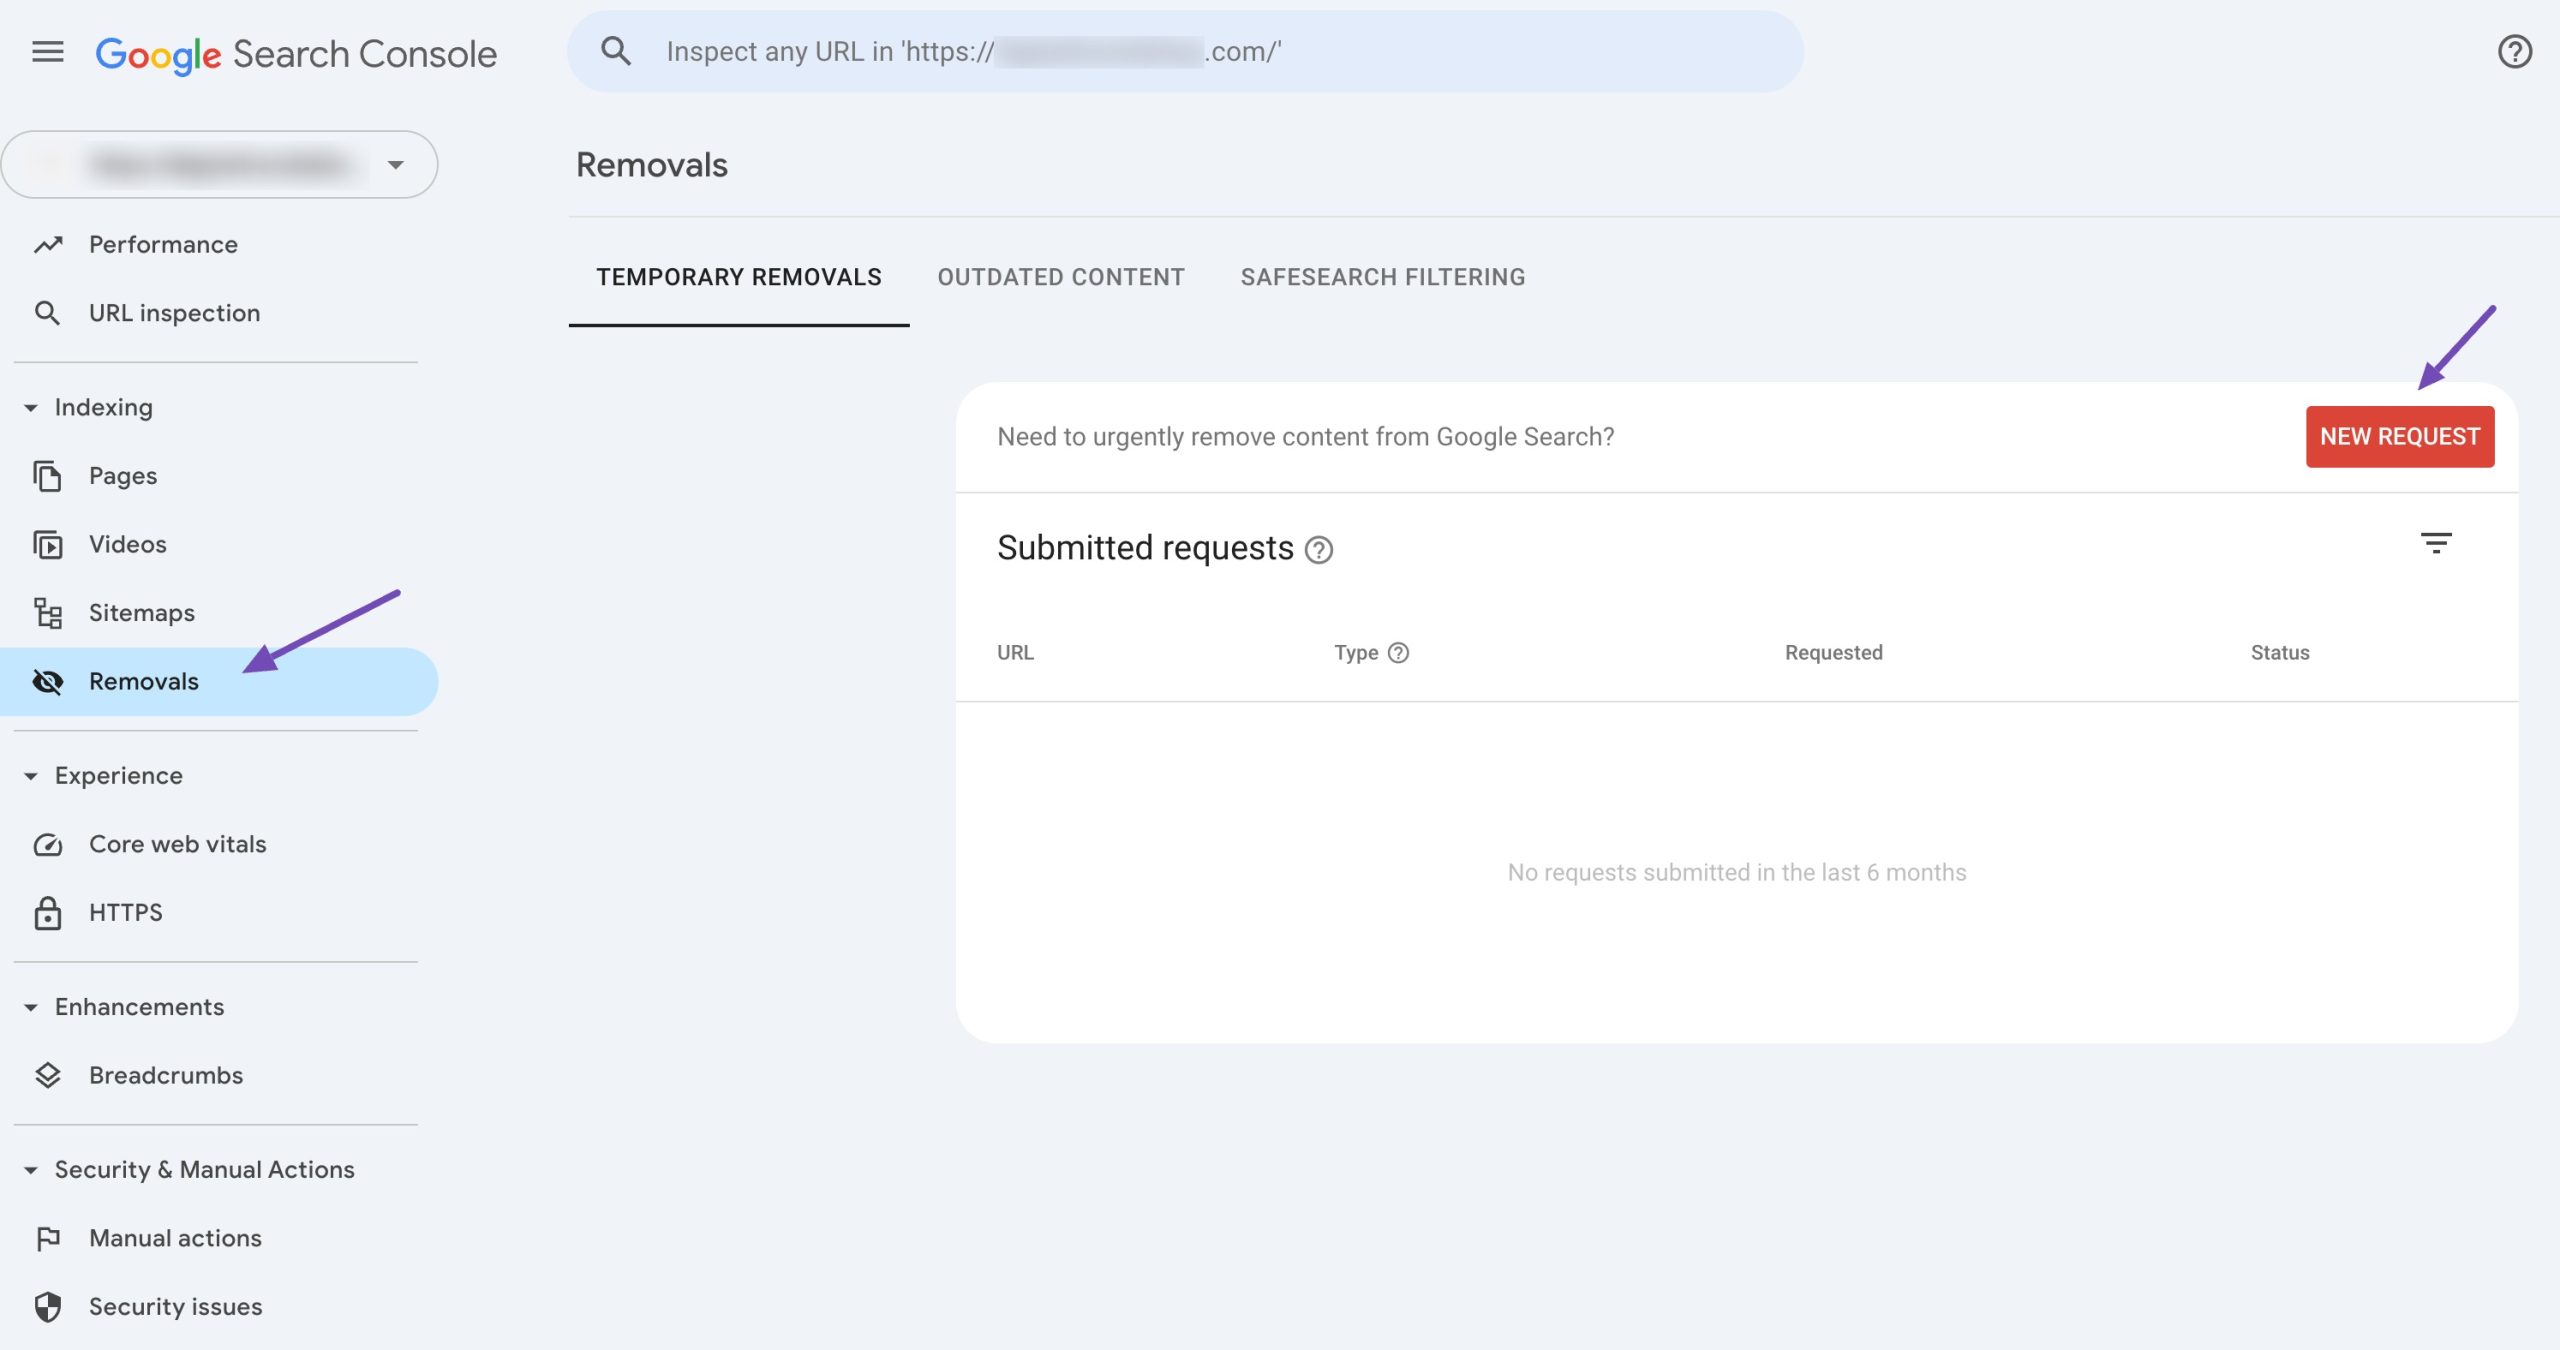
If you want to speed up the removal of that page from Google’s index, you can use the Removals Tool in Google Search Console. It lets you temporarily hide the deleted URL from search results while Google works on updating its index. This is especially helpful if the deleted page was outdated, incorrect, or no longer relevant.
Also, if you’ve replaced the deleted page with new content at a different URL, don’t forget to submit that new page for indexing in Search Console. This ensures Google picks it up quickly and shows the right version in search results.
If you’re using an SEO plugin like Rank Math, your sitemap will usually update automatically. But it’s still a good idea to double-check that the deleted page is no longer listed.
And if the deleted page had valuable backlinks and you didn’t set up a redirect, you might lose that link equity. Consider reaching out to the site owners and asking them to update their links to point to a relevant page.
7 Using HTTP 410 for Faster Deletion from Google’s Index
When a page is deleted, search engines typically encounter a 404 (Not Found) or 410 (Gone) status code.
While both indicate that the page is unavailable, they communicate different messages to search engines.
A 404 suggests that the page might return, prompting search engines to keep checking for it.
In contrast, a 410 explicitly states that the page has been permanently removed, leading to faster deindexing.
If you want Google to remove a deleted page from its index as quickly as possible, using a 410 Gone status code is a better option.
Rank Math makes it extremely simple to add a 410 Gone status code. To do so, navigate to the Redirections section and click the Add New button, as shown below.
In the Source URLs field, provide the URLs of the pages you want to set to the 410 status code.
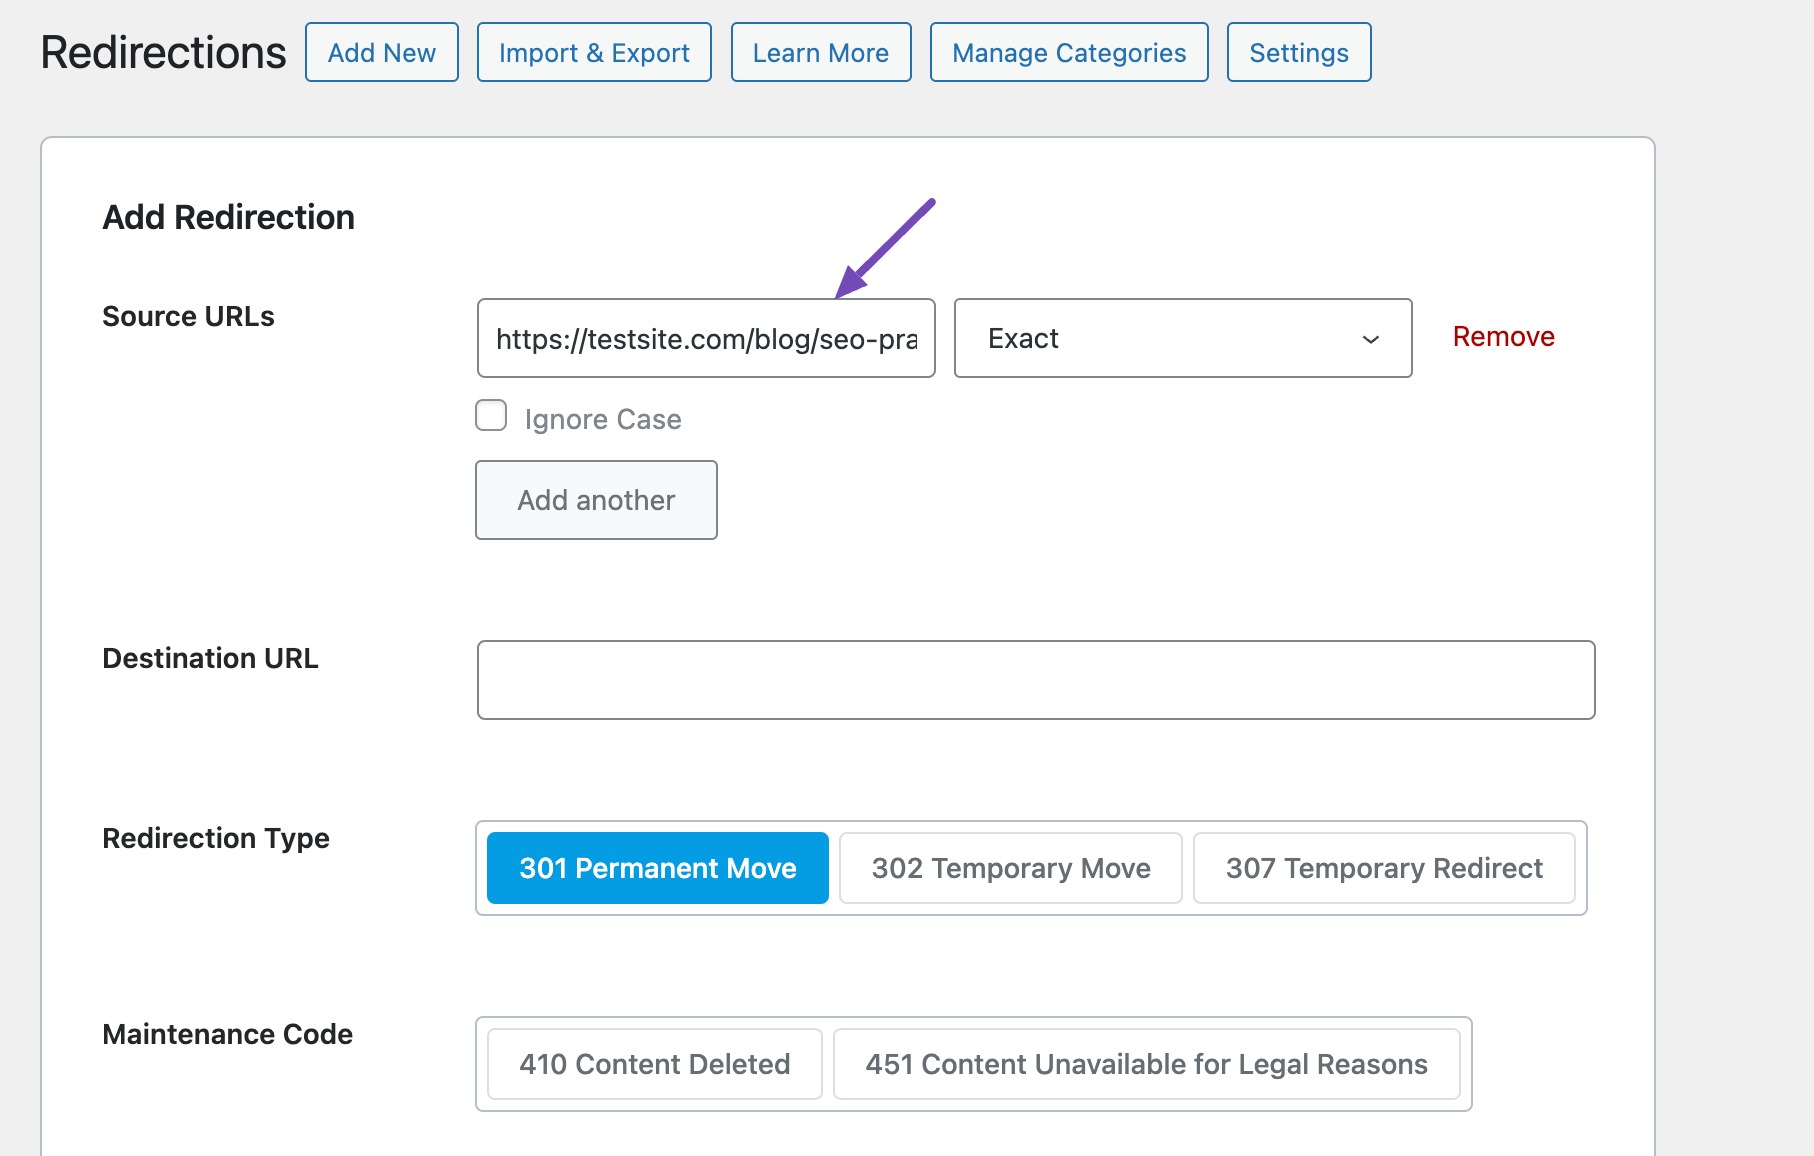
Next, skip the Destination URL and Redirection Type options and move directly to the Maintenance Code option. Click the 410 Content Deleted button, and you’ll notice the Destination URL option disappear.
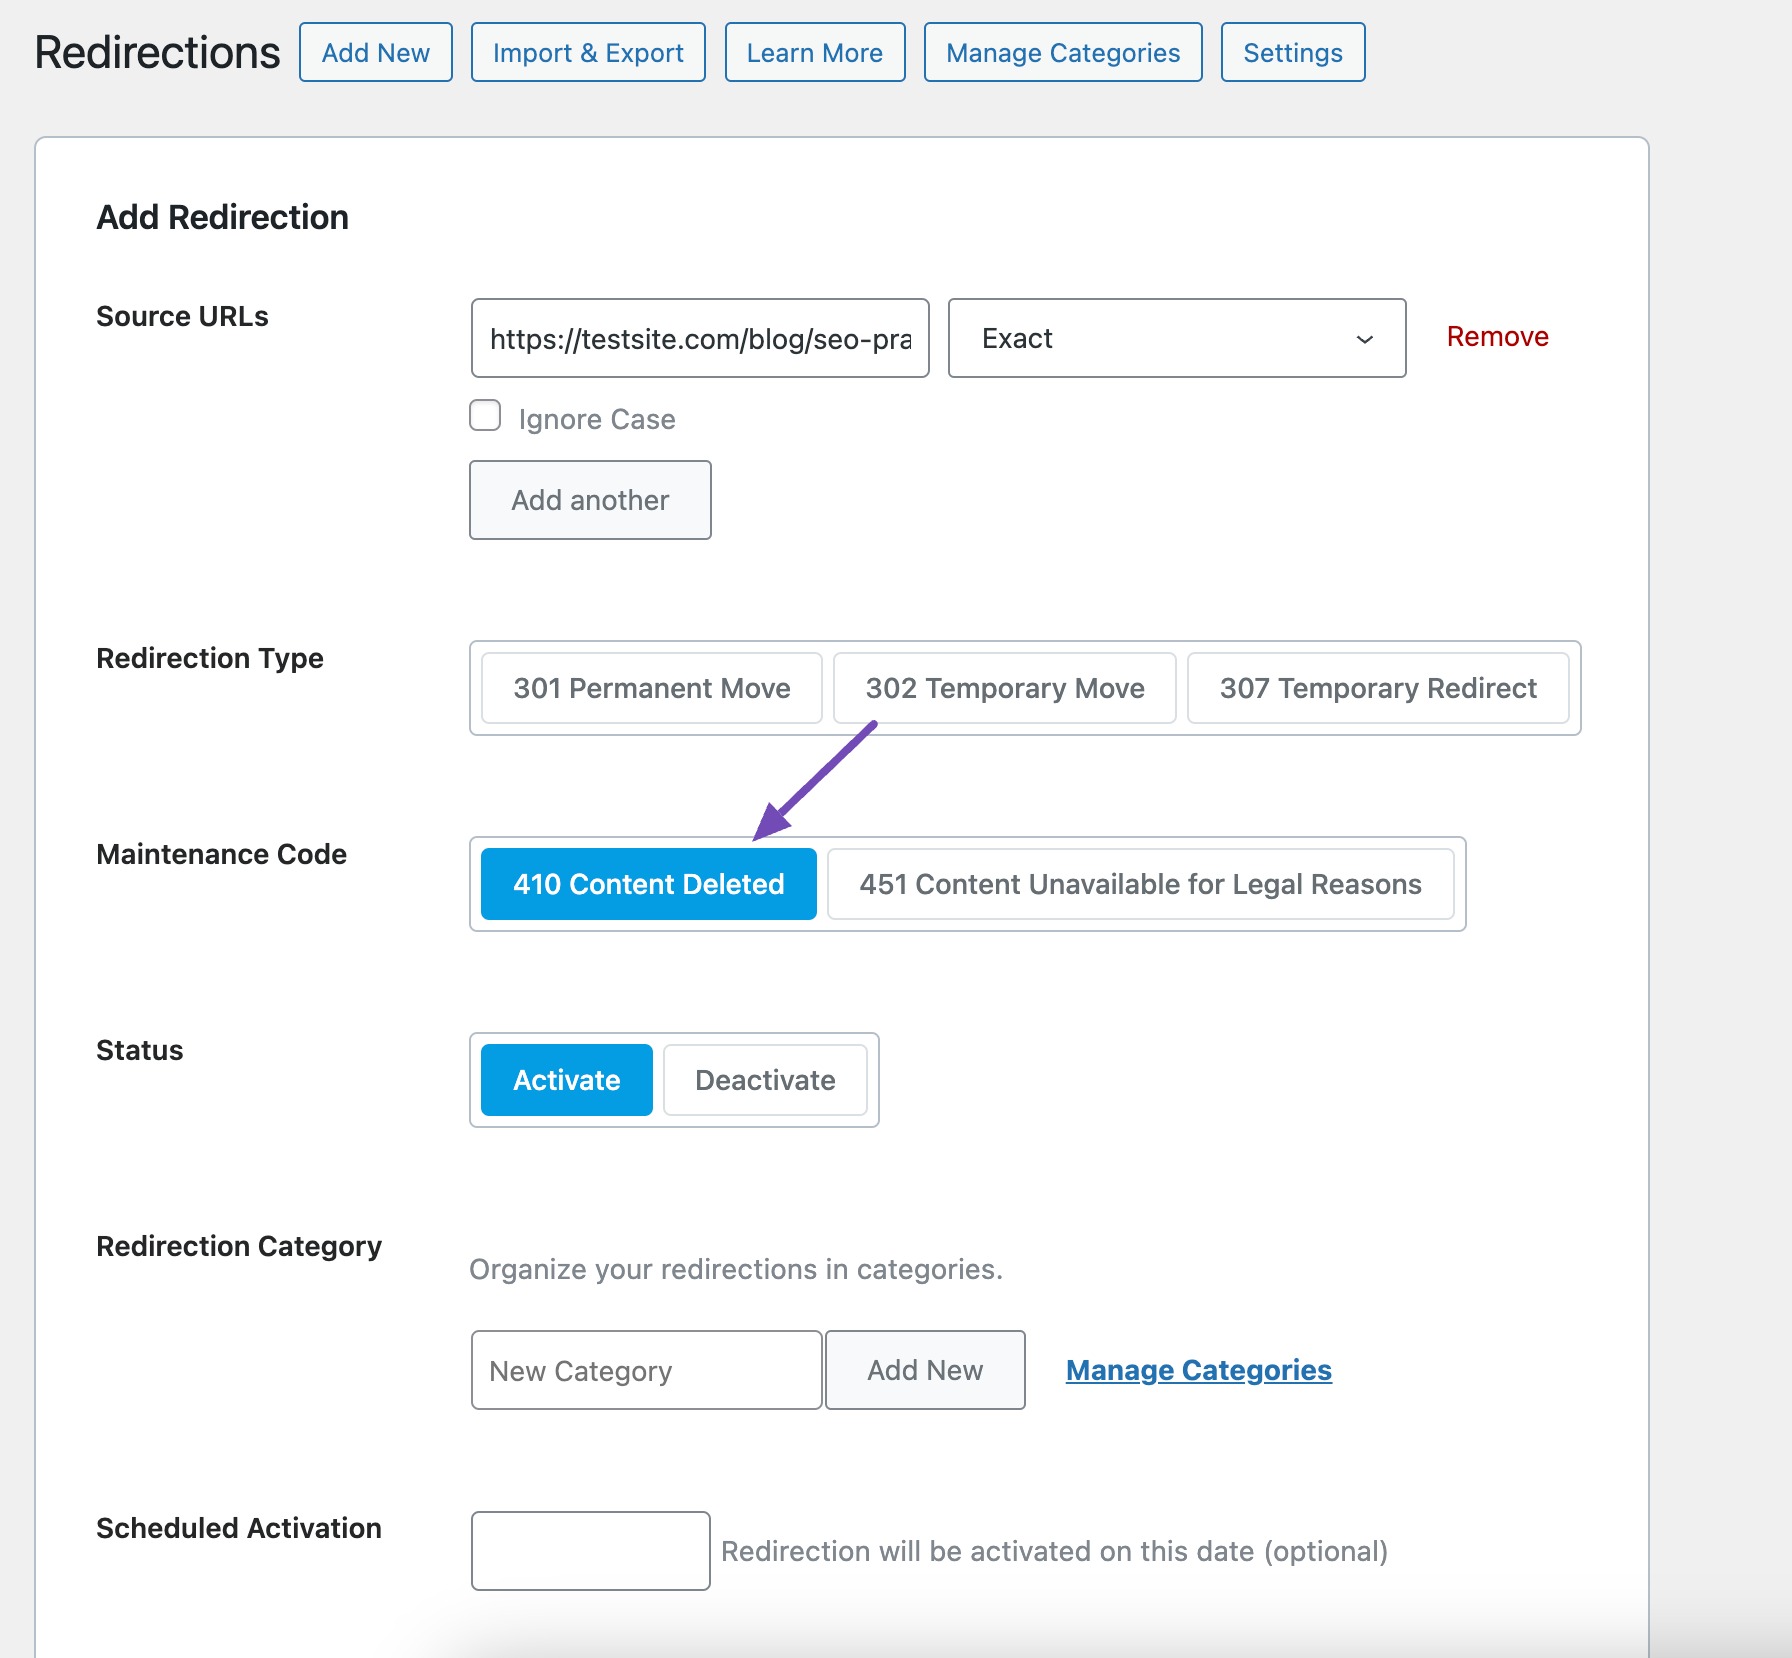
After configuring the redirection settings, you can assign a category, select the status, and schedule its activation as needed.
Once everything is set up, scroll to the bottom of the page and click the Add Redirection button to apply the changes.
After saving, all URLs entered in the Source URLs field will immediately return a 410 status code. You can verify this by visiting the pages or using a header-checking tool like httpstatus.io.
8 Frequently Asked Questions
Will deleting a WordPress page remove it from Google?
Not immediately. Deleting the page removes it from your site, but you should ensure it returns a proper response (like a redirect or 410) so search engines stop indexing it over time.
What happens if someone visits a deleted page’s URL?
By default, WordPress returns a 404 Not Found error. You can improve user experience by setting up a redirect to a relevant page instead.
What’s the difference between deleting and unpublishing a page?
Deleting removes the page entirely from your site (moves it to trash), while unpublishing (switching to draft or private) hides it from the public but keeps it in your dashboard.
Should I delete or update outdated content?
Often updating and improving outdated content is better than deleting it, keeping SEO value and refreshing information for users.
9 Conclusion
Deleting a WordPress page is easy once you understand the steps. Before removing a page, take a moment to check if it still gets traffic or helps your site’s search rankings.
If it does, consider updating or redirecting it instead. Removing a page the right way helps you avoid broken links and keeps your site easy to use.
With a little care, you can clean up your site without causing problems for your visitors or your search results.
If you like this post, let us know by tweeting @rankmathseo.