HTTP redirects are incredibly important in SEO & UX. When you visit a URL with a redirection, your browser automatically jumps to a new address.
You’ve seen this before with URL shortener services like Bitly – instead of typing a long address, you type a short one. Your browser is automatically redirected to a different site, and it happens faster than you can blink.
HTTP redirections are powerful tools in SEO, and they have lots of other uses, too. Rank Math makes it extremely easy for you to set up HTTP redirects – in this article, we show you how.
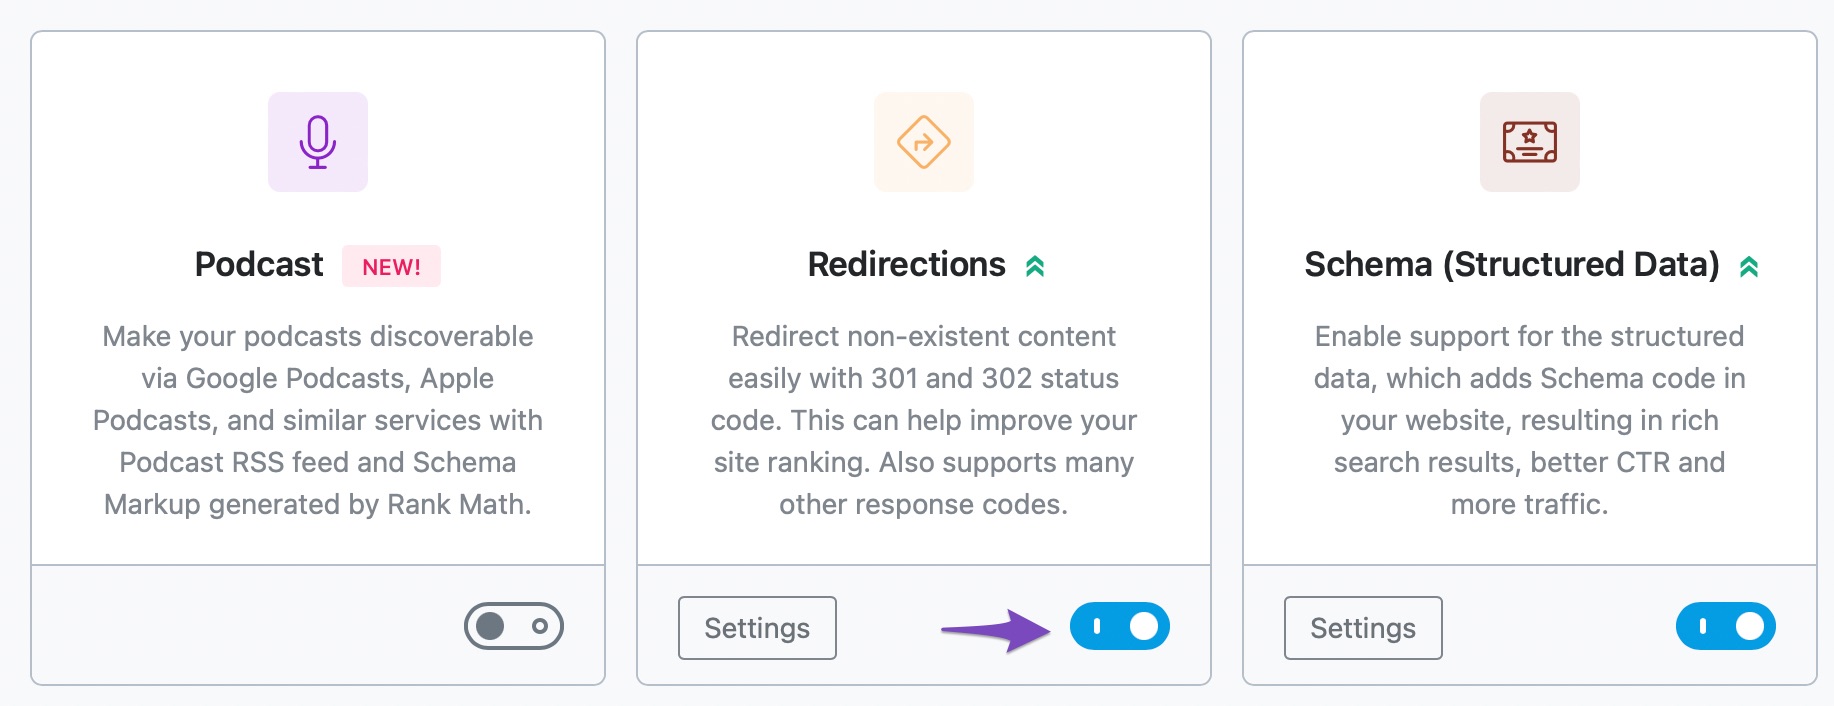
Before you get started with creating redirections, ensure that your Redirections module is enabled under WordPress Dashboard → Rank Math SEO → Dashboard → Modules.
Note: For the Redirections module to appear, ensure you switch to the Advanced mode in Rank Math.
There are three places where you can set up a redirect – in the redirections screen, on the 404 Monitor screen, and in the editor screen.
We cover the URL redirection options for each of these screens in their respective articles.
Which Screen Should You Use?
If you decide to redirect one of your existing posts or pages, it makes sense to use the editor screen.
You can read how to do that in the editor screen article.
If you are getting a lot of 404 errors, it either means you have missing files, or people are clicking on broken links. We cover this in more detail in the 404 Monitor article.
If you want to create a new redirection, you can use the “Redirections screen.”
On the redirections screen, you can choose any URL to redirect. You don’t need an existing post or page at that address, and it doesn’t have to follow the format of your pages and posts.
The rest of this article covers the redirections screen.
Table of Contents
1 Redirections
You can find the redirections in Rank Math’s sub menu:

When you click on the link, the following screen appears:
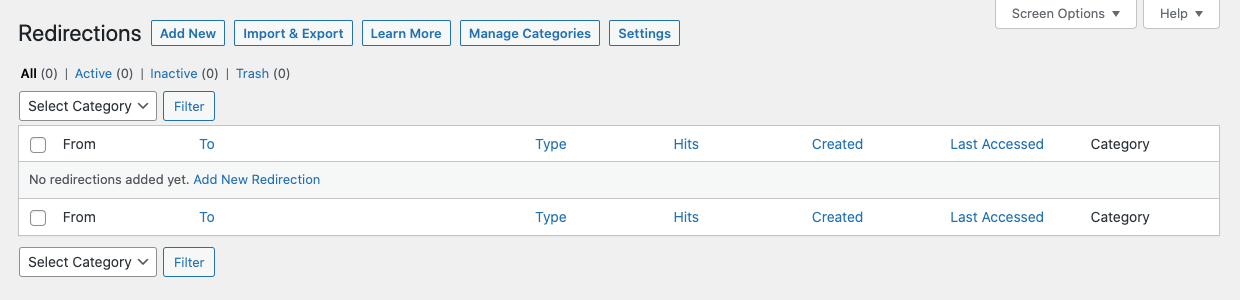
As you can see, it’s a very simple interface. Of course, we don’t have any redirections set up yet! Let’s fix that now.
Click on the button that says “Add New”.
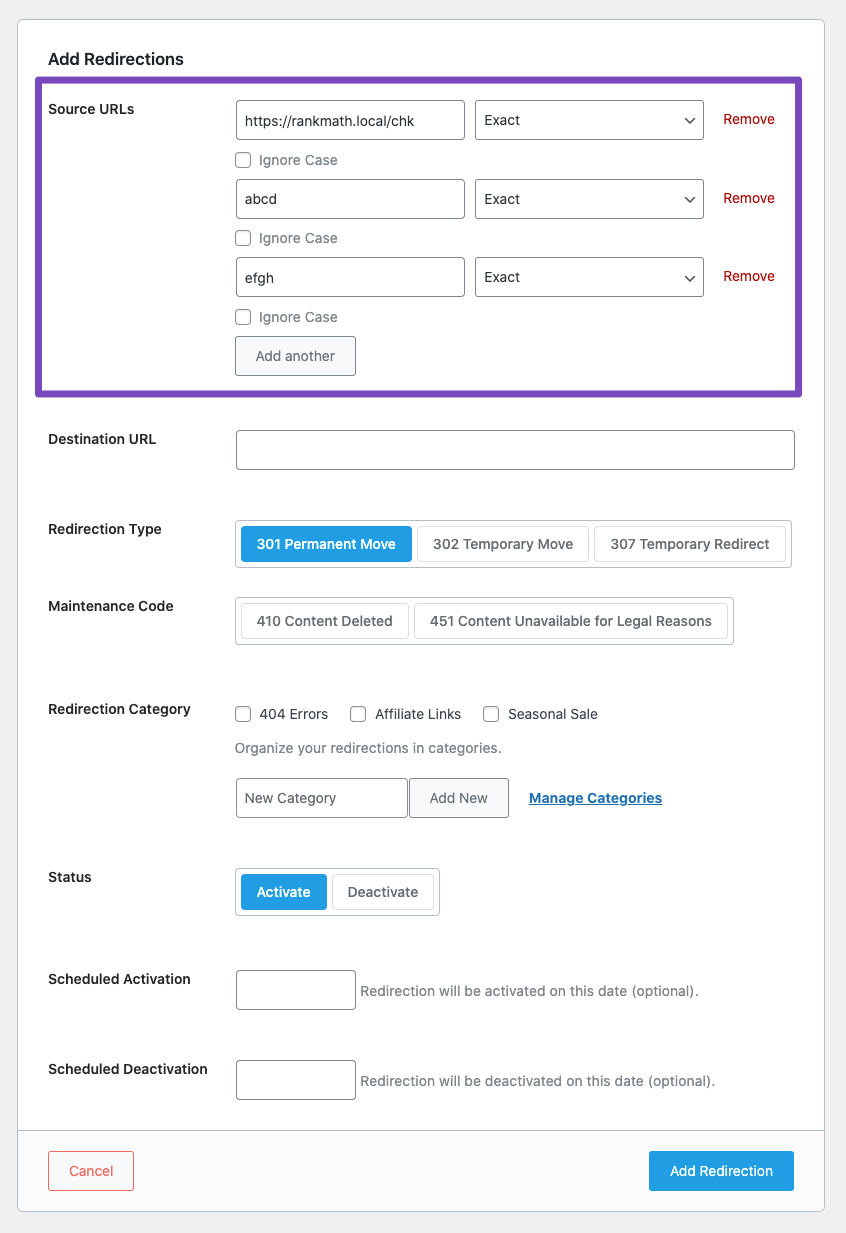
A form will appear at the top of the list:

As you can see, there are plenty of options present in the Redirections menu. Specifically, here are the options you should be concerned with:
- Source URLs
- Match Type
- Ignore Case
- Destination URL
- Redirection Type
- Maintenance Code
- Status
- Scheduled Activation
- Scheduled Deactivation
Here is what each of the fields is used for.
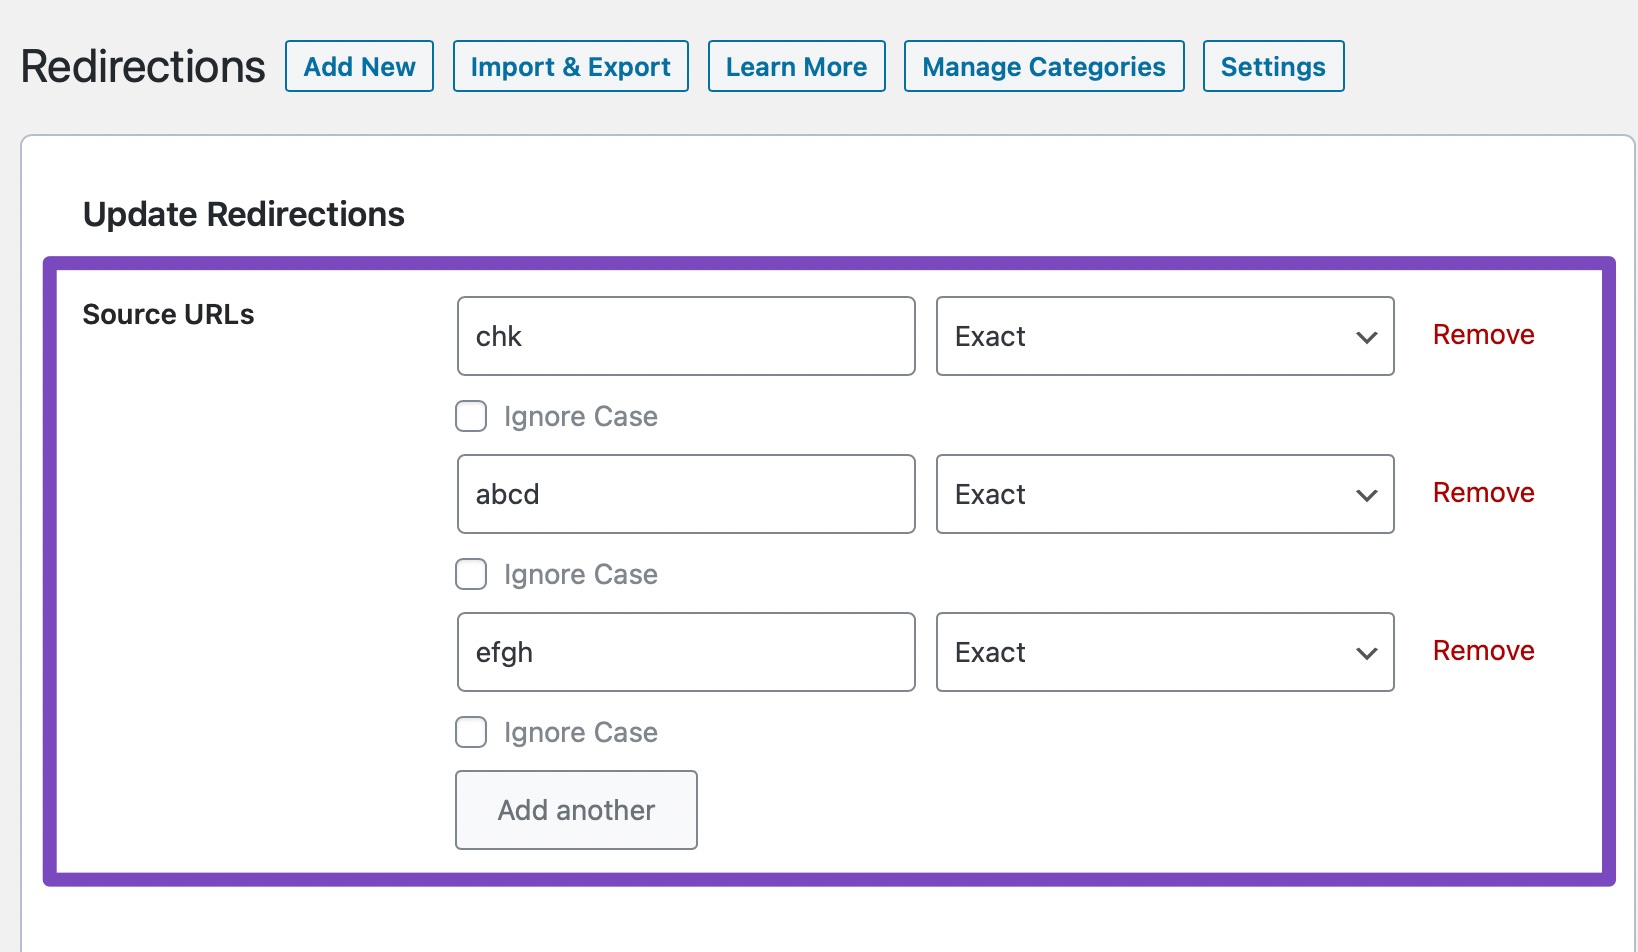
1.1 Source URLs
The Source URL is where you type the URL (or URLs) you want to redirect from. That means any errors causing URLs that you find in the 404 Monitor will go here.
You can add your Source URLs either by adding the full URL(with the https protocol and the domain name) or just writing the address from the document root (the first “/” after your domain name), as shown below.
Rank Math will automatically remove the domain name and slashes in the Source URL.
Note: Rank Math’s Redirection module does not allow redirection of the homepage. If you try to redirect the homepage you’ll no longer be able to access your website and might lose access to our plugin.
1.2 Match Types
There will be many cases where redirecting a single URL to a destination URL will be limiting—you will need more control. Let us take an example.
Imagine if you had a blog about mobile phones and had an entire category dedicated to Windows Phones. As Windows Phone died, you decided to redirect those articles to your homepage. The only problem is, you would have to create hundreds of redirects manually.
The match type is built for this type of scenario. It gives you multiple options by which Rank Math will “match” a URL to see if it needs redirecting. Here are the options in the Match Type.
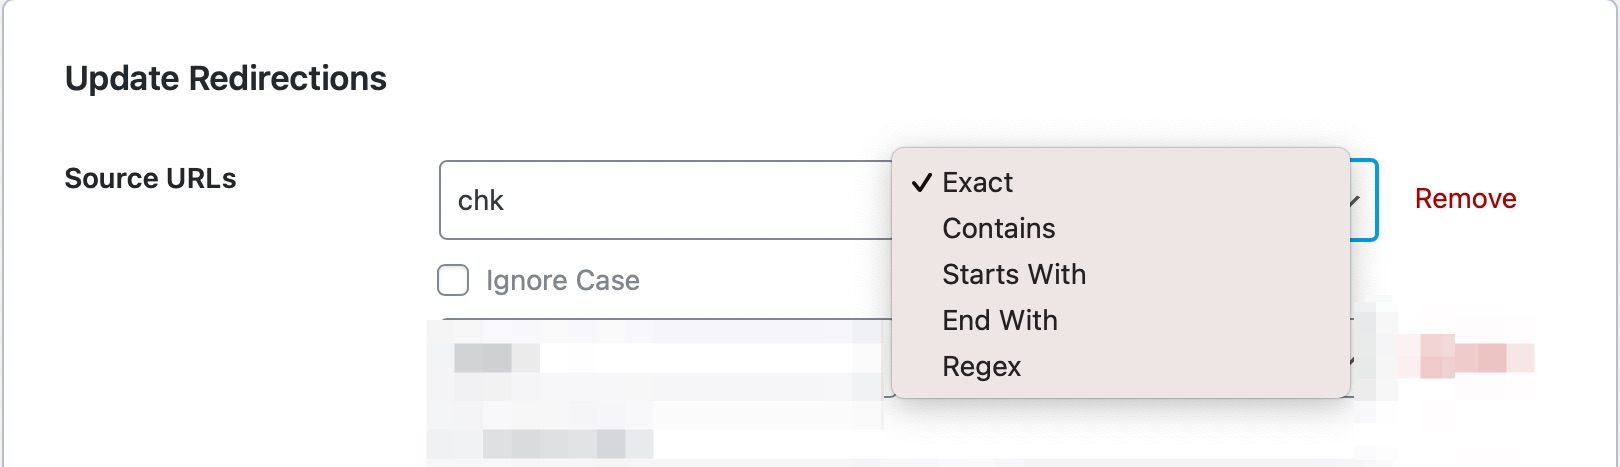
Let’s discuss each of the types.
1.3 Exact Match
The Exact Match is pretty self-explanatory. It matches the URL that the user lands on to the exact URL that you placed in the source URL and redirects only if both the fields are an exact match.
For example, if the URL the user visits is yoursite.com/cat/apple-cider-vinegar/ then the source URL must say /cat/apple-cider-vinegar for the redirection to work. Even the slightest change will cause the redirection to fail.
1.4 Contains
The Contains match type field will cause all the URLs to redirect that contain a specific term.
Let’s say that you have many posts on your website with “oranges” in the URL. If, for some reason, you want to redirect them all to a new URL, all you have to do is enter “oranges” in the Source URL field, choose Contains as the match type and enter a destination URL. All the URLs on your website with the word “oranges” will then be redirected to the destination URL.
You might be thinking about how would you use this match type on a day-to-day basis. Let us give you a more practical example to show you how powerful this is.
Imagine that you have a blog about Celebrity Lifestyle. You have hundreds of celebrity posts that talk about their life, what they do, etc. You wake up one day and find out that Justin Bieber just got married. You write a post about it and quickly use the Contains match feature to redirect all Justin Bieber posts to the new wedding post. As a result, your blog soars in popularity and gets tons of shares, views, and maybe links. Once the hype dies, you can disable the redirect.
PS: This technique is used by the biggest publications in the world, especially when major news breaks out. The more you know.
1.5 Start With
The Start With match type will redirect all URLs that start with the keyword in the Source URL field. For example, if you enter “bacon” in the source URL, this will happen.
- bacon-and-eggs – Will match and redirect
- bacon-for-breakfast – Will match and redirect
- why-is-bacon-delicious – Will not match and not redirect
1.6 End With
Similar to Start With, the End with match type will redirect all URLs that end with the keyword in the source URL field. For example, if you enter “orange” in the source URL, this will happen.
- how-to-make-orange-juice – Will not match and not redirect
- how-to-peel-an-orange – Will match and redirect
- apple-juice-vs-orange-juice – Will not match and not redirect
1.7 Regex
There’s a “regex” option under the “From” URL box. Regex stands for regular expressions – they’re a very powerful pattern matching tool. Regular expressions allow you to write a pattern, and Rank Math will redirect any URL that matches the pattern.
For instance, you might want to match any URL for pages that start with an “a” and end with a “z”. You can use an expression like this:
**^a*z$**
This pattern will match URLs like:
- http://your-site.com/applez
- http://your-site.com/antz
- http://your-site.com/andrew-fell-asleep-zzz
It will not match a URL like this:
http://your-site.com/are-you-reading-this
Regular expressions are a great tool because you can match thousands of URLs with a single line. But they can also be dangerous – if you make a mistake, they will either not work, or match too many URLs.
A bad regular expression could make whole sections of your site disappear!
If you’ve never used regular expressions before, you should read through a tutorial or a book first. Get some practice and confidence before you try them in Rank Math. You can test your regular expressions with this online editor before you use them live on your site.
Even if you’re careful while using Regex, mistakes can happen. That is why we’ve created a redirection debugger that will help you diagnose potential redirection issues. More about that at the end of this article.
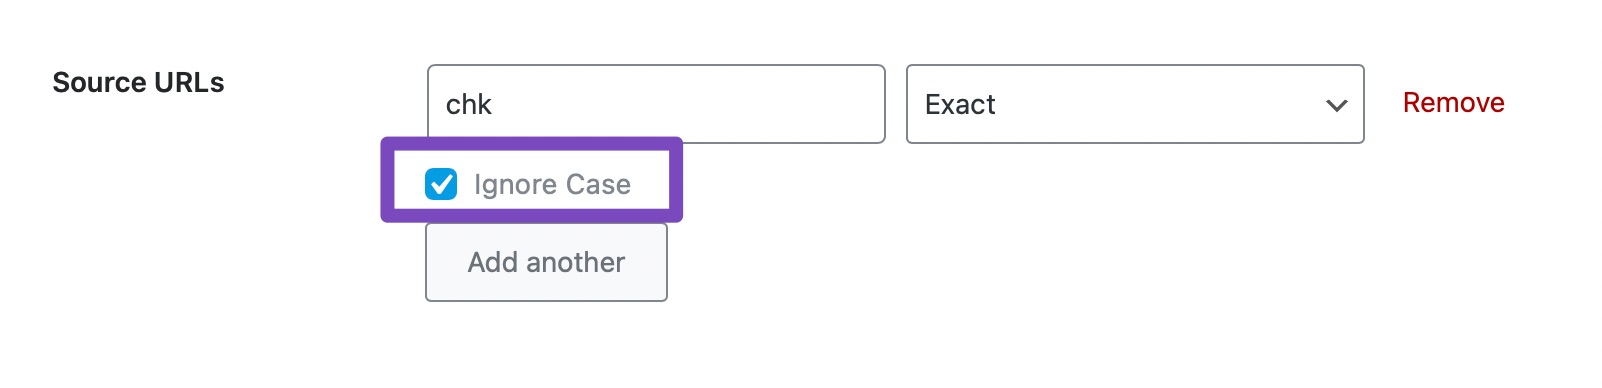
1.8 Ignore Case
URLs are case sensitive, and thus, if you’re sure that the URLs don’t have an uppercase version that goes to a different destination, you can click on the ignore case toggle.
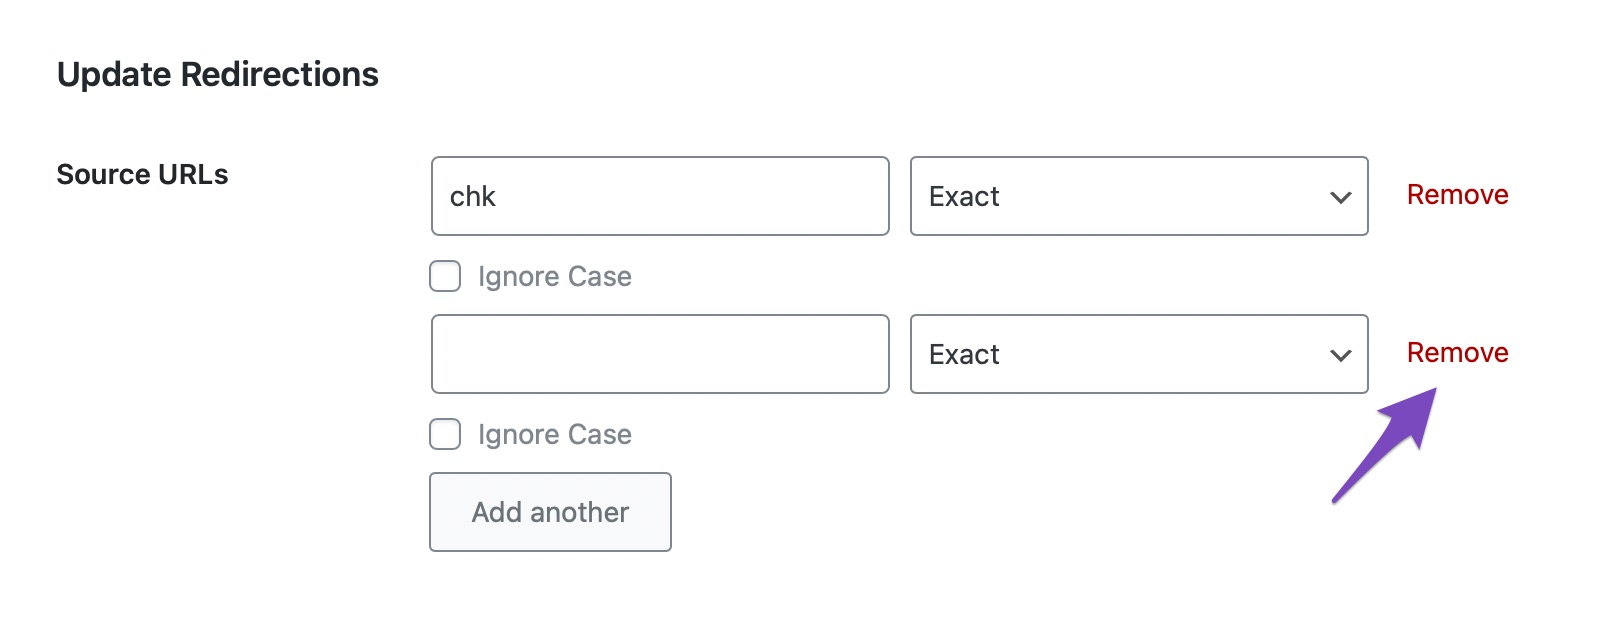
1.9 Using Multiple Sources
The relationship between the Source URL field and the destination URL is many to one. This means that you can have multiple source URLs pointing to a destination URL.
To add more sources, click the “Add Another” button just below the source URL field. Another field will open up just below it. You can then add another source URL in that field and even use all the match types that we showed you earlier. The use of multiple source URLs can help you deconstruct complex redirections into simple rules that will be easy to create, remember, follow, and diagnose.
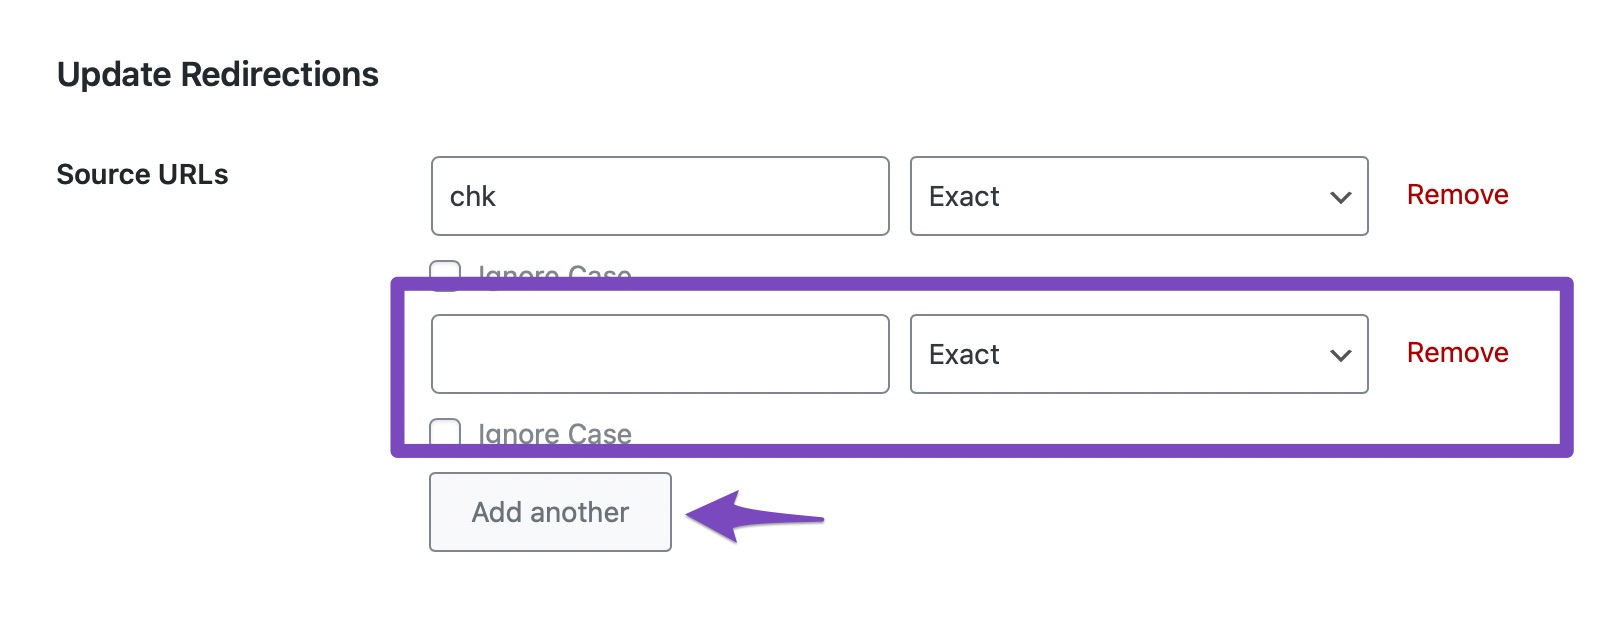
You can also remove additional fields in the same way you added them. Just click the “Remove” button at the end of the field to remove it.
1.10 Destination URL
The Destination URL field is where you want to take the user after the redirection. It can be a URL on your website or even an external URL. It does not even have to be a static file; you can also redirect users to PDF files, images, videos, etc.
If you’re creating redirections to your internal URLs, then you can use part of the URL in the Destination URL field. But, Rank Math will convert it into a fully qualified URL. To avoid confusion, we’d recommend that you always use fully qualified domain names in the Destination URL field.

1.11 Redirection Type
Redirections can be of many types, and the type of redirection used is communicated to the search engines via the Redirection Code. In fact, every time a web page is requested, the server responds with a status code to indicate its status. For example, a status “200” represents that the requested resource was found. Similarly, a “404” status means that the request was not found.
There are many types of redirections, but you’d probably use only a few types. That is why Rank Math supports only the 3 major Redirection Types.

A “301” code means the old URL has permanently moved to a new address. It’s never coming back. Obviously, you’d use it when you are permanently redirecting a URL to a new one.
A “302” code represents a temporary redirect, which tells the search engines to take the users to the new URL temporarily. Use this when you have intentions of using the original URL once again.
A “307” redirect is another temporary redirect, but it is technically different from a 302, one of the differences being redirect caching and the request format. You can use a 302 a 307 redirect almost interchangeably.
If you’d like to learn more about the various types of redirects, this resource is quite extensive.
1.12 Maintenance Code
Sometimes when you move or delete content, there is no new content for you to redirect it to. If you simply delete it, it would result in a 404, and the search engines will never know what happened to the content.
To combat this scenario, Maintenance codes were introduced. They help you communicate information about the content to the search engines when a redirect does not make sense. Technically, they are not actually redirect codes, but they do fit the context here; that is why they are available in the Redirection option.
Currently, only 2 maintenance codes are supported by Rank Math.
The “410 Content Deleted” should be used when the content in question has been deleted, and no suitable replacement is available. When search engines encounter a 410, they also de-index the page naturally.
The “451 Content Unavailable for Legal Reasons” is a tricky one. If the content on your website has to be restricted to a demographic, age group, or another similar restriction, then you can use the 451 for the people who do not qualify.
For example, if you run a gambling website, then you have to follow the law applicable in your country and state and not allow minors to access the content. You can then use the 451 to restrict the content for people below the mandatory age.

Important Note: Due to the nature of how the redirects and the maintenance codes work, you can not use both of them at the same time. You can either redirect the URL, or present a maintenance code, but not both. In fact, when you select a maintenance code in Rank Math, the Redirection Type is automatically disabled, and vice versa.
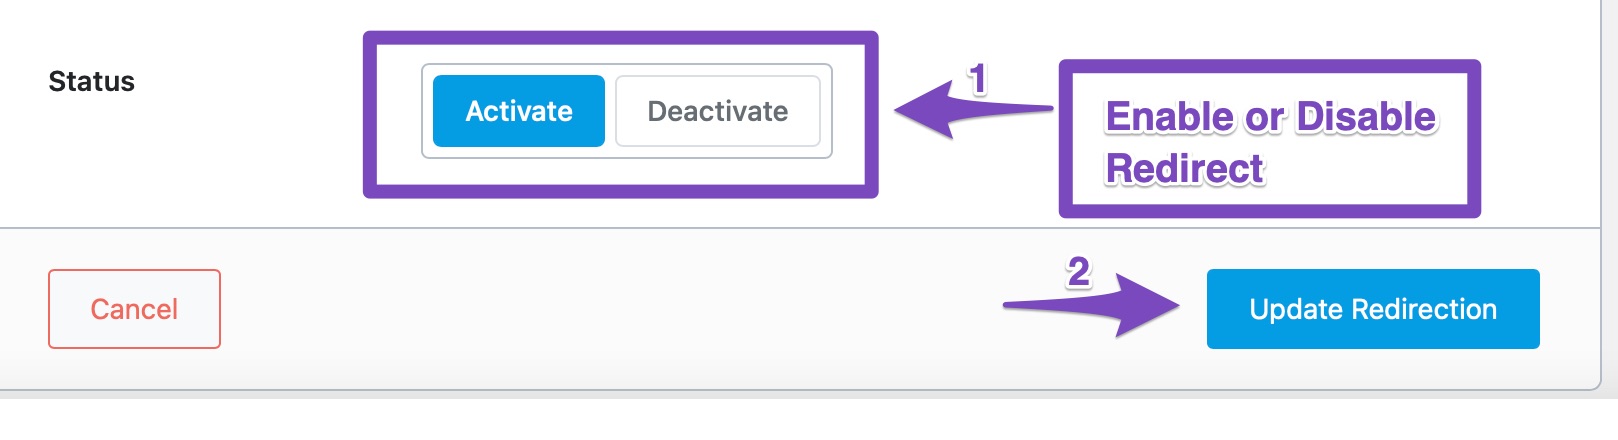
1.13 Status
The Status option represents whether the redirect is active or not. It can be used for both creating redirects in advance and enabling them later, or creating redirects that you would want to disable later.
For example, think of a product launch scenario. During the promotion phase, you’d create many landing pages, offer pages, etc.—all presell pages. During this phase, you can also create a redirect for all these pages pointing towards your final page and keep it disabled. As soon as the product launch window opens, you can enable the redirect and instantly take users to the page where they can buy your product.
You can enable or disable the Redirection in 2 ways. You can either edit the redirect, change the Status, and then save the redirection, or simply click the Activate/Deactivate link from the All Redirections Page. Here are images that show both methods.
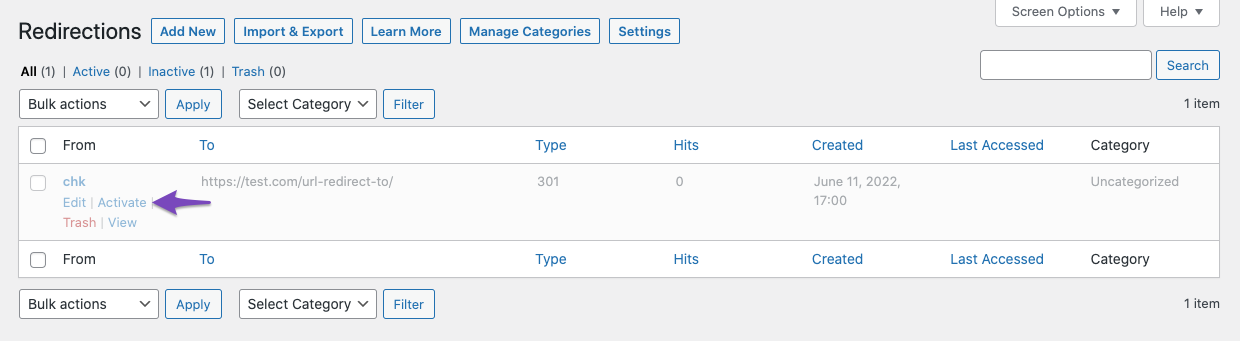
Note that when a redirect is disabled, it will appear washed out on the page, as apparent from the image above.
1.14 Scheduled Activation PRO
When you want to create a redirection on a future date, such as during seasonal sales, where you want to redirect your users to the offer page, then you no longer have to set yourself a reminder for the redirection.
This option will allow you to set a date when the redirection should be activated. On the set date, the redirection would be activated on its own. This is an optional feature and you don’t need to set it if you want to activate the redirection immediately.
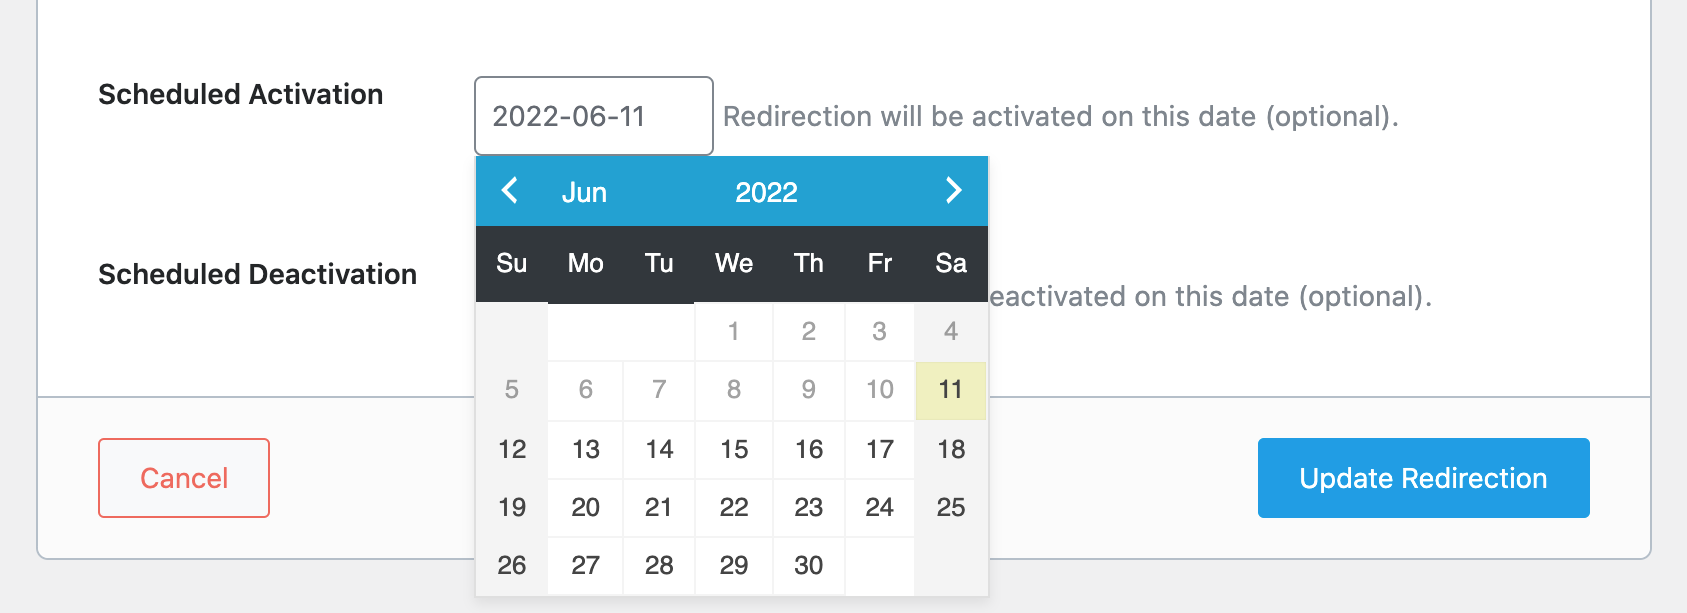
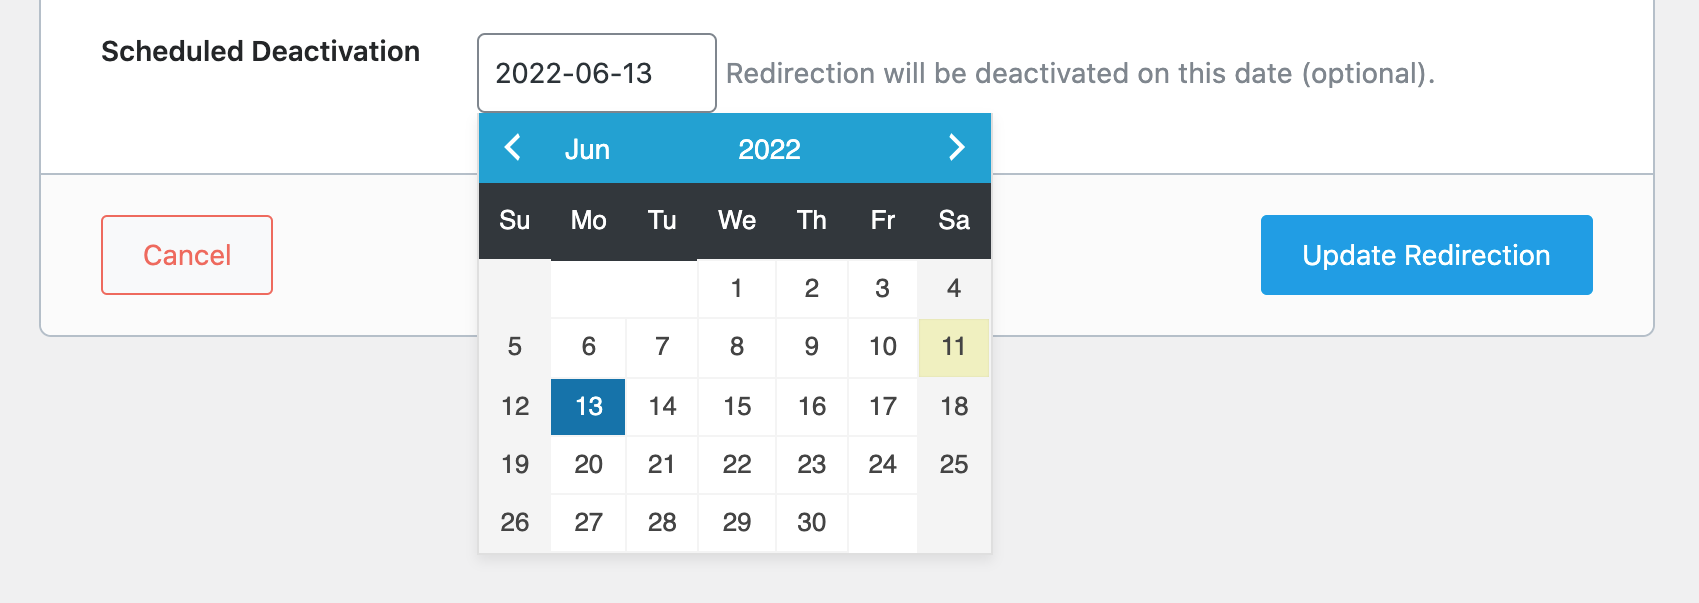
1.15 Scheduled Deactivation PRO
While the previous option is meant to enable activating a redirection on a specific date, the current option lets you deactivate a specific redirection at the set date. Simply click the field to set a date for deactivation.
However, this field is optional and you don’t need to set it if you don’t want to deactivate the redirection.
2 Searching Redirections
After creating your redirects, you can access them by heading to Rank Math SEO → Redirections from your WordPress dashboard.
Here, you will see all the redirections you have created. You will also see a search bar with which you can search for your redirects.
To search for redirects, enter one or more letters or words in the URL into the search bar. Once done, click Enter.
Note: The search feature only returns redirects that contain your exact search term. So, do not include spaces and make sure to include hyphens - and forward slashes / where relevant.
For example, let us search for all redirects that contain for-beginners.
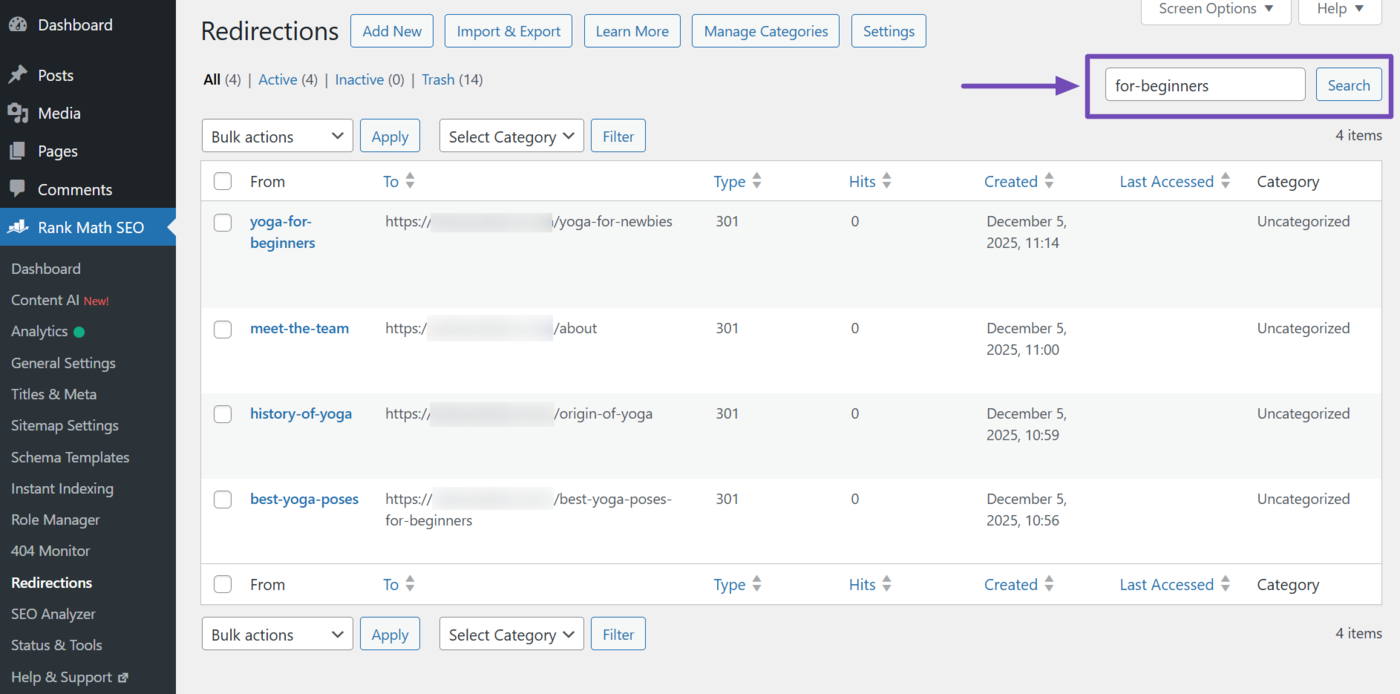
Rank Math will return with every redirect containing for-beginners.
3 Organizing Redirections PRO
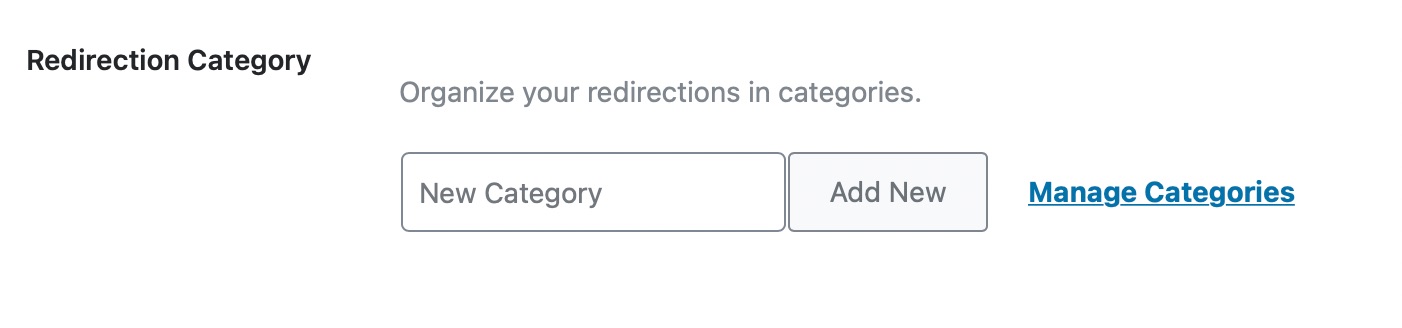
On a website with 10s of 100s of redirects, it can get pretty hectic having to maintain those redirects. Finding a particular redirect can often lead to frustration and many hours of productivity lost. That is why have included an option in Rank Math PRO to let you organize your redirects into categories.
Adding categories to your redirects has two main benefits:
- You can easily organize your redirections into manageable categories.
- It allows you to filter redirects and hence make finding a particular redirect amongst dozens of them a walk in the park.
When adding a new redirect, you can create a new category to file it in, or you can choose from one of the categories you already created in the past.
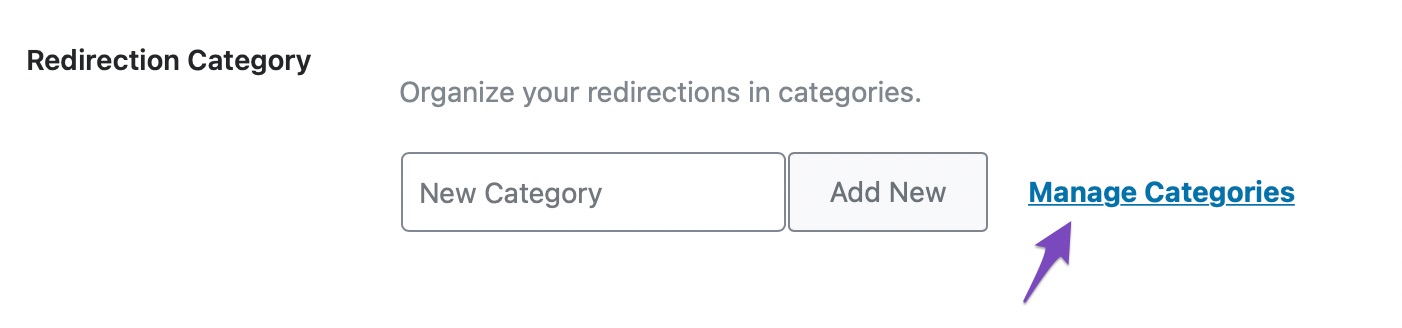
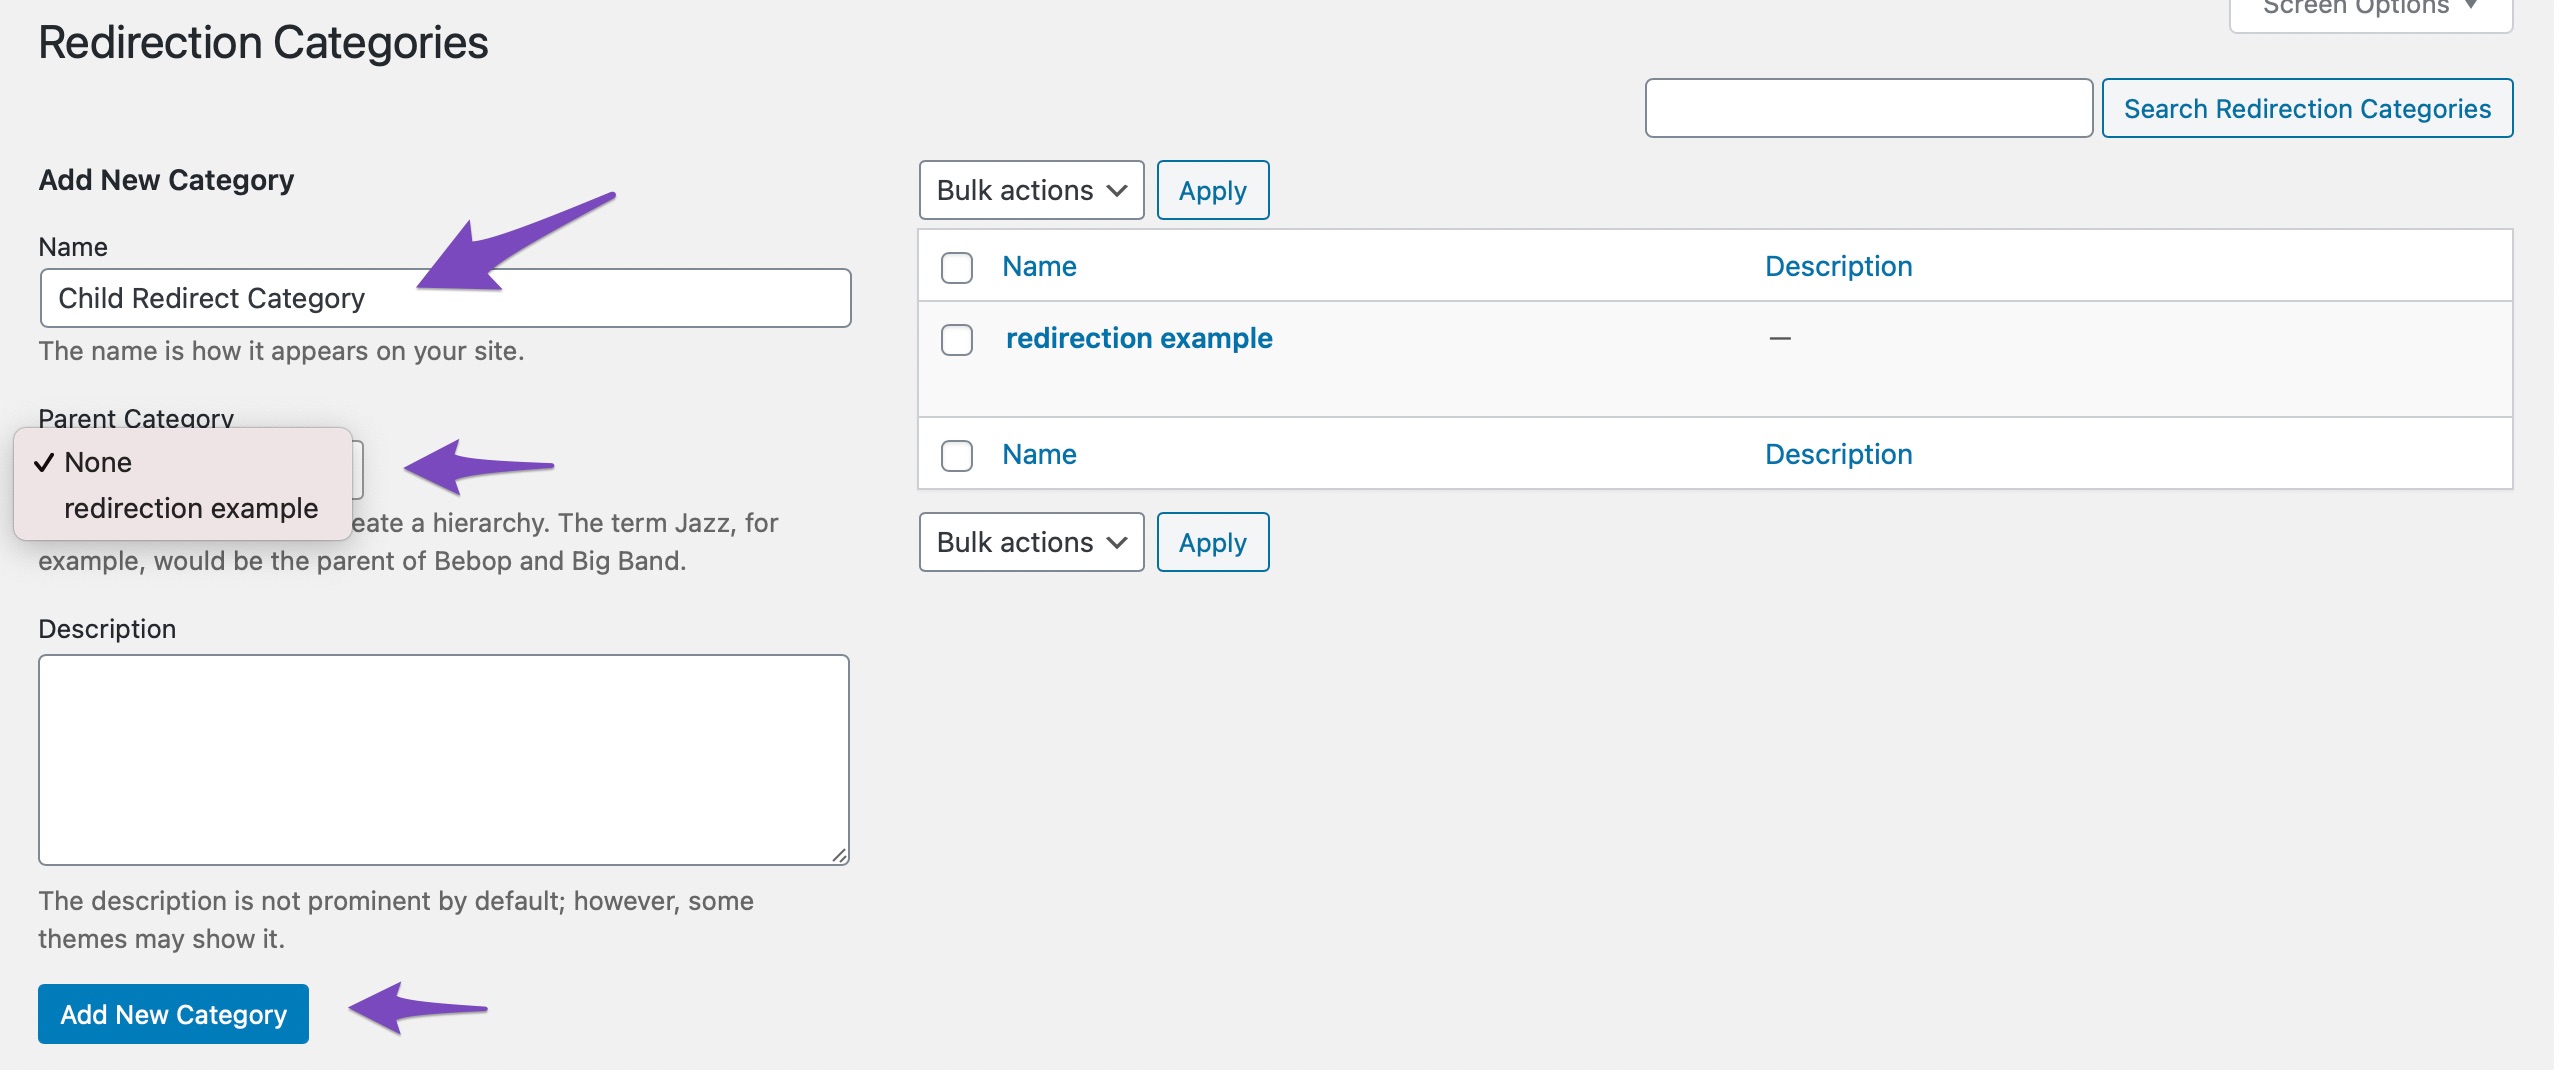
To manage your redirect categories, click on the `Manage Categories` option at the top.
You can create child categories for additional control and organization:
4 Filtering Redirections PRO
Categorizing redirects is only half the battle. The other half is making use of these categories to filter what you don’t need and only see redirects that are filed under a particular category or child category.
To find redirects filed under a particular category, go to WordPress Dashboard → Rank Math SEO → Redirections.
Once you are there, click on “Select Category” and choose a category from the dropdown:
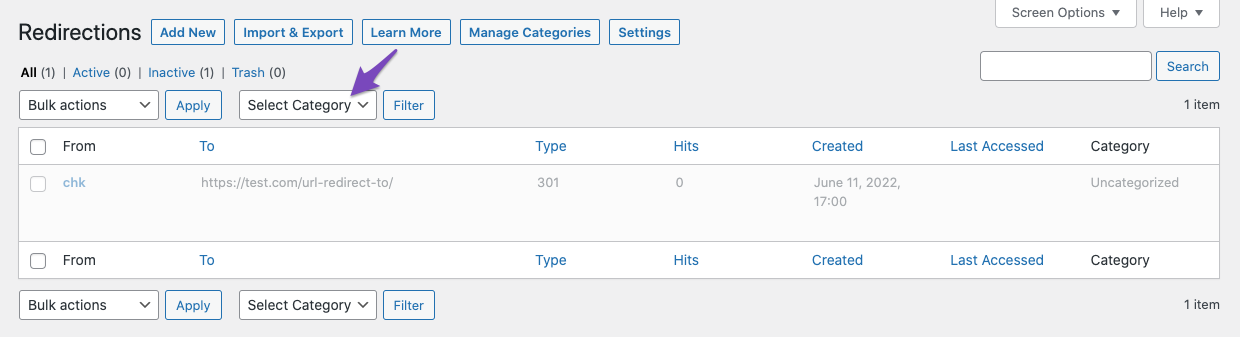
Then, click on the “Filter” button. That will show you redirects only within a particular category. Then, you can make changes to your redirect and hit the save button.
It is that easy.
5 Redirections For Parameterized URL PRO
You can set redirections for parameterized URLs in Rank Math. In other words, you can use URL Redirect to forward visitors to a specific page by passing values via query strings to the destination.
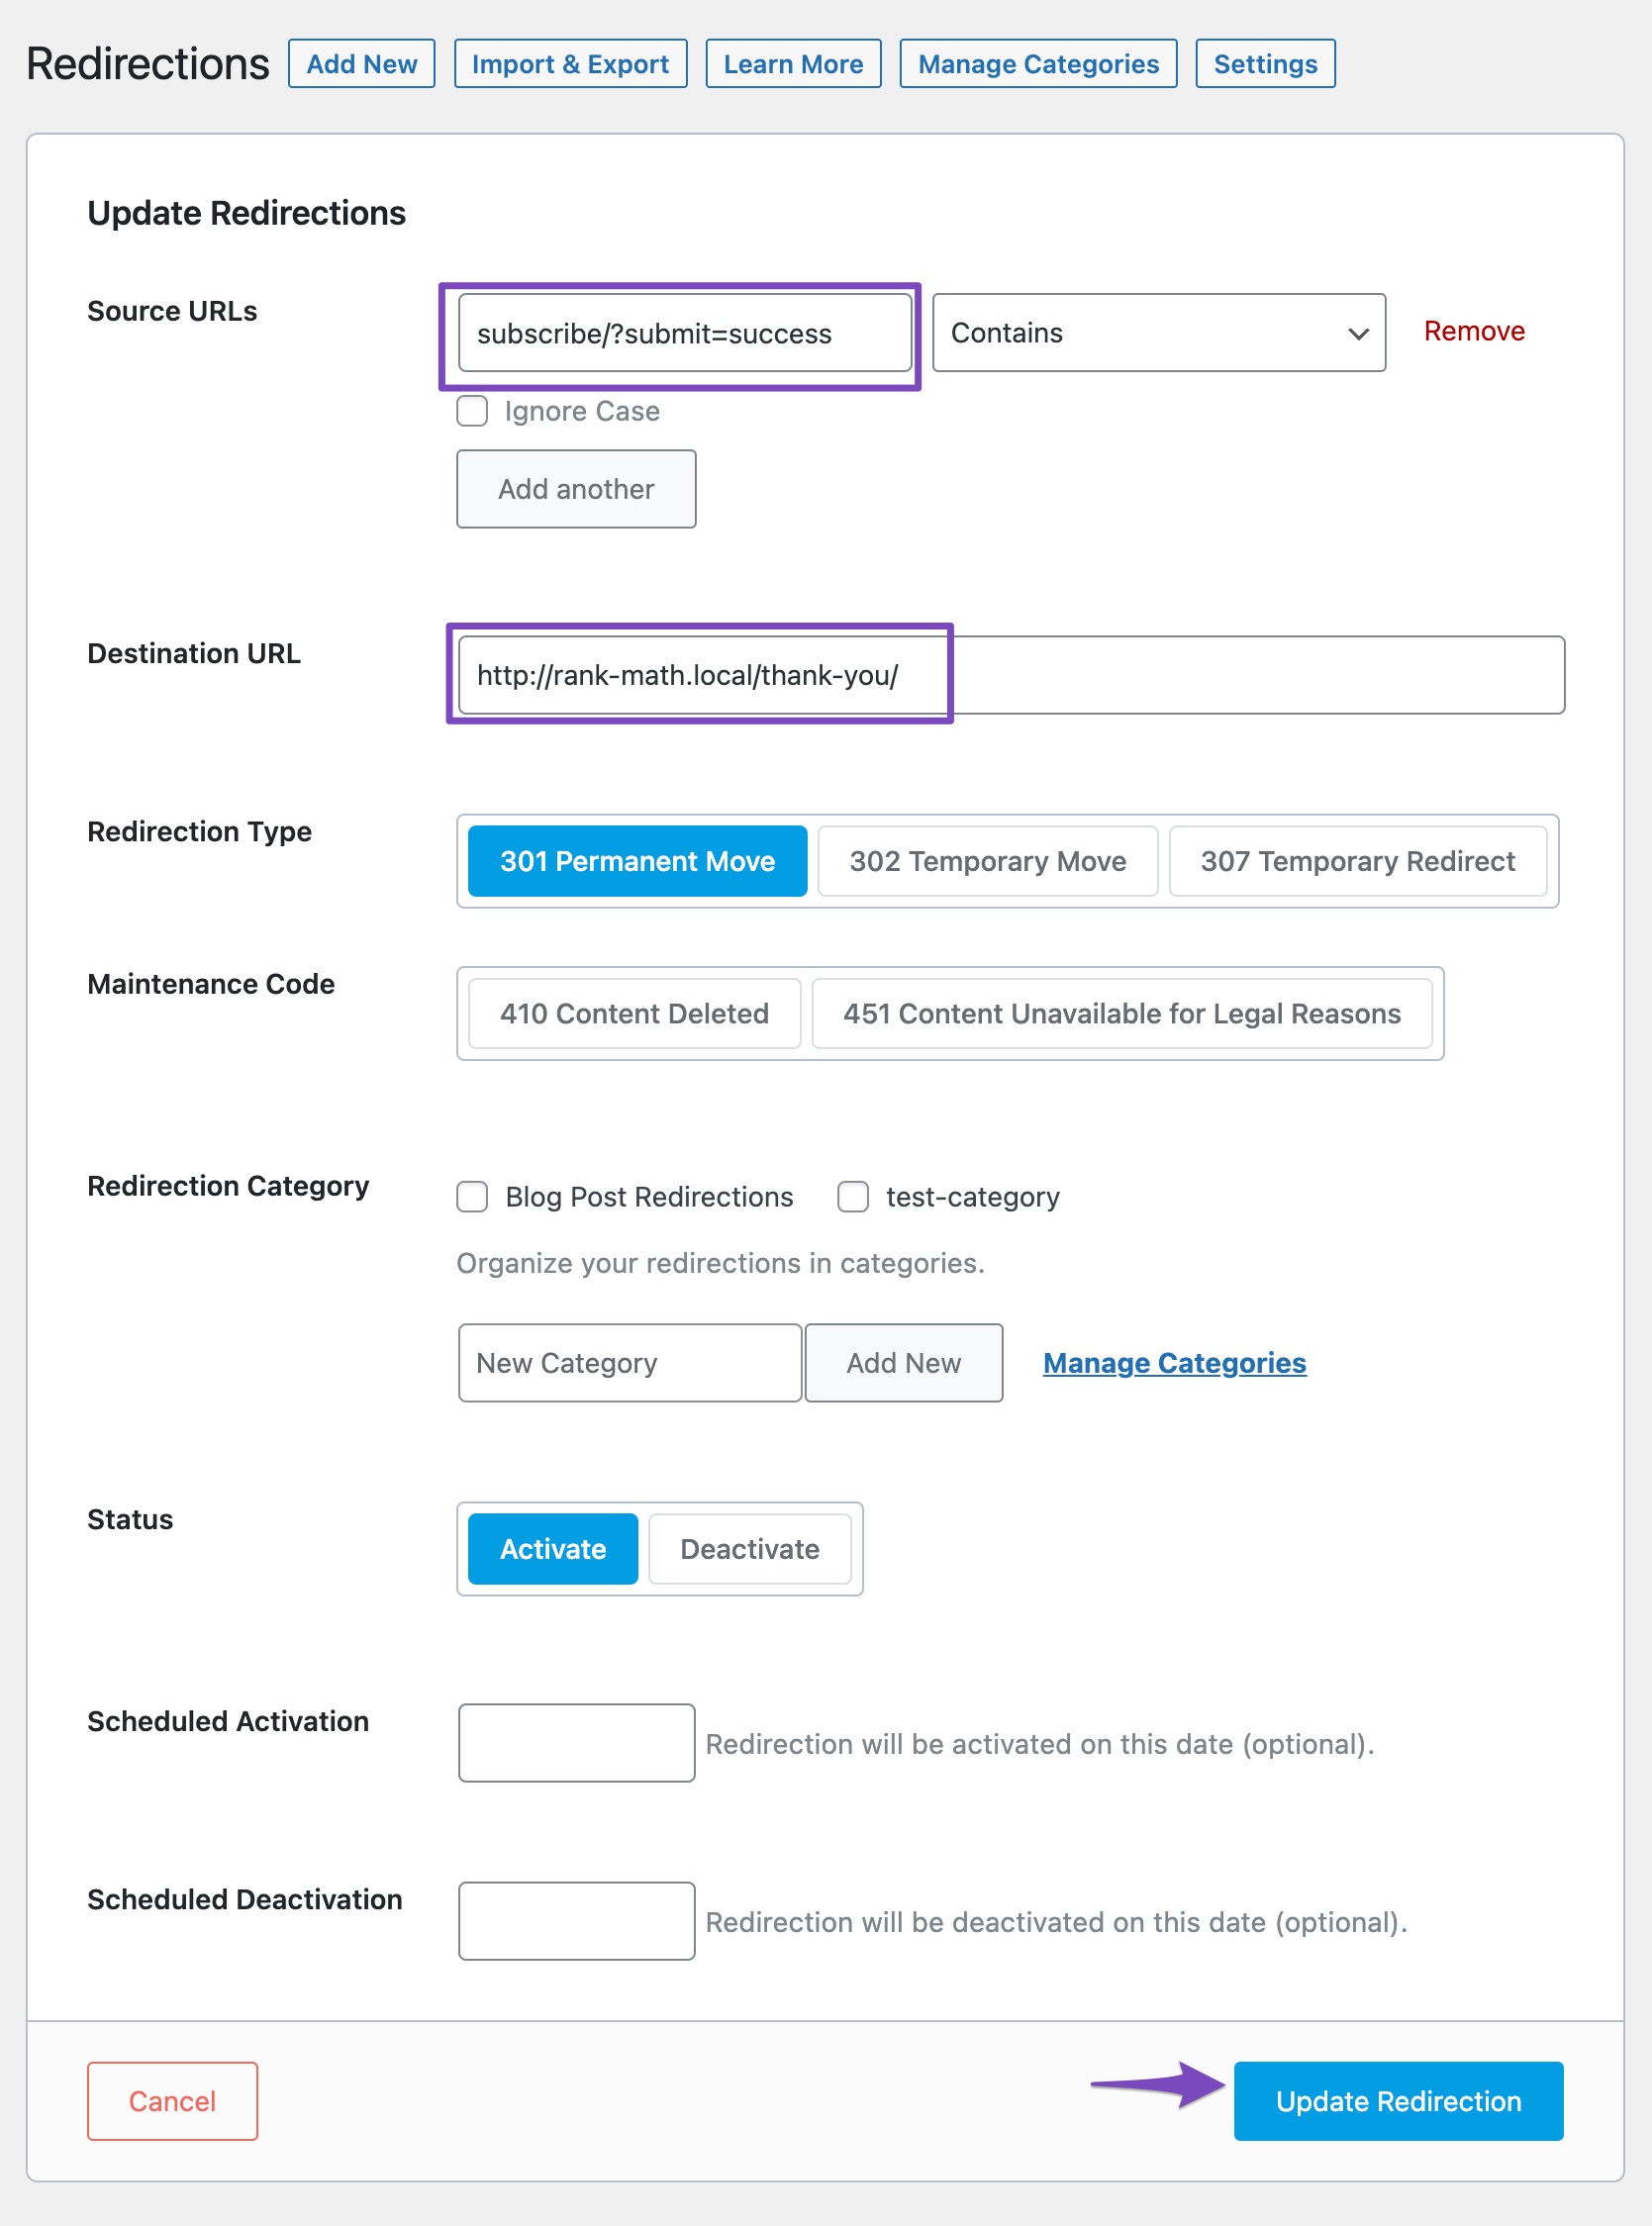
To do so, add the parameterized URL as the Source URL, and add the Destination URL field where you wish to take the user after the redirection, as shown below. Once done, click on the Update Redirection button.
For example, to redirect visitors from your subscription form to thank you page, the parameterized URL will be as shown below.
Note: By default, parameters are passed to the destination URL. If you want to disable appending the query string in the redirected URL, you can do so by using this filter.
6 Bulk Actions in Redirects
If you have a lot of redirects to manage, then editing them one by one can be tedious. That is why we’ve included Bulk Actions inside Rank Math, using which you can apply actions to multiple redirects at once.
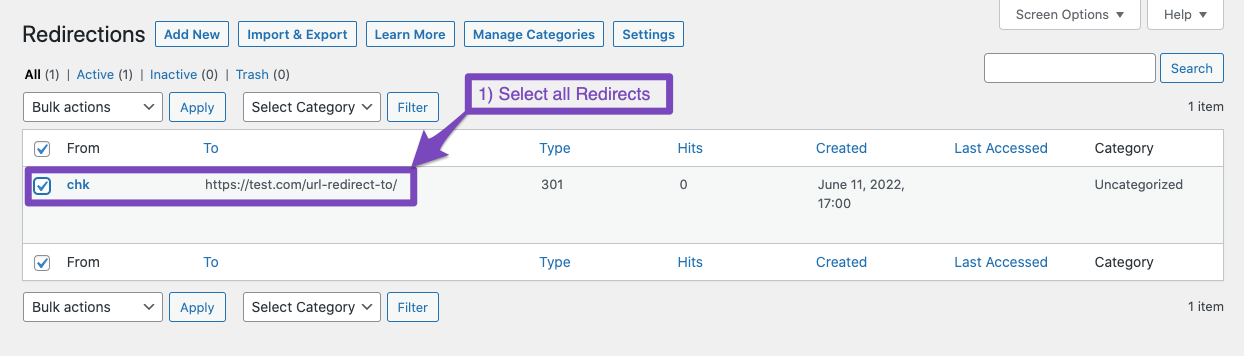
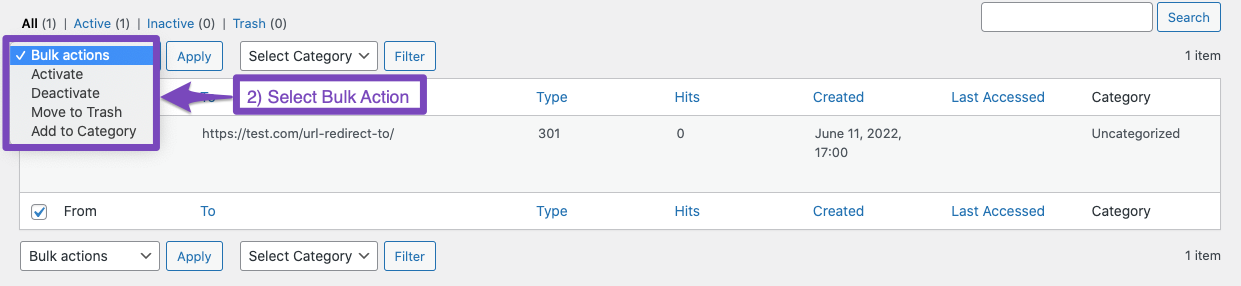
The available actions are self-explanatory. You can activate the redirects, deactivate them, or move them to the trash.
7 Redirection Statistics
Rank Math tracks how many times each redirection has been accessed – humans and bots are counted.
This is very useful to get feedback on where your traffic is flowing. For instance, if you’re redirecting to an external site, you probably can’t access their server logs. But Rank Math will tell you how many people clicked the link.
You can see the redirection statistics in the last three columns of the Redirections screen before Category:
The “hits” column gives you the total number of times the redirect has been accessed since you set it up.
The “Created” column gives you the time when the redirection was created on your site,
The “last accessed” column gives you the most recent time when someone clicked on the redirect. It counts robots as well as human visitors.
Unlike the 404 monitor, there is no Advanced Mode in redirections which captures the access time and other information of each of the redirects.
8 Backing Up Your Redirects
Just as you back up your website and the important data on your computer, it is also important to back up your redirects. Losing redirects without having a backup is the stuff webmaster’s nightmares are made of. Don’t put your website at risk, back up your redirects.
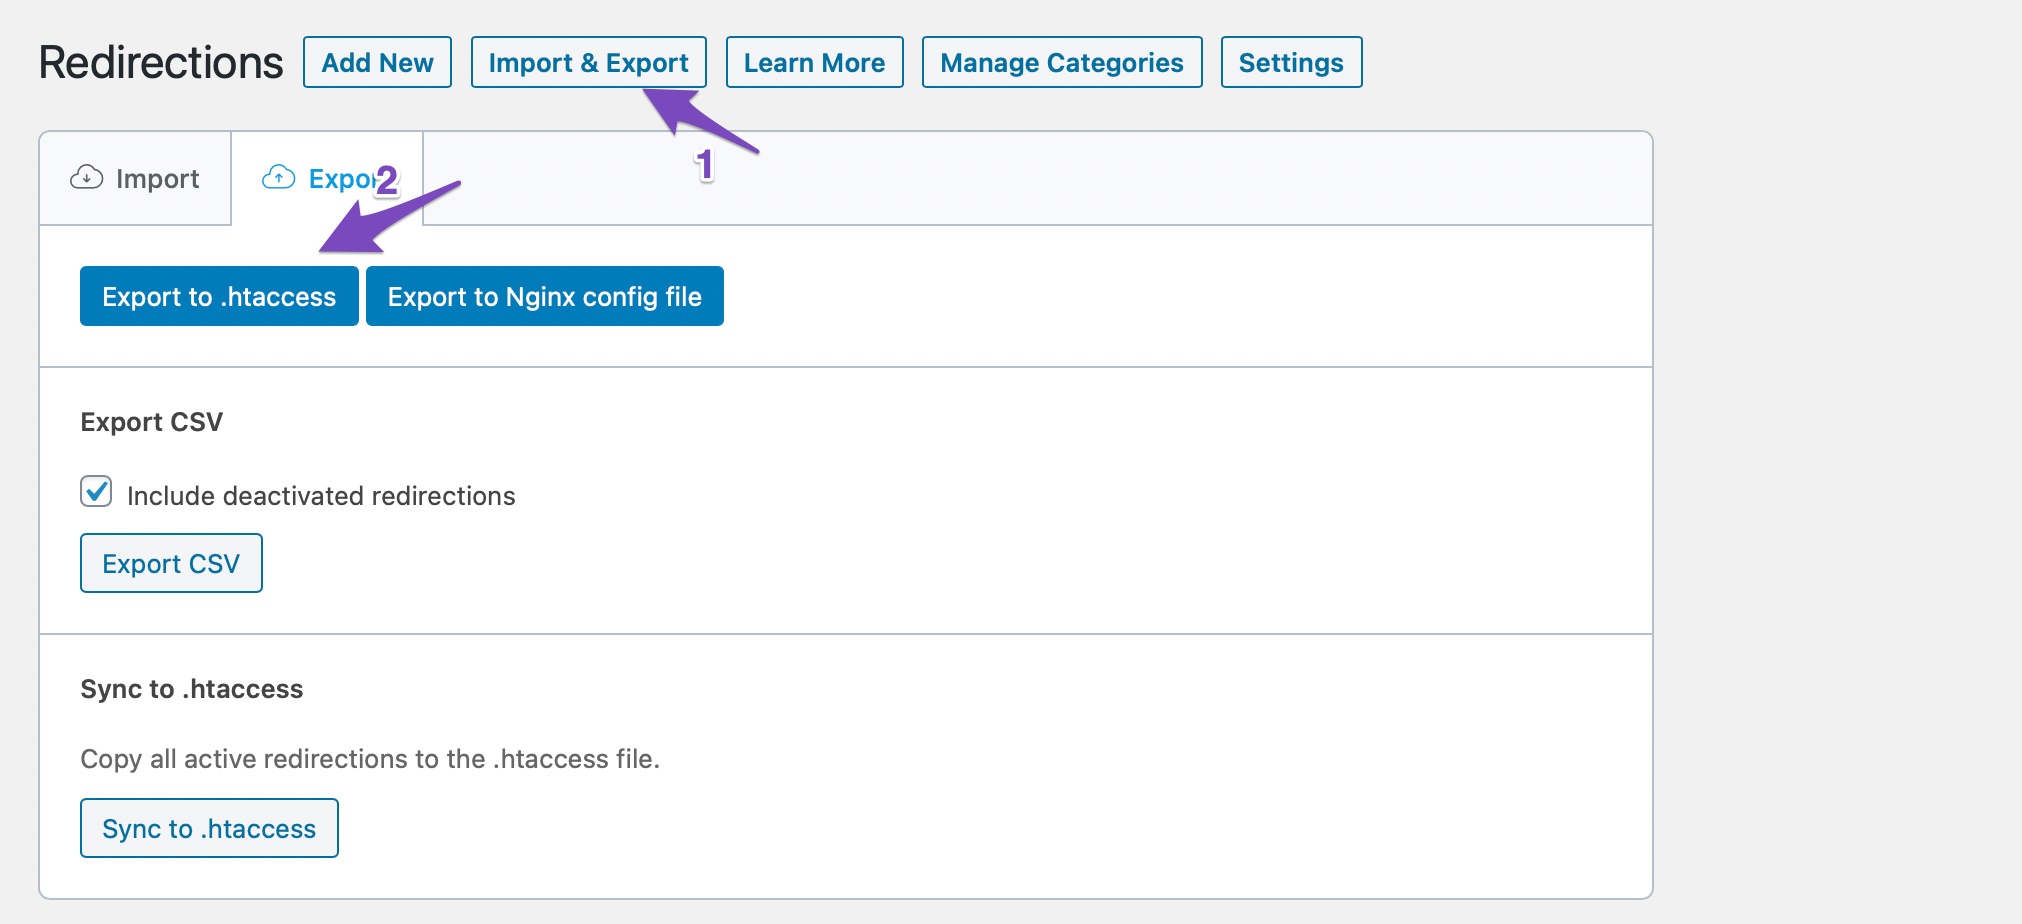
Rank Math not only makes it effortless to redirect your backups, but it also supports 1-click backups for Apache and Nginx servers. Let’s see how to create a backup.
On the top of the page, you’ll see 2 buttons to backup your settings. Click the button for your server to create a backup. For this example, we are going to create a backup for Apache servers by exporting the corresponding .htaccess file.
Rank Math will automatically download the file to your computer. The Redirects are time-stamped so that you can manage them better, but there is no other information to identify them. If you’d like, you can make changes to the file name and add some information about the backup.
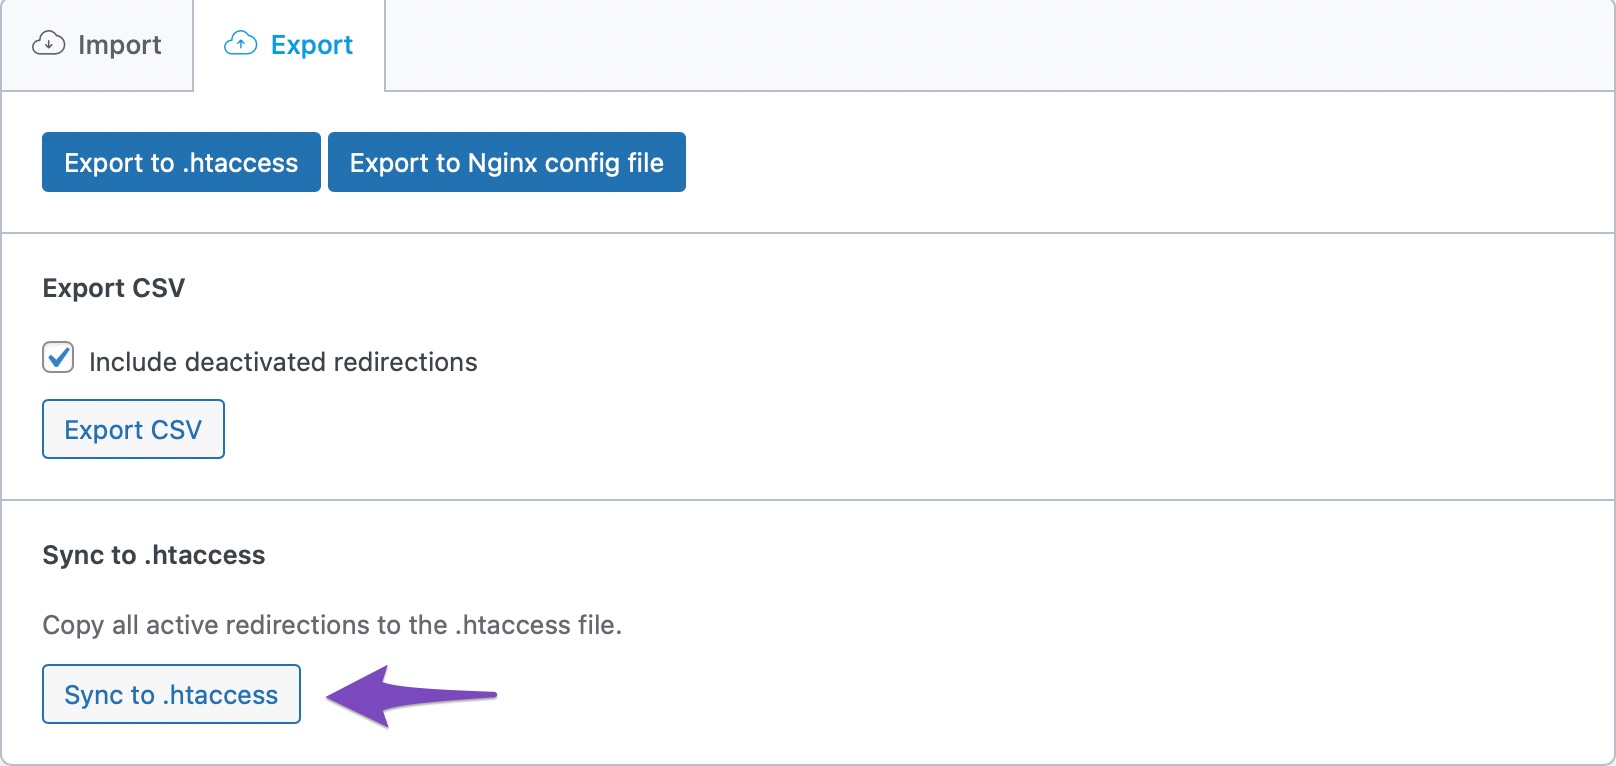
As a Rank Math PRO user, you can also automatically sync your redirections to the .htaccess file for even faster redirects by clicking Sync to .htaccess button as shown below:
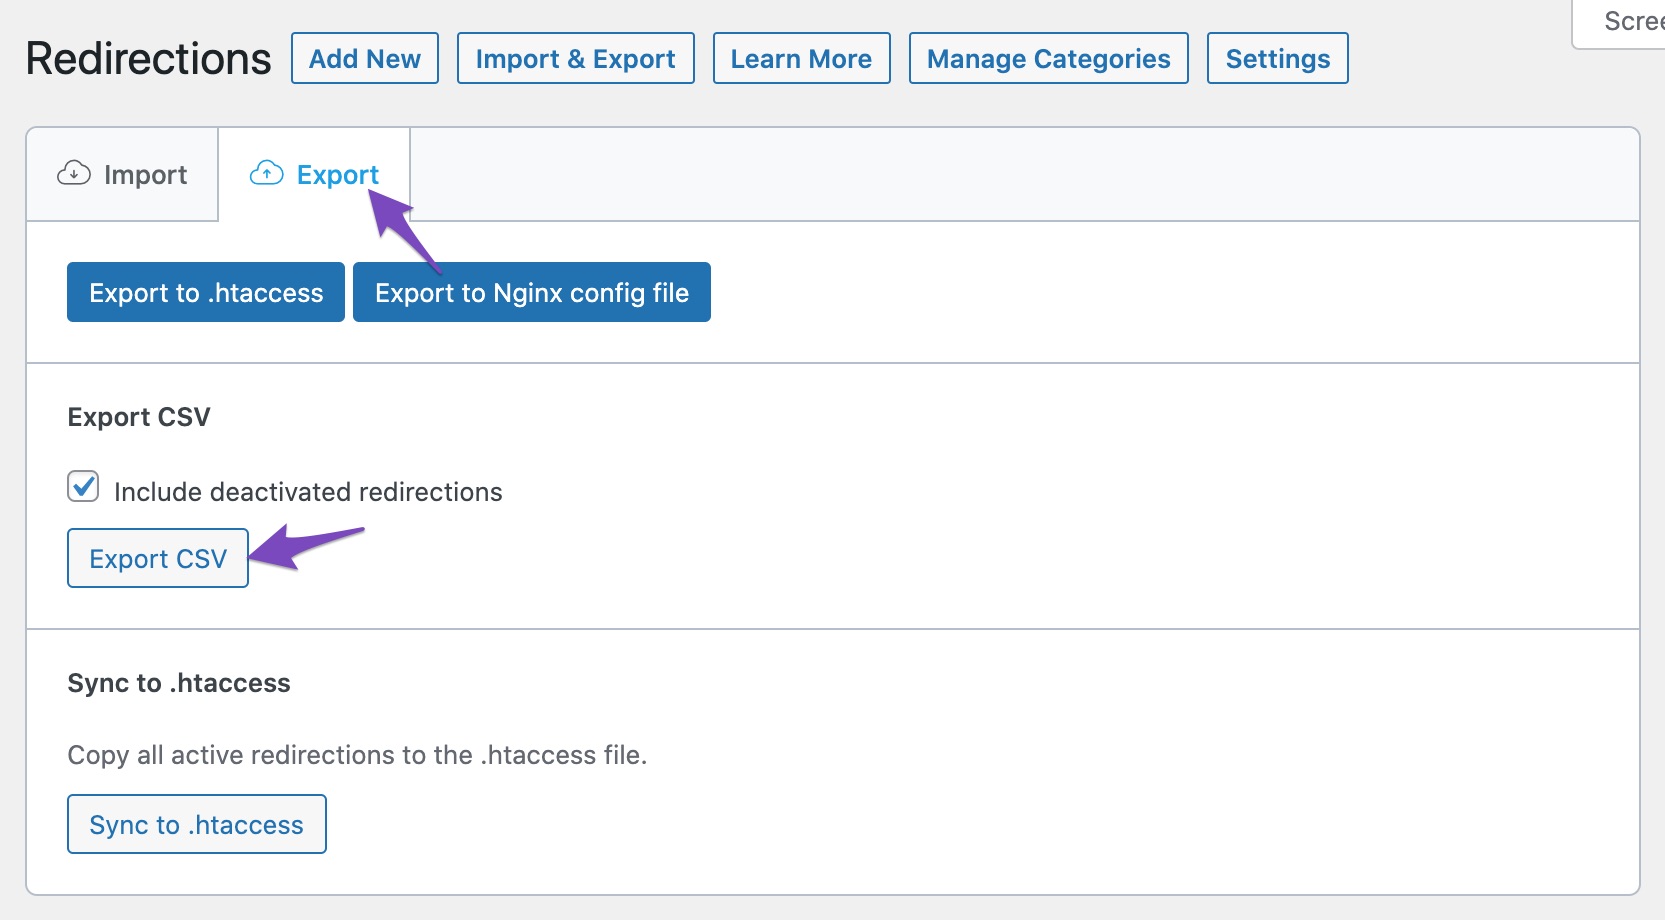
9 Export CSV File PRO
Under the Export tab, you can also find the option to export the redirections to a CSV file. You can save this CSV,
- As a backup file
- For collaborating with your team to handle redirections
- For updating the redirections in bulk
To export the redirections to a CSV file, click the Export CSV option available here. You can also choose to include all the redirections or only the active redirections with the Include deactivated redirections checkbox.
Now that you have exported the CSV file, you can open the CSV in a spreadsheet editor of your choice and edit the file accordingly. Here is a detailed tutorial to help you with it.
Once you’ve updated the redirections in the CSV, you’d need to upload the CSV back to Rank Math to reflect the redirection changes on the site.
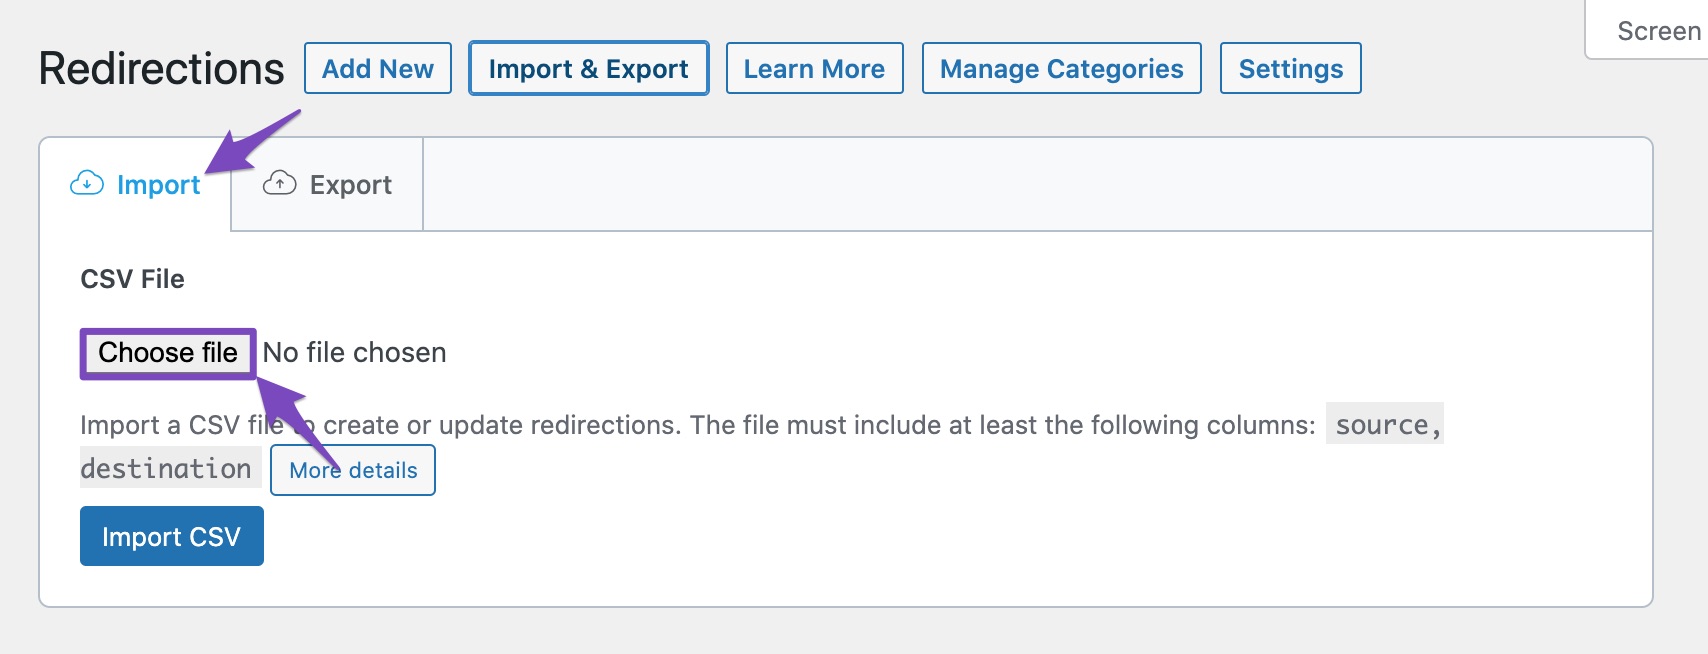
10 Import from a CSV File PRO
You can import a CSV file to create or update the redirections. This option is available in the Rank Math PRO version.
To do so, select a file using Choose File button and import it to either create or update the redirections. Once your file is selected, click on Import CSV, and all your redirects will be imported.
The CSV file includes the following:
- id
- source
- matching
- destination
- type
- category
- status
- ignore
There are no restrictions in arranging the columns in any order. But, make sure that the CSV file must consist of at least the source and destination columns for a redirection to be created and work smoothly.
If you miss adding source or destination columns, chances are that you might fail to upload the CSV file properly, and you might also see the error message “Missing one or more required columns“.

If you added the source and destination columns, you would be presented with one or more status messages, as shown below:
Created – The Created status displays the number of redirections created from the imported CSV file.
Merged – When there are multiple redirections to the same destination, the Rank Math redirection module will merge them into a single redirection.
Updated – When an imported redirection has the same destination as an existing redirection, the Rank Math redirection module will combine both redirections.
Deleted – The Deleted status displays the number of redirections removed from the redirection settings. To delete a redirection, set its destination URL to DELETE, as shown below.
Note: The redirection in the CSV file should have the same ID as the redirection in the Redirection settings.

11 Debugging Your Redirects
When your website is small and has only a few redirects, it is easy to manage them and keep track of what redirect is doing what. But as your site grows, this task will become overwhelming and difficult to manage.
What happens when you mess up by creating 2 redirects for the same URL? Or if you create a Regex-based URL that causes a large number of unintentional redirects?
This is where the Redirections debugger comes in. We’ve created a capable debugger that will help you locate and debug your redirections.
To enable the debugger, head over to the Redirection settings by clicking the Settings button on top of the page.
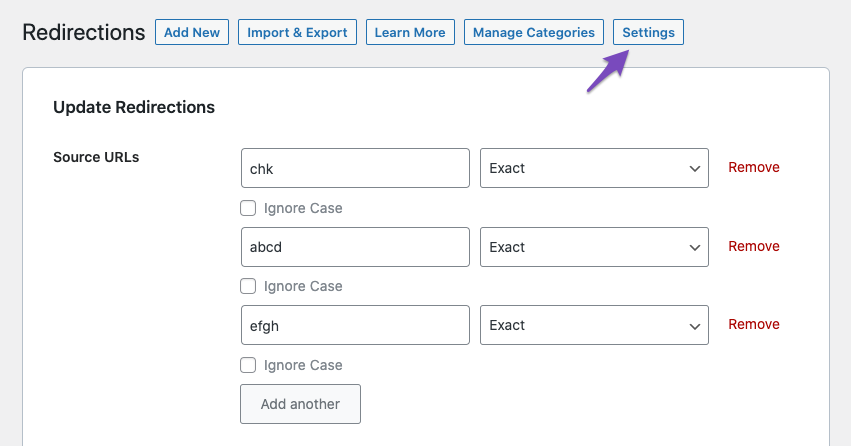
Rank Math’s General settings will open up, and the Redirections tab will be highlighted. Find the Debug Redirections option and enable it. Then, save your settings.
Once the settings are saved, head back to the Redirections options.

On the Redirections page, right-click any of the redirects that you’ve created and open them in a new tab.
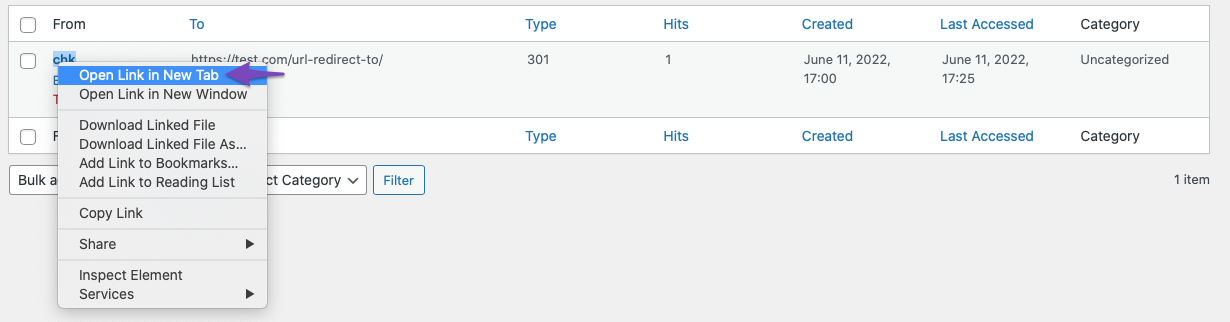
You should see this interstitial before the redirect actually happens.
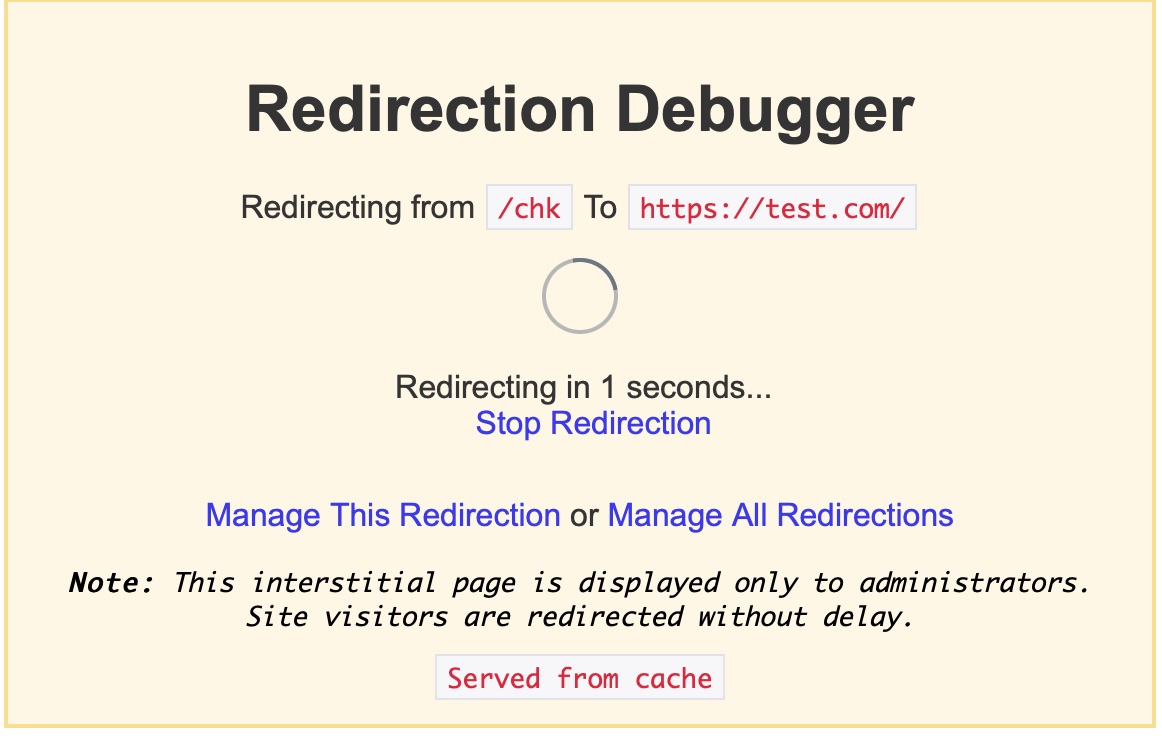
There is plenty of information in this interstitial, but the most important part is the “Manage This Redirection” link. When you click the link, you’ll be taken to the exact redirect rule that caused this redirection, helping you diagnose and fix unwanted redirections.

Once you click the link, you’ll reach the edit window for the redirect rule that caused this redirection.

There, you can make changes to the redirection and save it. It is pretty powerful.
Important Things to Know About the Debugger
- The Debugger is visible to website administrators only, and regular visitors will never see it. You can use the debugger without affecting their experience in any way.
- The interstitial is visible for only 5 seconds, after which the actual redirect is processed. If you do not see the interstitial even after enabling the debugger, then this might be the reason.
12 Conclusion

That’s all that you need to know about Redirects in Rank Math. We hope that you were able to follow along and understand all the details that we discussed. If you have any doubts, feel free to contact Rank Math’s support staff, they will help you out to the best of their abilities.