When you search on Google, you expect relevant and trustworthy results, right? So does Google! That’s why Author SEO is becoming increasingly important for website owners.
By optimizing author profiles, you help search engines recognize the expertise and trustworthiness behind your content. Websites with well-established authorship signals often rank higher in Search Engine Results Pages (SERPs).

In this knowledgebase article, we’ll explore Author SEO, its connection to Google’s E-E-A-T factors, and how to implement it on your WordPress website using Rank Math SEO.
1 What is Author SEO?
Author SEO involves optimizing author profiles and bylines to establish credibility and visibility in search results. This includes crafting detailed author bios, linking to social media profiles, and implementing structured data markup so search engines can better understand and display your author information.
But how does Author SEO help boost your website’s E-E-A-T? It can help you as a content creator in the following ways:
- Experience: Reflect genuine knowledge and cite reliable sources.
- Expertise: Highlight relevant qualifications, awards, and accomplishments in author bios.
- Authoritativeness: Link to reputable publications, industry recognition, and social media profiles.
- Trustworthiness: Ensure content is from identifiable and credible authors, boosting user trust and engagement.
For more information on optimizing your website with E-E-A-T, refer to our detailed guide.
2 Setting Up Author SEO on Your WordPress Website
To set up Author SEO on your WordPress website, follow these steps:
2.1 Configure Your User Profile
Begin by ensuring your author profile is accurately configured. Navigate to Users → Profile from your WordPress dashboard to access your author information.
In the “Name” section, provide your real first and last name. For the ‘Nickname’ option, you can use your social media username if available.
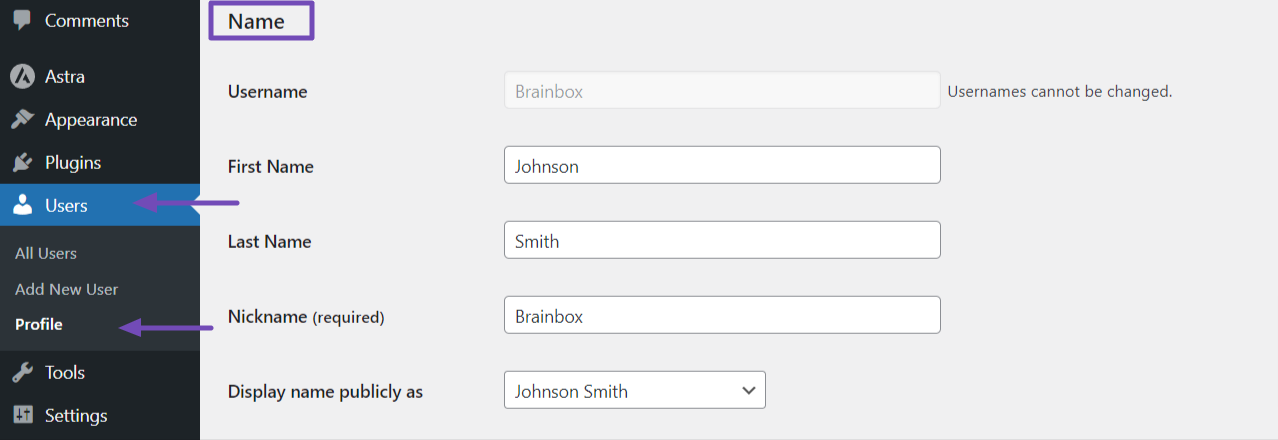
Next, in the “Contact Info” section, ensure you provide an active and accurate email address and your website URL for users to contact you.

In the “About Yourself” section, you’ll find the ‘Biographical Info’ option. Here, provide a brief introduction about yourself, including your area of focus or niche, awards, publications, industry recognition, hobbies, and college degree (if applicable).
Lastly, for the “Profile Picture” option, use a clear, real-life image. Do not use icons or default placeholder images. To upload your profile picture, click on the “You can change your profile picture on Gravatar” link below the profile image option, as shown below.
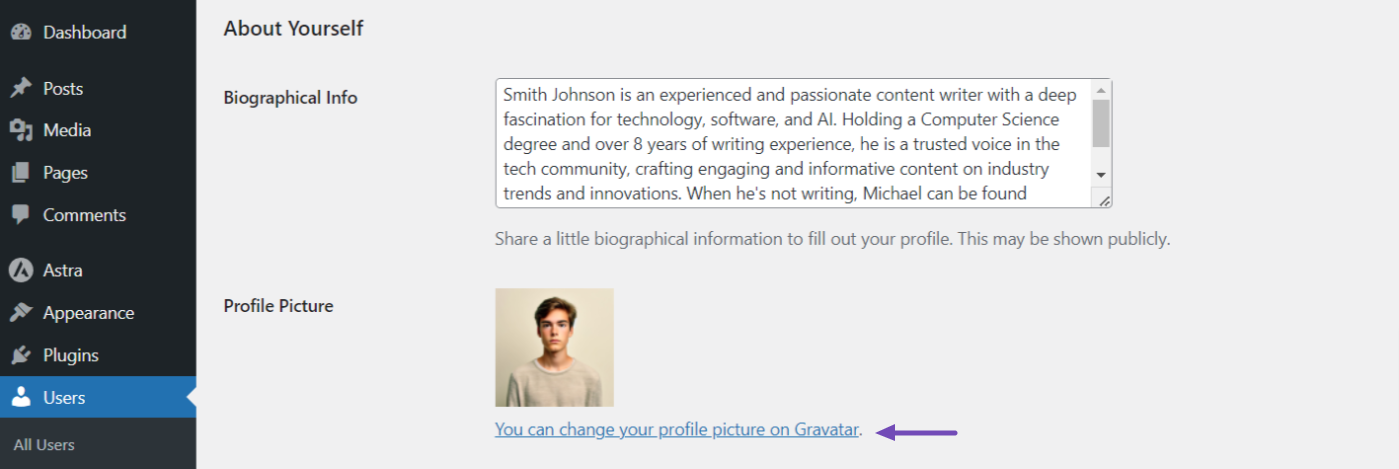
Note that the options on this page may vary depending on the WordPress theme you’re using, as some themes add additional options, such as social links.
2.2 Implement Author Schema Markup
Providing your author details is not enough; you want to ensure search engines understand the structured data you’ve provided.
To achieve this, you’ll need to apply Schema markup to your author page, also known as profile page Schema markup.
First, ensure you have the Rank Math SEO plugin installed and set up on your WordPress website. After the setup, navigate to Rank Math SEO → Titles & Meta.
Here, you’ll need to focus on three key features: Local SEO, Social Meta, and Authors.
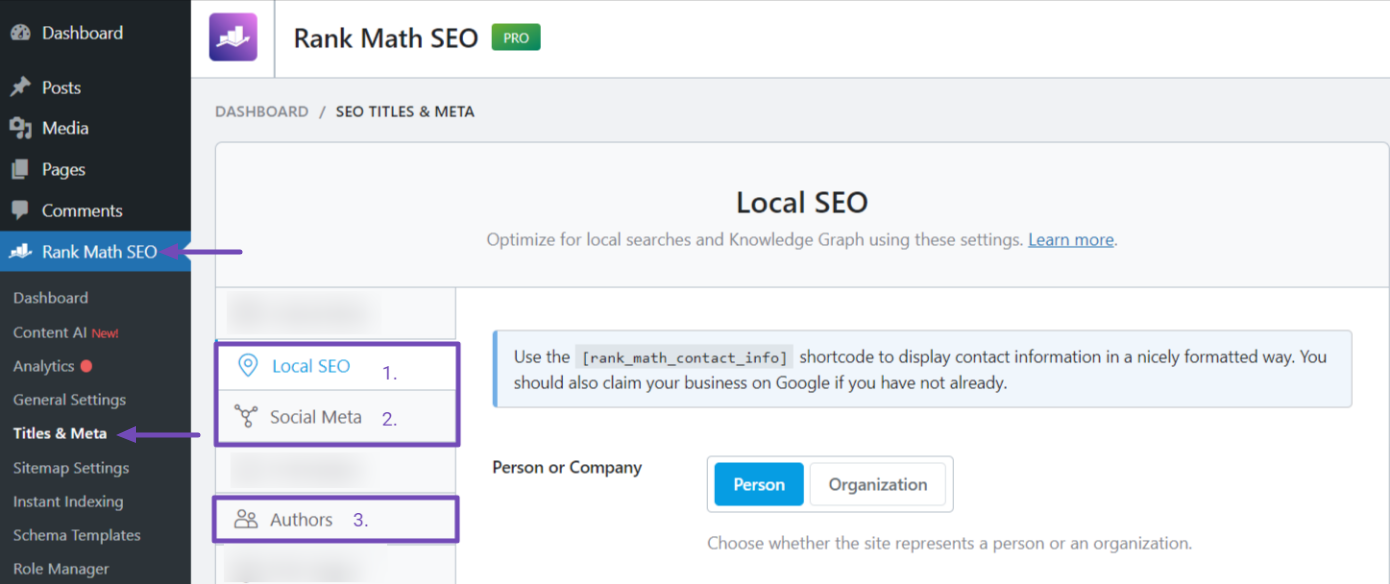
These features allow you to input relevant details about yourself as the website owner, which can appear on your website’s author Schema markup.
Configure Local SEO Settings
In the ‘Local SEO’ tab, select your entity type (Person or Organization) and provide your details accordingly.
For example, if you choose Person, you’ll want to provide your website and company name, your name, logo, email, and other information, as shown below.
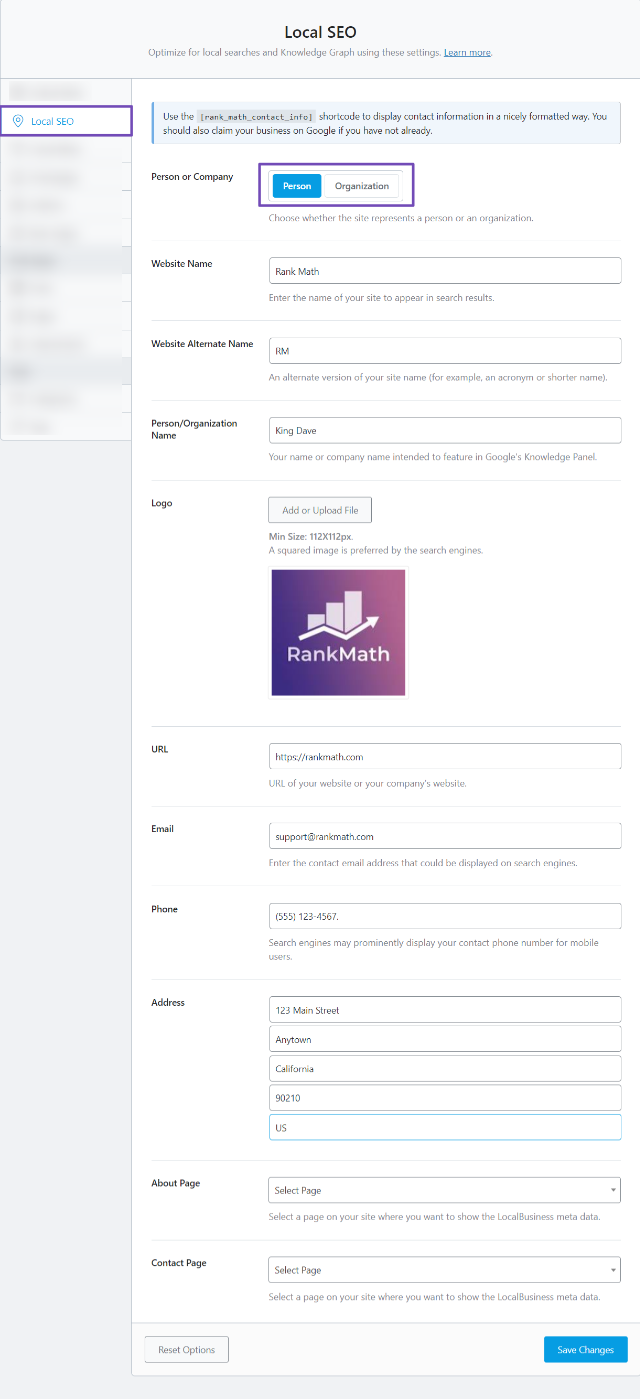
Fill in all these details as they are required for your author Schema. For more details, refer to our guide on how the Local SEO module works and how to set it up properly.
Set Up the Social Meta Settings
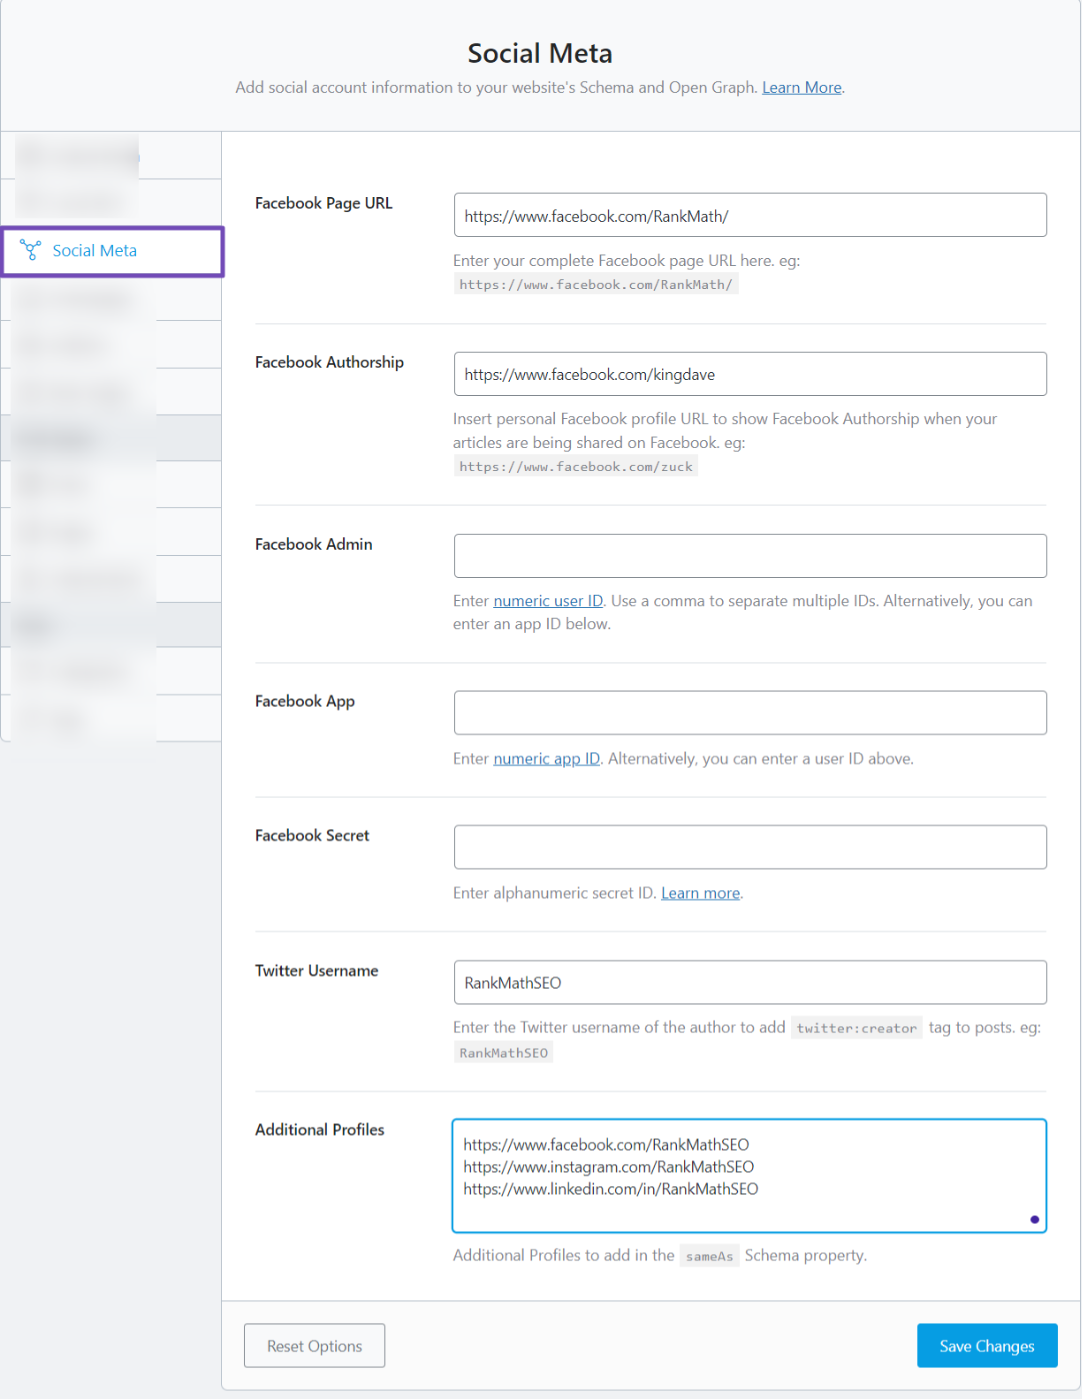
Next, move to the ‘Social Meta’ tab and enter your social media page URLs and any additional profile links you want to include in the ‘Additional Profiles’ field.
These links connect you, the author, to your online presence and demonstrate your engagement within your industry. For more details, refer to our guide on setting up the Social Meta settings.
Customize the Author Settings
Finally, head to the ‘Authors’ tab. Here, you can customize the appearance of your profile in search results.
Rank Math defaults the ‘Author Robots Meta’ option to ‘No Index’. However, as shown below, you should ensure you set it back to Index so your author page can be crawled and indexed.
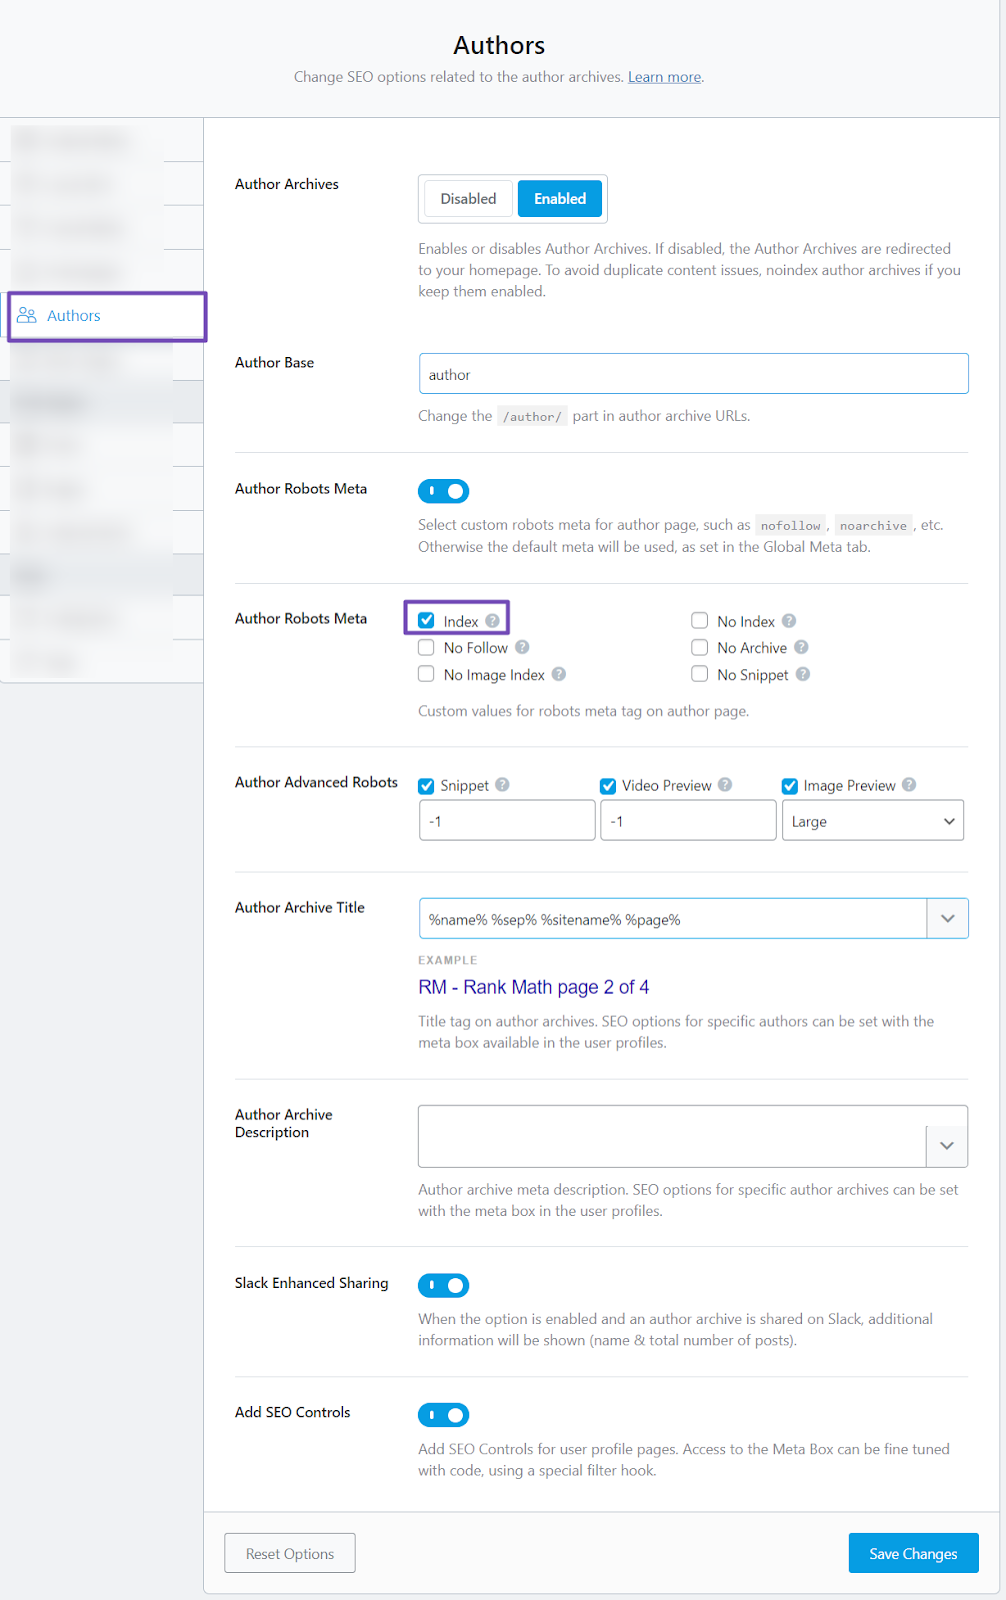
Please ensure you click the Save Changes button below once you’re done with any of these configurations.
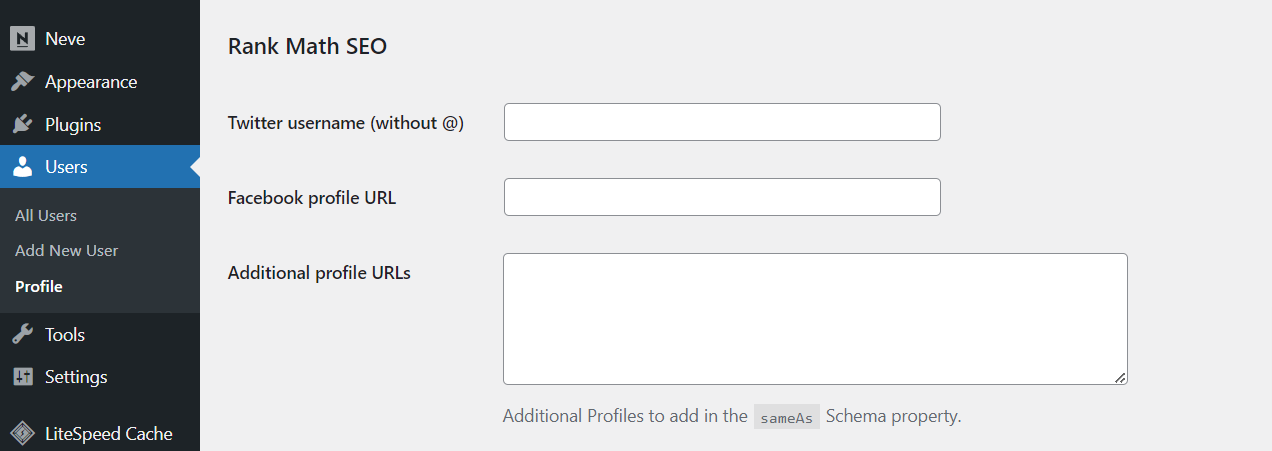
Alternatively, you can set up the Author feature directly from your user profile. The Rank Math plugin will add additional options after you set it up. Simply visit the Profile settings page by navigating to Users → Profile from your WordPress admin.
In the “Rank Math SEO” section, provide your social media details, such as your Facebook profile URL and Twitter username.
Then, in the “Additional profile URLs” field, provide URLs to other profiles you have, including relevant profiles you hold, such as social media links, content publishing directories, forum URLs, or discussion sites where you’ve contributed content.
Next, scroll down to the Rank Math meta box. Next, navigate to the Advanced tab and the ROBOTS META option to ensure your author page is set to ‘Index’. If it is not already selected, select ‘Index’, as shown below.
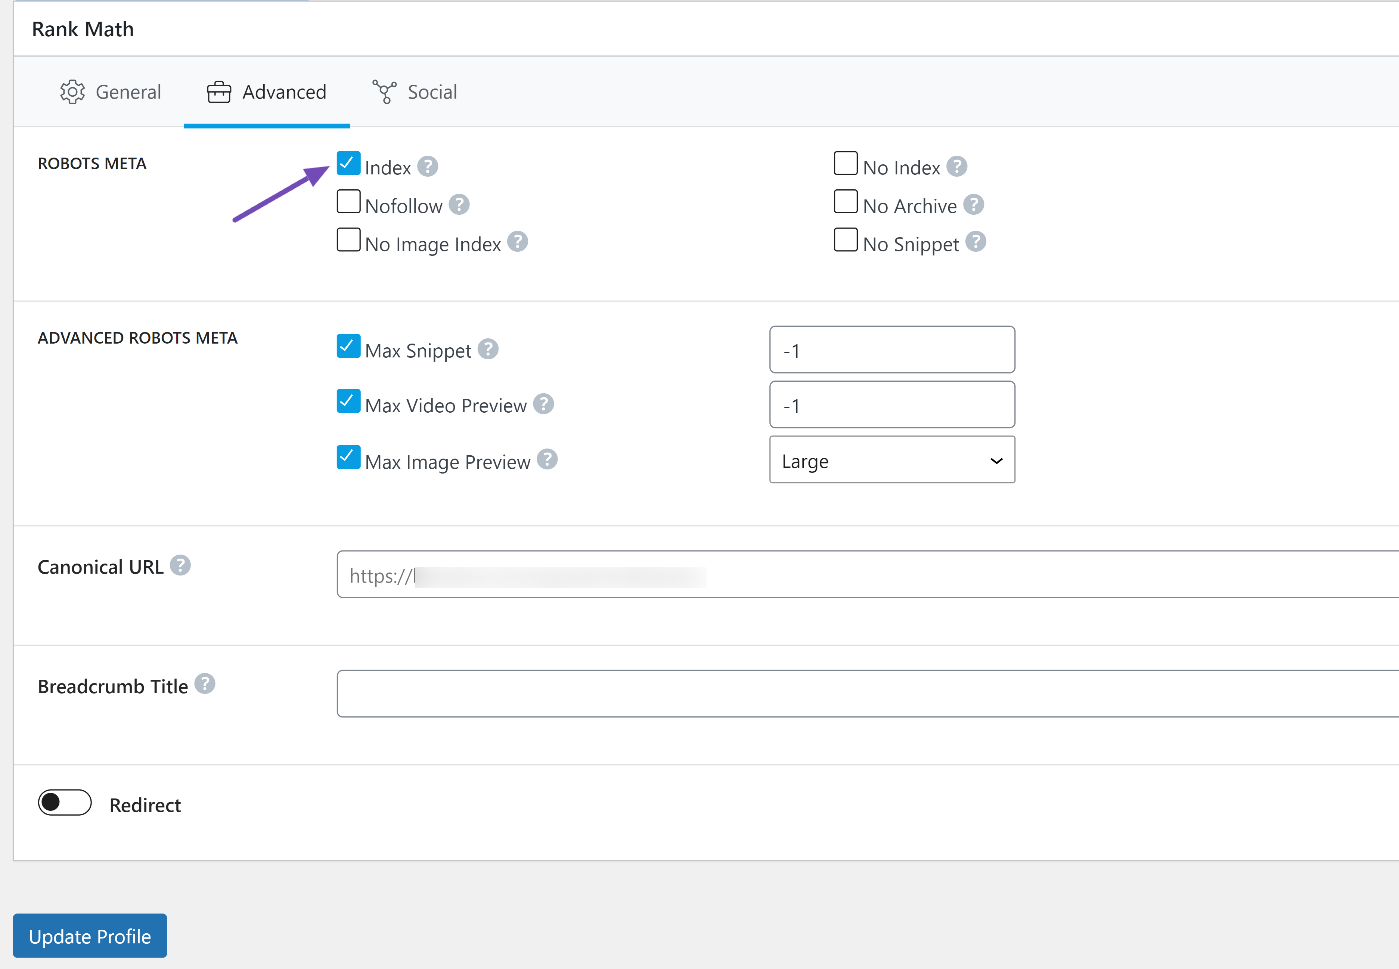
Also, you can optionally set up the Canonical URL and Breadcrumb Title options.
Next, return to the ‘General’ tab and click the Edit Snippet button to set up the Permalink, meta title, and description for your author page.

Any changes you make here will determine how your author page appears in search results when indexed. If you’re satisfied with the default settings, you can leave them as is.
Once you’re done, remember to click the Update Profile button to save your changes.
Verifying Your Implementation
Once you’ve implemented author Schema on your page, use Google’s Rich Results Test tool to confirm everything is correct.
Copy and paste your author page link into the tool, and Google will display the Schema data it detects. For more details, refer to our guide on how to use Google’s Rich Results Test tool.
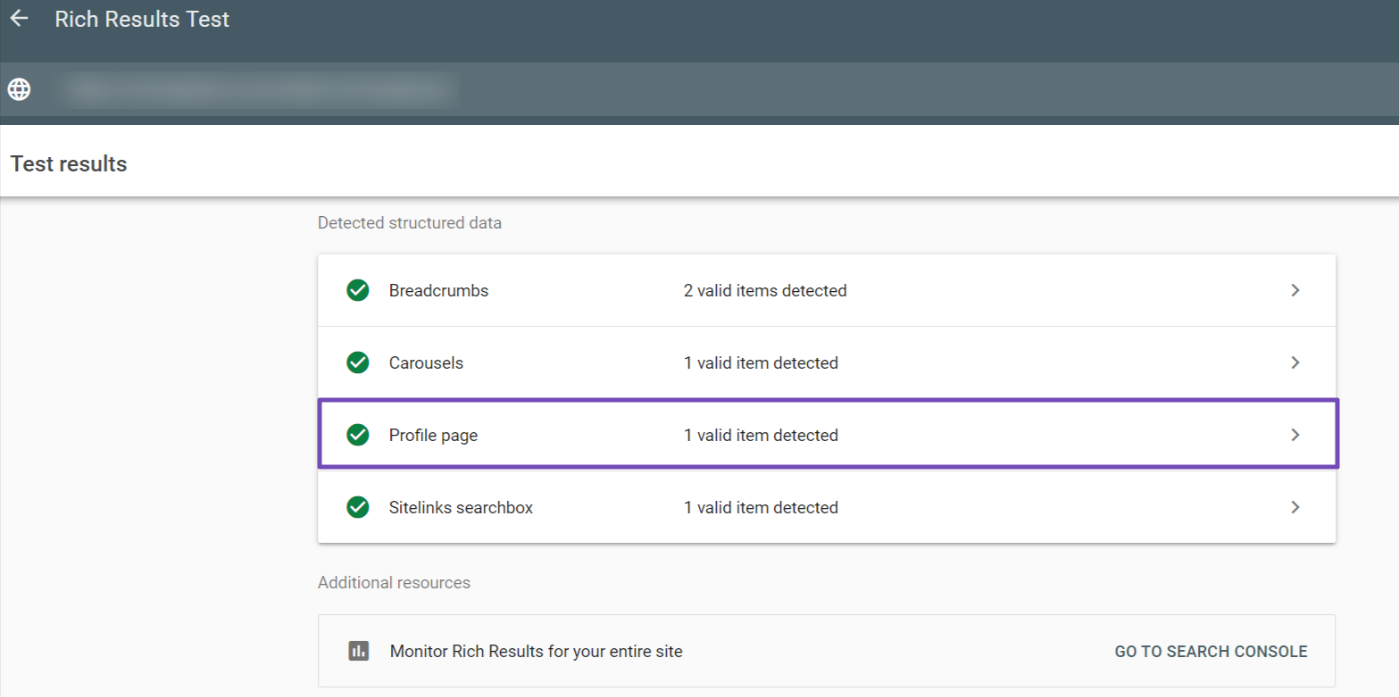
If there are any errors or warnings related to the Schema, Google will display them, and you can fix them and retest the URL until they are resolved.
2.3 Displaying Author Information
Configuring and setting up your author page Schema is not the end of the process. You should also ensure that your profile page is accessible to both search engines and users.
Author Page
By default, WordPress creates an Author page showcasing your details and written content.
To visit this page, navigate to Users → All Users from your WordPress dashboard. Here, you will see a list of all users on your site. Hover over your username and click the ‘Edit’ option that appears, as shown below.
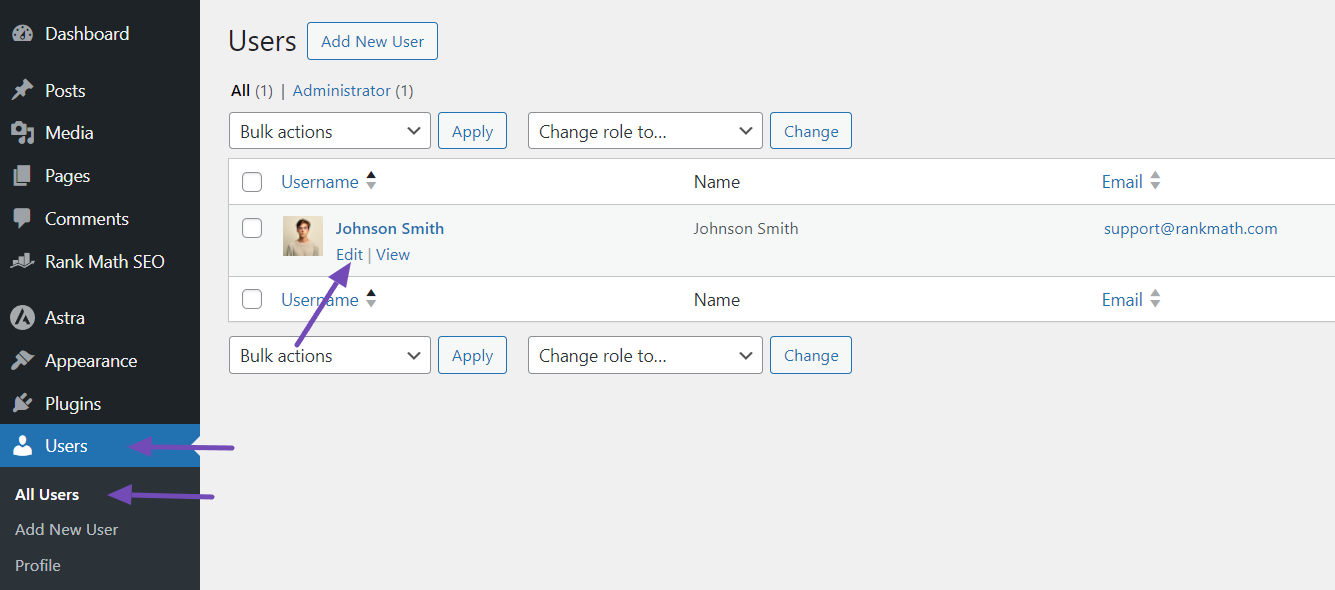
This will take you to your Author page. The look and feel of this page will vary depending on the WordPress theme you’re using.

Some themes display the author’s information, profile picture, social media links, and articles written by the author, while others may have a different layout.
If the WordPress theme you’re using does not display the author page to your liking, you can consider building a custom one with a page builder or upgrading to a premium theme that offers better author page customization options.
Author Meta and Card
These further enhance your Author SEO strategy.
- Author Meta: This appears after your blog post title, typically displaying your name (and sometimes profile picture and company role). Here’s what it looks like:

- Author Card: This card, usually at the bottom of your post, showcases your name, bio, profile picture, social links, and (for some themes) your company role. Here’s what it looks like:

Both elements allow users to visit your main author page by clicking on your name. Search engine crawlers also follow these links to your author page, where your Schema markup is implemented.
This Schema data provides search engines with information about you as the author, potentially boosting your website’s E-E-A-T (Experience, Expertise, Authoritativeness, Trustworthiness).
Just ensure that clicking on your name as the author leads users and search engine crawlers to the main author page where the Schema markup is implemented.
Unfortunately, if you’re using a free WordPress theme, you might not see the author card feature. In this case, you may want to upgrade to the premium version or build a custom blog page using a page builder plugin.
Alternatively, you can use a free plugin like PublishPress Authors to incorporate author cards or boxes at the end of your post, even for multi-author posts. It can also include author meta for both writers and editors.
So, that’s how to implement author SEO on your WordPress website. For better E-E-A-T, ensure that the information you provide is complete and accurate, and implement the strategies discussed in this article. Remember always to update your author page with new information when possible.
That’s it! We hope you’ve learned how to implement author SEO on your WordPress website. If you still have questions regarding Rank Math and Author SEO, you can reach out to our support team from here. They are available 24/7, 365 days a year.