![How to Update Your WordPress Theme Safely [A Step-by-Step Guide]](https://rankmath.com/wp-content/uploads/2024/02/How-to-Update-WordPress-Theme.png)
Updating your WordPress theme is essential for keeping your website secure, functional, and up-to-date with the latest features.
However, if not done carefully, a theme update can break your site, cause design issues, or even lead to data loss.
The good news?
You can update your WordPress theme safely without risking your hard work!
You can ensure a smooth update process by following the right steps, such as backing up your site, testing updates in a staging environment, and preserving customizations.
In this step-by-step guide, I’ll walk you through everything you need to know to update your WordPress theme safely and efficiently.
Are you ready? Let’s dive in!
Table Of Contents
1 What is a WordPress Theme Update, and How Does It Work?
A WordPress theme update simply means installing a newer version of your theme to replace the one you’re already using. Just like any other software, themes need updates from time to time to fix bugs, improve security, and sometimes add new features.
WordPress will notify you in the admin dashboard when a theme developer releases a new version, prompting you to update. To proceed, click the Update now option next to the theme, as shown below.
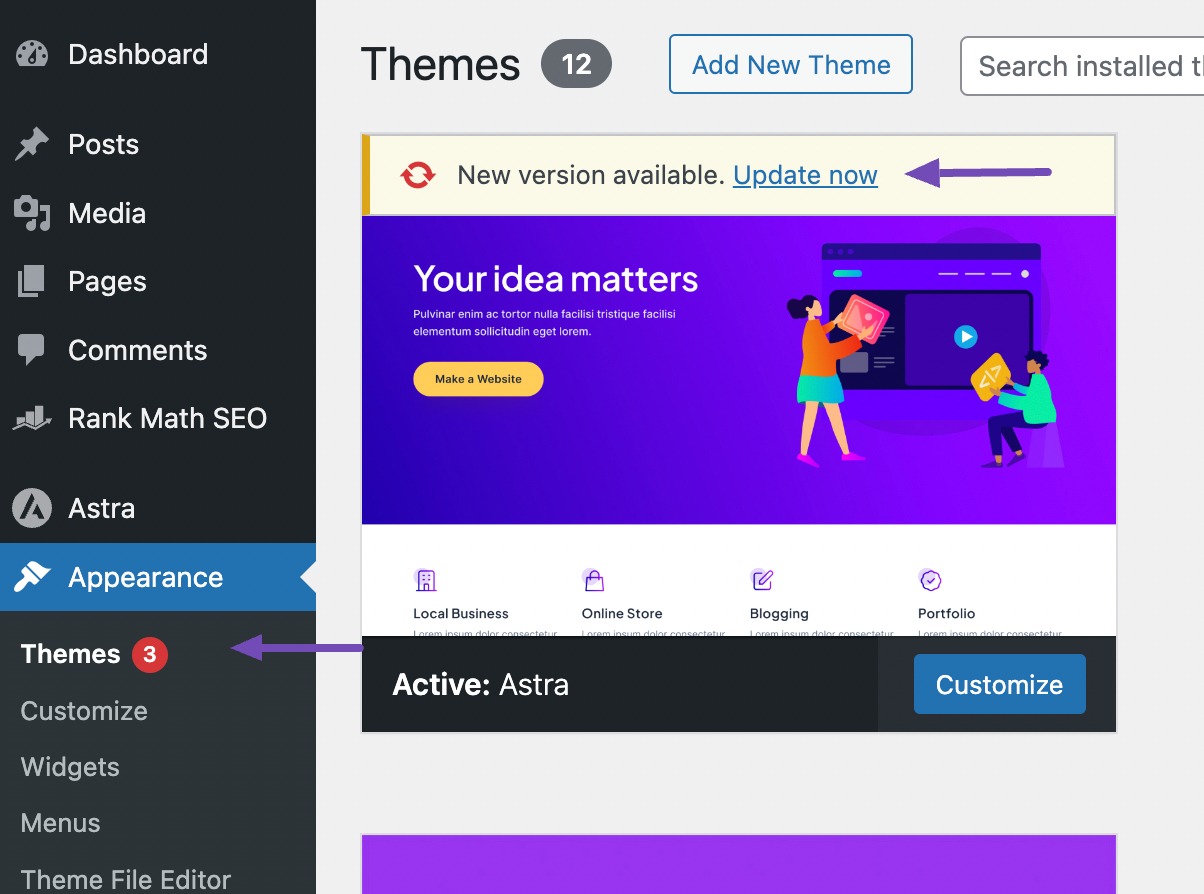
Behind the scenes, WordPress will download the theme package, unzip it, and replace the existing theme files on your server with the newer version.
It also runs any necessary database updates the theme developer includes with the update.
Once the process finishes, the updated theme becomes active on your site right away. But here’s the important part, you should know that updating a theme can overwrite certain customizations you’ve made. That’s why it’s always a good idea to update carefully so you don’t lose your work.
2 Customizations You Can and Can’t Lose During Theme Updates
When you update your WordPress theme, some of your changes will stay safe, while others might disappear. Here’s what you can count on keeping, and what you need to watch out for.
2.1 Customizations You Can’t Lose
1. Theme Customizer Changes: If you’ve changed colors, layouts, header images, or added custom CSS through the WordPress Customizer, don’t worry, those changes are stored in the database and won’t be touched.
2. Widgets and Menus: Your menus and widget placements are separate from your theme, so they’ll still be there after the update.
3. Companion Plugin Settings: If your theme uses a companion plugin, the settings you’ve configured in that plugin are usually safe.
4. Page Builder Modifications: Built your pages with Elementor, Divi, or another page builder? Those layouts won’t be affected.
5. Plugin Functionality: Anything added through plugins (like contact forms, analytics, or popups) remains intact.
2.2 Customizations You Can Lose
1. Direct Theme File Edits: If you’ve edited theme files directly, like functions.php or style.css, those changes will be overwritten.
2. Template file changes: Edits to core files such as header.php, footer.php, or index.php are at risk too.
3. Hook/filter code: If you’ve added custom code to your theme files using hooks or filters, you may lose it if the update modifies those same sections.
3 Methods to Safeguard Your Customizations Before Updating Your WordPress Theme
Updating your theme doesn’t have to mean losing the changes you’ve worked hard on. With a little preparation, you can update safely and avoid surprises.
3.1 Backup Your Website
Before you do anything, always back up your site. This means saving your files, database, and settings. Think of it as a safety net, if something goes wrong during the update, you can quickly restore your site to the way it was.
The easiest way is to use a WordPress backup plugin, which handles everything for you in just a few clicks. If you’re comfortable with technical steps, you can also back up manually by downloading your files and exporting the database through tools like phpMyAdmin.
Either way, don’t skip this step, it’s your best protection.
To back up your WordPress website, follow our guide on how to back up your wordPress website.
3.2 Use a Code Snippets Plugin
Using a code snippet plugin is the simplest method to keep your customizations intact even after updating your theme file. To achieve this, you can use the WPCode plugin.
For instance, if your filters/hooks code resides within the rank-math.php file, simply access it by navigating to Appearance → Theme File Editor on your WordPress dashboard.
Locate the rank-math.php file and copy the filter/hook code from there, as shown below.
Next, install and activate the WPCode plugin on your WordPress website. After activation, navigate to Code Snippets → Add Snippet in the WordPress dashboard.
Hover your mouse over the ‘Add Your Custom Code (New Snippet)’ option and click the Use snippet button.
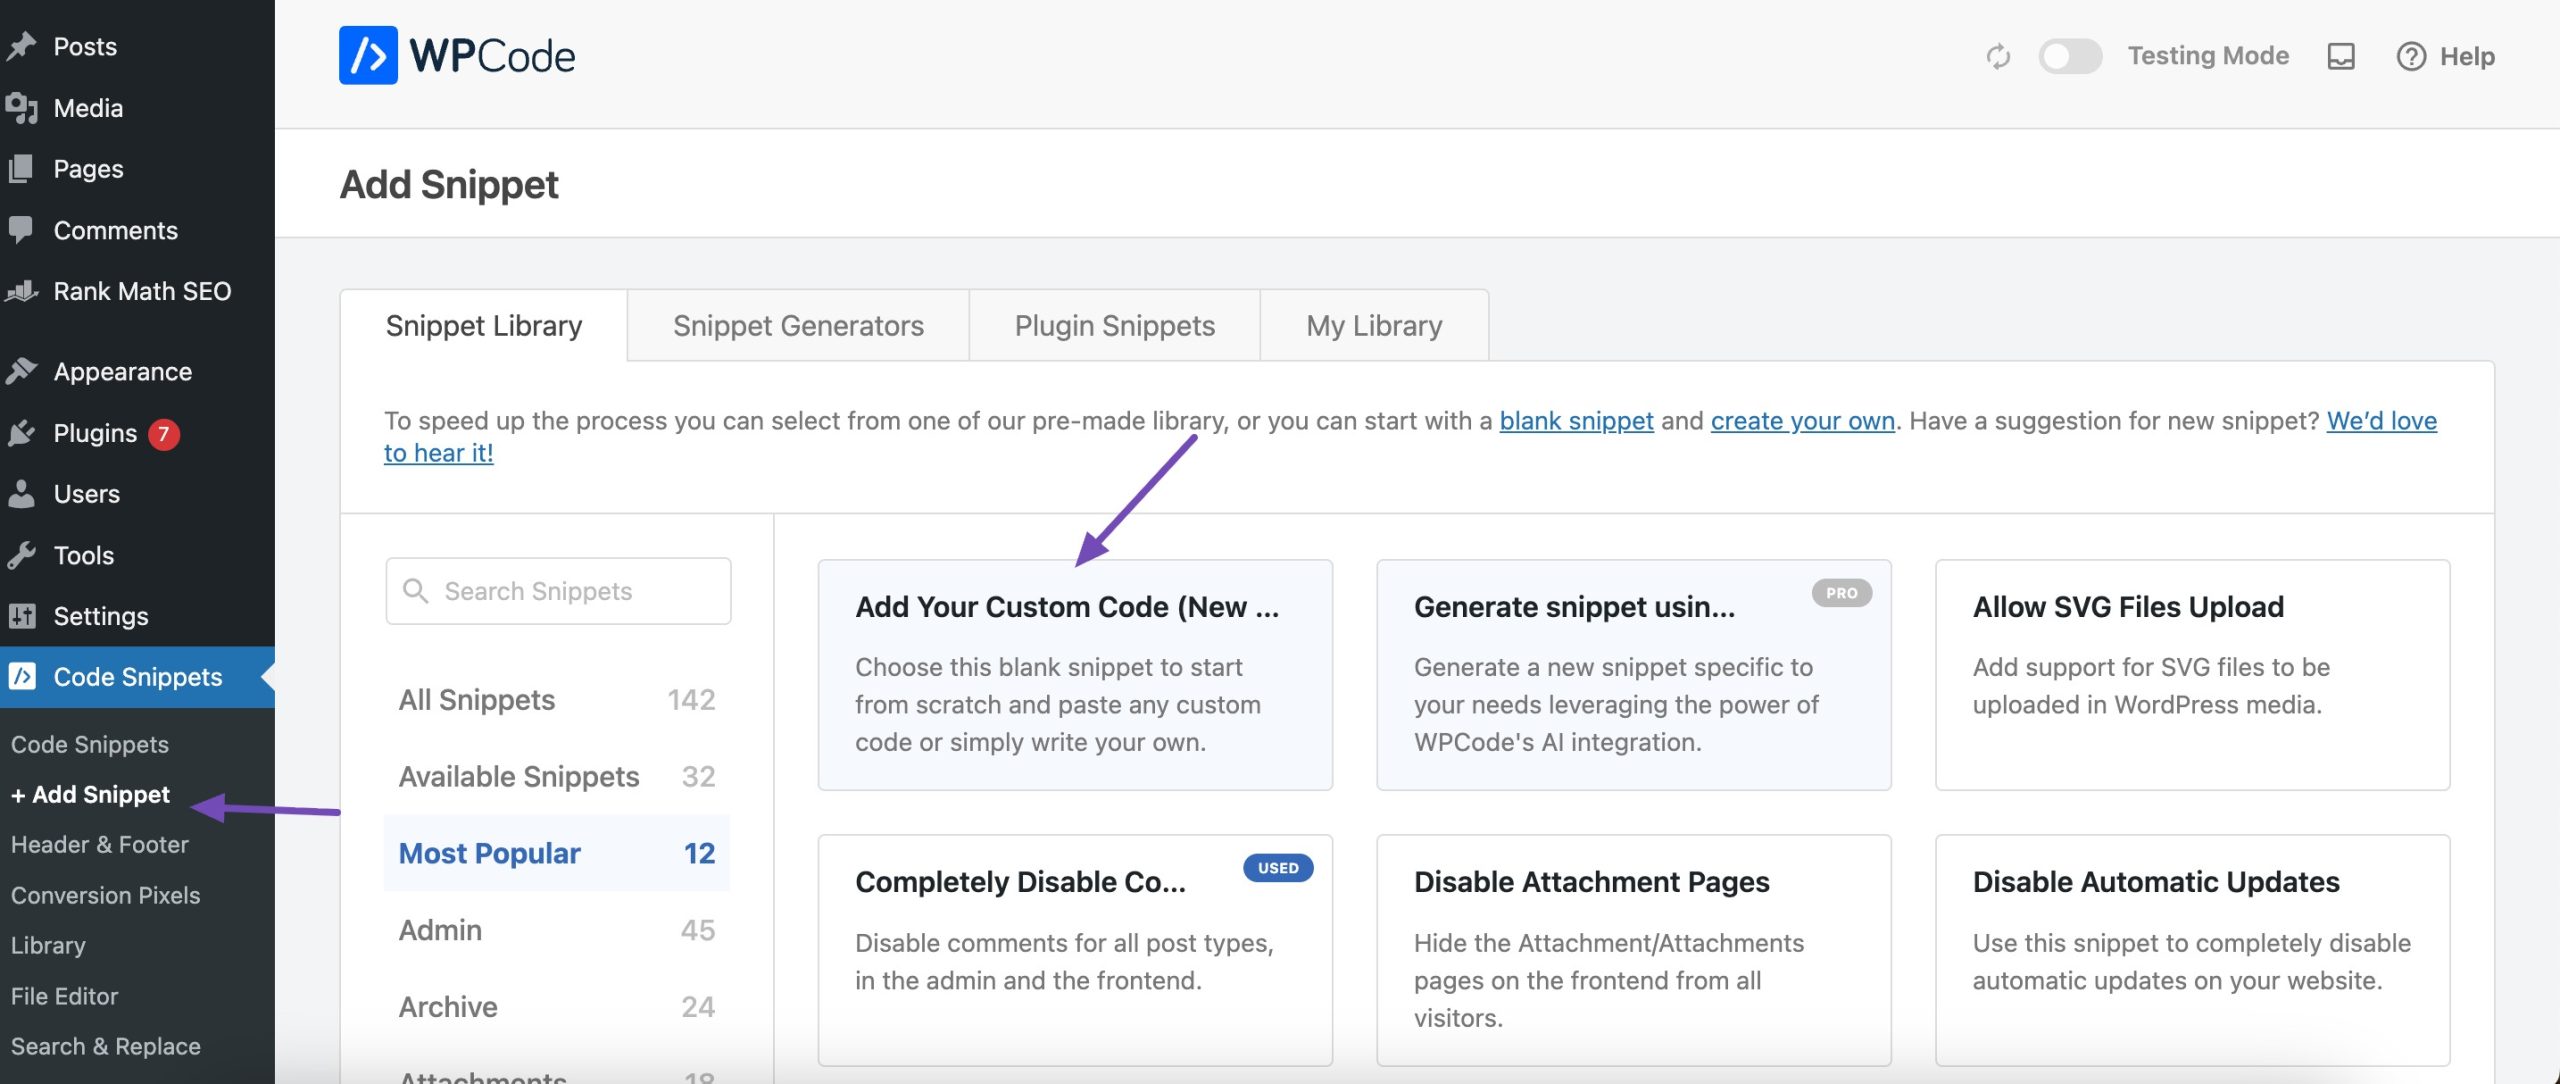
This will redirect you to the page where you can input your custom code.
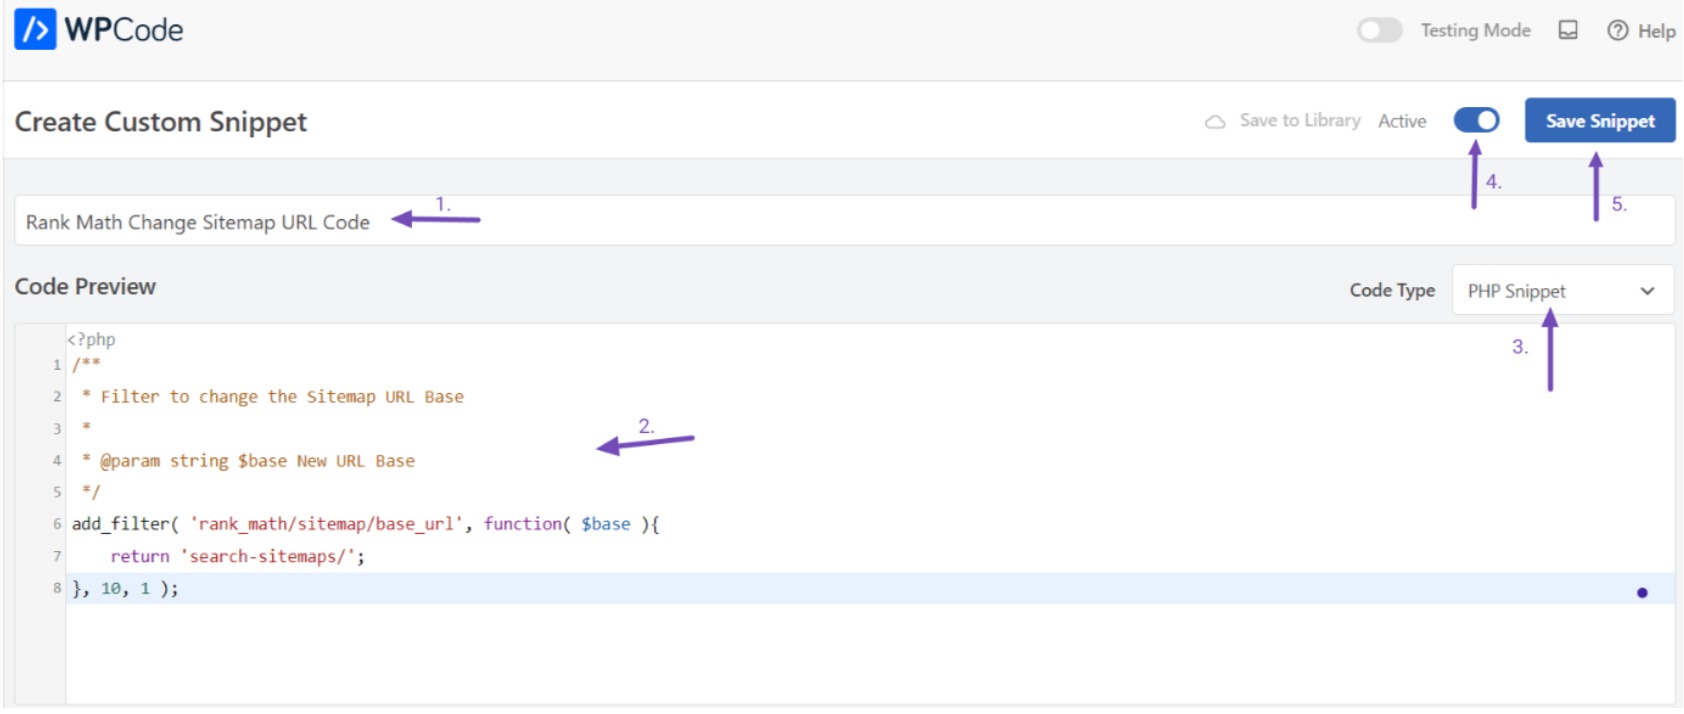
Then, provide a name for the code, paste the code in the Code Preview section, choose PHP Snippet as the code type, activate the toggle switch, and finally, click the Save Snippet button to complete the process, as shown below.
The plugin will promptly implement the code on your WordPress site. You can repeat this process for each of your custom code snippets.
Any code snippet added through this plugin will remain on your website, even after updating your WordPress theme, changing it, or activating a child theme, as long as the plugin remains active.
3.3 Use a Child Theme
A child theme is the safest way to keep your customizations when updating WordPress. Instead of editing your parent theme directly, you make changes in the child theme.
That way, whenever you update the parent theme, your adjustments stay untouched.
You can use a custom code or a plugin to create a child theme in WordPress. We have provided a detailed guide that outlines the steps to create a child theme.
After creating the child theme, it’s best not to activate it immediately. Instead, focus on transferring your configurations from the parent to the child theme. Before this transfer, download all necessary theme files to your local computer.
Downloading Theme Folders to Your Computer
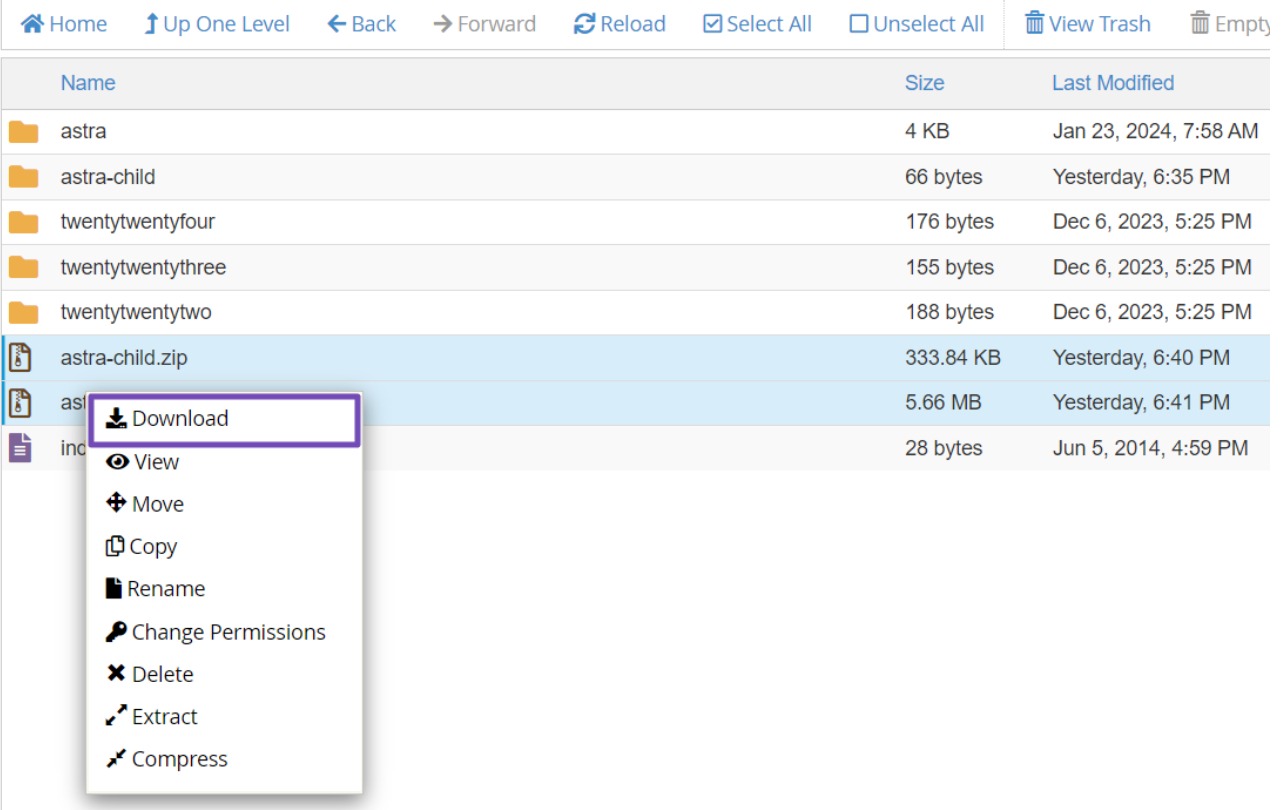
To download the theme files, navigate to your File Manager or connect to your website via an FTP client.
Locate the /wp-content/themes directory, where folders for parent and child themes can be found. Compress these folders into a zip file and download them by right-clicking and using the Download button.
Make sure to download both the parent theme and the child theme.
After downloading the theme files, visit your current theme’s website to download the latest version.
At this point, you should have the parent, child, and latest theme versions on your computer, likely all in zip files.
Now, it’s time to locate your customizations and transfer them to the child theme.
Identifying and Transferring Customizations
During this process, your goal is to preserve the customizations made within your parent theme.
For instance, if you’ve integrated filters/hooks for Rank Math within the rank-math.php file, you must transfer this file to the child theme for continued functionality.
After extracting the downloaded zip file, navigate through the theme files to locate the rank-math.php file.
Open the file and copy the filters/hooks. Create a new rank-math.php file in your child theme and paste the filters/hooks code there.
However, you may not remember all the custom codes you added to your theme. In such cases, you can utilize software like WinMerge for Windows users, Kaleidoscope for Mac users, or Meldmerge for Linux users.
These tools enable you to compare two files and identify their differences.
After installing the appropriate software on your computer, upload the latest version of your WordPress (downloaded earlier) and the recent theme file (containing your customizations) from your file manager. Proceed to compare these two theme files.
During the comparison, the software will highlight areas where the files differ. For instance, it may point out the rank-math.php file containing the filters/hooks code.
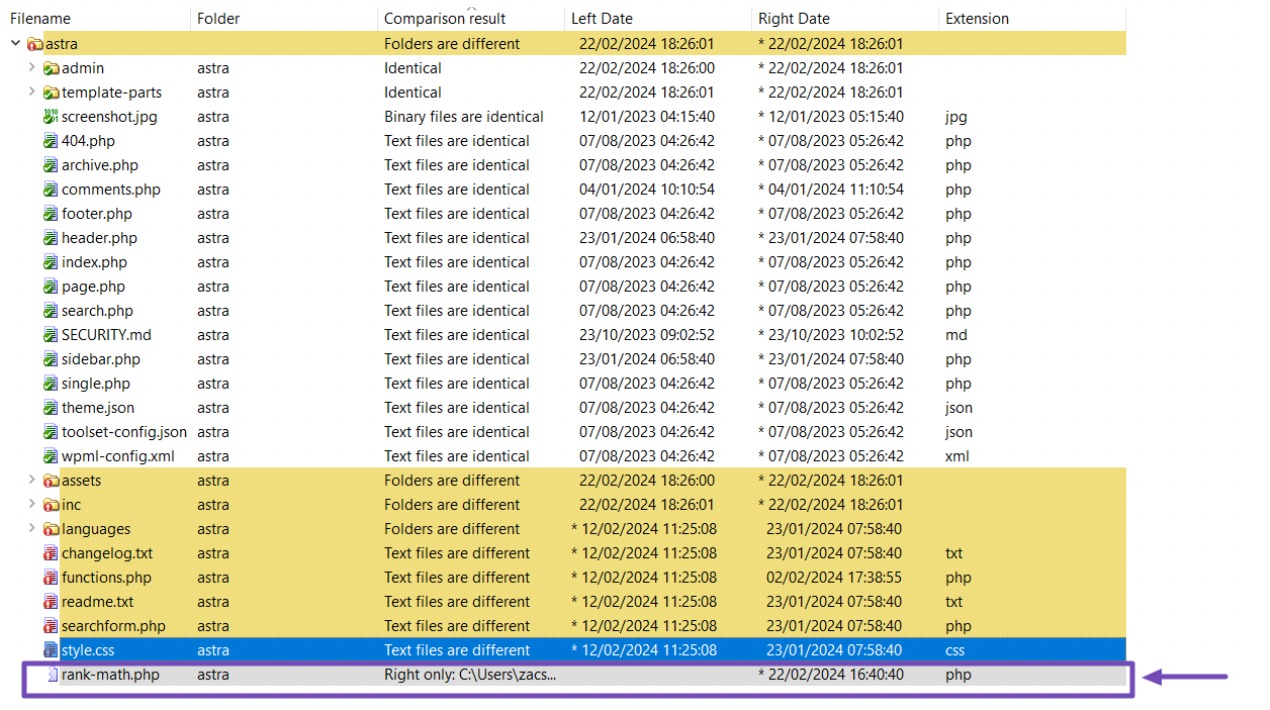
Select the rank-math.php file; within it, you’ll find the code for the filters/hooks.
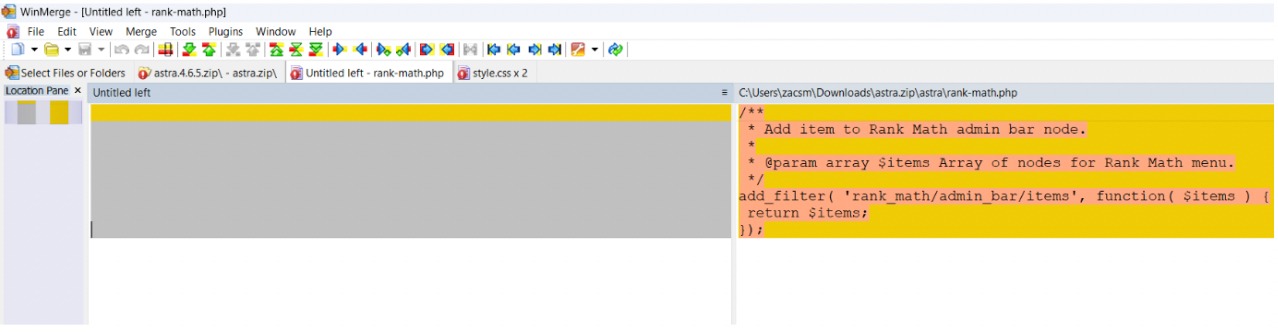
Copy the filter/hook code to your clipboard. Open your child theme file and create the rank-math.php file if it doesn’t already exist. Paste the code into the rank-math.php file.
Repeat this process for other modified areas, such as functions.php, style.css, and other relevant files. Copy the respective codes and paste them at the end of the corresponding files in your child’s theme folder.
Uploading the Child Theme to Your Website
After transferring your customizations to your child theme, the next step involves uploading it back to your website.
To do this, connect to your website using an FTP client or access your File Manager, then navigate to the themes directory at /wp-content/themes/.
Then, you can use the Upload button to upload the child theme.
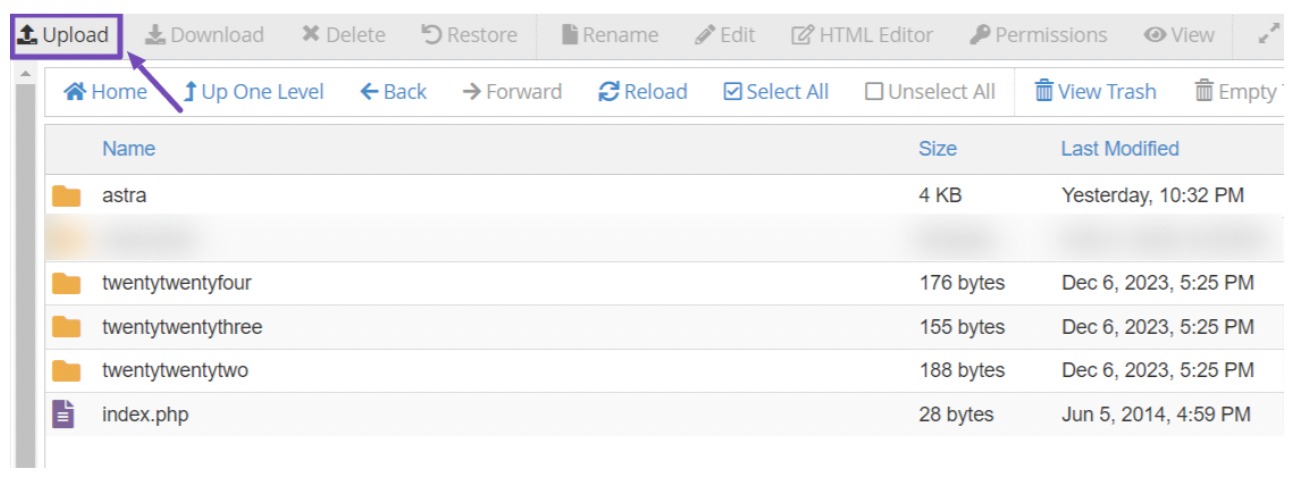
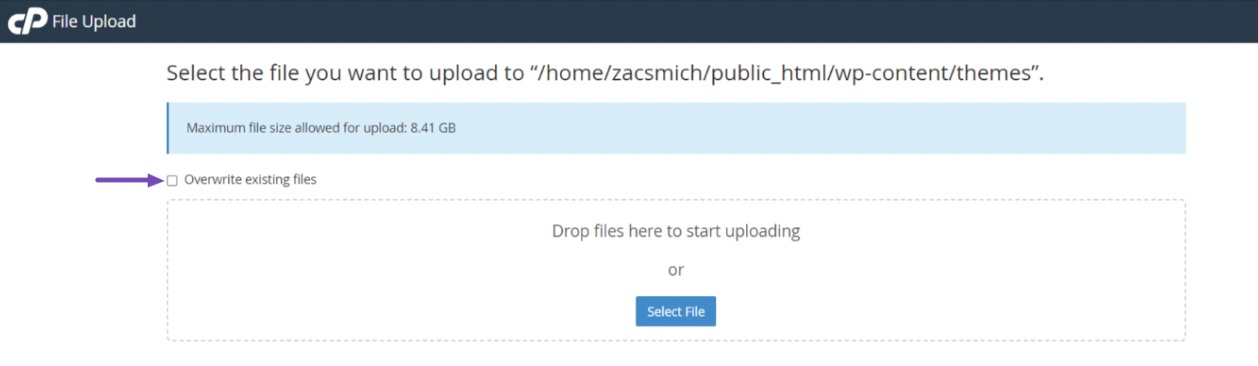
Once you click the Upload button, the page will redirect you to the upload section for the child theme. Ensure you check the ‘Overwrite existing files’ option.
By doing so, if a child theme already exists on your website, the uploaded one will replace it seamlessly.
After uploading the child theme zip file, right-click and select the Extract option to extract it into a folder.
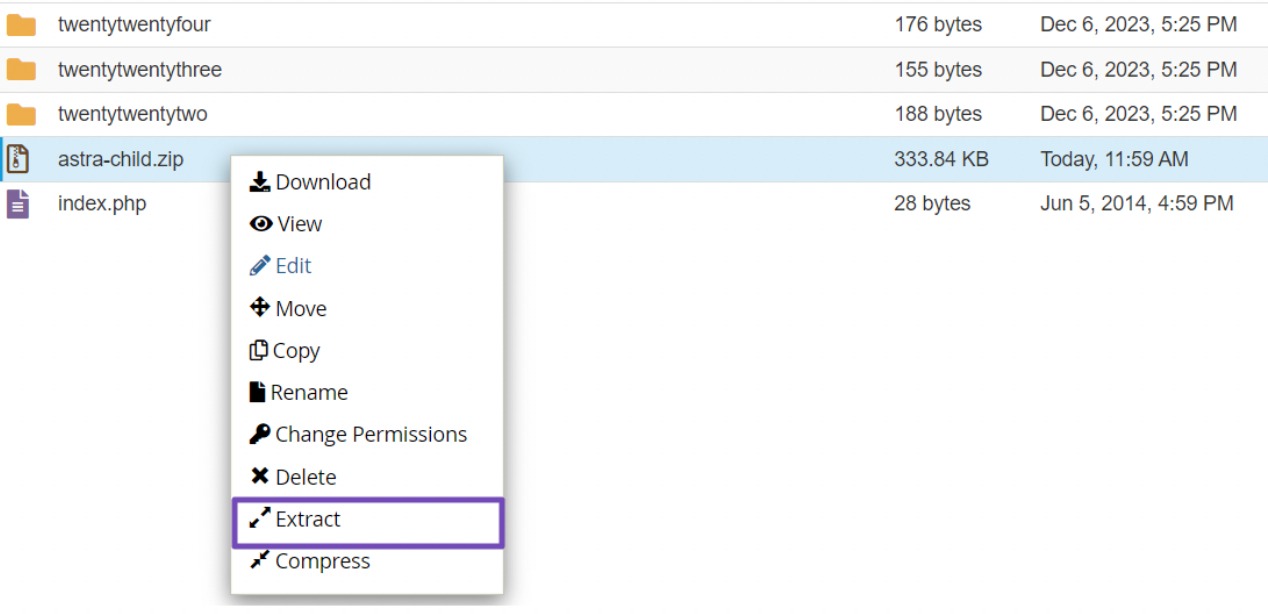
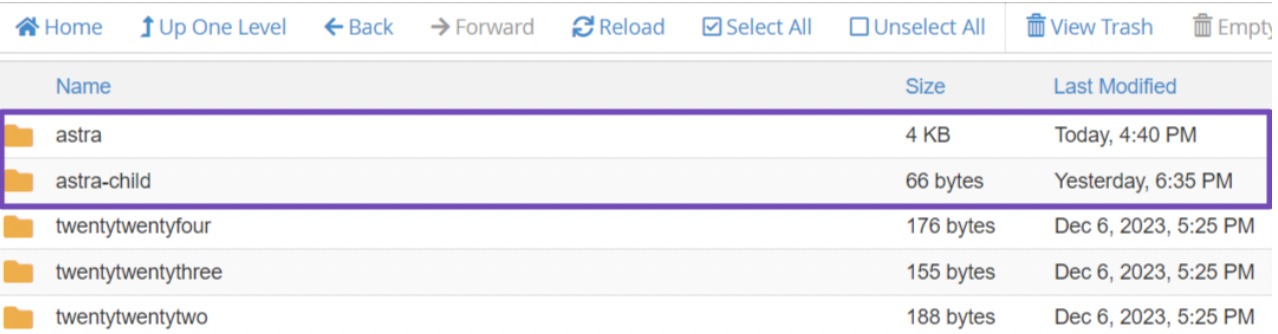
Once extracted, the child theme will appear as a folder alongside the parent theme.
Importing Customizer Settings to Your Child Theme
Remember, any customizations made via the WordPress theme customizer are not automatically saved in your theme, so they must be transferred to the child theme manually.
To do this, we will use the Customizer Export/Import plugin. Install and activate the plugin.
After activation, you should export the customizer settings from the parent theme.
Ensure that the parent theme is active, then go to Themes → Customize in your WordPress dashboard. Then, access the Export/Import panel and click the Export button.
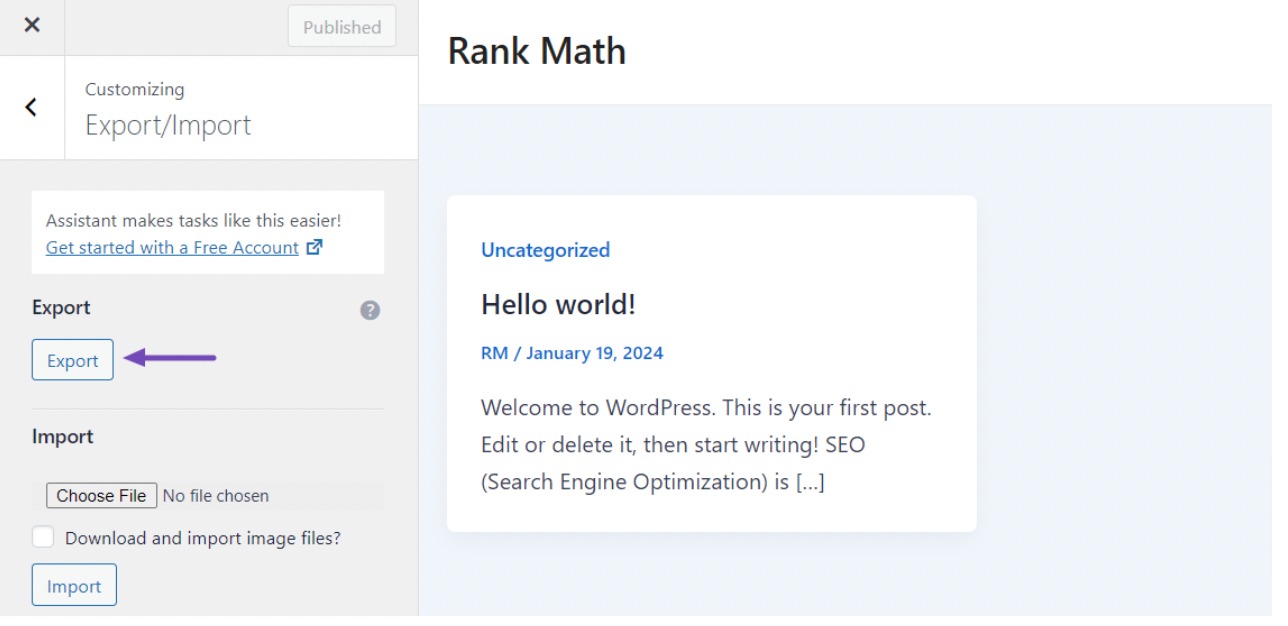
The plugin will generate a .dat file containing your customizer settings and download it to your computer.
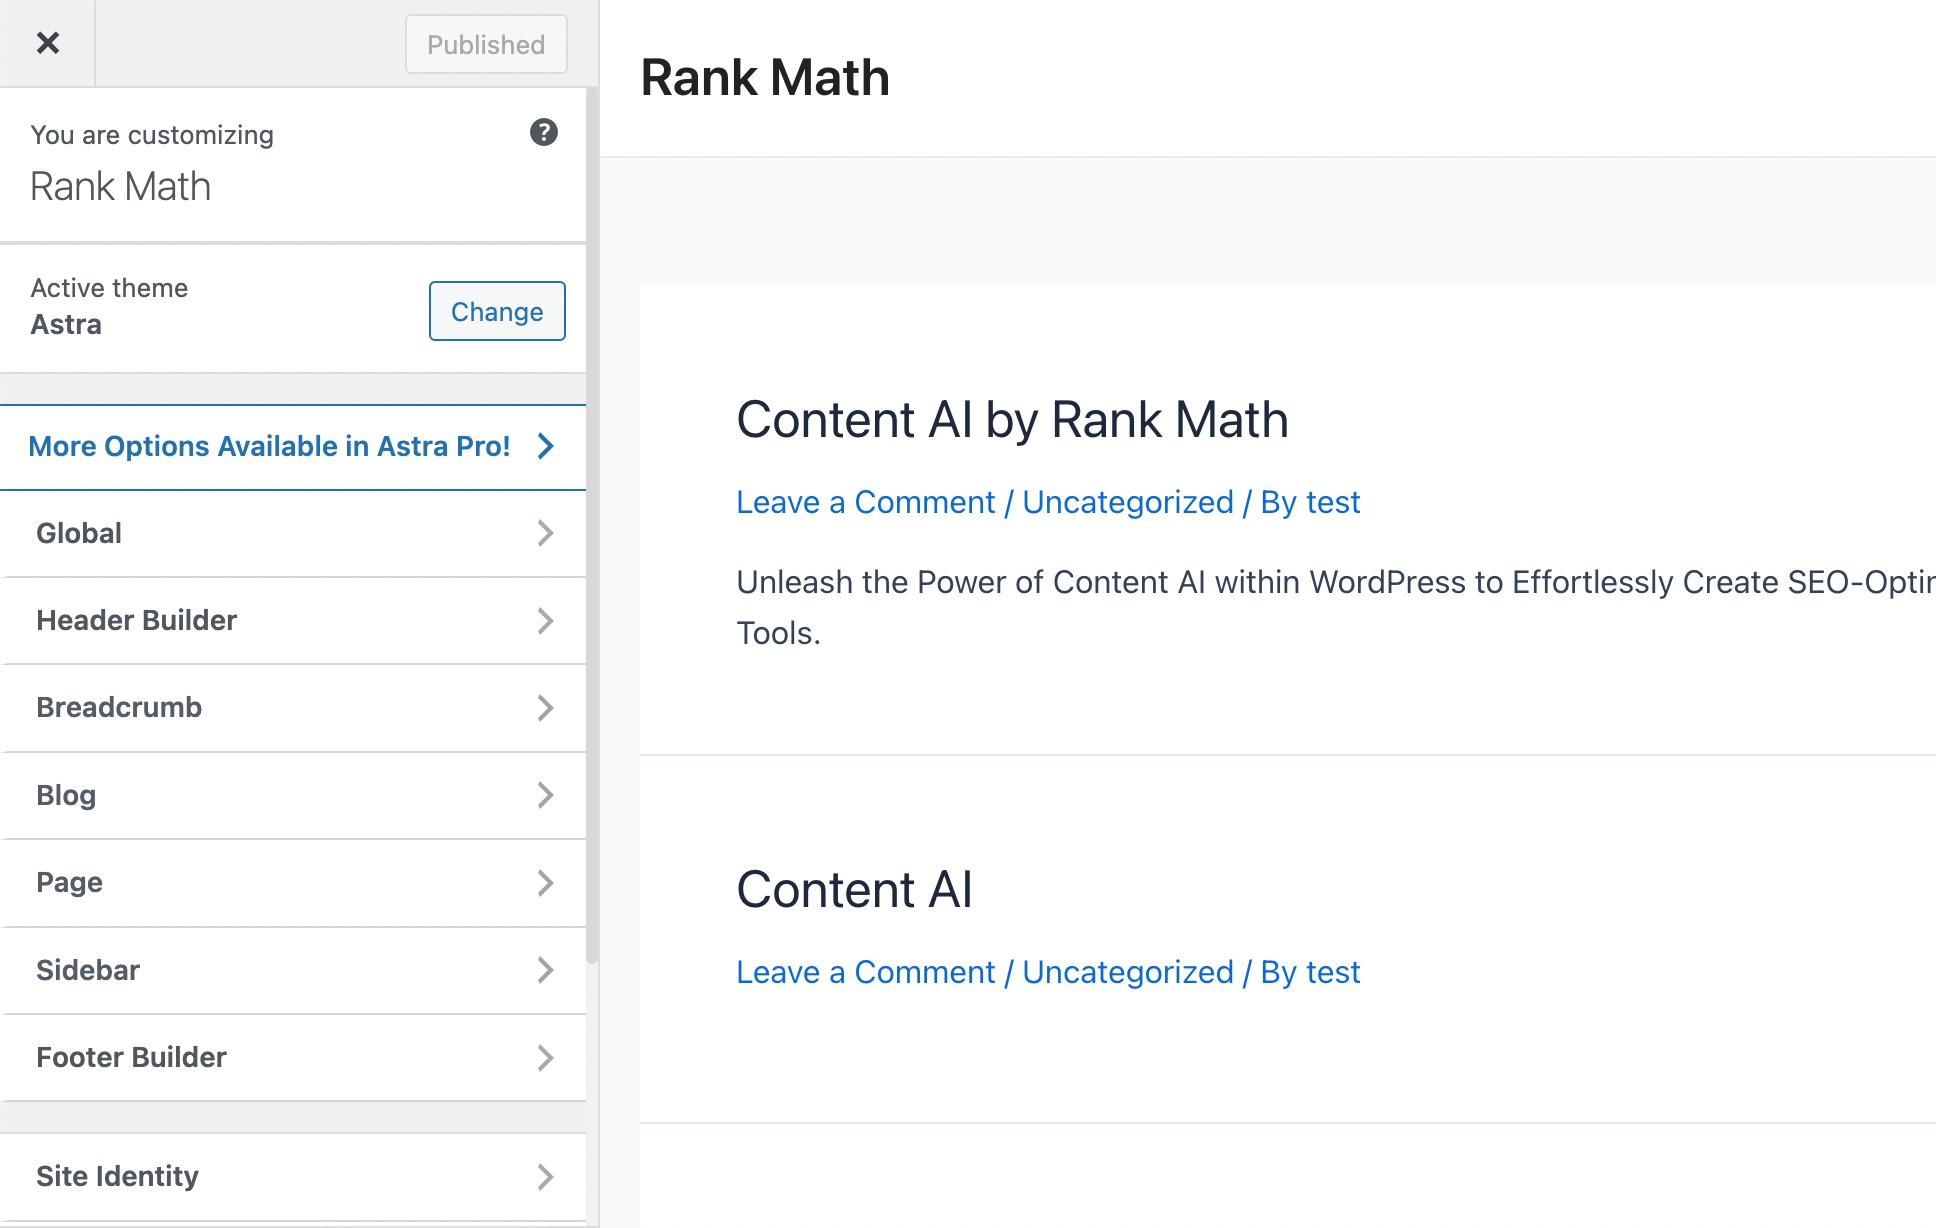
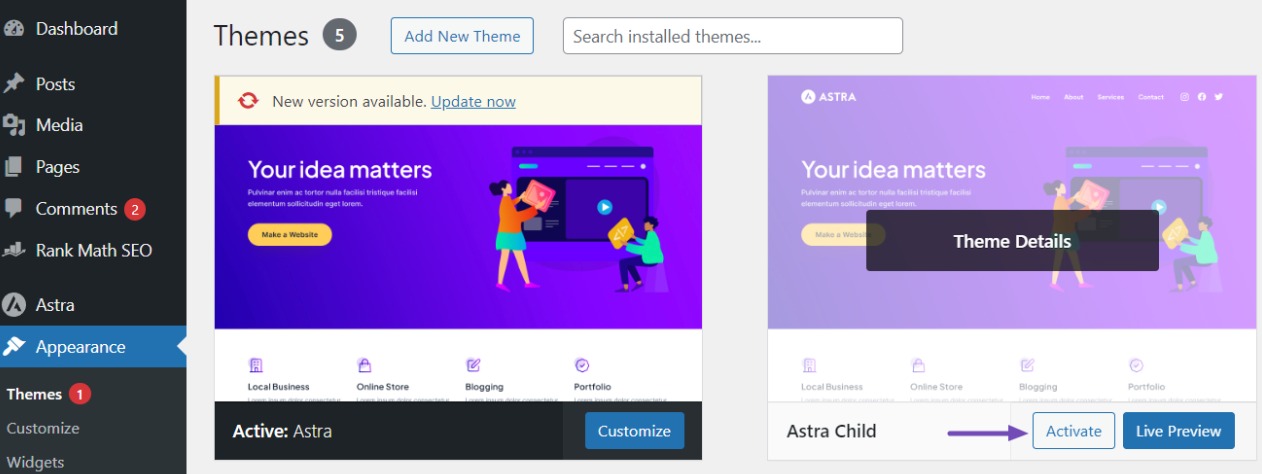
Now, activate your child theme on your website by navigating to Appearance → Themes and click the Activate button next to the child theme, as shown below.
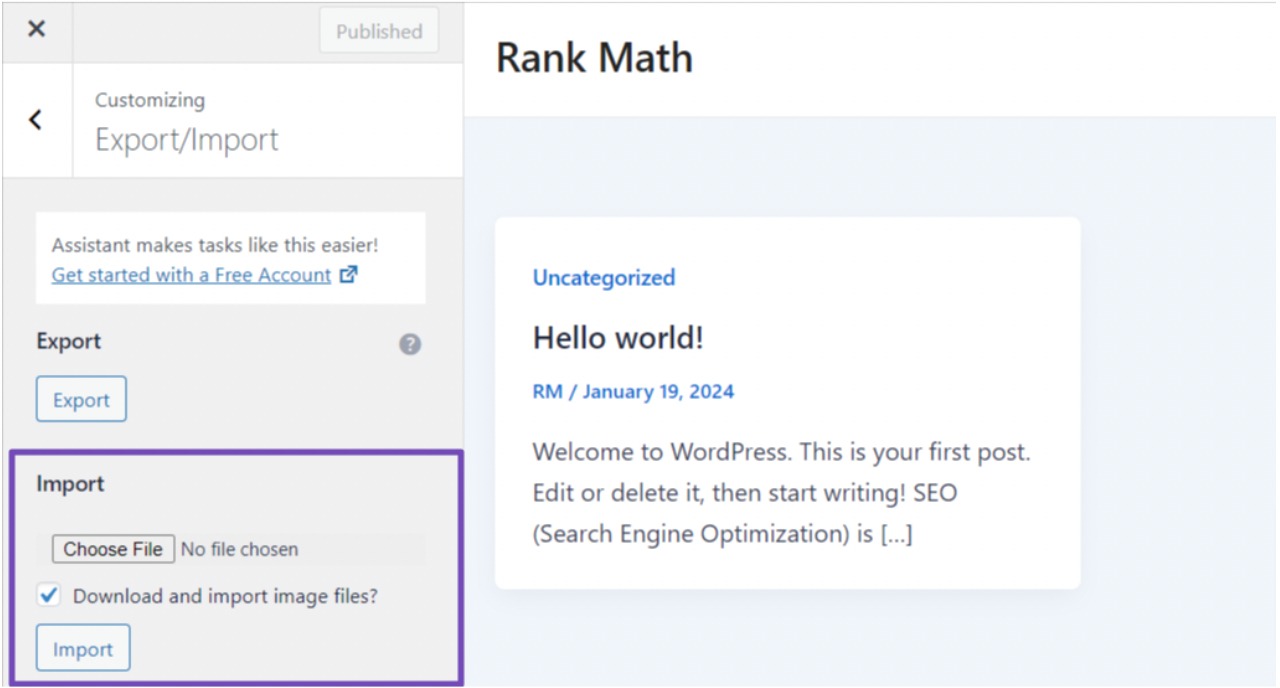
Then, revisit the Customizer screen, navigate to the Export/Import panel, and select the Choose File button to import the previously exported file. Ensure you check the option ‘Download and import image files?’.
To finalize the process, click the Import button to initiate the upload. The plugin will then seamlessly import the customizer settings from your exported file.
After the import process, you can preview the changes in the customizer. Once satisfied with the modifications, click the Save & Publish button to make them live on your website.
That’s it. You’ve moved all customizations to the child theme. Now, you can update the parent theme without repeating these steps since changes are safely stored in the child.
4 How to Update Your WordPress Theme
After safeguarding your customizations on your parent theme to prevent them from being lost, let’s discuss how to update your WordPress theme.
4.1 Automatic Update via WordPress Dashboard
One way to update WordPress themes is through the Automatic Update feature in the WordPress dashboard.
This allows you to update your theme directly from the WordPress dashboard without manual intervention.
Once an update is available, you will receive a notification in your Dashboard. Then, you can navigate to Appearance → Themes and click on the Update now button to initiate the process, as shown below.

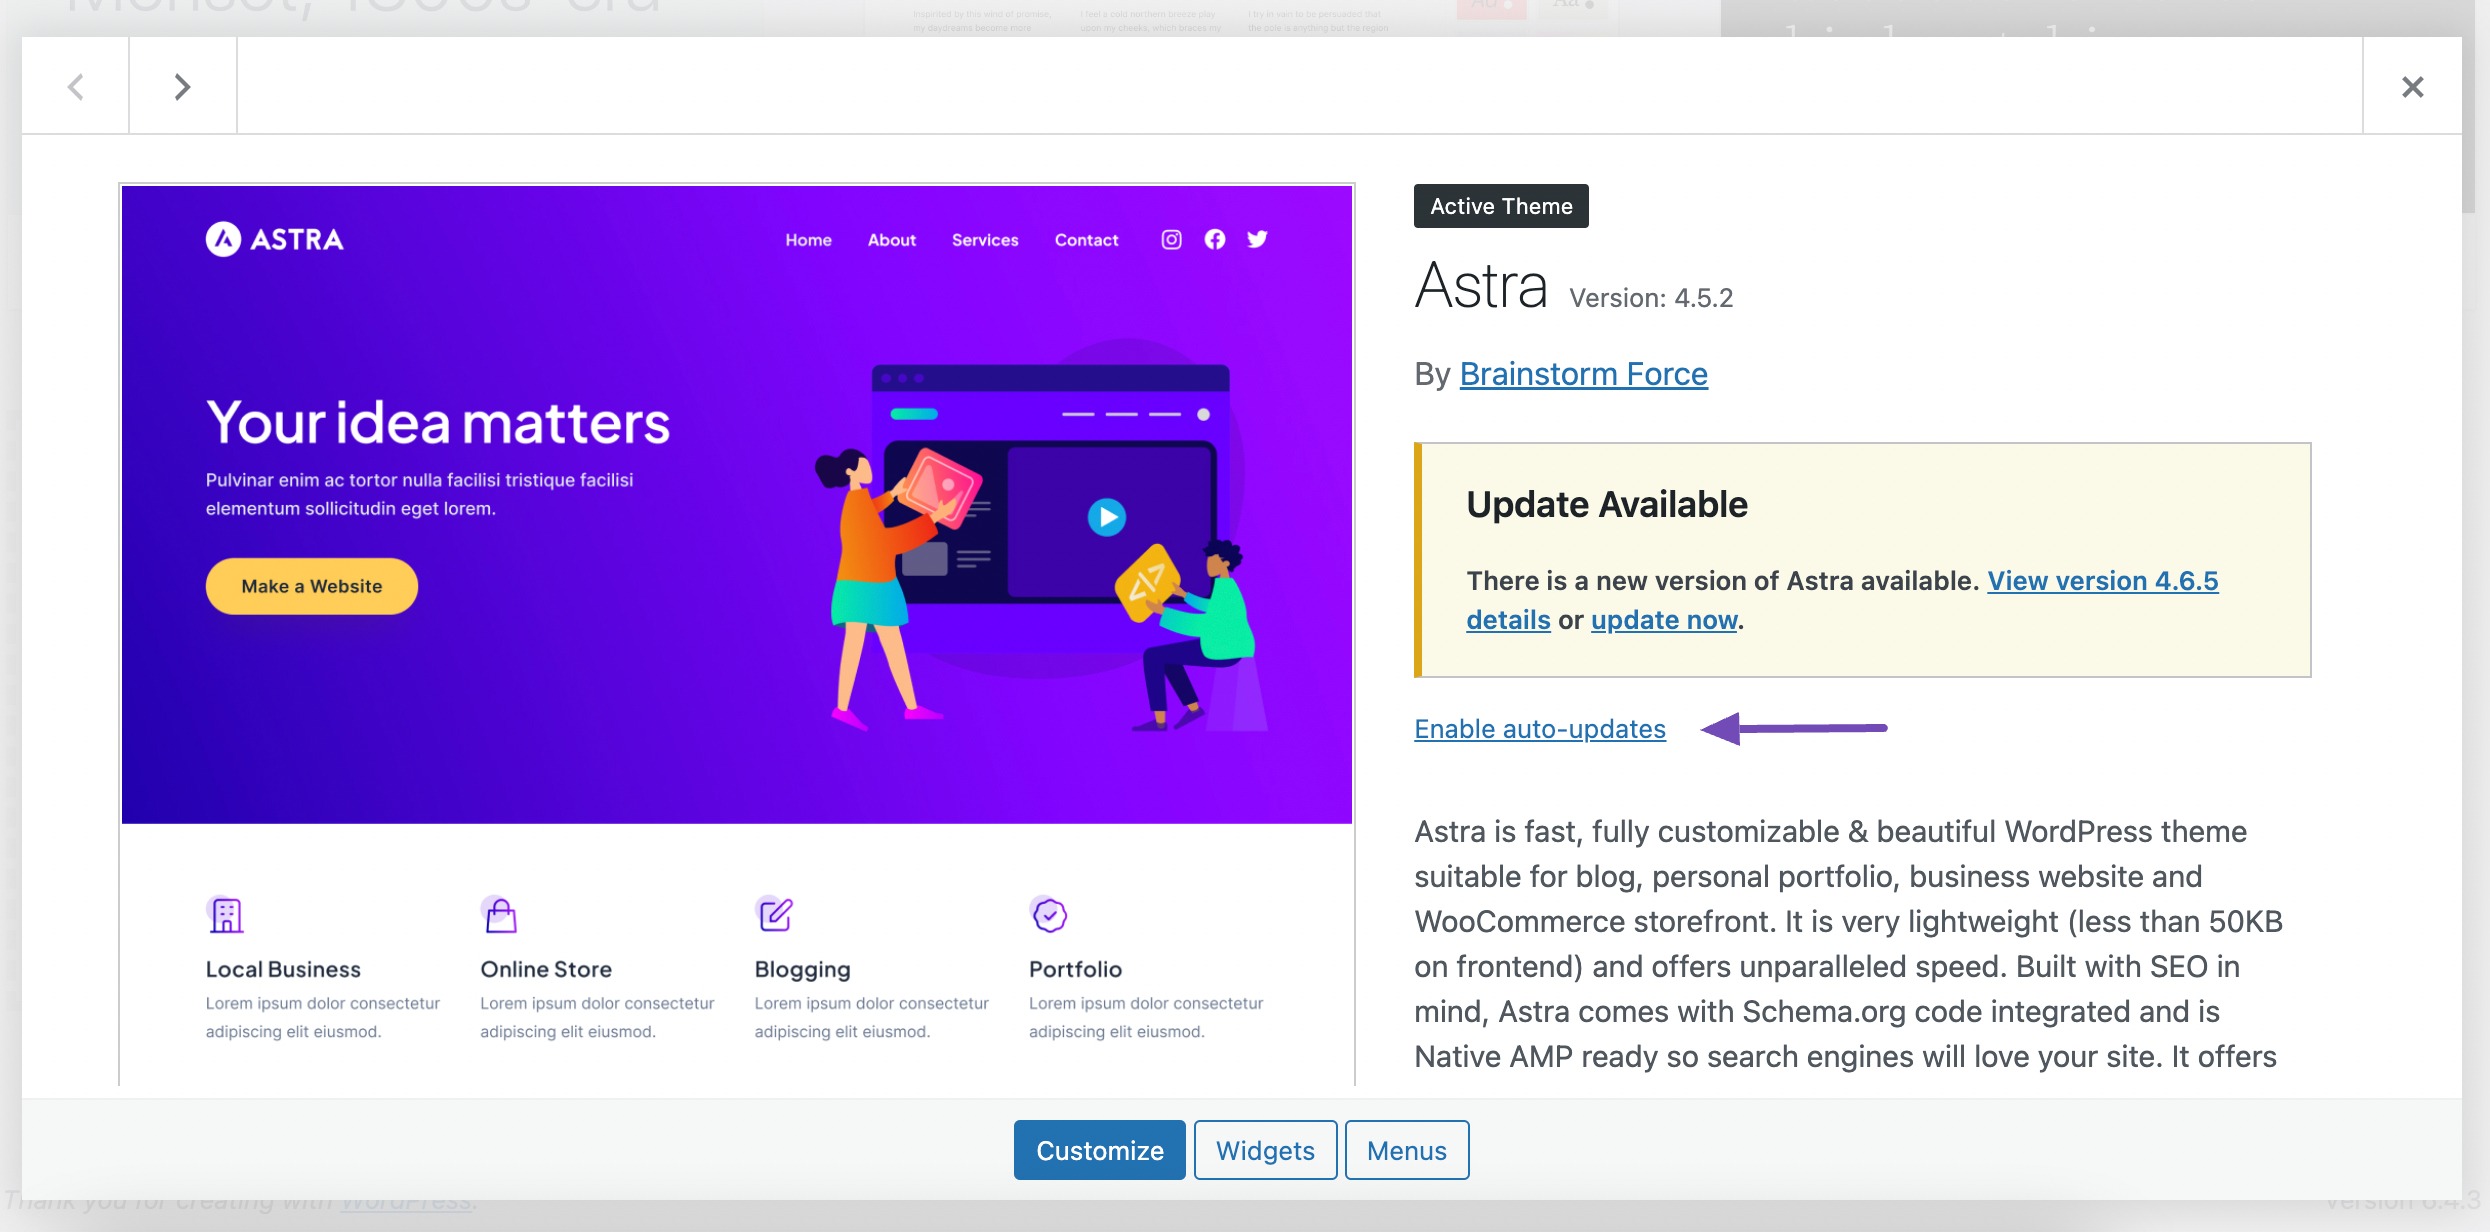
Another option is to enable automatic updates for your theme, allowing WordPress to update it automatically whenever a new version is released.
To do this, navigate to the Themes page and click on your current theme. Look below the theme’s name section for an Enable auto-updates link.
Click on it to activate automatic updates for your theme.
4.2 Manually Update Your WordPress Theme
If you prefer to update your WordPress theme manually, you can do so by uploading the updated theme files yourself. Download the most recent theme version from the official WordPress theme directory or the developer’s site.
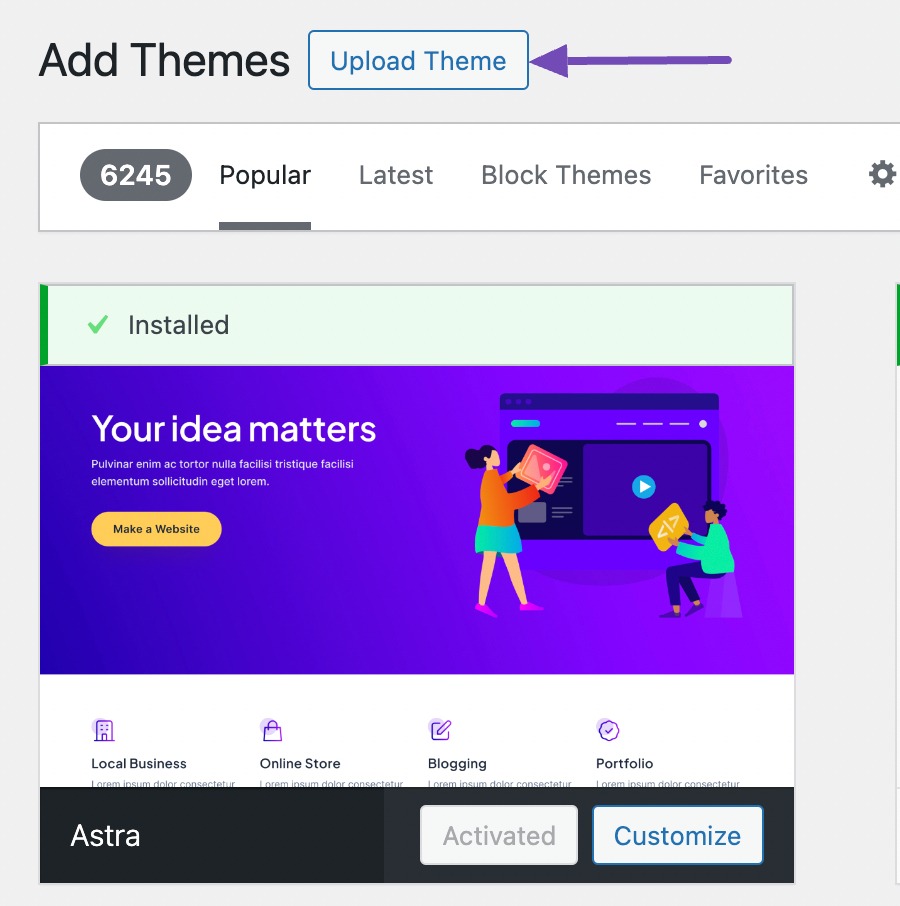
After acquiring the updated theme files, log in to your WordPress dashboard and proceed to Appearance → Themes. Click the Add New Theme button.

This will take you to the theme directory page. Next, click the Upload Theme button above the page to reveal where you can upload your theme file.
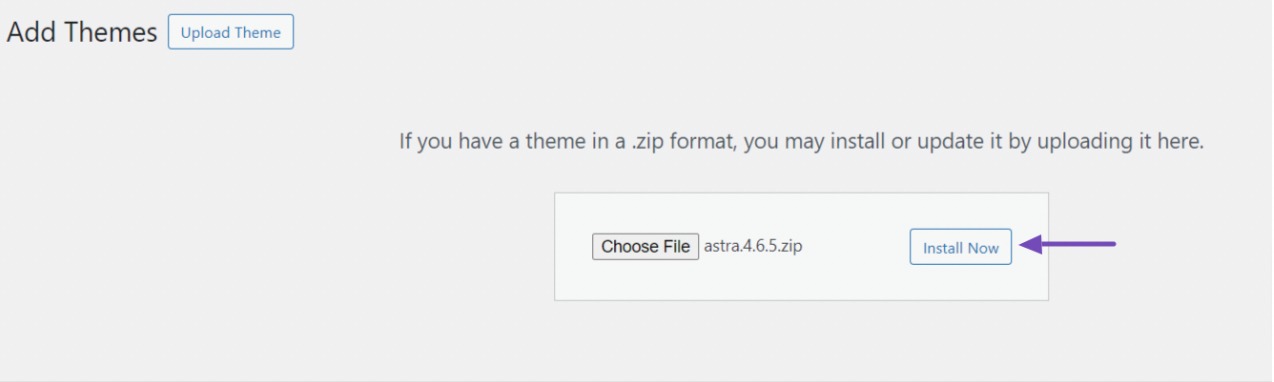
Now, click the Choose File button and select the updated theme files from your computer.
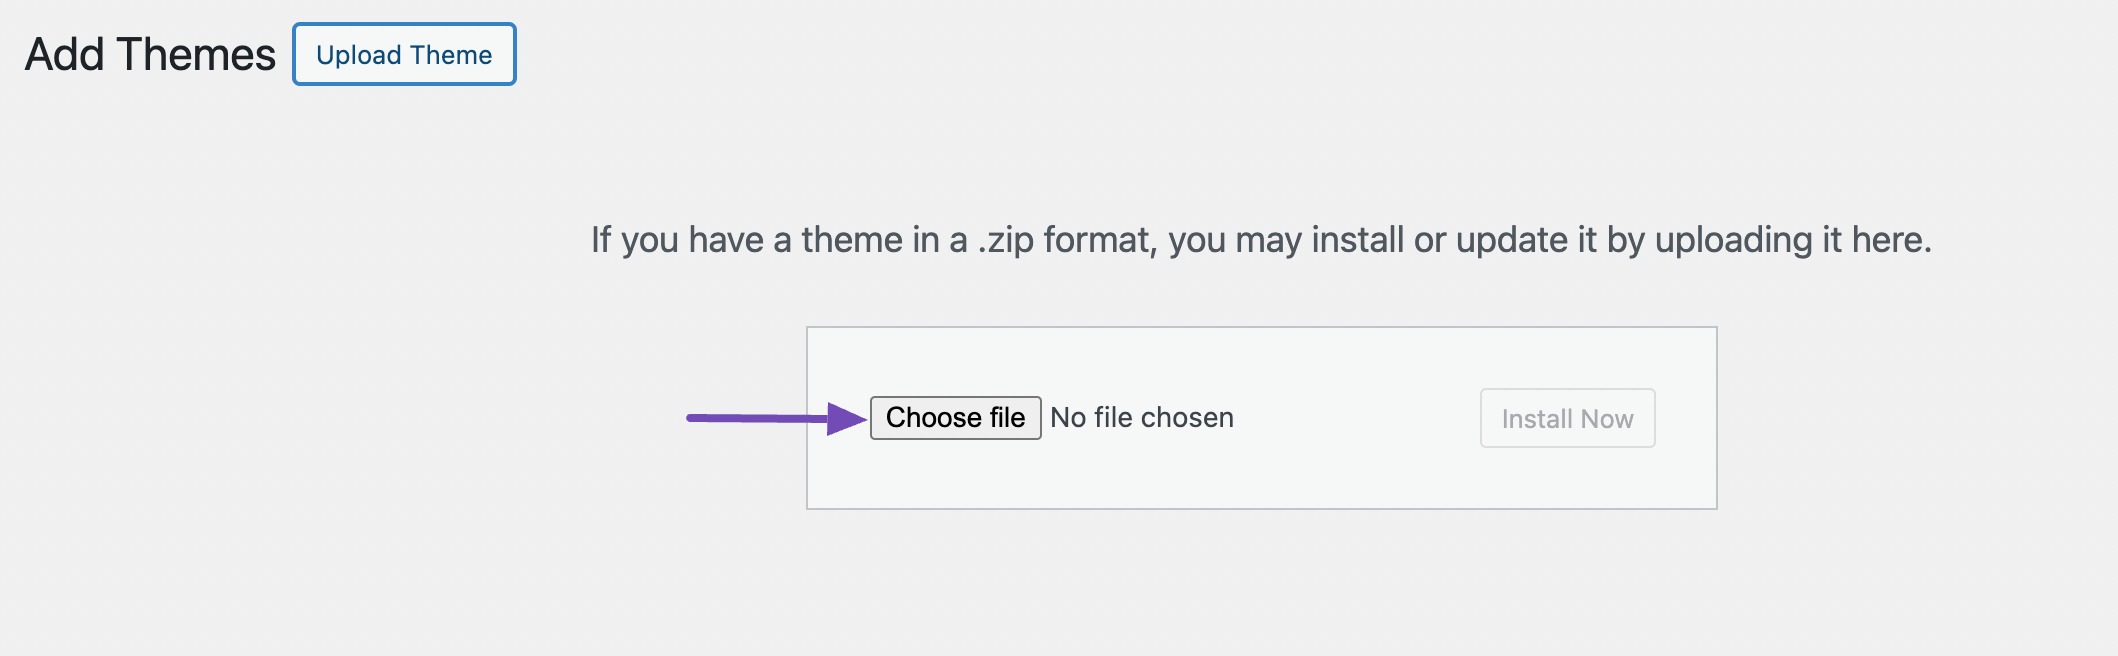
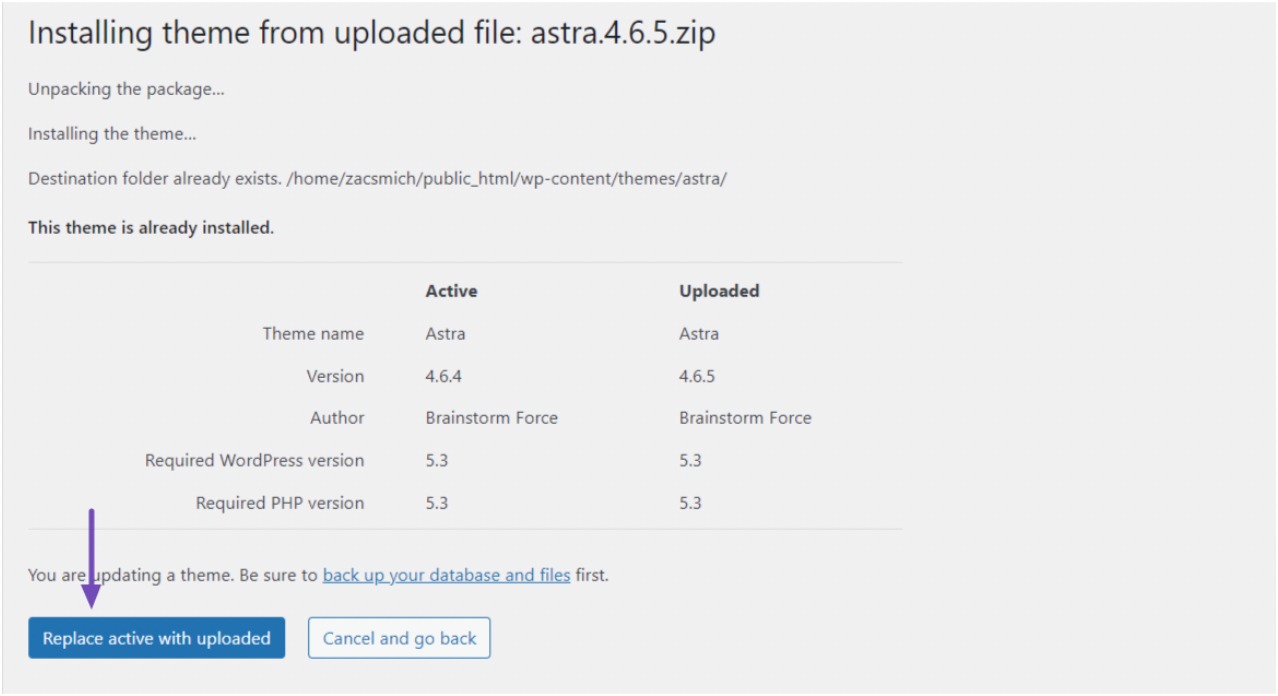
After selecting the file, click on the Install Now button to upload and install the updated theme.
Once the theme is installed, click the Replace active with uploaded button to ensure the new version of the theme replaces your site’s older version.
4.3 Using FTP or File Manager
This approach provides greater control over the update process, allowing you to address potential issues.
Download the newest version from the developer’s site to update your WordPress theme using FTP or File Manager.
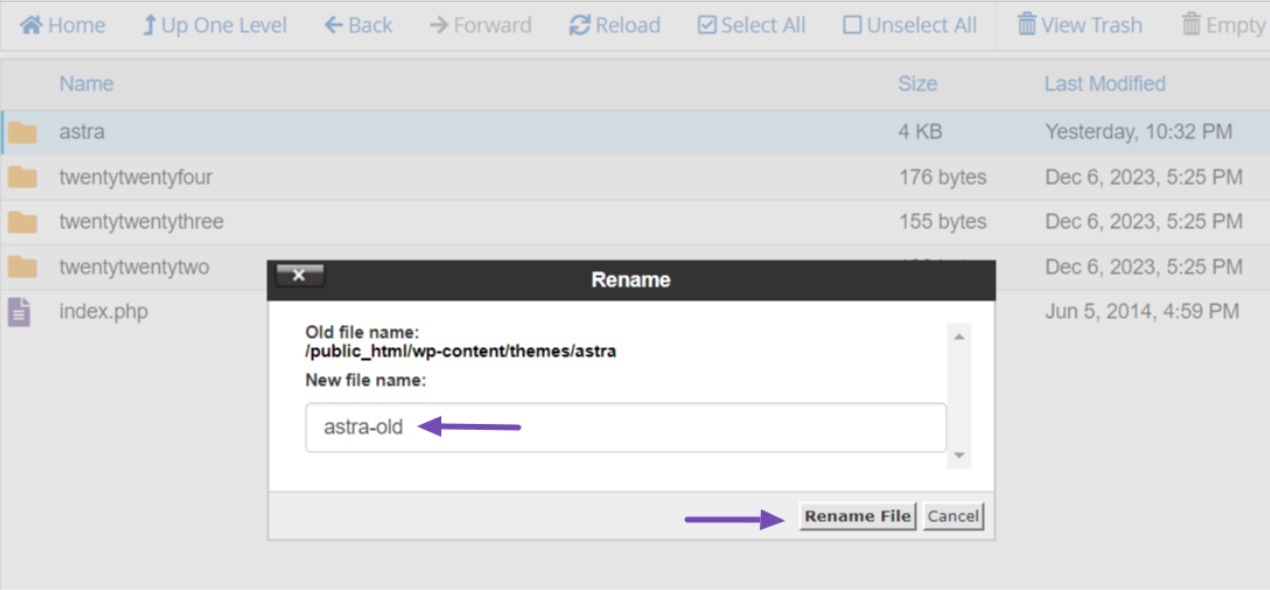
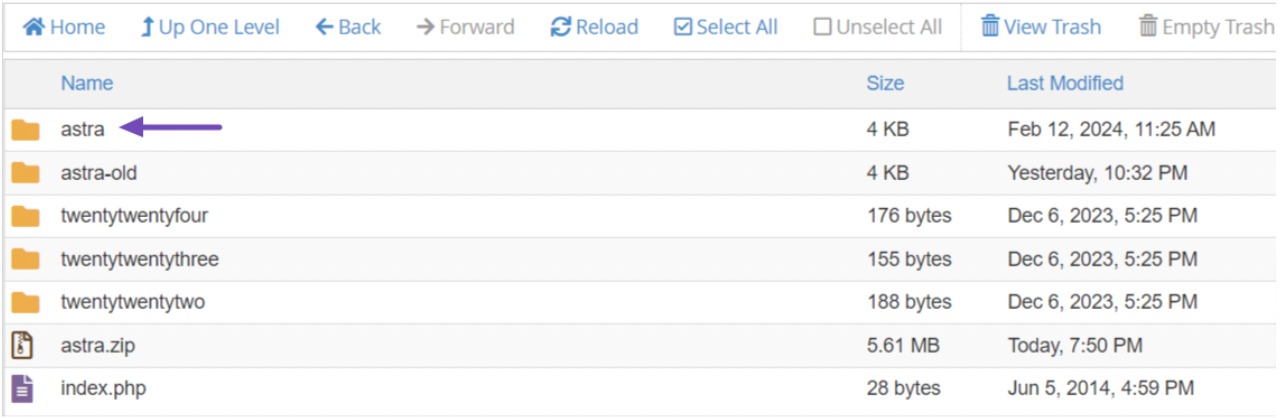
Then, connect to your website’s server using an FTP client or File Manager. Locate the wp-content/themes directory and find the theme folder you wish to update.
To proceed, rename the folder by adding “-old” as a suffix to the name, resulting in a format like “theme-old.”
Now, upload the latest version of the theme to the same directory and extract it from the zip file. Ensure that the folder name matches the name of the old theme folder that you renamed earlier.
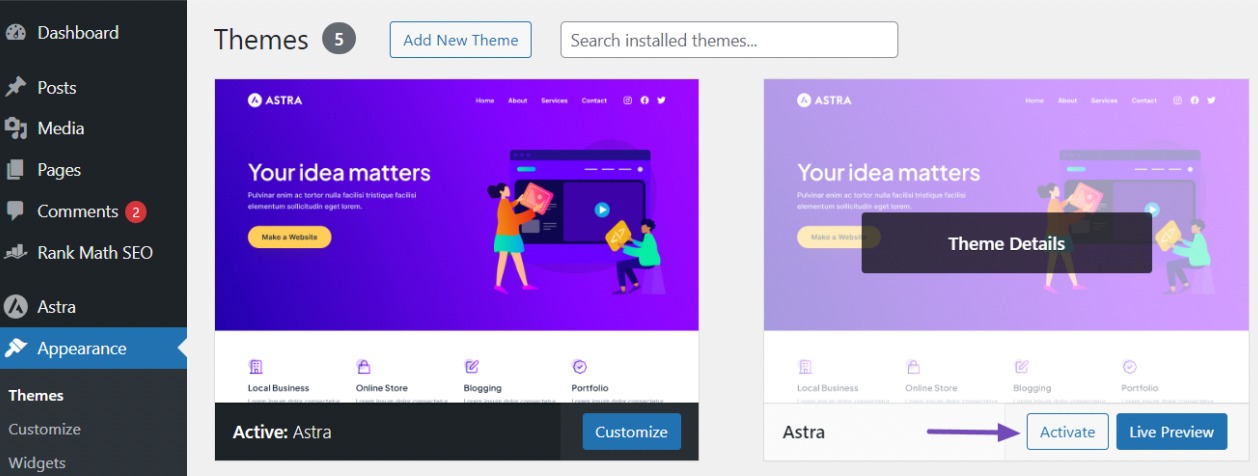
After uploading the new theme folder, log in to your WordPress dashboard and go to Appearance → Themes.
You should see the updated version of your theme and the one you renamed as active.
Finally, hover over the new, inactive theme and click on the Activate button to update your website theme.
5 Conclusion
Updating your WordPress theme regularly is essential for maintaining a secure, high-performing, and feature-rich website.
By adhering to the steps detailed in this guide, you can ensure a seamless and secure update process, reducing the risk of website issues or customization loss.
Remember, preparation is key to safeguarding your online presence.
Here are some valuable tips:
- Backup your site before any update.
- Consider using a child theme to protect customizations.
- If possible, test updates on a staging environment before applying them live.
- Update during low-traffic hours to minimize disruptions.
- Check the theme’s changelog and compatibility with plugins and servers before updating.
With these recommendations, you can confidently update your WordPress theme and maintain optimal website performance.
If you like this post, let us know by tweeting @rankmathseo.