Are you thinking about revamping your website, testing a new plugin, or experimenting with a fresh theme, but worried about breaking things in the process?
You’re not alone.
You might worry about making any changes, thinking that a small error can disrupt your live site or drive visitors away.
But what if you can safely explore, test, and tweak without any risk to your main site?
That’s exactly what a staging site is for. A staging site is a replica (duplicate) of your live website in a separate environment. It allows you to test changes like theme updates, new plugins, or custom code modifications without affecting your visitors.
In this post, we’ll discuss four effective methods to create a staging site for your WordPress website.
Table Of Contents
1 What is a Staging Site and Why Do You Need One?
A staging site is a copy of your website where you can safely test changes before making them live.
It acts as a sandbox for experimenting with changes without impacting your live website.
Using a staging site is important because it helps you:
- Test safely – Make changes without affecting your live site.
- Avoid downtime – If something breaks, your main site stays online.
- Catch errors early – Spot problems before your visitors do.
- Experiment freely – Try out new ideas without fear.
By utilizing a staging site, you can maintain your website’s integrity while confidently implementing improvements. This approach minimizes downtime and enhances your visitors’ overall user experience.
2 Best Practices to Follow While Using a Staging Site
To make sure your staging site is safe, secure, and doesn’t cause problems down the line, keep these best practices in mind:
Always create a full backup of your live website before setting up a staging site. This ensures you can restore your site if something goes wrong during the process.
Since your staging site is a copy of your live site, you don’t want visitors or bots to find it accidentally. Use a password to keep it private and secure.
Tell search engines not to index your staging site by adding a noindex tag. This prevents it from appearing in search results, which can cause duplicate content issues and hurt your SEO.
Just like your live site, your staging site should also run on the latest versions of WordPress, plugins, and themes to avoid compatibility issues during testing.
3 Methods to Create a Staging Site for WordPress
Now, let’s discuss the methods to create a staging site and determine which best suits your needs.
3.1 Creating a Staging Site With Your Hosting Provider
Many hosting providers offer built-in tools to help you create a staging environment with just a few clicks. This is often the recommended method and fastest option.
Start by checking if your hosting plan includes a staging feature. Some hosts let you set up a staging site directly from the control panel, while others may provide a custom plugin or tool to handle it.
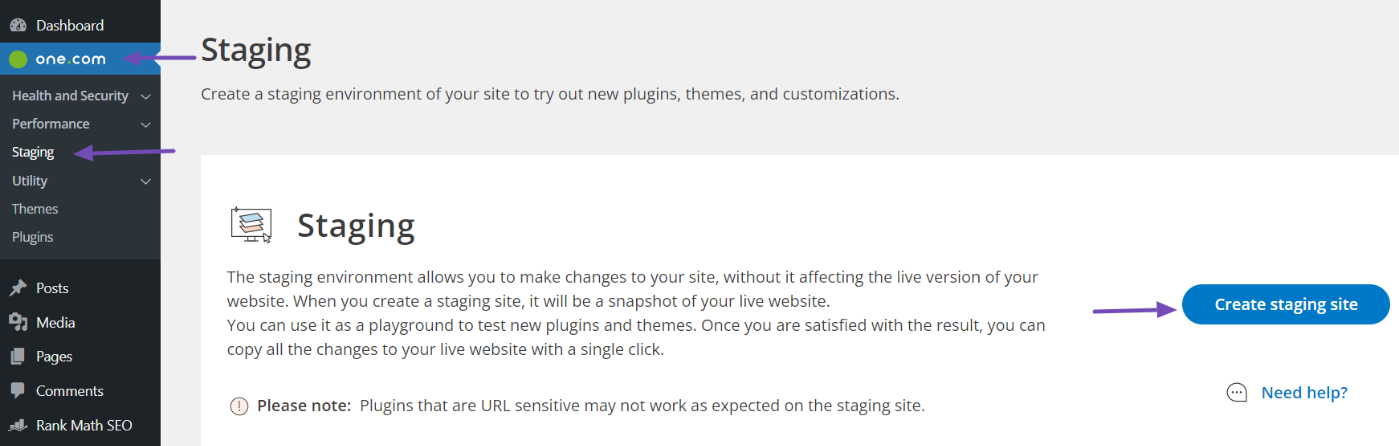
For instance, One.com users can easily set up a staging site with a single click within their WordPress dashboard.
To create a staging site in WordPress, start by navigating to your WordPress dashboard. From there, navigate to One.com → Staging. Click the Create staging site button and follow the on-screen instructions to complete the process. For a detailed guide, click here.
However, if you use a different host, consult their support documentation or contact them directly for guidance.
3.2 Creating a Staging Site Using a WordPress Plugin
The easiest way to create a staging site is by using a WordPress plugin. These plugins automate the entire process, making it ideal for users of all technical skill levels.
While several plugins can be used to create a staging site, let’s focus on the InstaWP Connect plugin.
This plugin lets you clone your website for free and even push changes from your staging site to your live site—a feature typically reserved for premium tools. However, keep in mind that free users are limited to three staging sites.
Install and activate the InstaWP Connect plugin on your WordPress website to get started.
Refer to our dedicated tutorial on how to install WordPress plugins.
Once the plugin is installed and activated, navigate to Tools → InstaWP. On your first visit, you’ll need to create an InstaWP account and connect your API to your website. This process happens automatically when you create your InstaWP account.
Click the Connect with InstaWP button, as shown below.
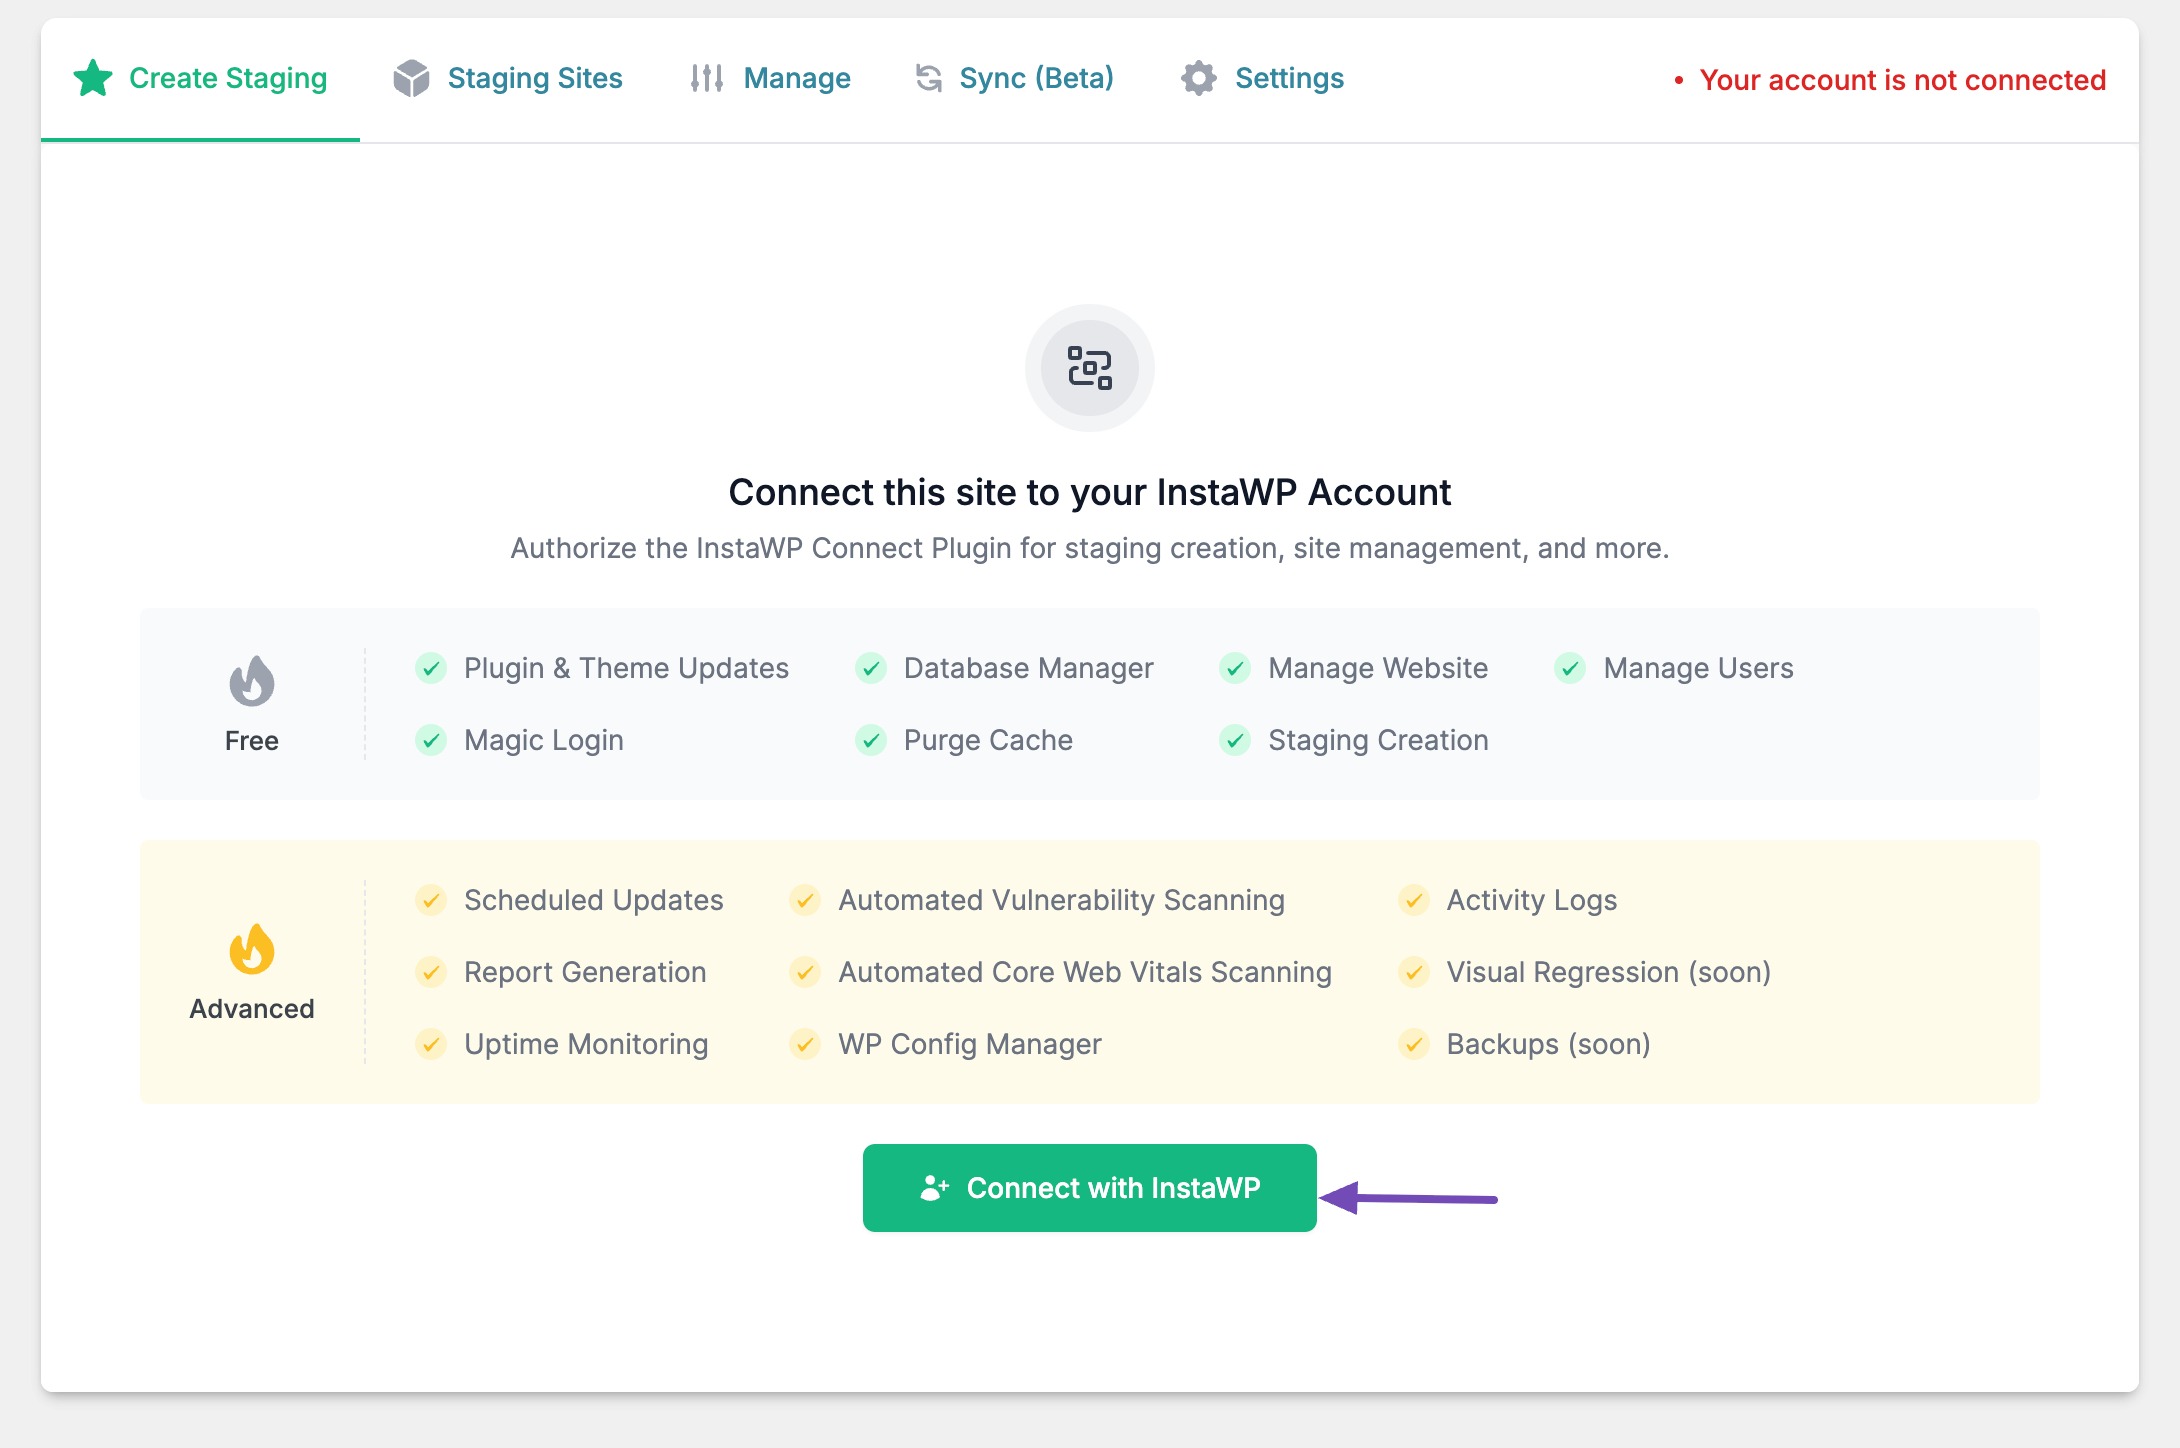
This will redirect you to the InstaWP website to create an account and approve the connection.
Once connected, it will redirect you back to your site. Then, click the Create Staging Site button to start setting up your staging environment.

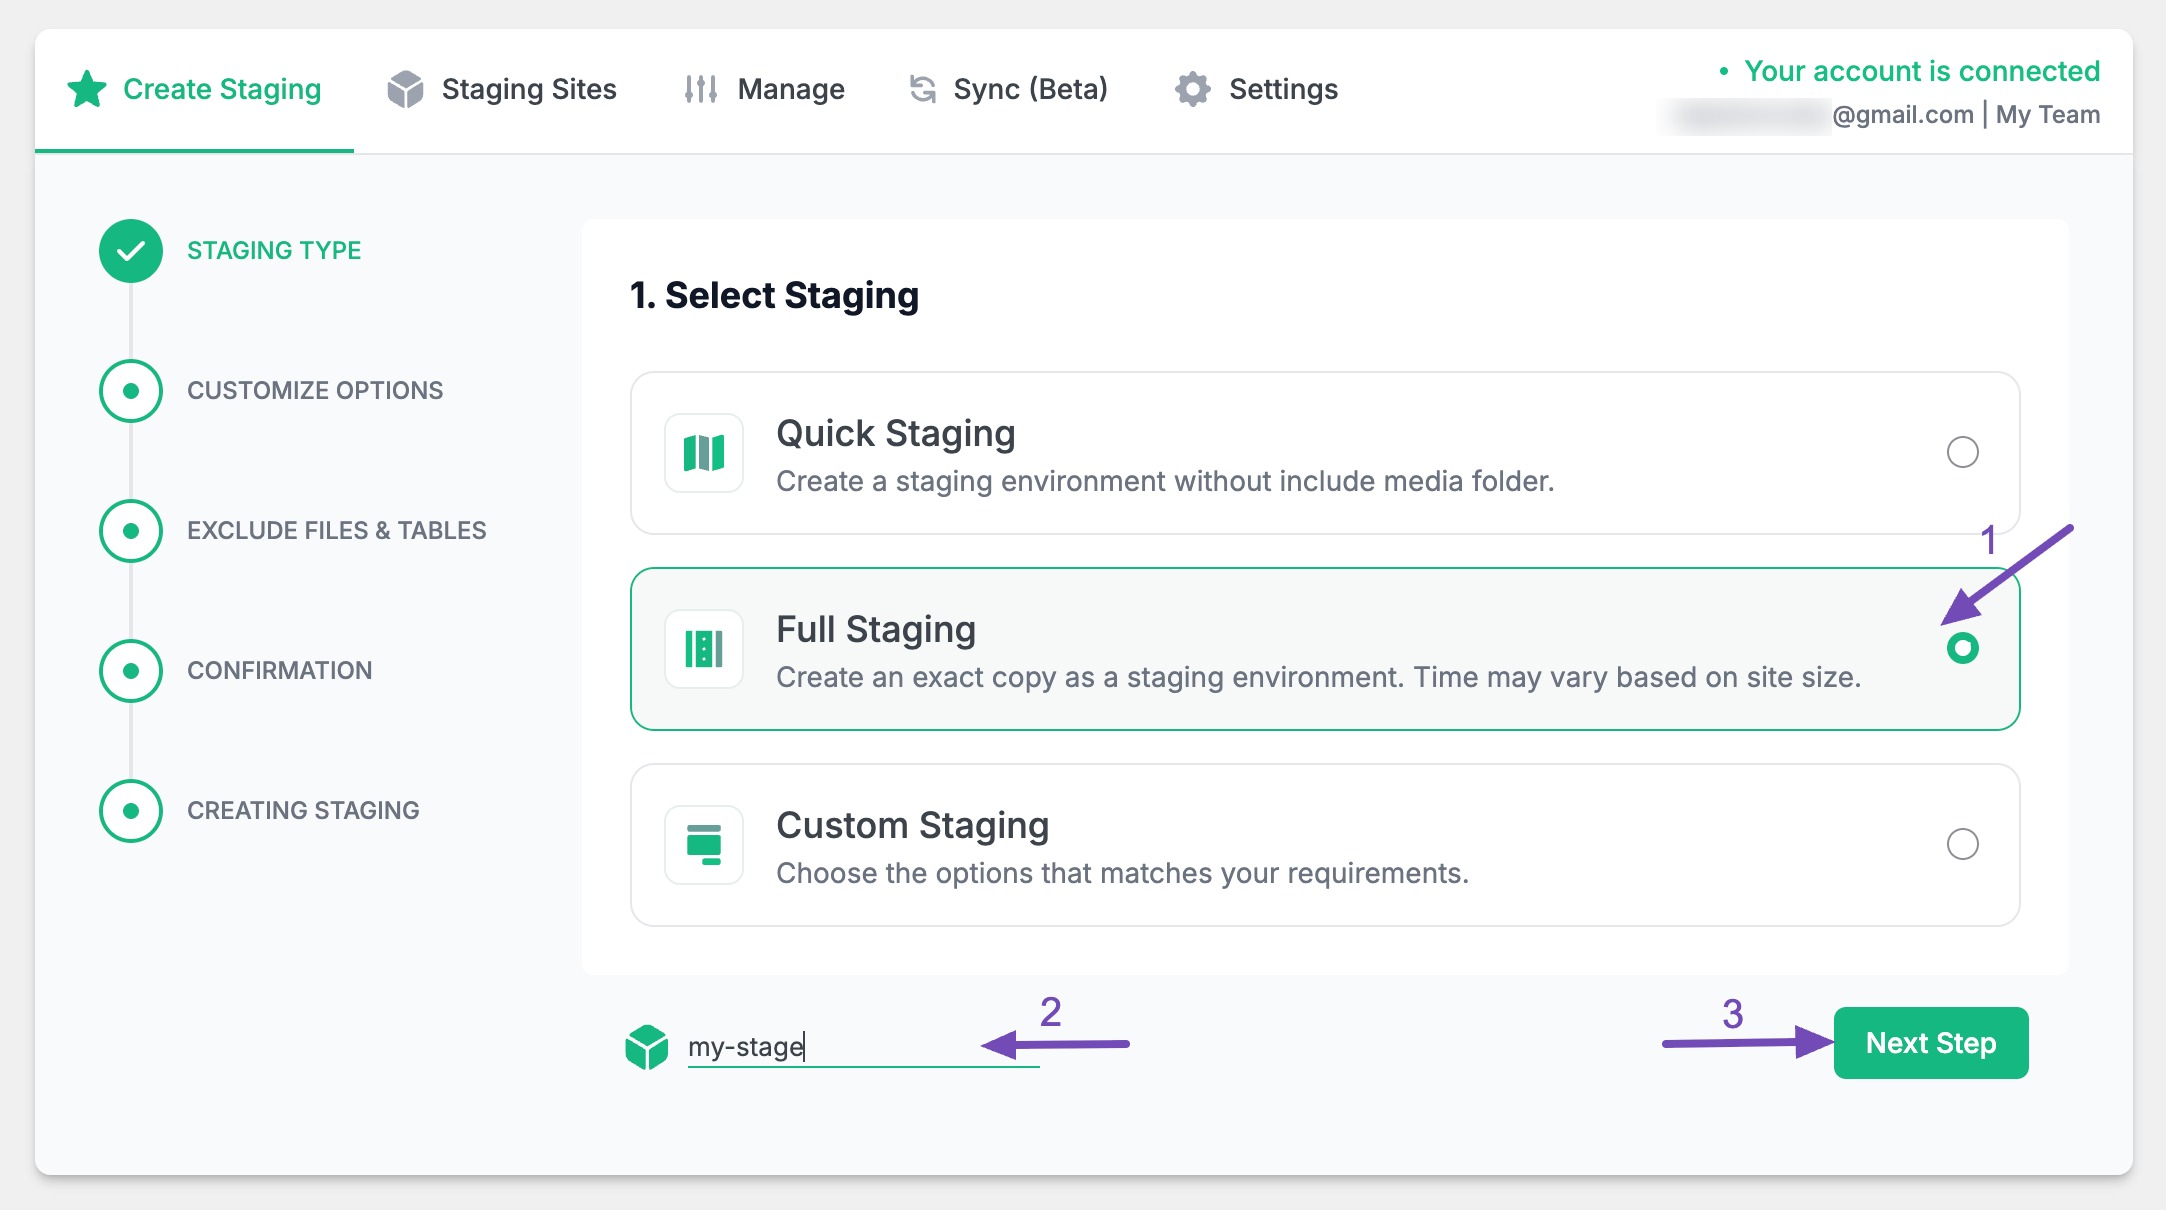
Next, choose the staging site conditions (we’ll use “Full Staging” for this guide) and optionally provide a name. Then, click the Next Step button, as shown below.
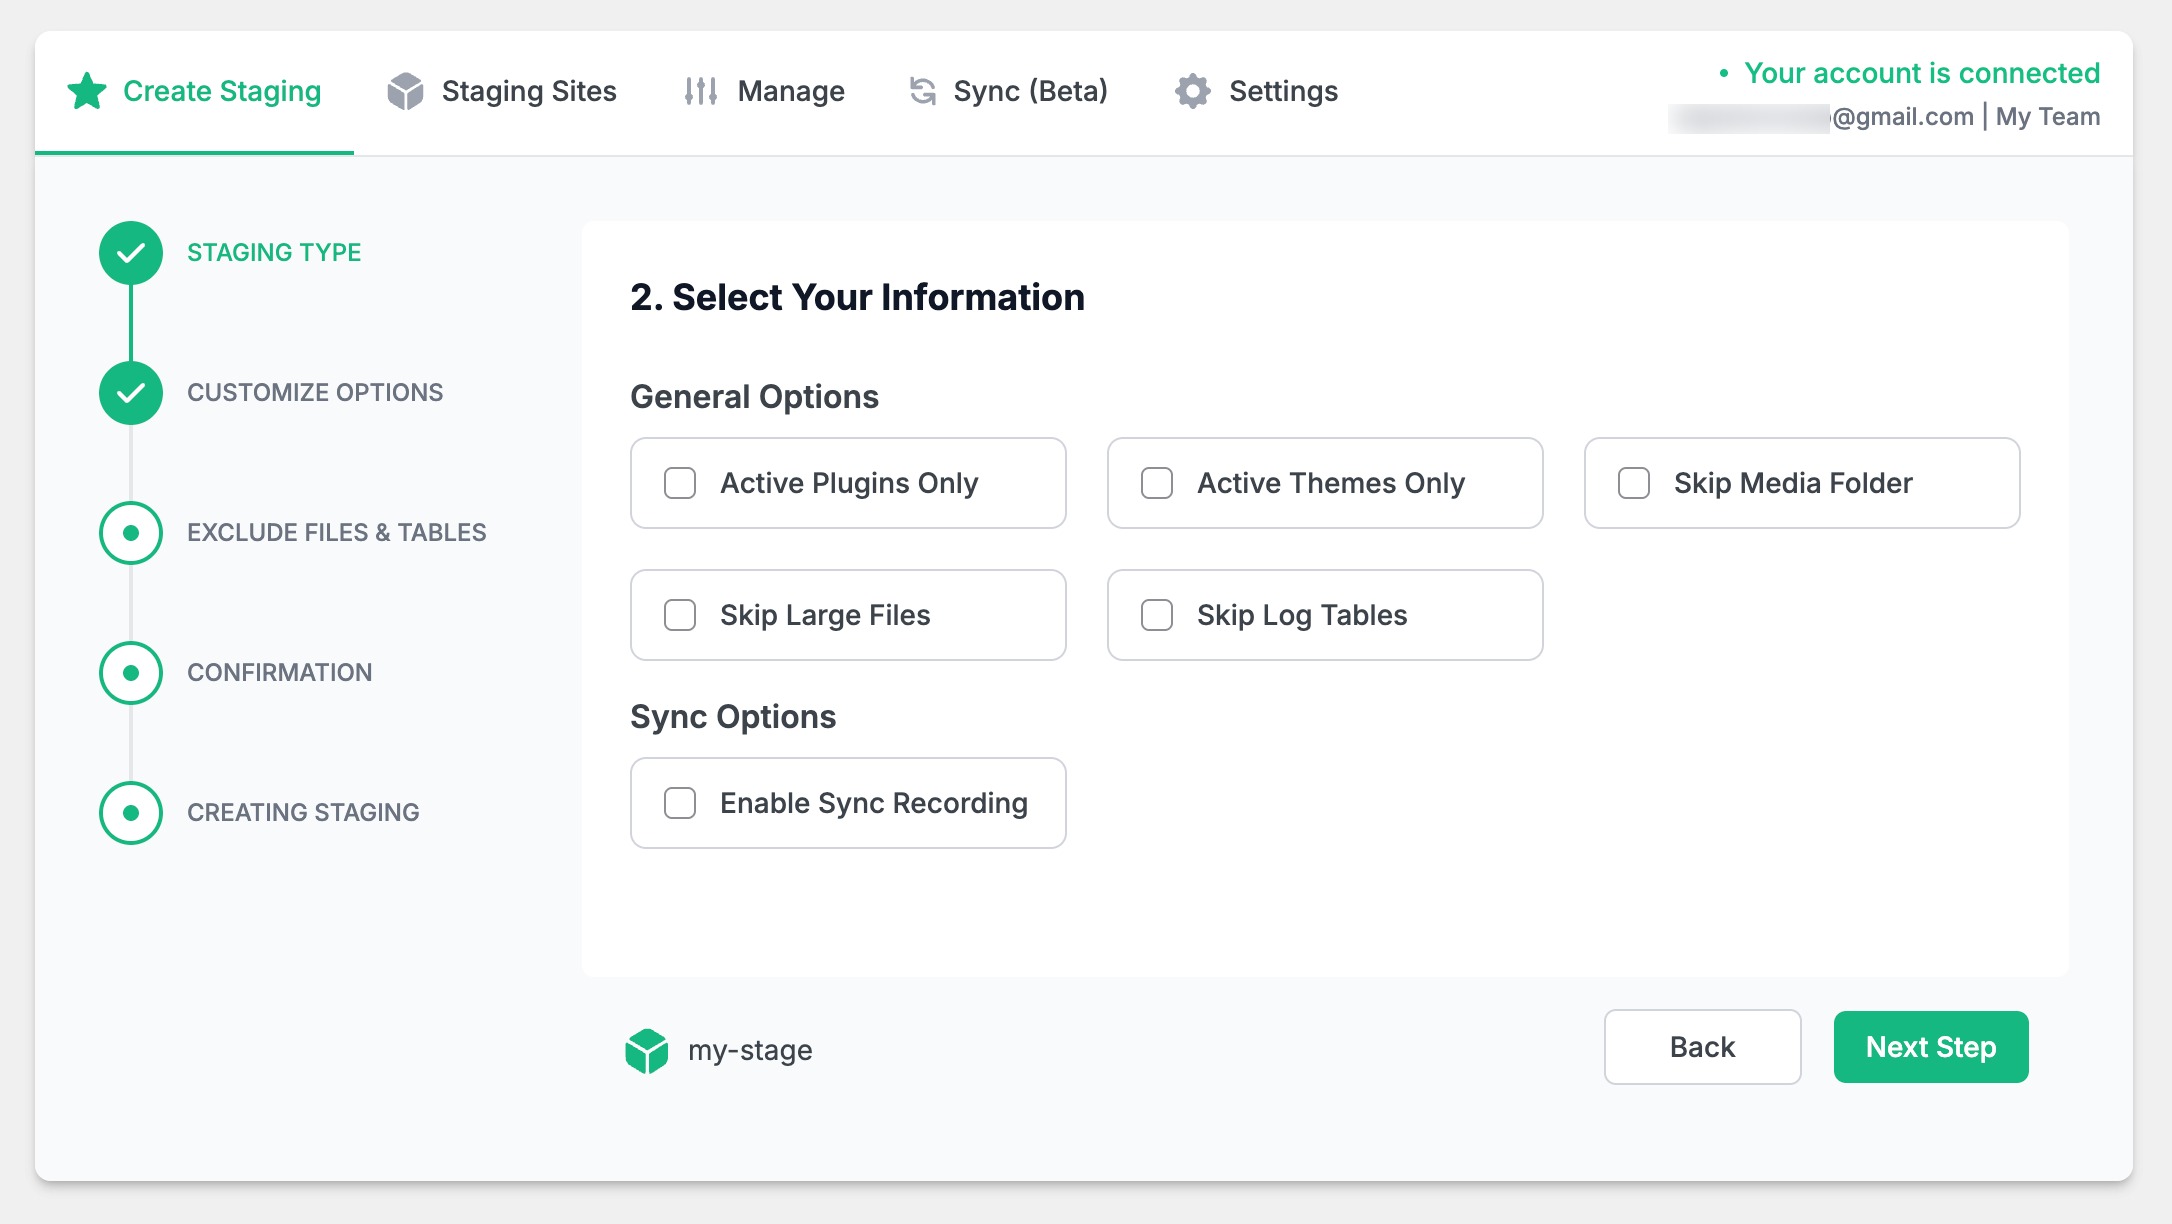
The plugin will present customization options, including active plugins, themes, and media folder inclusion. Select your preferences and click the Next Step button.
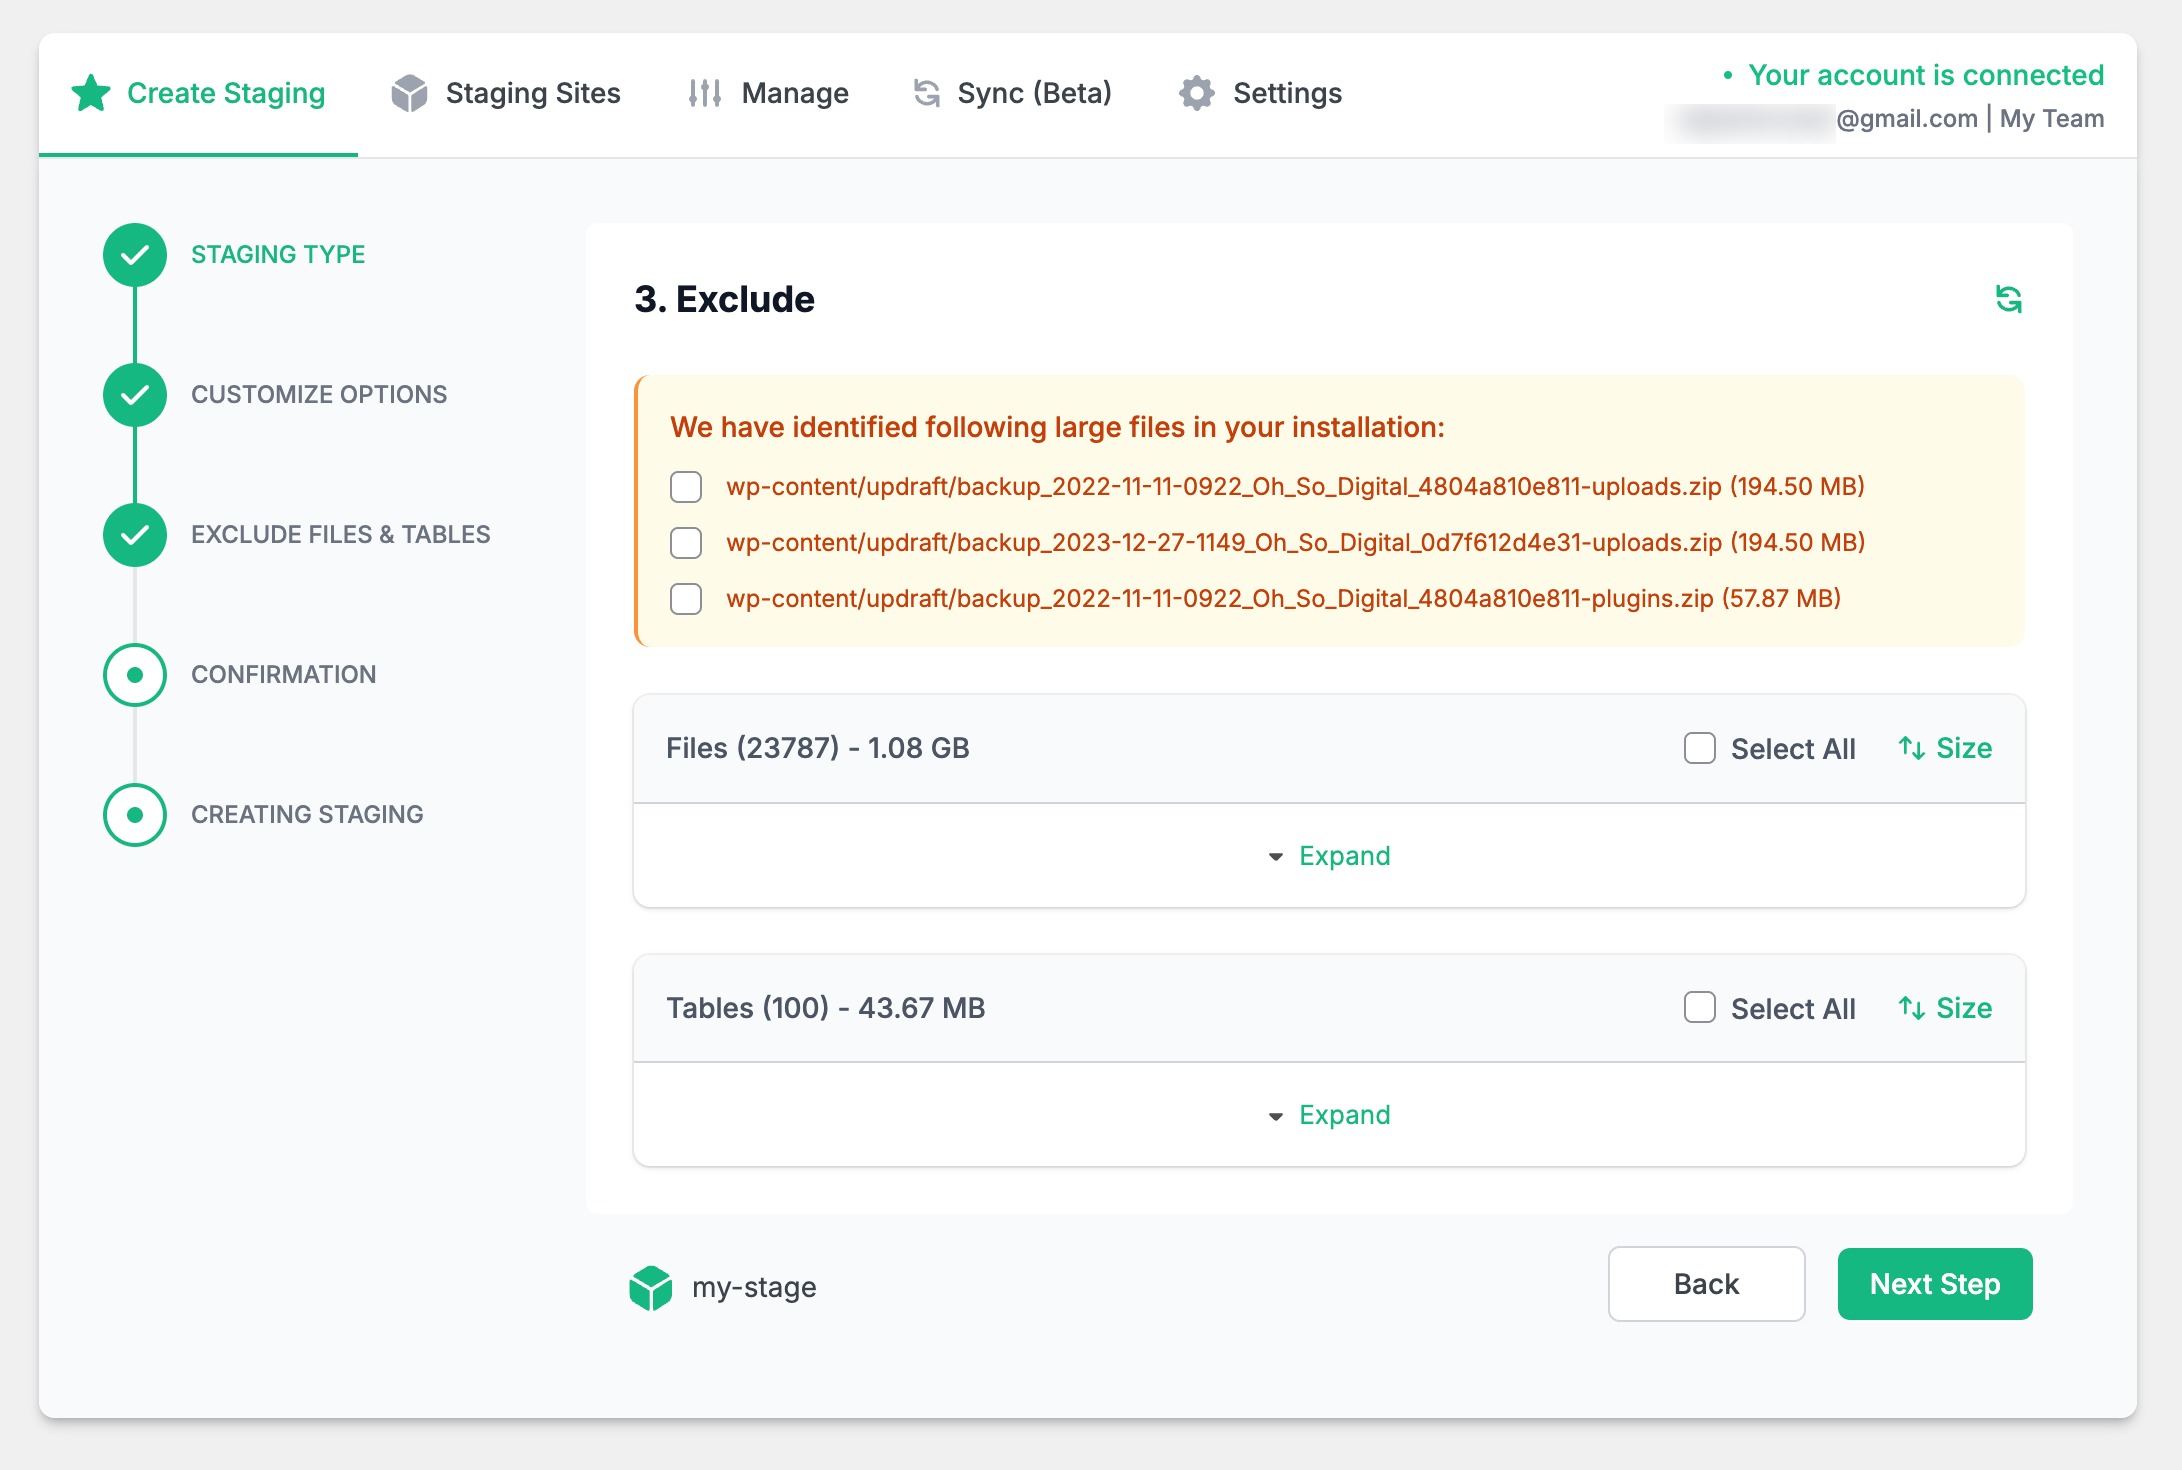
After that, an Exclude Files & Tables dialog will appear, allowing you to eliminate specific files or tables from your WordPress site. Expand the options and select the files and tables you want to exclude from the staging site or leave them as they are. Once done, click on the Next Step button.
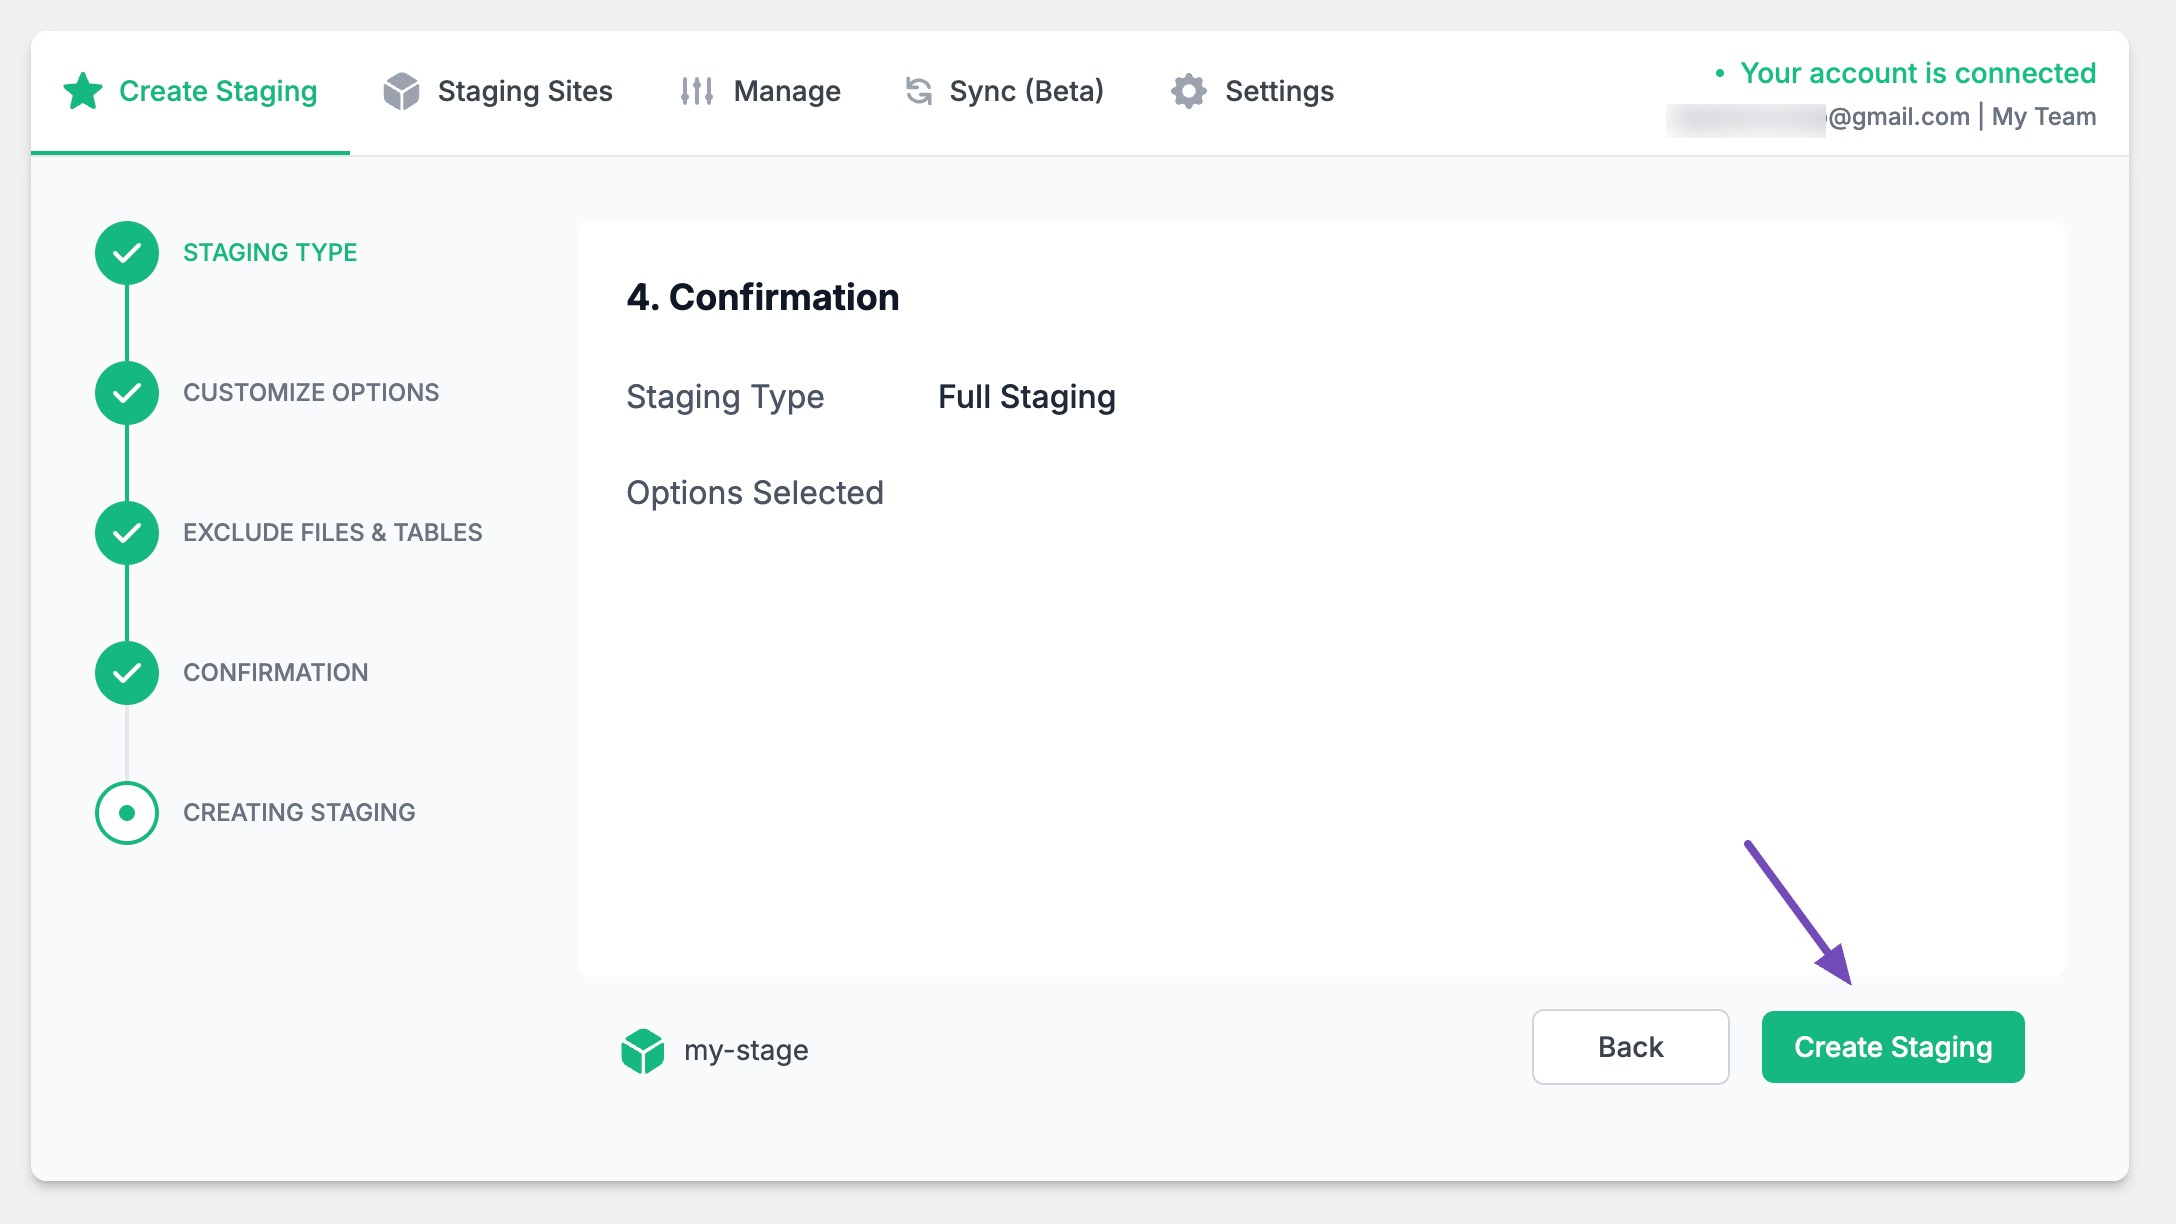
In the Confirmation section, click on the Create Staging button.
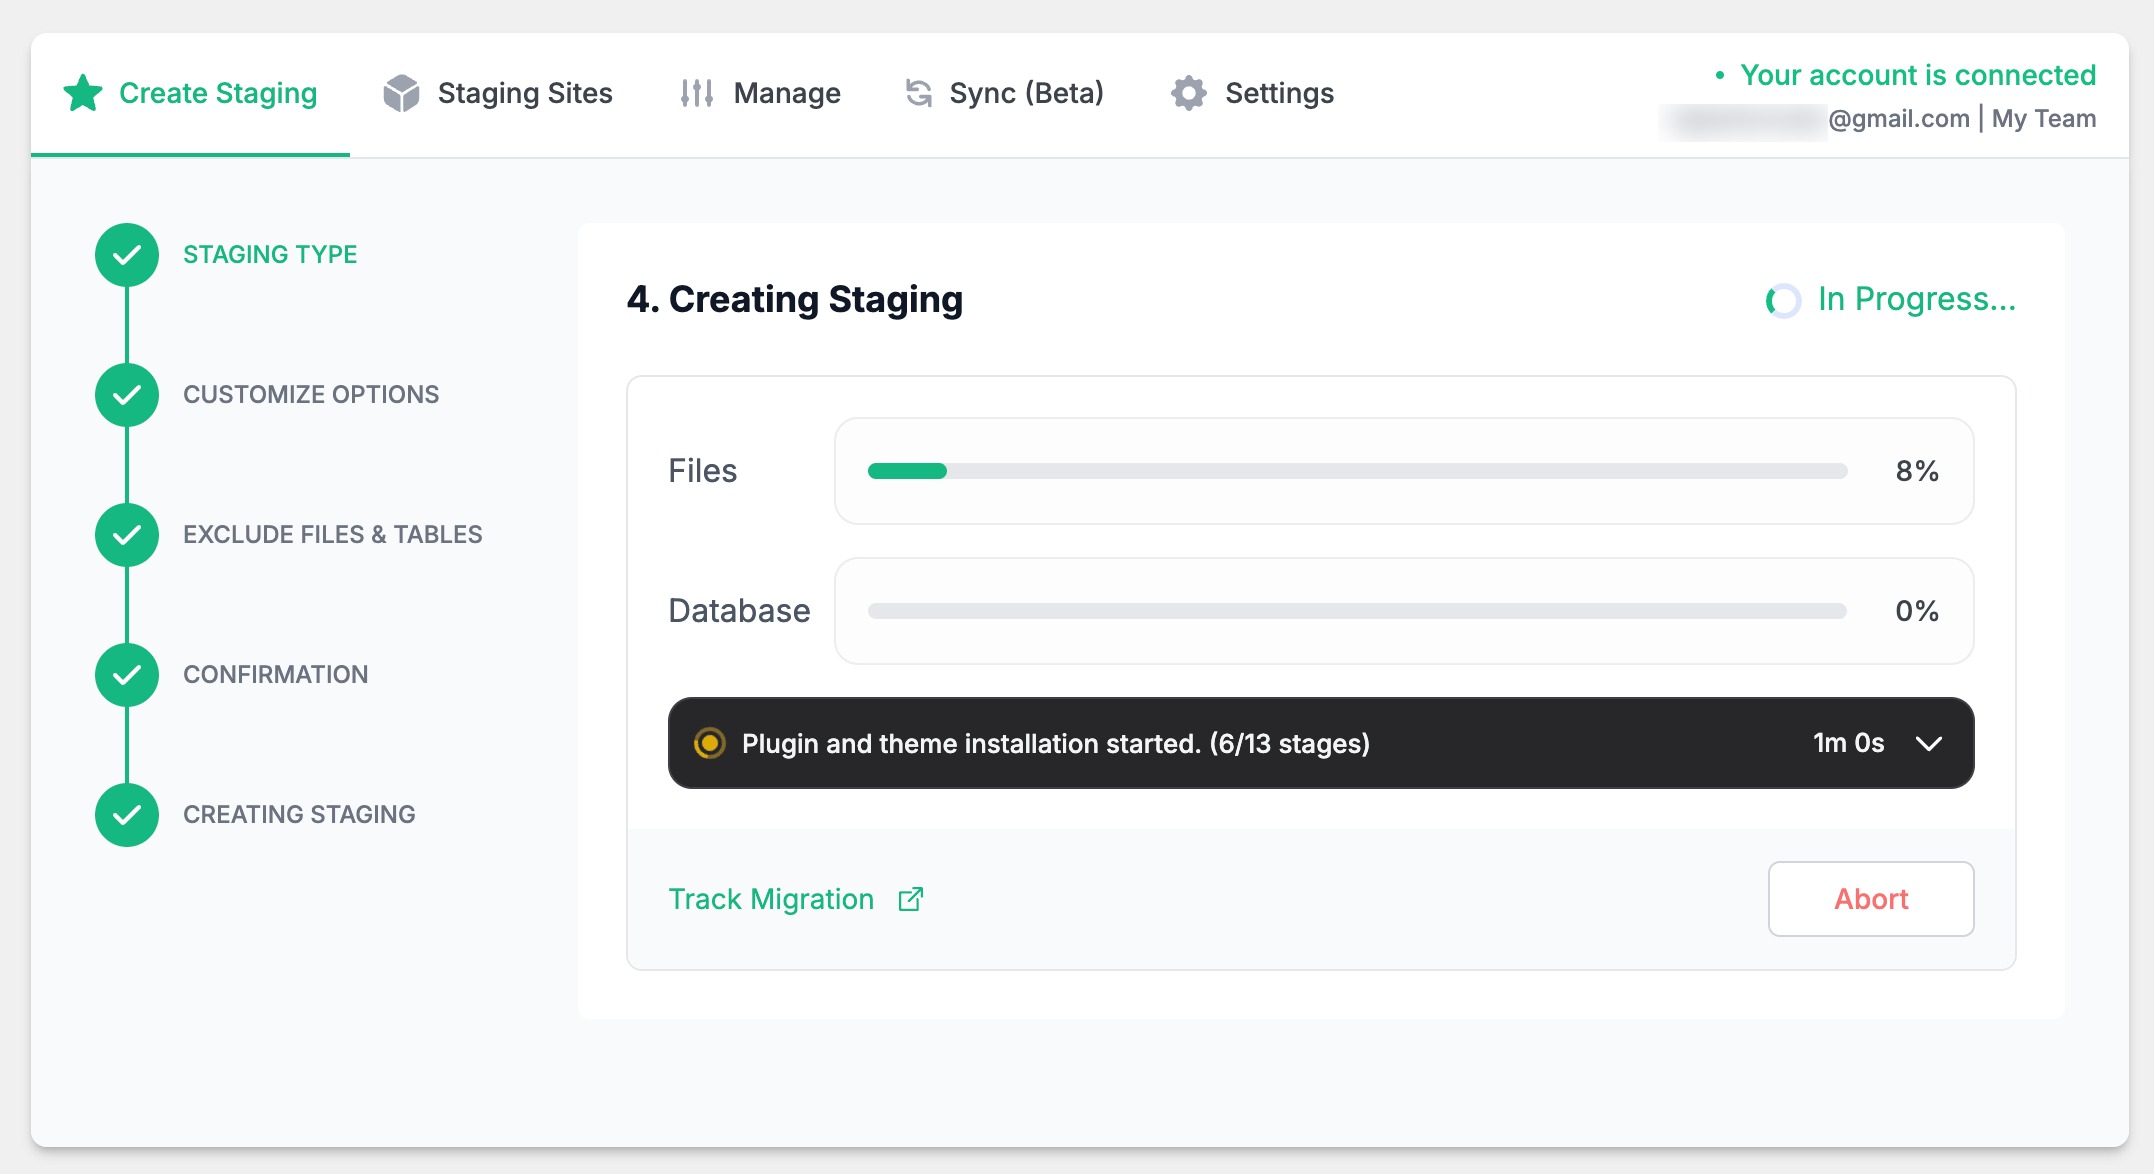
The plugin will create a staging site, which might take time, depending on your website’s size. So do not reload the page; keep the window open.
Once created, the plugin provides a link to the staging site and a Magic Login button to access the staging site’s WordPress dashboard. To log in, click on the Magic Login button.

After logging into the staging site, go to the InstaWP page and navigate to the Sync (Beta) tab. Enable the Start Listening for Changes option to track any modifications made.

You can optionally adjust settings in the Settings tab to fine-tune the plugin’s behavior. Remember to save your changes.
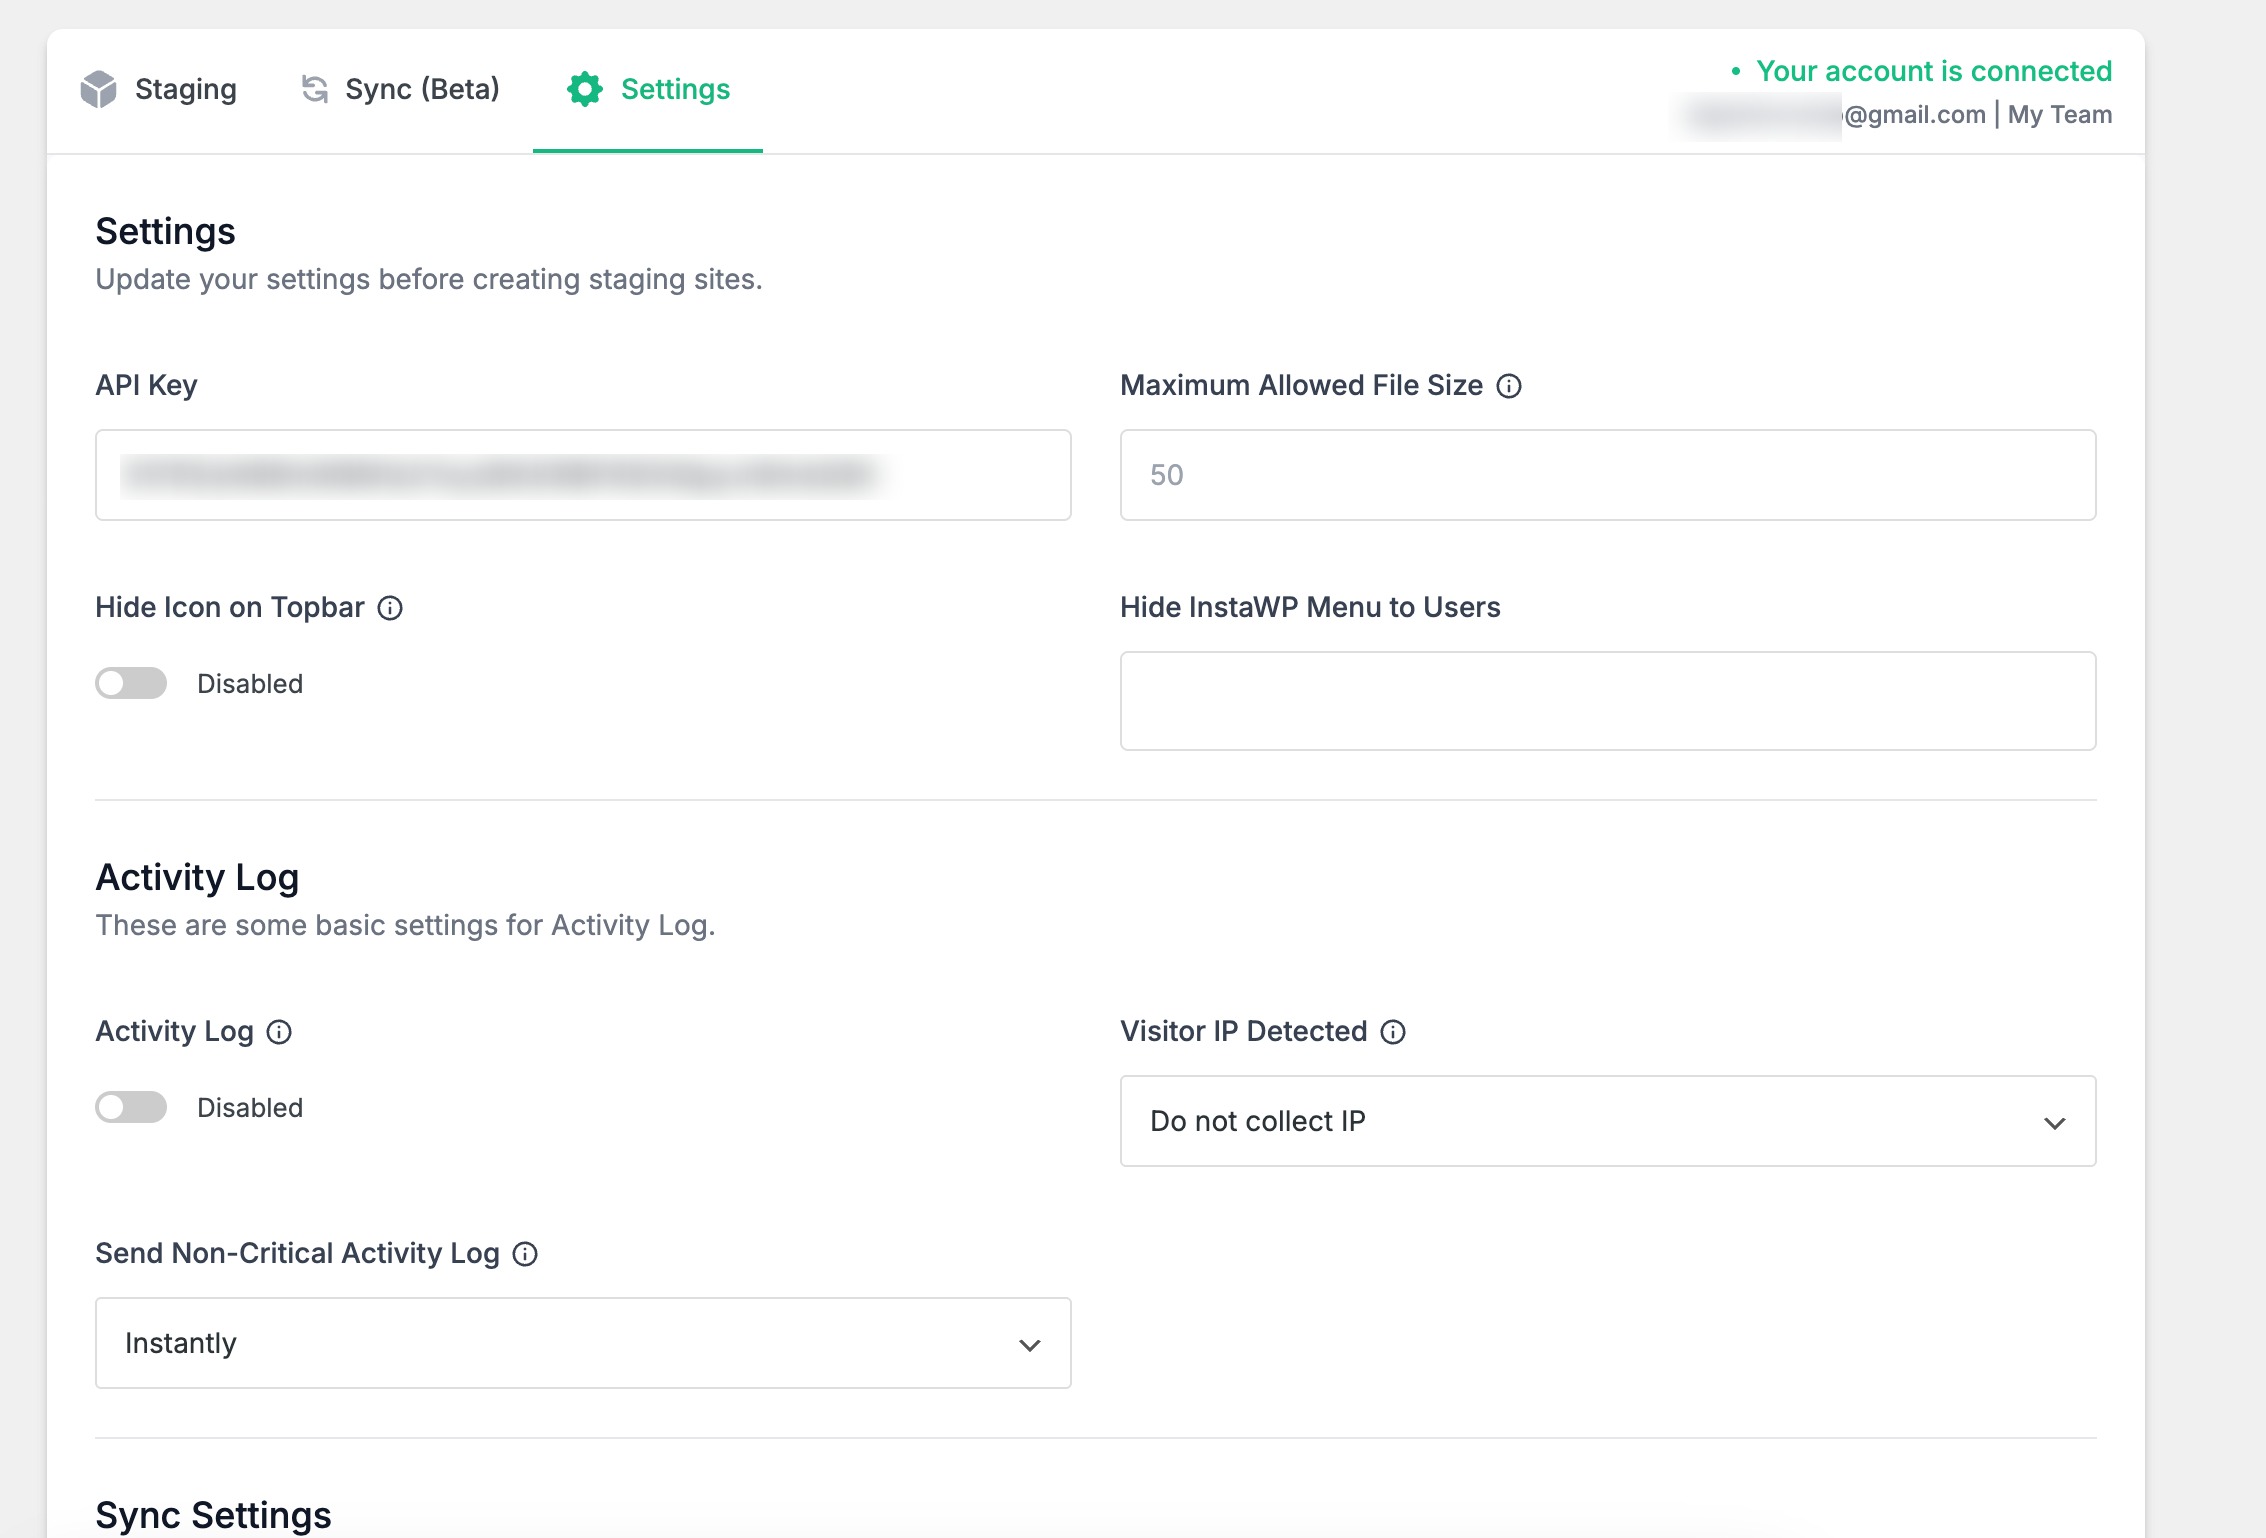
This setup allows the plugin to efficiently push changes from the staging site to your live site when needed.
3.3 Creating a Staging Site Using Softaculous
Softaculous, a popular app installer tool found within cPanel, offers an efficient method to create a staging site for your WordPress installation. This option is available if you initially installed your live WordPress using Softaculous.
Note: Your cPanel login details are usually in the welcome email from your hosting provider. If you can’t find the email, contact your host’s support team for help.
Log in to your cPanel and locate the Softaculous Auto Installer icon. Your cPanel interface may vary slightly.
On the Scripts page, navigate to the top and select the WordPress Manager icon, as shown below. This option is often visible on your cPanel alongside other software options.
On the WordPress Manager page, find the domain associated with your live WordPress site and click the drop-down arrow.
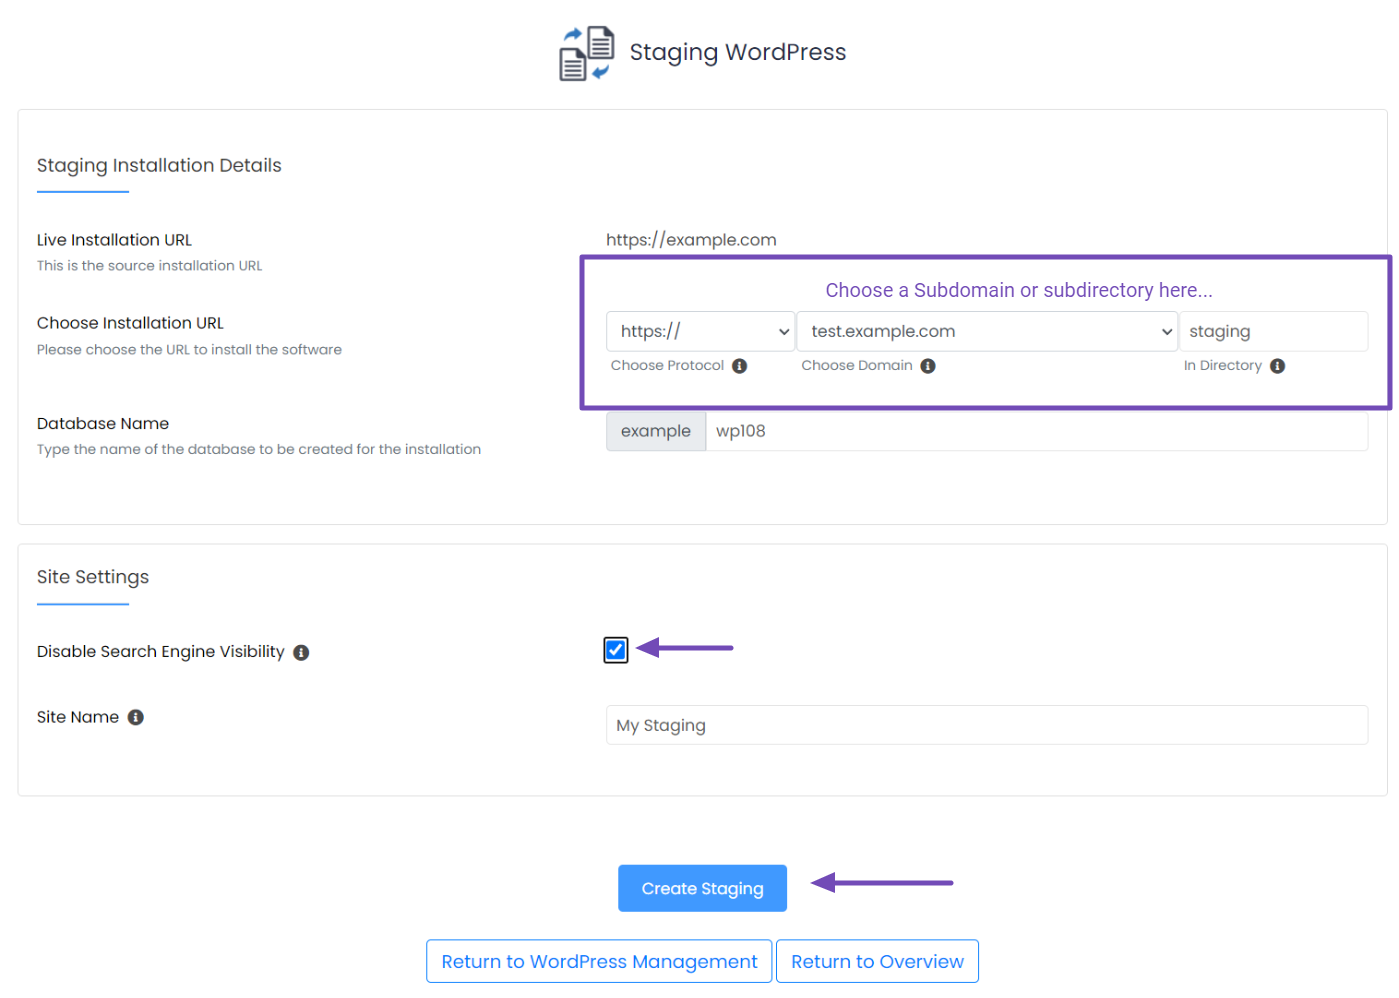
Next, scroll down to the bottom of the options list, where you’ll find Staging. Click on this option to initiate the staging creation process, as shown below.
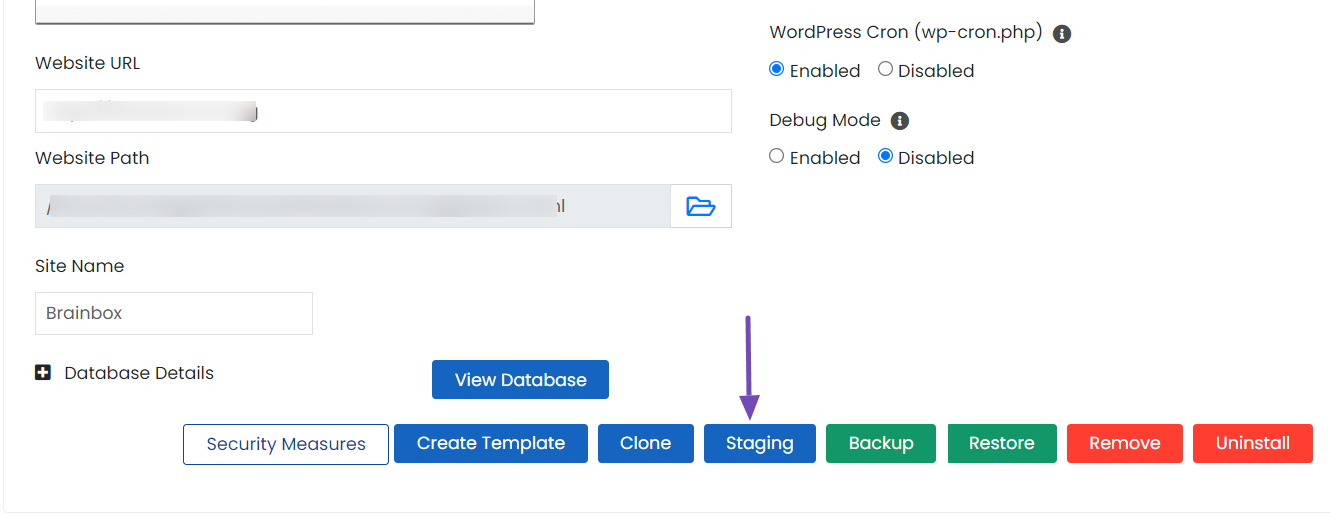
During this process, you can define several details:
- Choose Installation URL: Select the domain or subdirectory where your staging site will be accessible. You can choose an existing subdomain or create a new one within cPanel.
- In Directory: If you prefer not to use a subdomain (which is recommended), enter a directory name within your main domain (e.g., “staging”).
- Database Name: Softaculous may suggest a unique database name for the staging site.
- Disable Search Engine Visibility: Check this box to prevent search engines from indexing your staging site.
- Site Name: Leave this blank to keep the same site name for the staging site, or change it if desired.
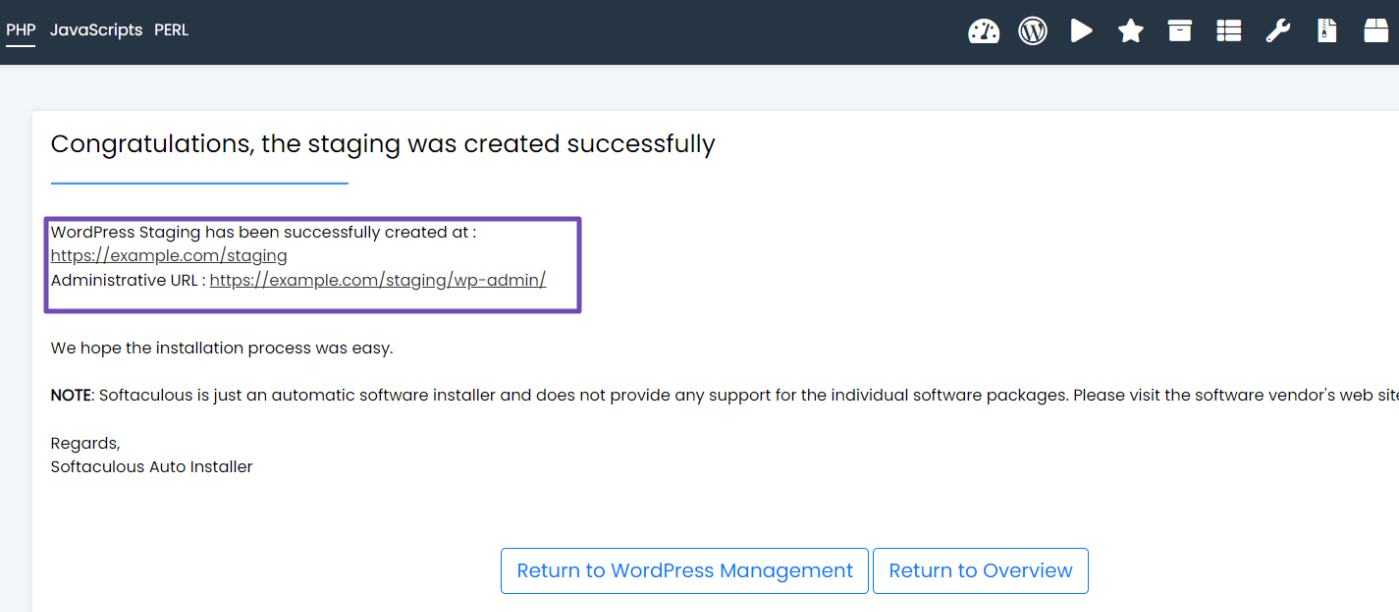
After configuring these details, click the Create Staging button. Softaculous will then begin to create a staging site.
Upon successful creation, Softaculous will display a message with details about your new staging site, including its URL and admin panel login information (the same as your live site). You can then access the staging site to test your changes safely.
3.4 Creating a Staging Site for WordPress Manually
Creating a staging site manually offers several benefits. It gives you full control over the setup, configuration, and environment, without being limited by hosting restrictions or plugin capabilities. This method can also be a valuable learning experience, helping you understand how your website works behind the scenes.
However, the manual approach does come with some challenges. It requires a good level of technical knowledge, including working with databases, file transfers, and WordPress installations. It’s also more time-consuming and leaves more room for mistakes, especially if you’re unfamiliar with the process.
If you’re comfortable with these tasks and want complete control, creating a staging site manually might be a good fit. But if you prefer a more straightforward and safer option, using a plugin or your host’s built-in tools is often the better choice.
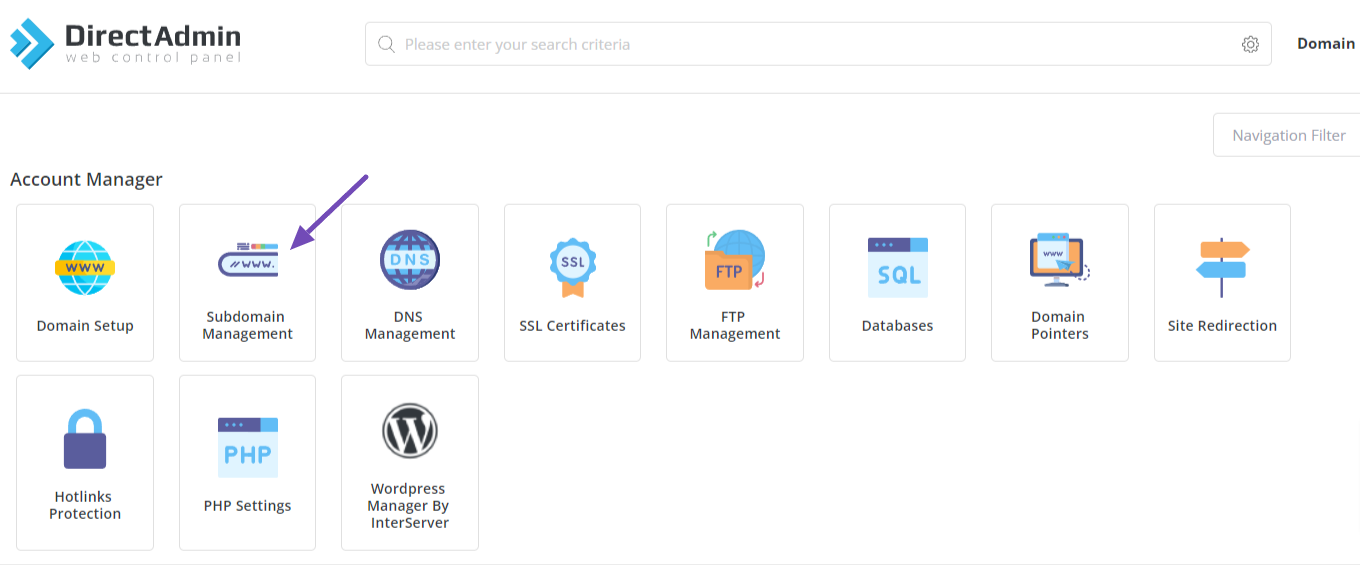
Set Up a Subdomain
First, log in to your cPanel and click on the Subdomains option.
Next, enter a name for your staging site (e.g., staging) and ensure it points to the same document root as your main website. After that, click the ADD SUBDOMAIN button.
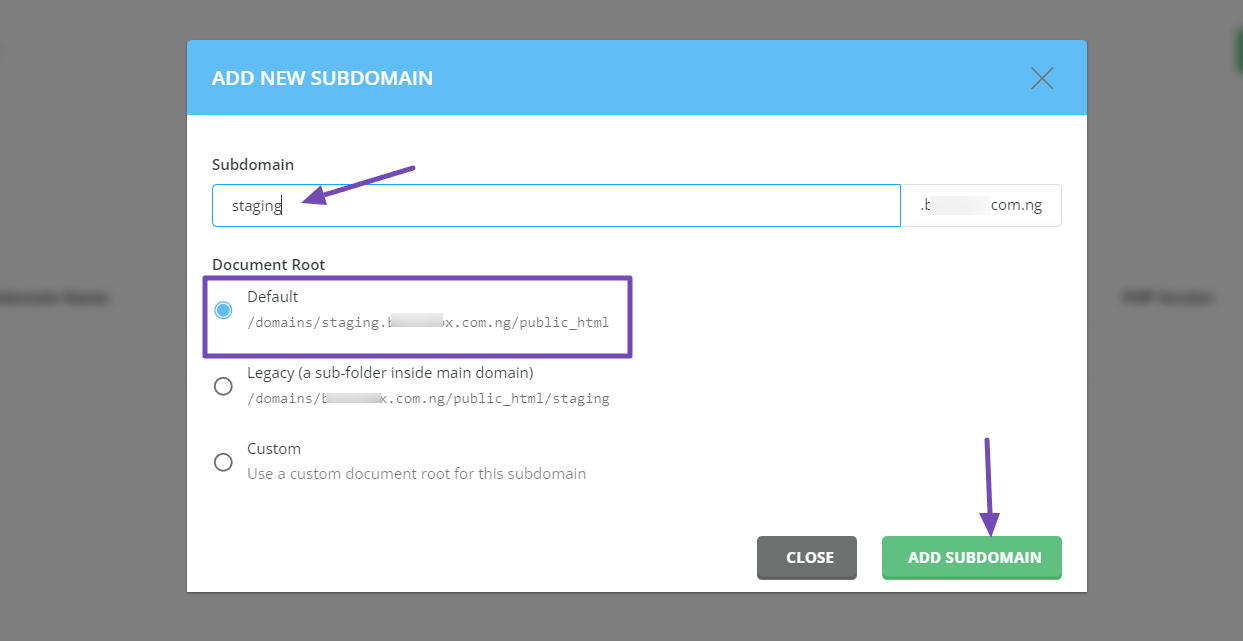
Once you create the subdomain, your hosting provider will set up a new directory on your server. Then, install the SSL certificate for this subdomain to ensure its security.
Copy Your Site Files
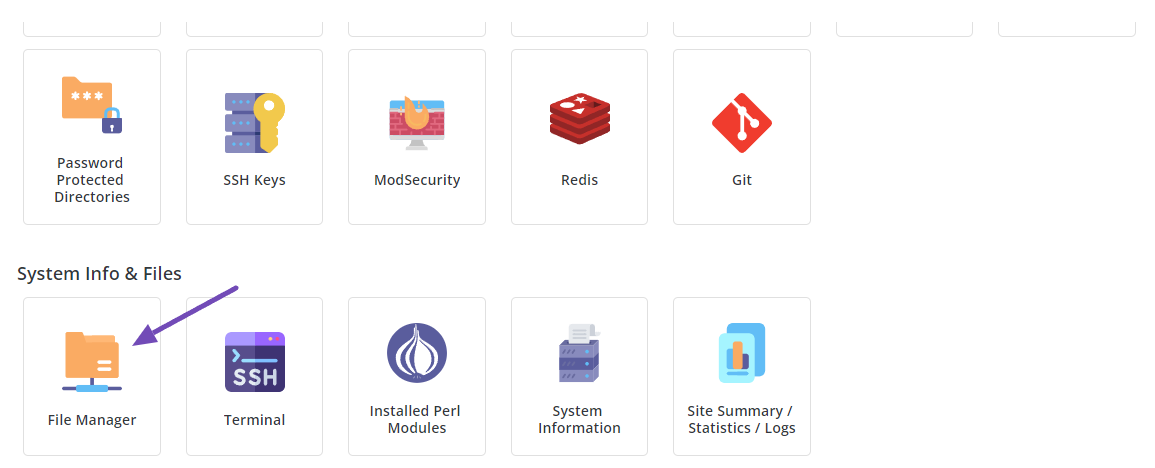
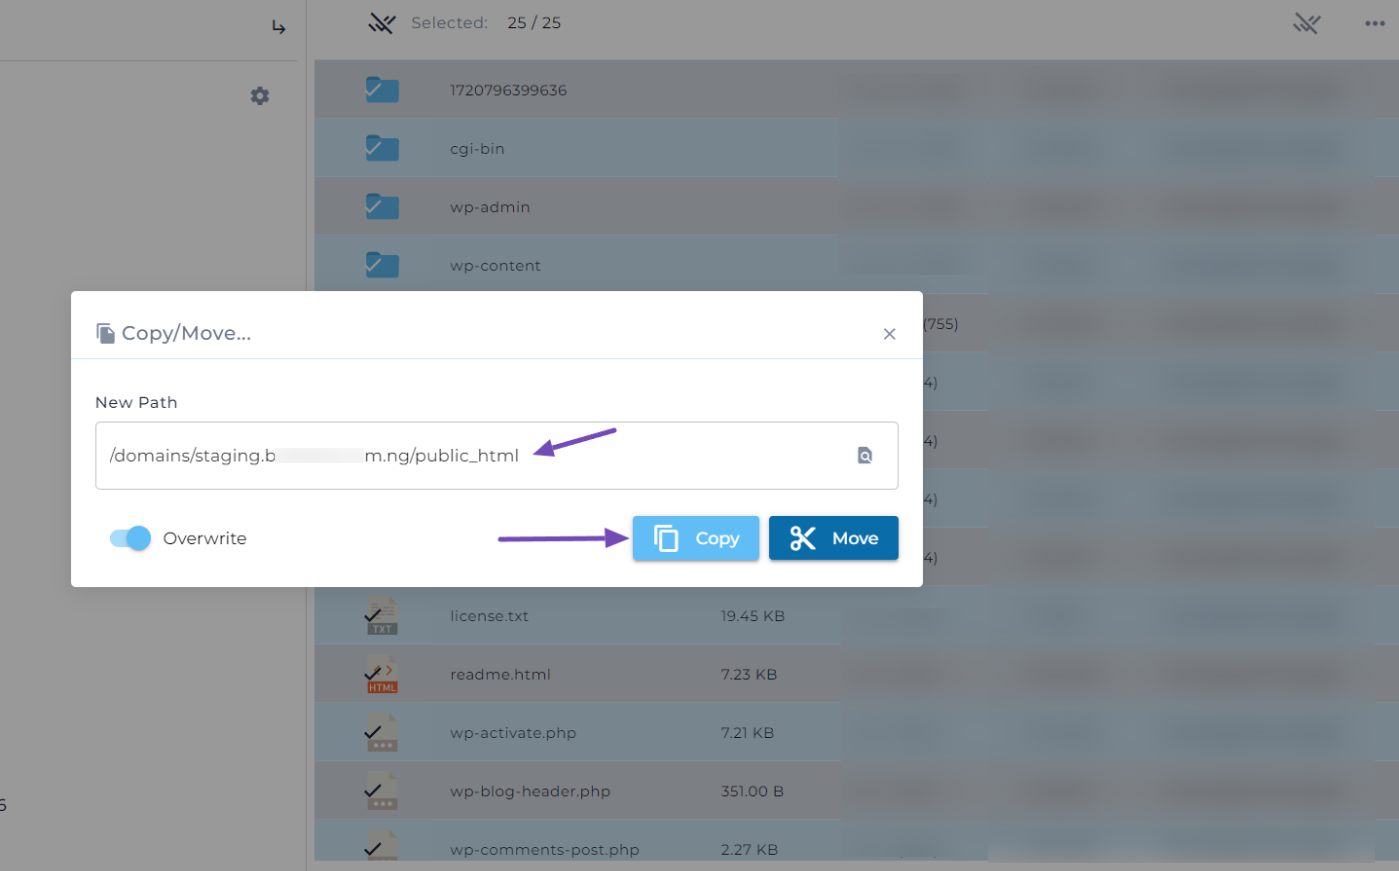
Next, copy the files from your live WordPress site to the new subdomain directory. You can use an FTP client like FileZilla or your hosting provider’s File Manager.
If you’re using an FTP client, connect to your server with your FTP credentials. Alternatively, you can access the File Manager from your cPanel by clicking on the File Manager option.
Navigate to the directory where you installed your live WordPress site, typically public_html or a similar folder.
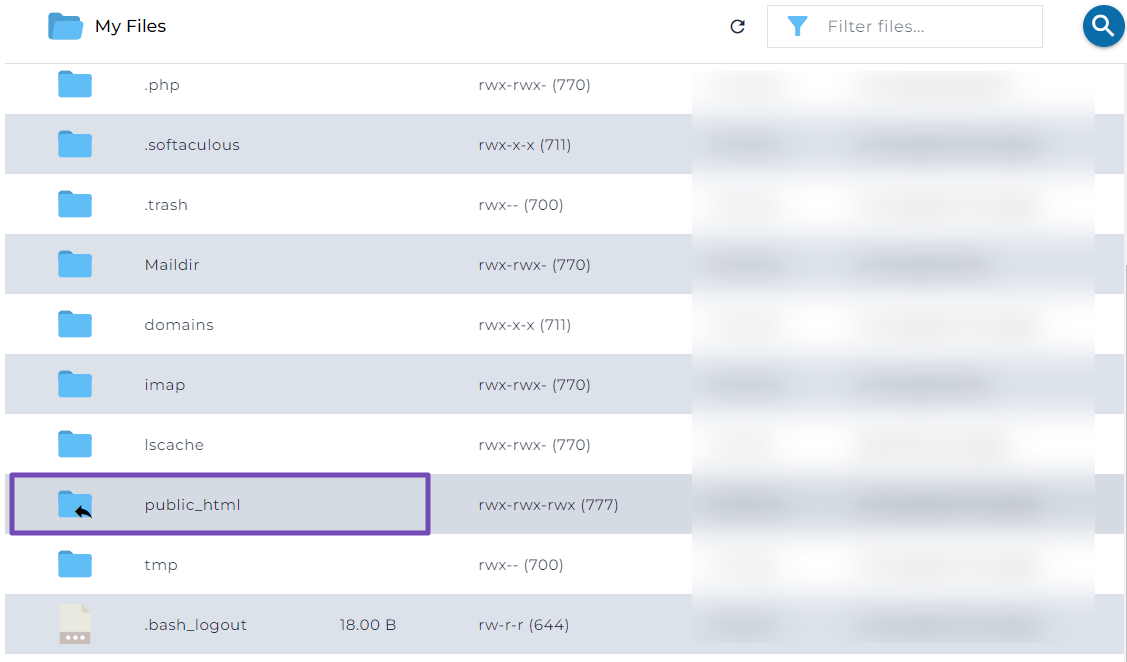
Select all the files and folders, including wp-content, wp-admin, wp-includes, and all other files. Copy them to the directory you created for your subdomain, such as staging.maindomain.com/public_html.
Duplicate Your Database
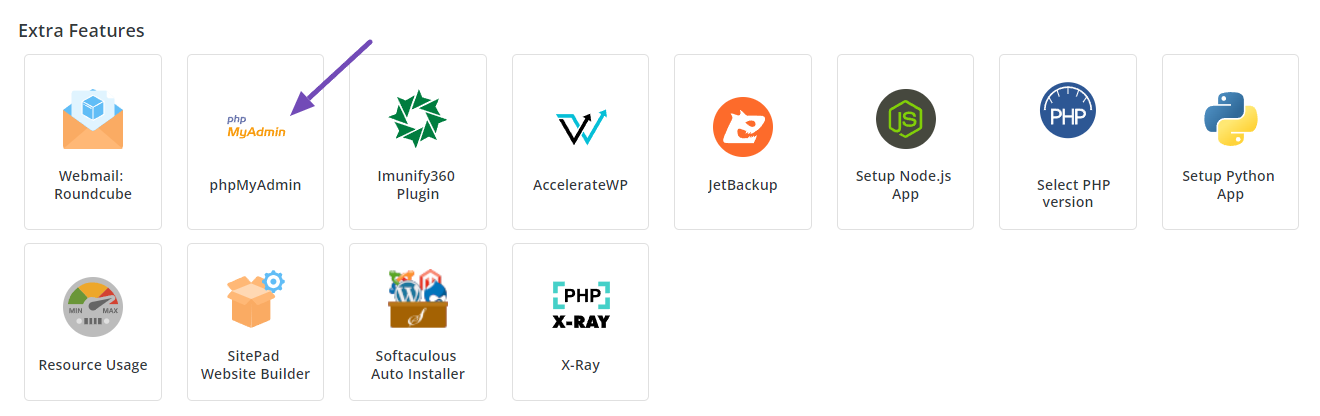
After copying the files, duplicate your WordPress database to ensure your staging site has the same content as your live site. Navigate to the phpMyAdmin option from your cPanel.
Next, select the database used by your live WordPress site and click on the Export tab. Choose the Quick export method and select the SQL format. Then, click the Export button to download a copy of your database, as shown below.

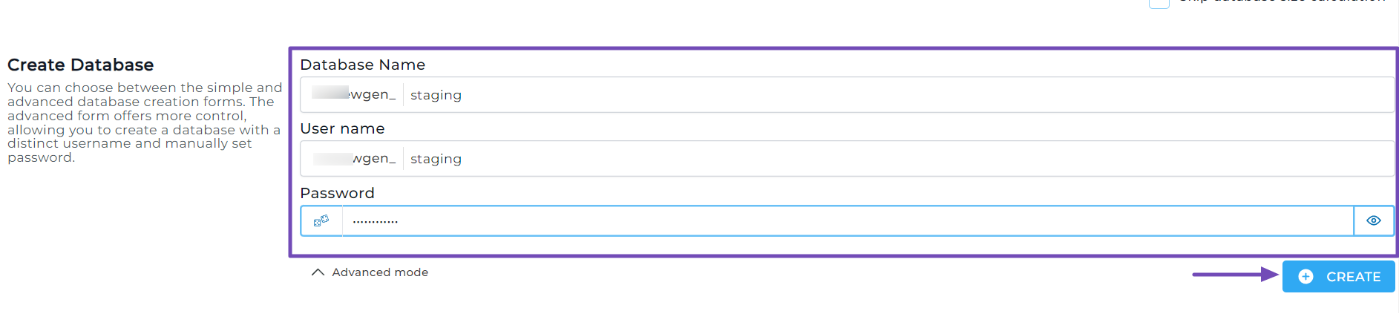
Next, create a new database for your staging site by navigating to the MySQL Databases option on your cPanel.

On the Databases page, enter the name of your staging site database, create the new username, and enter the password. Once done, click the CREATE button. Then, you can copy these details to a safe place.
Now, return to the phpMyAdmin page and select your new database. Navigate to the Import tab, click the Choose File field, and select the SQL file you exported earlier from your computer.
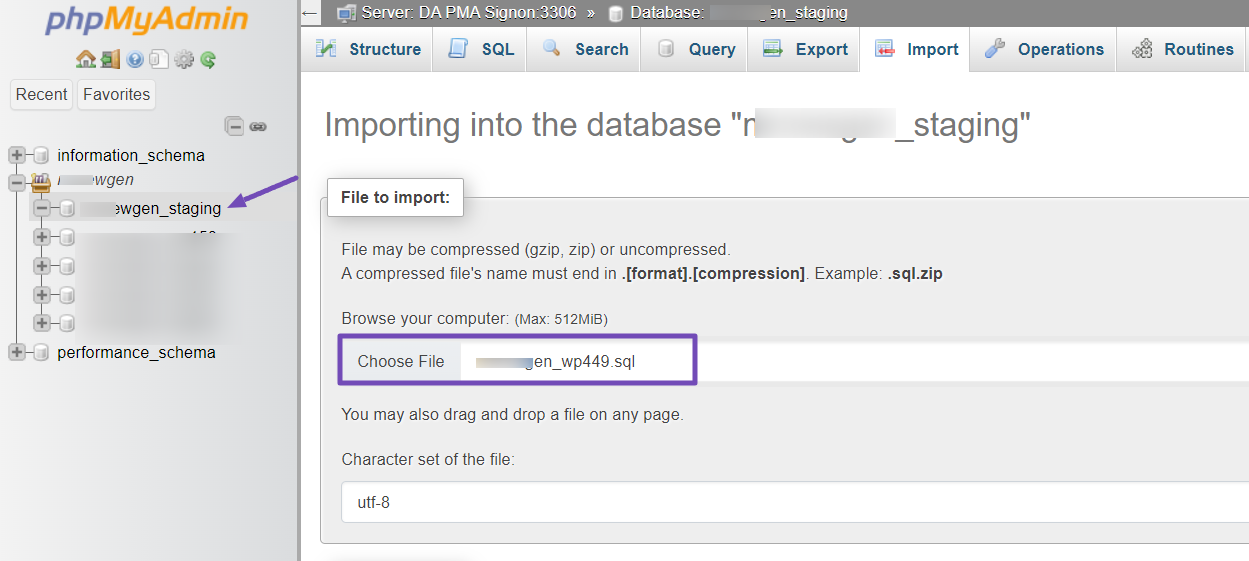
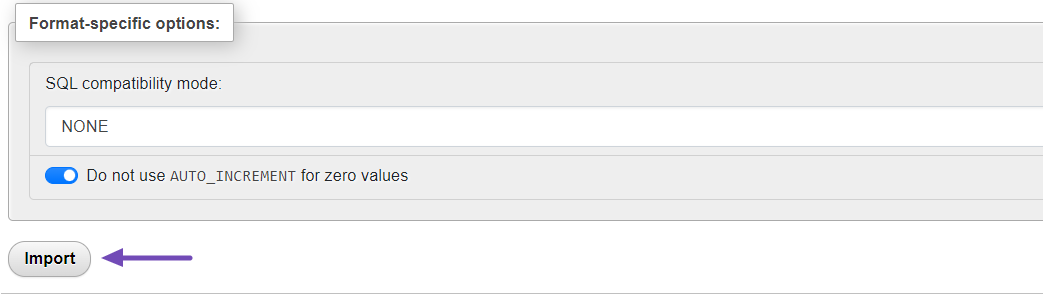
Then, scroll down and click the Import button to import the data into your new database.
Configure wp-config.php
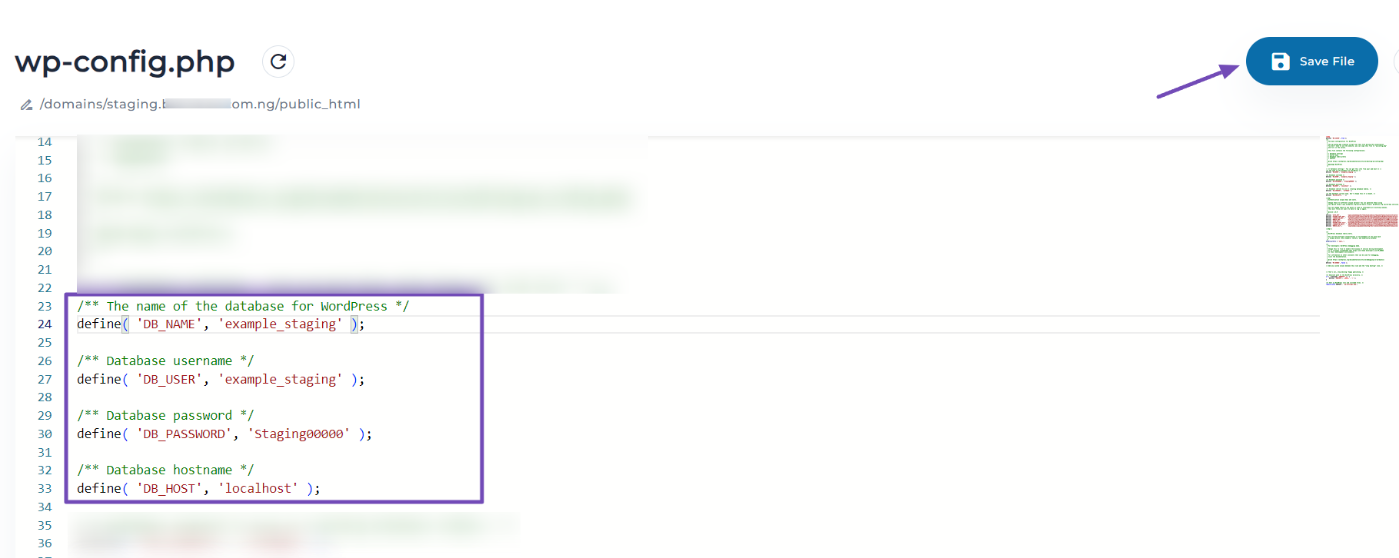
Now, configure the wp-config.php file of your staging site to connect to the new database. Open the wp-config.php file in the directory of your staging site using a text editor or the File Manager in your hosting control panel.
Locate the following lines:
define('DB_NAME', 'your_database_name');
define('DB_USER', 'your_database_username');
define('DB_PASSWORD', 'your_database_password');
define('DB_HOST', 'localhost');
Now, replace `your_database_name` with the name of your new database, `your_database_username` with the name of your database user, and `your_database_password` with the user’s password, as shown below. Note that this will be the new staging site database details you created earlier.
Then, save the changes and close the file.
Update the Site URL
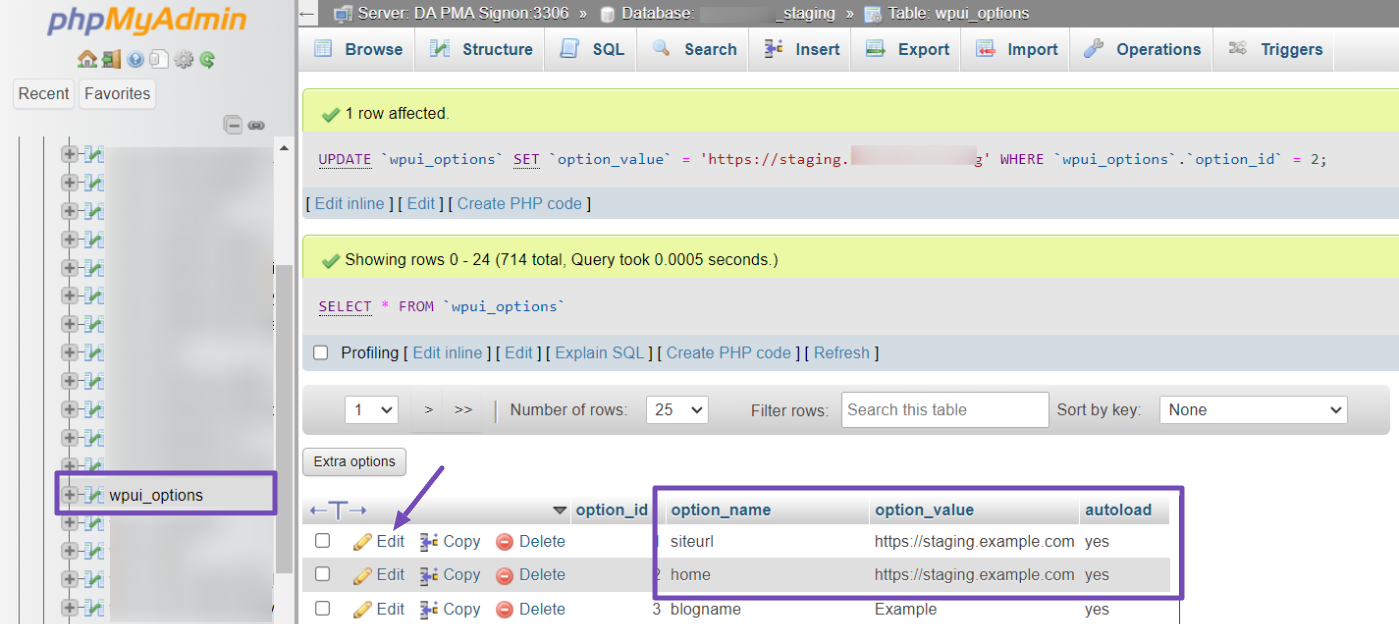
To ensure your staging site operates independently, update the site URL settings in the database.
In phpMyAdmin, select the new database and open the wp_options table. Next, update the `siteurl` and `home` values to reflect your staging site’s URL by clicking the Edit option in the rows.
Test Your Staging Site
Finally, test your staging site by navigating to the subdomain you created. You should see a clone of your live WordPress site. Log in to the WordPress admin dashboard using your usual credentials.
At this point, you can test updates, plugins, themes, and any other changes in this isolated environment without affecting your live site. Once you are satisfied with the changes, you can confidently push them to your live site if desired.
4 Pushing Changes from Staging Site to Live Site
Once you’ve thoroughly tested your website on the staging environment and are satisfied with the results, it’s time to transfer these changes to your live site.
The process varies depending on how you created your staging site.
Remember: Regardless of your method, always test your live site thoroughly after pushing changes. If you encounter any issues, revert to your backup immediately.
4.1 Using Your Hosting Provider
Suppose you used your hosting provider’s built-in tools. In that case, the process will likely involve using their specific interface or following their instructions to push changes from the staging to the live environment.
Your hosting provider’s support documentation should provide detailed steps.
4.2 Using a WordPress Plugin
If you created your staging site using the InstaWP Connect WordPress Plugin, follow the below steps.
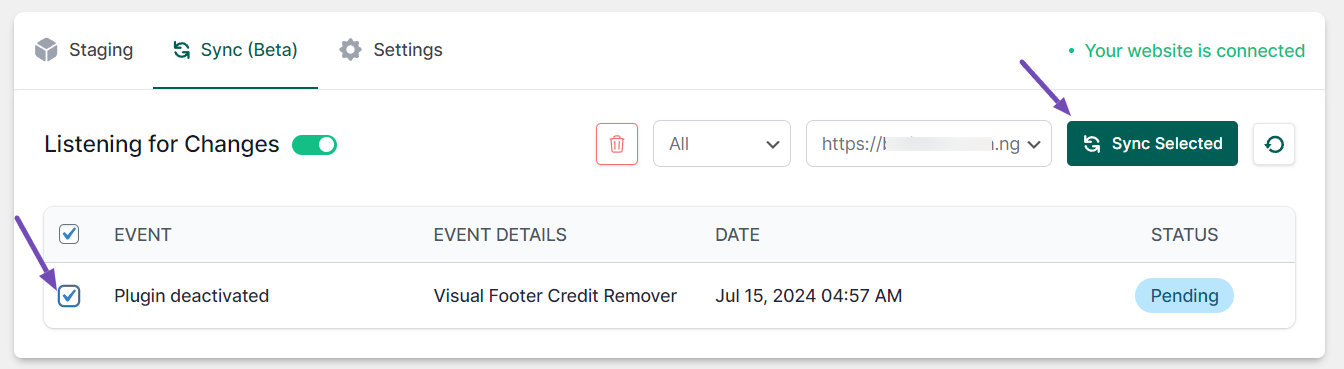
Access your staging site’s WordPress admin dashboard. Navigate to Tools → InstaWP → Sync (Beta).
You will see the changes you’ve made on the staging site. To push the changes to your live site, click the Sync All button or select the specific changes you want to move and click the Sync Selected button.
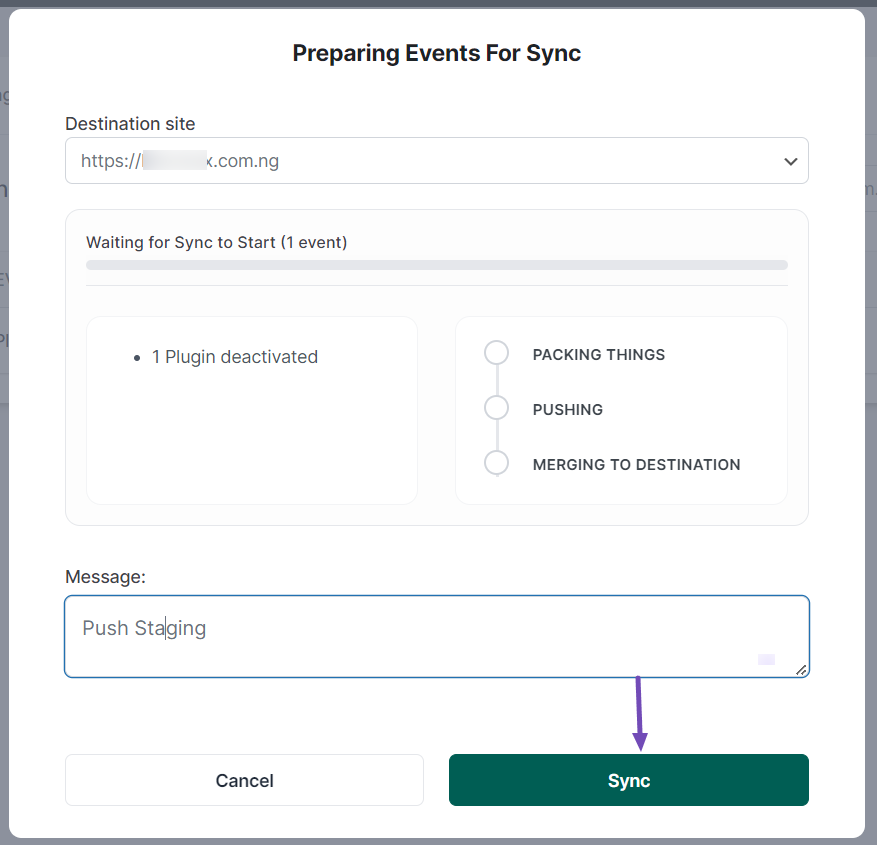
A confirmation window will pop up. Enter a message if you’d like, and click on the Sync button.
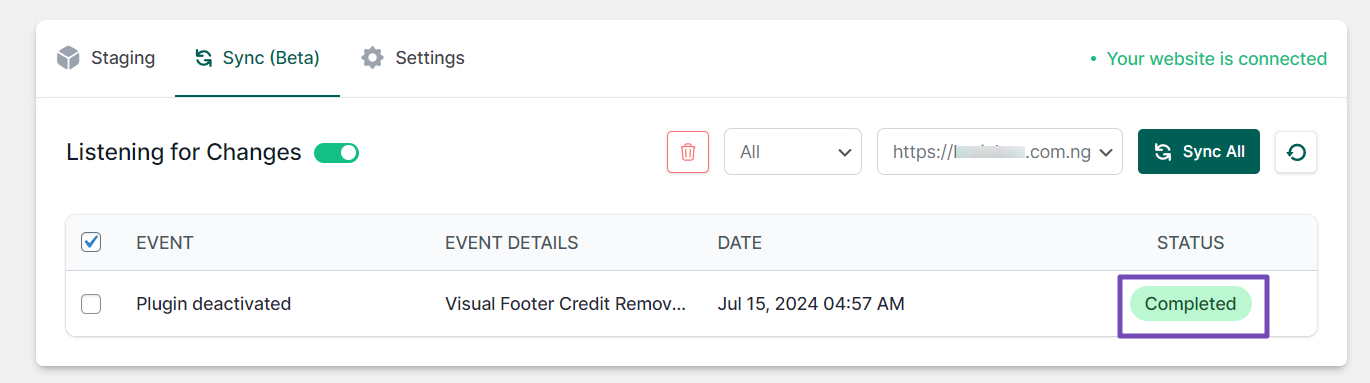
Once you’ve done that, the change status will turn to Completed. You can then return to your live site to find these pushed changes.
4.3 Using Softaculous
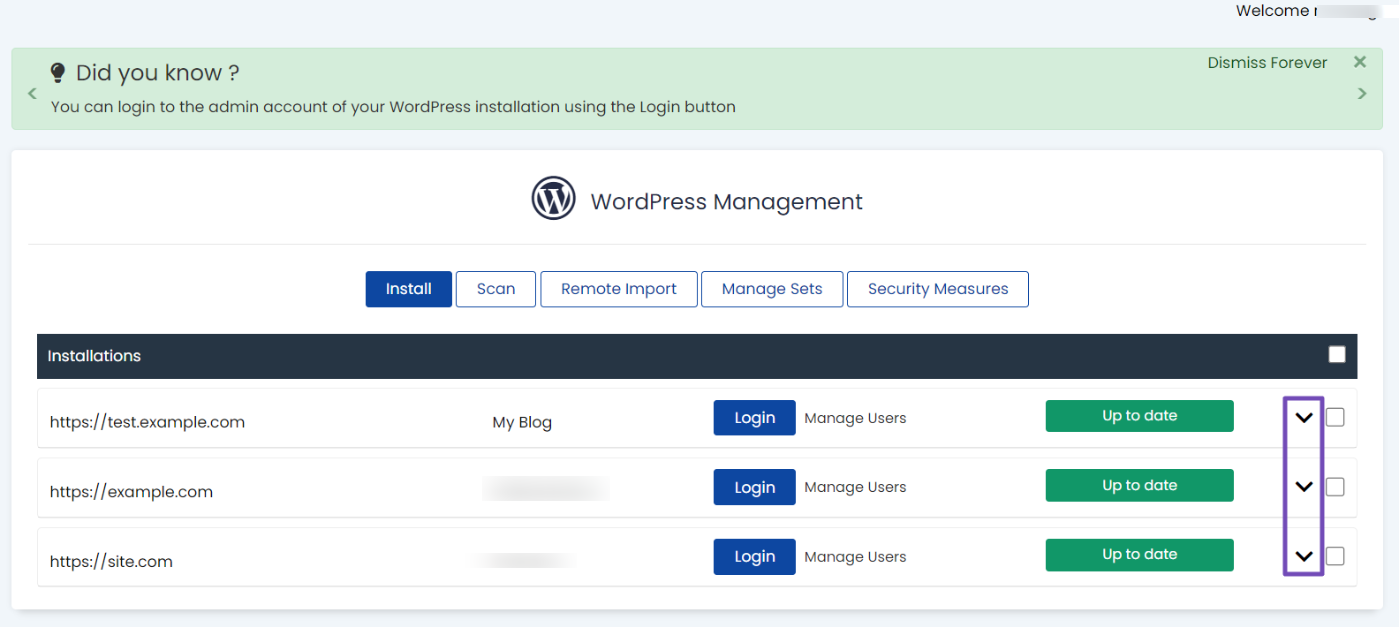
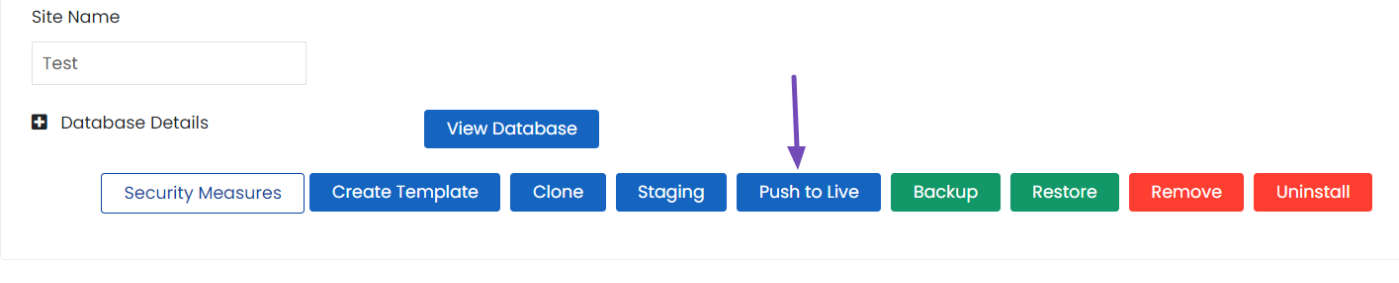
If you created the staging site using Softaculous, navigate to your WordPress Manager, where you created the staging site with Softaculous earlier.
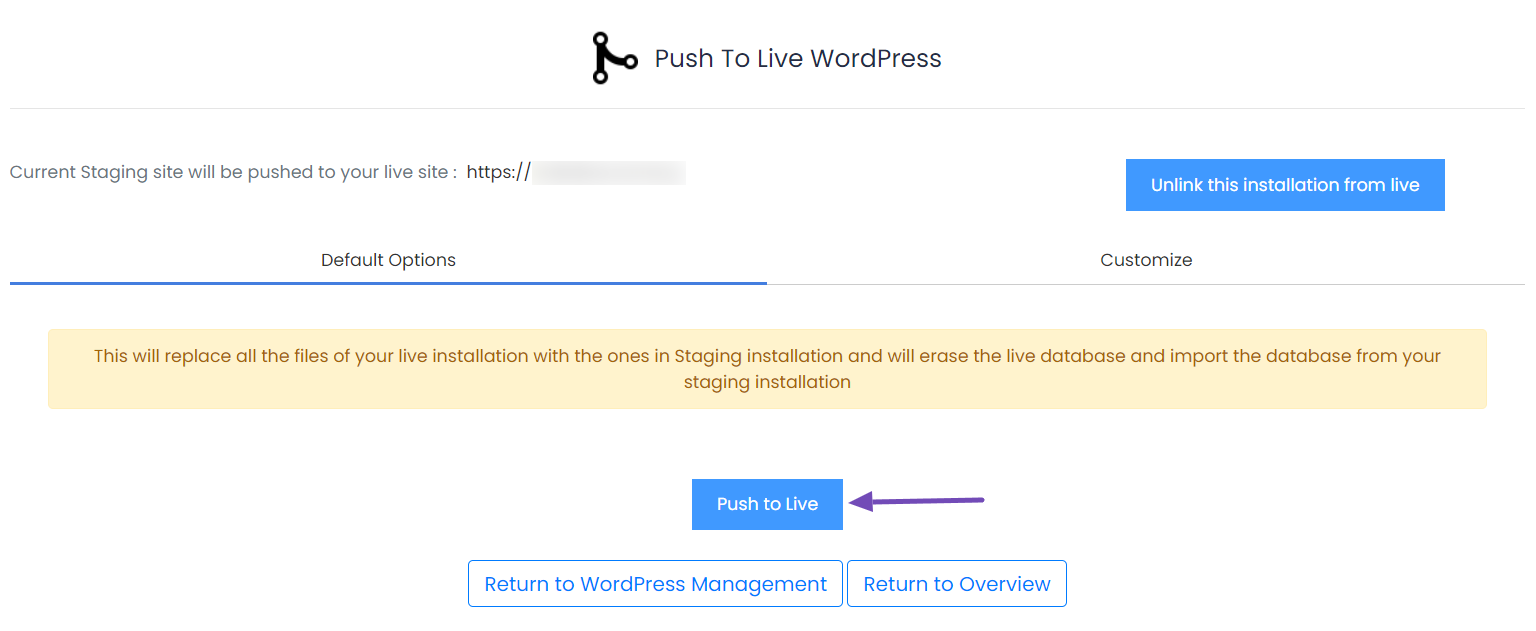
Locate the staging site, open the dropdown arrow, and scroll to the bottom of the options. You will see the Push to Live option. Click on it.
On the Push to Live page, optionally navigate to the Customize tab to configure the databases and tables you want to push. Otherwise, leave it as it is if you want to push everything. Then click on the Push to Live button.
4.4 Manually Pushing Changes
Manually pushing changes involves several steps to ensure that updates from your staging site are correctly applied to your live site.
Start by backing up your live site to safeguard against any issues.
Next, connect to your staging site using an FTP client or File Manager and download the updated files to your local computer. Then, upload these files to your live site, overwriting the existing ones.
After that, export the updated database from your staging site using phpMyAdmin and import it into your live site’s database.
You can either replace the existing database entirely or update specific tables as needed. Finally, make sure the site URL in the wp_options table of your live database is set correctly for your live site.
Manually pushing these changes can be complex and riskier than automated tools, so proceed cautiously and ensure you back up all data.
5 Common Issues After Moving from Staging to Live
After you push your changes from the staging site to your live site, a few issues can sometimes pop up. Be aware of these so you can quickly fix them:
- Broken links: Internal links might still point to your staging URL. An effective method to identify and fix broken links on your site involves using the 404 monitor and redirections feature within the Rank Math SEO plugin.
- Permalink issues: Sometimes, URLs don’t work correctly after the move. If this happens, navigate to Settings → Permalinks in WordPress and click Save Changes to refresh the links.
- Plugin or theme conflicts: Some plugins or themes might behave differently in a live environment. Test everything thoroughly after the transfer to make sure all features work as expected.
- Missing images or files: If media files weren’t copied properly, some images or documents may not load on your live site. Double-check your uploads folder and re-upload missing items if needed.
6 Frequently Asked Questions
Can I work on a staging site while my live site runs?
Yes! A staging site is separate from your live site, so you can test and make changes without affecting your visitors or daily operations.
Are there any risks when using a staging site?
The main risks include forgetting to password-protect it (which can expose your site to the public) or accidentally overwriting your live site when pushing changes. Always back up your site and double-check before making changes live.
Is it free to create a WordPress staging site?
It depends on the method. Some plugins, like InstaWP Connect, offer free staging with limited features. Many hosting providers also include staging in their plans. Manual methods are free but require more effort.
Can I delete my staging site after I’m done?
Yes. Once you’ve tested your changes and pushed them live, you can safely delete the staging site to free up resources and avoid confusion. Just ensure everything is working correctly on the live site first.
7 Conclusion
By taking the time to create a staging site, you protect your website from potential issues and enhance its overall performance and reliability.
Whether you utilize your hosting provider’s tools, a dedicated plugin, or a manual approach, establishing a staging environment empowers you to test thoroughly before deploying updates. Remember to keep your staging site synchronized with your live site to maintain an accurate testing ground.
By incorporating regular backups and following best practices, you’ll enhance your website’s resilience and minimize potential disruptions.
If you like this post, let us know by Tweeting @rankmathseo.