Plugins make it easy to add new features and functionality to your WordPress website. However, there may come a time when you no longer need a plugin, or it starts causing problems with your site.
In such cases, it’s a good idea to uninstall the plugin to improve performance and reduce potential security risks.
In this post, we’ll walk you through the steps to uninstall a WordPress plugin. Not only this, but we’ll also help you assess your plugins and discuss additional ways to completely remove the traces of the plugin from your WordPress site.
So, without any further ado, let’s get started.
Table Of Contents
1 How to Decide Which WordPress Plugins to Uninstall
Uninstalling unnecessary plugins isn’t just about cleaning up your WordPress dashboard—it directly impacts your site’s performance, security, and manageability.
Too many plugins can slow down your site, resulting in longer load times and a poor user experience, which can negatively impact your search engine rankings. Additionally, outdated or poorly maintained plugins may introduce security vulnerabilities, putting your site and data at risk.
Beyond performance and security, it’s also about relevance. As your site’s needs change, specific plugins may no longer serve a purpose. Removing them helps keep your site streamlined and easier to manage.
But before uninstalling anything, take a moment to review your existing plugins carefully.
Start by navigating to the Plugins section in your WordPress dashboard, where you’ll see a list of all installed plugins.
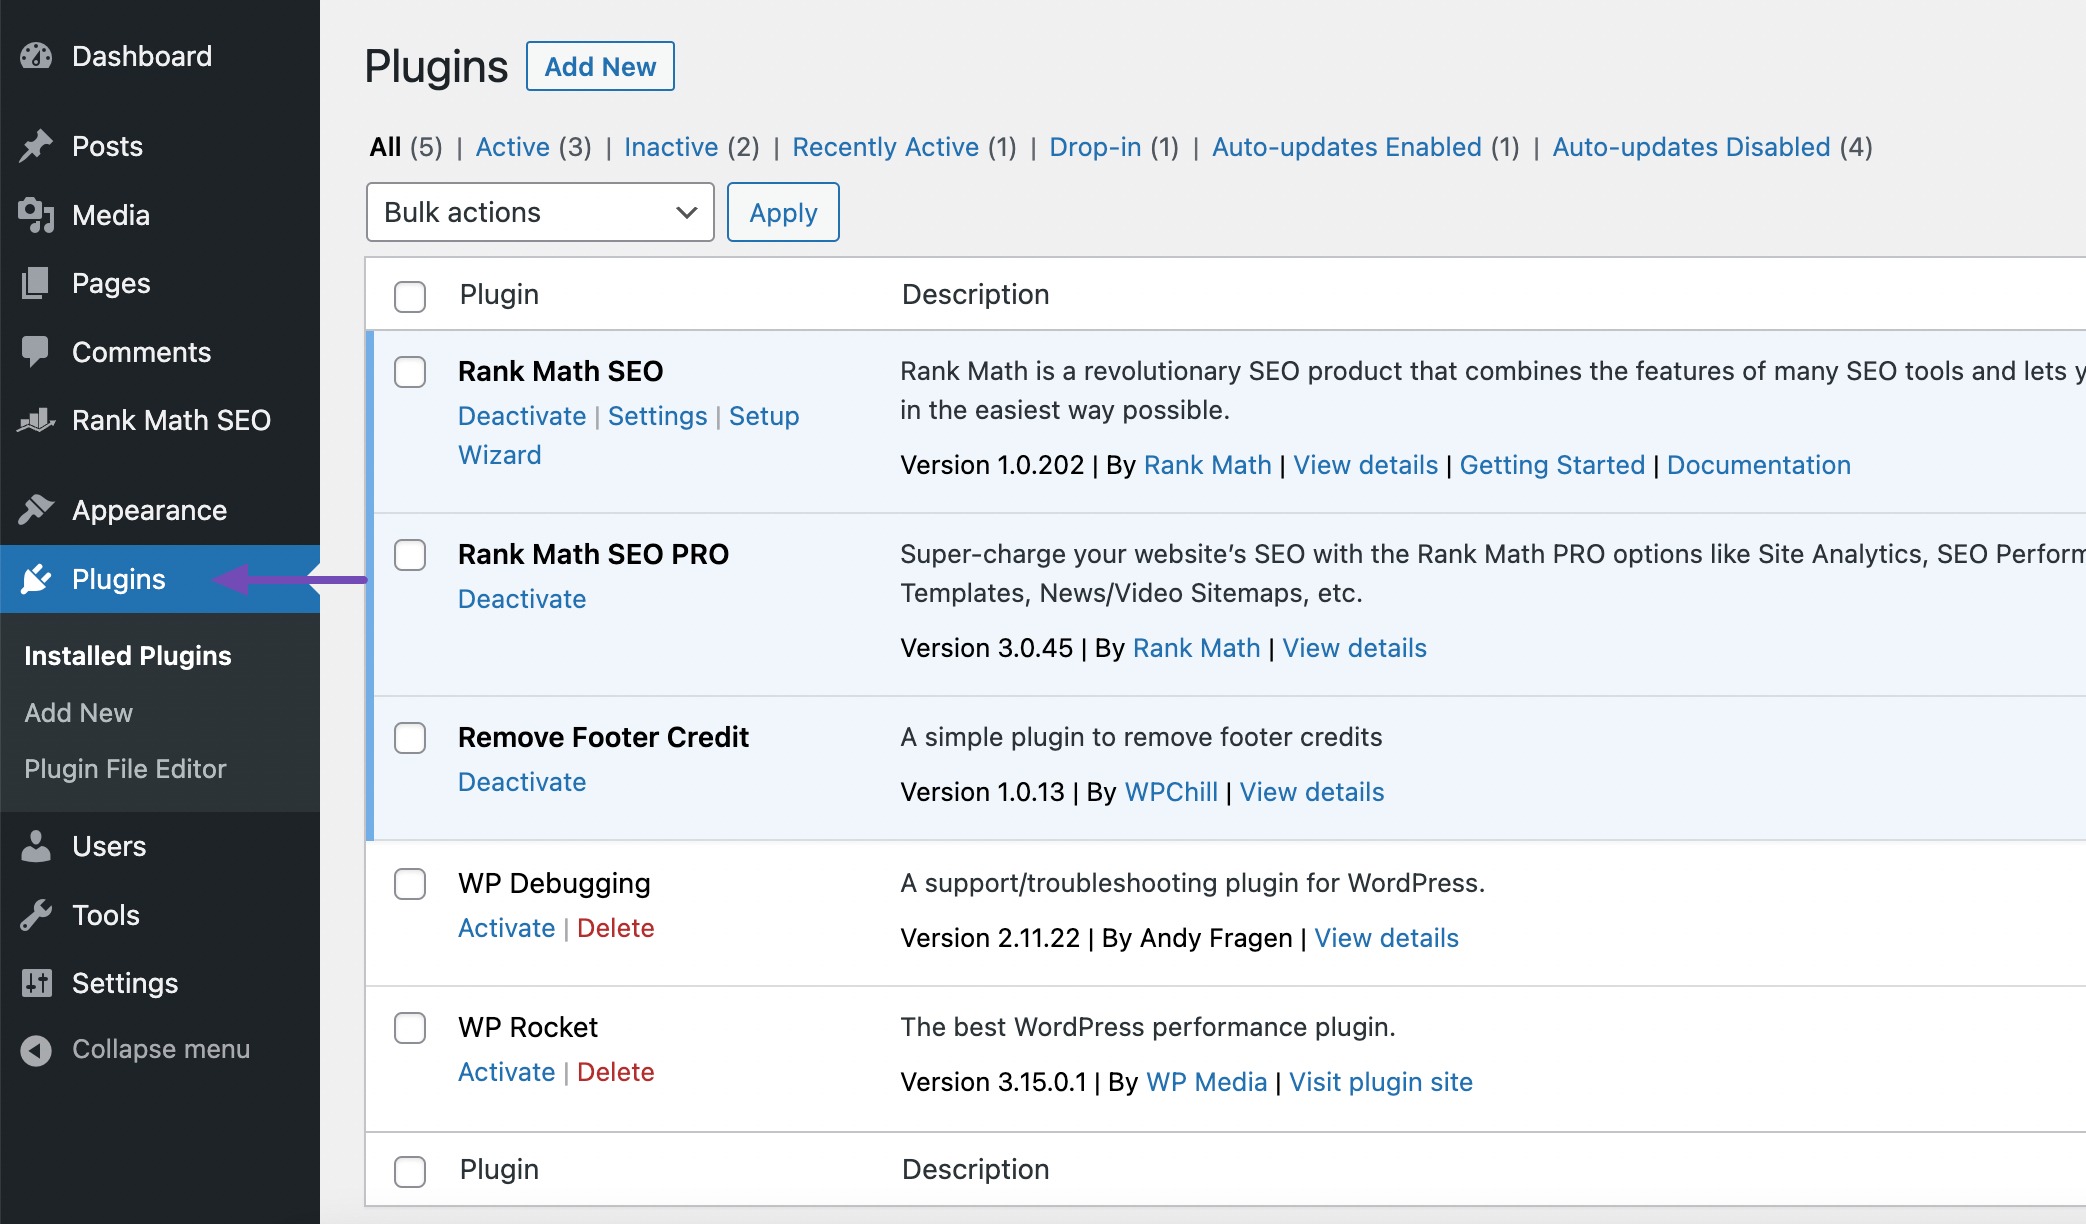
Evaluate each one by asking:
- Is this plugin still actively used on my site?
- Does it provide unique value, or do I have other plugins that do the same thing?
- Is it compatible with the current version of WordPress?
- Has it received recent updates and positive feedback from users?
If a plugin is no longer useful, redundant, outdated, or known to cause issues, it’s a good candidate for removal.
Taking time to assess your plugins ensures you’re only keeping the plugins that truly benefit your site, making it faster, safer, and easier to maintain.
It’s always wise to make a website backup before you uninstall a WordPress plugin. Refer to our dedicated tutorial on backing up a WordPress site.
For a more efficient way to troubleshoot plugin or theme conflicts without affecting your live site, install the Health Check & Troubleshooting plugin.
Install and activate the plugin on your website, then go to Tools → Site Health and click on the Troubleshooting tab. Subsequently, click on Enable Troubleshooting Mode to initiate the process.

Enabling troubleshooting mode will automatically deactivate all your WordPress plugins. You can then systematically re-enable them individually to identify the problematic ones.

2 Difference Between Deactivating and Deleting a WordPress Plugin
When managing plugins in WordPress, you’ll often come across two options: Deactivate and Delete. While they might seem similar, they serve very different purposes.
2.1 Deactivating a WordPress Plugin
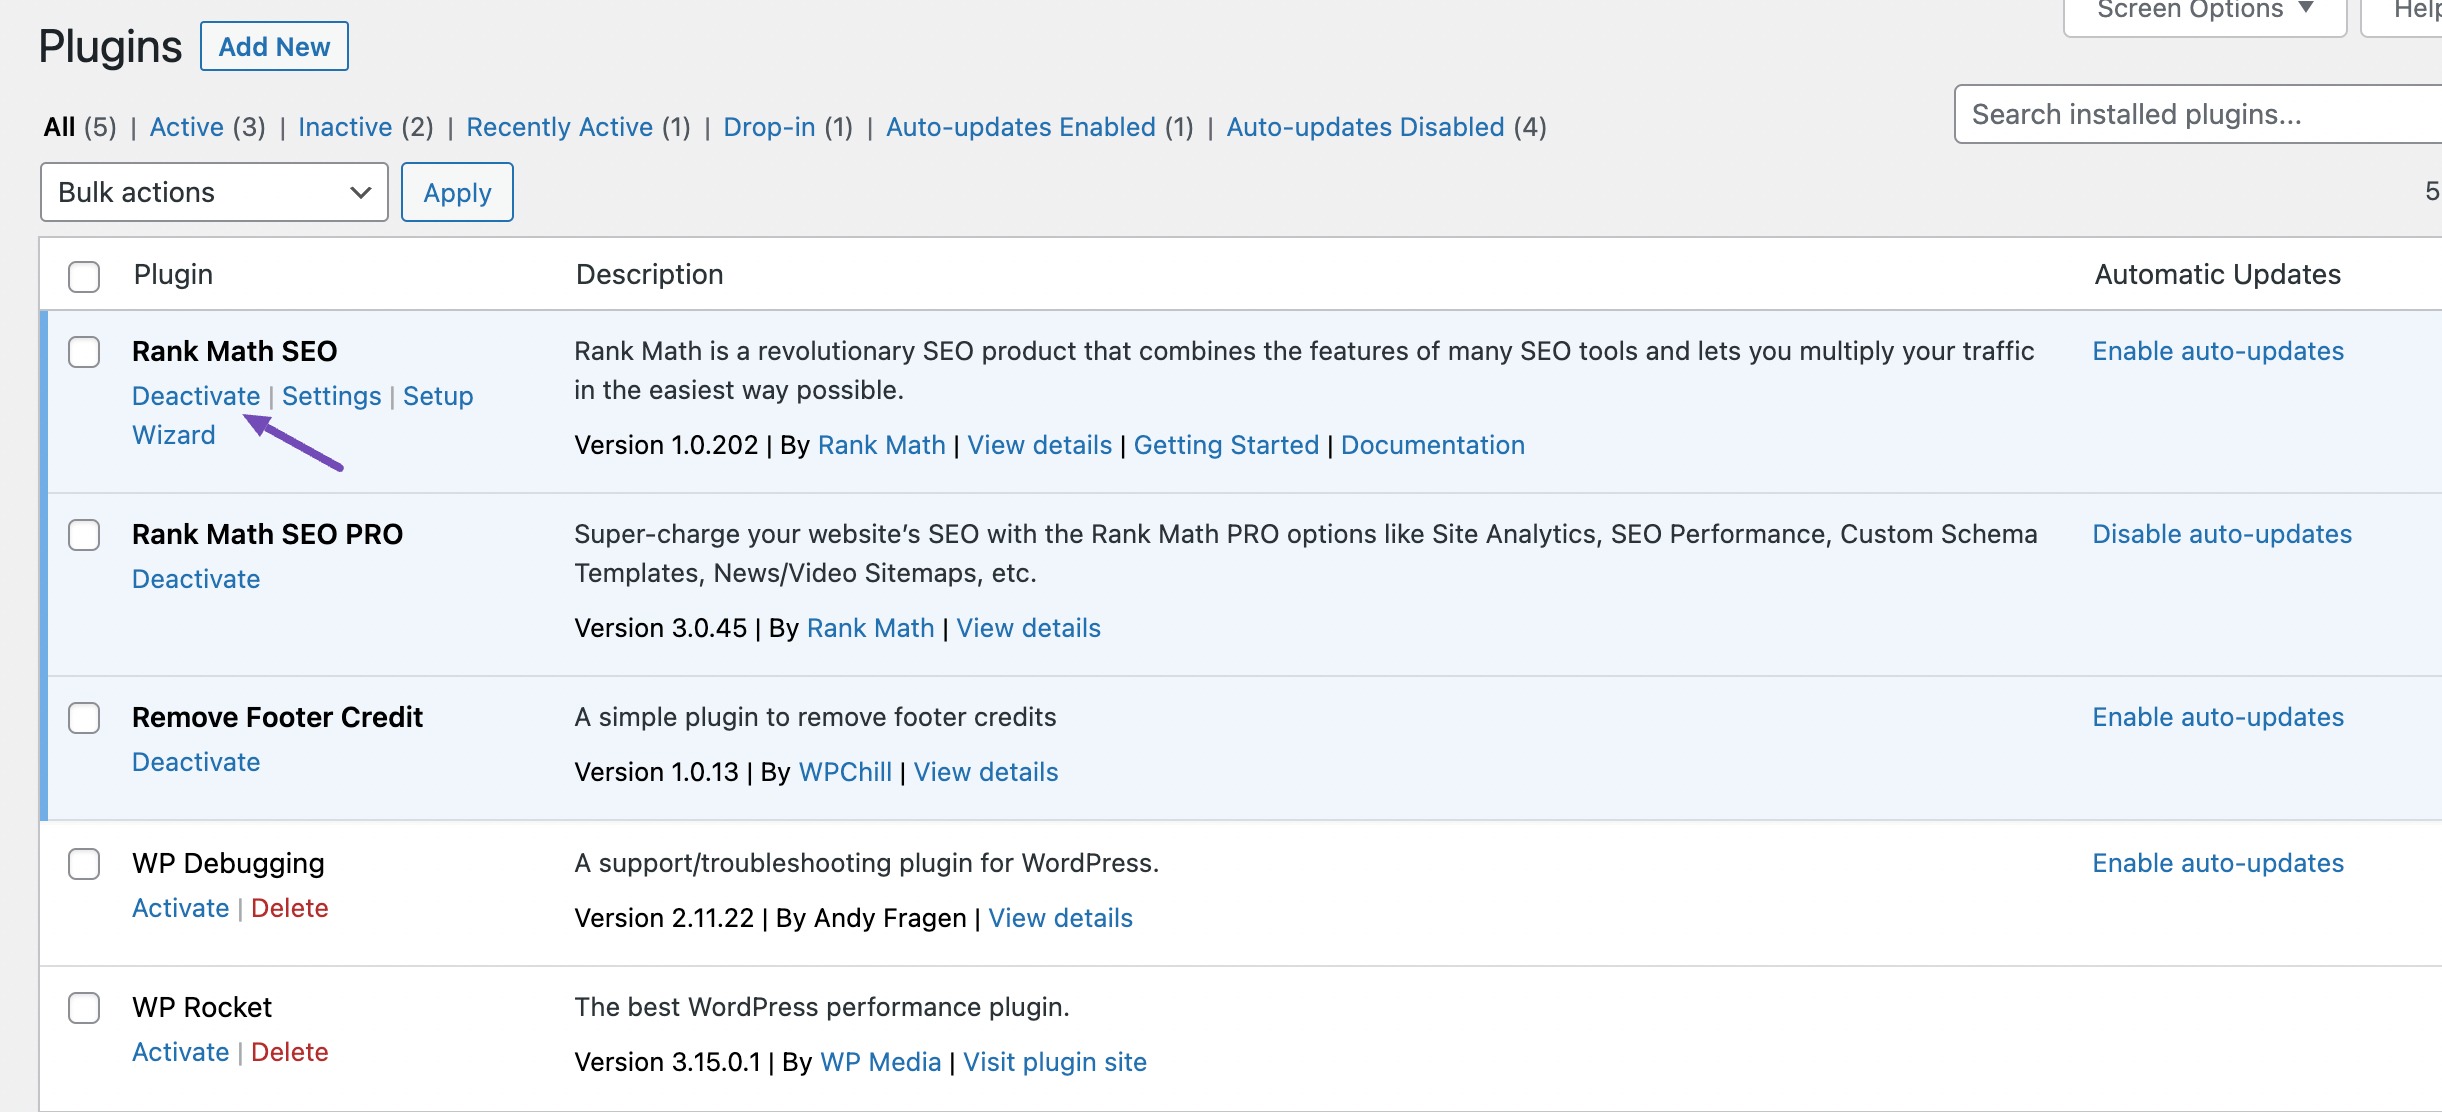
Deactivating a plugin turns it off without removing it from your website. It’s still installed and visible in your plugin list, but it won’t affect your site’s functionality until you activate it again.
This is useful when:
- You’re troubleshooting an issue and want to see if a plugin is causing a conflict.
- You want to temporarily disable a feature without losing settings or data.
For instance, if you deactivate a contact form plugin, the forms will stop working on the front end, but your form settings and entries will still be stored.
2.2 Deleting a WordPress Plugin
Deleting a plugin removes it completely from your WordPress site.
The plugin files are erased, and in most cases, so are its settings and stored data (unless the plugin is designed to retain them even after deletion).
Use this when:
- You’re sure you no longer need the plugin.
- You want to reduce clutter, improve performance, or minimize security risks.
3 How to Uninstall a WordPress Plugin
Let’s now see how to uninstall a WordPress plugin.
Navigate to the Plugins section from your WordPress dashboard. As mentioned, you’ll see all the plugins installed on your website. Before uninstalling a WordPress plugin, you must first deactivate it.
Locate the plugin you wish to uninstall and click the Deactivate link below its name.
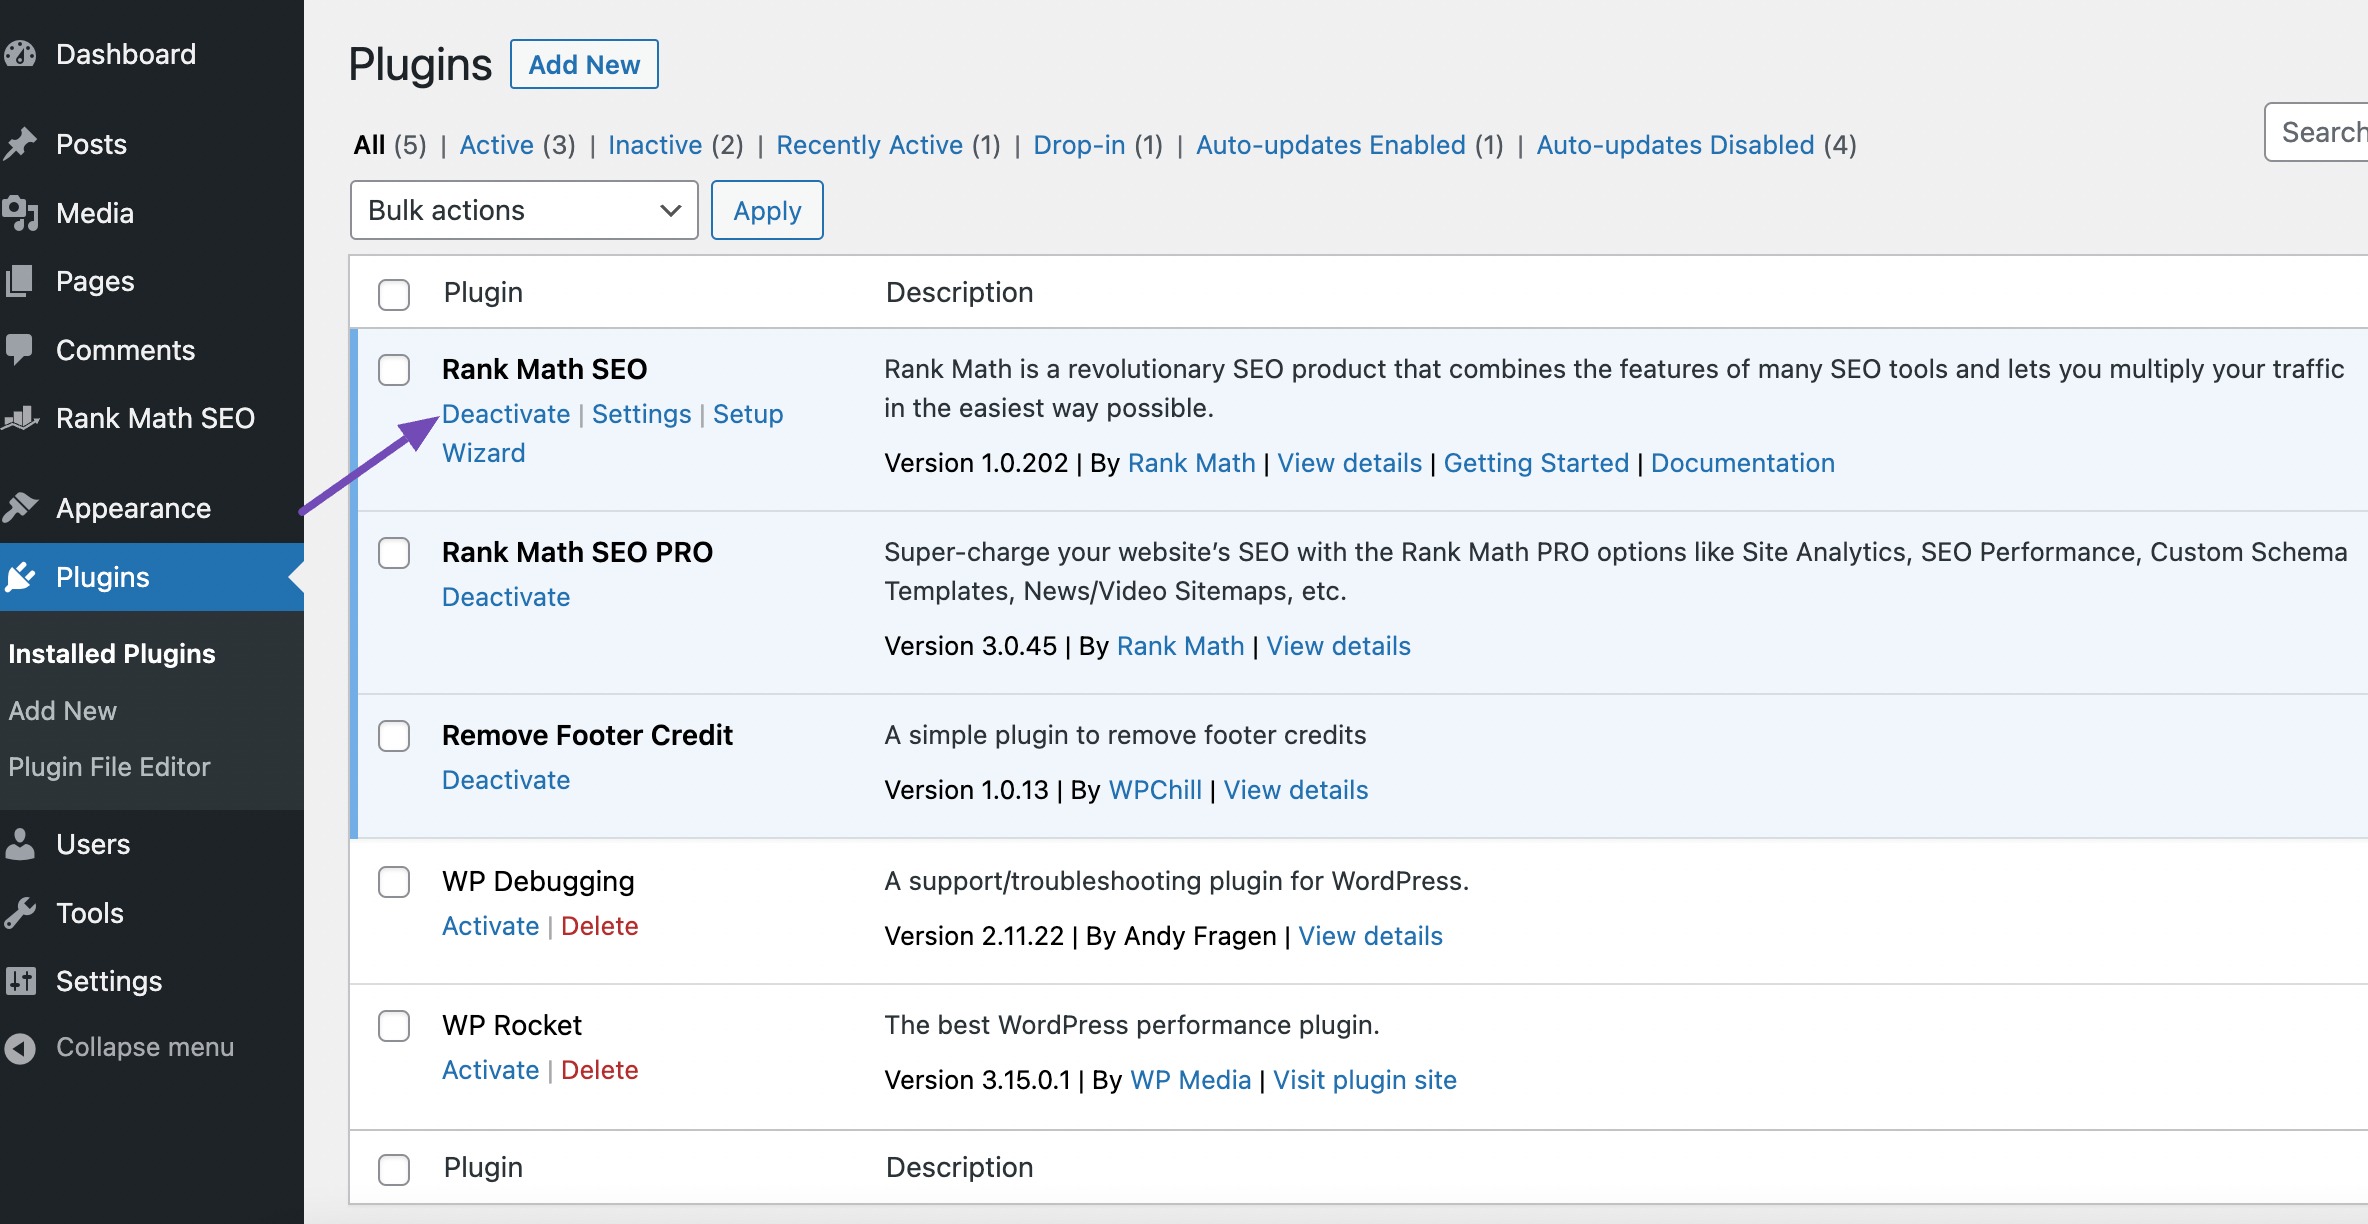
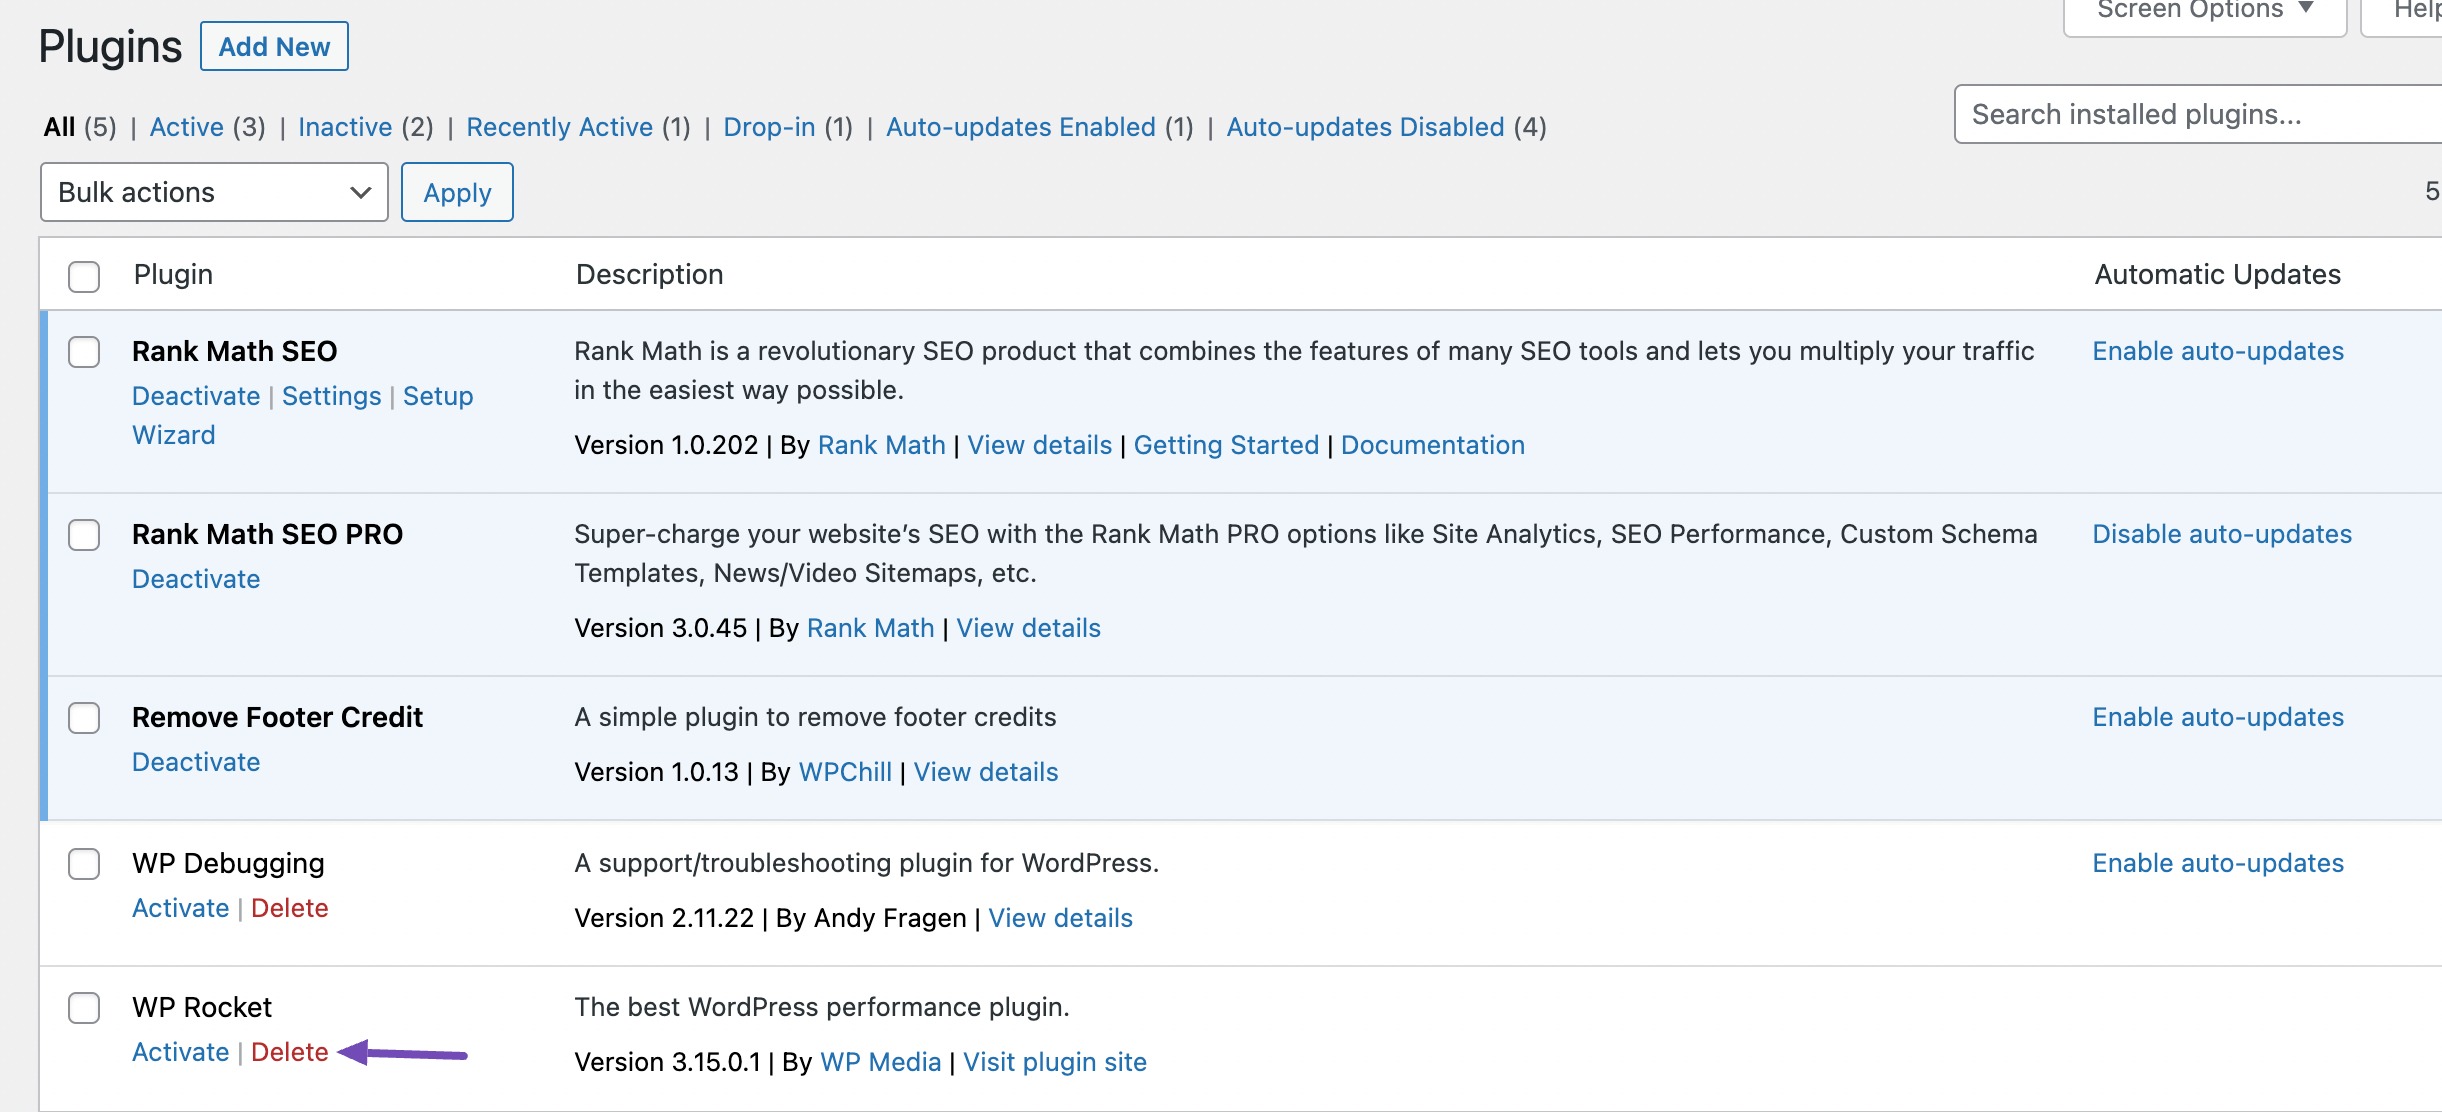
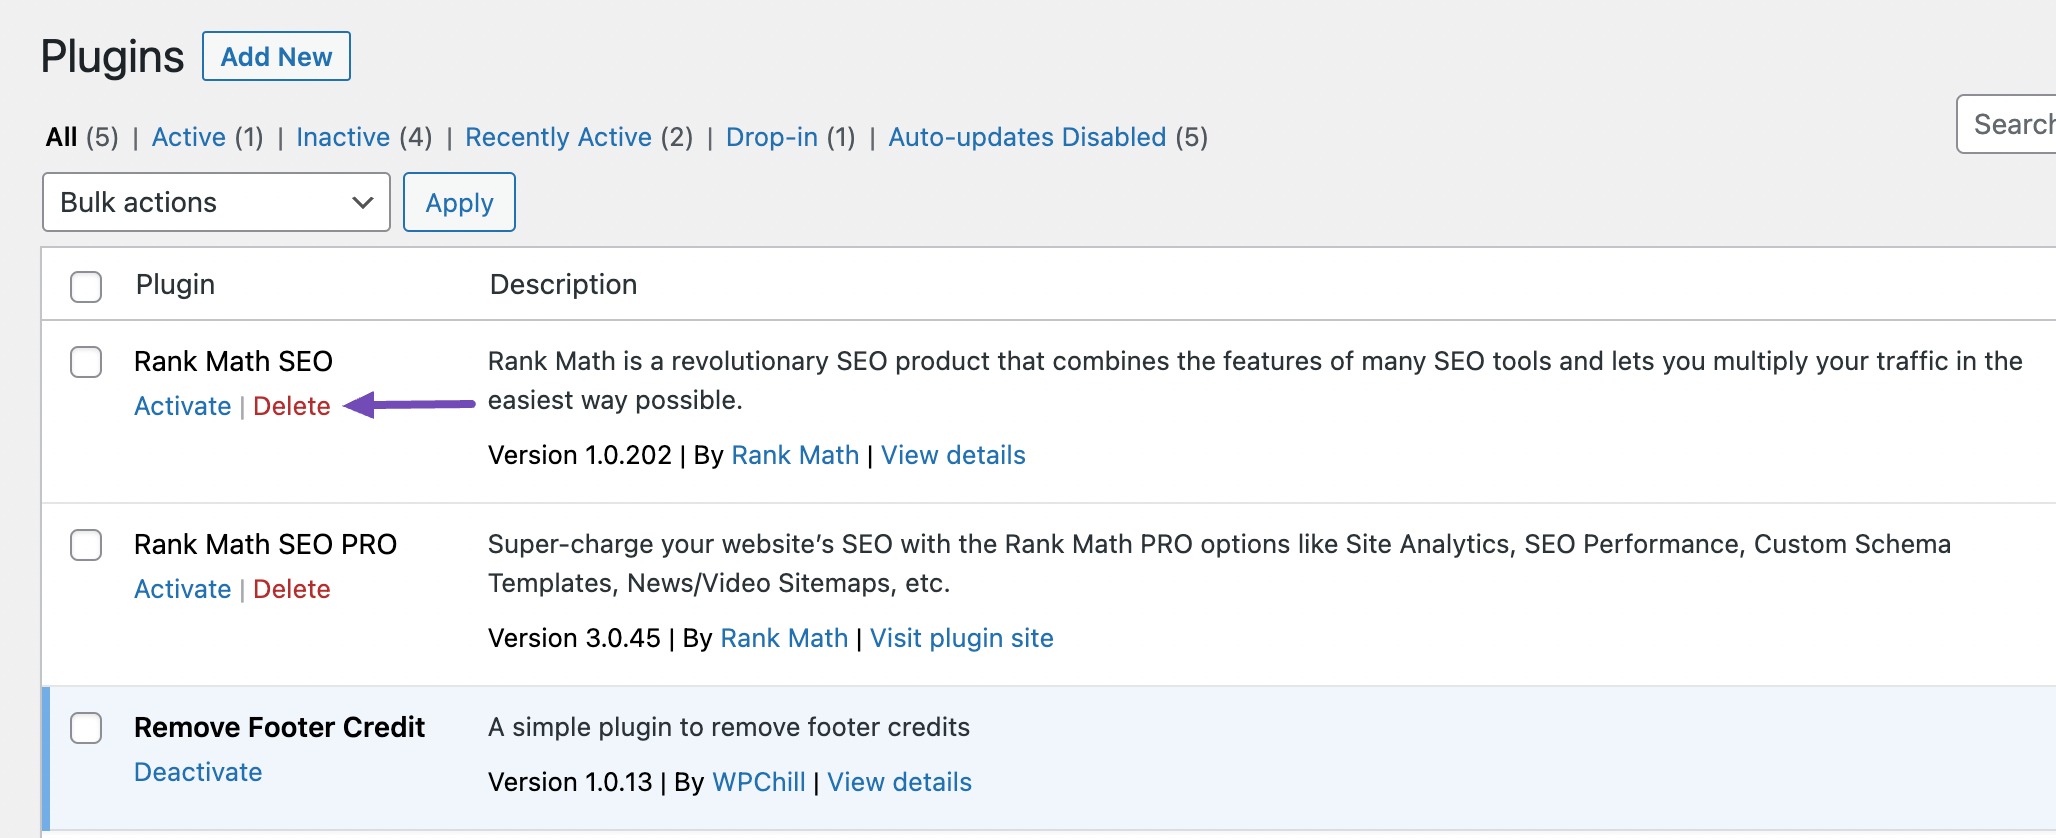
Once the plugin is deactivated, you’ll notice that the Deactivate link changes to the Delete link. Click on the Delete link to uninstall the plugin, as shown below.
WordPress will ask you to confirm the deletion of the plugin. Double-check to ensure you’re uninstalling the correct plugin. If you’re certain, click on OK.
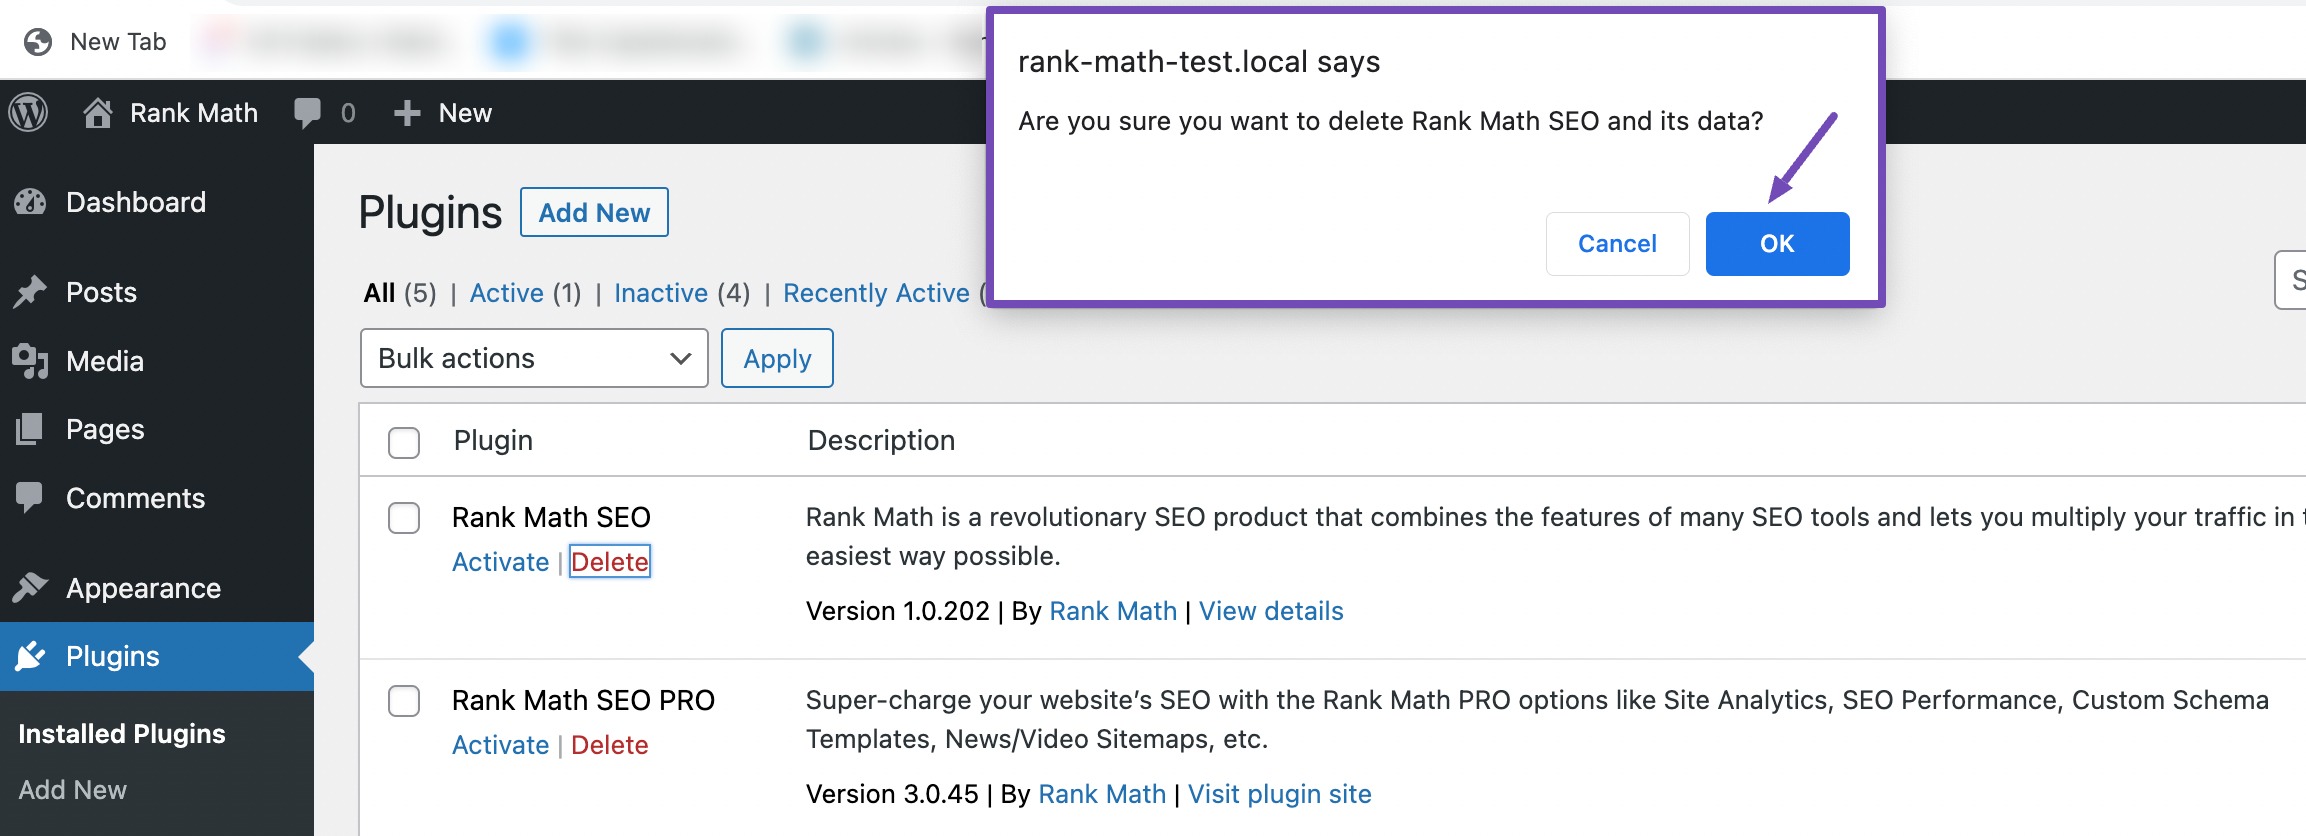
WordPress will now safely uninstall the plugin from your site.
You can choose to take additional actions to ensure every last trace of the plugin is removed. It’s important to note that the steps below are not mandatory and are better suited for users with some experience rather than absolute beginners.
4 Removing Extra Files Added by a WordPress Plugin
Plugins can leave behind various files and data even after deactivating them through the WordPress dashboard. Removing these extra files helps to maintain a clean and efficient website.
Use FTP like FileZilla or your web hosting control panel to remove the extra files. In your website’s file directory, navigate to the wp-content folder. Inside, you’ll see the plugins folder.
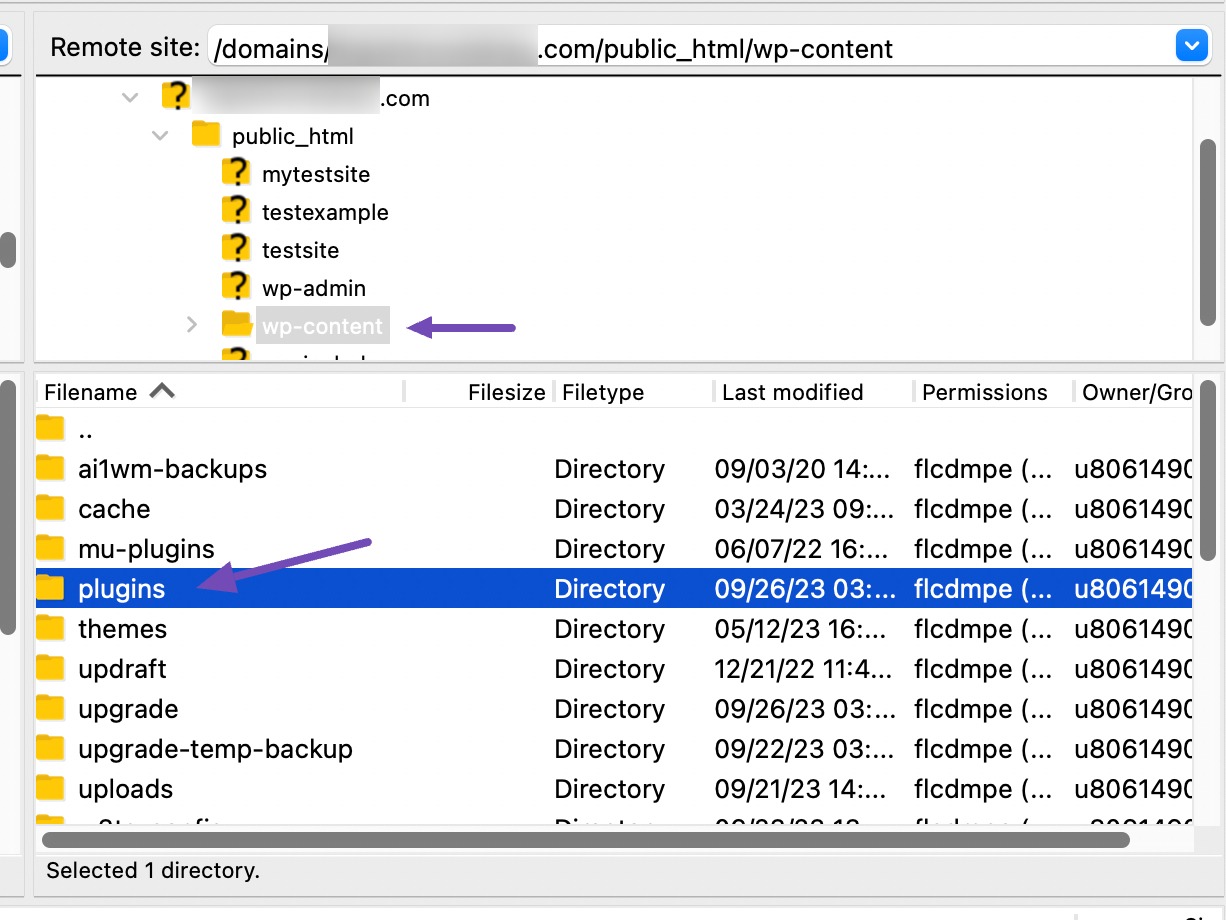
Within the plugins folder, search for the folder named after the plugin you want to remove extra files from. For example, Rank Math SEO creates a seo-by-rank-math subfolder.
Once you’ve located the plugin’s folder, right-click on it and click the Delete option to delete it entirely.
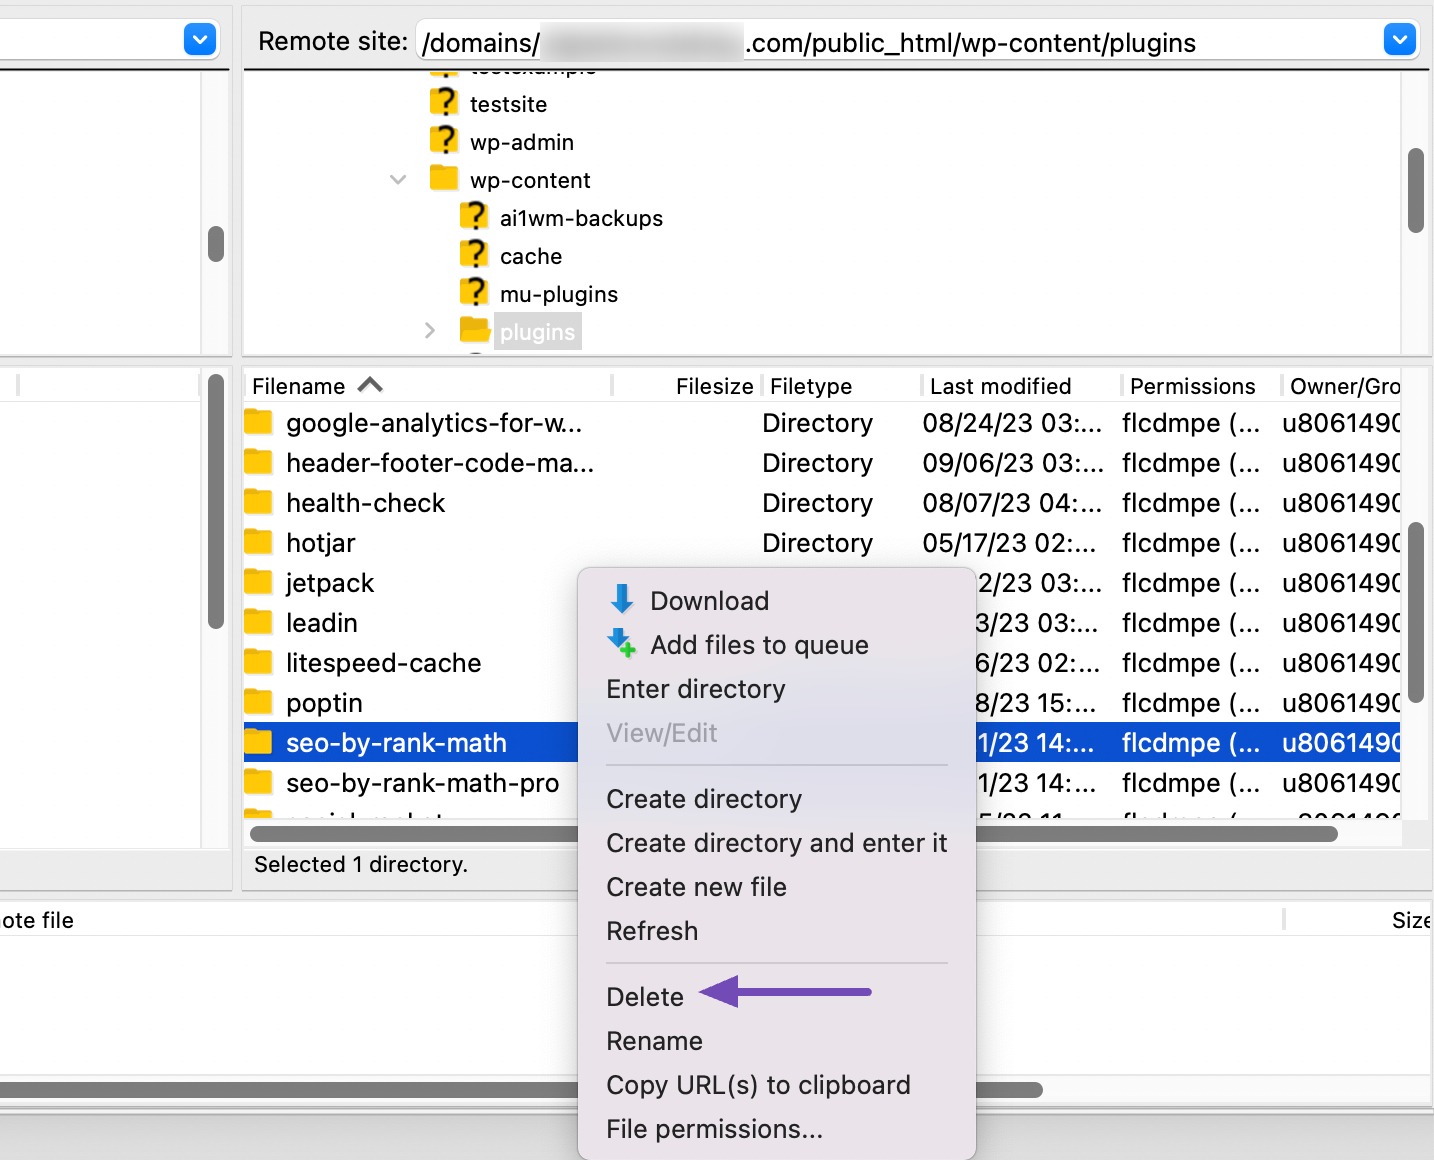
This will remove all the plugin files, including any extra files it may have added.
To ensure that all extra files are removed, navigate back to the Plugins section in your WordPress dashboard and verify that the plugin is listed there. If it’s not, you’ve successfully removed all its files, and the plugin is deleted.
5 Remove Unused Shortcodes in WordPress
When you stop using a plugin that provides specific shortcodes, you may be left with unused or broken shortcode tags in your content. It’s a good practice to remove these shortcodes for an efficient website.
To remove unused shortcodes, add the following code to your functions.php file. Update the pluginshortcode with the plugin’s actual shortcode tag.
add_shortcode( 'pluginshortcode', '__return_false' );Remember, if you want to use them with the original plugin again, you must remove the code.
6 Cleaning Up the WordPress Database
When plugins are installed or uninstalled, they can leave behind data traces that may clutter your database, potentially affecting your site’s performance.
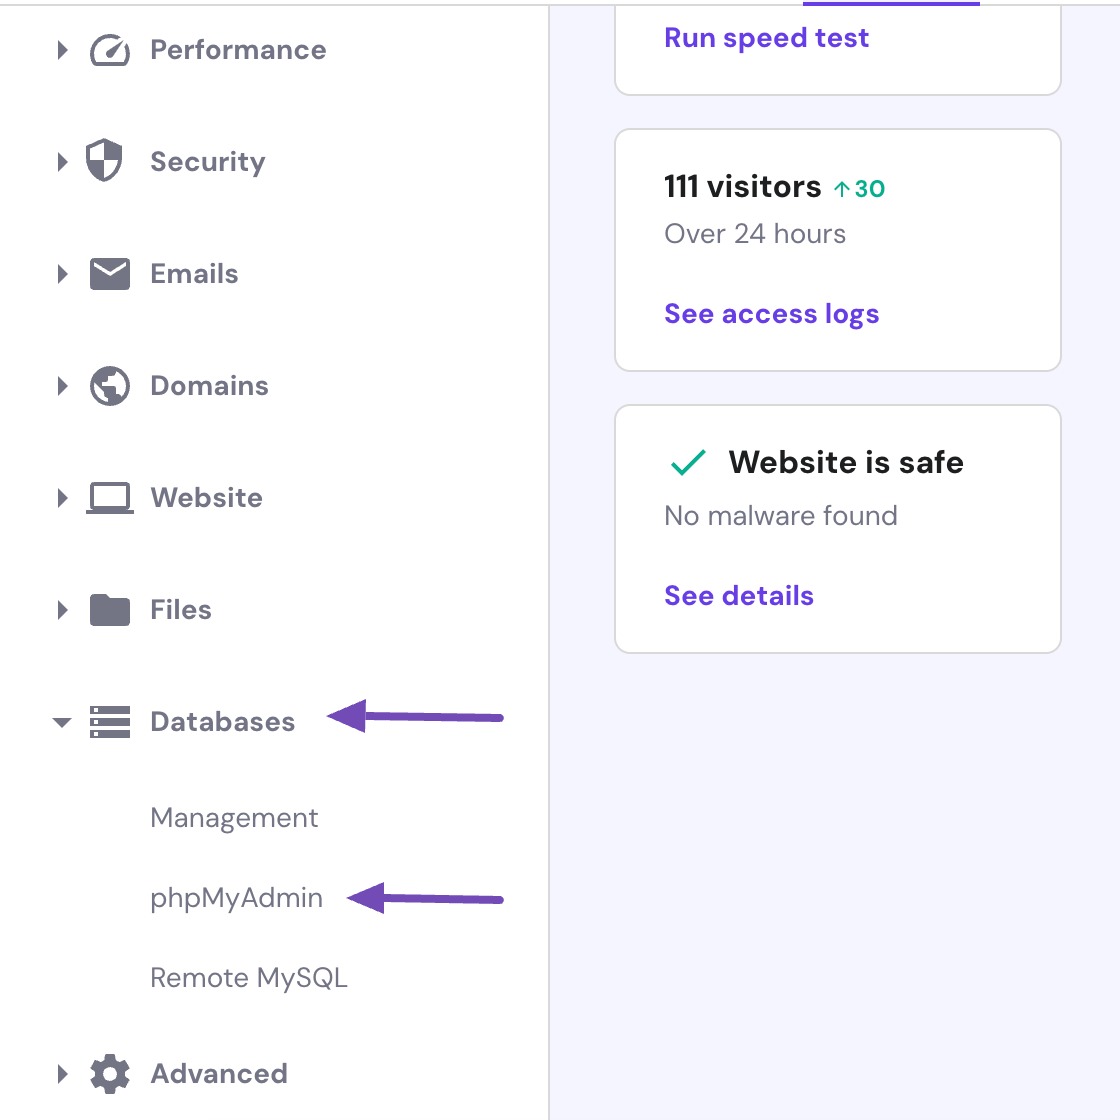
You can remove the tables directly within phpMyAdmin. Log in to your hosting account, then scroll down to the Databases section. Click on phpMyAdmin, as shown below.
Next, click the Enter phpMyAdmin button.
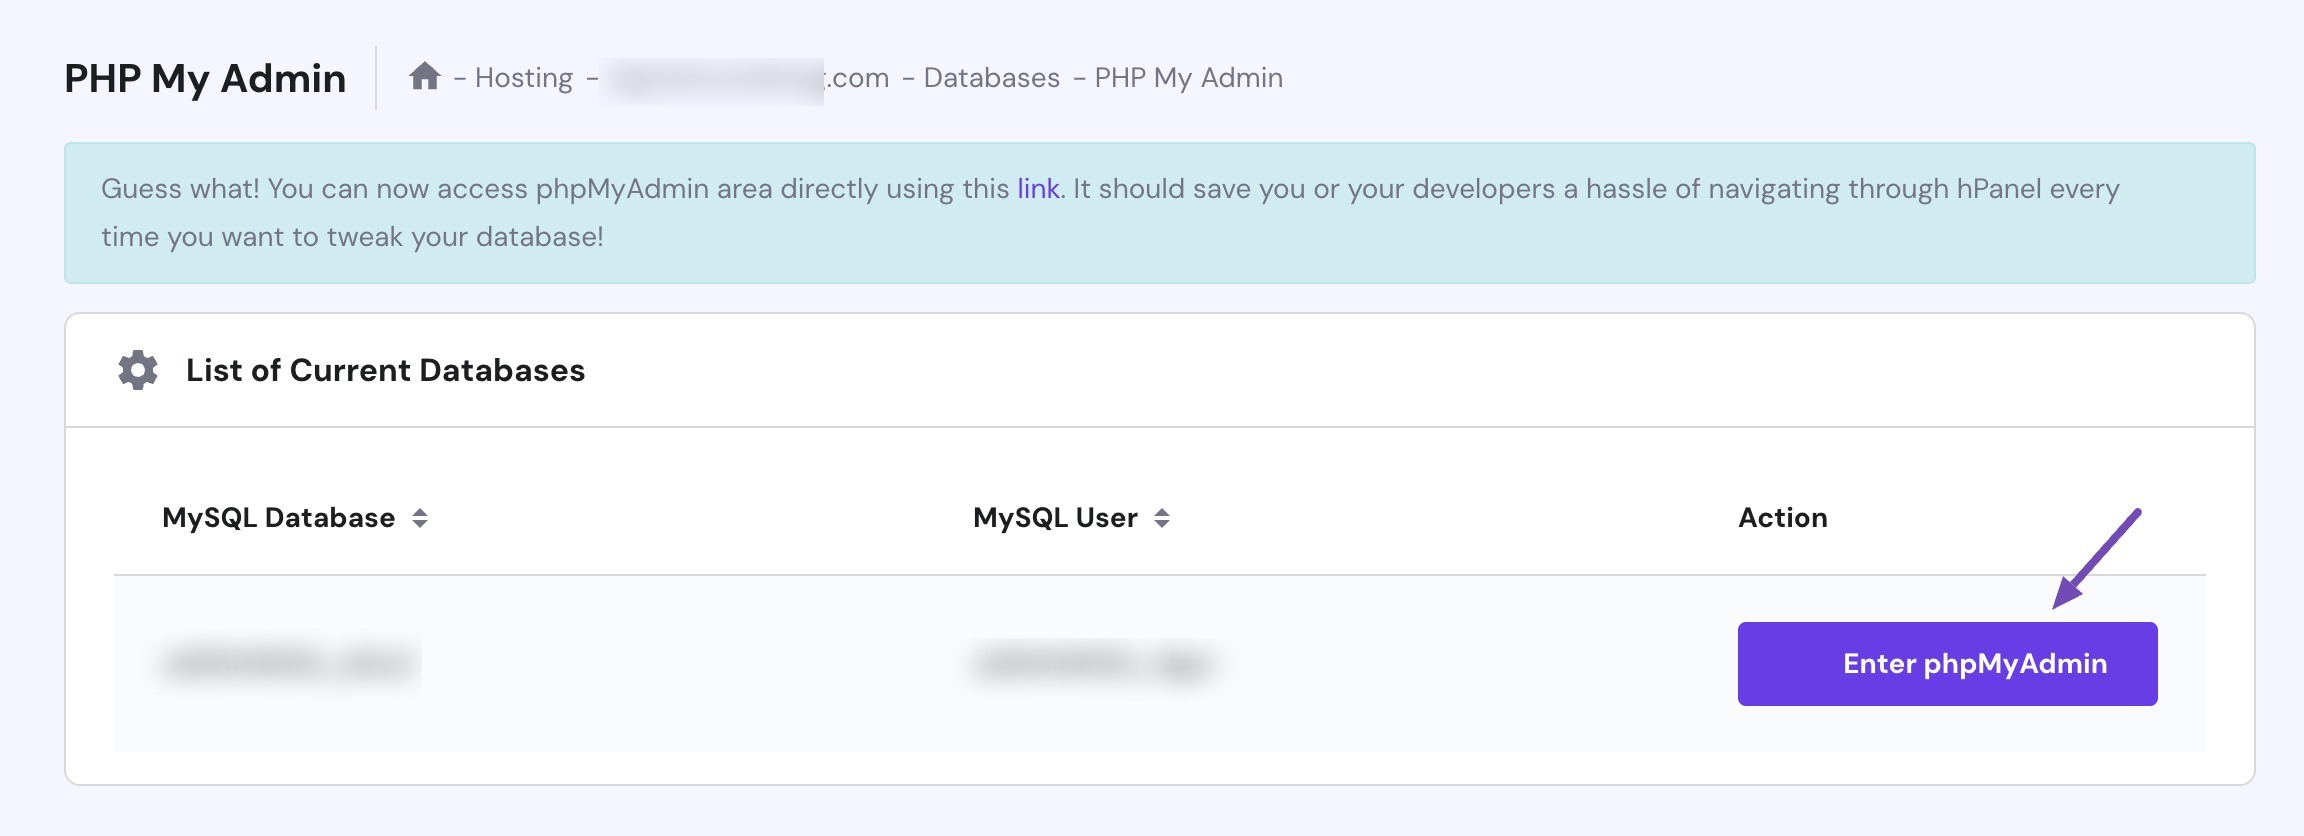
Note: These settings may differ slightly based on your hosting provider.
Next, click on your database and select the tables you want to delete.
Once you have chosen the tables, click the Drop option to remove them.
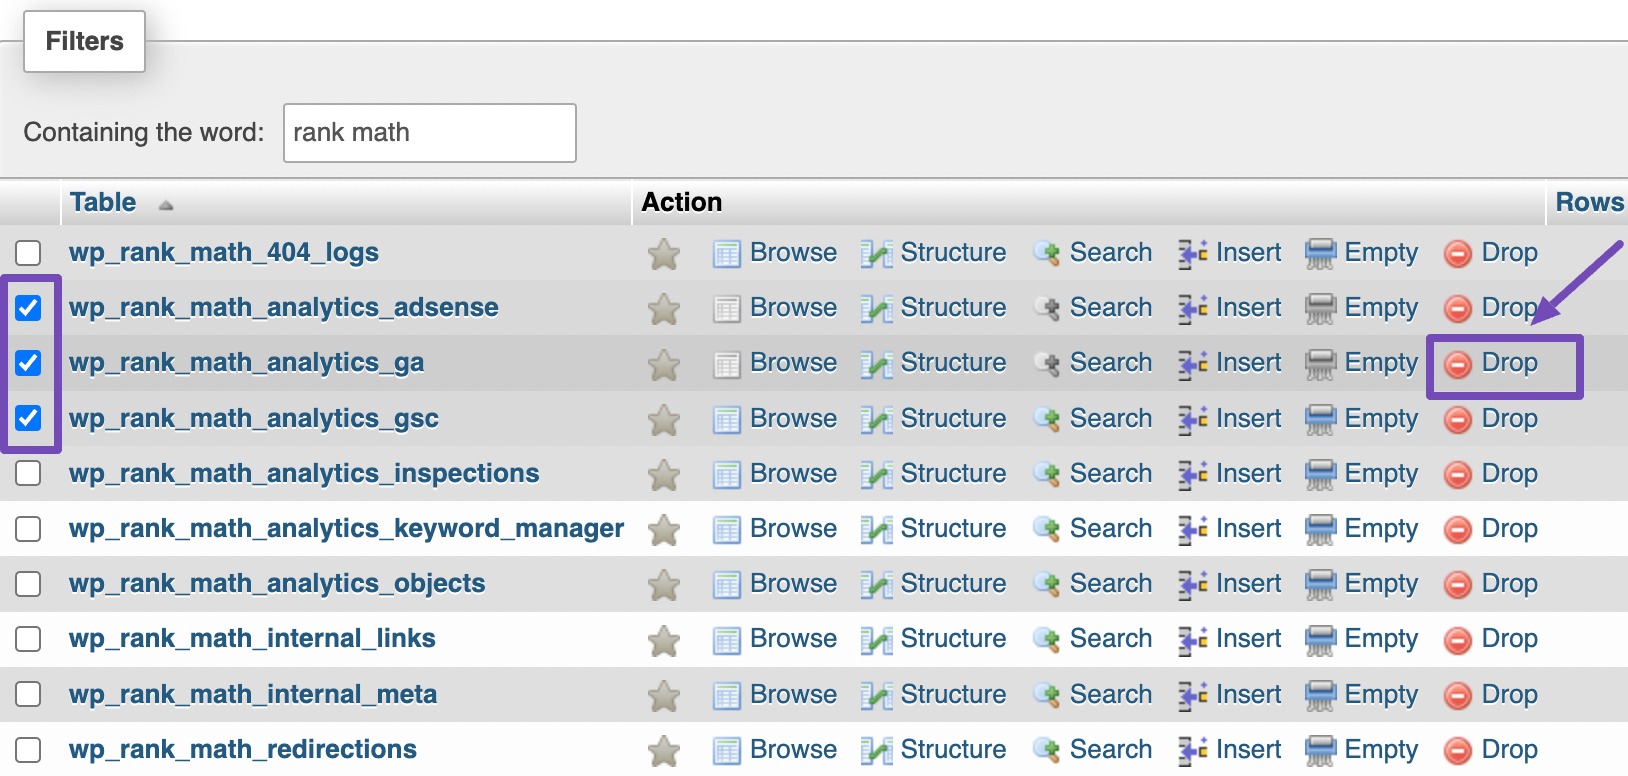
You will now see a message that you are about to destroy these tables. Click the OK button to confirm the action.
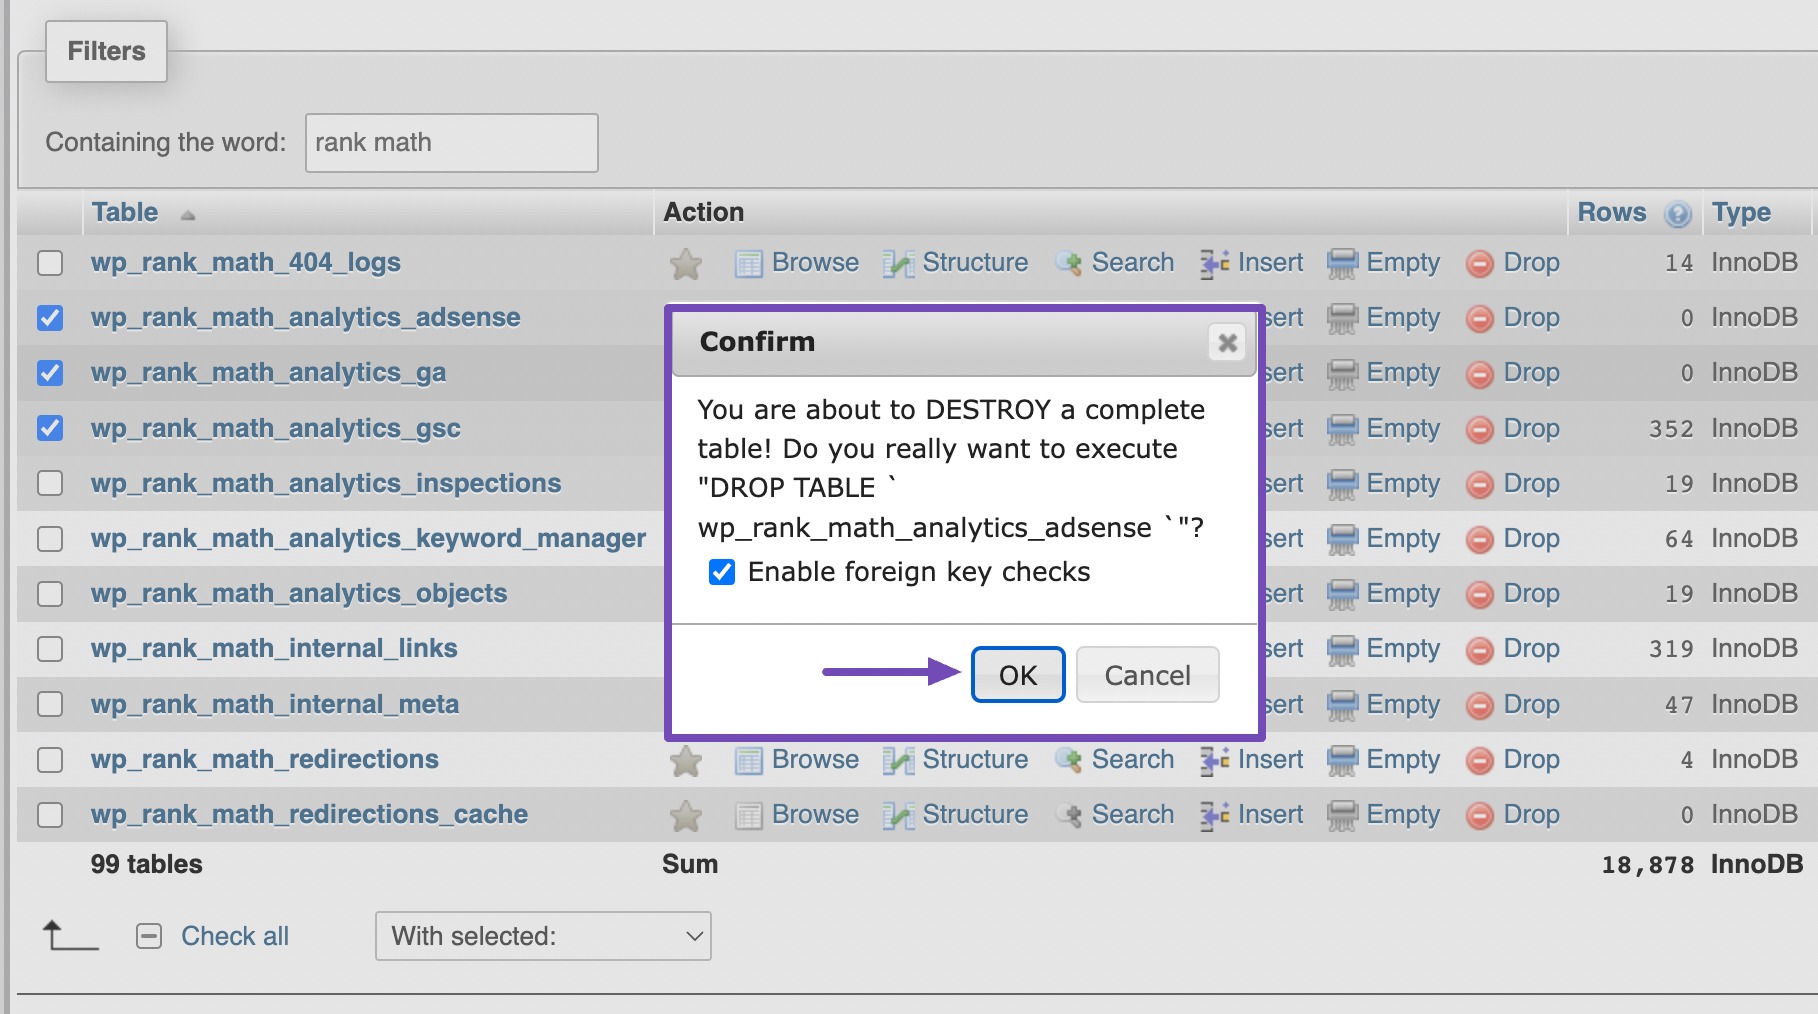
phpMyAdmin will proceed to drop the tables and remove all data they contain. It’s important to understand that this action is permanent; once the tables are deleted, there’s no way to recover them unless you have a backup.
7 Wrapping It Up
Mastering the process of uninstalling a WordPress plugin is an essential skill for any website owner. It’s not just about removing excess baggage; it’s about maintaining a well-organized, high-performing, and secure online platform.
By carefully assessing which plugins to uninstall, understanding their impact, and making backups when necessary, you’ve equipped yourself with the knowledge to keep your WordPress site in tip-top shape.
So, remember, when it comes to WordPress plugins, less can often mean more. Uninstall wisely, and you’ll enhance your site’s efficiency, ensuring a smoother and safer online experience for you and your visitors.
If you like this post, let us know by Tweeting @rankmathseo.
