If you’re managing multiple WordPress websites, constantly logging in and out of different dashboards can get overwhelming. That’s where WordPress multisite network comes in; it lets you run and manage multiple sites from a single WordPress installation.
Setting up a multisite network can save you time and effort.
In this post, we’ll walk you through how to set up a WordPress multisite network step-by-step, so you can streamline your workflow and stay in control of your entire site network from one place.
Are you ready? Let’s get started!
Table Of Contents
- What is WordPress Multisite?
- Pros and Cons of WordPress Multisite Network
- Who Should Use a WordPress Multisite Network?
- Difference Between Single and Multisite WordPress Installations
- Requirements for a WordPress Multisite
- Installing WordPress Multisite Network
- Choose a Domain Structure for Your Multisite Network
- Configuring Multisite Network Settings
- Setting Up Themes and Plugins for Your Multisite Network
- Frequently Asked Questions
- Conclusion
1 What is WordPress Multisite?
WordPress multisite is a feature that lets you create and manage a network of multiple websites using a single WordPress installation.
Instead of setting up separate WordPress installs for each site, you can run them all from one central dashboard. This makes managing updates, themes, plugins, and users much more efficient.
Introduced in WordPress 3.0, multisite has become a go-to solution for anyone who needs to manage several sites, whether you’re running a blog network, managing client websites, or creating microsites for a brand.
With multisite, you can create new sites instantly, manage them all using the same username and password, and assign user roles and permissions across your entire network. It’s flexible, powerful, and a huge time-saver once you’ve got it set up.
2 Pros and Cons of WordPress Multisite Network
Let us discuss the pros and cons of the multisite network.
Pros
- Website administrators can efficiently handle multiple websites from a single dashboard.
- Creating new websites instantly within multisite networks is remarkably easy.
- Each network site can have its dedicated administrators managing only their respective websites.
- Multisite functionality eliminates the need to repeatedly log in and out of multiple sites, saving time and effort.
- The network admin panel facilitates the sharing of themes and plugins across all sites in the multisite network.
- Updates for WordPress core files, themes, and plugins can be performed simultaneously for all sites from the network admin panel.
Cons
- Shared resources in a network may result in slower loading times for all sites.
- Certain WordPress plugins may not seamlessly function within a multisite network.
- New users may find managing traffic and server resources challenging, with surges affecting all network sites.
- Security risks pose a higher threat to all network sites simultaneously.
- Handling a multisite network can be more complex than managing individual sites, especially during troubleshooting.
- Limited support from some hosting providers may constrain options for WordPress multisite networks.
3 Who Should Use a WordPress Multisite Network?
You shouldn’t create a multisite network simply because you have multiple websites. Keep in mind that technical knowledge is required to manage multisite networks effectively.
WordPress multisite network is suitable for specific scenarios.
- Organizations that require multiple websites with different content but want to manage them under a single domain.
- Educational institutions need to create separate websites for each department or faculty.
- Bloggers who want to manage multiple blogs from a single dashboard.
- E-commerce businesses that want to manage multiple online stores under one domain.
- News websites that want to create multiple subdomains or subdirectories for different topics or regions.
- Non-profit organizations that need to manage multiple websites for different causes or initiatives.
So, if you have multiple websites that do not have the same purpose or resemblance, you should make different WordPress installations for each.
In the next section, let’s delve into the distinctions between multisite and single sites.
4 Difference Between Single and Multisite WordPress Installations
Let us compare the main differences between a single-site WordPress installation and a multisite WordPress installation.
| Single Site | Multisite |
| Designed to host only one website or blog | Allows the creation of multiple websites or blogs from a single WordPress installation |
| Managed from a single dashboard | Network dashboard for managing all sites, plus individual dashboards for each site |
| Created from one domain | Created from the subdomains or subdirectories of the main domain |
| Single sites operate with separate databases. | Multisites use a shared database with separate tables for each site |
| Requires fewer server resources | May require more server resources |
| Each site is updated individually | Updates can be applied to all sites in the network at once |
| Any plugin/theme can be installed and activated on the dashboard | Plugins/themes must be network-enabled for use on multisite |
| Standard WordPress user roles needed for user management | Additional super admin role needed for managing the network |
| Suitable for small-scale websites or blogs | Suitable for large-scale websites or blogs with multiple sub-sites or users |
5 Requirements for a WordPress Multisite
Before you set up a WordPress multisite network, there are a few essential requirements you’ll need to meet to ensure everything runs smoothly.
- A self-hosted WordPress installation: You’ll need a WordPress.org site (not WordPress.com) with enough storage to handle multiple sites.
- Access to your site’s files: Make sure you can access your website files using FTP or your hosting provider’s file manager.
- Database access: You should be able to create a new database and user, or at least manage your existing database.
- Basic WordPress knowledge: It helps if you’re familiar with how WordPress is installed and configured.
- Multisite-compatible hosting: Not all hosting environments support multisite out of the box. Double-check with your hosting provider to confirm compatibility before getting started.
Having these basics in place will make your setup process much smoother and help avoid issues down the line.
6 Installing WordPress Multisite Network
Before setting up a multisite Network, make sure your domain name and web hosting are properly configured. You should have access to your hosting control panel (like cPanel), and it’s a good idea to install an SSL certificate and create a domain email address through your hosting dashboard.
Once those prerequisites are in place, you’re ready to begin the installation.
6.1 Setting Up a WordPress Multisite Network From Scratch
If you’re new to multisite installations, this method is perfect.
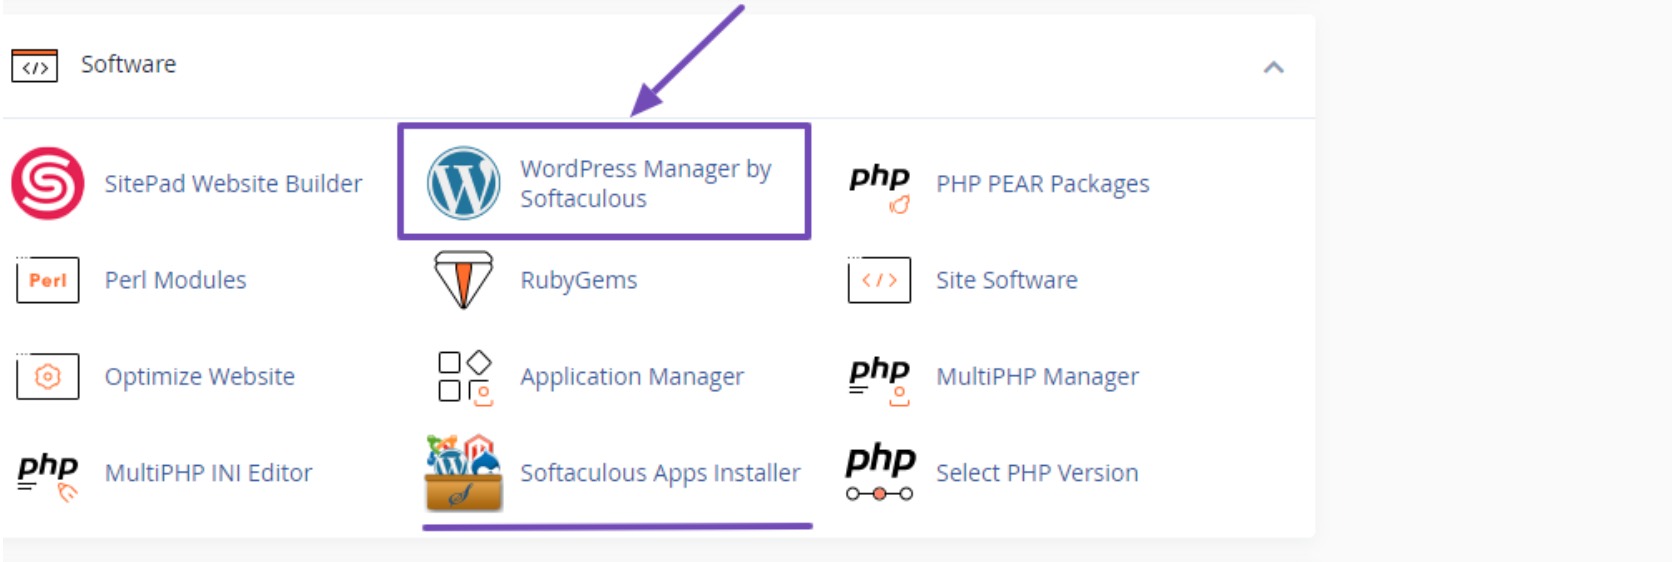
Firstly, access your hosting panel or cPanel, navigate to the Software section, and opt for WordPress Manager by Softaculous. If you can’t locate this option, select Softaculous Apps Installer.
Keep in mind that the appearance of your hosting panel might vary from the example provided below.
Regardless of your choice, make sure to select WordPress as the software. This will guide you to the installation page, where you must focus on six areas to configure, as shown below.
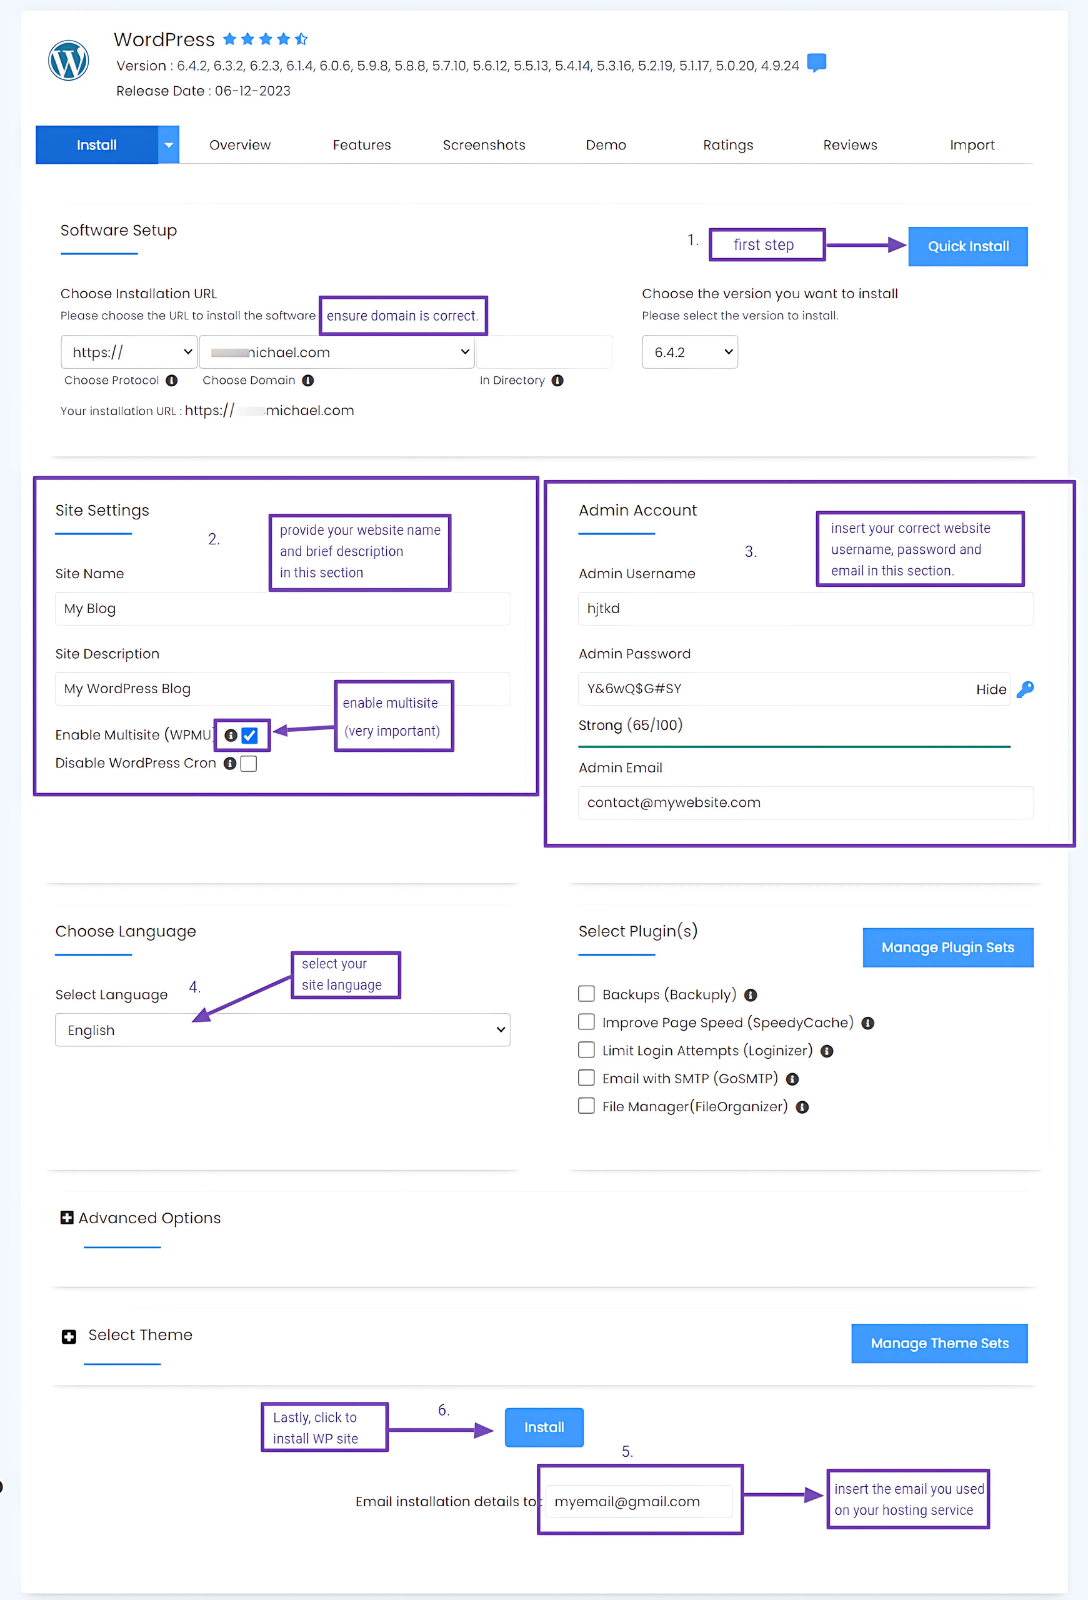
To start the process, click Quick Install, as shown in the image above.
Before proceeding with other settings, confirm that you have selected the desired domain for WordPress installation. In the Site Settings section, enable Multisite (WPMU); this step is crucial.
Next, refer to the indications in the image above to configure your site settings. Once completed, click the Install button below and patiently wait for the automatic installation of your WordPress site.
Upon successful installation, a link to either your website or the WordPress dashboard will appear. Feel free to click on the one that you prefer.

Now that we’ve covered the simplest method to install a WordPress multisite website, let’s proceed to the second method.
6.2 Adding Multisite to an Existing WordPress Installation
The multisite network feature is inherent in every WordPress installation, allowing you to transition from a single site to a multisite network seamlessly.
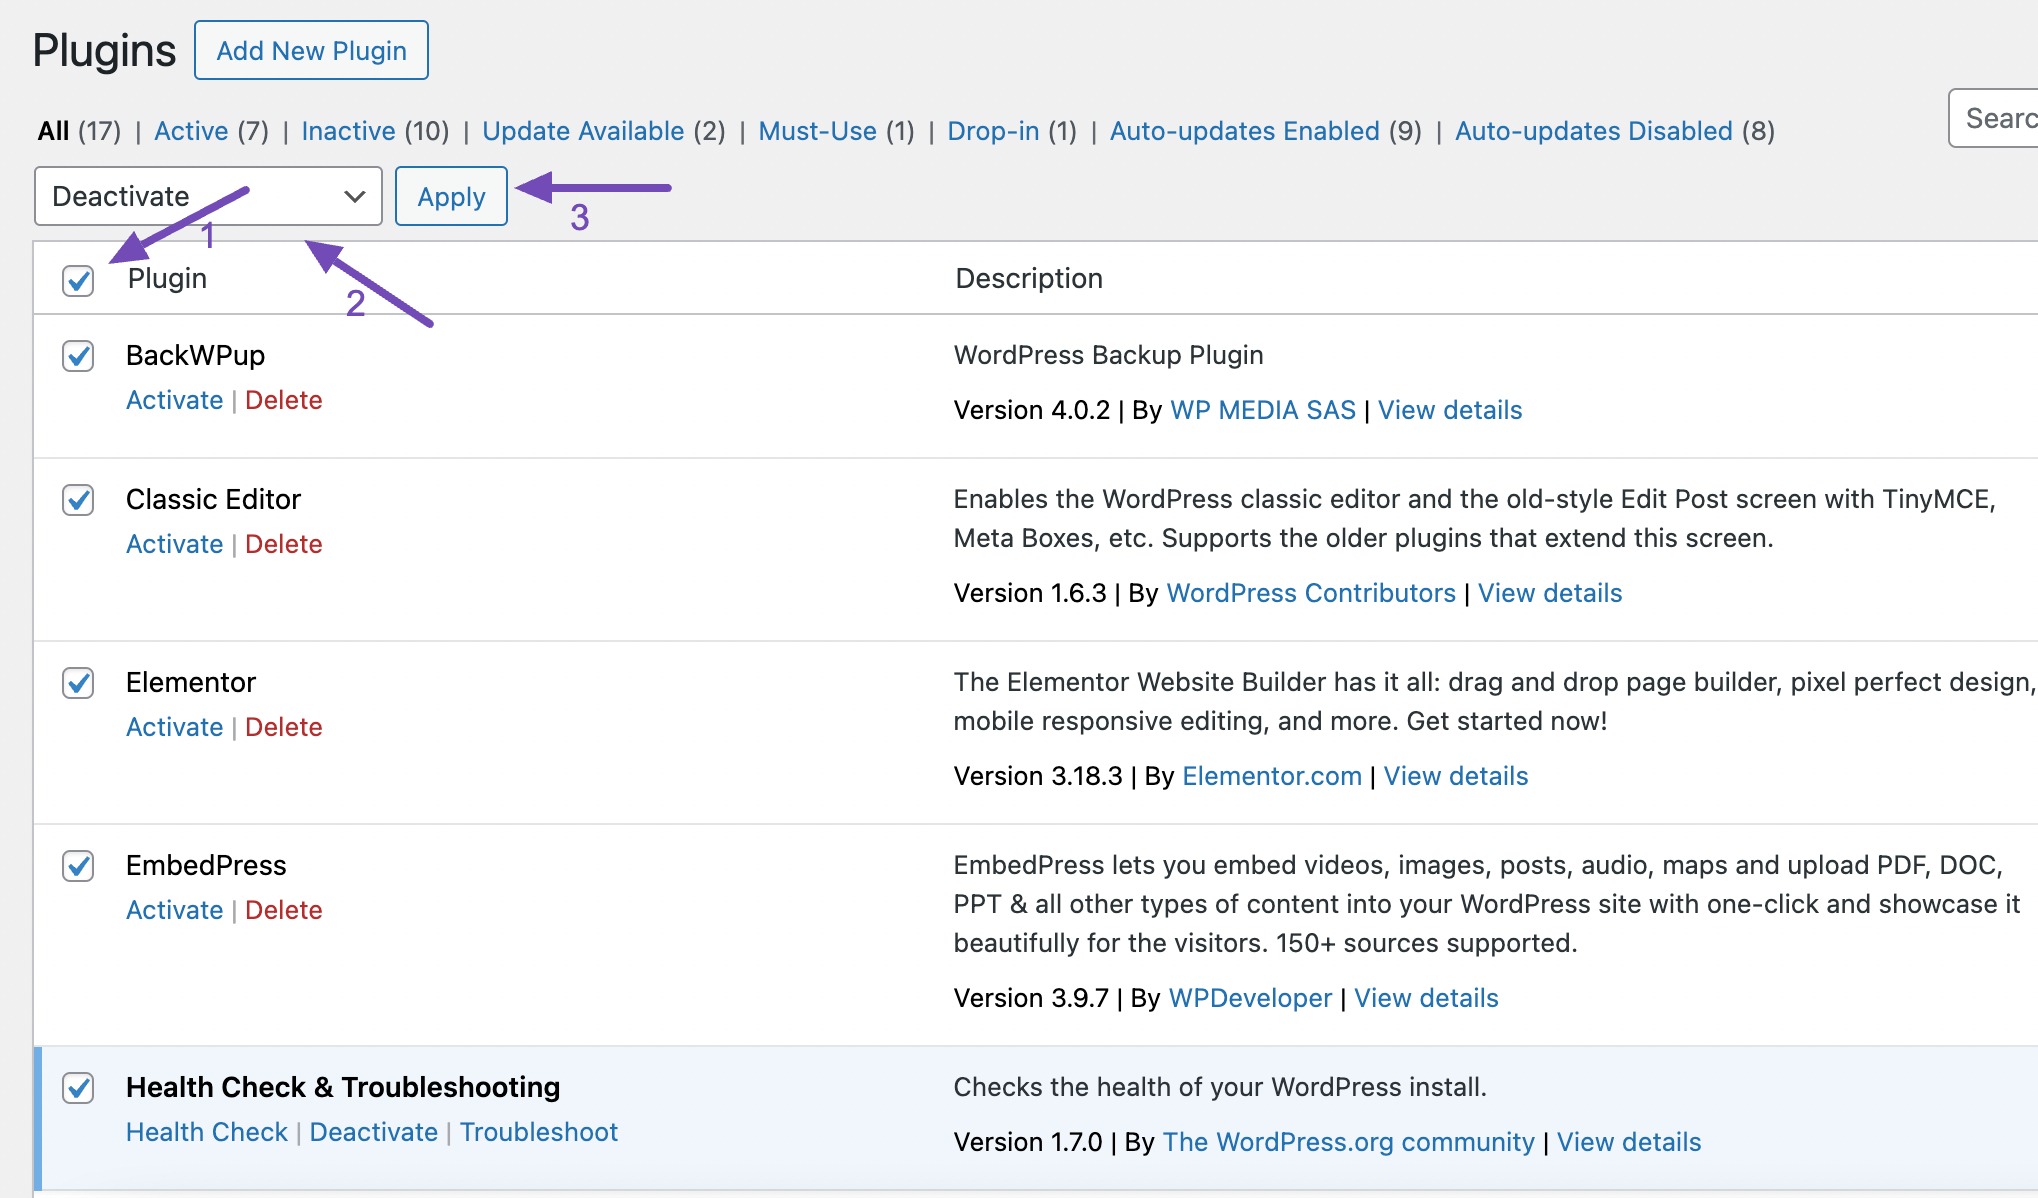
Before starting, it’s important to back up your WordPress website. Additionally, deactivate your plugins by navigating to Plugins → Installed Plugins from your WordPress dashboard.
Select all active plugins, opt for Deactivate, and click the Apply button to ensure a faster process.
After deactivation, proceed to your site’s FTP client or cPanel file manager. Navigate to the site’s file directory or public_html and open the wp-config.php file for editing.
Insert the following code into your wp-config.php file just before the /* That's all, stop editing! Happy publishing. */ line.
/* Multisite */
define( 'WP_ALLOW_MULTISITE', true );
Ensure you save your changes.
This code activates the multisite feature on your WordPress site. Once activated, proceed to set up the multisite network.
Return to your WordPress dashboard and navigate to Tools → Network Setup to configure your multisite network.
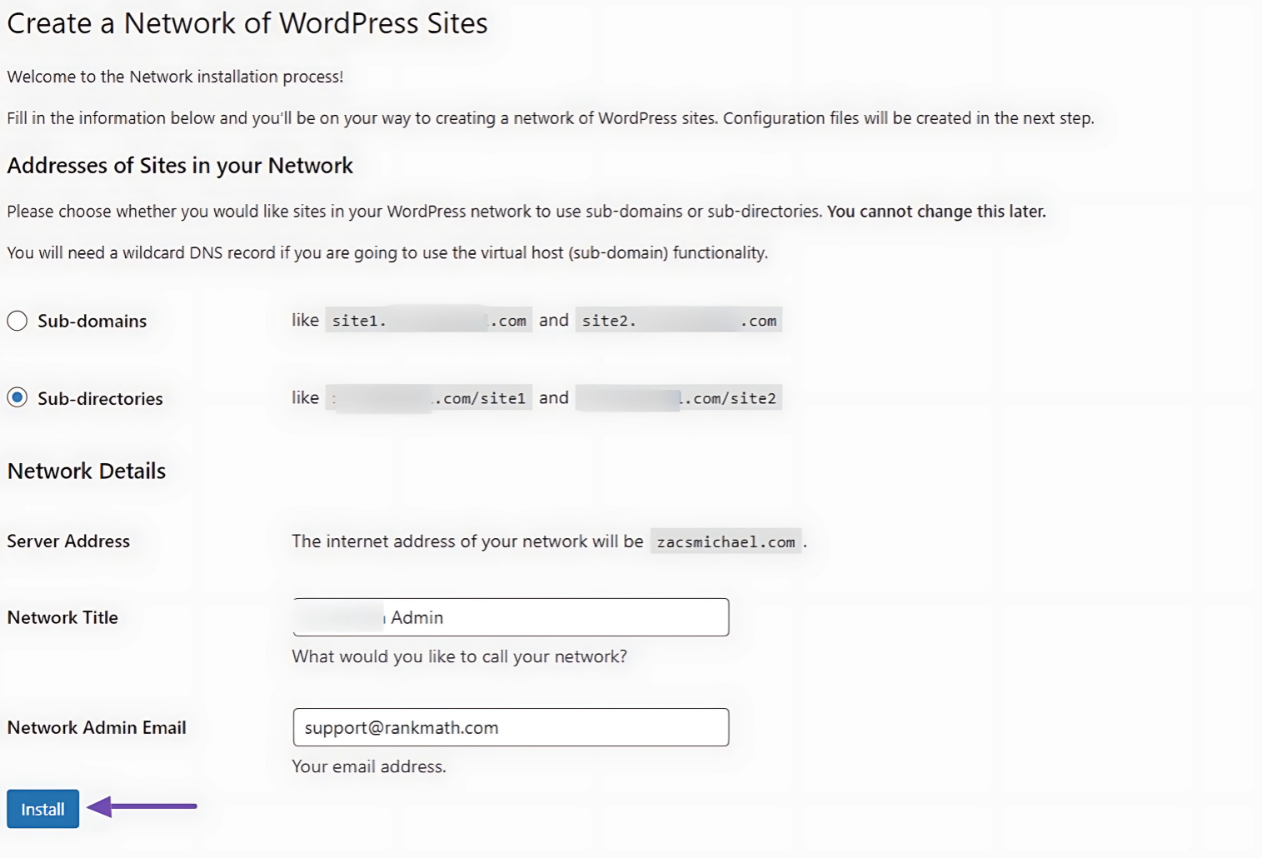
During setup, choose the domain structure for your network (e.g., Subdomains or Sub-directories).
Provide a title for your network and ensure the Network admin email address is correct. Click the Install button to proceed.
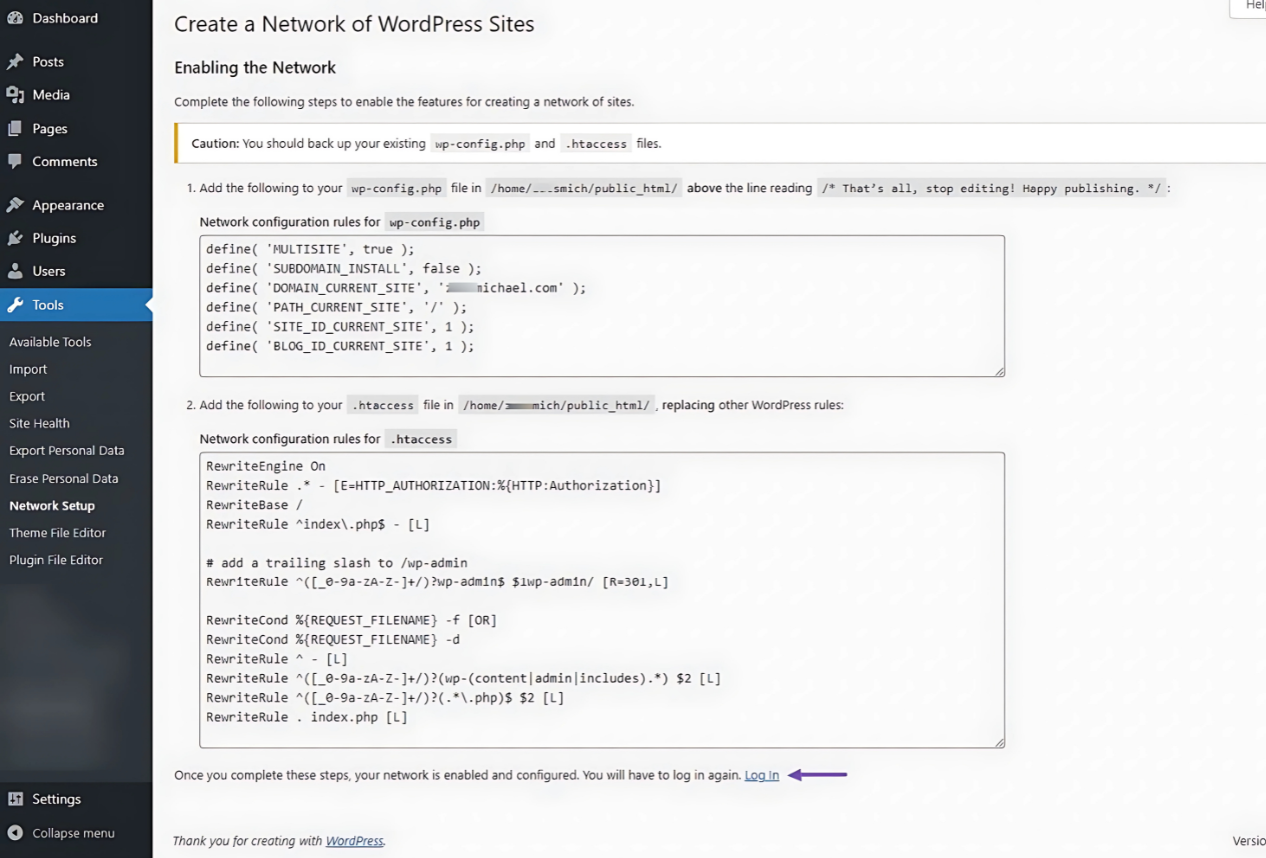
Once you’ve completed the installation of this network setup, you’ll be redirected to a page prompting you to enable the network setup. To proceed, simply copy and paste the provided codes into specific areas, such as your site’s wp-config.php and .htaccess files.
Remember to back up the existing files before making any changes. Once you’ve saved these files, return to this page and click the Log in link, as shown below.
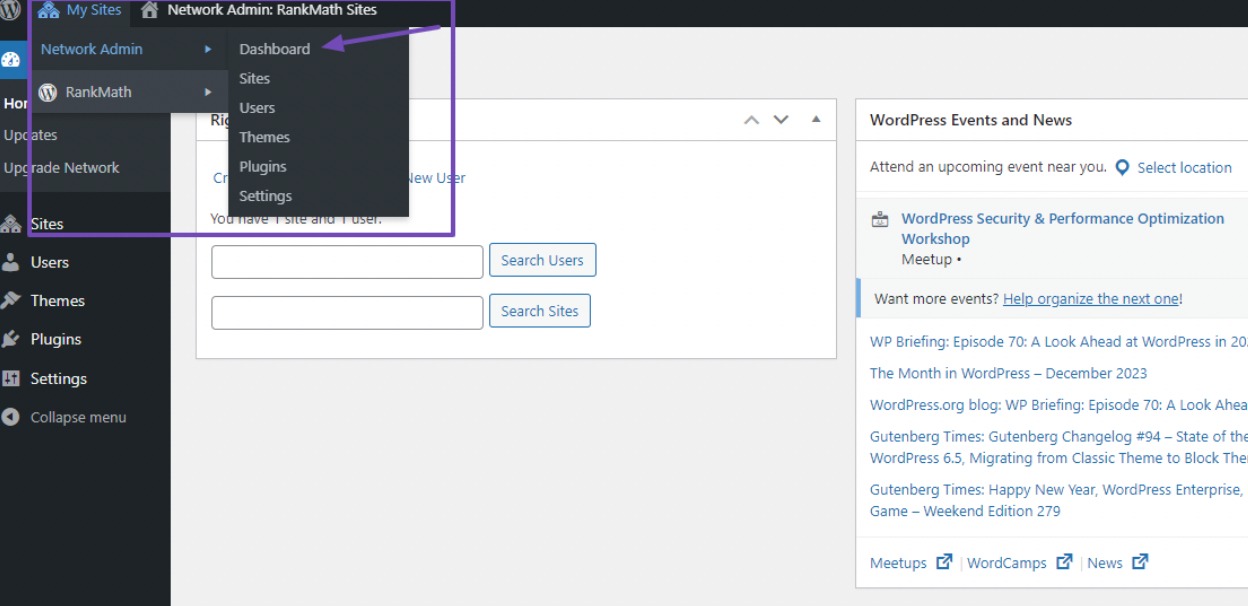
After clicking on the login link, you’ll gain access to your Network Admin dashboard as the administrator. To locate it, hover over the My Sites option on the WordPress bar and click Network Admin, as shown below.
In the Network Admin dashboard, your next step is to create your sites. But before that, it’s essential to decide on the domain structure for your network.
7 Choose a Domain Structure for Your Multisite Network
The structure of your multisite network’s domains is important as it impacts how your sites are accessed and their visibility in search engine results.
You have various options for domain structures, including subdirectories, subdomains, or separate domains. To illustrate:
- Subdirectory: example.com/blog
- Subdomain: blog.example.com
- Custom Domain URL (Mapped): customdomain.com
If you opt for subdomains, configuring wildcard subdomains on your server is necessary, a process we’ll cover in the next section.
If you choose a subdirectory, proceed to the ‘Configuring Multisite Network Settings’ section in this article since you’ve already set it up on the Network Setup page.
Alternatively, using a separate domain for your multisite is an option. This involves adding another domain to your server besides your primary website domain. If you prefer this method, skip to the ‘domain mapping’ section below.
7.1 Setting Up Subdomains for Multisite
Establishing subdomains for a multisite network involves setting up individual subsites. While it’s a straightforward process, there are key steps to ensure everything is done correctly.
Begin by creating a wildcard SSL certificate for your domain. This certificate streamlines installing SSL certificates for any new subdomain created under the same domain name.
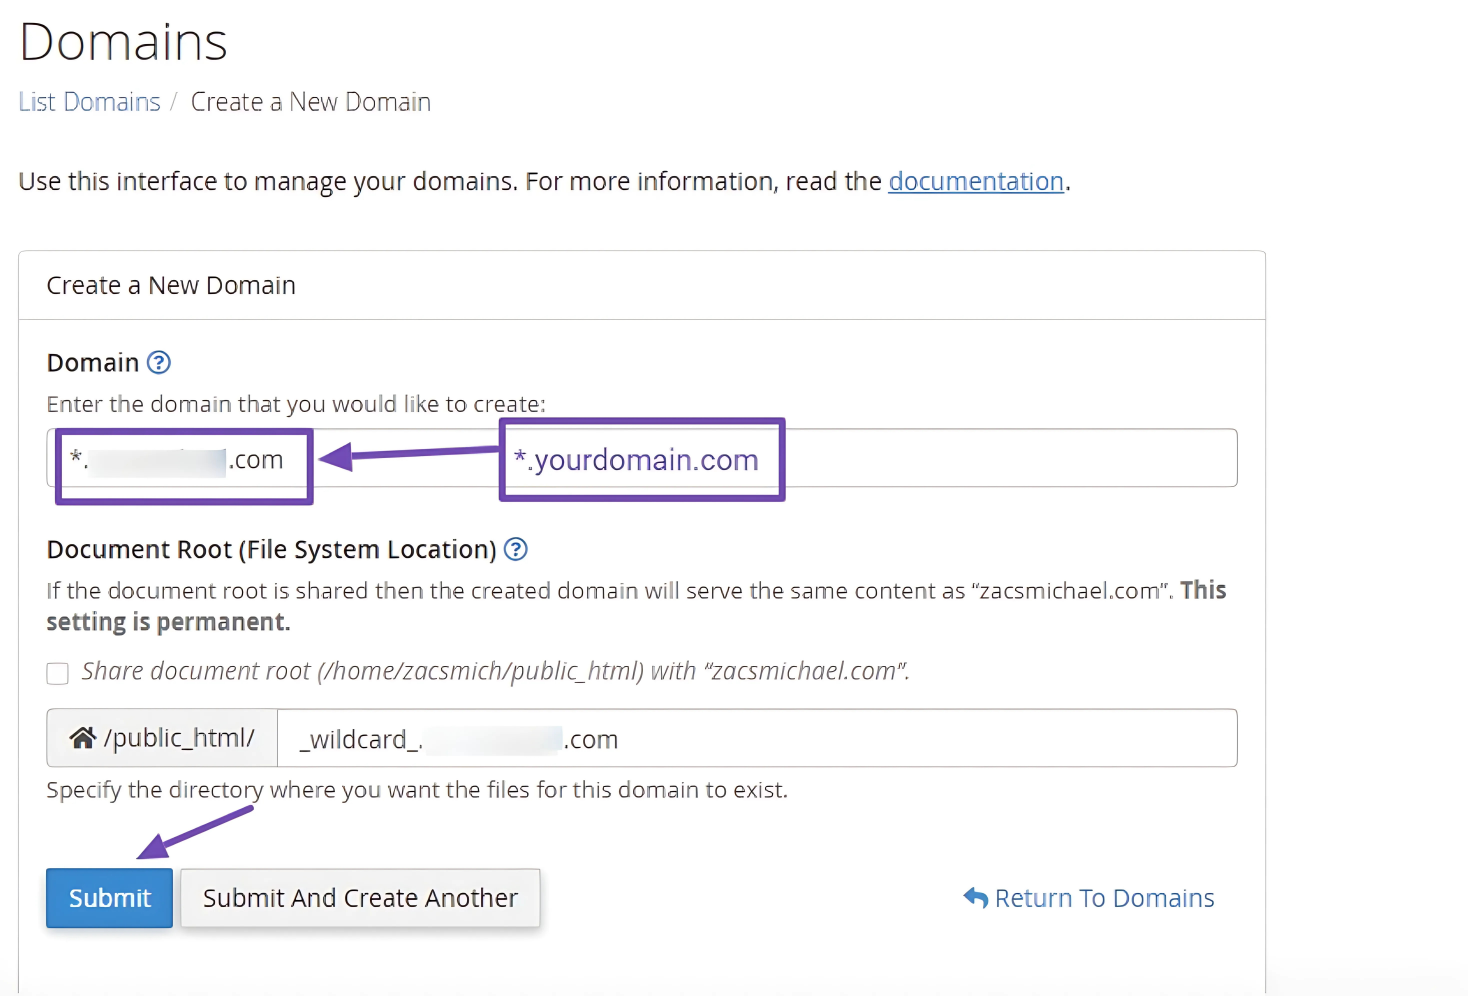
Rather than manually installing SSL certificates for each new subdomain, this process handles it automatically. To initiate this, log in to your cPanel or hosting panel. Navigate and select the Domains option to create a new domain.

Within the domain field, you need to enter the ‘*‘ sign in the subdomain area, followed by your main domain name, and then click the Submit button to save your changes.
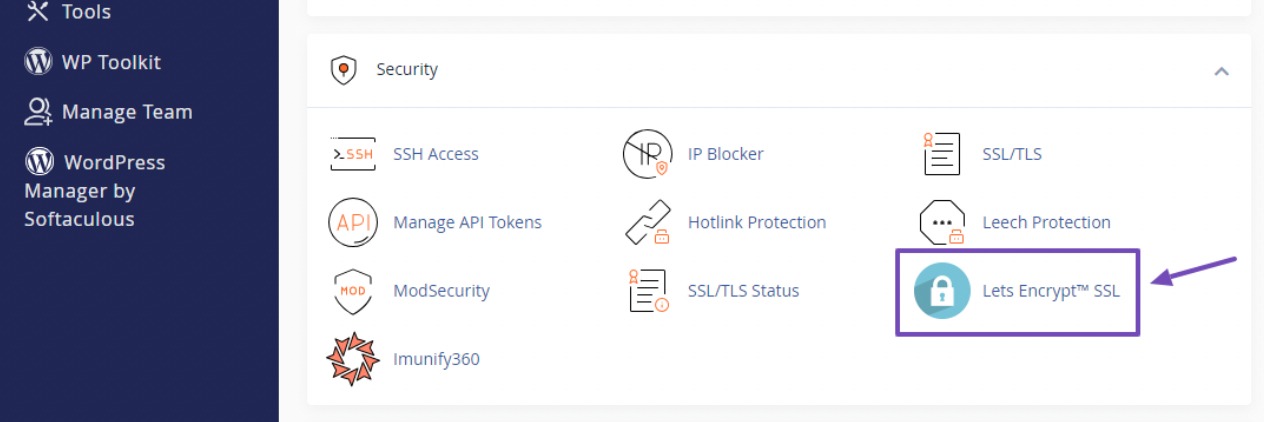
Next, install an SSL certificate for the wildcard subdomain. To do so, navigate to Let’s Encrypt SSL from your cPanel dashboard.
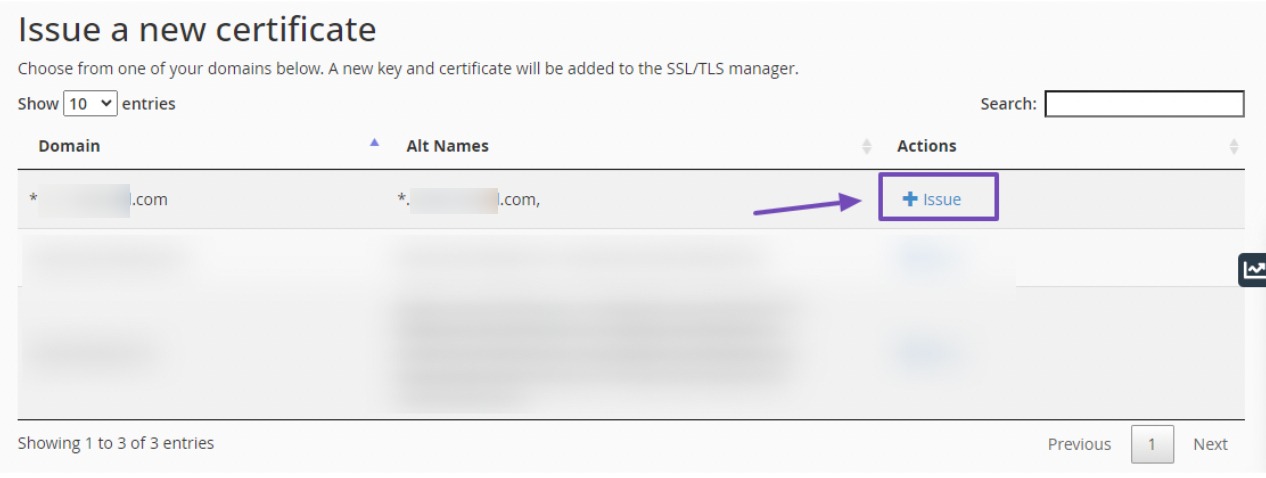
On the SSL certificate page, scroll down and click on Issue for the wildcard subdomain.
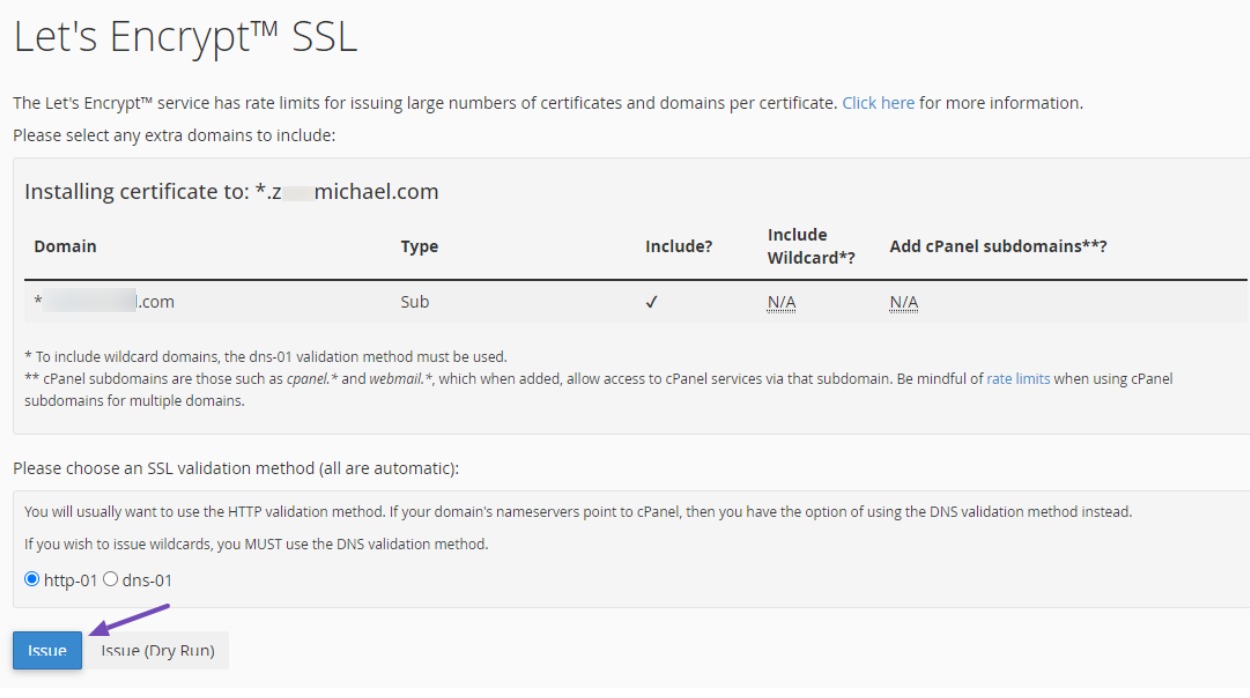
Click the Issue button to install the SSL certificate for the wildcard subdomain.
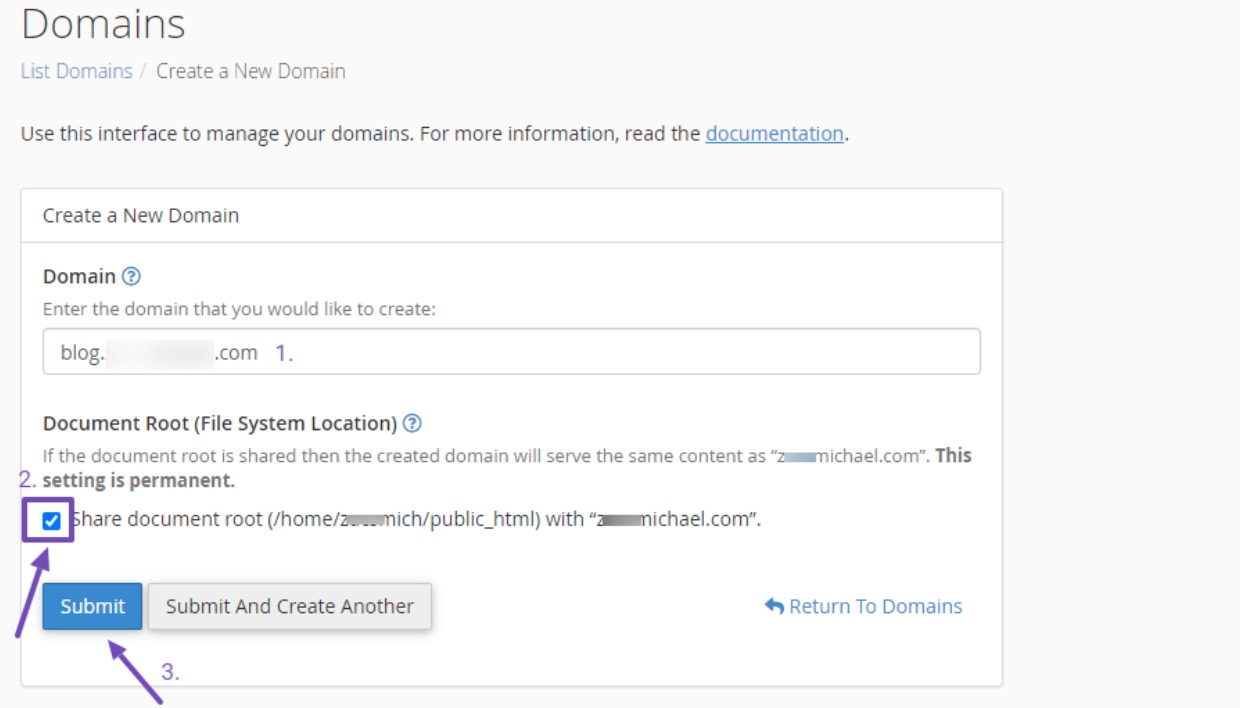
Once done, go back to the Domain page to create the desired subdomains for your website. For each subdomain, choose the option to share the document root with your main domain file directory (/home/domaindirectoryname/public_html) and click Submit to save the changes.
Once you’ve set up this subdomain, there’s no need to reinstall an SSL certificate. The earlier created subdomain wildcard will handle that, including any subsequent subdomains under this domain.
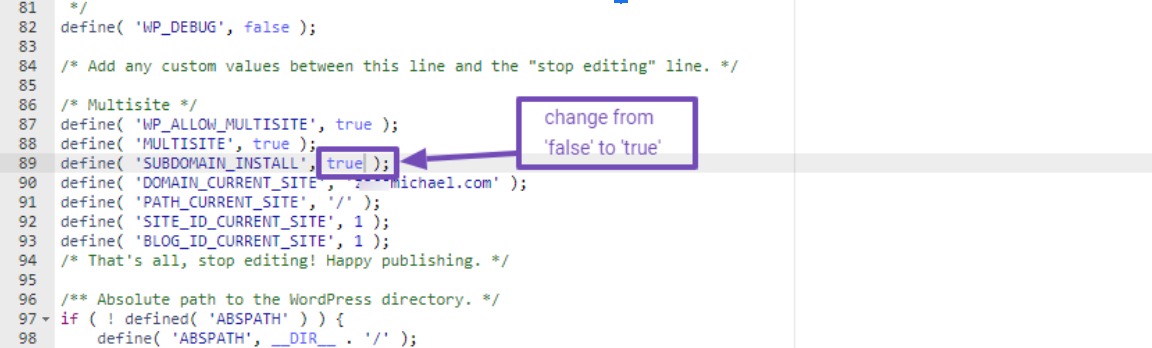
Now, it’s time to enable the subdomain in your Network Admin. Navigate to your website’s wp-config.php file and edit the Network Configuration code you copied from the Multisite Network configuration.
Locate where you pasted the code and change the boolean value “false” on the subdomain activation code to “true”. Here is the code:
define( 'SUBDOMAIN_INSTALL', true );After carefully changing the value to “true”, it will look like this:
After making this adjustment, remember to save your changes.
Now, return to your Network Admin in WordPress and navigate to Sites → Add New Site. You’ll witness the transformation, as the site address will no longer follow a subdirectory structure but will adopt a subdomain pattern.
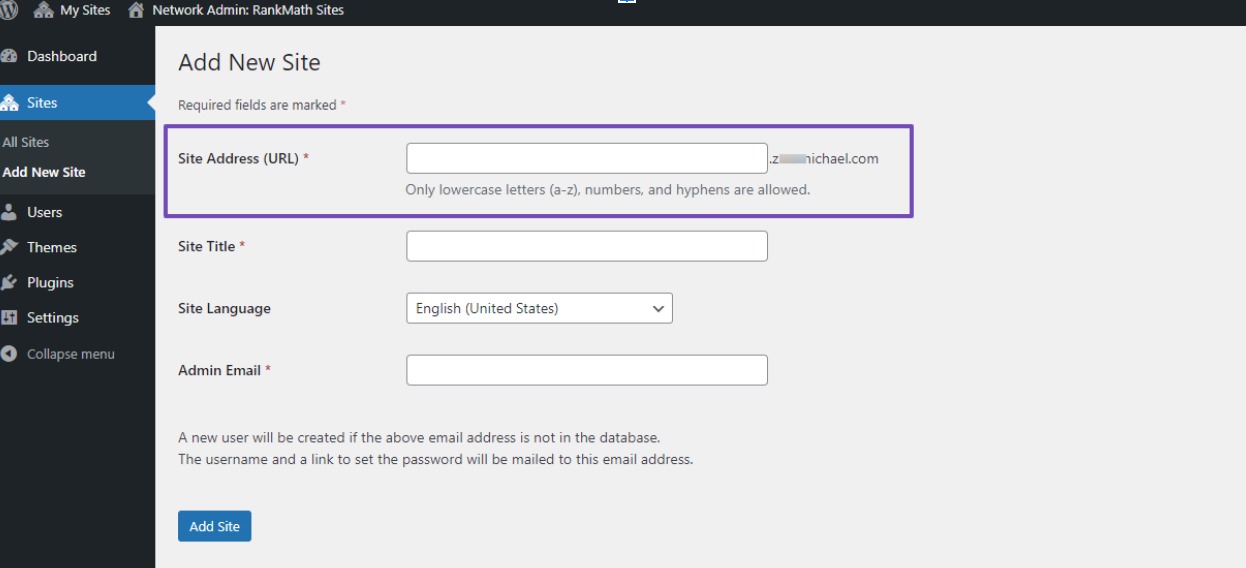
You can input the subdomain address you’ve created, specify the name, choose your preferred language, and enter your domain email address.
It’s advisable to use the email you used for your main website. This ensures seamless control of the subsites as the Super Admin.
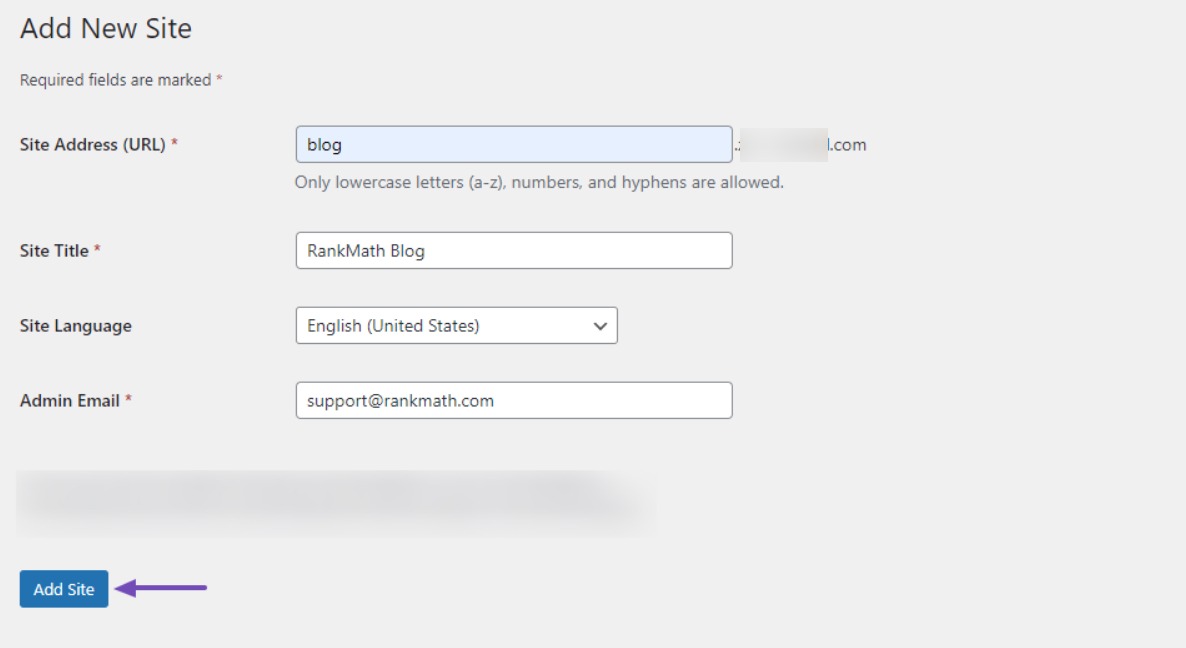
After completing the input, click the Add Site button to establish your site.
7.2 Domain Mapping in Multisite Networks
This approach is ideal if you prefer using custom domains for your subsites instead of subdirectories or subdomains, as WordPress inherently supports domain mapping.
Before proceeding, ensure you’ve purchased custom domains and connected them to your hosting server using their nameservers.
In your cPanel’s Domain section, add these domains as usual and install SSL certificates for these addon domains.
Once these steps are completed, you’re ready for the next phase. To set up domain mapping, use either the automatic cPanel method or the code implementation method discussed earlier during your multisite network installation.
In addition to the WordPress multisite code, you also need to include the following line in your wp-config.php file to enable user logins for each site:
define('COOKIE_DOMAIN', $_SERVER['HTTP_HOST'] );This is how it will appear:
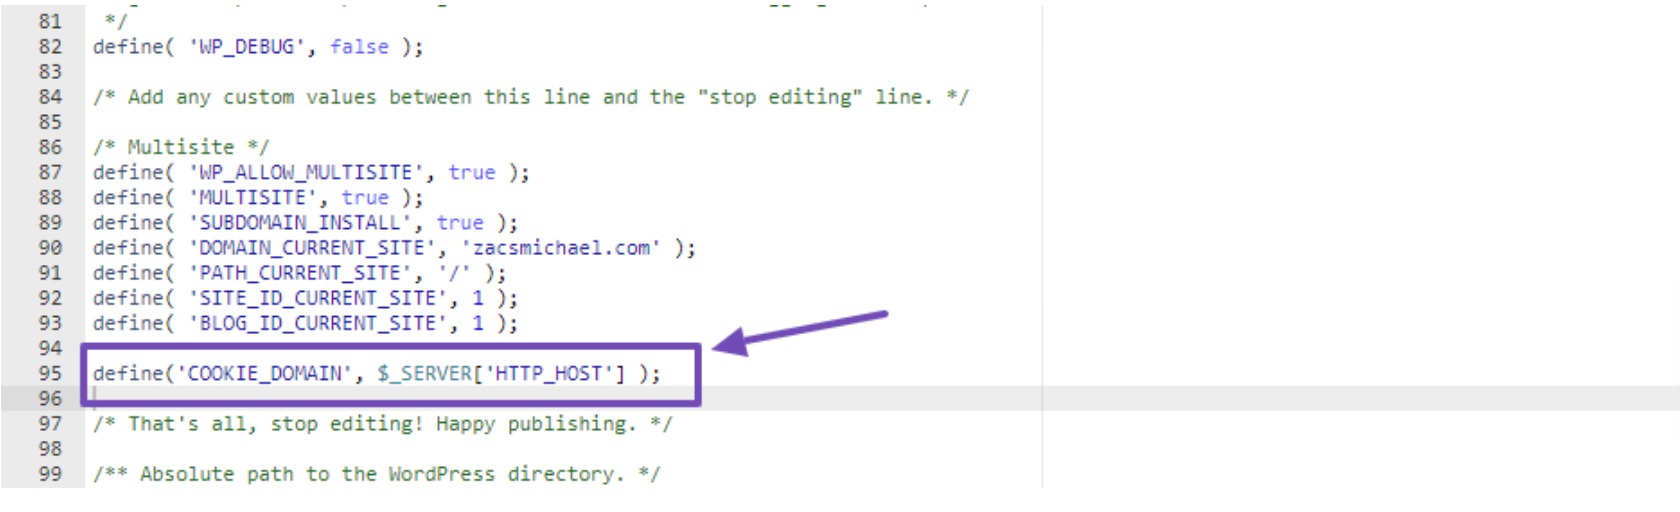
Ensure you save the changes.
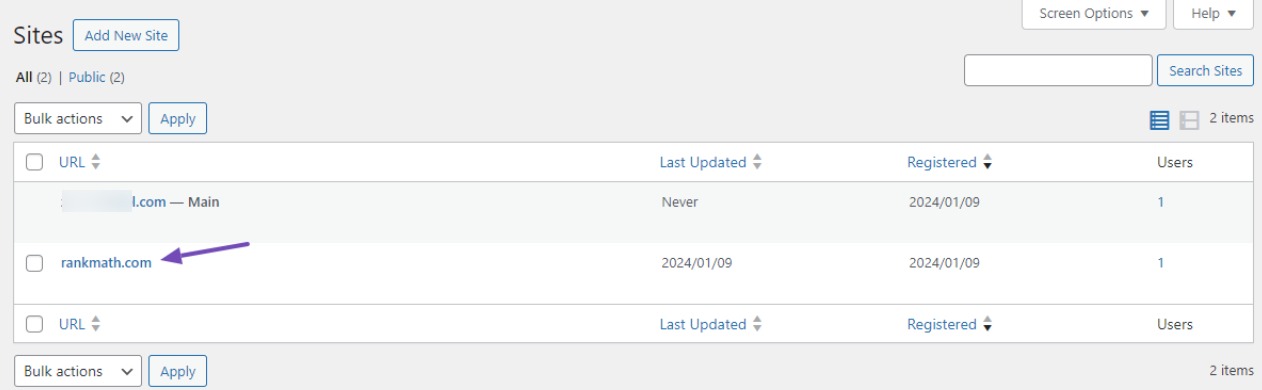
Once done, return to your Network Admin, go to Sites, and click on Edit below a created subdomain, as shown below.
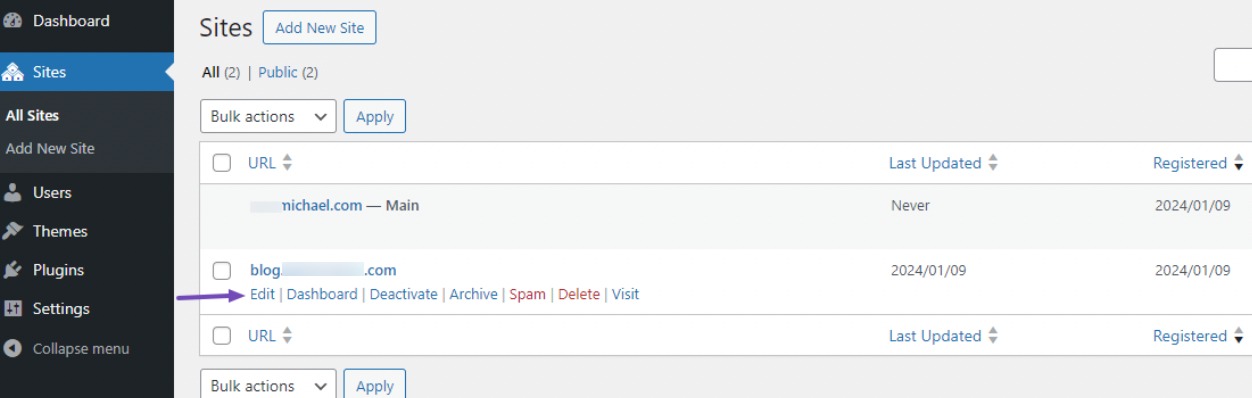
Then, in the site settings, replace the subdomain with the custom domain you want to use and click the Save Changes button to create the site.
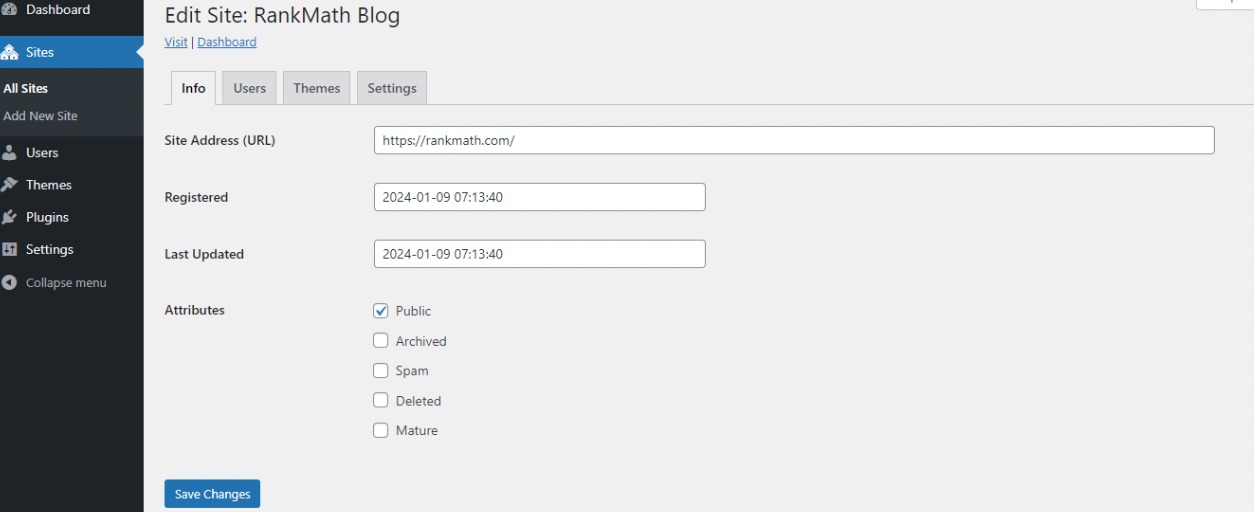
Upon saving your changes, your newly created website should now function as expected.
8 Configuring Multisite Network Settings
In the Multisite dashboard, known as the Network Admin, you’ll find Home, which displays critical updates and activities.
Navigate to Updates to check for and update WordPress core files, including plugins and themes.

To upgrade your Network Admin, navigate to Upgrade Network. In the Sites section, manage site creation, editing, and others. Add new users as Super Admins in the Users section.
Moving to the Settings section, you’ll find Network Settings and Network Setup. The Network Settings page allows you to configure general activity settings for all sites in your network.
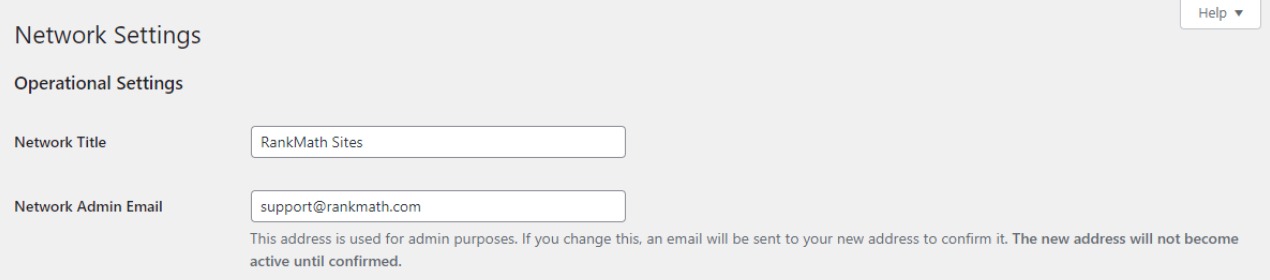
Operational Settings
This is where you set up the title of the network and also the email address you will use on your sites.
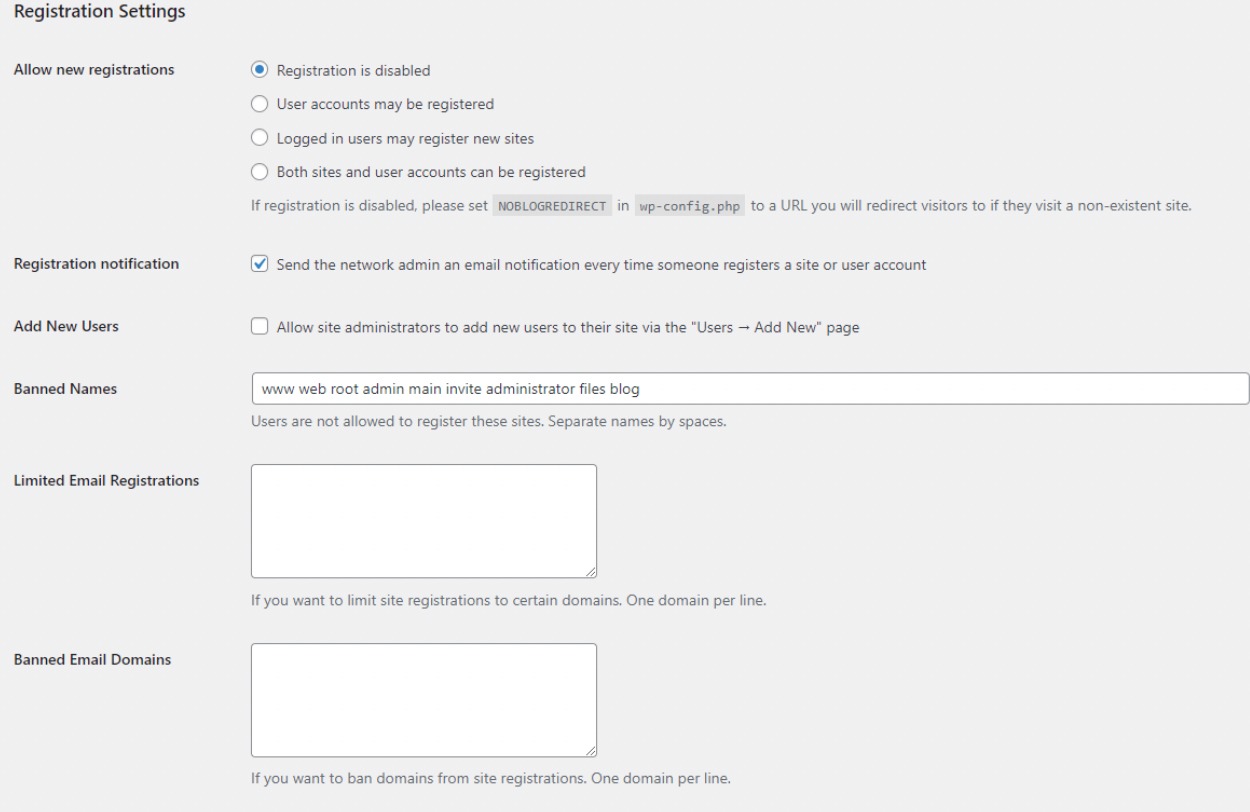
Registration Settings
The most crucial setting in your network setup is the Registration Settings section on the network settings page.
By default, user and site registrations are turned off. You can enable user registration, permit existing users to create new sites, or enable user and site registration.
New Site Settings
In the New Site Settings section, you can customize welcome emails and the content of the initial default post, page, and comment.
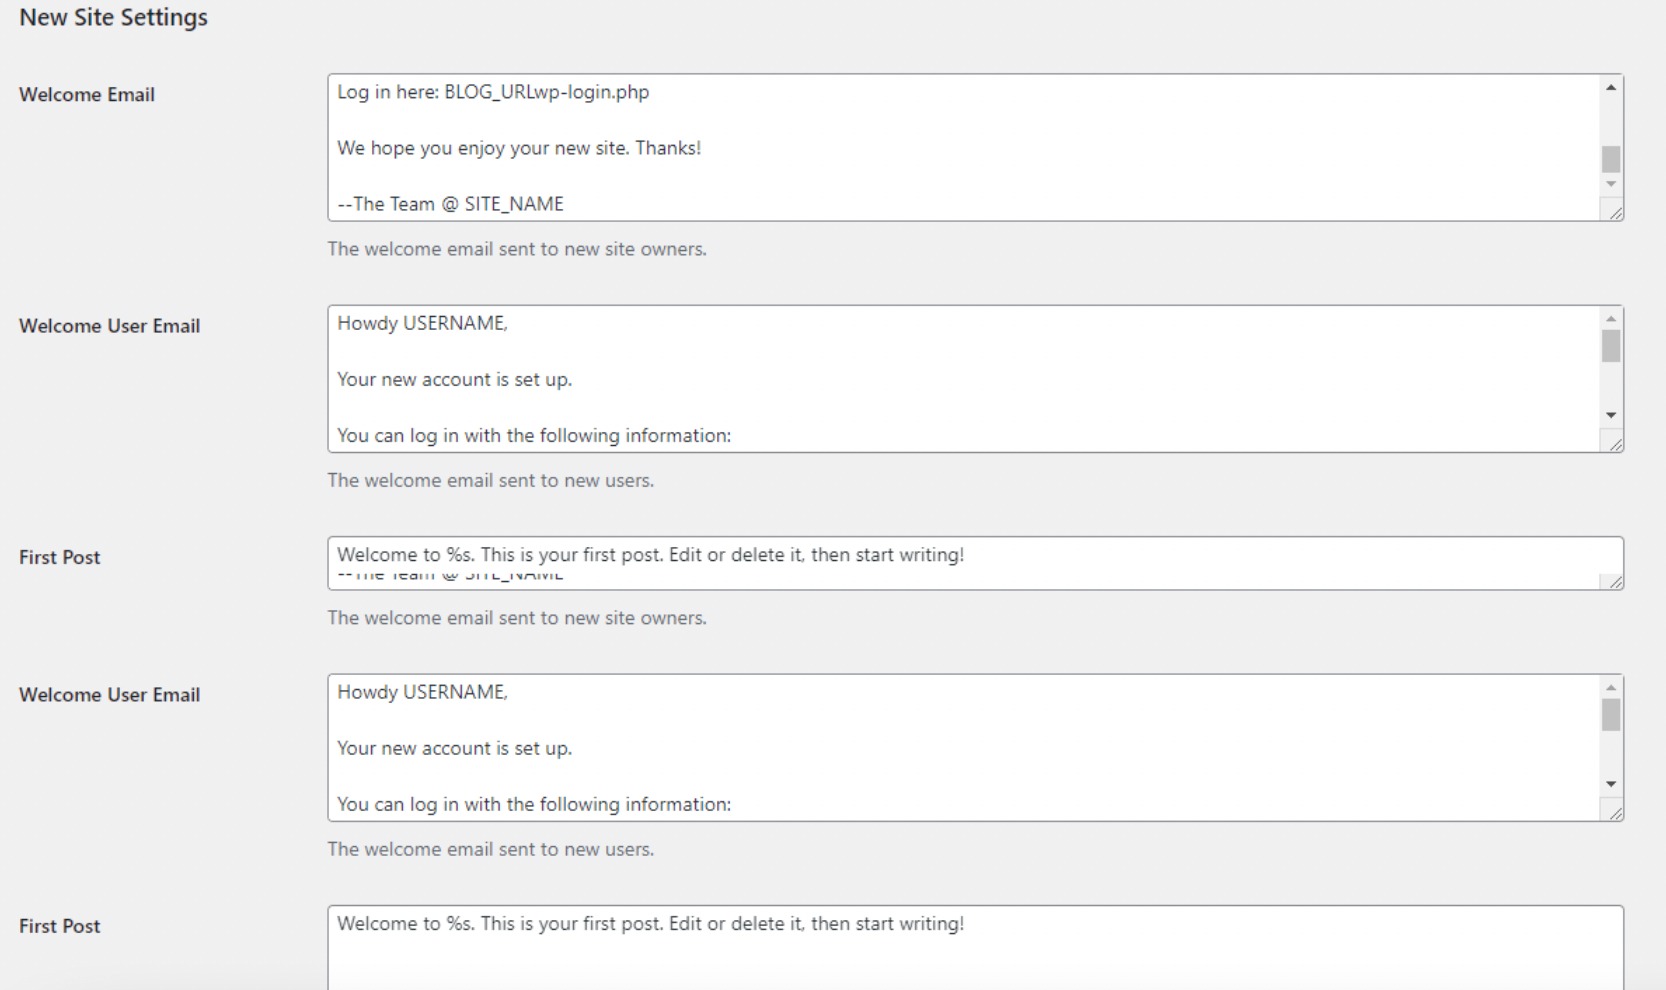
Keep in mind, as the network administrator, you can modify these settings whenever necessary.
Upload Settings
In the Upload Settings section, you can restrict file upload space by checking the box, viewing allowed file types for all sites, and establishing the maximum size for each uploaded file.
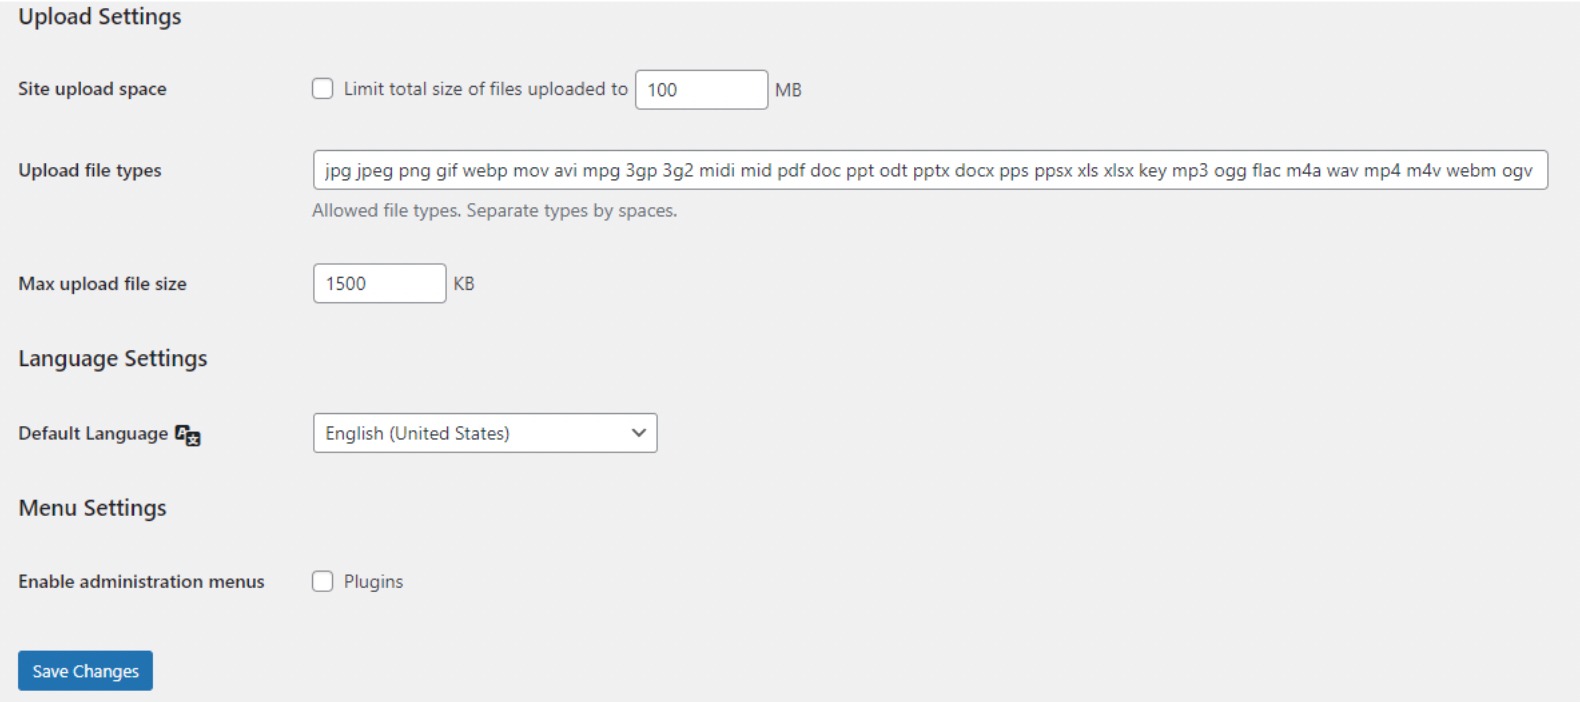
Language Settings
You can choose your preferred language for all sites in this section.

Menu Settings
The Menu Settings allow you to enable the administrative menu for the plugins section on your network sites.

Enabling this option will display the plugin’s menu for respective site admins, allowing them to activate or deactivate plugins on their individual sites, though they cannot install new plugins.
Once you’ve finalized all configuration settings, click the Save Changes button.
9 Setting Up Themes and Plugins for Your Multisite Network
In a multisite network, site administrators are not authorized to install themes and plugins independently.
However, as the network administrator, you can install these plugins and themes.
9.1 Installing Themes for Your Multisite
To install themes for your multisite network, navigate to Themes → Add New Themes within the Network Admin.
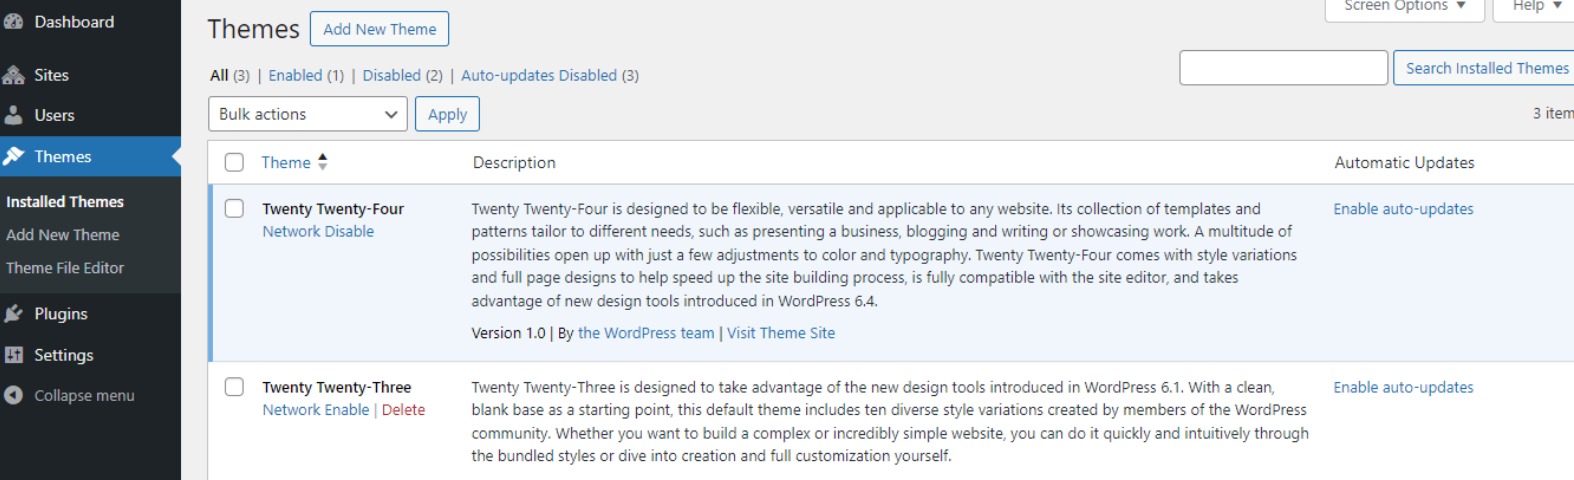
On this page, you’ll find a list of themes currently installed in your WordPress multisite. To make a theme available to other sites, click Network Enable for that theme.
Conversely, you can disable a theme by selecting Network Disable, but remember that this option only appears when the theme is enabled.
To add a new theme, click Add New at the top of your screen and install it as you usually would. Once installed, use the Network Enable option to make it available to other sites on your network.
By default, WordPress assigns its theme as the default for all sites. If you wish to change it, consider adding the following code to your wp-config.php file:
define( 'WP_DEFAULT_THEME', 'your-theme' );Replace ‘your-theme’ with your theme’s folder name, which is found in the /wp-content/themes/folder. Keep in mind that this step is optional.
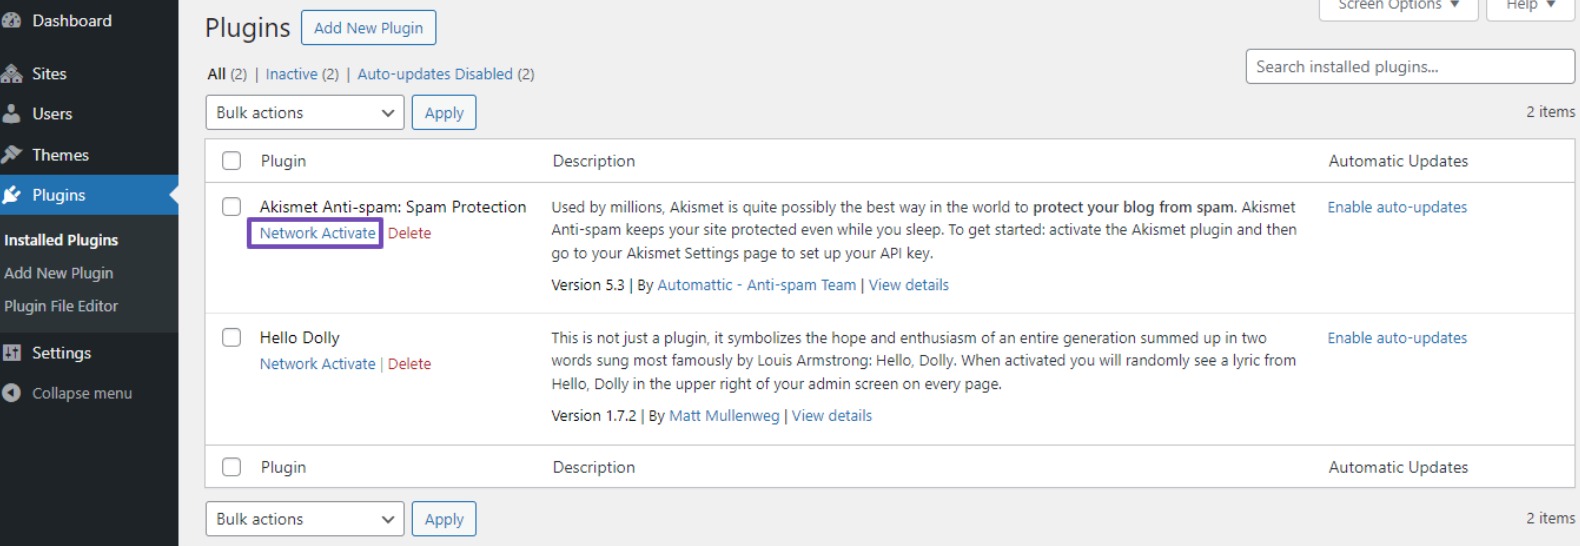
9.2 Installing Plugins for Your Multisite Network
Likewise, you can go to the Plugins page to install plugins. Activate them for your multisite network by clicking the Network Activate link below each plugin.
If you encounter issues, review your configurations for any missed steps. Verify the codes you implemented to ensure accuracy.
10 Frequently Asked Questions
Can I use different themes for each site in a Multisite network?
Yes, each site within the network can have its own theme. However, network-wide themes can also be applied for consistency.
How can I handle SEO for individual sites within the Multisite network?
Use SEO plugins that support Multisite installations, such as Rank Math SEO. Configure the settings for each site individually within the Network Admin dashboard.
Are there limitations on the number of sites I can have in a Multisite network?
While there’s no strict limit, the performance of your hosting environment and server resources may impose practical constraints. Choose a hosting plan that suits the anticipated scale of your network.
Can I have different domain extensions for sites in a Multisite network? (e.g., .com, .net, .org)
Yes, you can use different domain extensions for sites in a Multisite network. Ensure proper domain mapping settings and DNS configurations for each domain.
Can I add an online store to a WordPress Multisite Website?
Yes, you can add an online store to a WordPress Multisite Website. Utilize plugins like WooCommerce on individual sites for independent e-commerce functionality while centrally managing the network.
11 Conclusion
Setting up a WordPress Multisite Network can be a powerful way to manage multiple websites from a single dashboard. Whether you’re building a network of blogs, managing client sites, or launching separate sites for different departments or locations, Multisite gives you the control and flexibility to do it all efficiently.
By following the steps in this guide—from meeting the basic requirements to completing the installation—you’ll be well on your way to running a streamlined, centralized website network. Once it’s up and running, you’ll save time on updates, simplify user management, and maintain consistent branding across all your sites.
Take your time, follow the process carefully, and enjoy the convenience that WordPress multisite brings to multi-site management.
We hope you’ve successfully set up a robust WordPress Multisite Network. If so, let us know by Tweeting @rankmathseo.