Have you ever needed an exact copy of your WordPress website, maybe to move to a new host, set up a staging environment, or create a reliable backup?
Cloning your site can make all of that easier, saving you time and preventing potential headaches. And the best part? With the right tools and a clear guide, it’s much simpler than you might think.
In this post, we’ll walk you through the step-by-step process to clone your WordPress website, even if you don’t have technical experience.
Let’s dive in!
Table Of Contents
1 What is WordPress Cloning?
WordPress cloning is the process of creating an exact duplicate of your website. This means everything on your site, your database, theme files, plugins, media uploads, and settings, gets copied and recreated in another location.
When you clone a WordPress site, you’re essentially making a full replica that works just like the original. It’s like having a snapshot of your site that you can move, reuse, or restore whenever needed.
What Gets Cloned?
- Database: All your posts, pages, comments, user data, and settings
- Theme files: Your current design and layout
- Plugins: Functionality added to your site
- Media files: Images, videos, PDFs, and other uploads
- Settings: Customizations and configurations
2 Why Clone a WordPress Site?
Cloning a WordPress site might seem unnecessary at first, until you realize how useful and time-saving it can be. Here’s why you might want (or need) to clone your site.
- Website Migration: When you’re moving your website to a new hosting provider or domain, cloning makes the process smooth. Instead of rebuilding your site from scratch, you can simply create a full copy and move everything, your content, settings, themes, and plugins, to the new location.
- Creating a Staging Environment: A cloned site is perfect for testing. Before making major updates (like a new theme, plugin, or WordPress version), you can create a staging site to test everything without affecting your live website. If something breaks, your original site stays safe.
- Full Website Backup: Cloning can serve as a reliable backup. If your site crashes or gets hacked, you’ll have a full working copy ready to restore, saving time and minimizing downtime.
- Website Redesign or Development: If you’re planning a redesign or major structural changes, working on a clone allows you to experiment freely. Once you’re happy with the changes, you can push them live without risking errors on your active site.
- Creating a Template for Other Projects: If you often build similar websites, cloning an existing one can help you save time by using it as a starting point. This is especially useful for developers or agencies who work on multiple sites with similar setups.
- Troubleshooting and Debugging: Sometimes, you need to test or troubleshoot issues. Cloning your site allows you to do this in a safe environment without breaking anything on the live version.
3 Methods of Cloning a WordPress Site
Let us now discuss the methods to clone a WordPress website.
3.1 Clone a WordPress Site Using Softaculous
One of the easiest ways to clone your WordPress site is through Softaculous, a popular auto-installer available in many hosting control panels. This method doesn’t require you to log in to your WordPress dashboard.
Log in to your hosting panel or cPanel. Look for Softaculous Apps Installer or go directly to WordPress Manager.
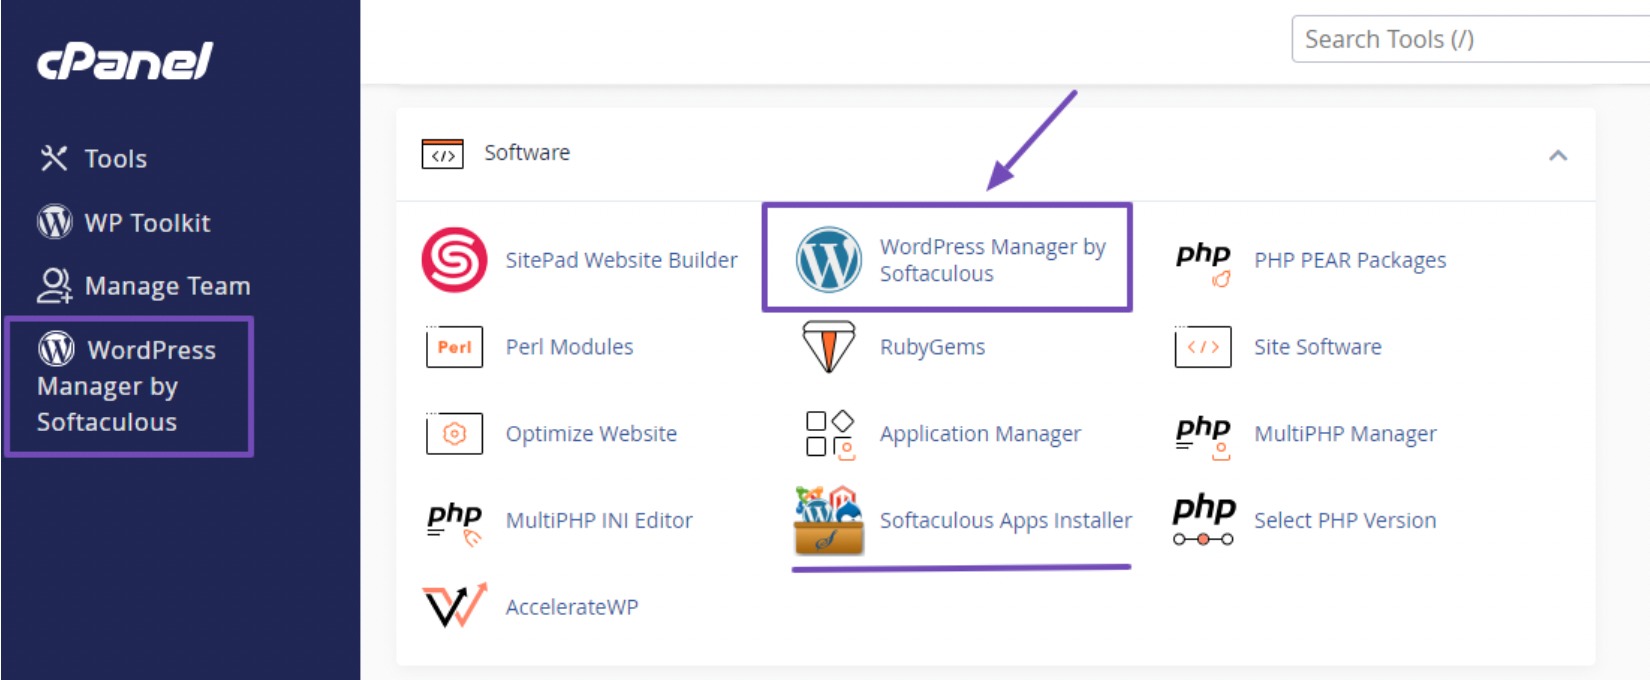
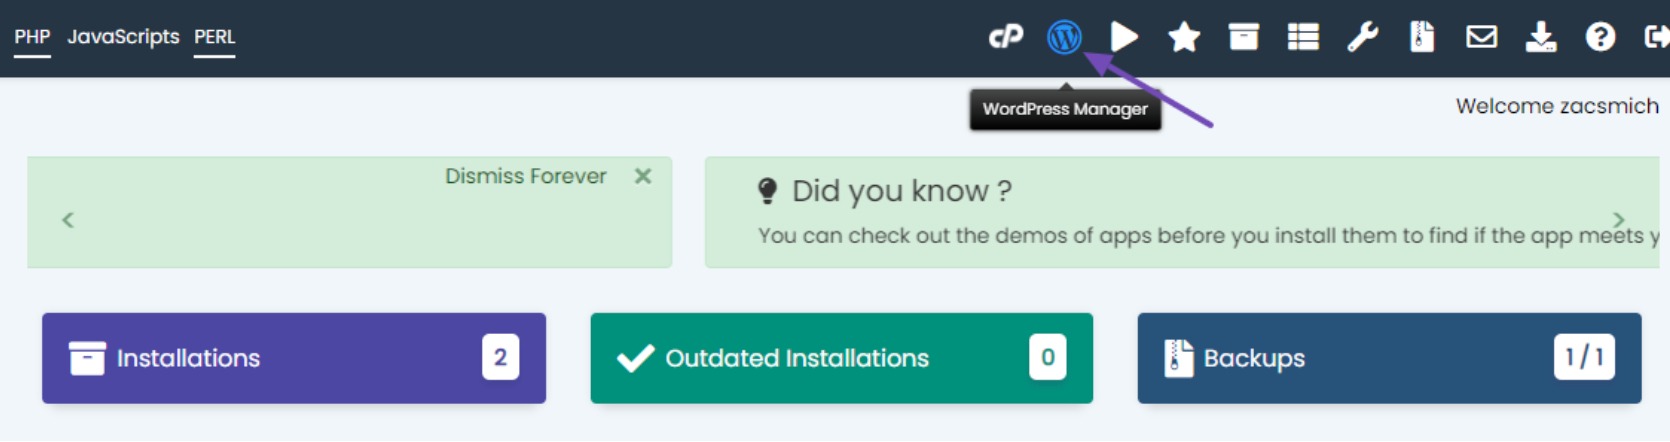
If you chose Softaculous, click on the WordPress Manager icon from the menu.
In the WordPress management interface, find the website you want to clone. Click the dropdown menu next to it, scroll to the bottom, and select Clone.
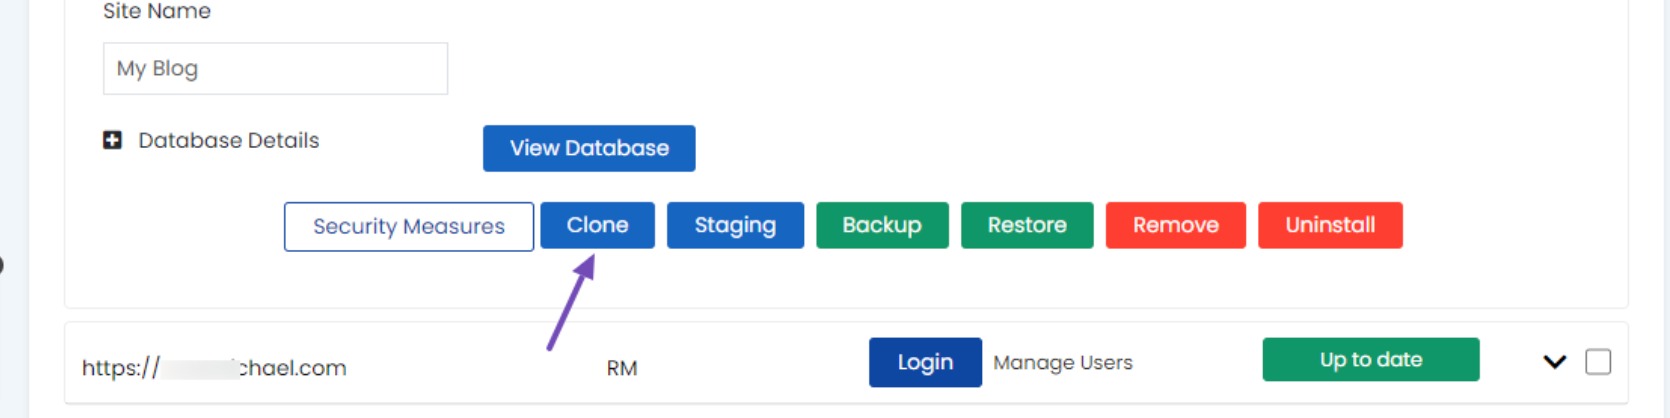
On the Cloning WordPress page, choose the destination URL (domain or subdomain) where you want to place the cloned site. Enter a name for the cloned installation.
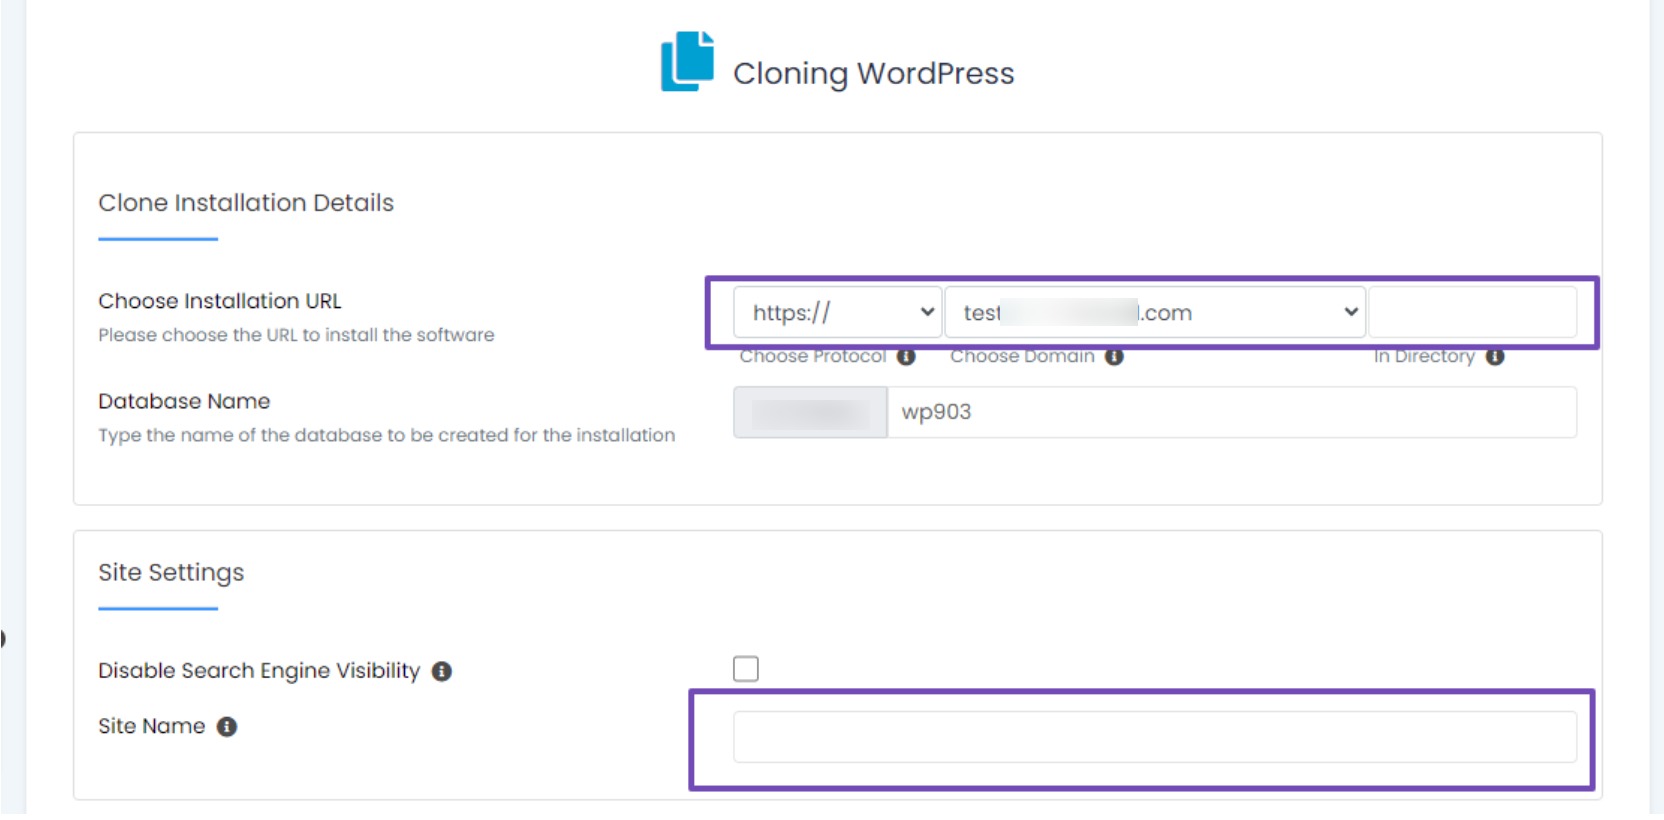
Make sure you have a subdomain or additional domain set up before starting the cloning process. Select the desired subdomain or domain, find the site information, and click the Clone Installation button to complete the process.
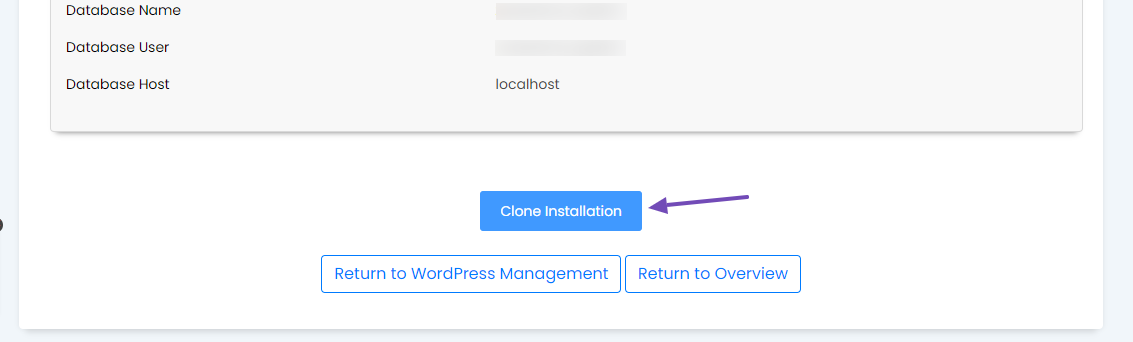
The cloning process requires some time. Wait a few moments, once the process finishes, you’ll see a success message with a link to your newly cloned site and its WordPress admin panel.
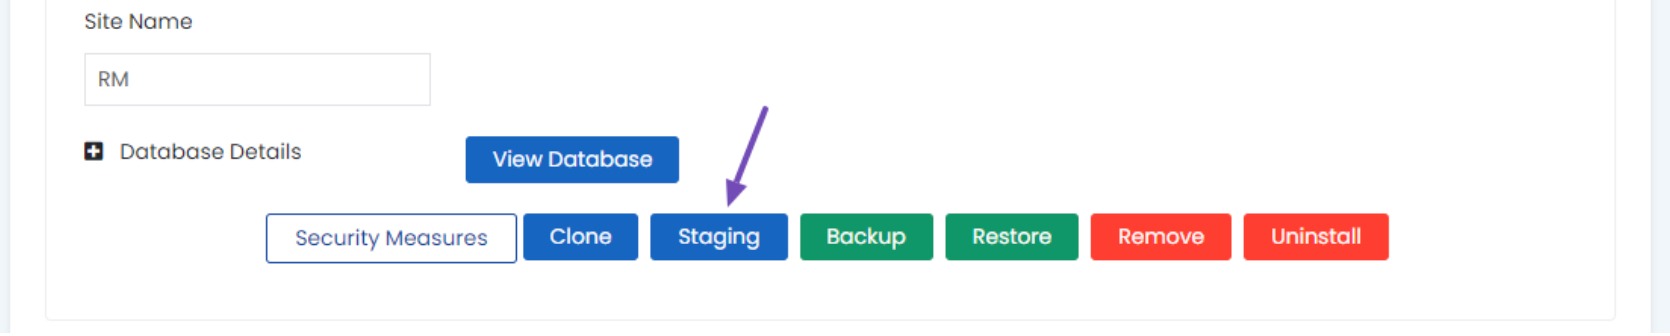
If you’d like to create a staging site instead, the process is almost the same. Just click on the Staging button instead of Clone, and follow the same steps.
3.2 Clone a WordPress Site With a Plugin
You can clone a WordPress site using a plugin, a method particularly useful for those wanting to replicate their site to a different location or domain.
Tools like Duplicator make the process simple, efficient, and beginner-friendly.
Duplicator bundles your entire website (files + database) into a single downloadable package, making it ideal for migrations, backups, or setting up a duplicate site elsewhere.
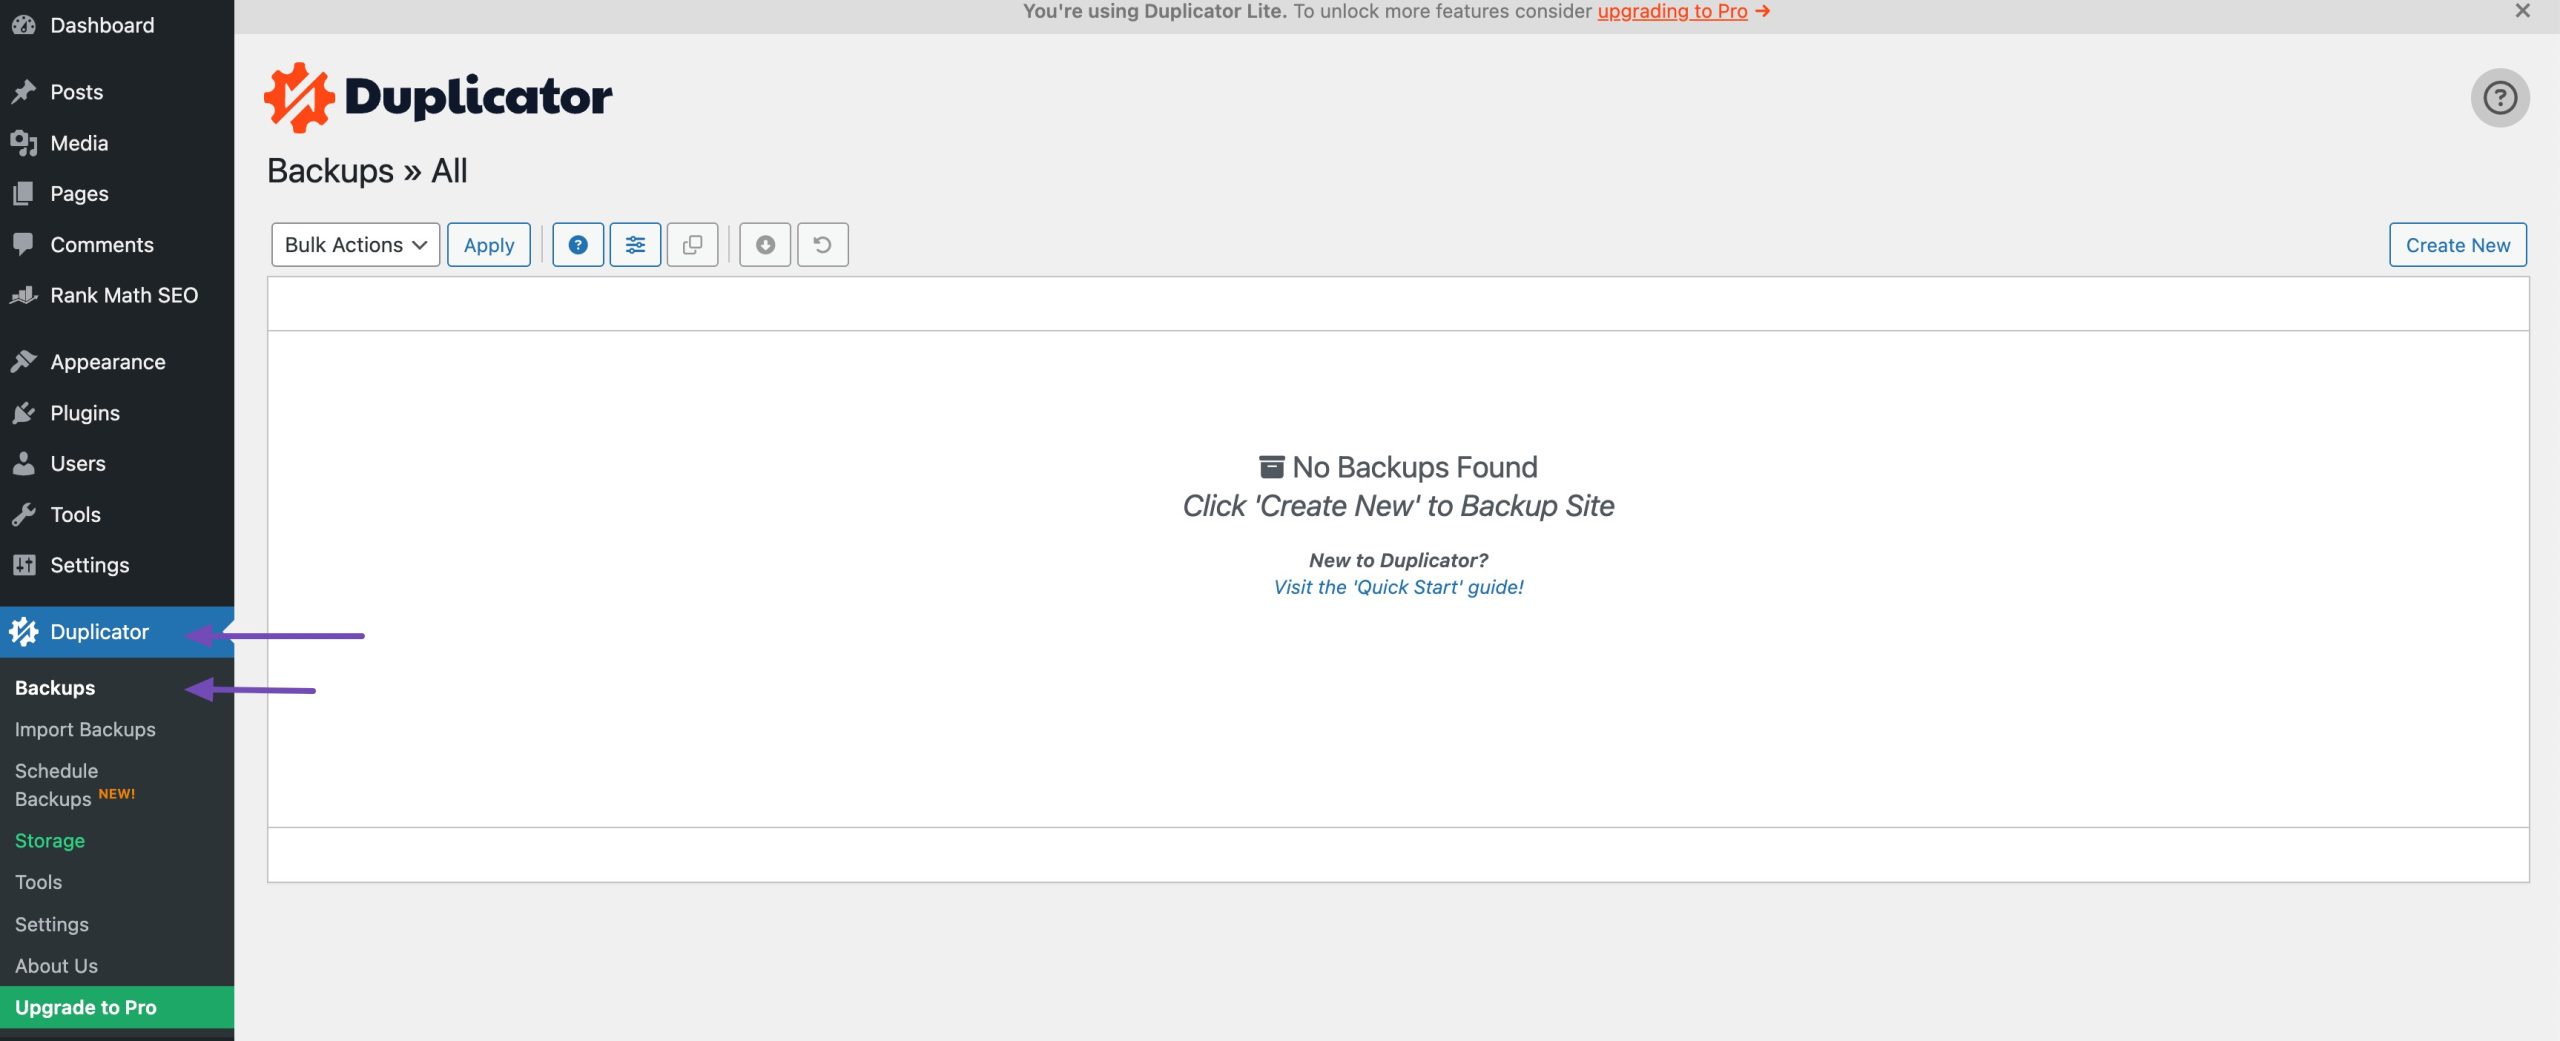
Install the Duplicator Plugin
To begin, install and activate the Duplicator plugin on the website you want to clone. For detailed instructions, follow our step-by-step guide on installing WordPress plugins.
Create a Duplicator Package
Once the plugin is installed and activated, navigate to Duplicator → Backups and click Create New, as shown below.
To proceed, assign a name to the clone for easy file identification. Once done, click the Next button, and the Duplicator plugin will initiate a scan of your website.
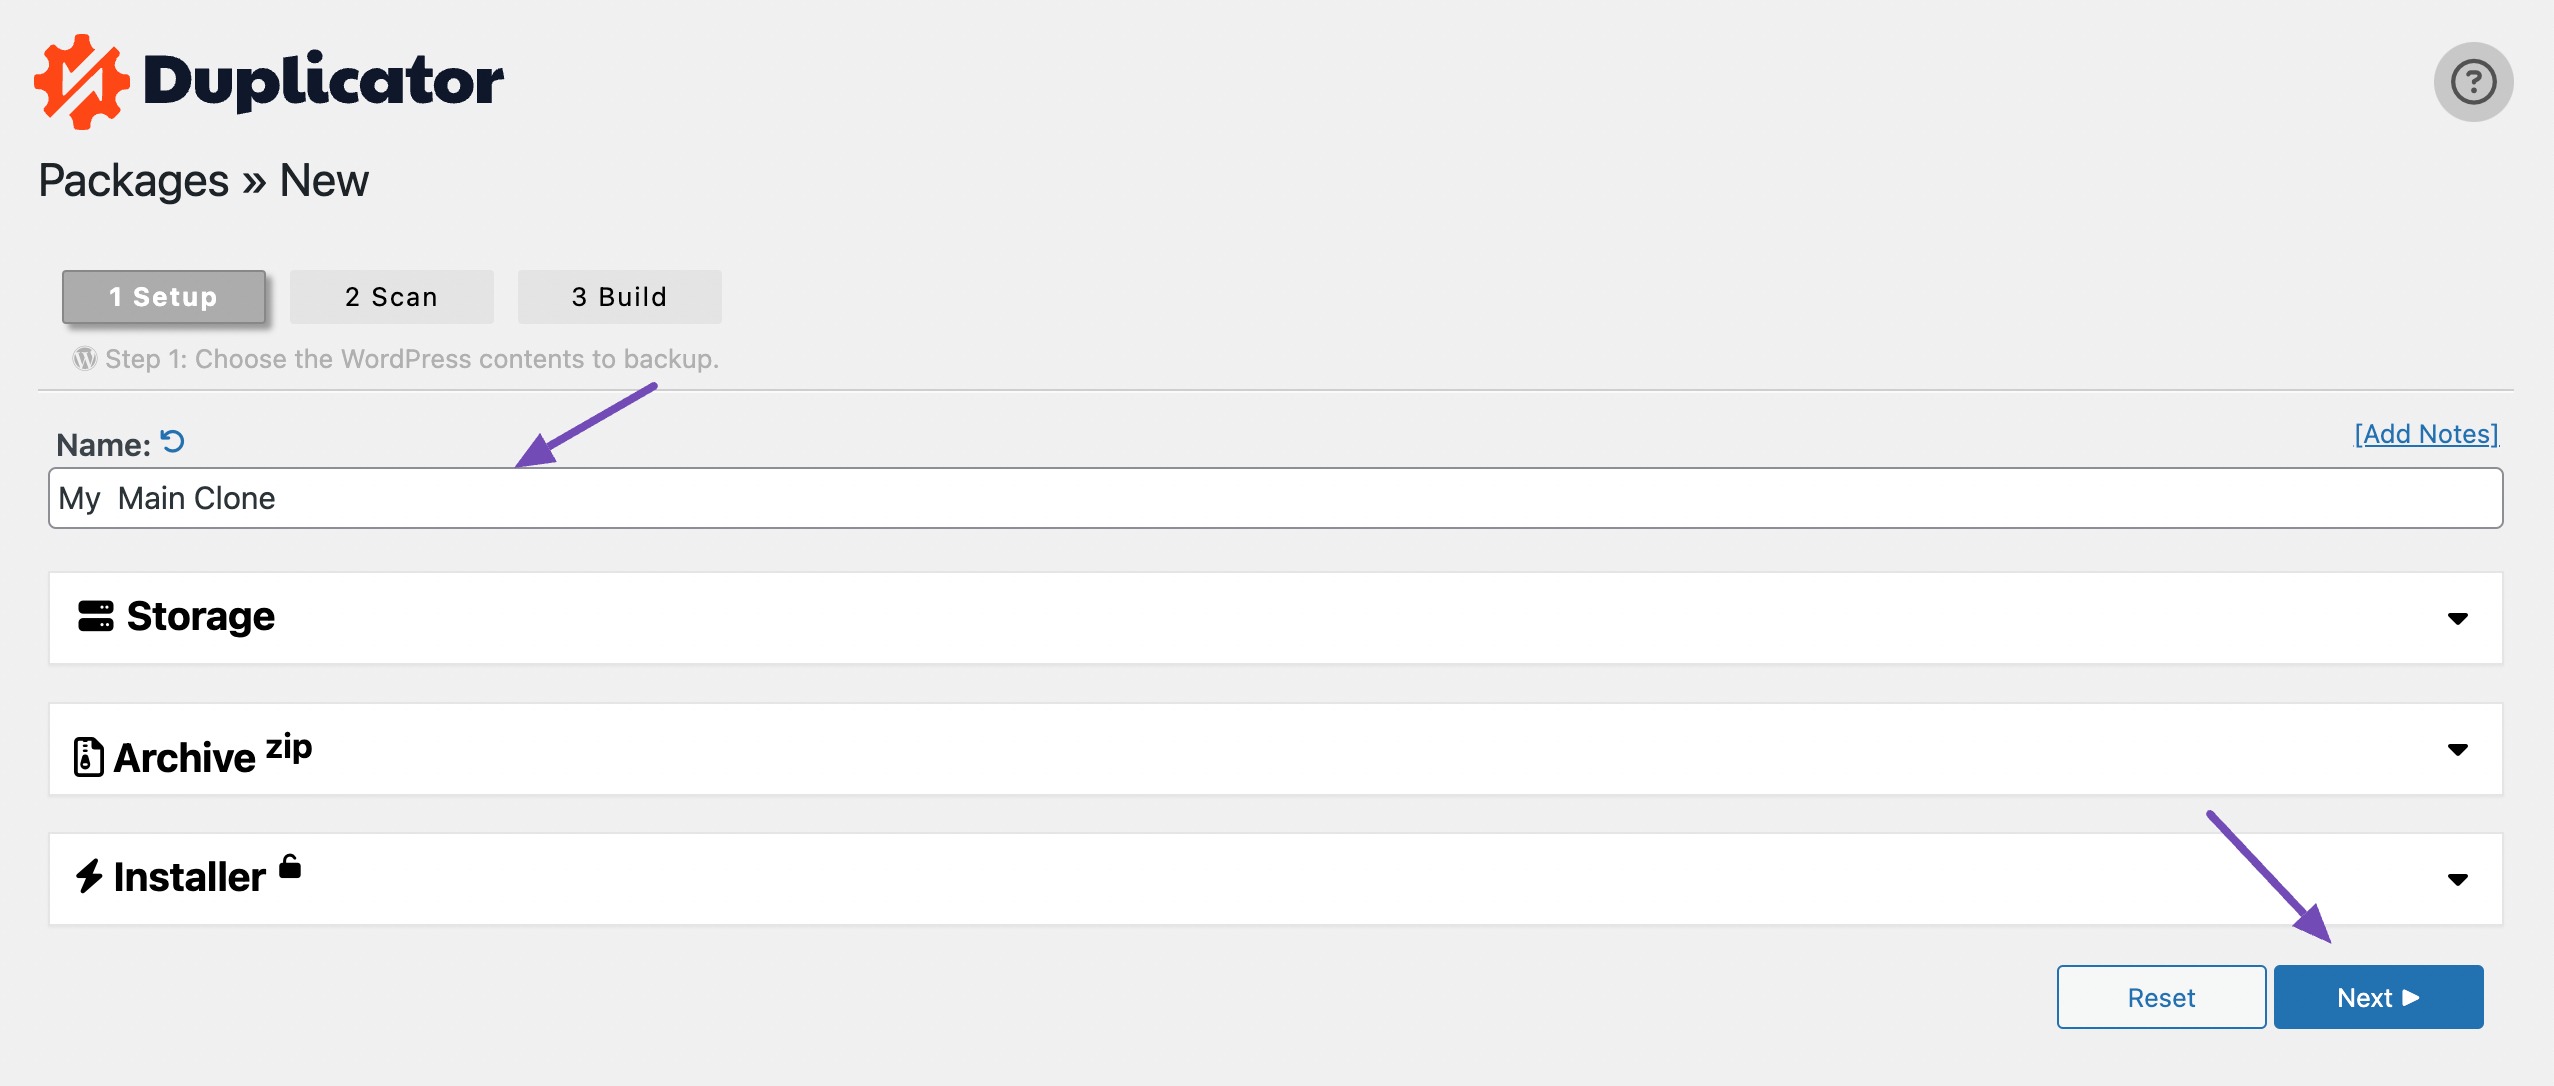
Once the scan is complete, carefully review the results to ensure there are no issues. If you come across any warnings or notices, it is important to address them before proceeding further.
Next, click on the Build button to initiate the creation of your package. This backup will be conveniently packaged into a single downloadable file.
This may take a few minutes, depending on your site’s size. Avoid refreshing the page during the process.
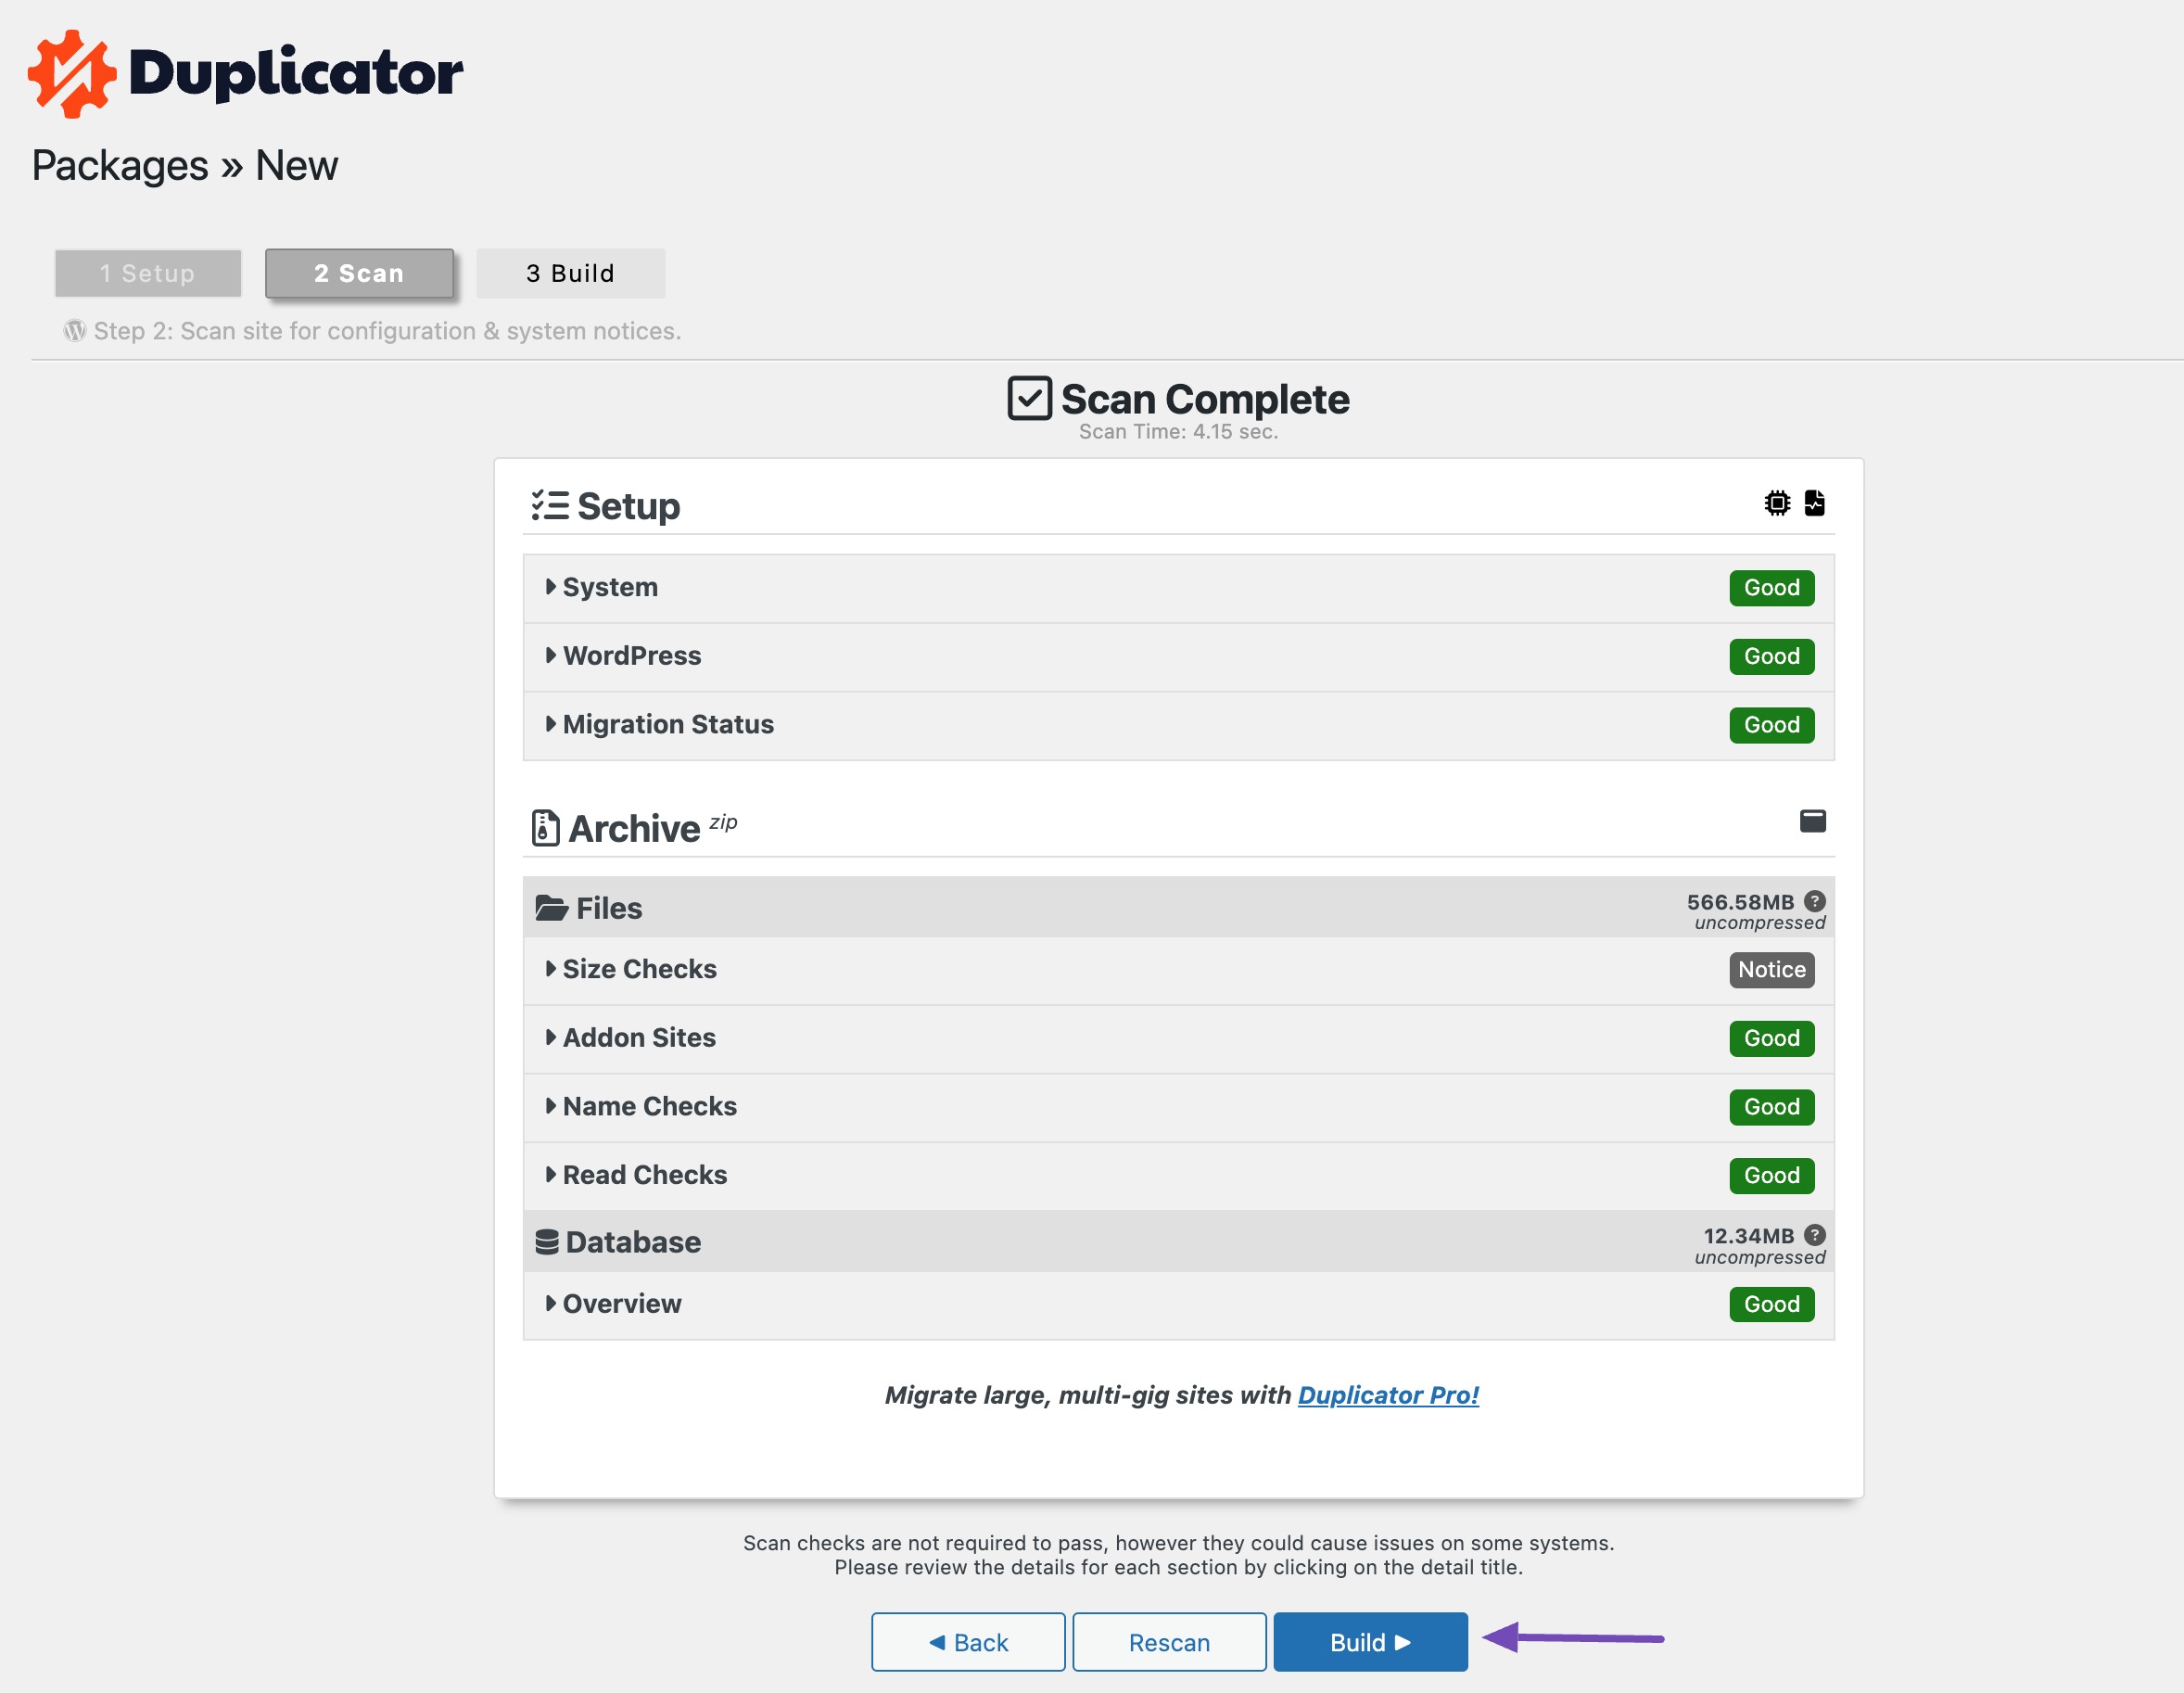
During this time, it’s important to keep the window open and refrain from reloading the page until the process is complete.
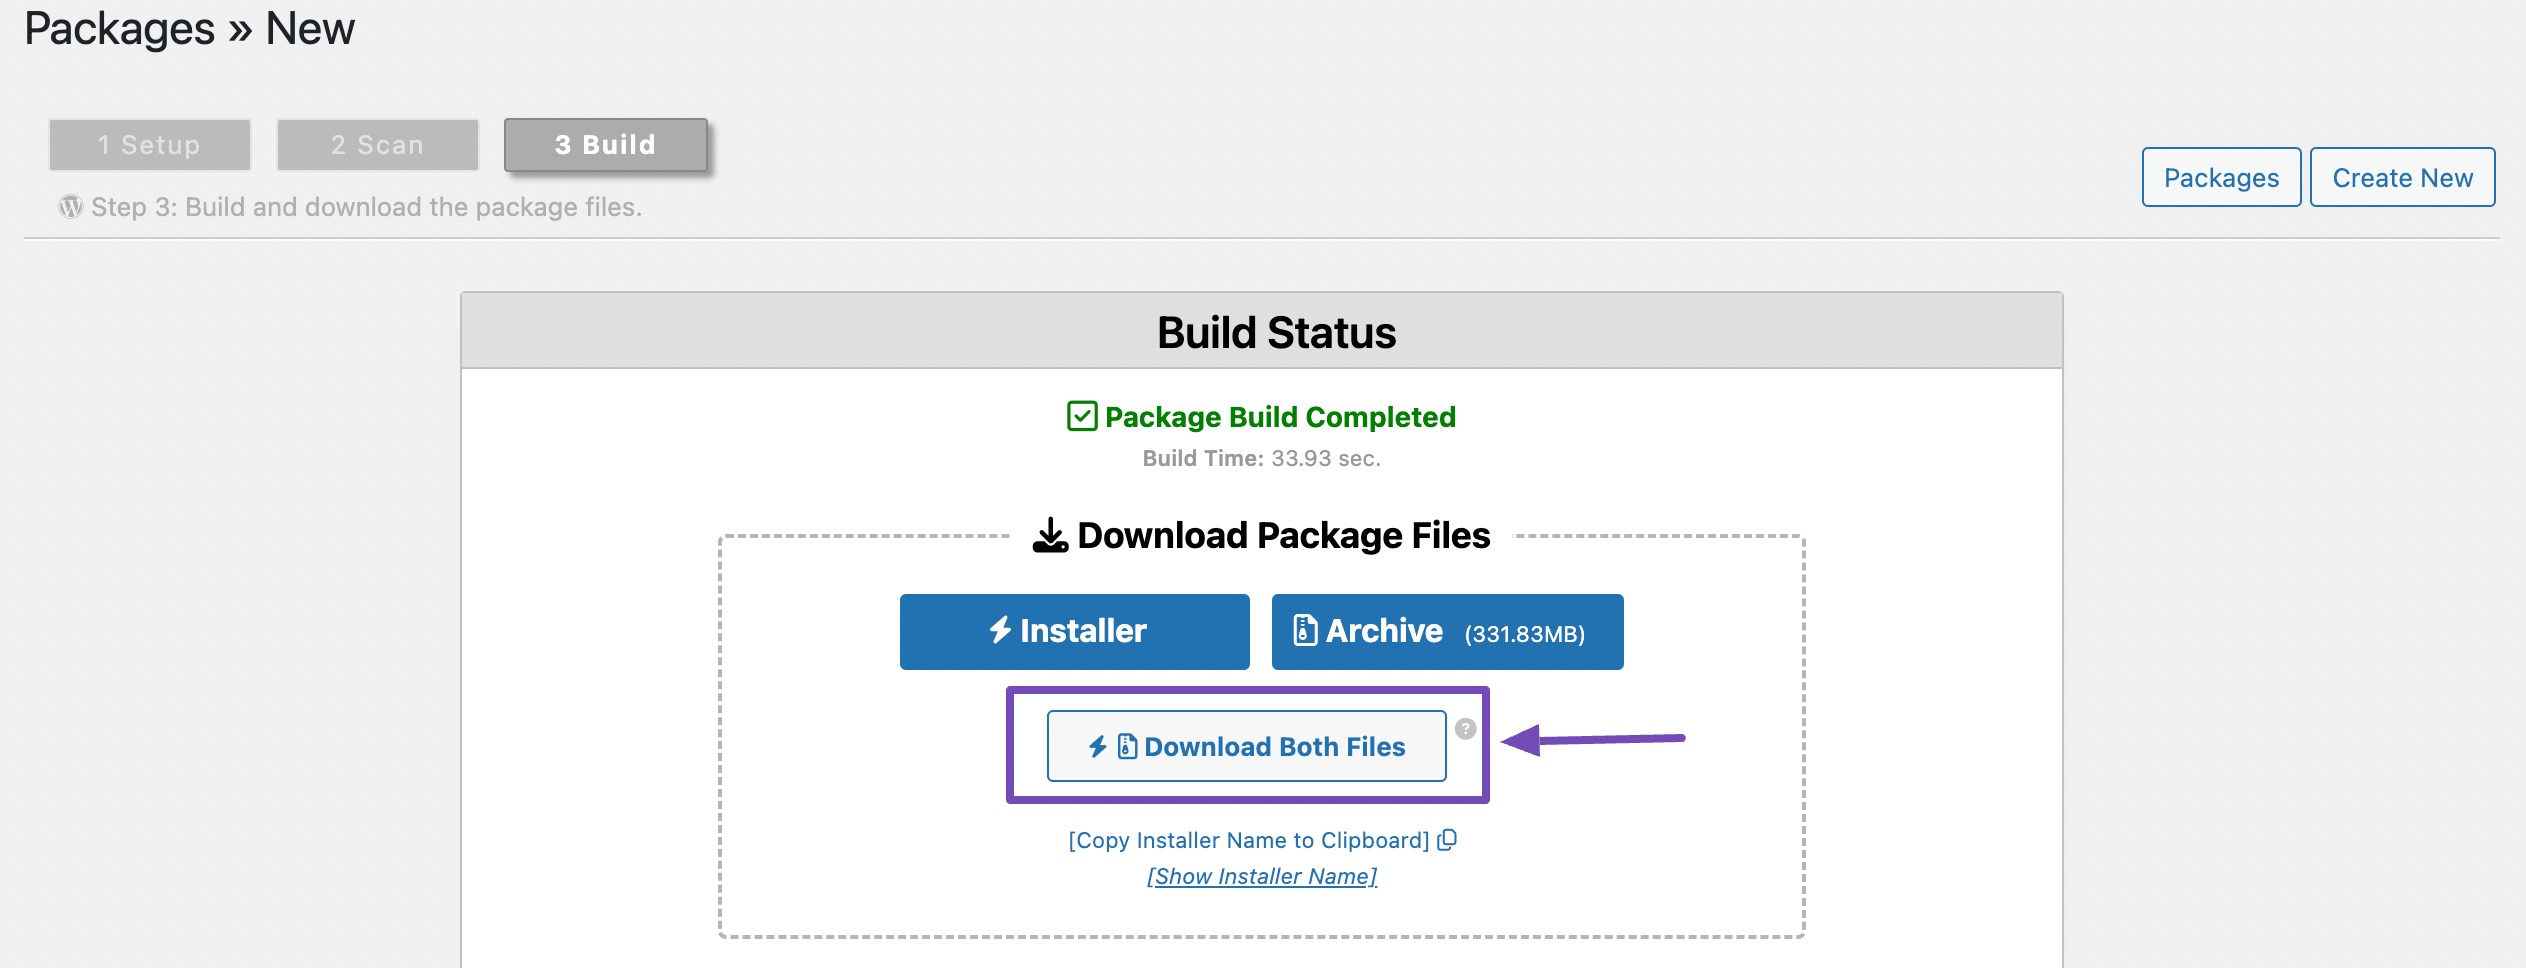
Once the build is complete, click Download Both Files to get:
- Installer file – helps unpack your site.
- Archive file – contains your entire website.
Upload Files to Local or New Hosting Server
After the backup process completes, proceed by uploading both the backup and installer files to the desired location. This can be a live WordPress site or a local server.
If opting for a local server, create a new folder in the root directory where all websites are stored.
Uploading to Local Server
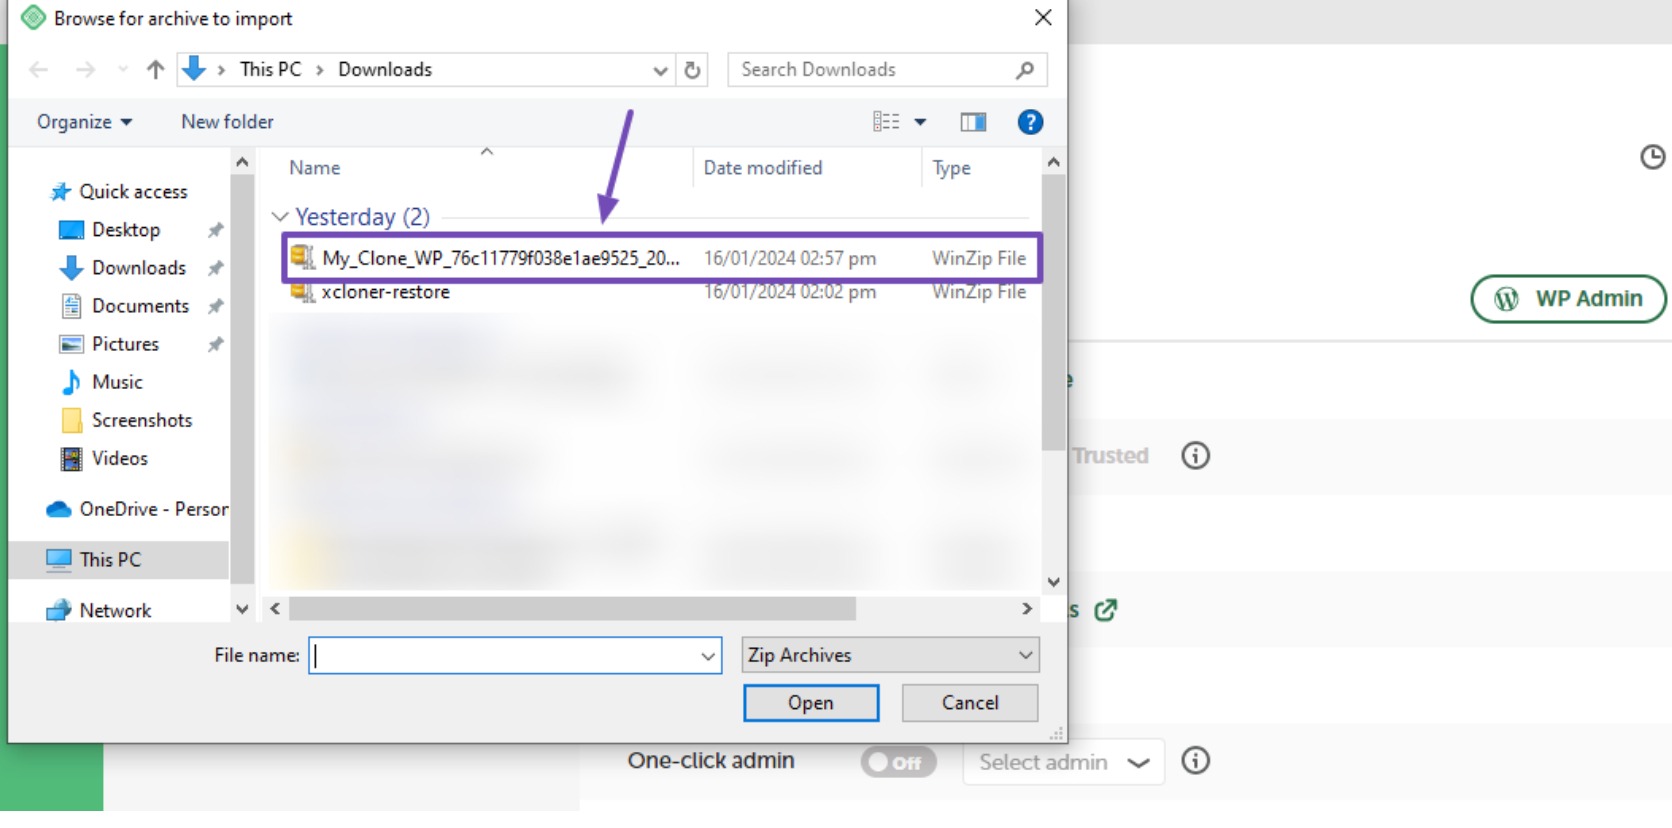
If you’re using Local WP to create a local site, simply open it and select Import site from the menu, as shown below.
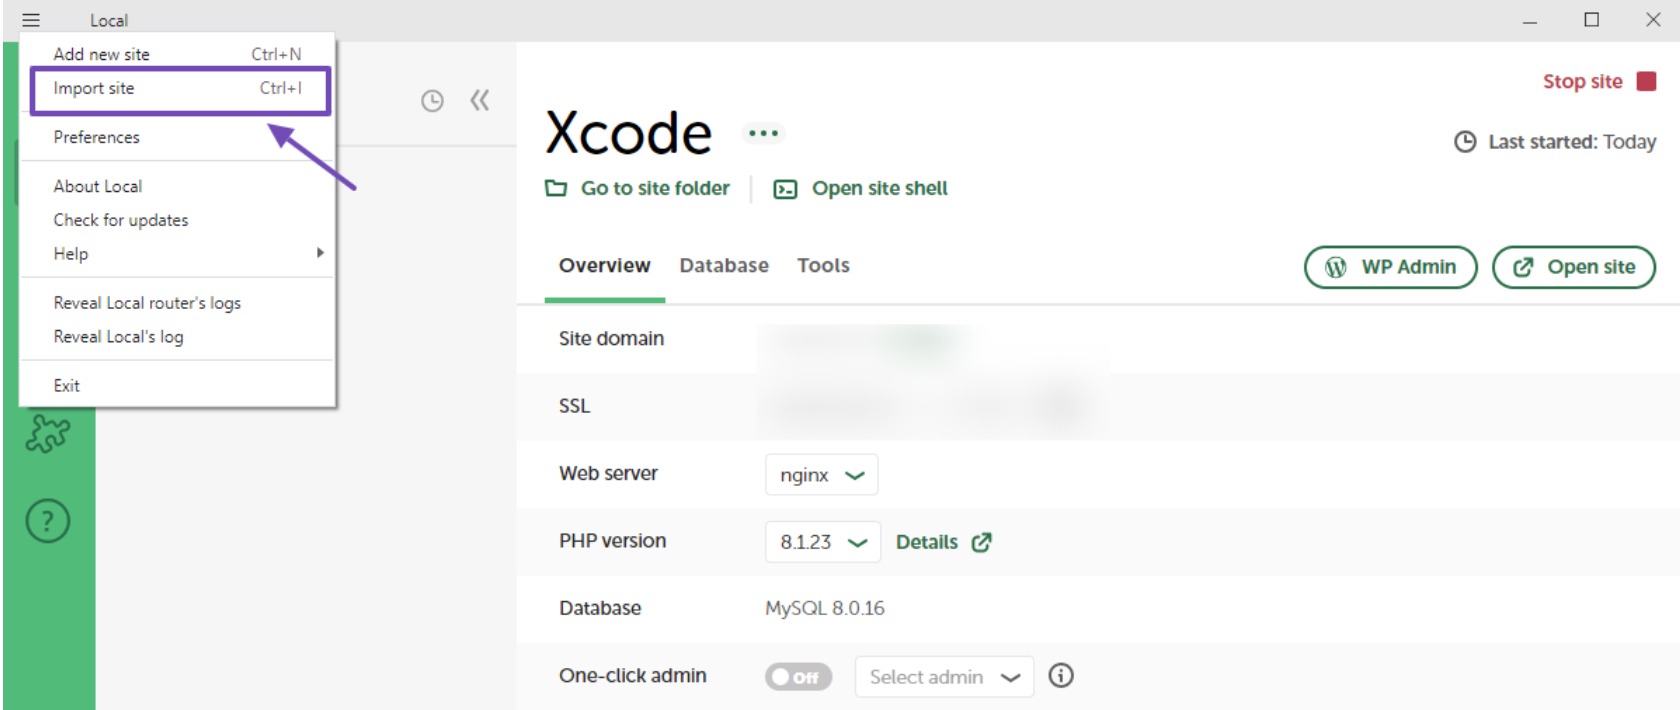
When you click Import site in Local WP, your computer files will open. At this point, select only the archive file. The Installer file is unnecessary since the software will handle it automatically.
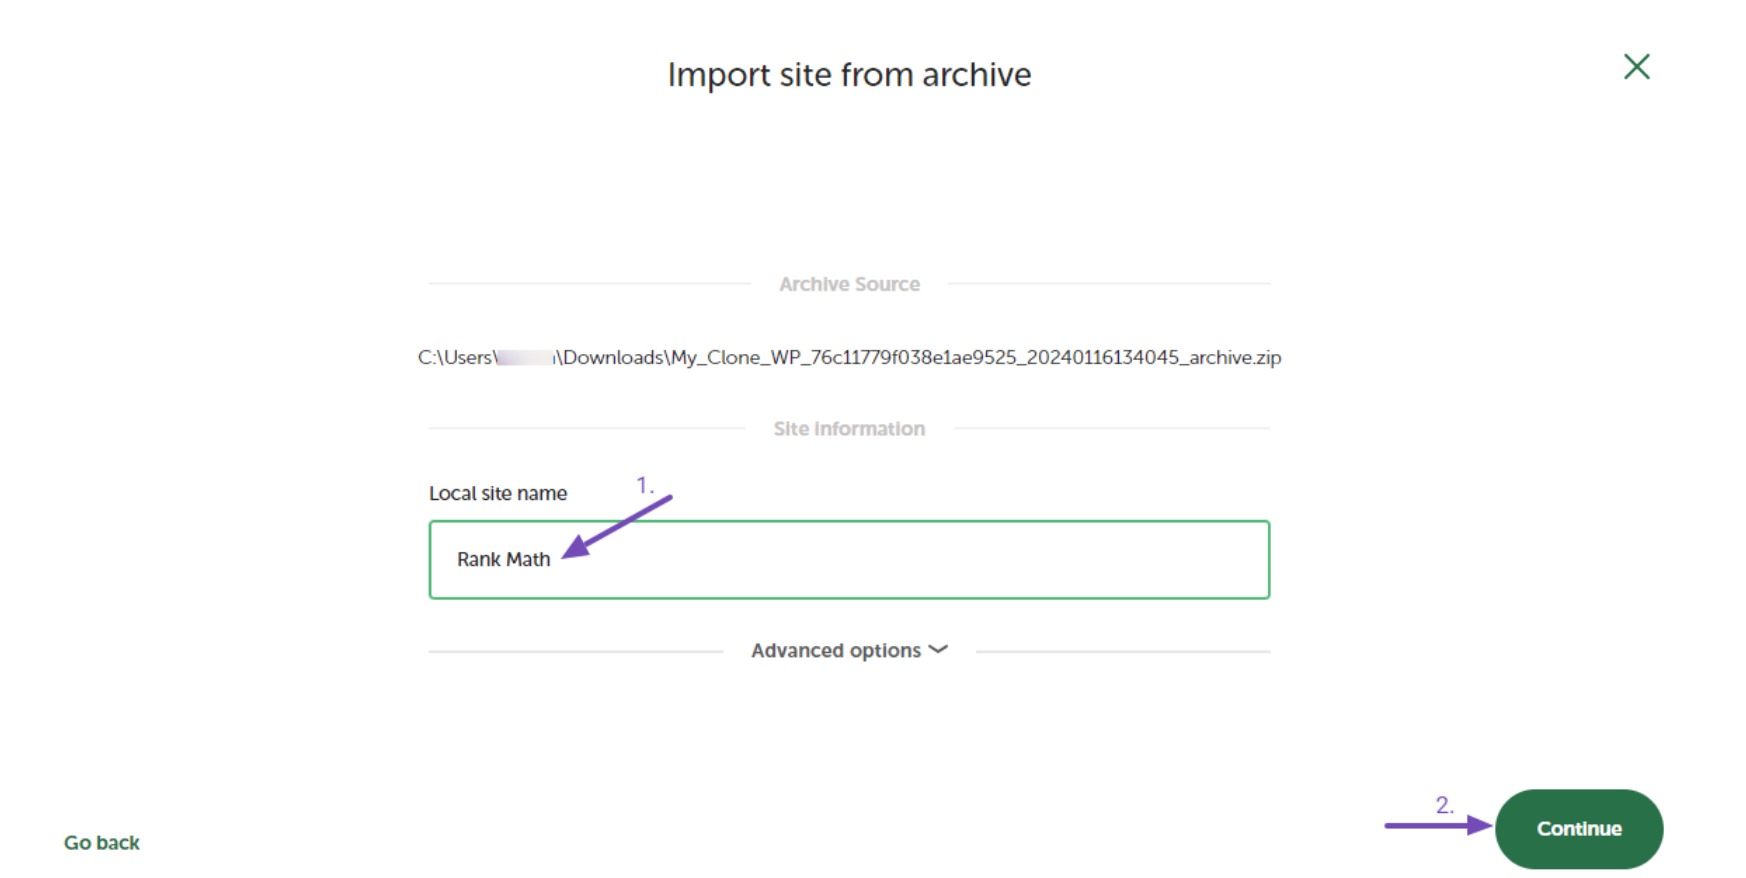
After uploading the archive file, you’ll need to complete two additional steps before the site is imported.
In the first step, provide a name for your local site. Then, click the Continue button to proceed to the next stage.
In the second step, select your environment, either leave it at ‘Preferred‘ or customize it using the ‘Custom‘ option if needed. Click the Import site button when you’re ready to proceed.
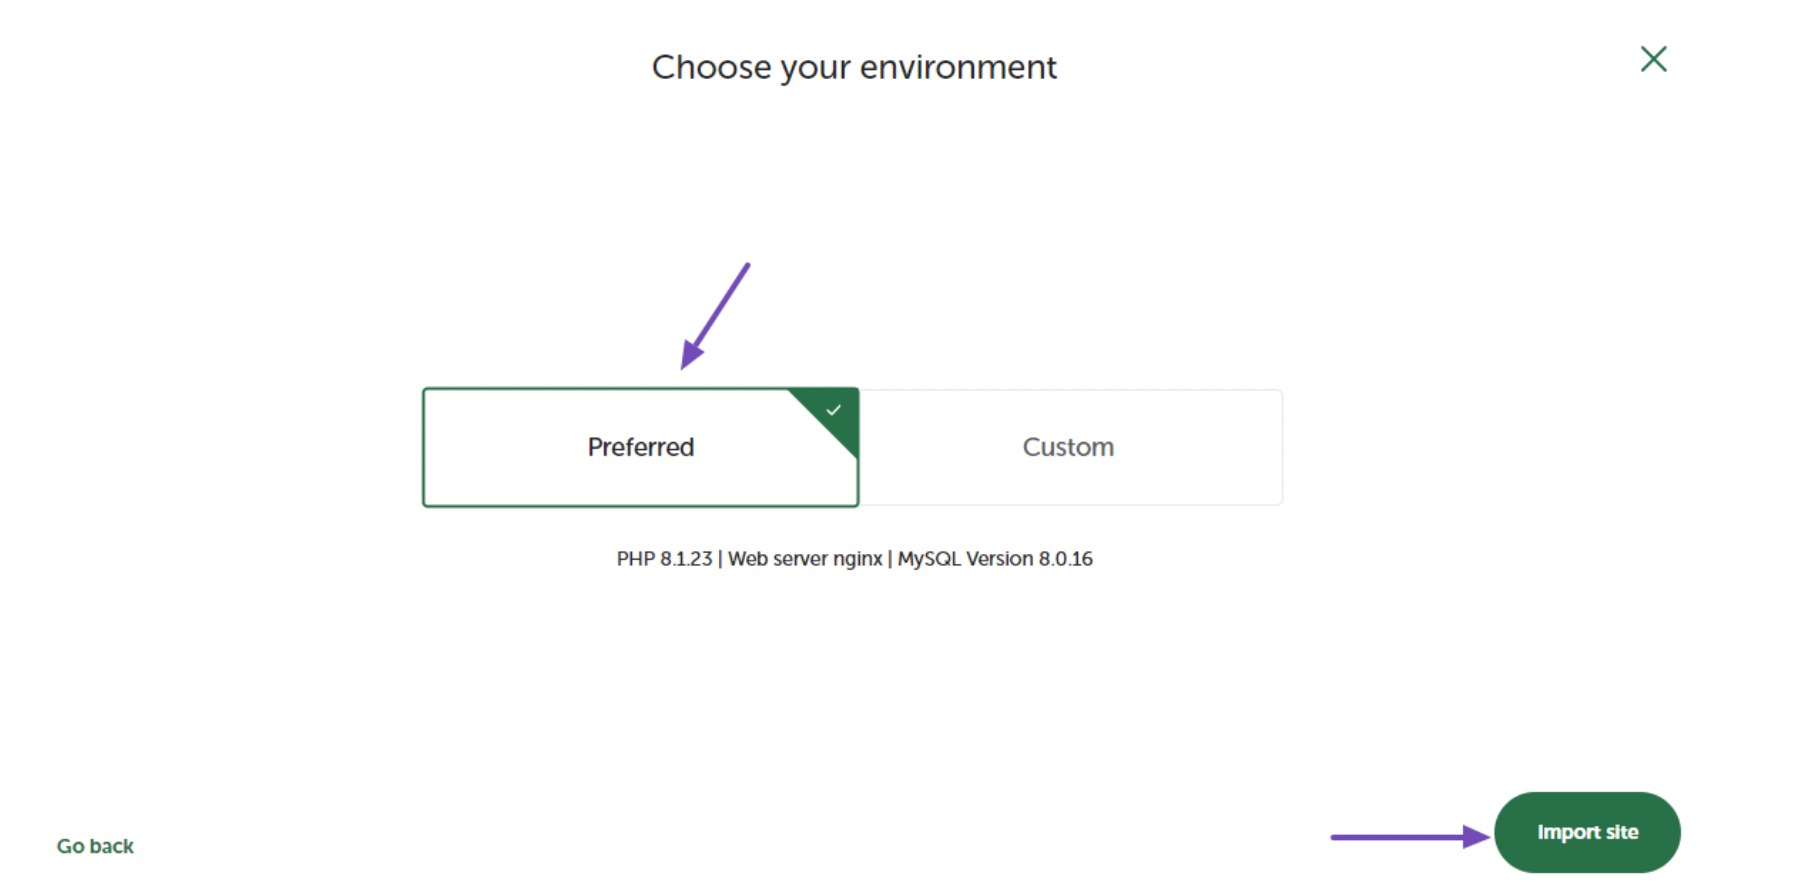
Clicking the button will begin the import of the cloned website, and you will need to wait for the process to finish.
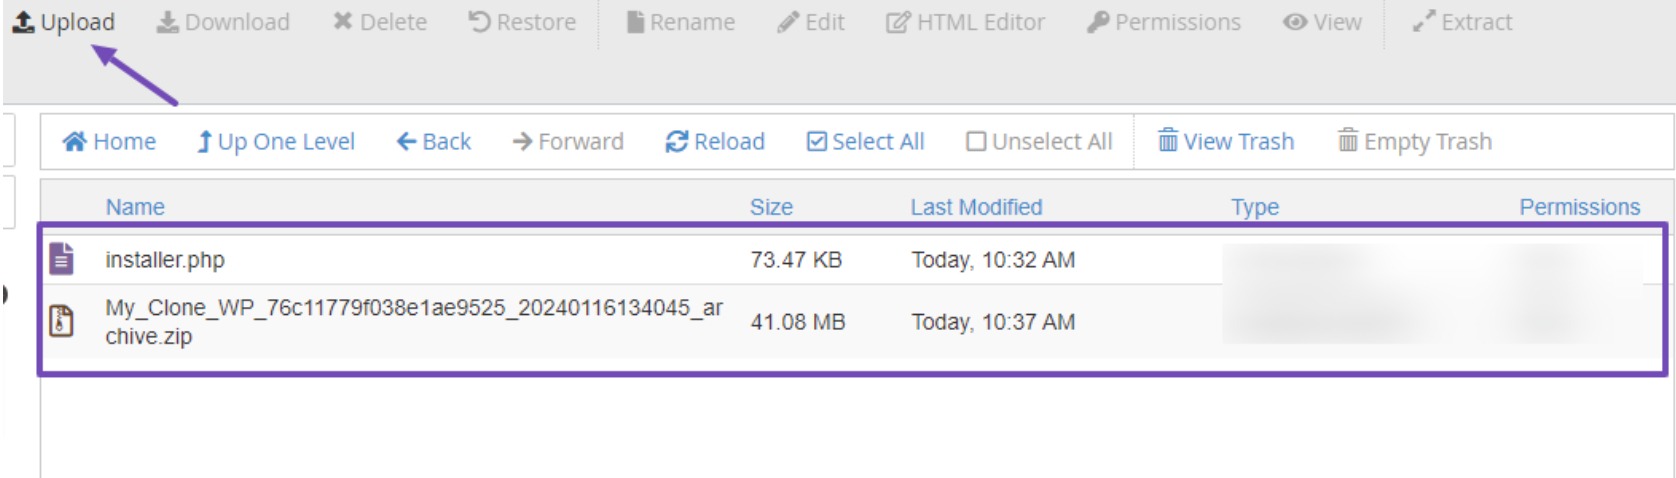
Uploading to New Hosting Server
For a live website, upload the Installer and Archive files to the root directory using an FTP client.
Alternatively, navigate to your hosting panel or cPanel, and then to the public_html folder.
If you’ve previously installed websites in your file directory that are still relevant, consider backing them up and deleting them before uploading the clone website files.
Create a New Database
After uploading the two files, create a new WordPress database to unpack your cloned website version. If you’ve already completed this step, feel free to skip it.
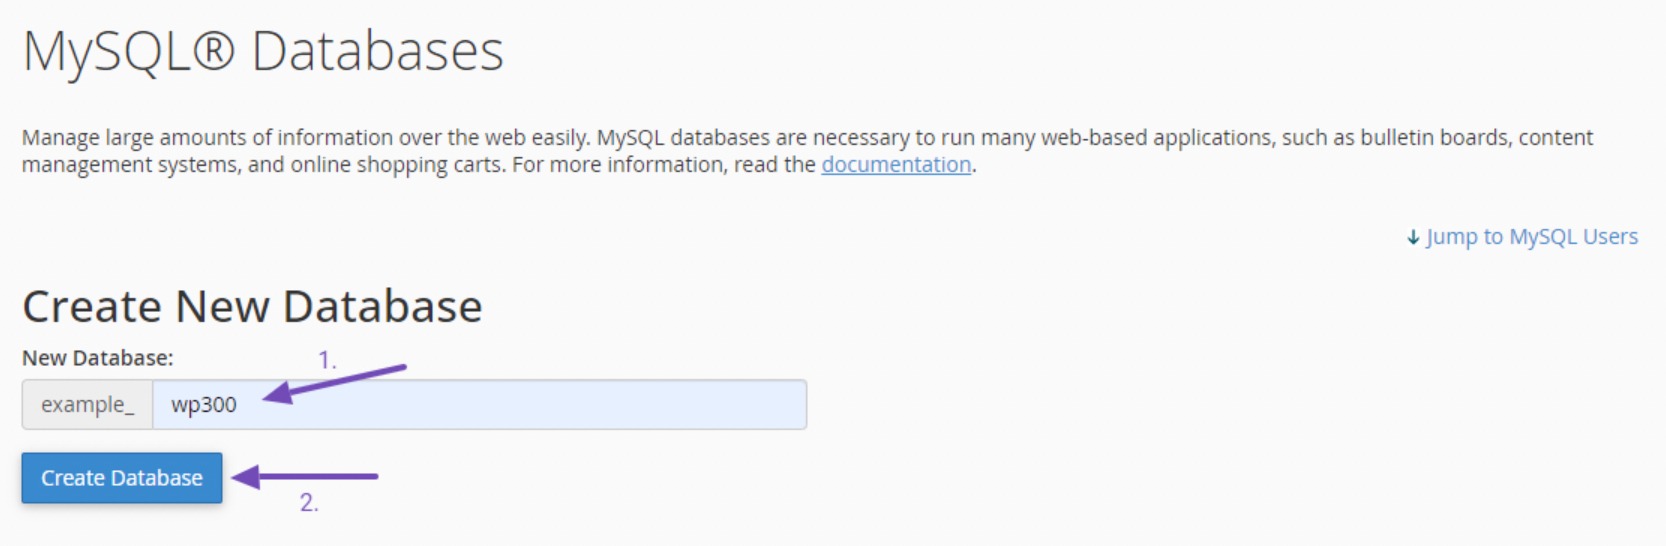
To create a new database, access the MySQL Databases option in your cPanel.

On the MySQL Databases page, input the desired name for your cloned site database and click the Create Database button.
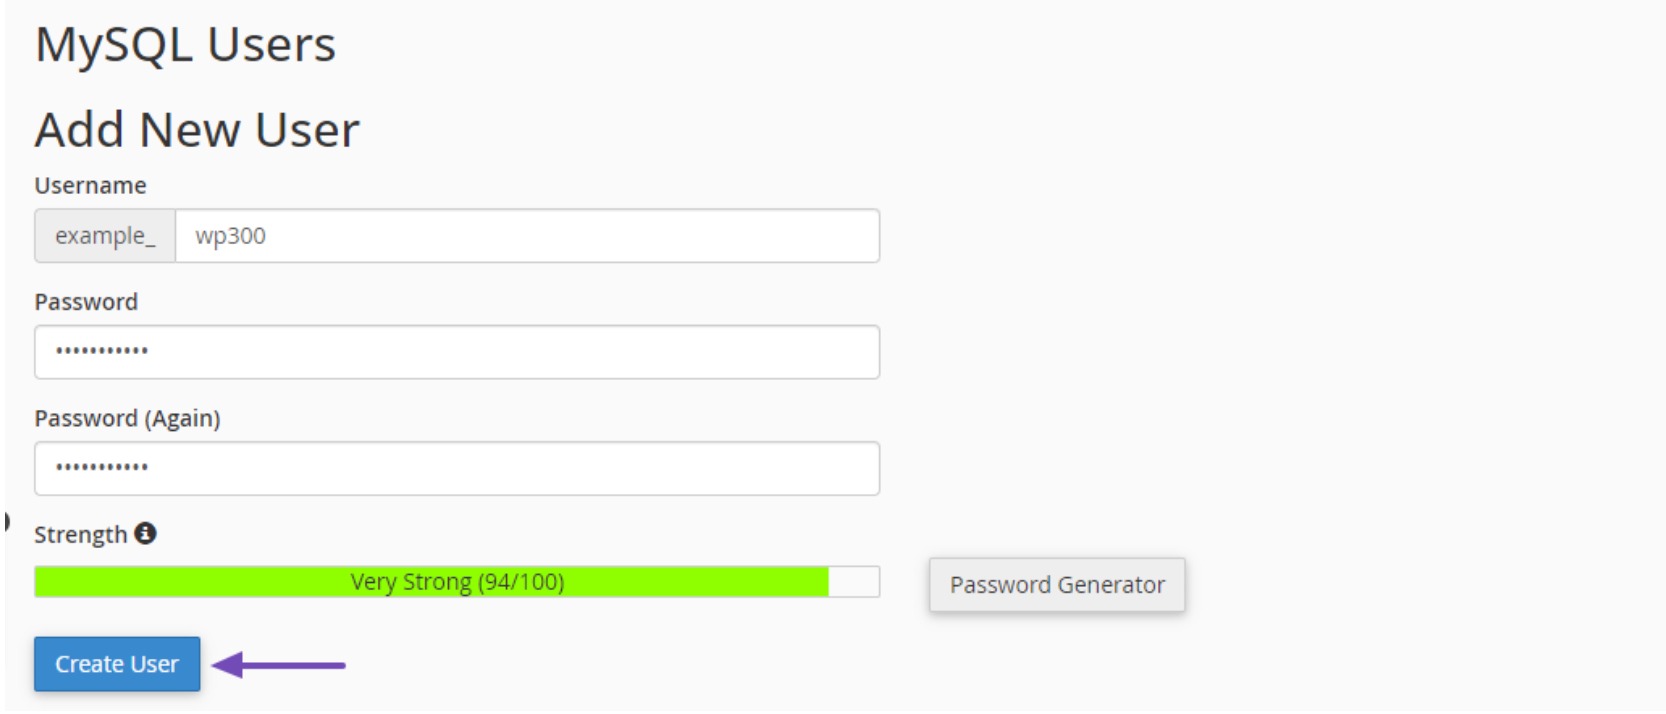
Once the database is created, revisit the MySQL Databases page and scroll down to the MySQL Users section. Input the database username and password, then click the Create User button when you are done.
Ensure that you securely store the database name, username, and password, as this information will be required later.
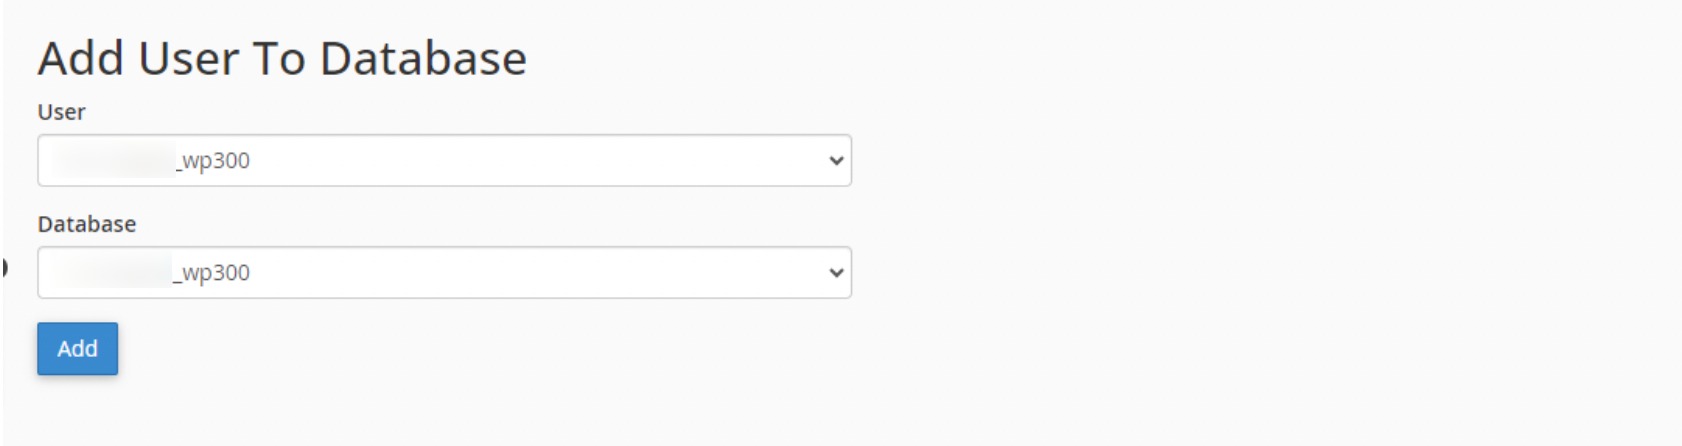
Once you’ve finished creating the user, move on to adding the user to your database. Scroll to the Add User To Database section and expand the User dropdown. Select the database user you created earlier.
Next, expand the Database dropdown, choose the previously created database, and click the Add button.
Now, choose the user privileges for your new database. Opt for the ALL PRIVILEGES option to grant all privileges simultaneously. Scroll to the bottom of the page and click the Make Changes button.
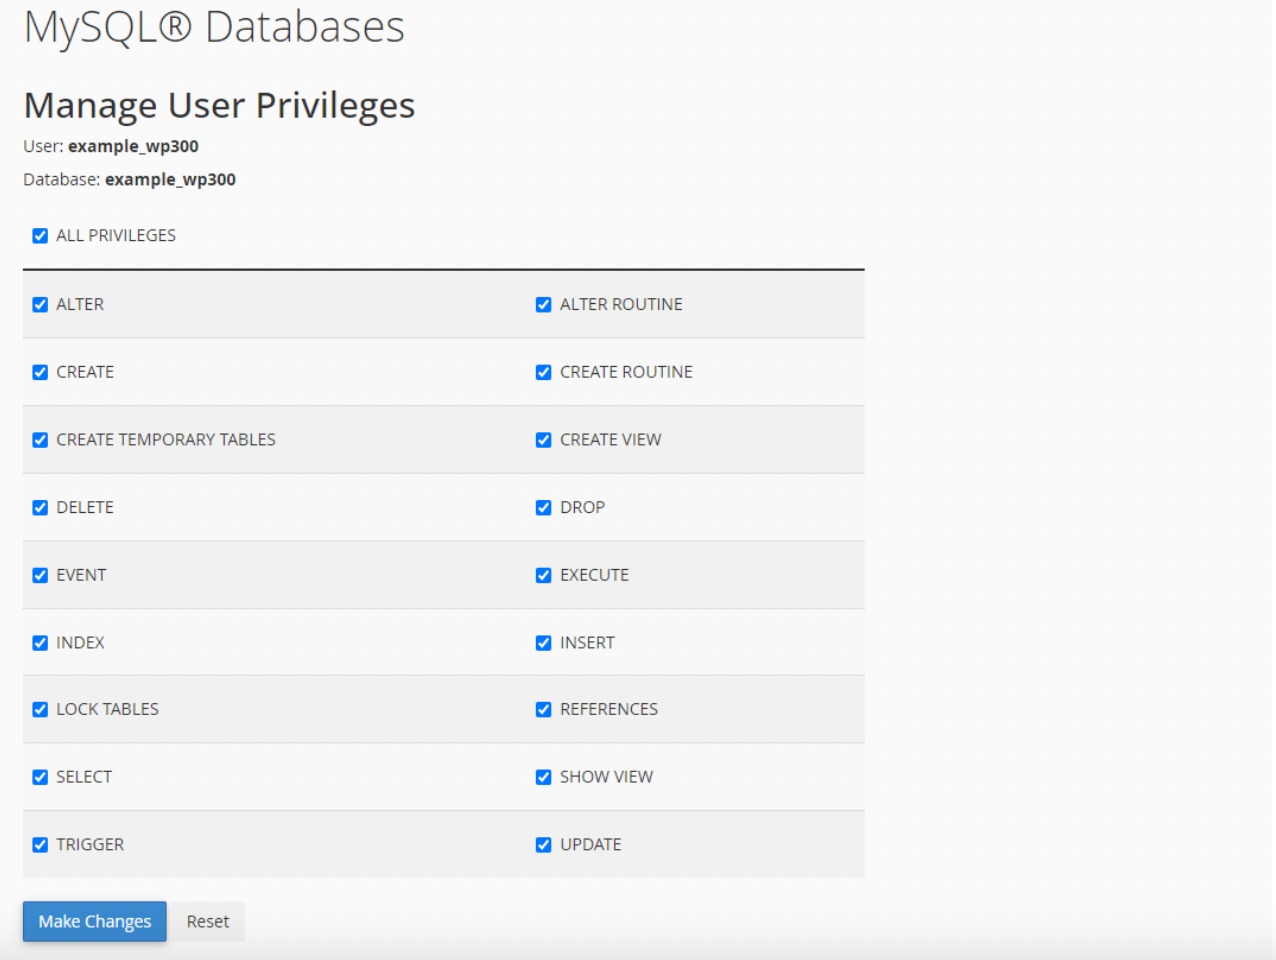
After saving your changes, a notification confirming successful completion will appear on your screen.
Now, you can move forward with the Duplicator installer script to effortlessly extract your archive file in a few simple stages.
Run the Duplicator Installer
To begin, open your web browser and enter your website’s URL, followed by ‘/installer.php.’ For example, if your domain is ‘example.com,’ the URL will be ‘https://example.com/installer.php.’
Make sure to replace ‘example.com’ with your actual domain name.
By doing so, the Duplicator installer script will launch and automatically detect any existing backup files and initial settings.
Next, scroll down to the Setup section and provide the database name, username, and password you previously created.
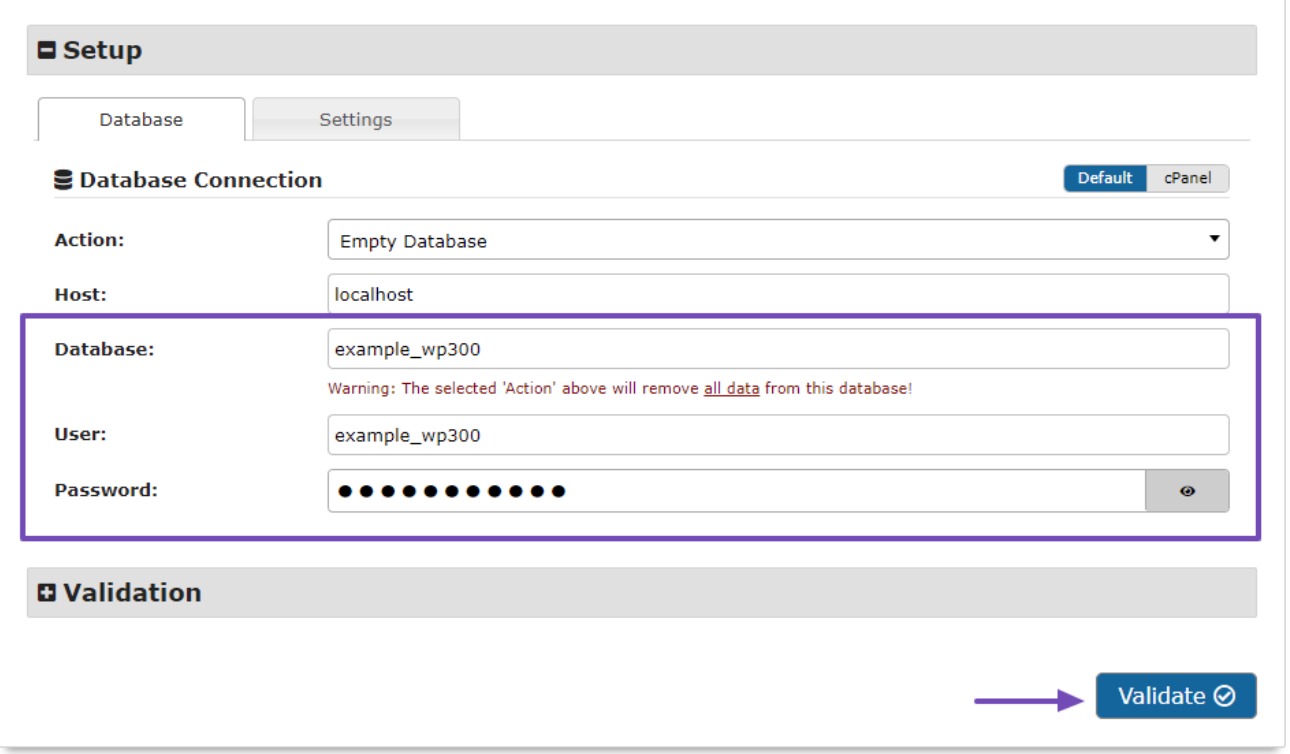
After accurately providing these details, click on the Validate button. This ensures the system is prepared for installation.
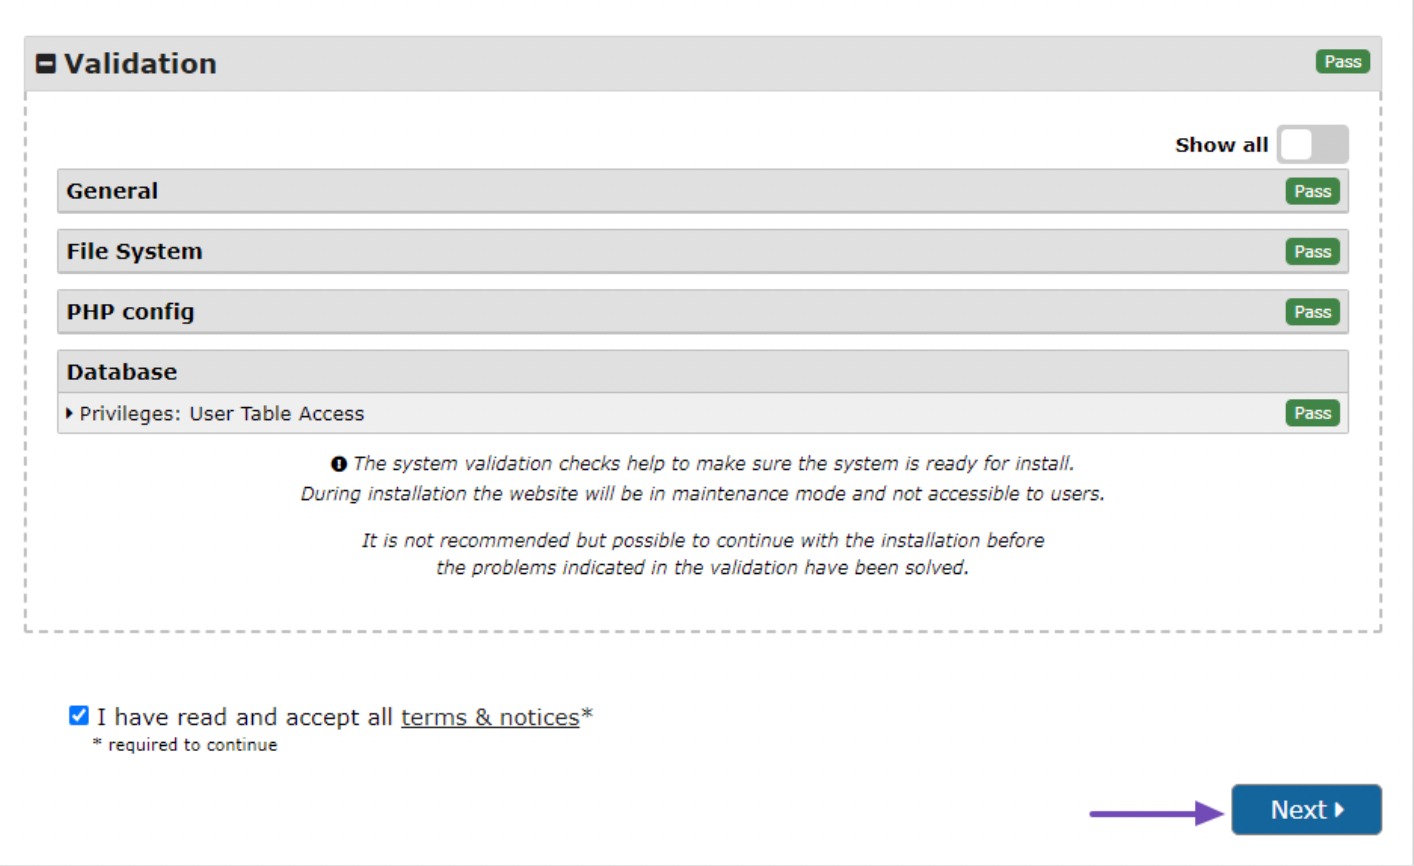
If any issues arise, a ‘Warn’ message will be displayed. In such cases, resolve the issues, confirm the terms and checks, and then click on the Next button to proceed to the next step.
Next, review the details and click the OK button to proceed upon confirmation.
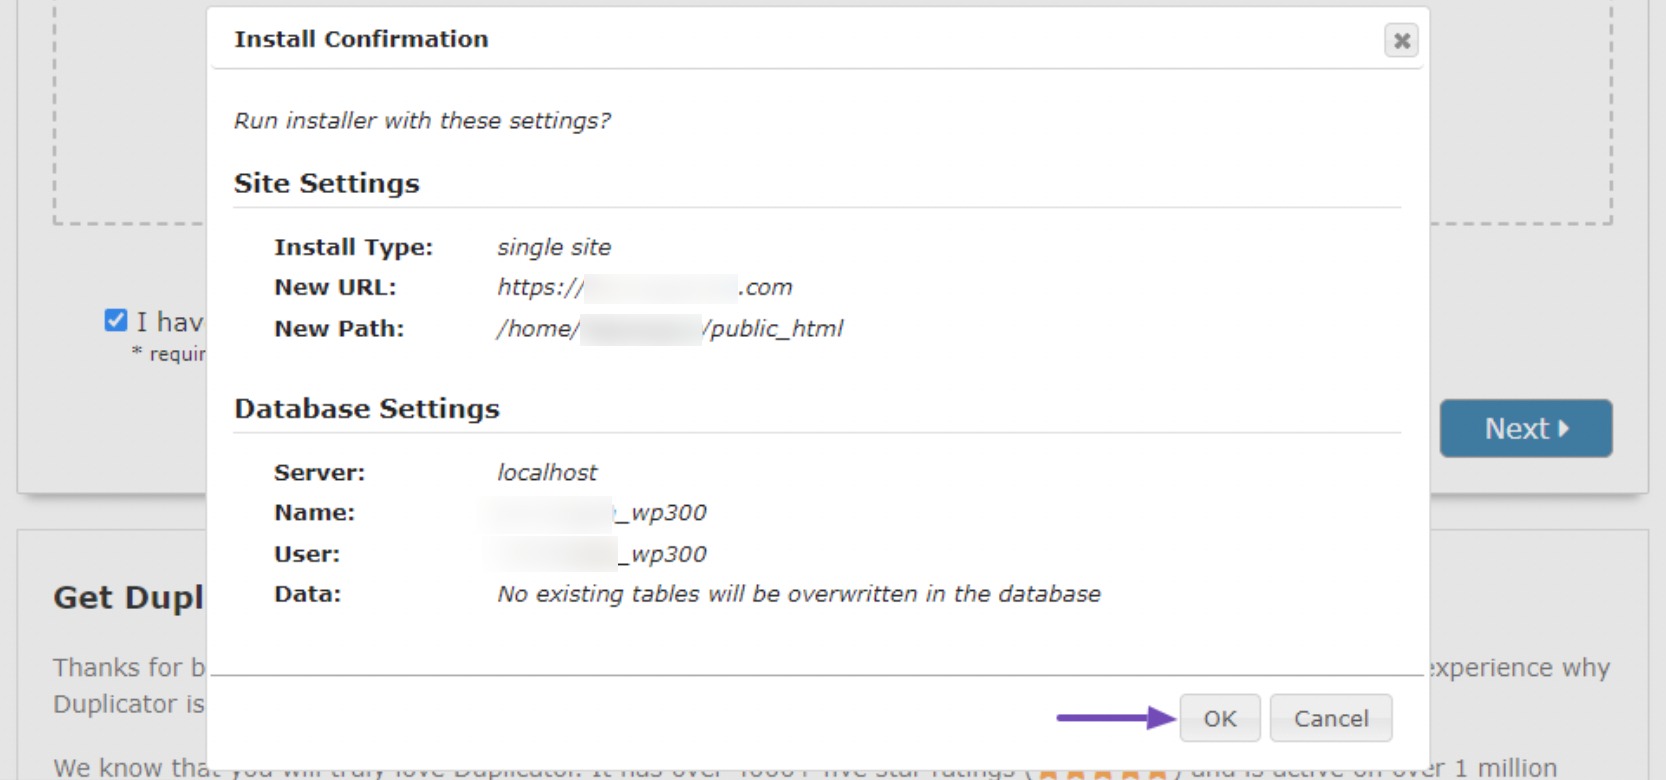
After completing the previous steps, the installation process will commence, which may take some time to complete.
Once the files are successfully installed, you will receive an Admin Login button. Simply click on the button to access your newly cloned website.
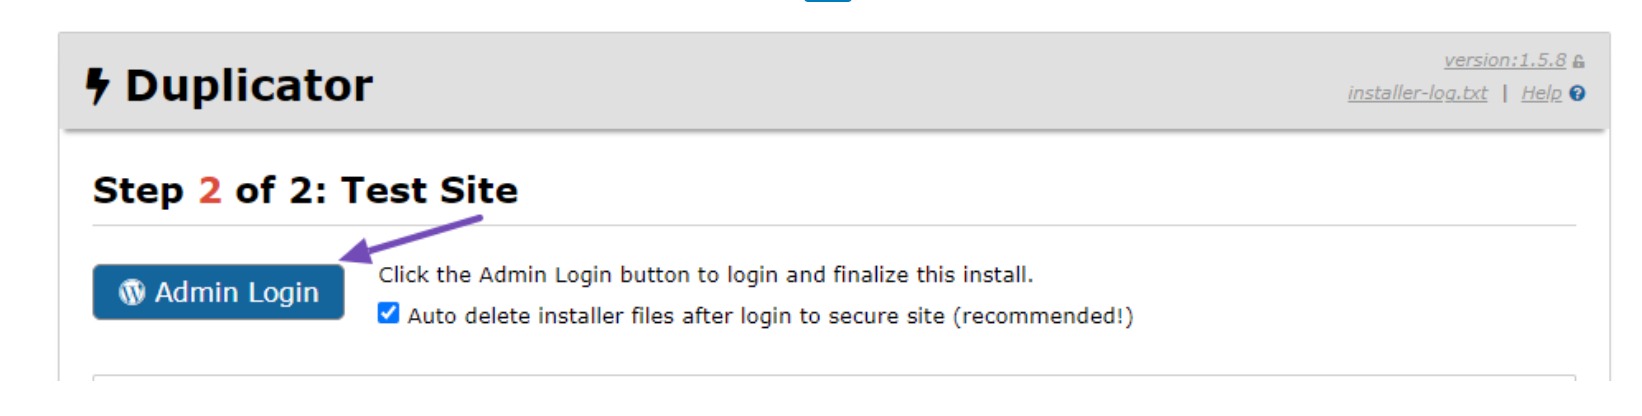
Before visiting your cloned website, WordPress will ask for your username and password. Use the same credentials you used on your old website.
Once logged in, a success message will appear, confirming the migration was successful.
Test Your Cloned Website and Delete Temporary Files
Now, it’s time to thoroughly test your website to make sure everything is working as expected.
Examine your pages, posts, images, and other functionalities to verify that all data has been transferred correctly. Don’t limit your review to the admin area; inspect your website’s front end.
Once you’re satisfied that everything has been imported correctly, you can delete the installation files generated by the Duplicator plugin.
To accomplish this, access the cloned WordPress dashboard and navigate to Duplicator → Tools. From there, locate the Data Cleanup section and click the Remove Installation Files button.
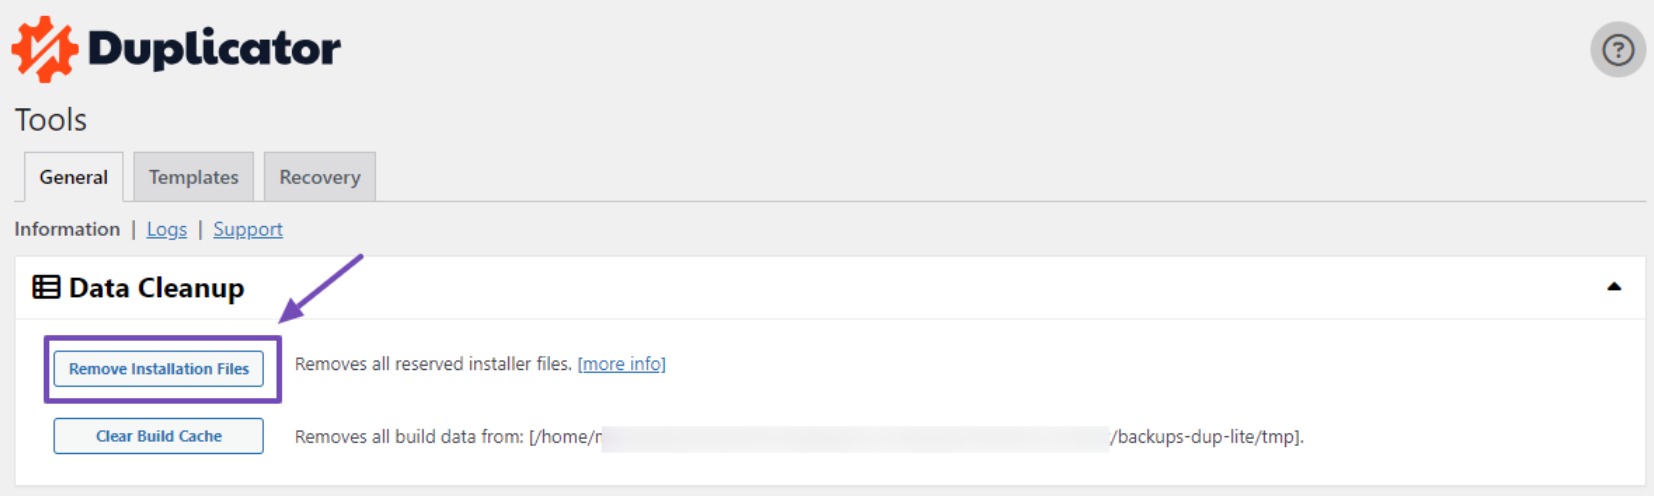
Failure to remove the installation files indicates an incomplete migration process and may pose security risks.
4 Post Cloning Checklist: What to Do Next
Once you’ve successfully cloned your WordPress site, there are a few important steps you should take to ensure everything works smoothly. Here’s a quick list of what to do next:
- Update URLs Across Your Site: After cloning to a new domain or location, your internal links, images, and media may still point to the old URL. Use a plugin like Better Search Replace to update all instances of the old URL in your database.
- Set Up Redirects (If You Migrated): If your cloned site is replacing your old one or living on a new domain, setting up 301 redirects is important. Redirect your old URLs to their new counterparts to preserve SEO rankings and ensure visitors don’t land on broken pages.
- Resubmit Your Site to Google Search Console: When you clone your site to a different domain, resubmit it to Google Search Console. This helps Google crawl and index your new site faster, and lets you monitor any issues during or after the migration.
- Update Your Sitemap: Regenerate your sitemap so it reflects the new structure or domain. If you’re using an SEO plugin like Rank Math, this is usually done automatically, but double-check just to be safe. Then, resubmit the sitemap in Google Search Console.
- Notify Your Audience (If Applicable): If your cloned site is live on a new domain or undergoing major changes, let your audience know. Share an update via email, blog post, or social media so they’re aware of where to find you and what’s new.
5 Conclusion
Cloning your WordPress site doesn’t have to be complicated. With the help of a plugin like Duplicator, you can easily create a full copy of your website, whether you’re migrating to a new host, setting up a staging environment, or just creating a secure backup.
By following the steps outlined above, you can confidently replicate your site without needing advanced technical skills. Just remember to test your cloned site thoroughly and remove any leftover installation files to keep everything secure.
And if you have any questions, run into issues, or want to share your experience, let us know by tweeting @rankmathseo. We’re here to help!