In this post, we’re going to take a look at how you can use Google’s new indexing API to get your website’s pages and content crawled immediately rather than having to wait! 🖖
Note: The process has slightly changed since the above video was recorded, so feel free to refer to the up-to-date written tutorial below in the meantime.
Here’s why this is worth the extra effort.
- Rank faster (especially important for time-sensitive content)
- Increase your chances of ranking above your competition
- Keep search results up-to-date for higher-quality user traffic
Thanks to Google’s Indexing API, Rank Math SEO for WordPress, and this guide we’ve put together for you, it’s now possible for you to get your website to rank faster.
Using this method, you can stay one step ahead of your competition by ensuring that your site is crawled and has the opportunity to rank before their site does, which is extremely important when it comes to time-sensitive, competitive content.
The process of setting this up isn’t typically very easy, but if you follow this step-by-step guide, you’ll be up and running (or, I guess, you could say up and ranking) in no time! So, without further ado, let’s jump right in and take a look at how to set this up.
Note: Google recommends using the Indexing API ONLY for JobPosting or BroadcastEvent embedded in VideoObject websites. During our tests, we found that it worked on any website with great results, so we created this plugin for testing.
If you are not sure whether you want to use this or not, please stop reading and don’t proceed further. Though the Indexing API isn’t against Google AdSense Policy and Terms of Service, we do not recommend using it on money websites. Please proceed at your own risk.
We understand this is not for everyone 🙂
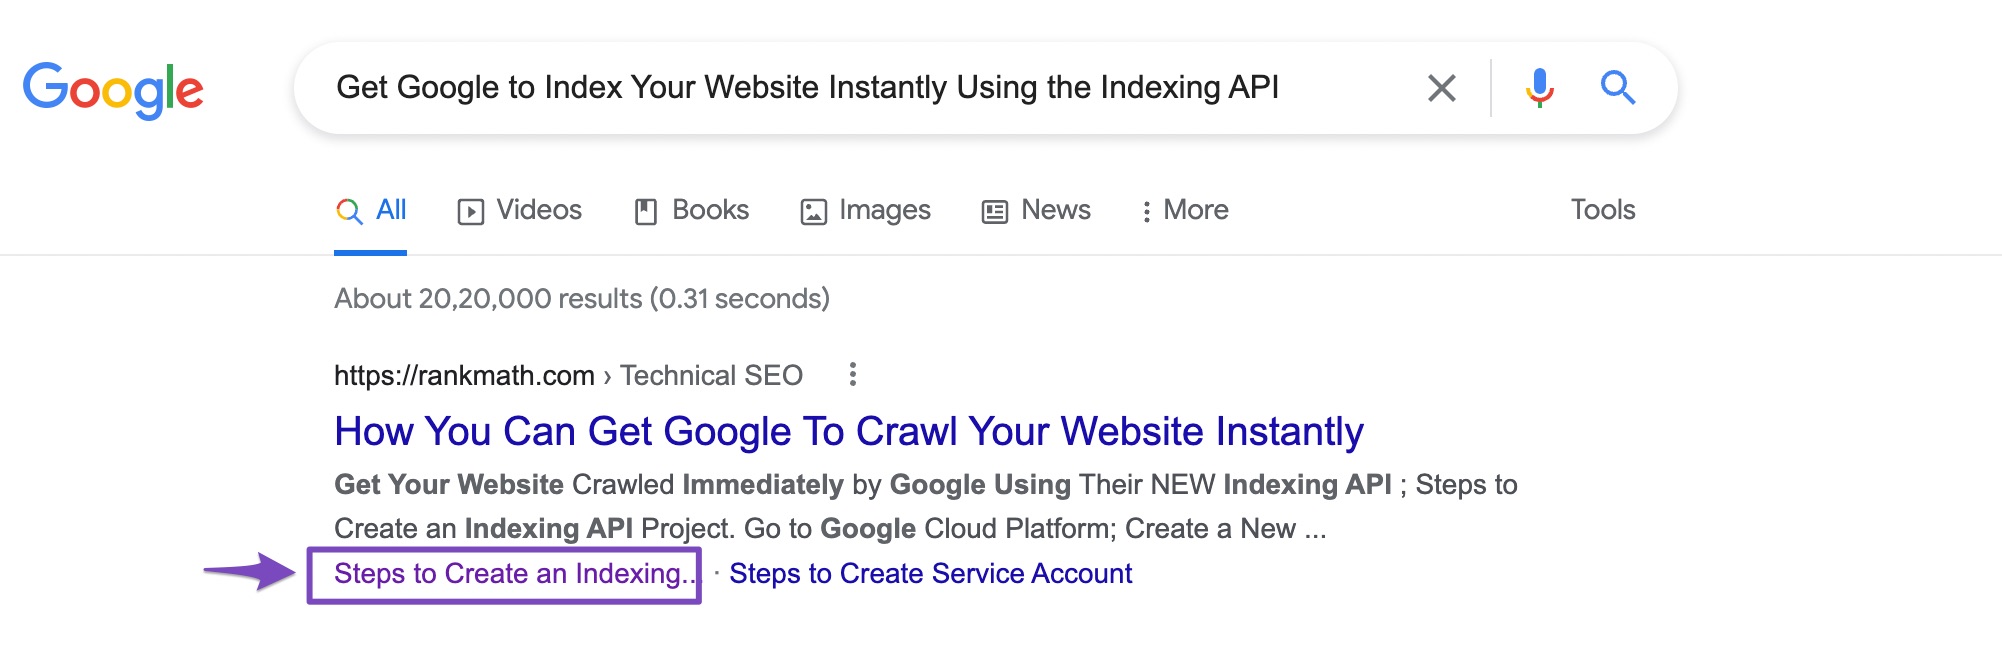
PROOF: Here’s How Google Responded to Our Request
In the 1st hour after publishing this article: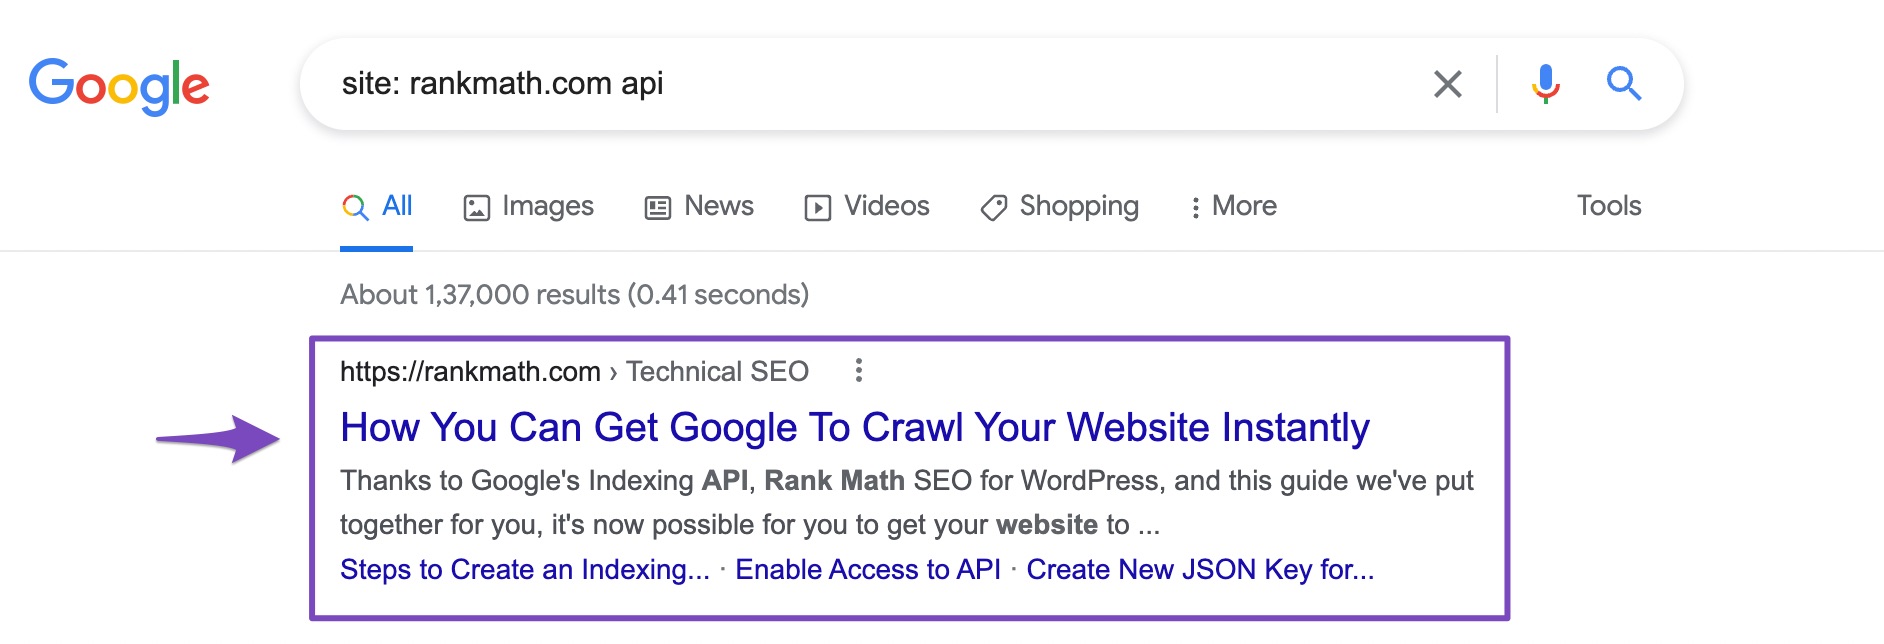
Get Your Website Crawled Immediately by Google Using Their NEW Indexing API
1 Download Google Indexing API Plugin
Click Here2 Steps to Create an Indexing API Project
Follow these steps to create an indexing API project:
2.1 Go to Google Cloud Platform
Start by heading over to the Google Cloud Platform directly from here.
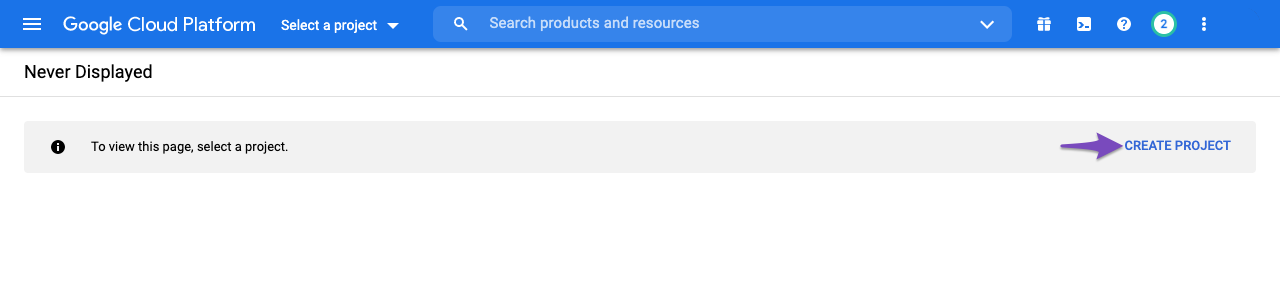
2.2 Create a New Project
Ensure you create a new Indexing API project by clicking the Create Project option.
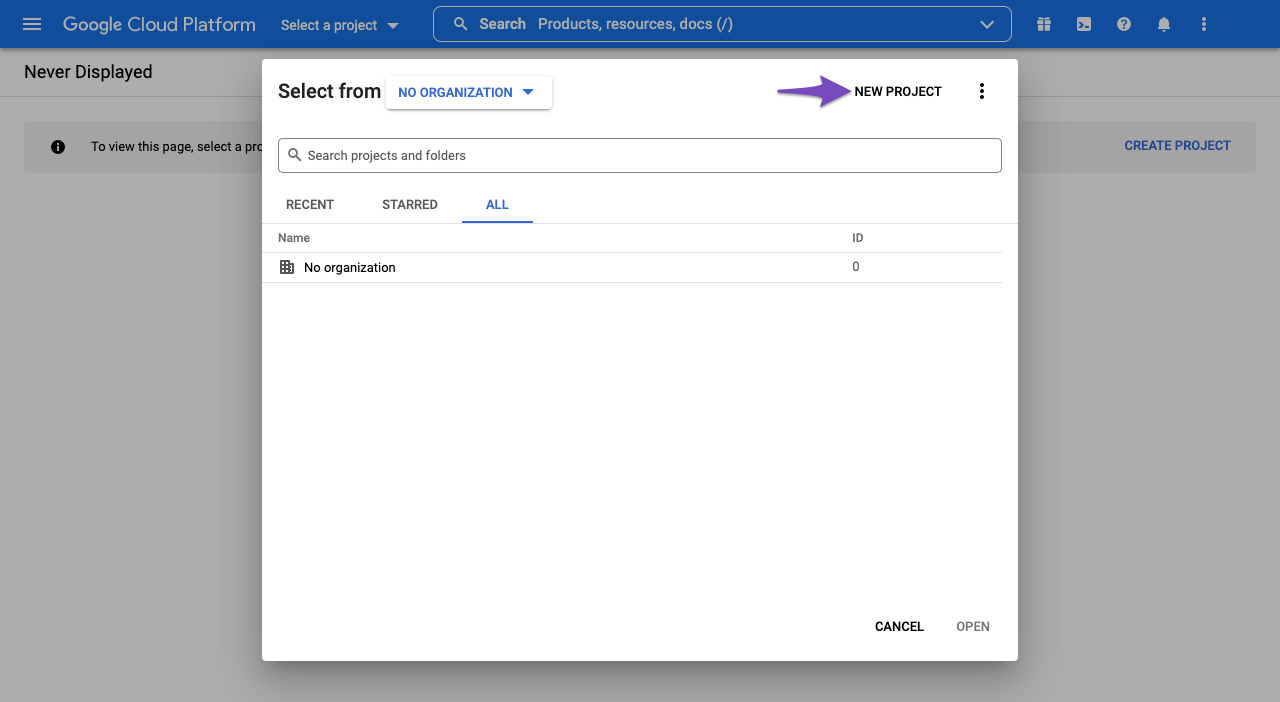
Alternatively, you can click the Select a project drop-down and choose New Project from the pop-up that appears on the screen.
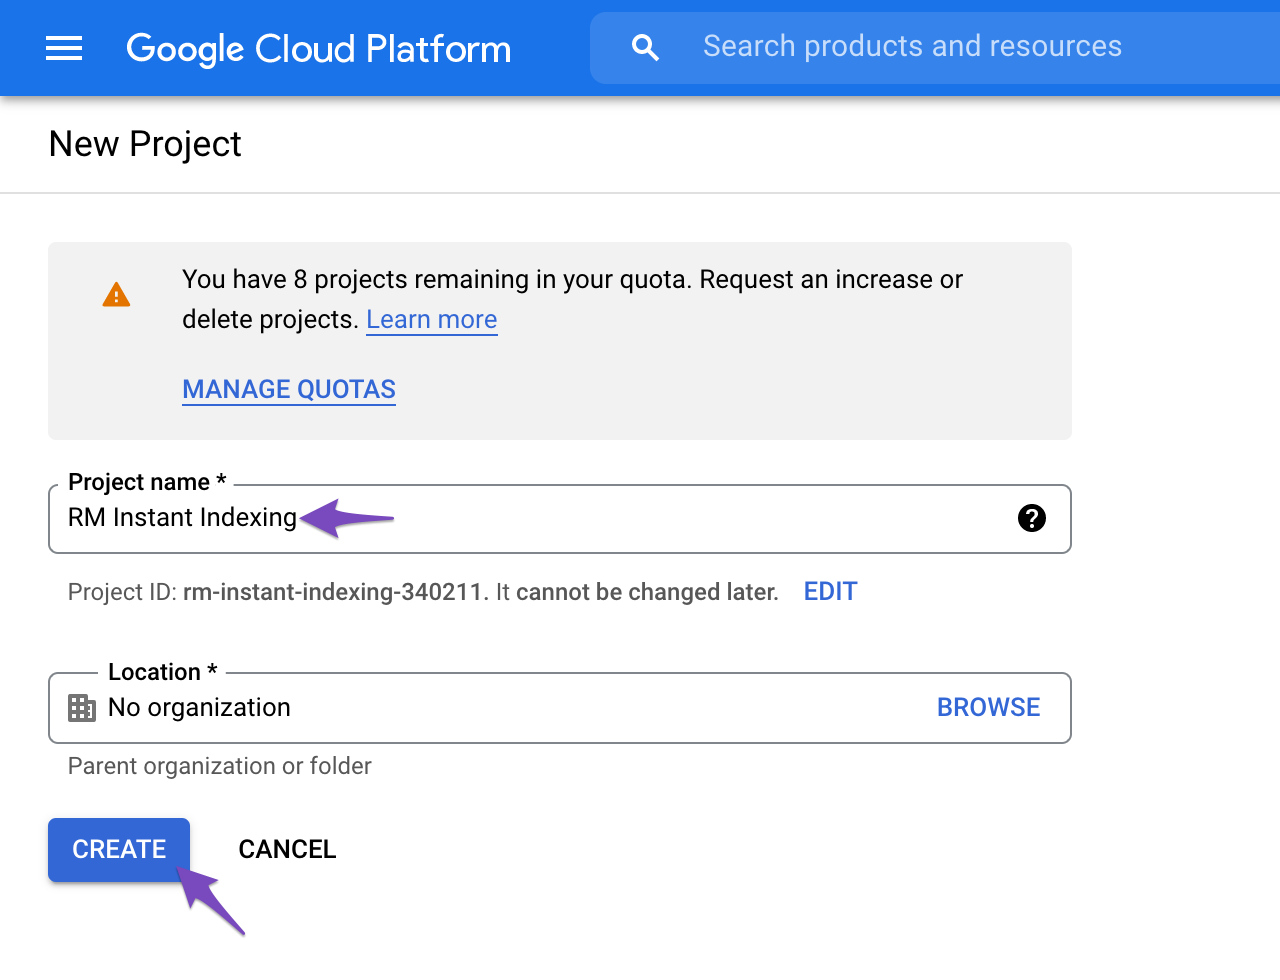
In the next screen, enter a project name that you can recognize later. And then click Create.
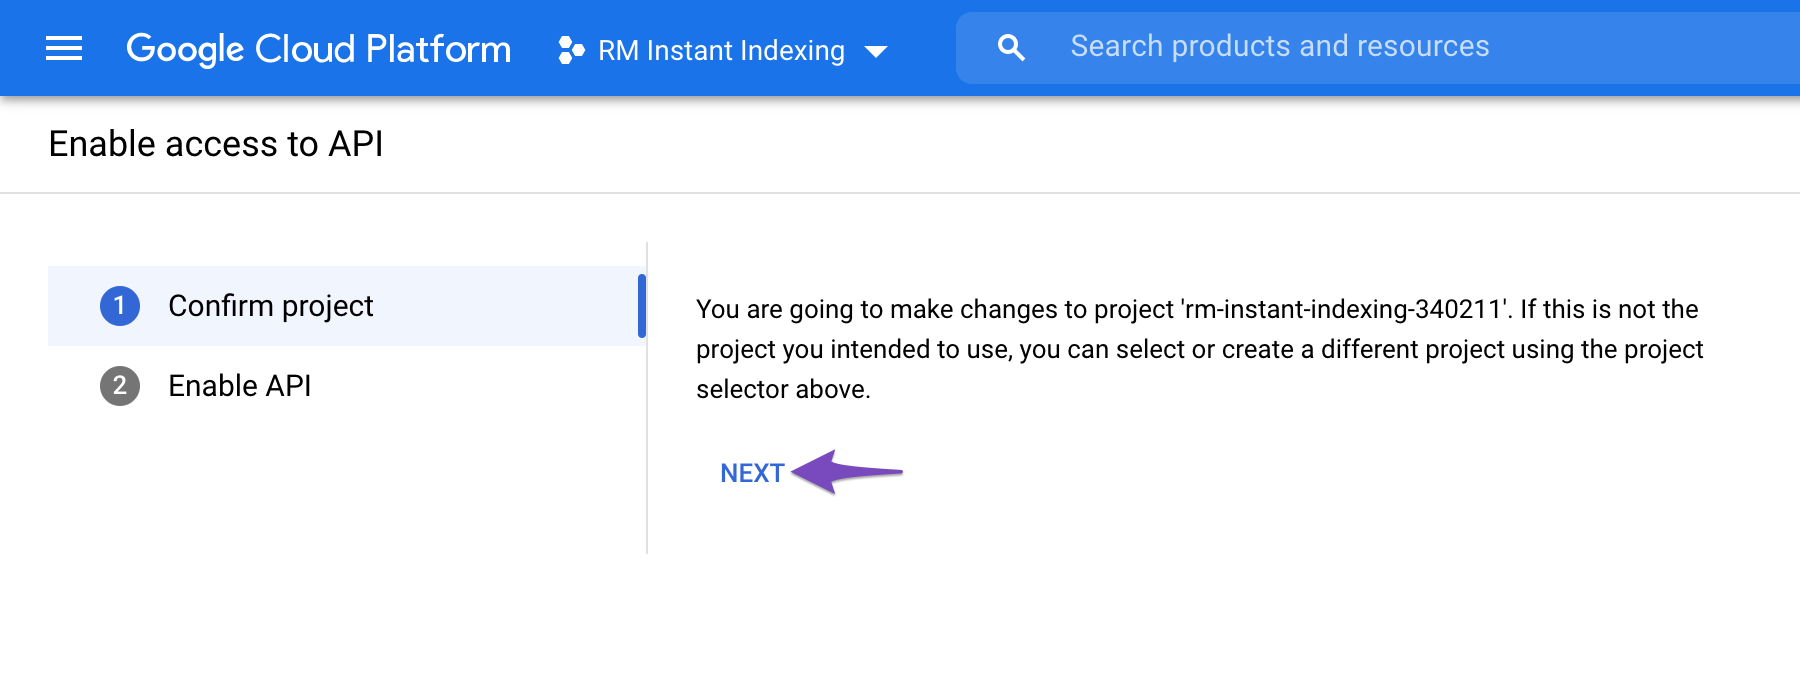
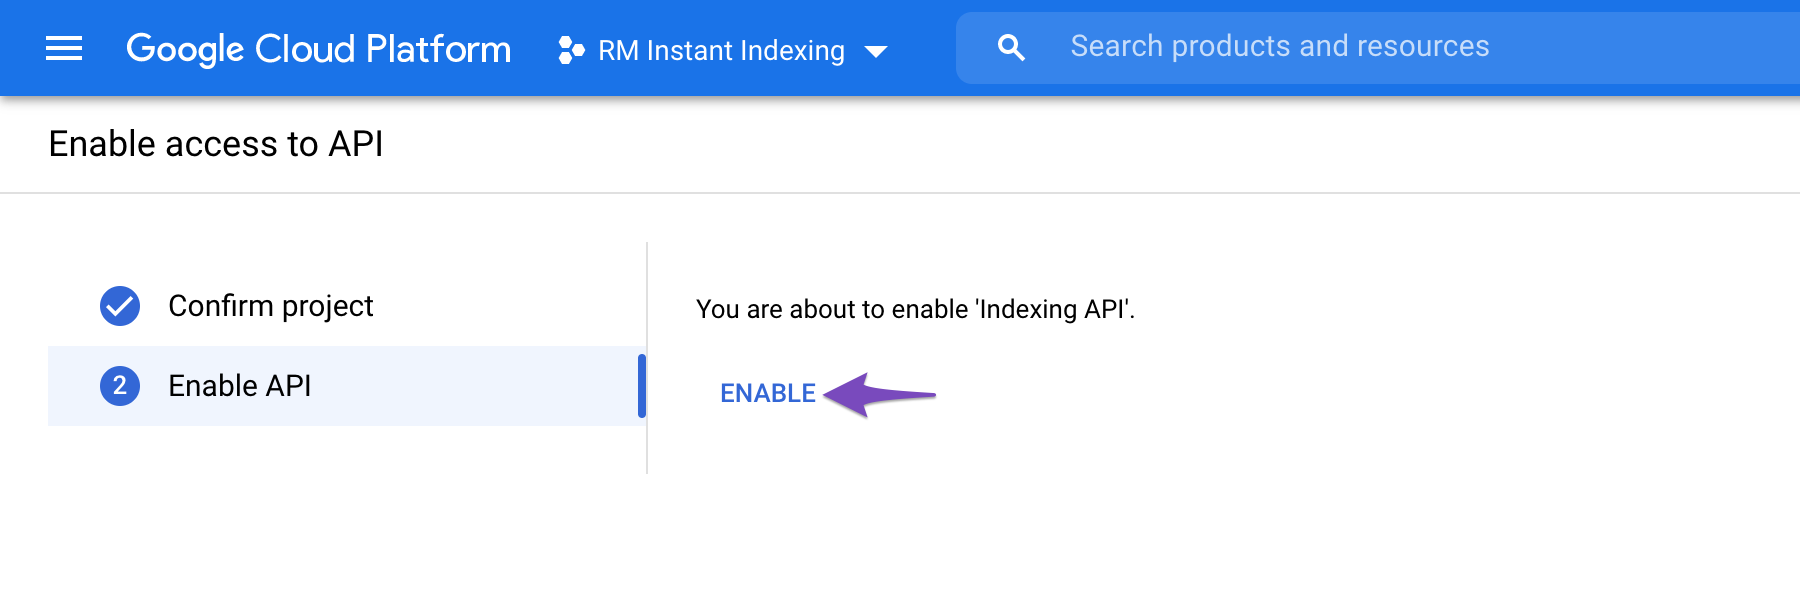
2.3 Enable Access to API
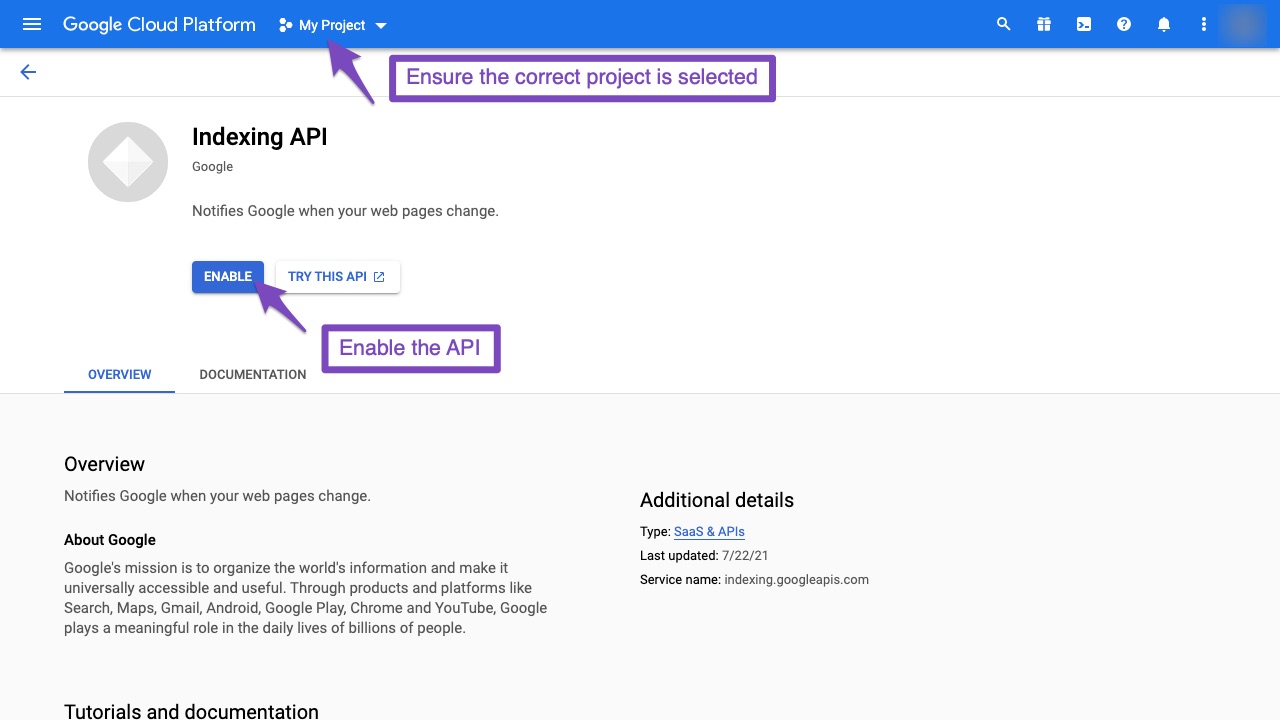
Once you create the project, you’ll need to enable the project to access the API. In the next step, you’ll see a screen, as shown below. Confirm if the selected project is the one we’ve created for Instant Indexing API; otherwise, select the drop-down at the top to change the project. Once you’ve selected the project, click Next.
In the next step, click the Enable option to enable the project to access the Instant Indexing API.
Once you’ve enabled it, you can close this tab.
3 Steps to Create a Service Account
Next, you need to create a service account by opening the service accounts page.
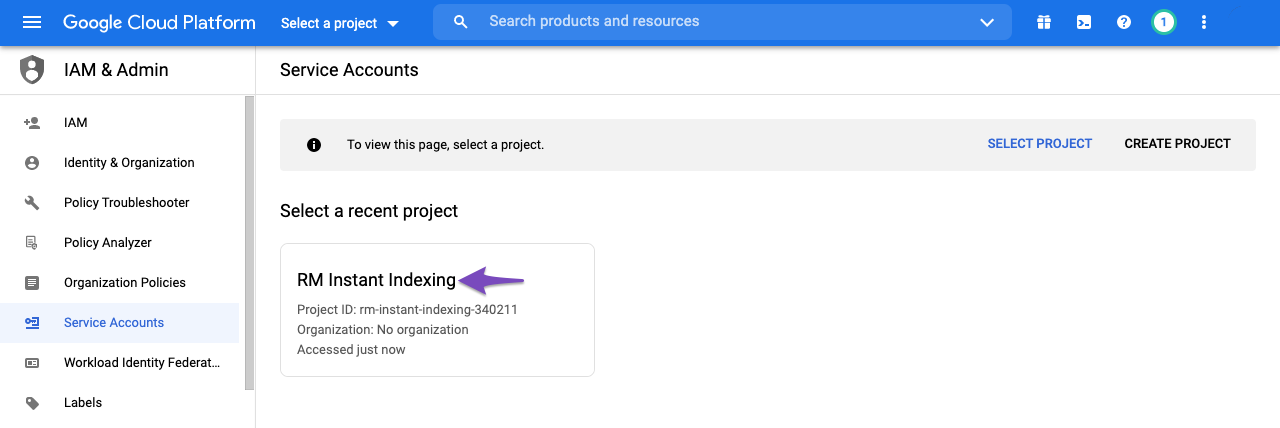
3.1 Select the Project
You will first be prompted to select the API project for which you wish to create this service account (the one created in the previous step).
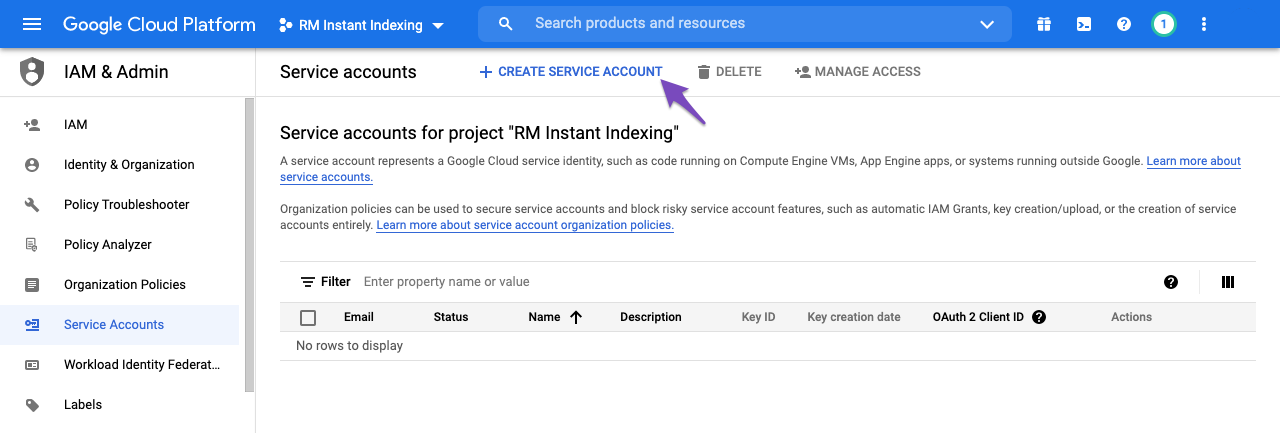
3.2 Create Service Account
After selecting the project you wish to create a service account for, you’ll be taken to the following page, where you simply need to click the Create Service Account button highlighted below:
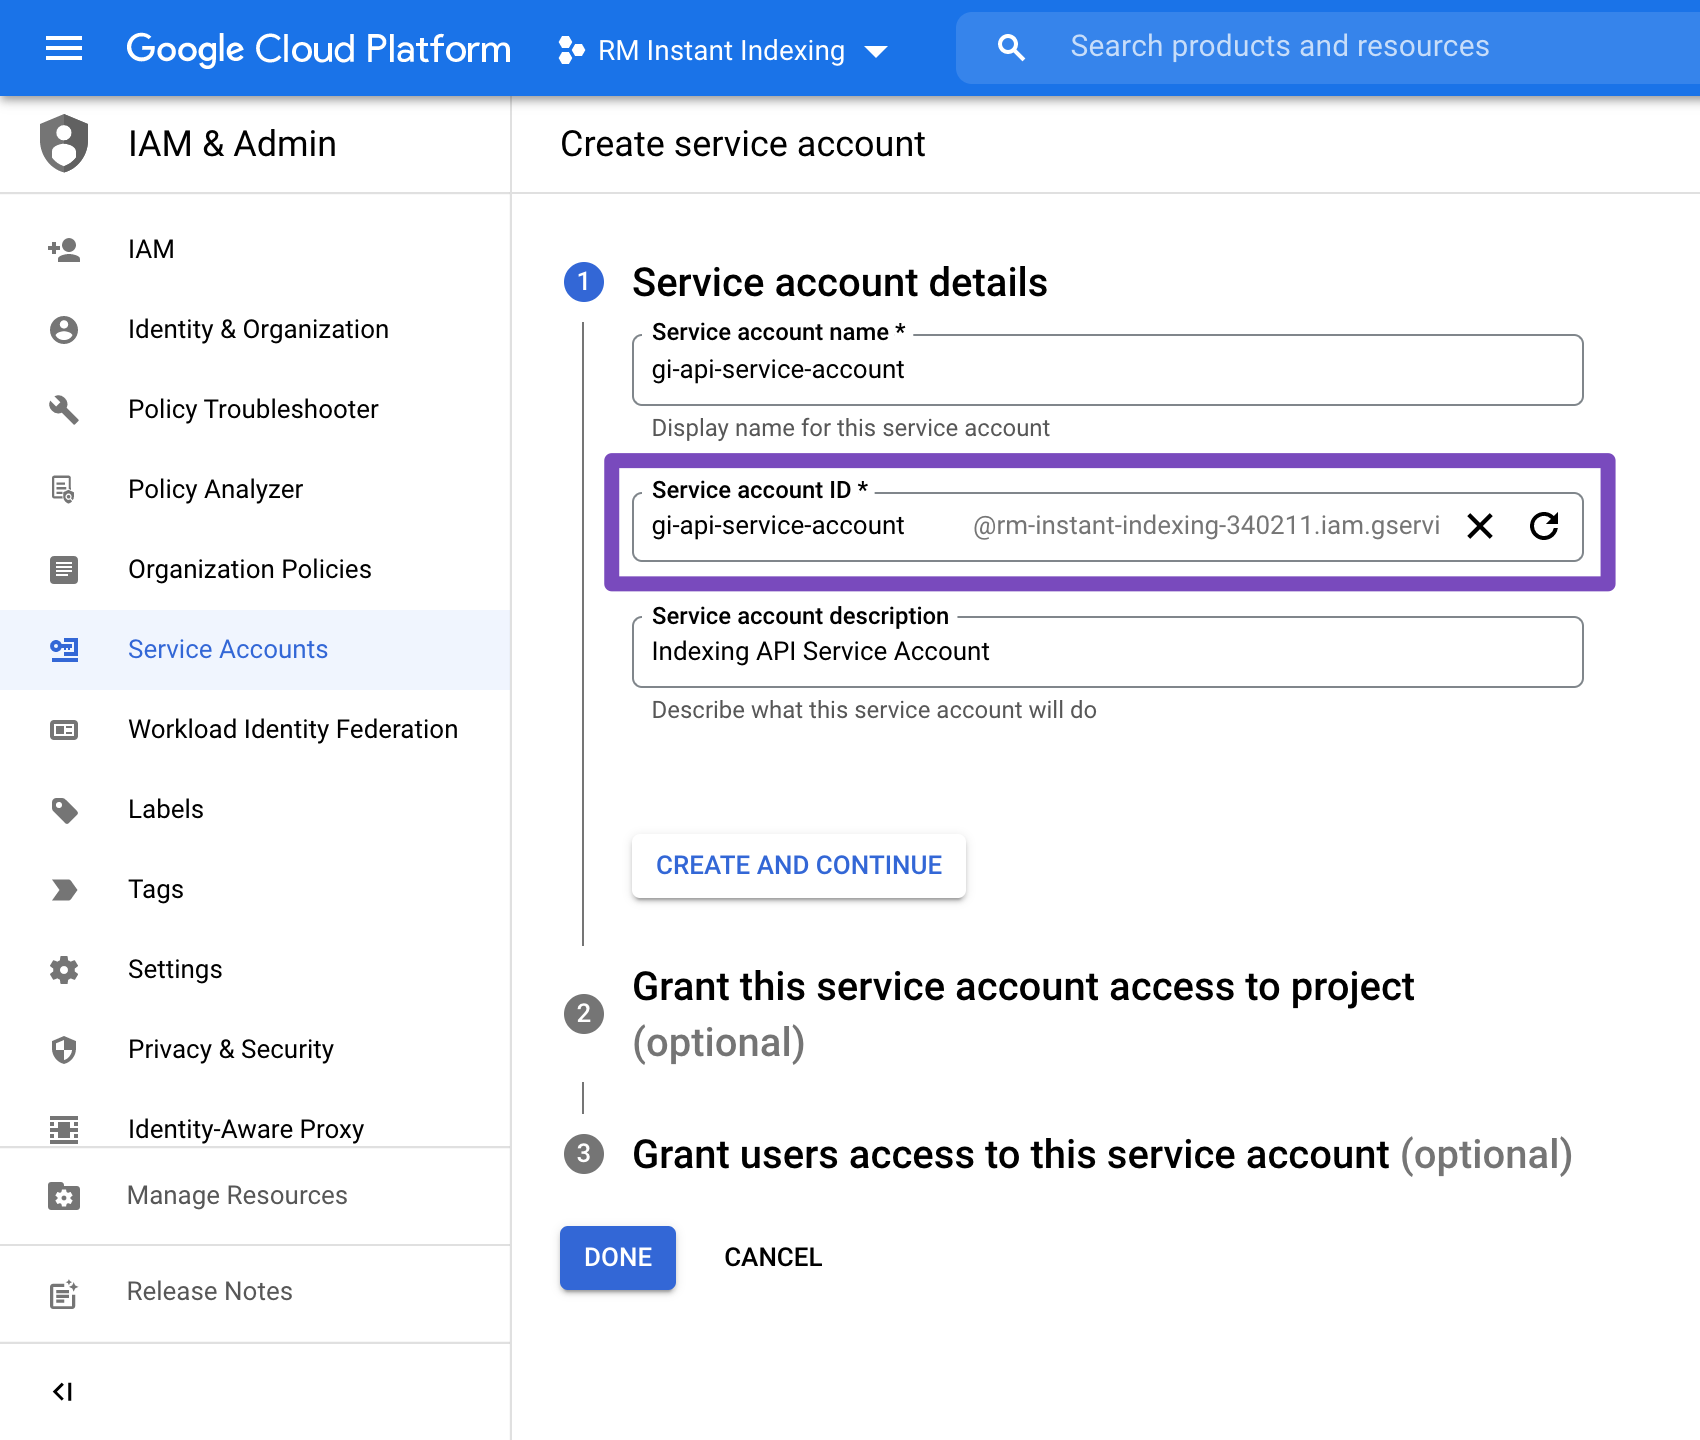
On the Create service account screen, enter a name and description for the newly created service account.
Select and copy the whole Service Account ID (the one that looks like an email address) because you will need it later. Then, click on the Done button at the bottom:
3.3 Manage Keys for Service Account
You will then be able to download the file that contains your API key. To do so, simply click the three vertical dots in the Actions column and then select the Manage keys as shown below:
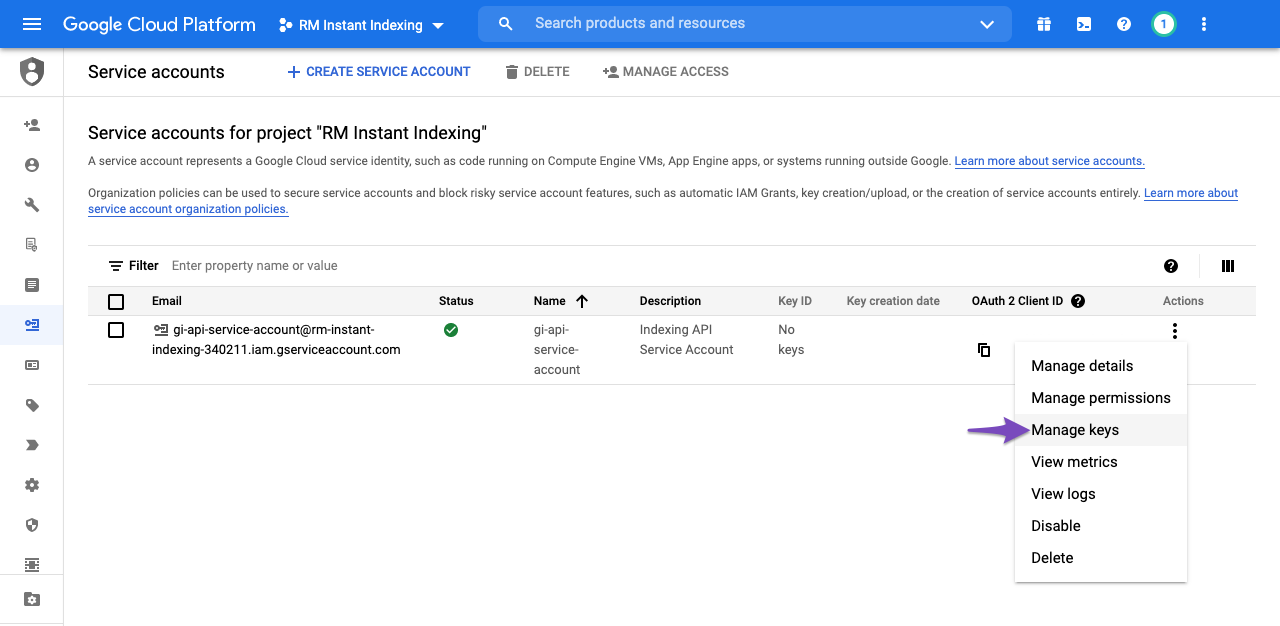
3.4 Create New JSON Key for Service Account
You will then be taken to the following page, where you can click Add Key and then select the Create new key option, as shown below:
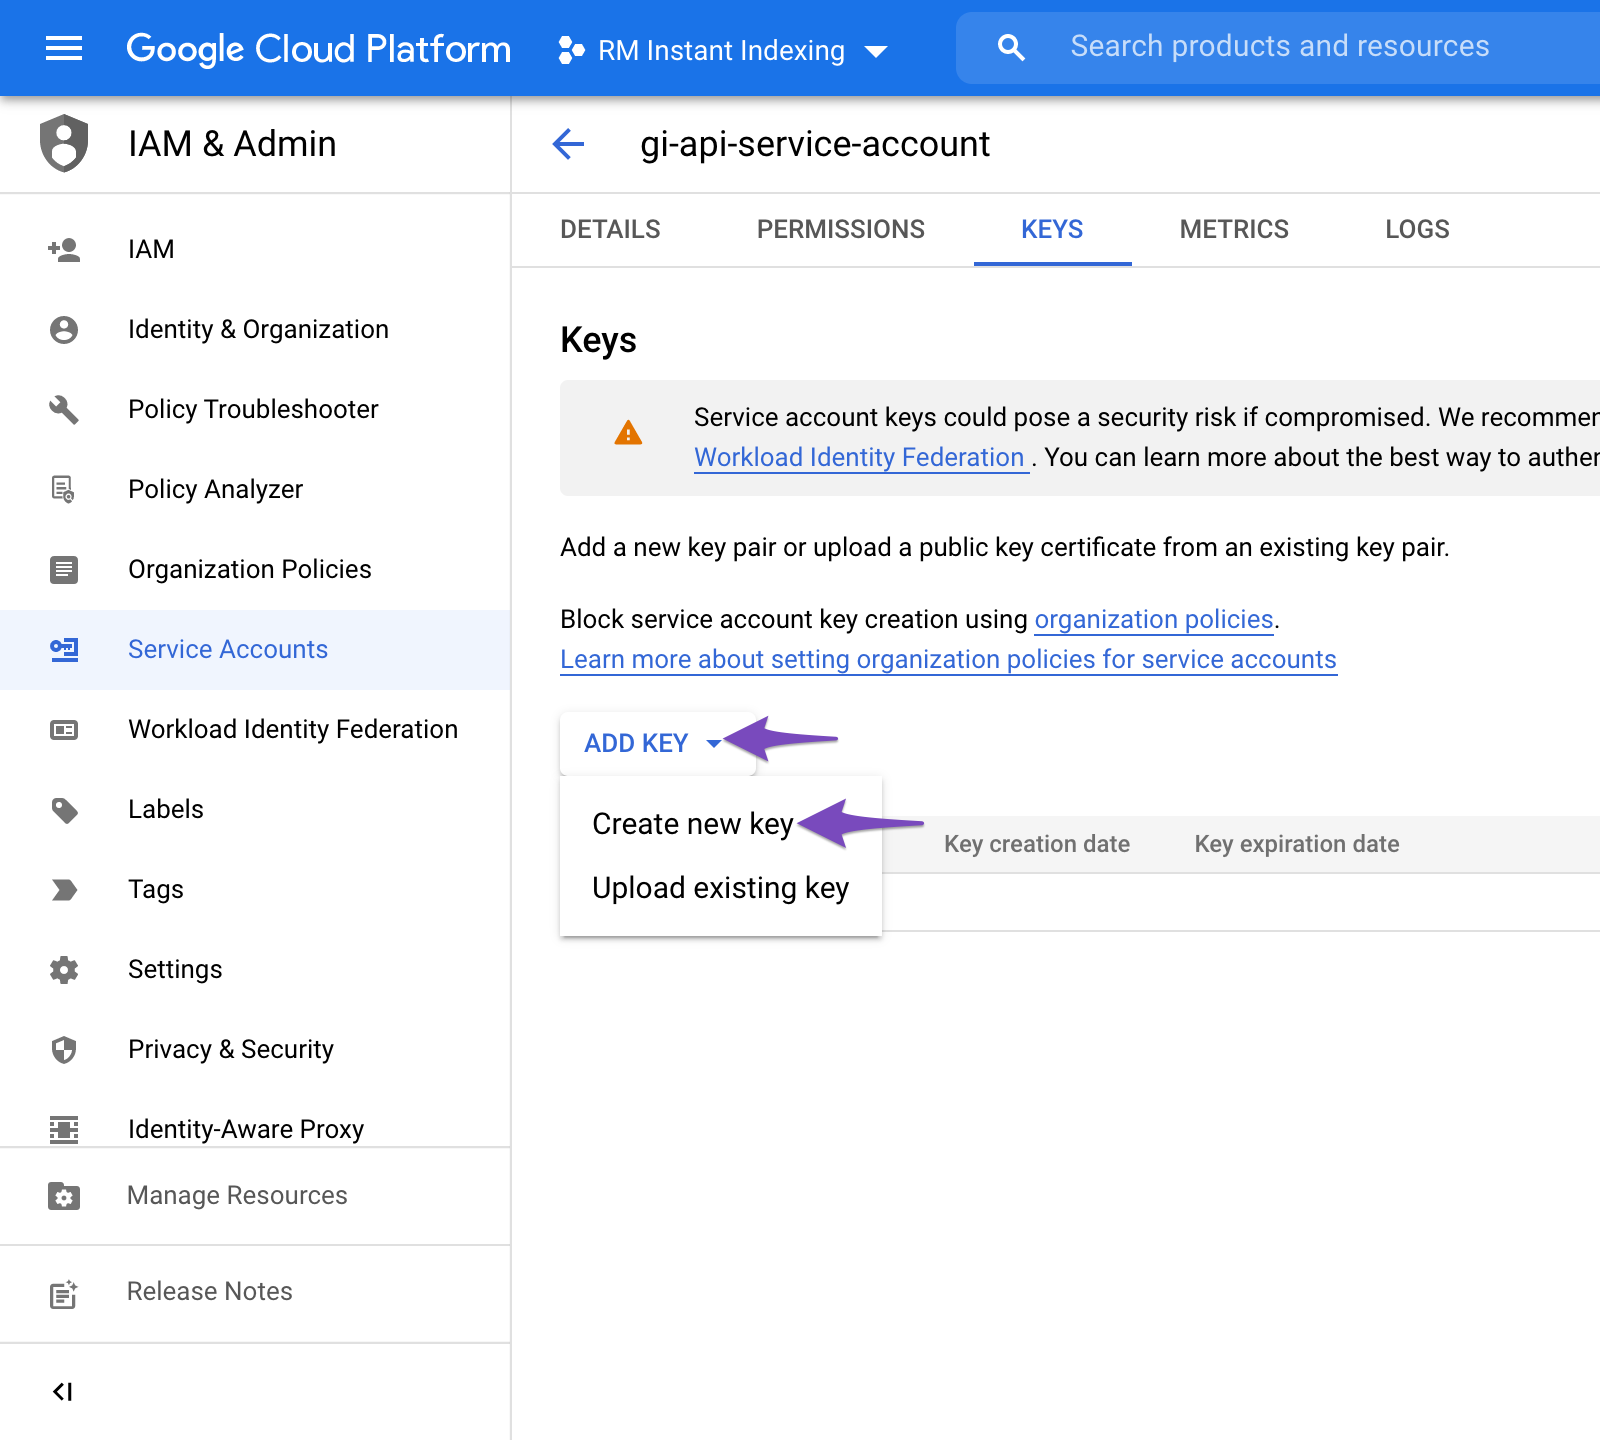
Choose the default JSON format when prompted in the overlay, and click Create:
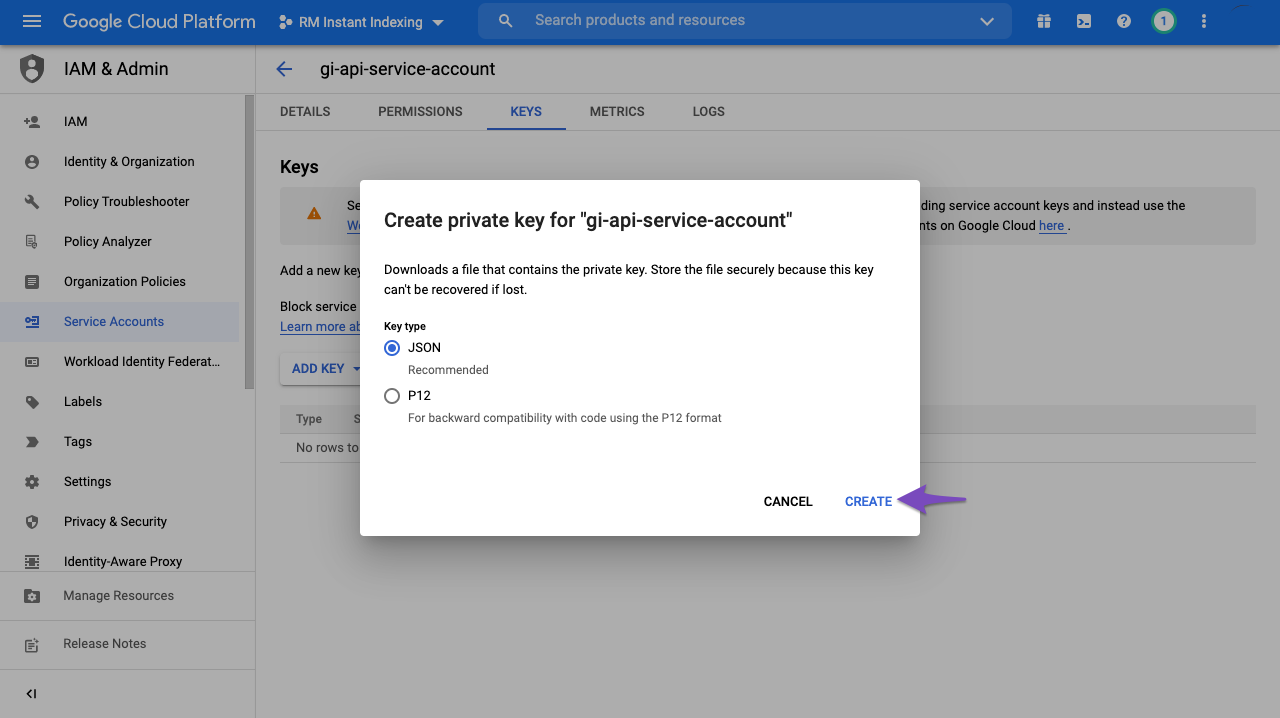
Upon clicking Create, the .json file will be automatically downloaded in your browser, meaning you’ve successfully created the API key & can proceed to the next step…
4 Add the Service Account as an Owner of Your Google Search Console Property
To do this, you’ll need to register and verify your website with the Google Search Console (if you haven’t done so already), which is super easy: follow the recommended steps to verify ownership of your property.
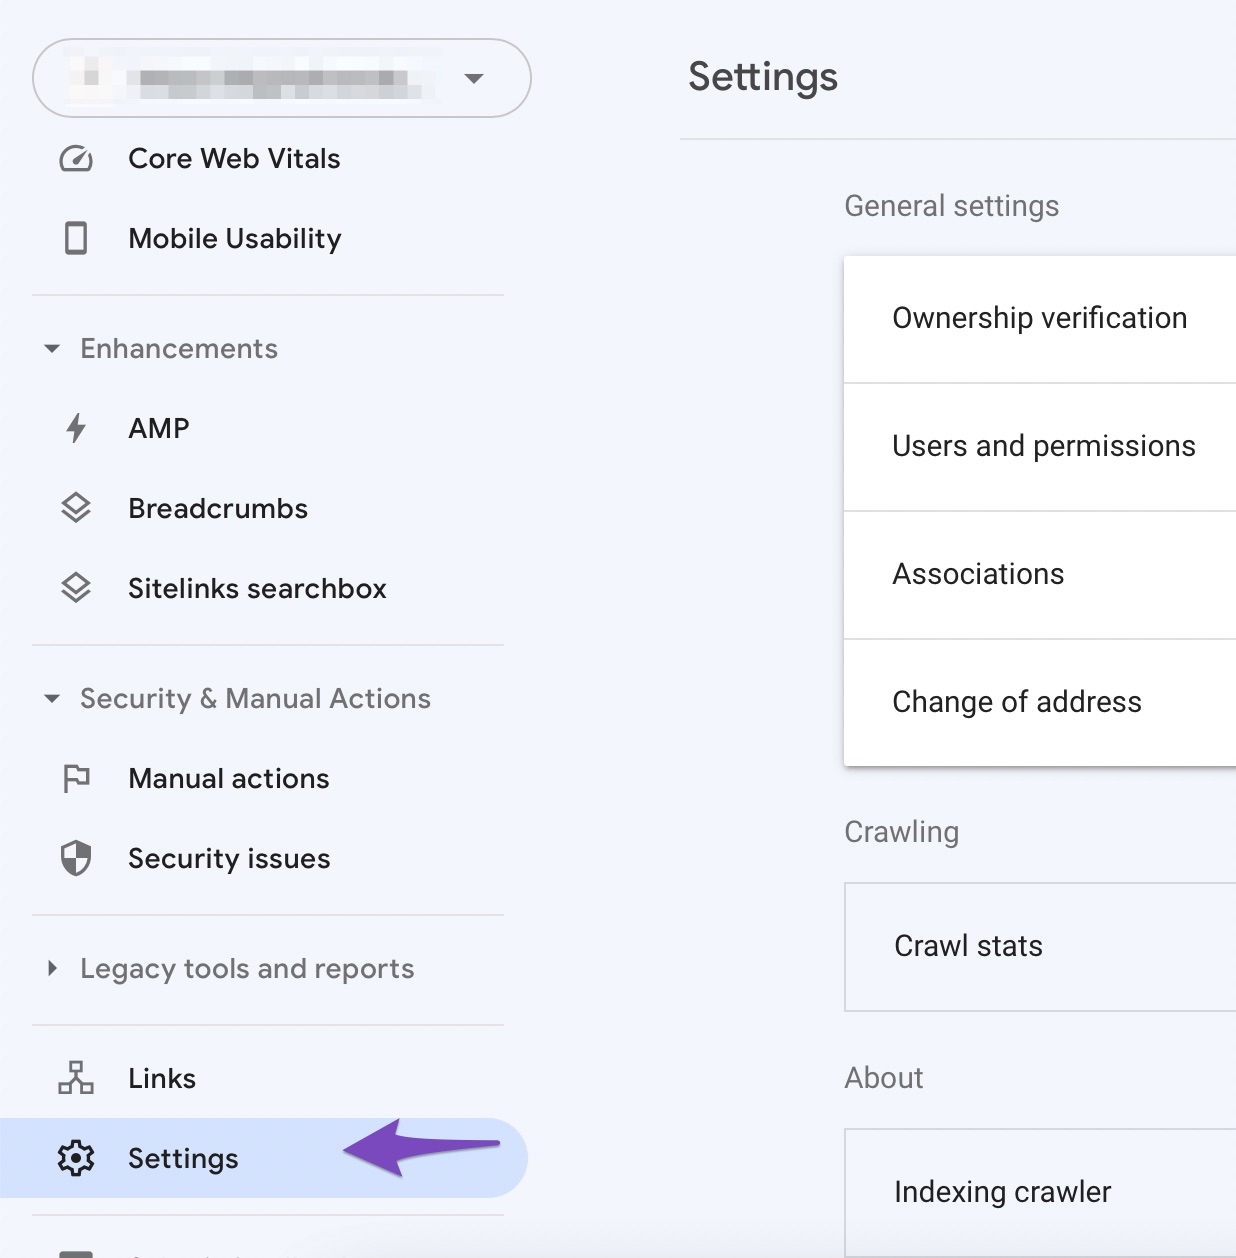
4.1 Navigate to Users and Permissions in Google Search Console Settings
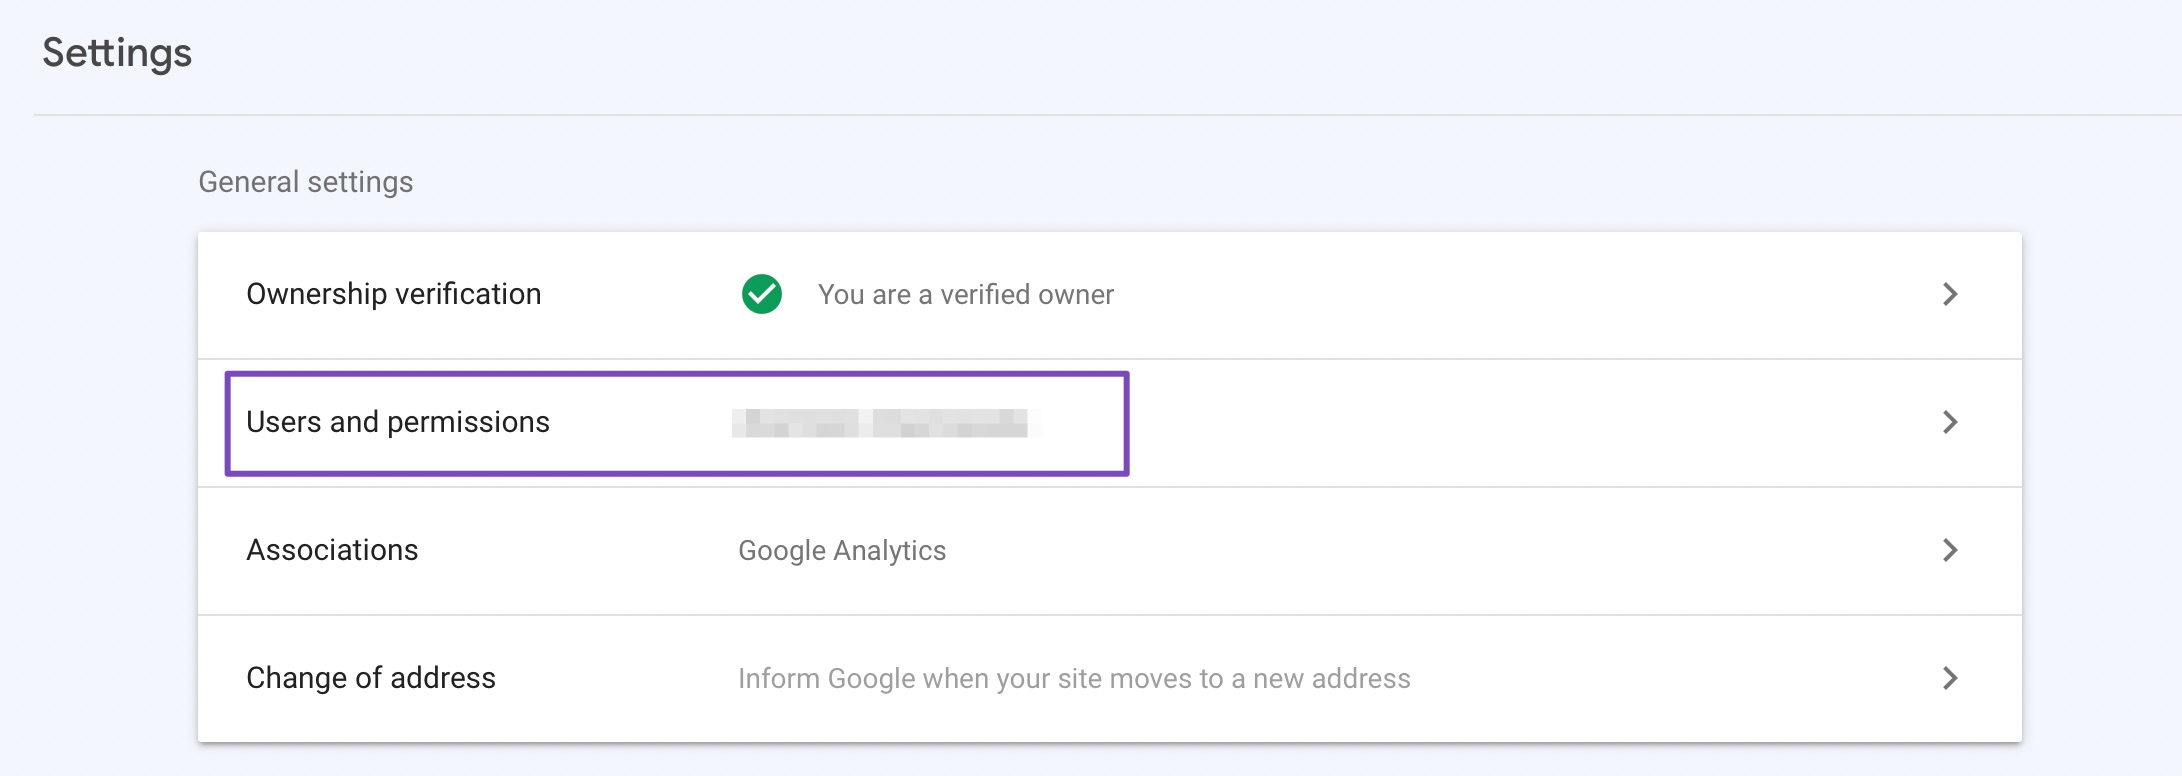
After verifying your property, open the Google Search Console, select your property on the left (if prompted), and then click on Settings near the bottom:
Note: If you’re configuring for a subdomain WordPress Multisite, then ensure that you’ve chosen the domain-level property in Google Search Console. Otherwise, you’d have to add the service account as the owner separately for each subdomain property.
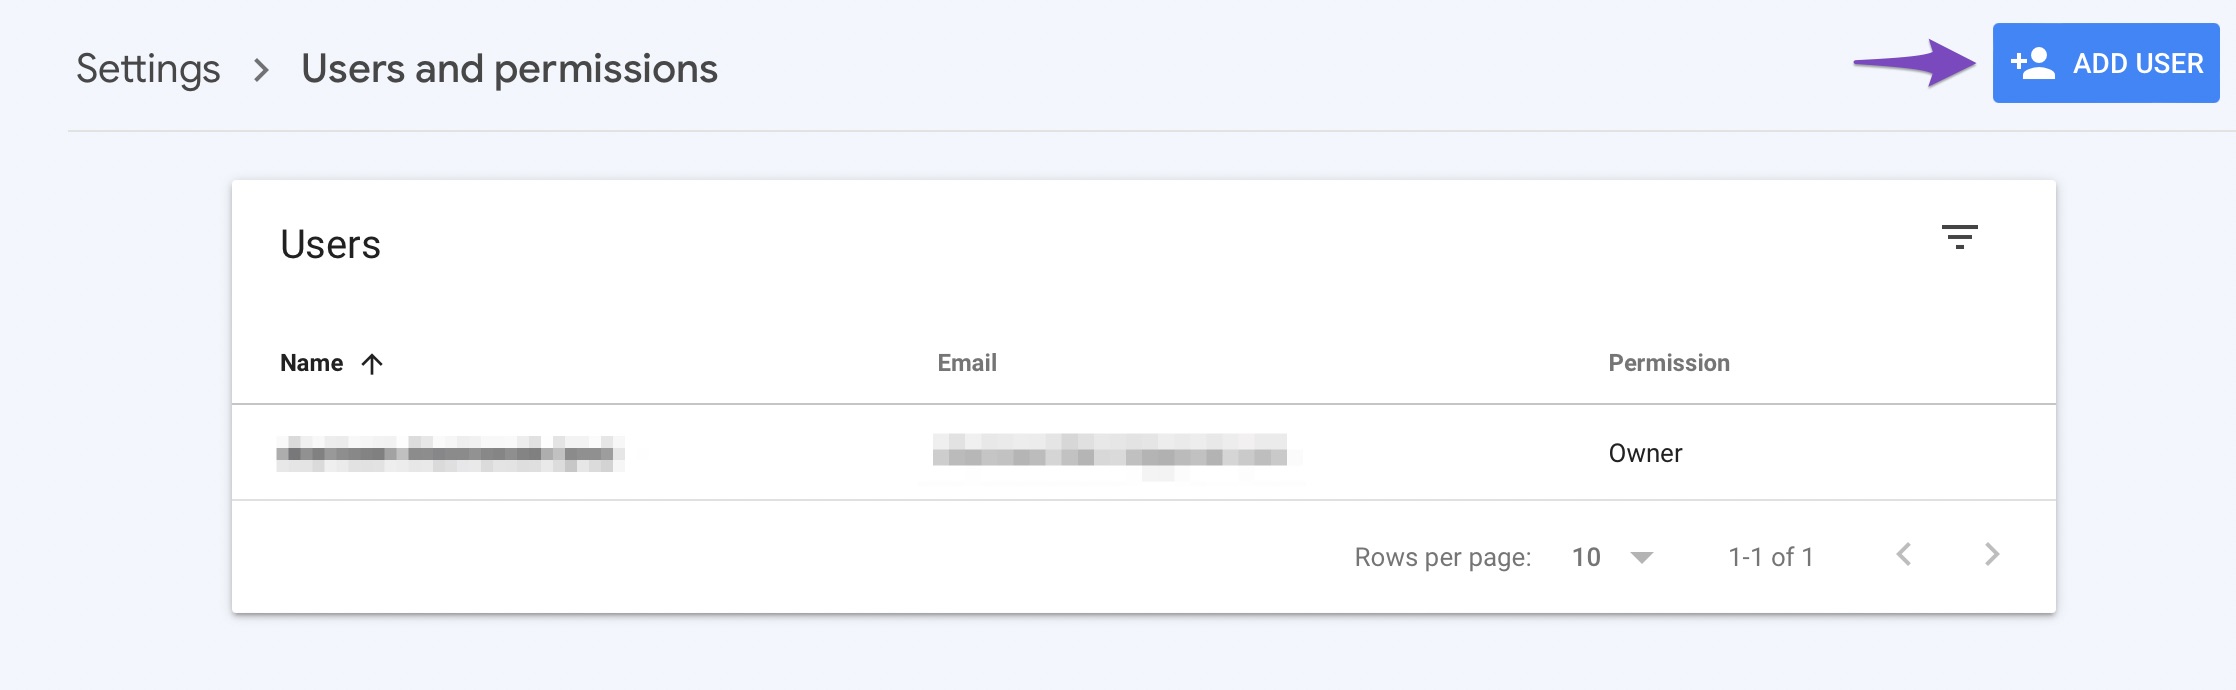
Click on Users and Permissions:
4.2 Add User to Your Search Console Property
Click on the three dots next to your account, and then click on Add User.
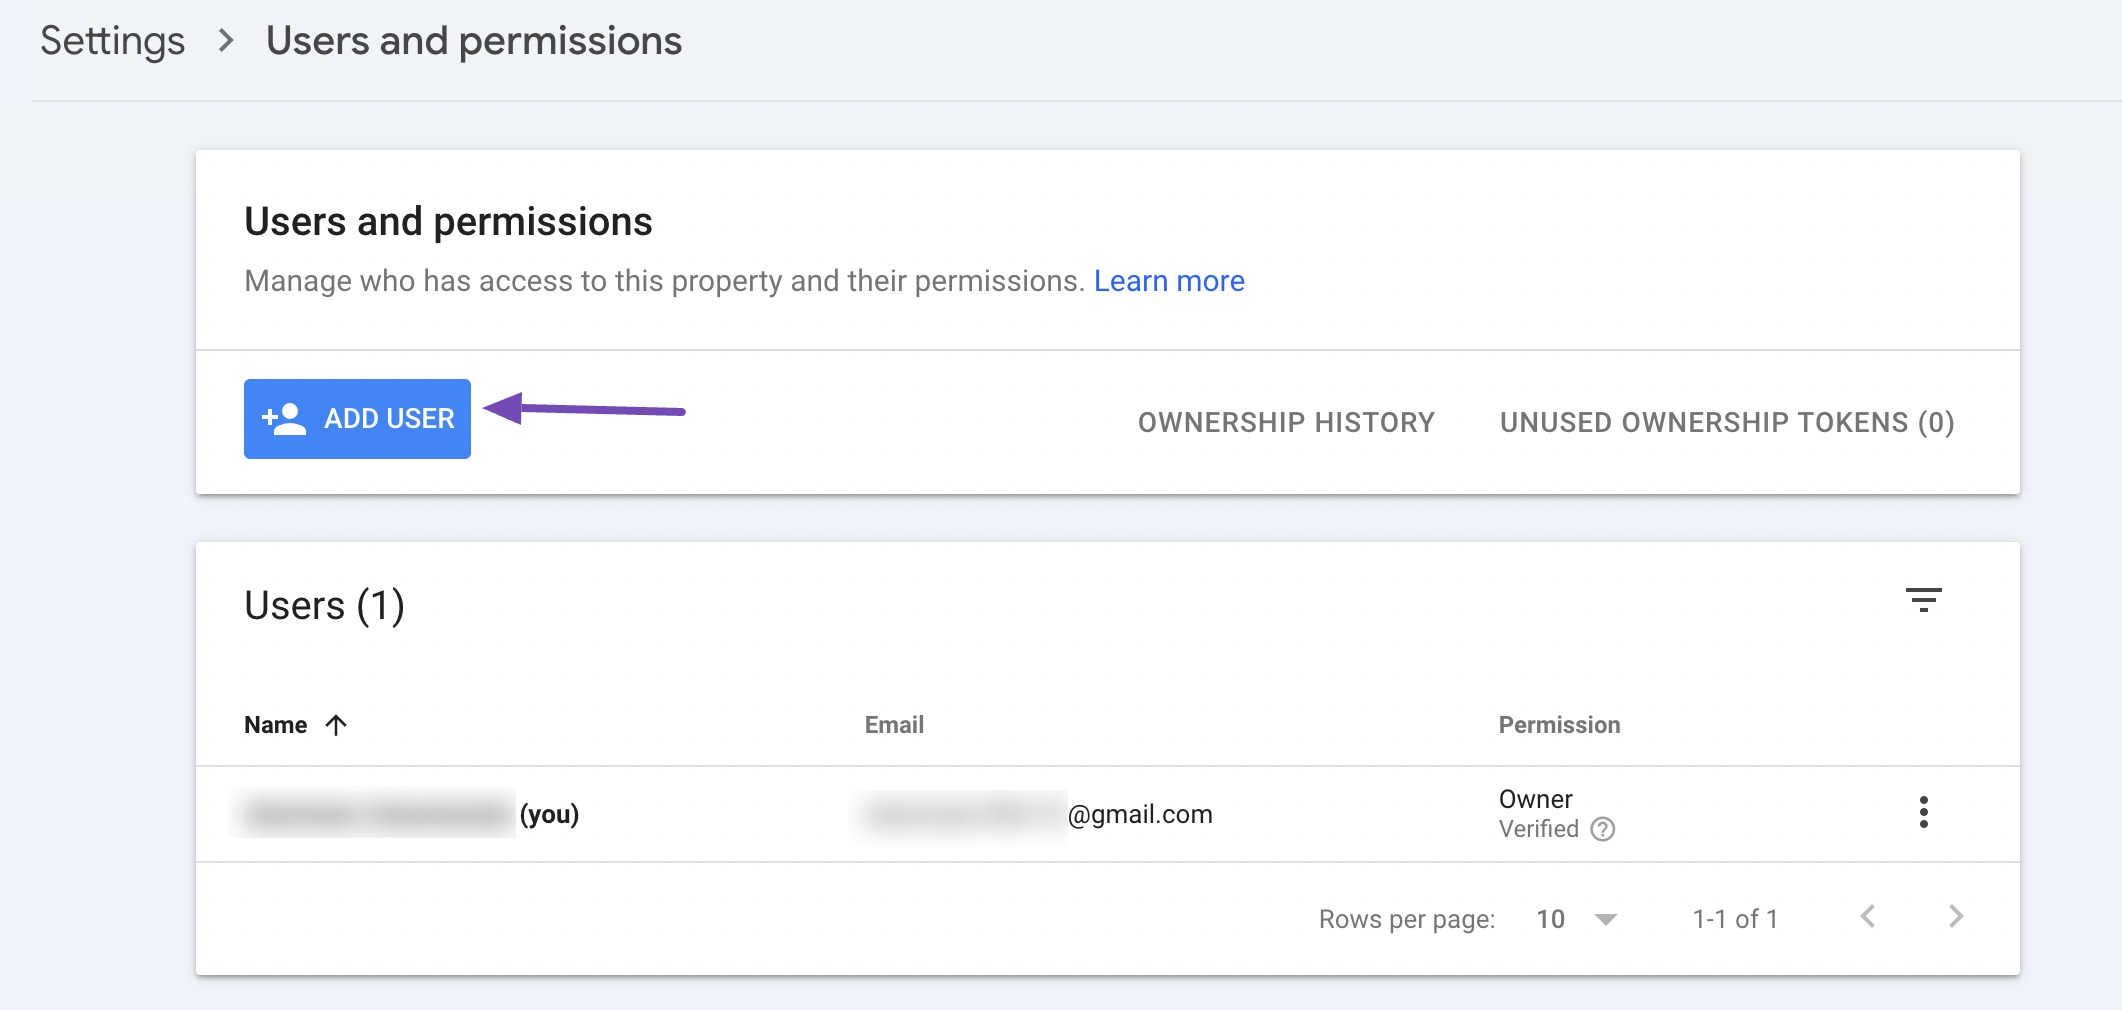
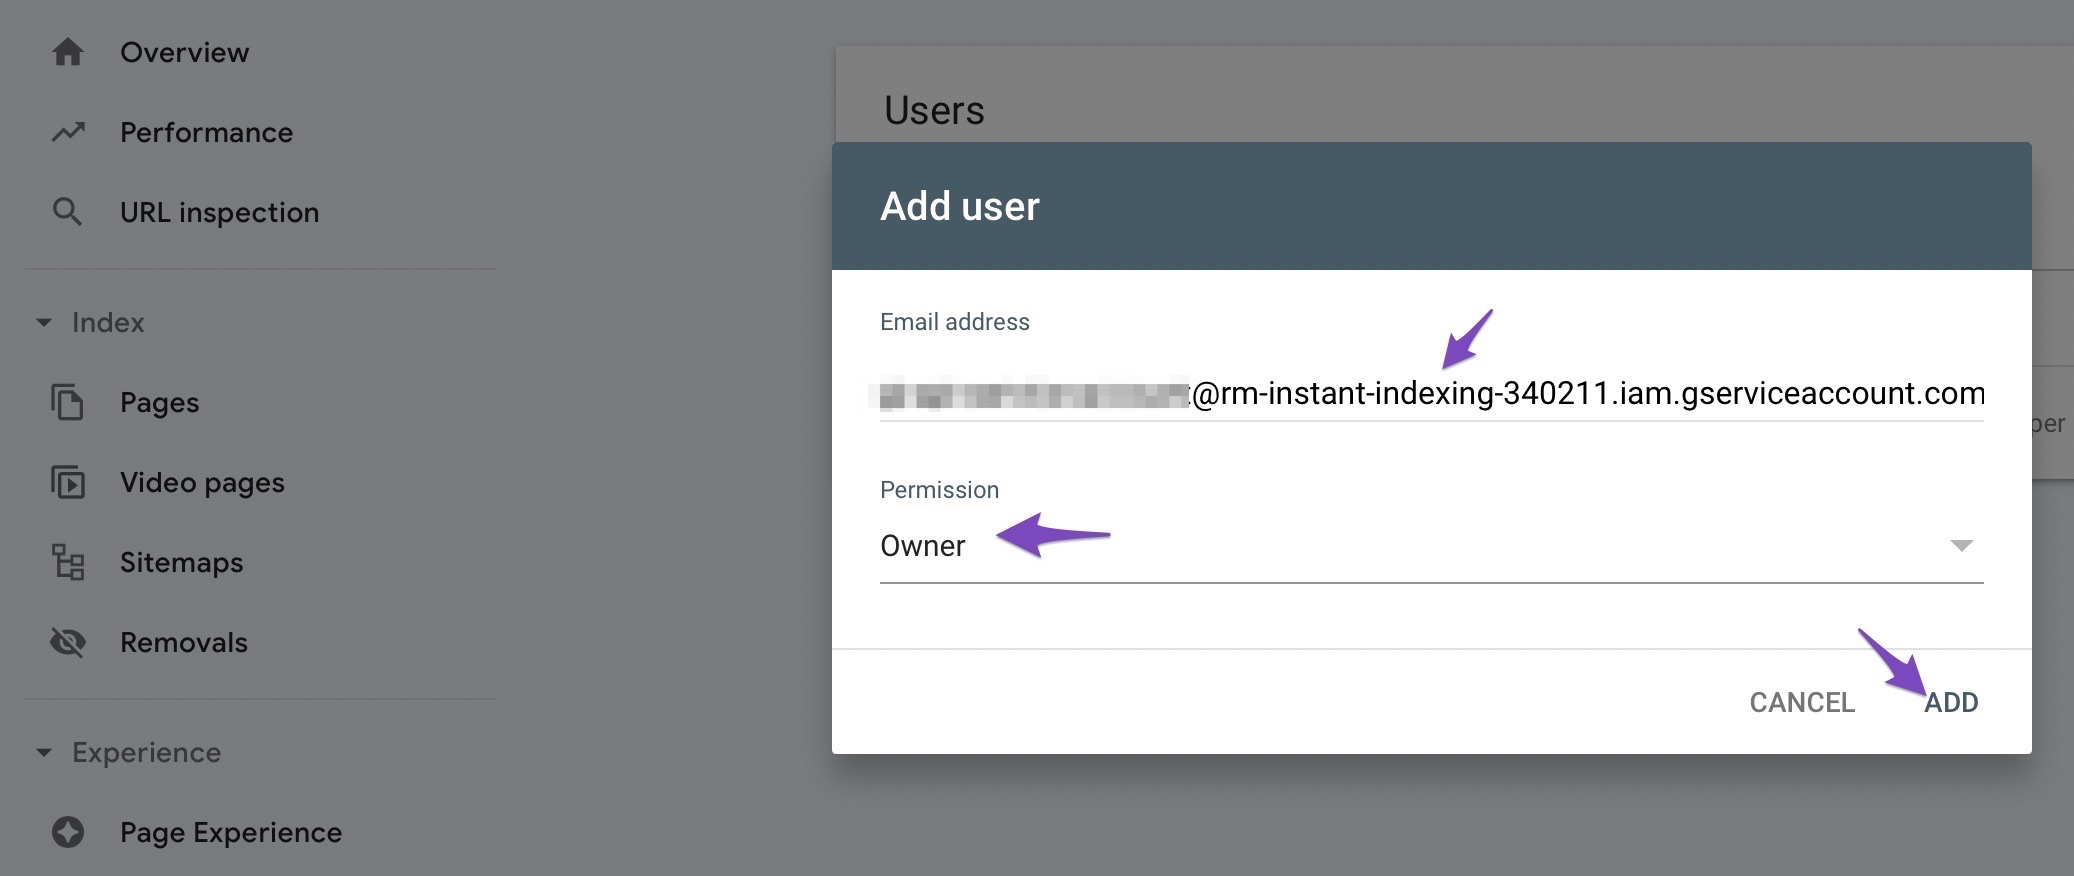
4.3 Delegate Service Account ID as Owner
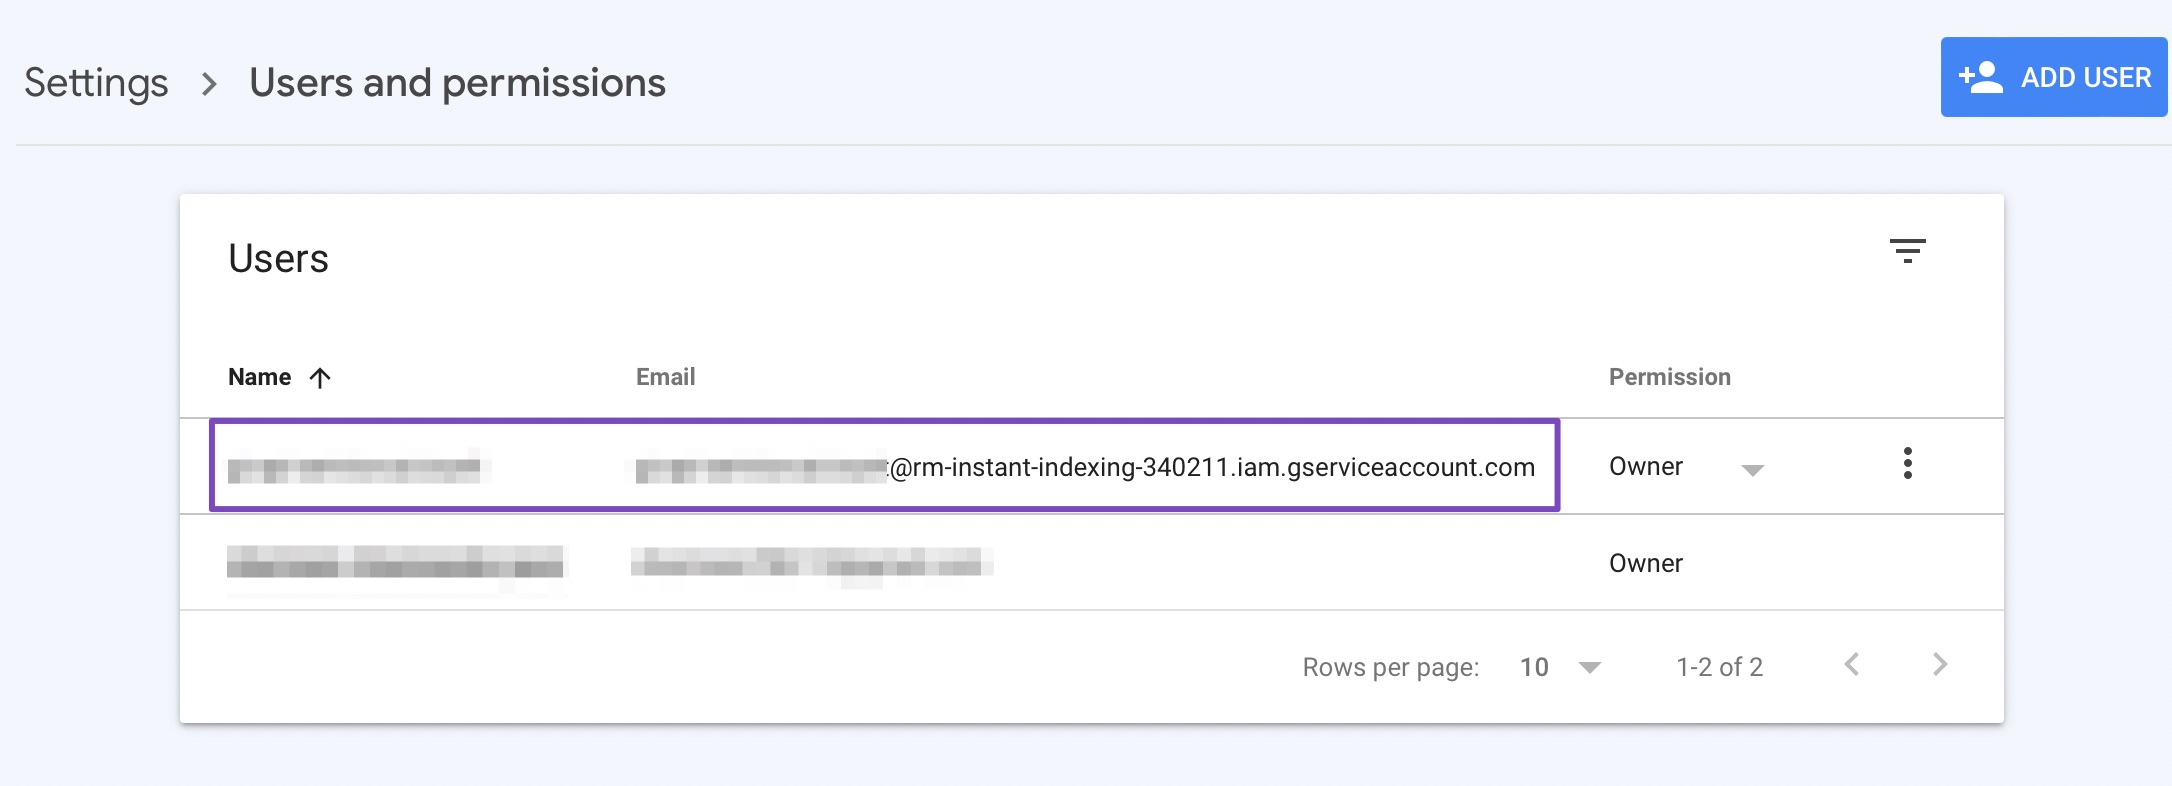
A popup will now appear. Enter the Service account ID (the one you copied out earlier) in the Email address field. Ensure that you’ve provided Owner level Permission, and then click Add.

Now, in a few moments, you should see the Service account listed as a new Owner.

You can use a single Project, Service Account, and JSON API Key across multiple sites; just make sure that the Service Account is added as Owner for all the sites in the Search Console.
5 Configure the Plugin
Now that you’ve created the API key and added the service account to your search console property, you’re only left with configuring the Instant Indexing plugin on your WordPress site.
5.1 Install Instant Indexing Plugin
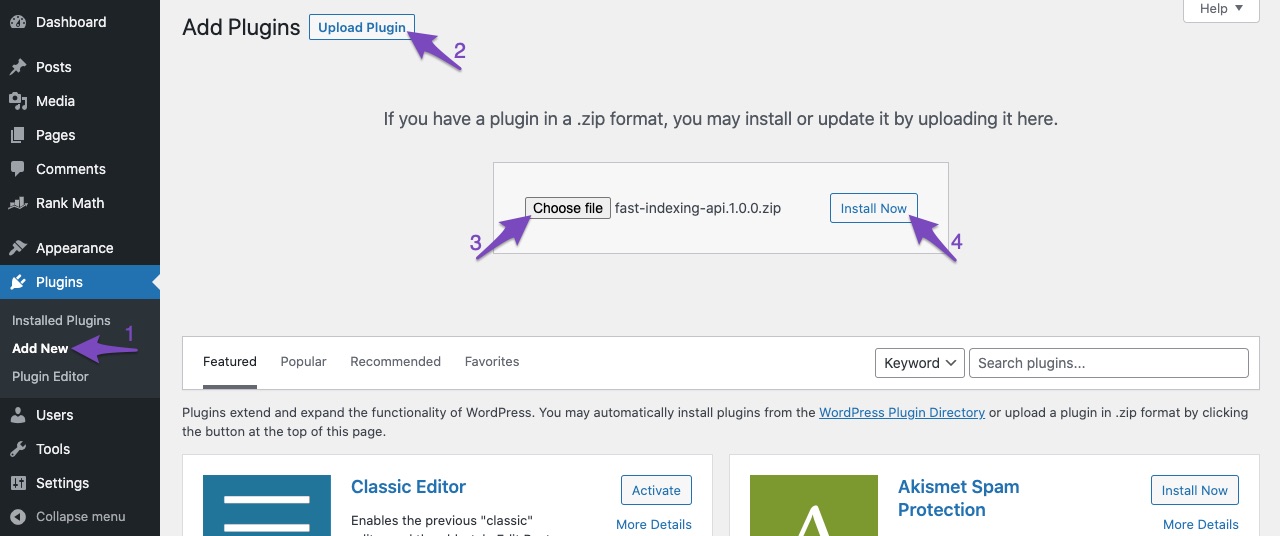
You can get the Instant Indexing plugin installed by uploading the plugin (you’ve downloaded in step 1) through the WordPress dashboard.
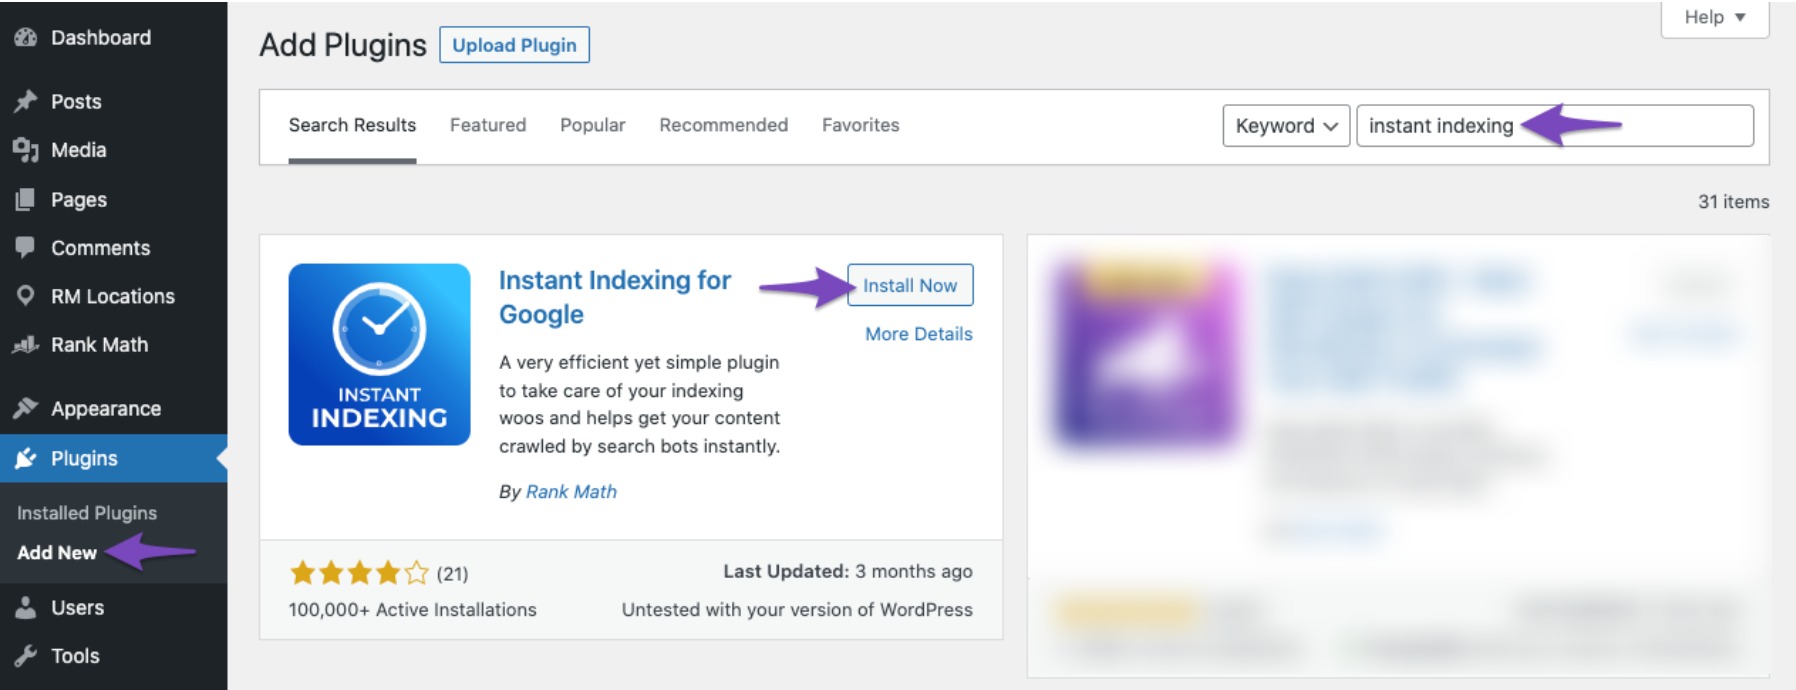
Alternatively, you can install it through the WordPress Admin panel by navigating to Plugins → Add New. Search and install the Instant Indexing plugin, as shown below.

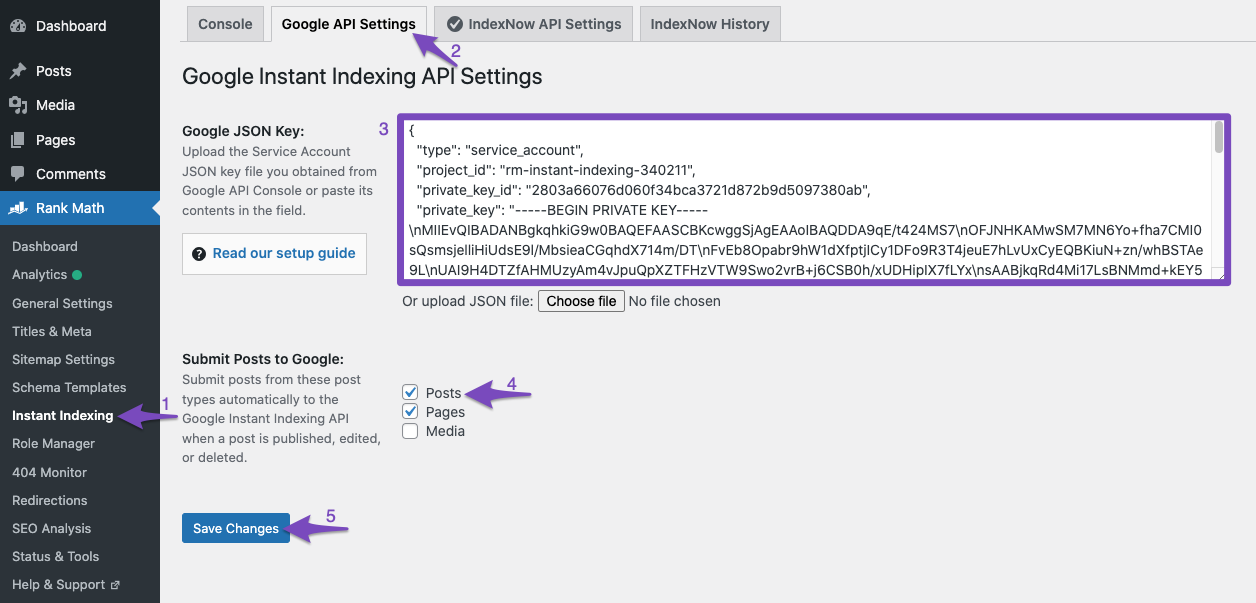
5.2 Insert Your API Key in the Plugin Settings
After installing and activating the plugin, just navigate to Rank Math SEO → Instant Indexing Settings in your WordPress admin area, and under the Google API Settings tab, paste in the contents of your JSON file or just upload the file.
Select the Post Types where you want the Indexing API to ping Google to crawl your website as soon as a post is published, updated, or deleted, and click on Save Changes.
Note: If you’re using WordPress multisite, then you need to configure the Google API Settings separately on each individual subsite.
5.3 Now it’s time to use Google’s indexing API to get any post or page on your site indexed almost instantly.
Head over to the Console tab at the top of the page. The screen should appear similar to the one below.
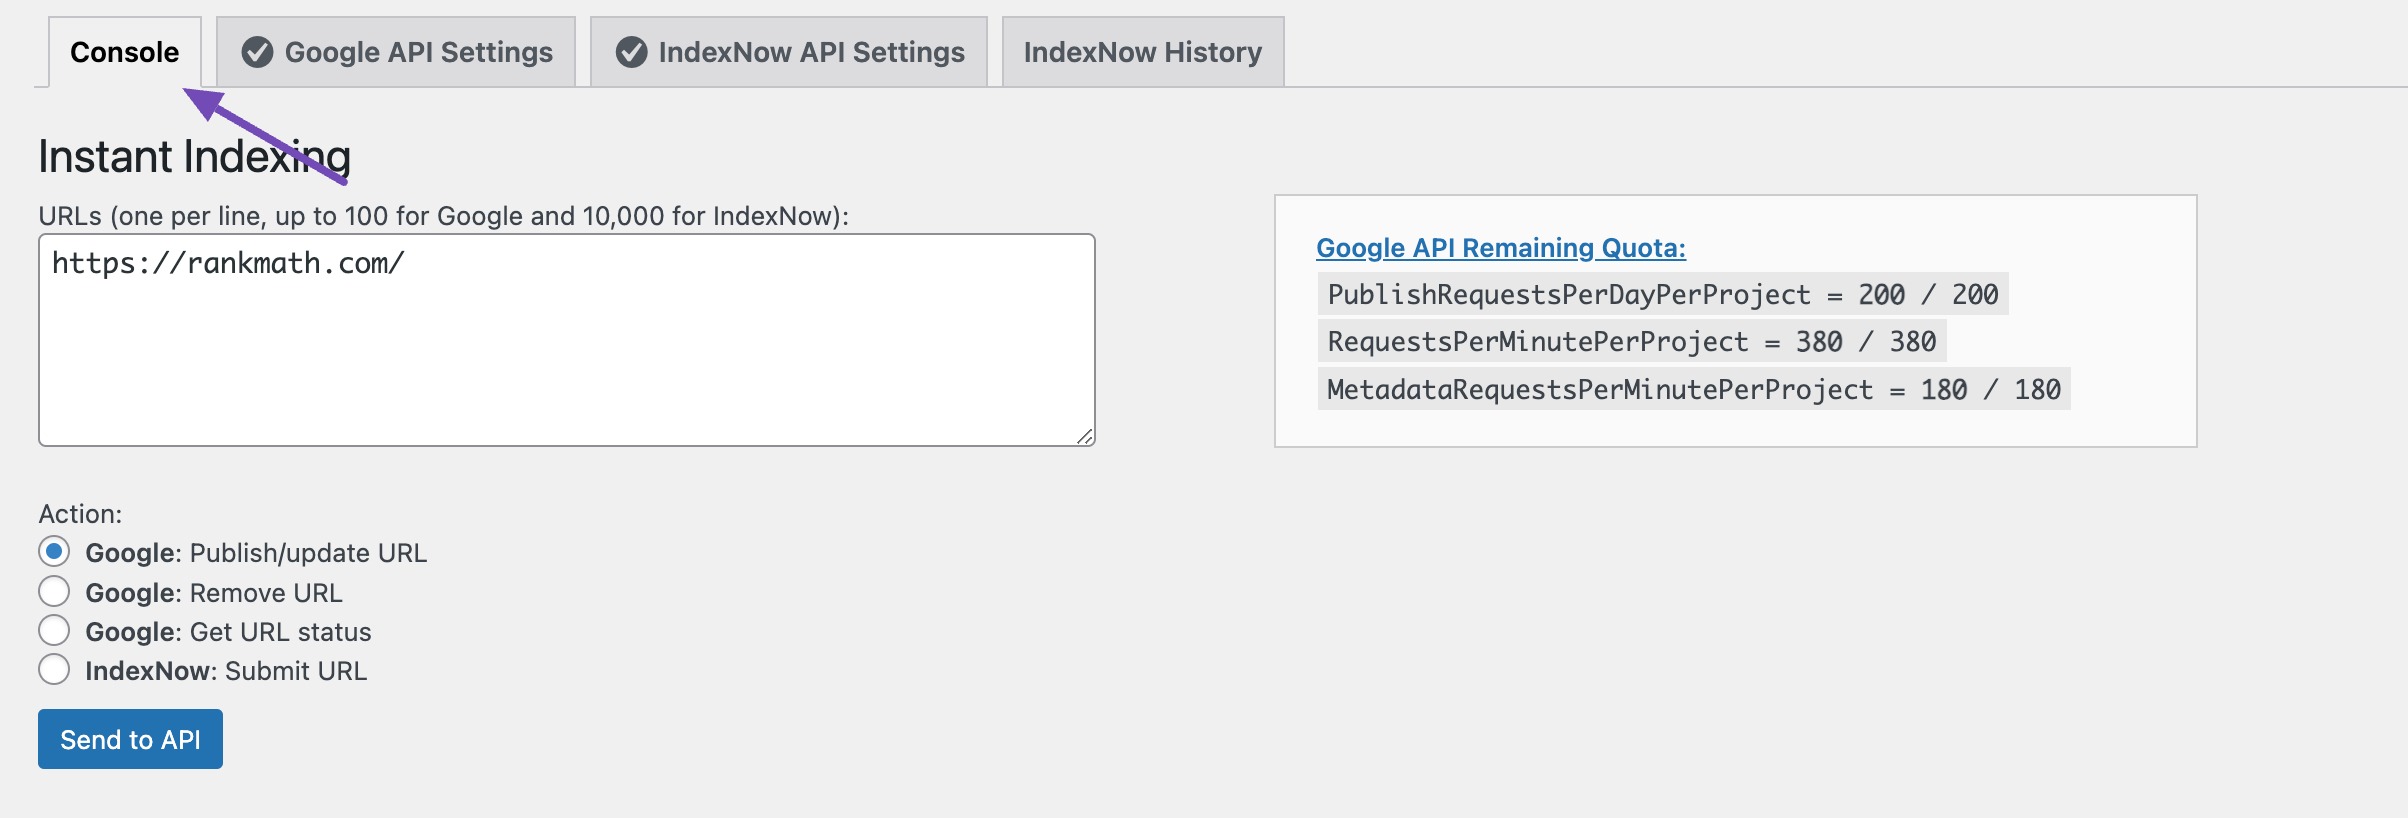
Enter a URL (or more) in the Instant Indexing section, and choose the Action as Google: Publish/update URL. Then, click the Send to API button.
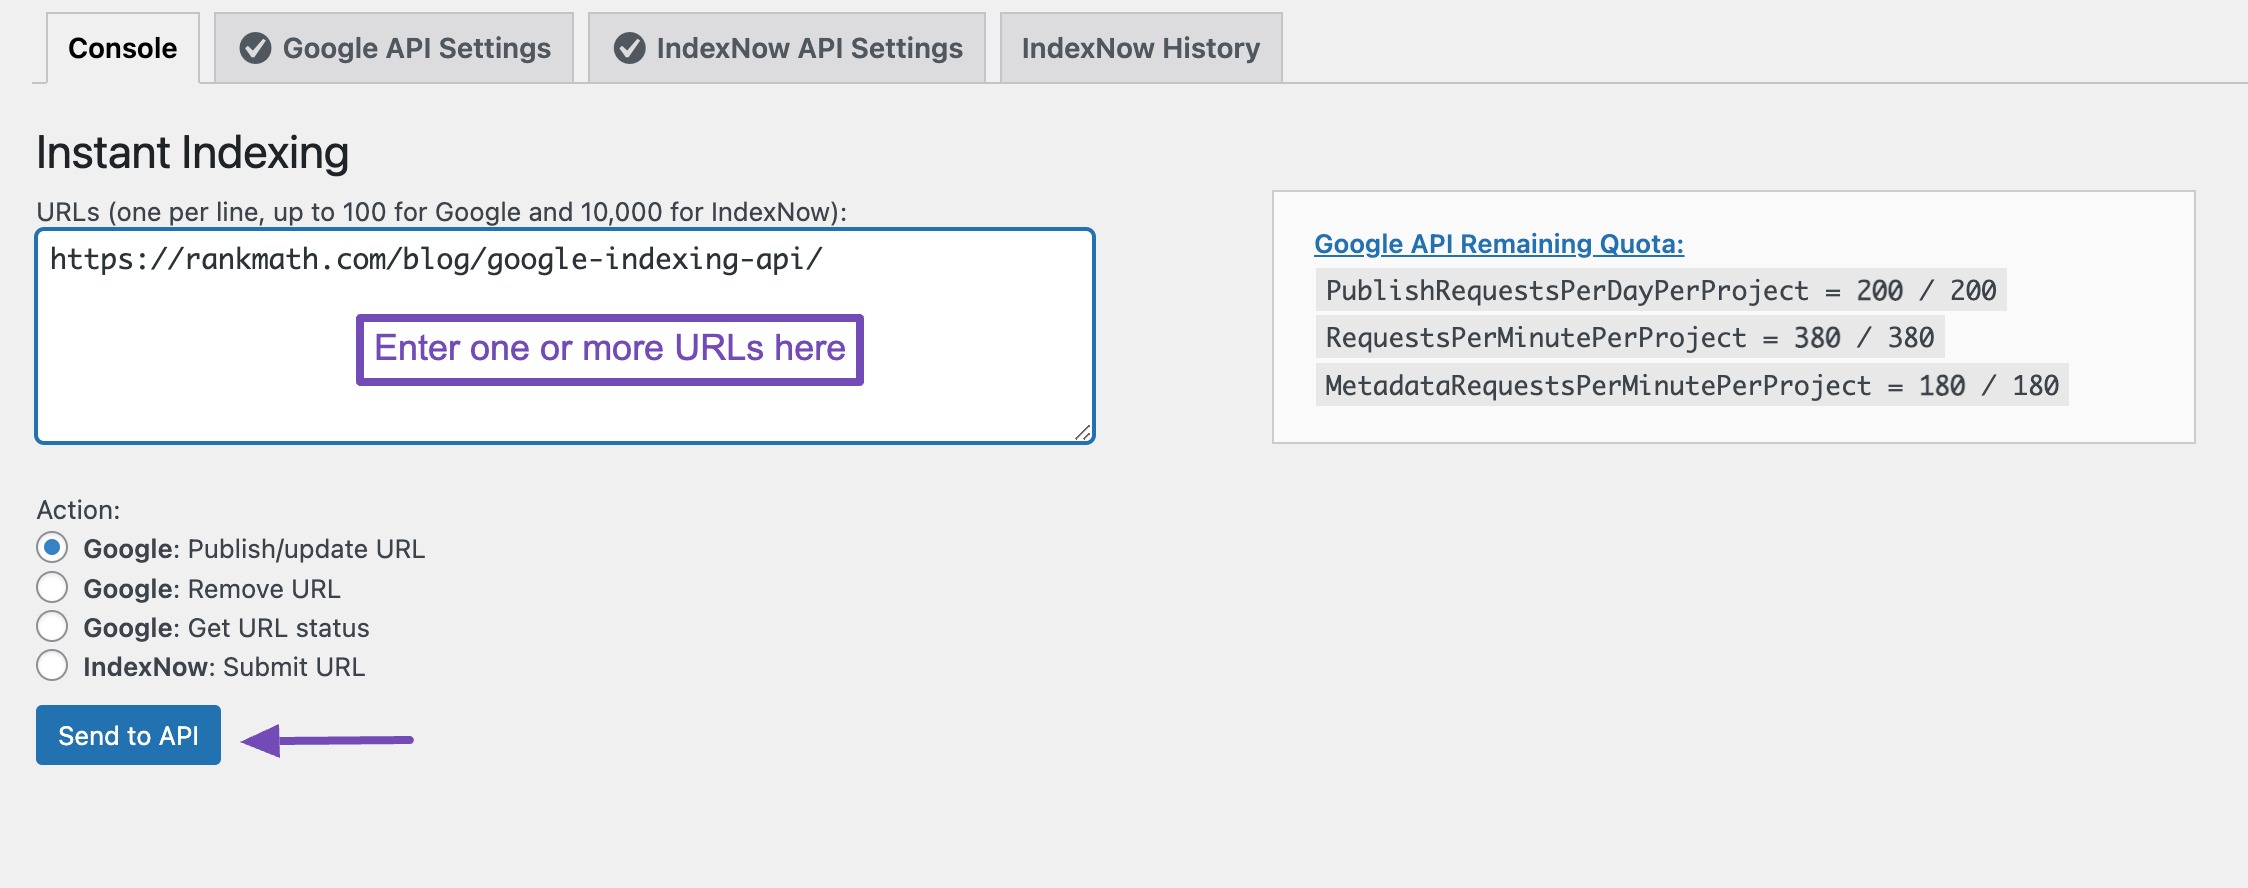
In just a second, you should see a response from the API, similar to the one below.
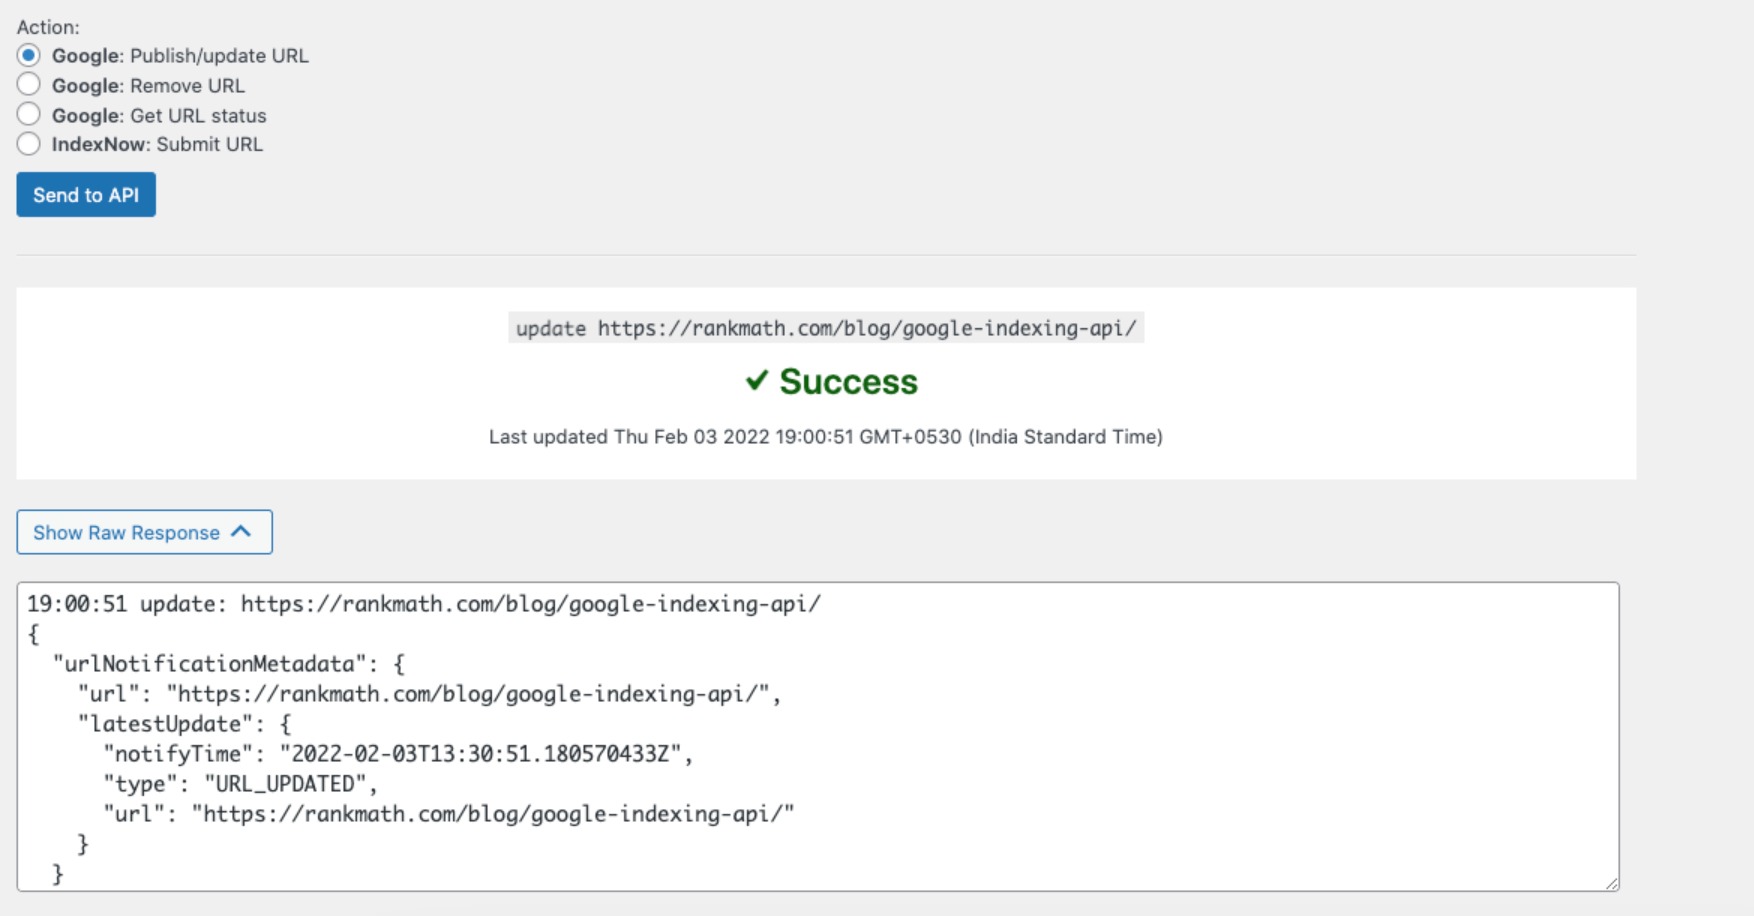
You can use the Remove URL or Get URL Status actions to remove the URL from the index or get the current status of the URL.
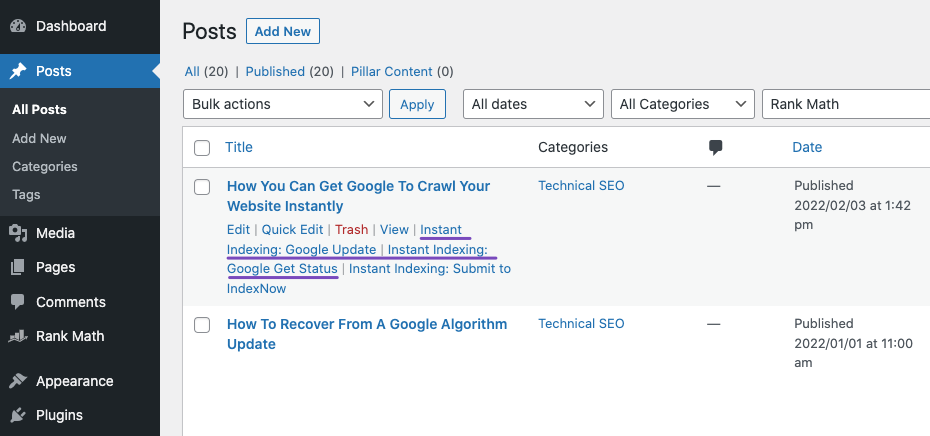
Instead of entering the URLs here and then indexing them, you can also do so from the WordPress Posts section. There, you should see an option to update a post or check its status.
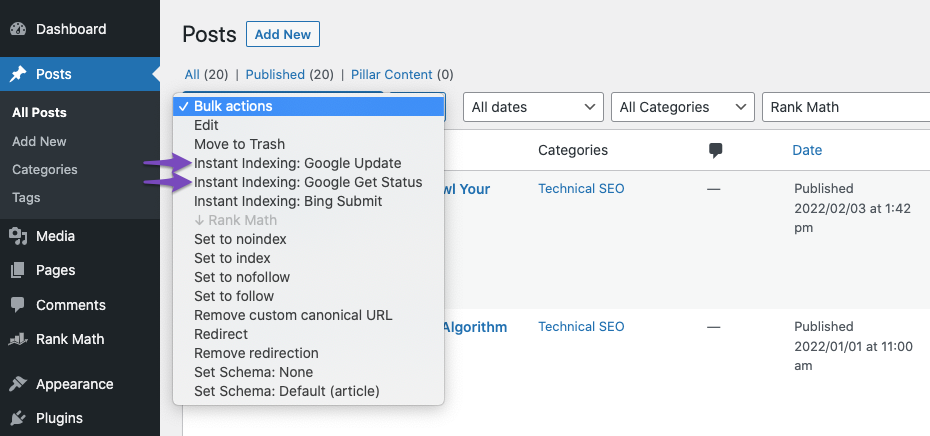
You can also use the bulk actions options to get multiple posts indexed or updated quickly.
And that’s it! We hope that you were able to make great use of this guide to help you get up and running with Google’s Indexing API.
So, getting Google to index your site instantly wasn’t all that complicated after all, was it? If you have any questions, comments, or suggestions, feel free to Tweet @rankmathseo. We can’t wait to hear from you. 😅
PS: Officially, the API is for pages containing Job Posting and Livestream Structured data; however, from our internal tests and our public beta, it seems that Google will crawl and index any page type regardless of the Structured data. It is an efficient way to get the page(s) crawled quickly, rather than requesting it from inside Google Search Console.
Also, Google plans to use the Indexing API instead of Sitemaps down the line.
6 Most Common Errors & Their Fixes
Let’s discuss some fixes for the common errors.
6.1 How to Install the Plugin?
You can install the plugin on your site like any other WordPress plugin using one of these three methods:
A) Installing through WordPress Admin Panel
Search and install the Instant Indexing for Google plugin under WordPress dashboard → Plugins → Add New.
B) Upload via WordPress Dashboard
Upload the ZIP file from your WordPress dashboard, in Plugins → Add New → Upload.
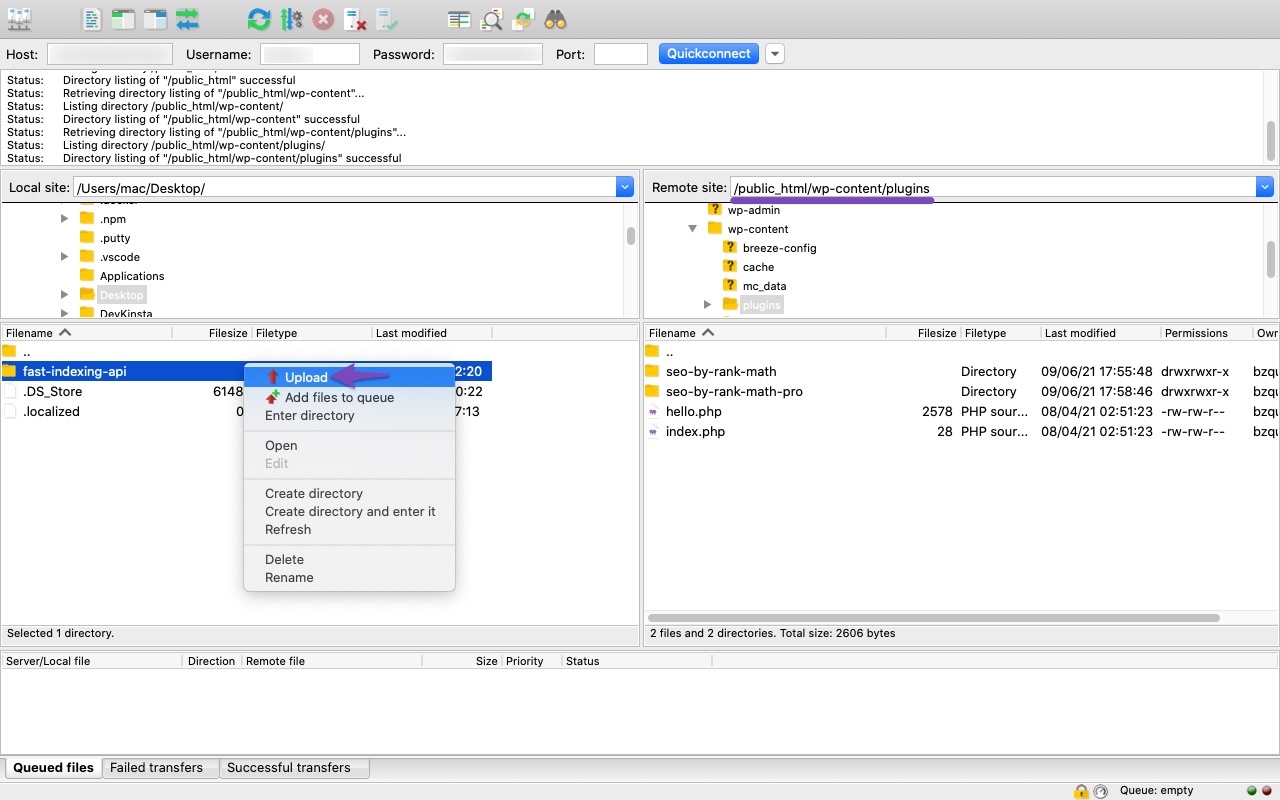
C) Upload it through FTP.
You first have to extract the zip file on your computer and then upload the new folder fast-indexing-api to your server, in the following folder: /wp-content/plugins.
6.2 403 Permission denied. Failed to verify the URL ownership.
Make sure the service account is listed as Owner for the site in Search Console:
If you don’t see it there, follow these steps:
In the pop-up that appears on the screen, add the service account as an owner:
Then refresh to confirm that the service account has been added correctly.
6.3 404 Requested entity was not found
Use the API Console to Publish/Update the page once, then use the Get status action.
6.4 403 Indexing API has not been used in the project [project name] before, or it is disabled. Enable it by visiting [URL], then retry
Copy and paste the URL in your browser to open it, or go to this page and select your project in the drop-down near the top, then enable the API:
6.5 Can I Use the Plugin Without Rank Math?
Yes, this is a standalone plugin that works independently of Rank Math. However, we recommend using it alongside Rank Math for optimal results.
6.6 Can I Use the Same API Project/Service Account/JSON API Key for Multiple Sites?
Yes, you can use the same project, service account, and API keys across multiple sites; make sure to set the service account as the Owner of all the sites in Search Console.
6.7 Can I Request Indexing of Pages From Different Websites From Just One Website?
No. You can only request indexing for URLs in a domain from the domain itself, not other websites, even if they are verified with the same Service Account. For example, if you use the same service account on website A and website B, you cannot request the indexing of URLs of website B from website A. You would have to do it from website B itself.
6.8 Can I Submit Pages That Do Not Have Job Posting or Livestream Structured Data?
The API officially supports pages containing Job Posting and Livestream structured data, and it is recommended to use it only on such websites.
However, from our internal tests and our public beta, it seems that Google crawls, indexes (if the content is original, new, and helpful), and follows links on any page you submit through the API, regardless of its structured data.
6.9 It’s Been More Than 24 Hours, and Google Still Didn’t Index My Page. What to Do?
In our tests, Googlebot crawled the pages we published through the API within minutes, and you can confirm the same on your site by checking the access logs.
This, however, does not always result in the indexation of the content. It may take minutes to days or even weeks before a URL appears in the search results. Using this plugin doesn’t guarantee that your pages will show up in the search results.
6.10 I Am Getting an “Error Undefined” When I Am Trying to Get an URL Indexed
This error may occur when you try to submit URLs from another website for indexing. Make sure that you are trying to update, remove, or check the status of URLs that are on the same domain as the one from which you are initiating the requests.