When you’re running a WordPress site, performance is always on your mind. You want your pages to load quickly and your visitors to have a smooth experience. That’s where transients come in. They’re a built-in WordPress feature that stores temporary data so your site doesn’t have to repeatedly fetch the same information, saving time and resources.
But here’s the catch: if transients aren’t managed properly, they can build up and cause issues like slow load times or outdated content being displayed. That’s why it’s important for you to understand what they are, how they work, and how you can manage them.
In this post, you’ll learn everything you need to know about transients, from what they do behind the scenes to how you can save, retrieve, and delete them with ease. So, without any further ado, let’s get started.
Table Of Contents
1 What Are WordPress Transients?
Transients are a standardized way of temporarily storing cached data in the database by giving it a custom name and timeframe, after which it will expire and be deleted. Transients have the advantage of self-expiring over other caching techniques. It is also storage-efficient because, with each transient record, there is also a record of when the transient should expire.
Transients are more secure, store many data types, and are easily programmable. This allows for faster page load times, as the browser doesn’t have to go back to the server whenever you want to display something on the page.
A transient consists of three parts:
- $transient. This is the string used to identify your transient. It’s also known as the transient’s ‘key’ or ‘name.’
- $value. This data is being retrieved using an API. The value of a transient can be a text, a number, an object, or an array.
- $expiration. This is the time that a transient is stored in your database before it is deleted, and you have to use the API to obtain the information once again.
Most of the time, transients are invisible to your visitors; however, when you want to customize a part of your site’s design or add functionality to parts of your site that are not visible to the visitor, transients can be used to store and restore data on the fly. The only downside is that transients require extra work when building a site or a theme.
Now let’s take a look at when you can use transients in WordPress.
2 When to Use WordPress Transients?
Transients are removed from your database after their expiration term is completed. Because of this, you should only use them for continuously re-created information.
Additionally, transients are best suited for large queries and remote calls and can boost your project’s performance.
The most common use case for WordPress transients is resource-intensive queries. For example, multiple users asking the same database-intensive query simultaneously can seriously impact the website’s performance. But with a transient, the needed information can be temporarily cached, and the whole expensive process can only be instigated if someone tries to retrieve data from a transient that expired.
You’re better off not using a transient if doing so requires more code than it will just to make a new request for the resource each time it is needed.
3 Basic Operations Using Transients
There are three basic operations you’ll most likely utilize while creating your own transients. Let’s have a look at the basic operations.
3.1 Save the Transient
To save the transient, use the below syntax.
set_transient( $transient, $value, $expiration );Do not forget to replace the appropriate values with real ones. For example, here’s how the code will look using set_transient() function.
set_transient('Website', $result, 3600);Here we are storing a key named ‘Website’ with the value ‘result’ for 1 hour. After 1 hour, the key will not be accessible anymore.
3.2 Retrieve the Transient
You can fetch a transient you’ve saved using the below syntax. The get_transient() will return false if the transient is expired or is not present. Otherwise, it returns the value of the transient.
get_transient( $transient );3.3 Delete the Transient
To delete the transient use the below syntax. It takes only one parameter i.e. the transient’s name.
delete_transient( $transient );In our example it would be:
delete_transient( $result );WordPress infrequently removes transients that have expired. Always remove your transient once you no longer need it to avoid expired transients piling up in the database.
4 How to Manage WordPress Transients?
The Transients Manager plugin is the most effective way to manage and remove WordPress transients. The plugin makes it simple to edit, delete, and manage your WordPress transients.
You need to install and activate the plugin by navigating to Plugins → Add New section from your WordPress dashboard. Search for the Transients Manager plugin and install and activate the plugin, as shown below.

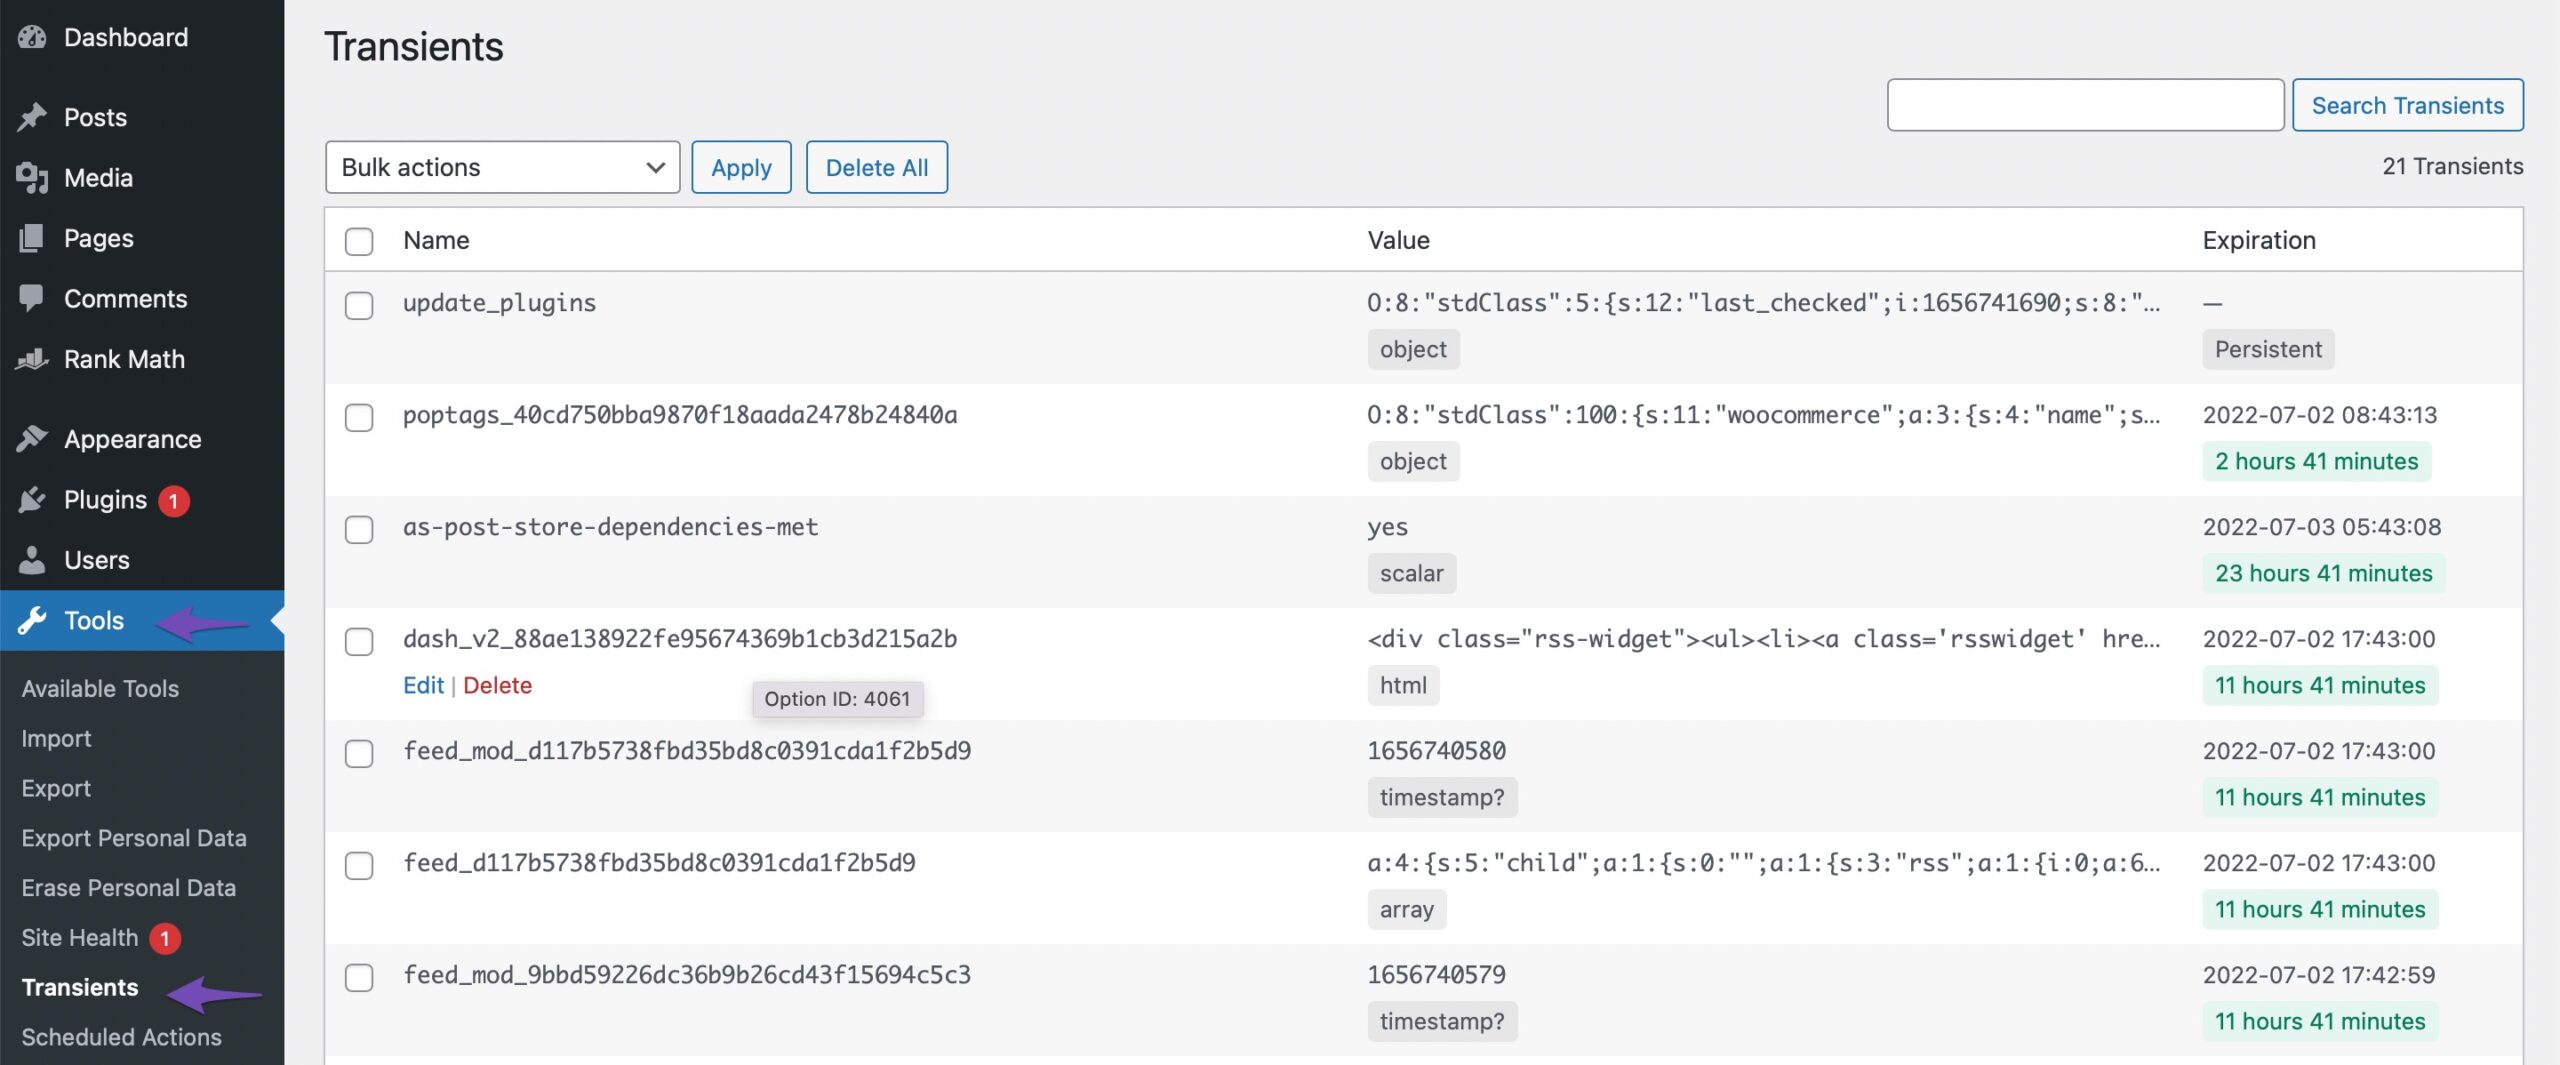
Once the plugin is activated, navigate to Tools → Transients. Here you’ll see a list of transients stored in your WordPress database.

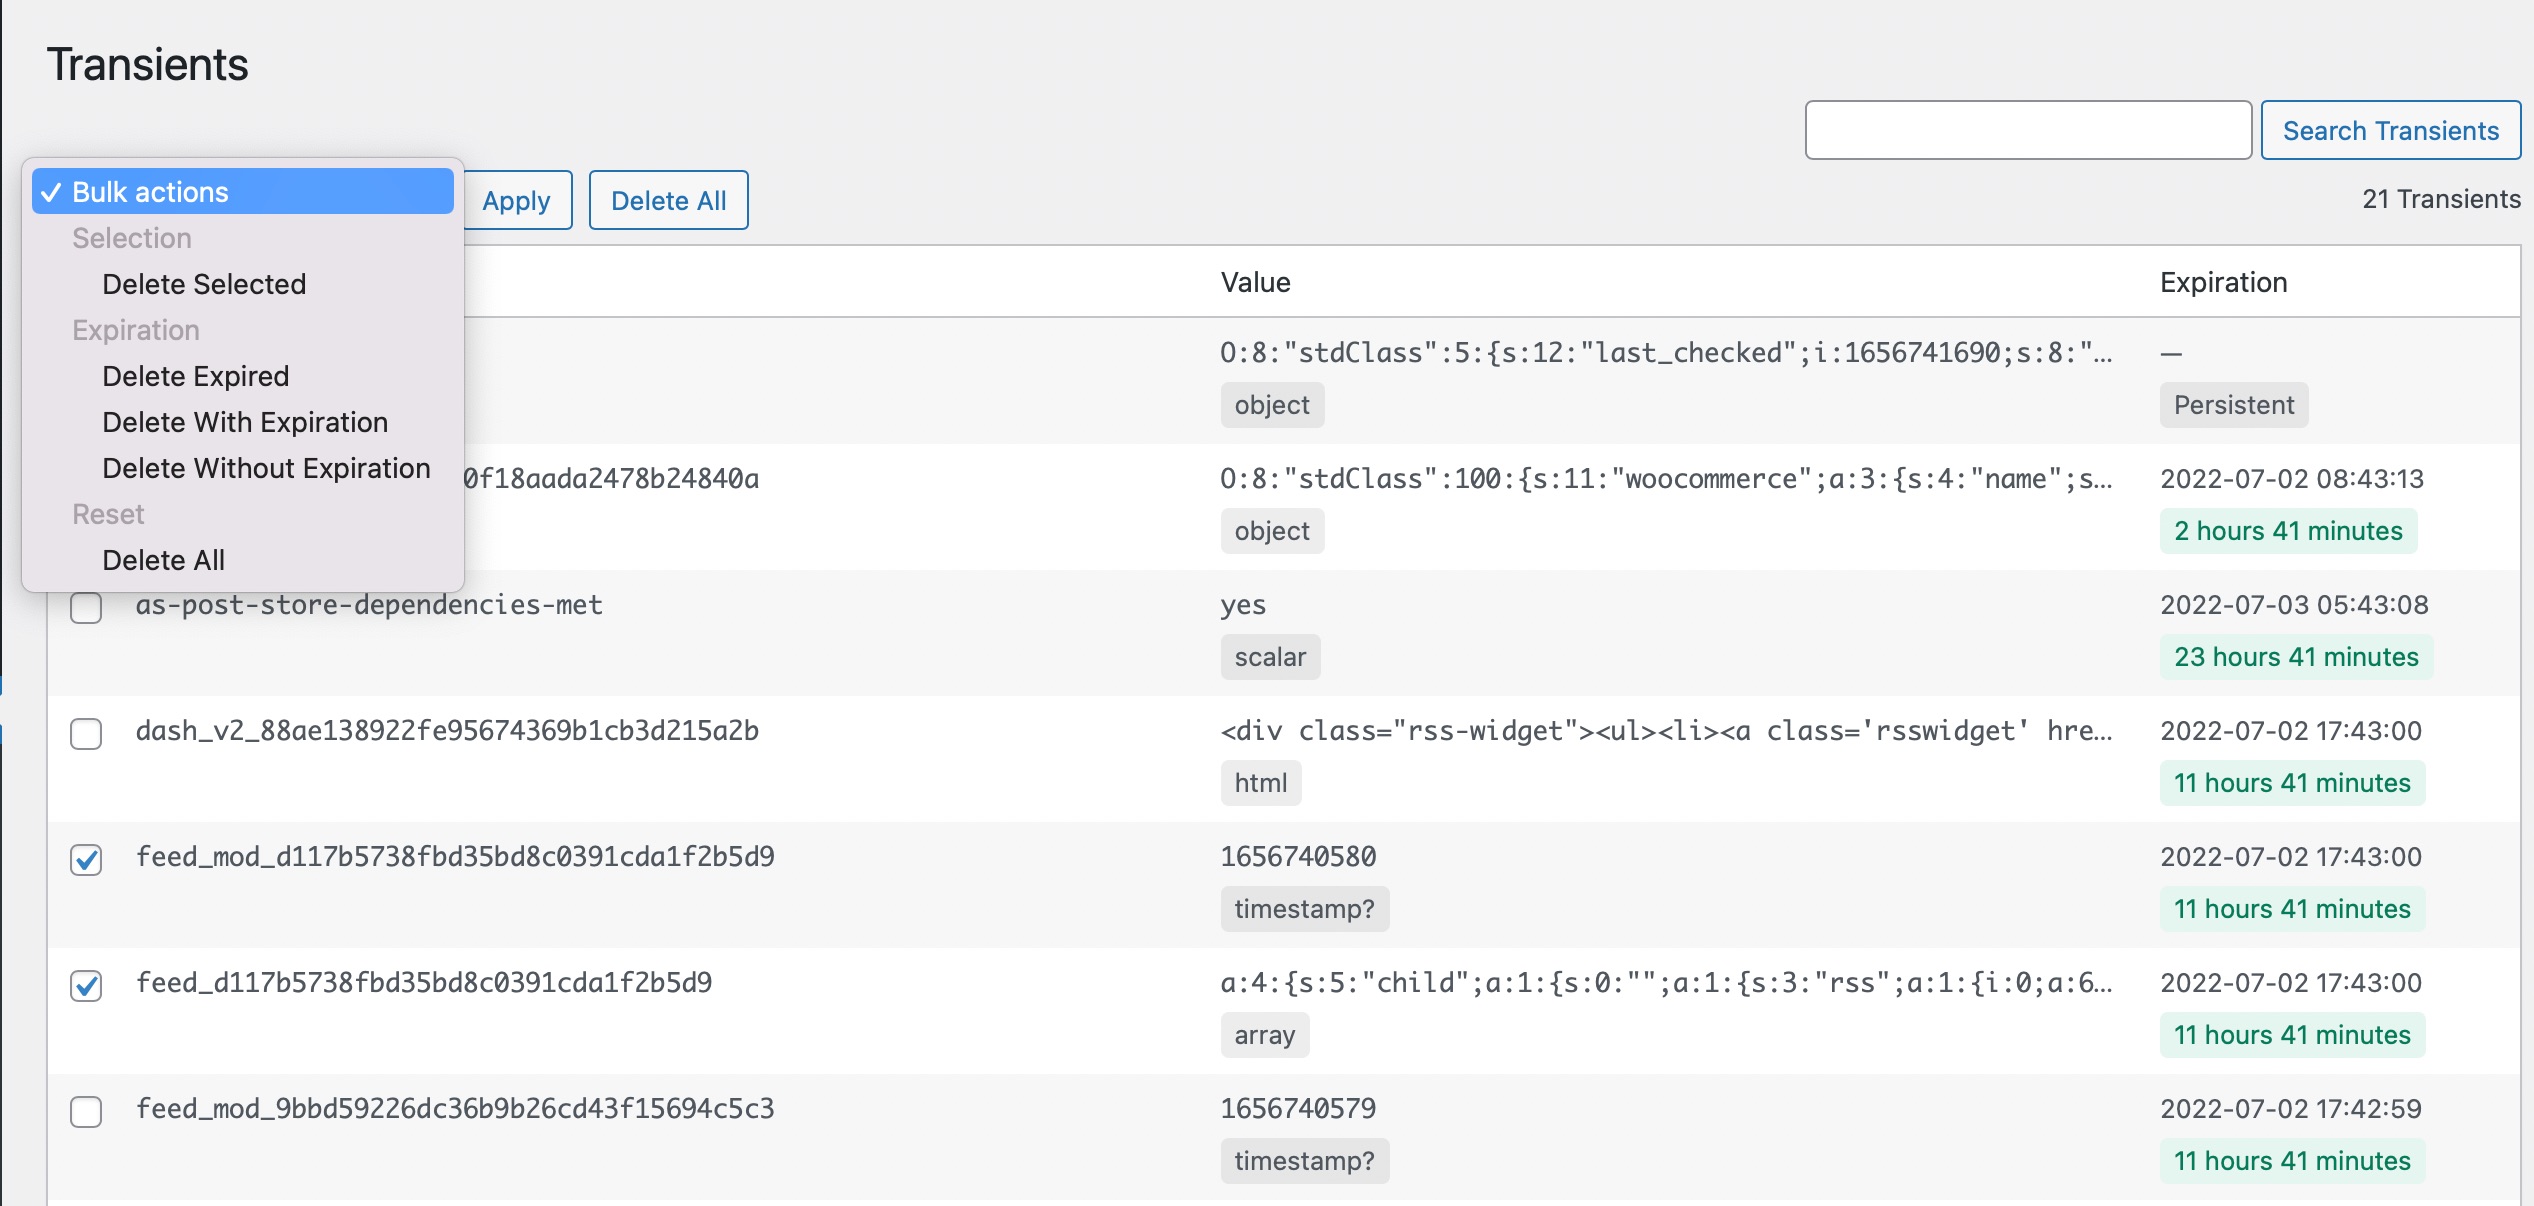
You can select the transient and perform the bulk actions by selecting from the Bulk actions drop-down list. It allows you to perform the following bulk actions:
- Delete selected transients
- Delete expired transients
- Delete all transients with an expiry date
- Delete all transients without an expiry date
- Delete all transients

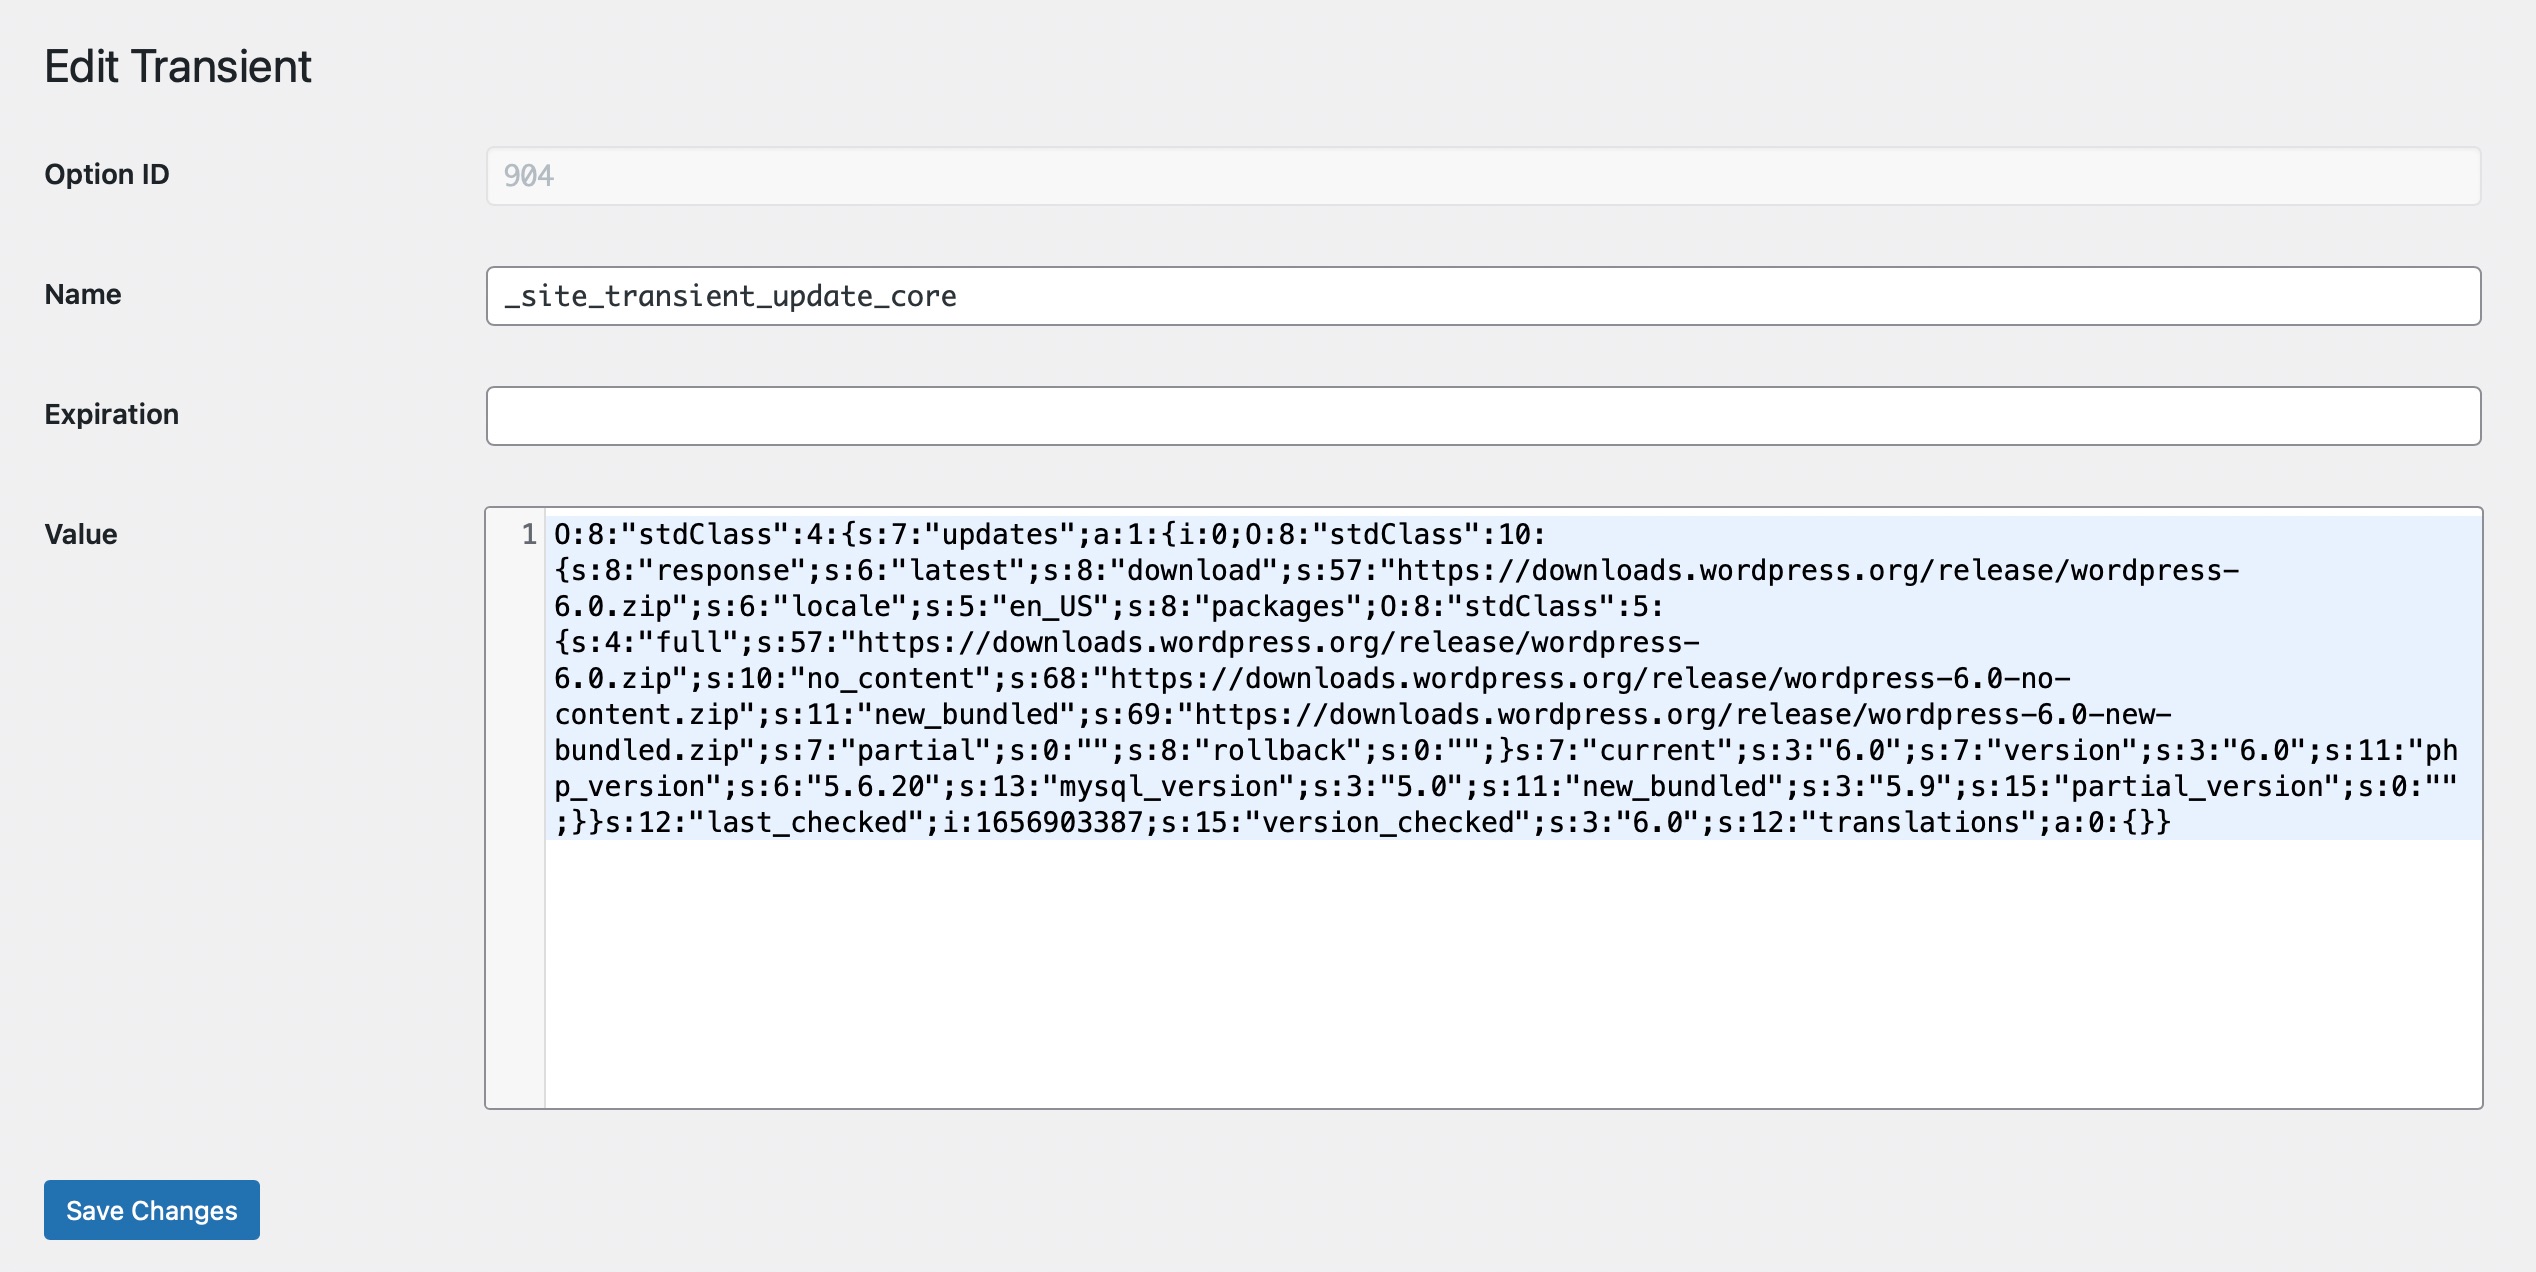
To edit specific transients, click the Edit link in the Actions column. This opens up a panel that lets you set the value, expiration time, and even rename the transient.

Once you’ve edited the transient, click on the Save Changes button to save your changes.
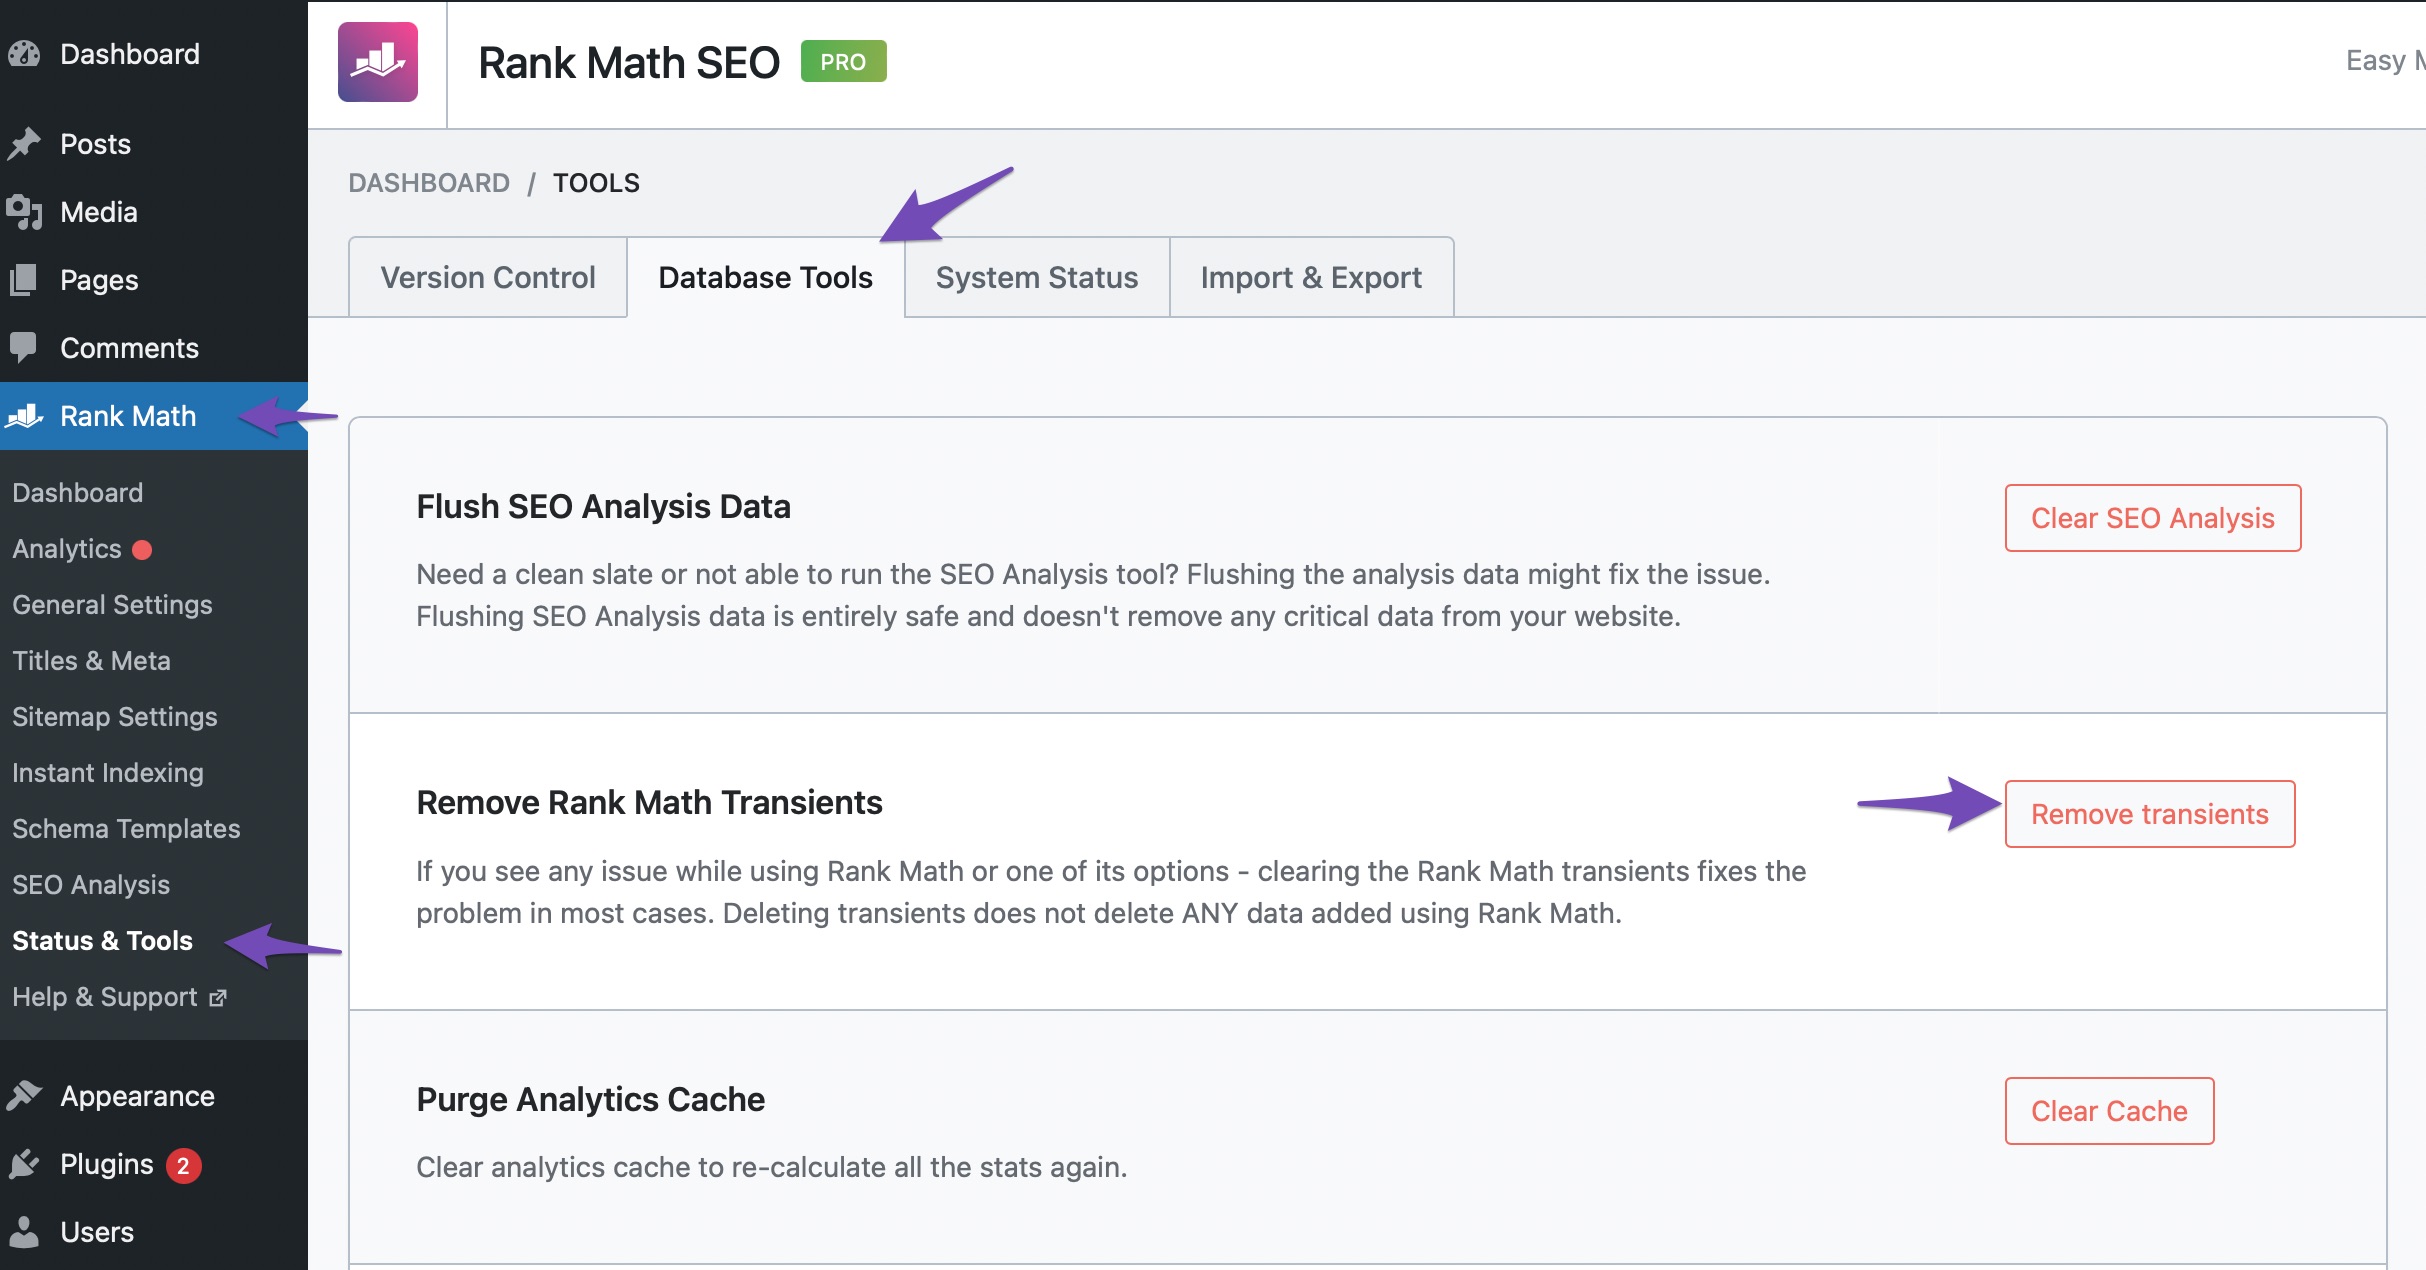
If you’re using Rank Math plugin, you can use the Remove transients option to clear all the transients created by Rank Math. To do so, navigate to Rank Math SEO → Status & Tools → Database Tools from your WordPress dashboard. Click the Remove transients button, and all the transients will be cleared.

5 Conclusion
In the never-ending quest to speed up your website, you can use every ally you can find. WordPress transients can help you achieve this, even though they’re sometimes overlooked. But the more you learn about them, the more you can do, and the tricks you can pull off with them, you’ll get more interested in using them, and they’ll become more and more useful.
If you like this post, let us know by tweeting @rankmathseo.
