In this tutorial, we are going to talk about Bulk Editing in Rank Math.
One of the most frustrating parts of optimizing the content on your website is that there is no easy way to make edits to multiple posts and links at once. Even if the features exist, there is no way to filter or select the exact posts or links you want to make changes on.
These problems keep growing as your website keeps growing, and the only solution is to work it out manually with elbow grease, which is less than ideal.
Fortunately, if you explore Rank Math’s settings, you’ll find that we’ve made making changes to a large number of content and links extremely easy:
Table of Contents
- What is Bulk Editing?
- Bulk Editing Options Available in Rank Math
- Rank Math vs. Rank Math PRO
- Bulk Actions
- AI Link Genius Bulk Actions
- Bulk Update Tool
- Filtering
- Quick Editing – Using Bulk Editing To Optimize Content
- Bulk Editing Media
- Working with WooCommerce & Other Custom Post Types
- Using Bulk Actions, Quick Actions and Filtering Together
- Conclusion
1 What is Bulk Editing?
You don’t need to be a rocket scientist to guess what bulk editing is. It is simply editing things in bulk—that is straightforward. It is the things that you will be editing in bulk is what more important than the act of editing them in bulk.
As you saw in our helpful guides, Rank Math allows you to add a lot of metadata to your posts. Along with focus keywords, you can add rich-meta data, social tags, and a bunch of other information.
When you install Rank Math, you can obviously start tweaking all the information in your posts itself. But, what about the posts that were already present on your website? Do you edit all those posts one by one and enter all the rich info on them?
You can, but it would be inefficient and will take a bunch of your time. That is where bulk editing comes in. Bulk editing allows you to edit certain portions of your posts together to save time.
Note: Rank Math also makes it possible to edit SEO meta at scale by exporting and re-importing a CSV file you can edit with your team using Google Sheets. Learn more about that here.
2 Bulk Editing Options Available in Rank Math
Rank Math provides you with three bulk editing options. They include:
- Bulk actions
- AI Link Genius bulk actions
- Bulk update tool
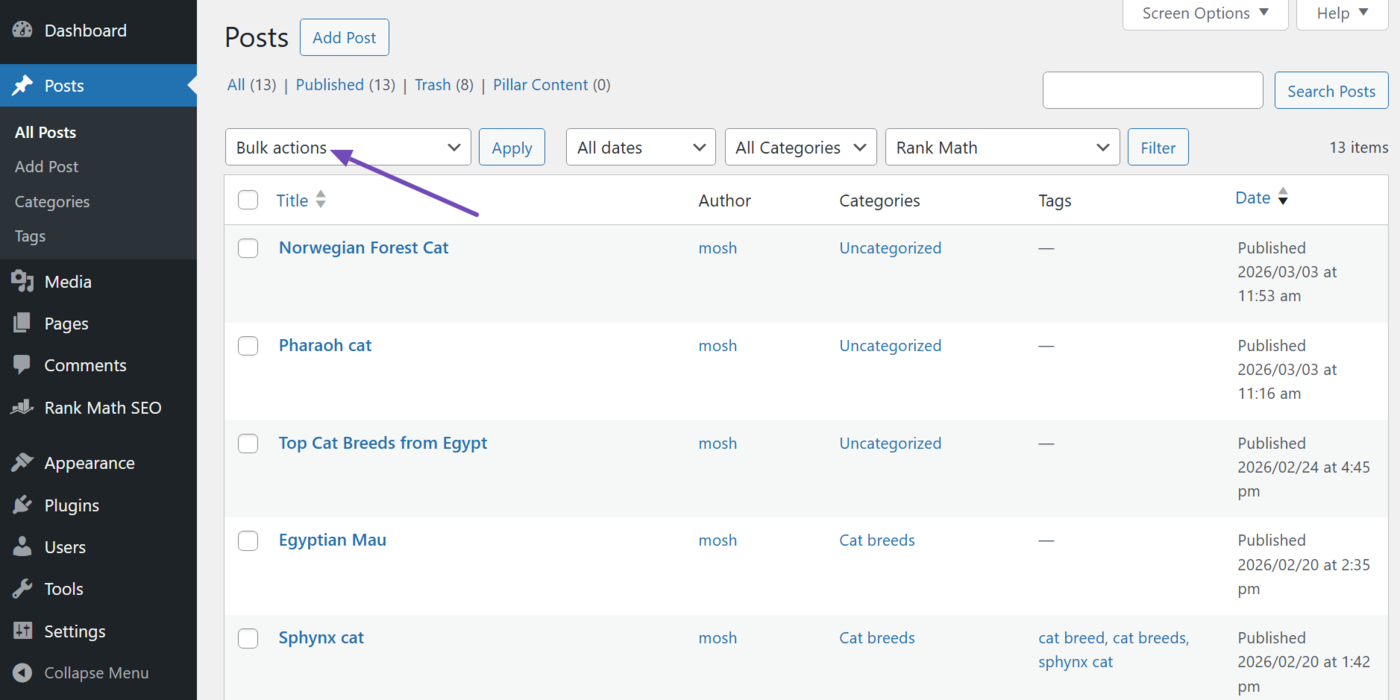
2.1 Bulk Actions
The bulk actions is the default bulk editing option available in WordPress. However, this feature is supercharged with additional options when you have Rank Math. You will typically find it in the all posts, all pages, categories, and tags screens.
2.2 AI Link Genius Bulk Actions
Rank Math also has a bulk editing option within AI Link Genius. This one is unique to Rank Math and allows you to edit your internal and external links in bulk.
Note: The bulk actions dropdown only appears after you select the links to bulk edit. You must also enable the Link Genius module to access AI Link Genius.
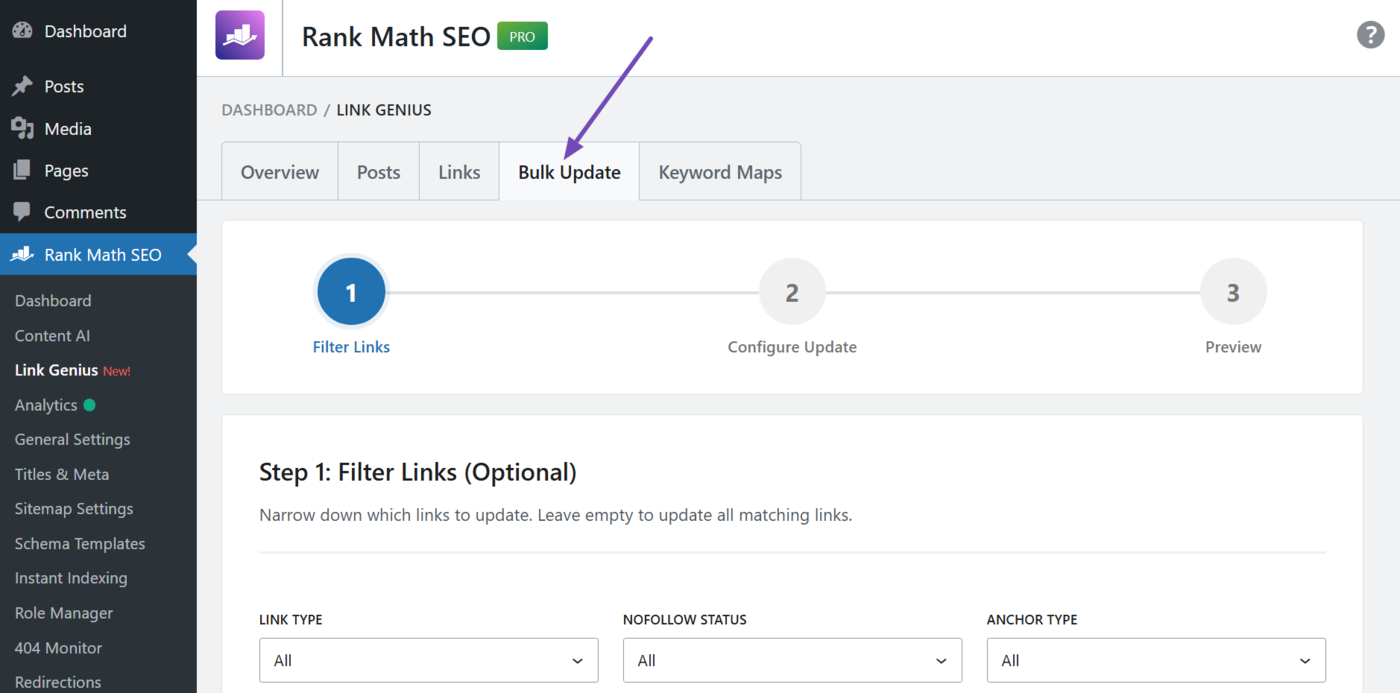
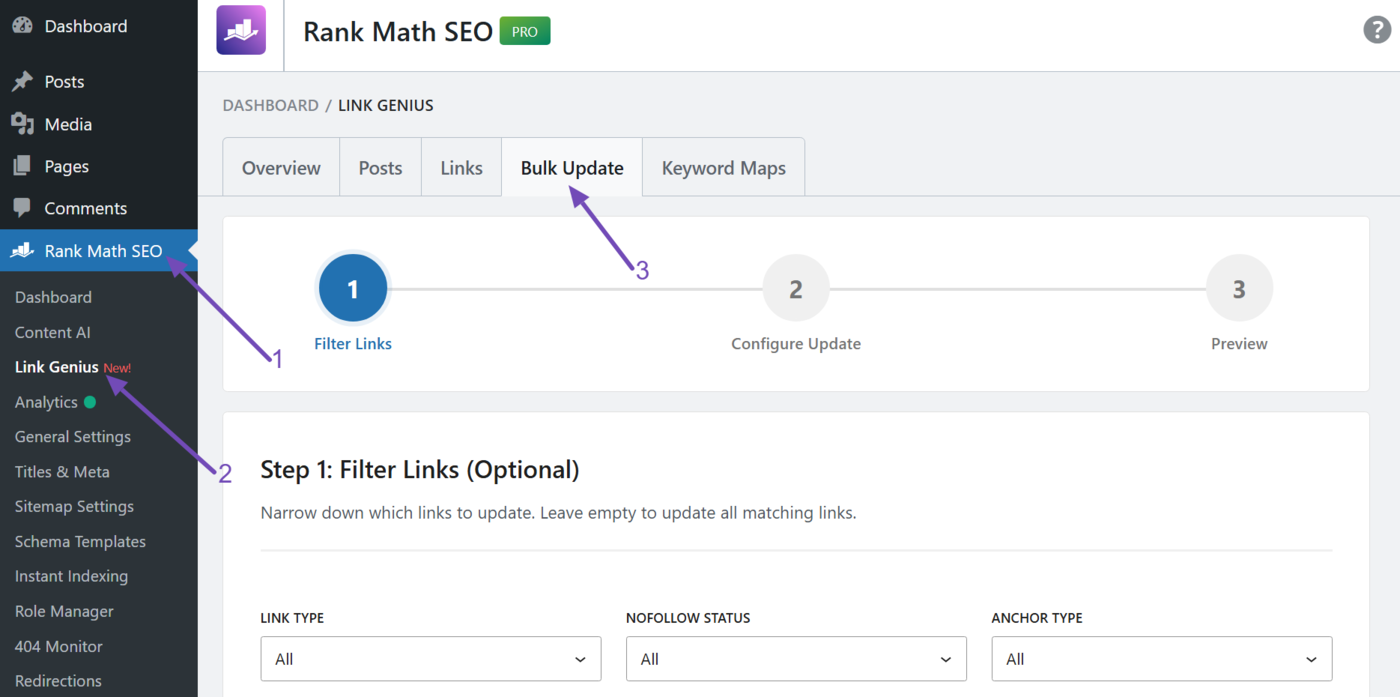
2.3 Bulk Update Tool
The bulk updates tool lets you find and replace multiple links on your site at once. With this, you can change the URLs and anchor texts of the internal and external links on your site, without needing to visit the individual posts containing the link.
Note: You must enable the Link Genius module to access AI Link Genius.
3 Rank Math vs. Rank Math PRO
Rank Math is free to use, now and forever. For professionals and people who want to make serious SEO progress on their website, we introduced Rank Math PRO. Some of the features we are going to talk about will be available in the free version of Rank Math, while some are reserved for Rank Math PRO. We will highlight those features prominently while we’re discussing them.
4 Bulk Actions
Bulk Actions have been present in WordPress for years. They are useful, but they are not groundbreaking in any way. But, with Rank Math’s help, bulk actions get the needed shot in the arm and become armed with some amazing options.
If you’ve been paying attention, maybe the dots are connecting in your head. When you combine the filtering options with the powerful bulk actions, you can get some amazing things done on your website in just a few clicks.
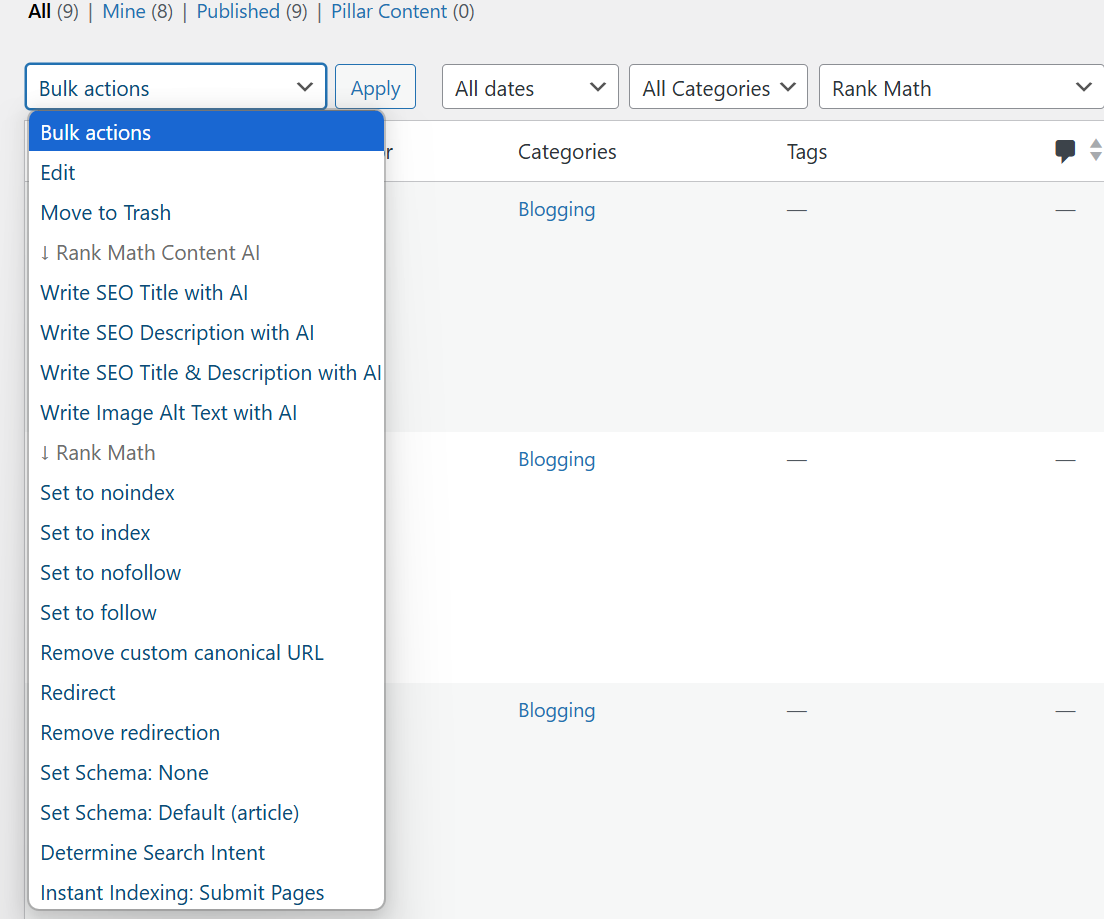
Let us go through each of the options and explain what they can do.
4.1 Edit
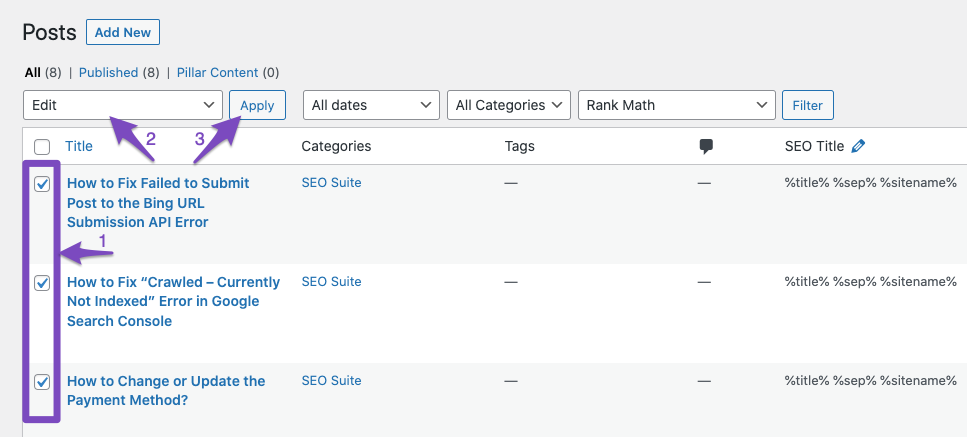
The edit option is present in WordPress by default as well, but it exists without the powerful filtering options in Rank Math PRO. When you use the edit option, you can edit some properties or content of your posts, pages, or custom posts at the same time. To use the action, either use the filtering option to filter some posts or select some posts by hand. Then, choose the Edit option and click the Apply button next to it.
And this is the interface you will see.
As you can see, you take the following actions for the selected posts.
- Add or remove categories
- Add, modify, or remove tags
- Assign an author
- Assign a default template
- Enable or disable templates
- Change the status of the posts
- Enable or disable pingbacks
- Make the posts sticky or not sticky
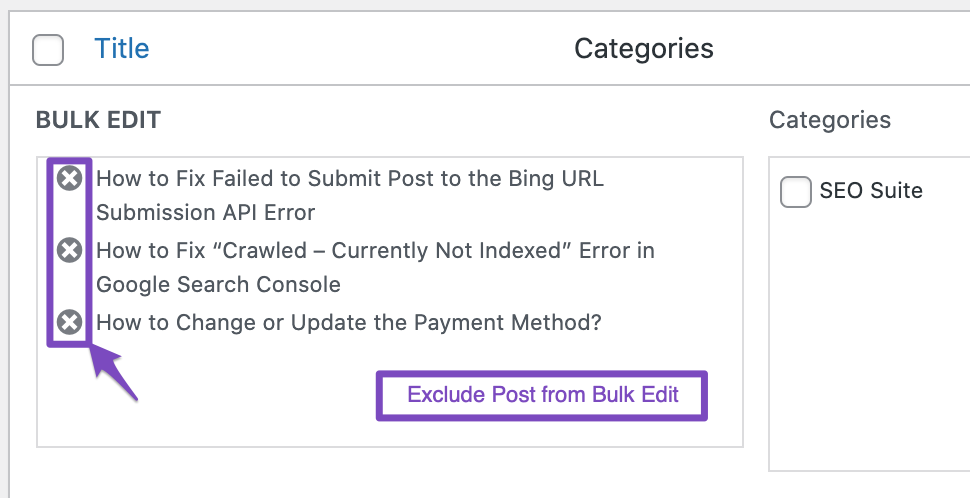
Another important thing you can do is remove any of the posts from the filtered list and apply the bulk actions to the rest. This is tremendously helpful as, many times, the filters are not enough. This way, you can select more posts than needed and then delete the ones you don’t want to edit from the list.
4.2 Move to Trash
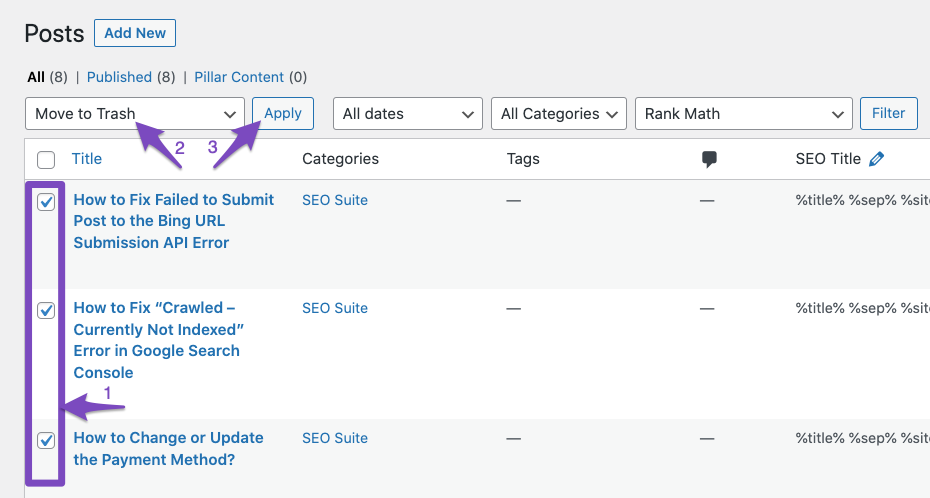
This is another core WordPress bulk action. This one is pretty simple. It sends all the selected posts to the Trash. To use it, select the action from the bulk actions menu and click the Apply button next to the option.
The selected posts will be moved to the Trash. From there, you can restore them or delete them permanently.
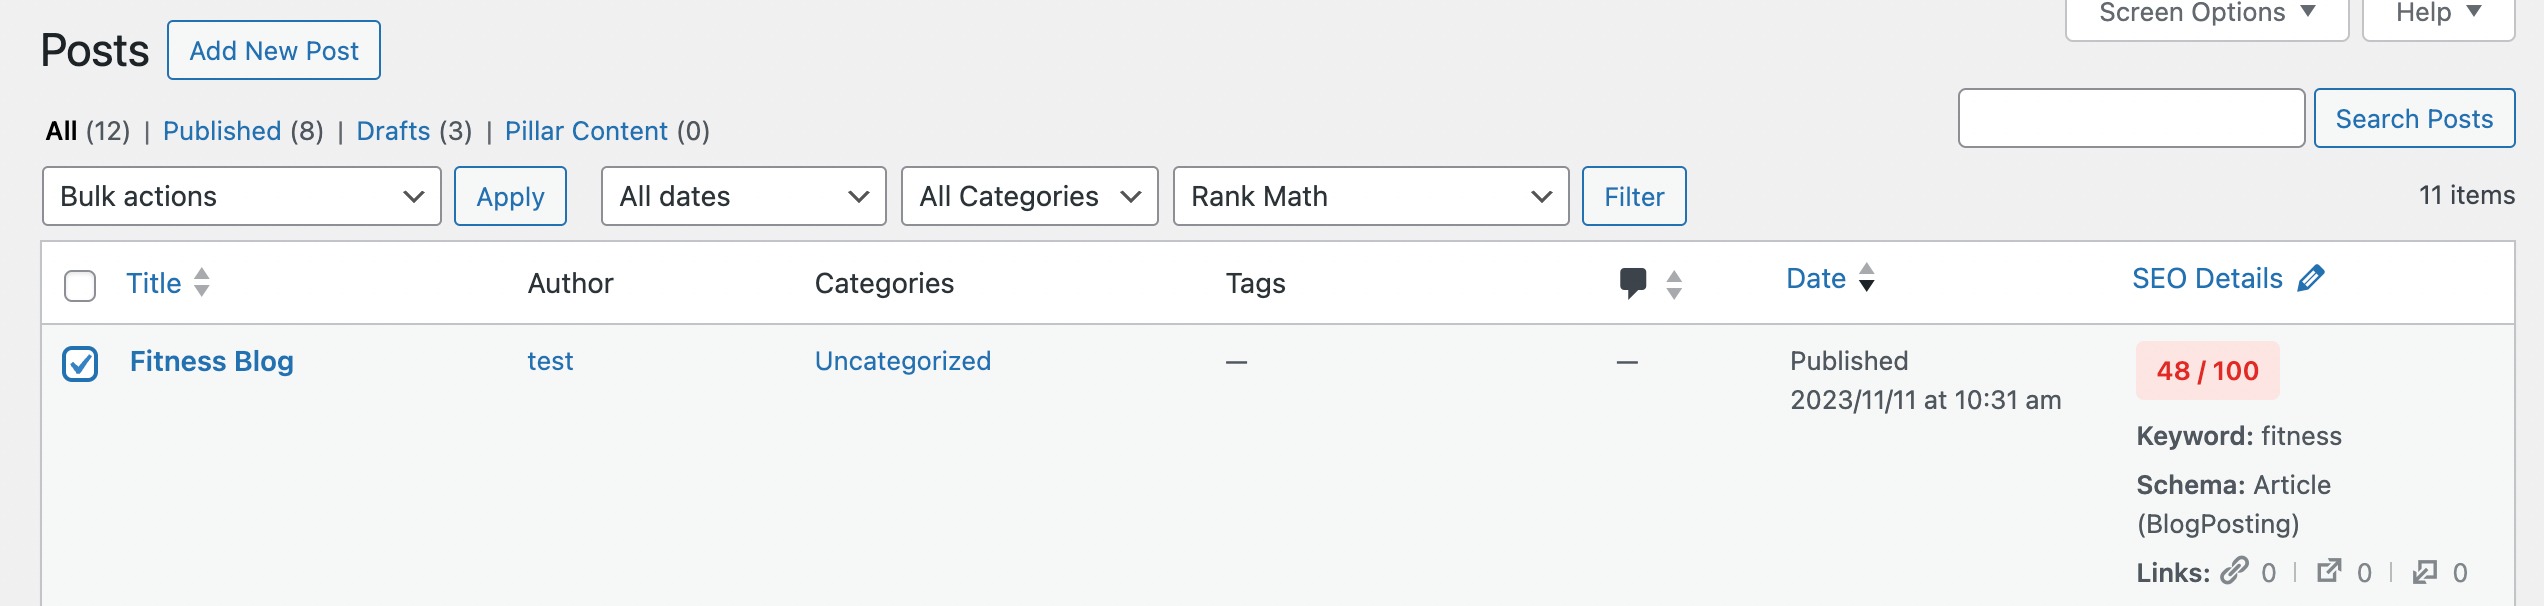
4.3 Write SEO Title with AI Content AI
You can use this option to generate SEO titles for your posts, pages, tags, and categories. To do so, select the desired posts for which you wish to generate the SEO title.
Note: If you reach your usage limits, you can easily subscribe to a Content AI plan that aligns with your requirements.
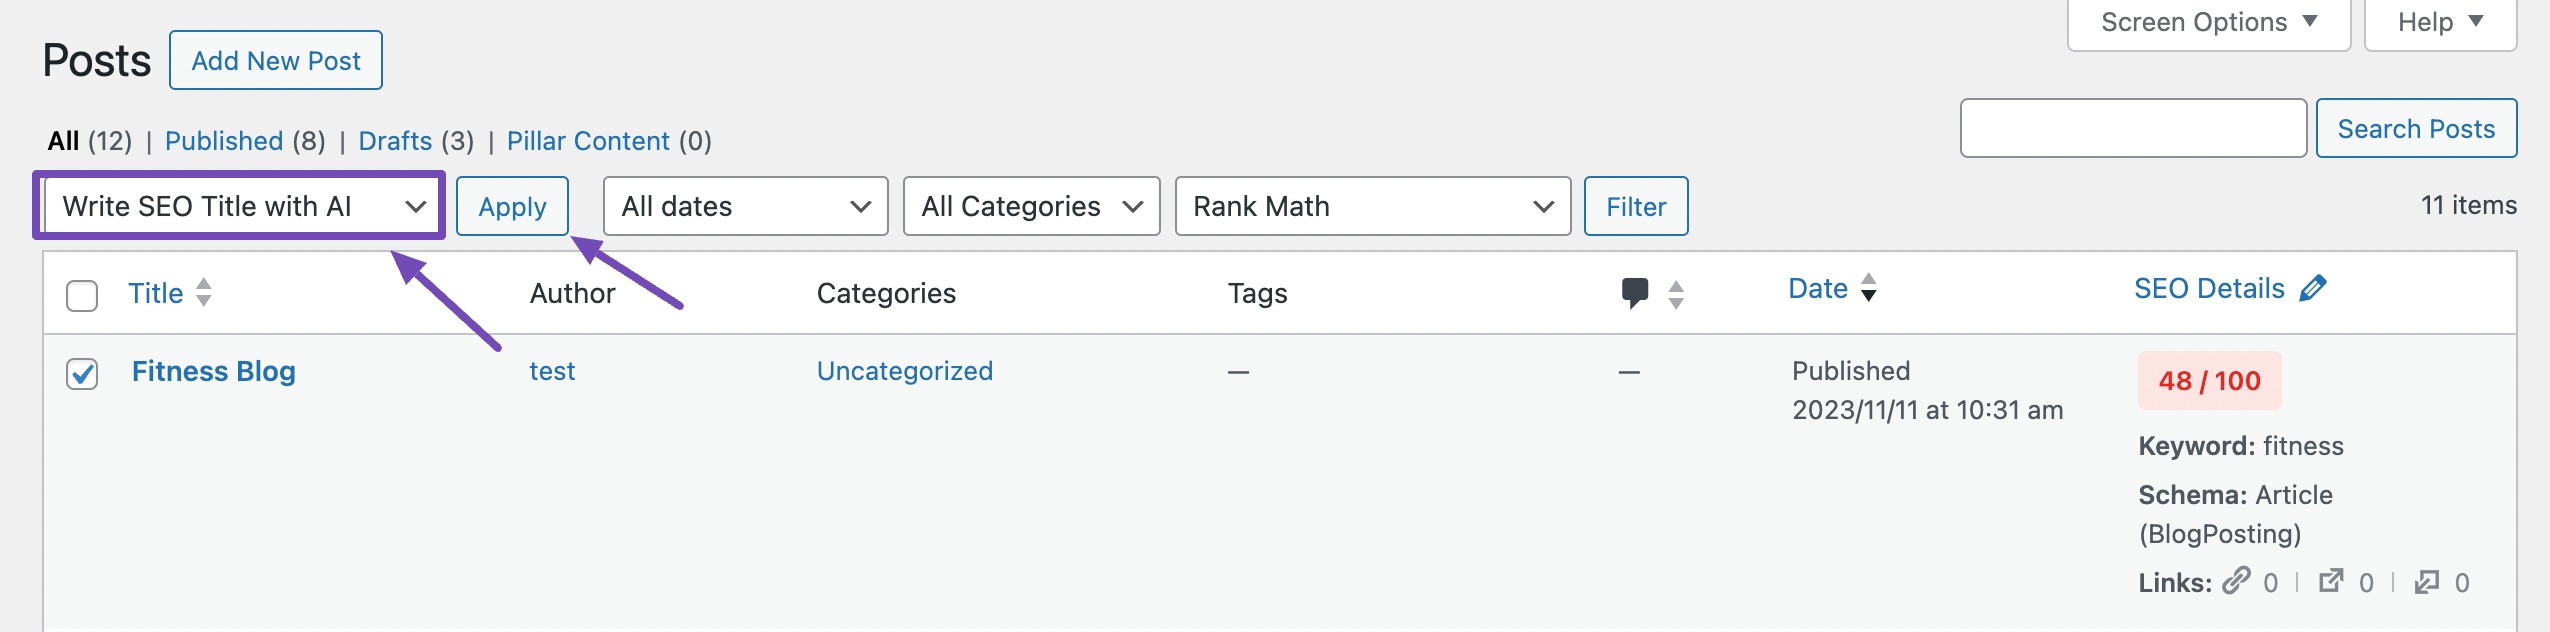
Next, select the Write SEO Title with AI option from the drop-down menu and click Apply.
Content AI will begin generating your SEO meta. In the meantime, it will display a ‘Bulk editing SEO meta started’ message, as shown below.

After a few seconds, refresh the page, and your SEO title will be edited.
4.4 Write SEO Description with AI Content AI
This AI option allows you to generate SEO descriptions for your posts, pages, tags, and categories. To do so, select the posts for which you wish to generate the SEO descriptions.
Next, select the Write SEO Description with AI option from the drop-down menu and click Apply.
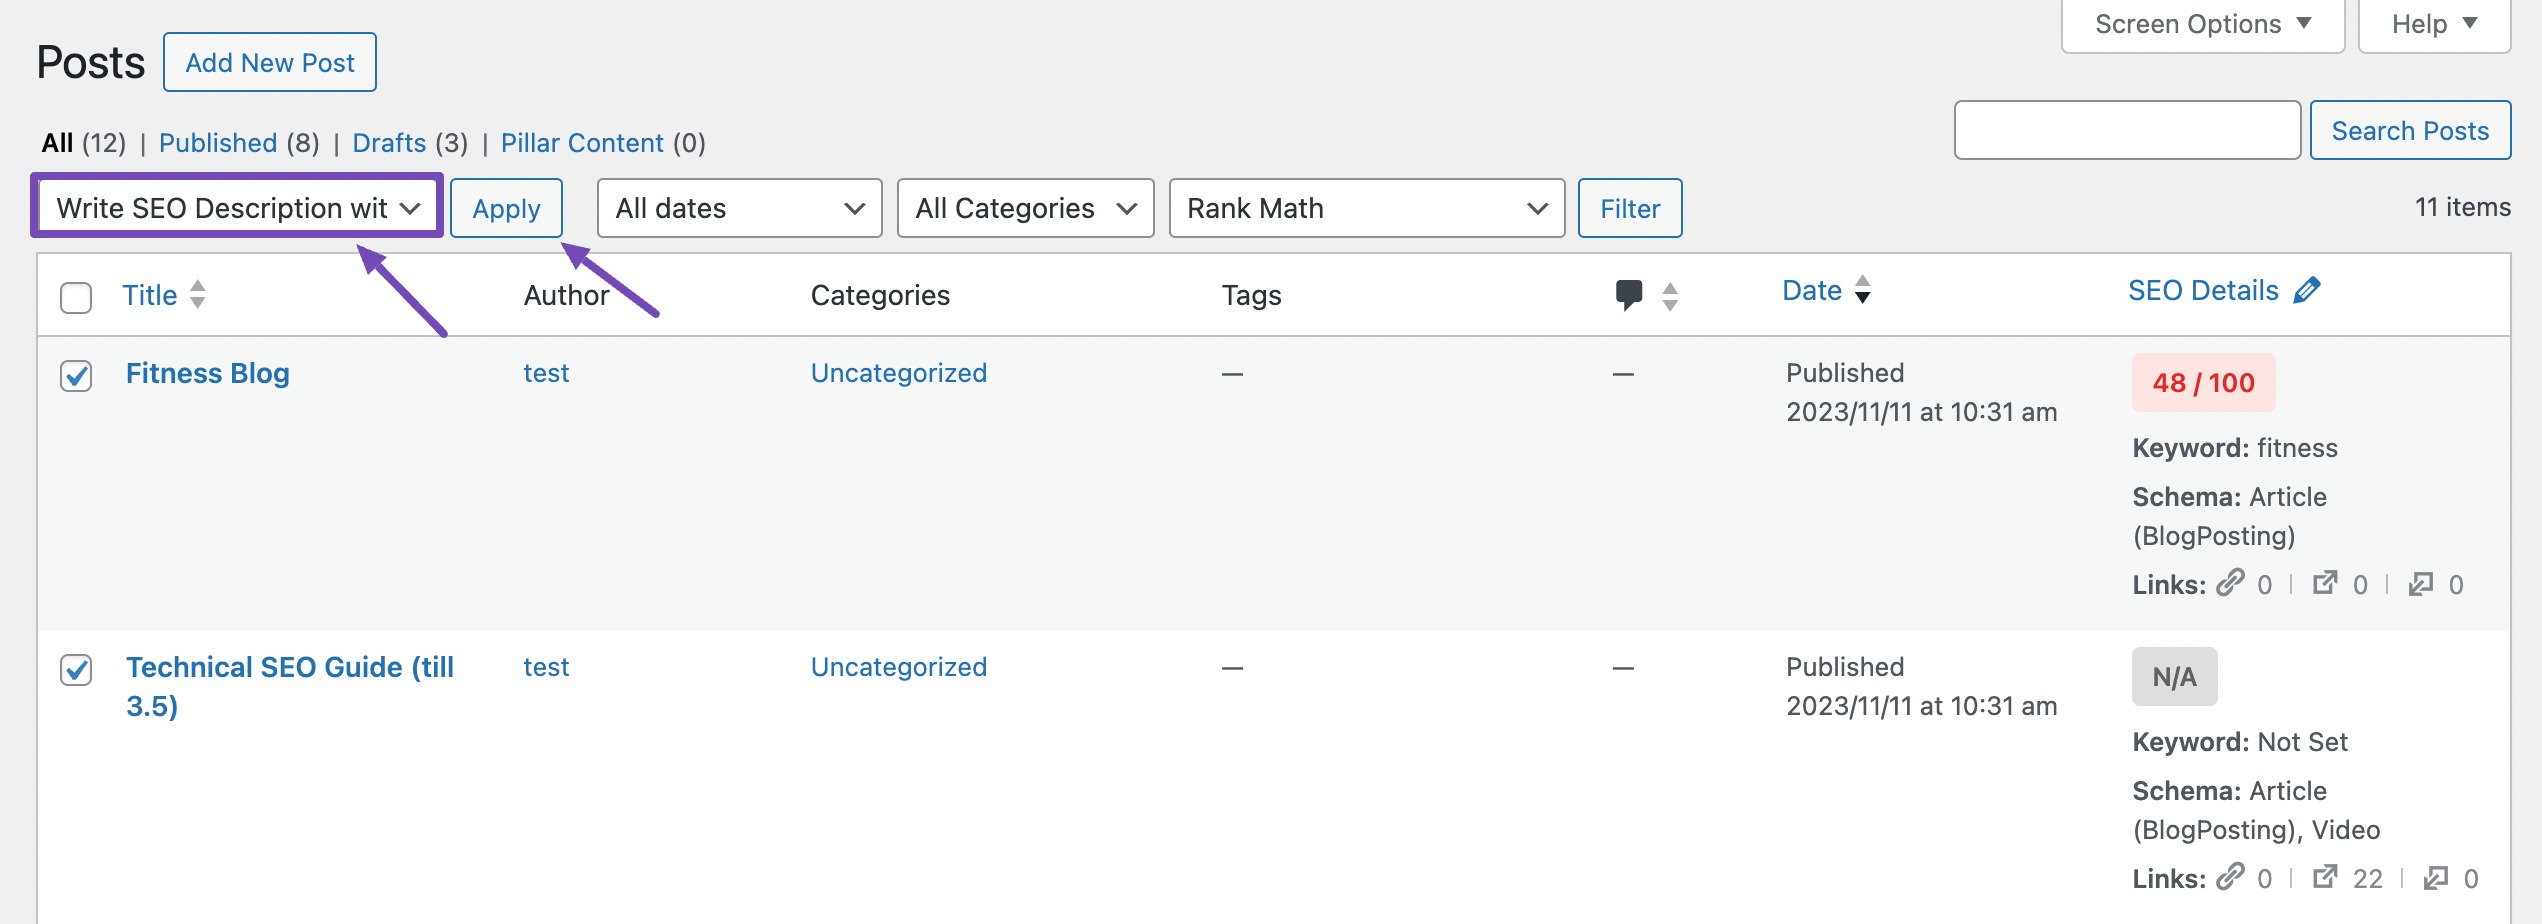
Content AI will begin generating your SEO meta. In the meantime, it will display a ‘Bulk editing SEO meta started’ message, as shown below.

After a few seconds, refresh the page. Your SEO description will be edited. You can visit the post and check its SEO description.
4.5 Write SEO Title & Description with AI Content AI
This option can generate SEO titles and descriptions for your posts, pages, tags, and categories. To do so, select the posts for which you wish to generate the SEO titles and descriptions.
Next, select the Write SEO Title & Description with AI option from the drop-down menu and click Apply.
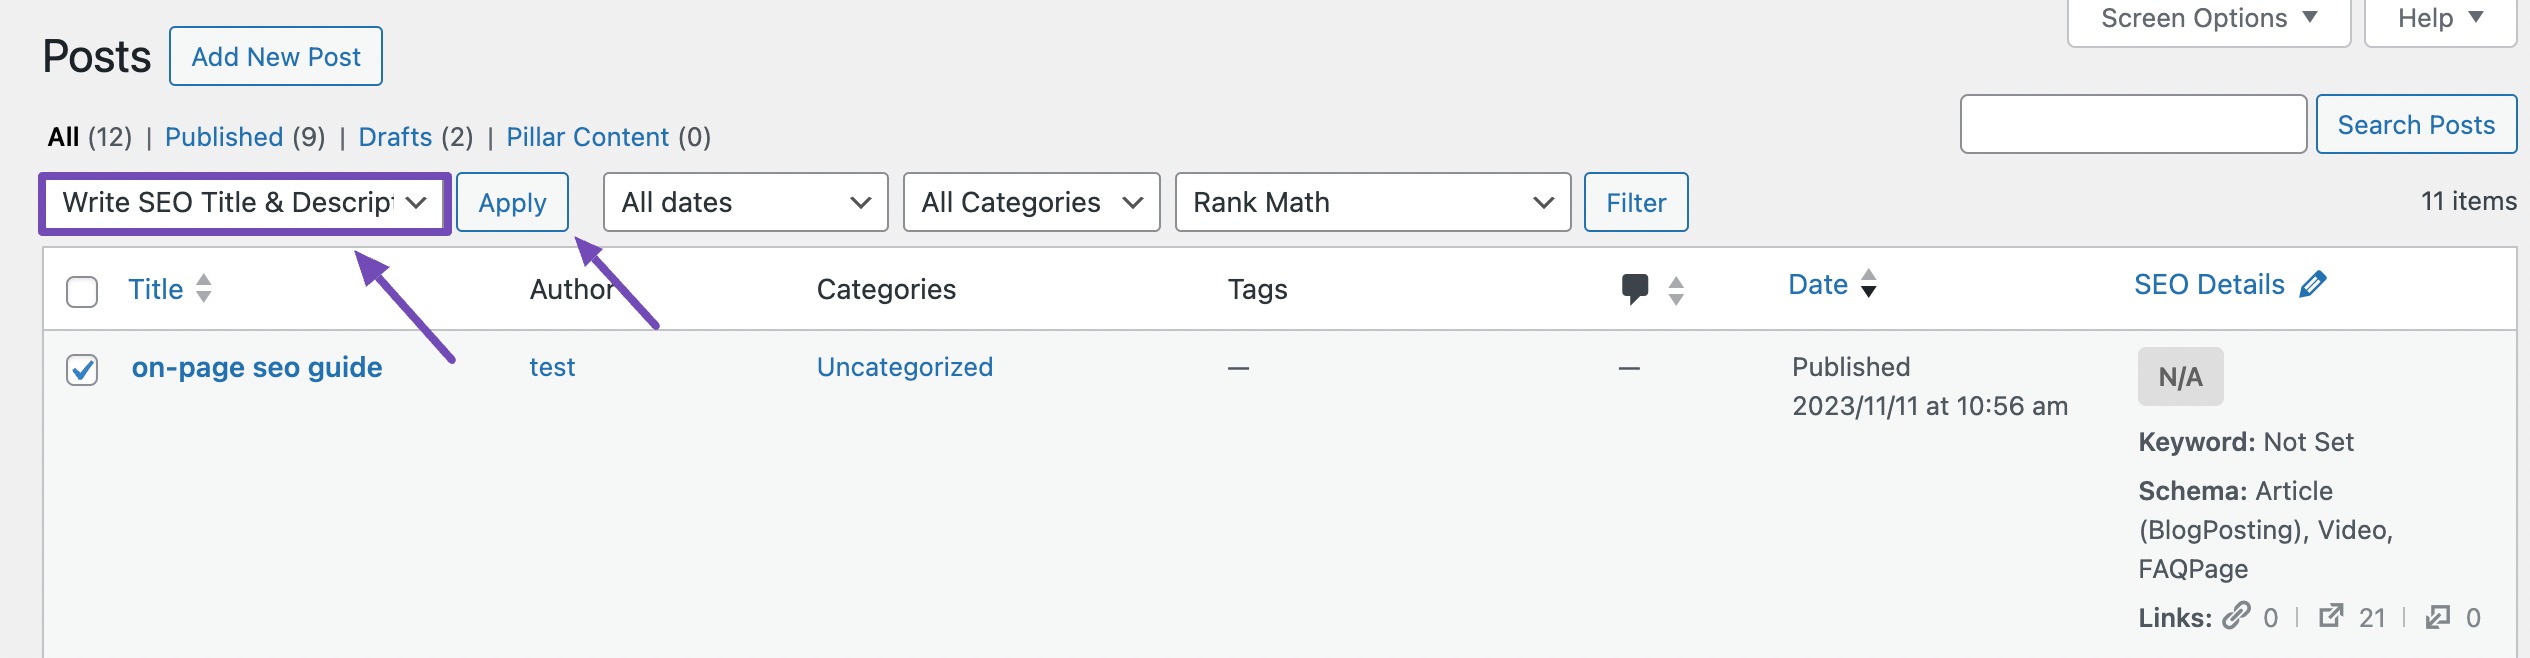
Content AI will begin generating your SEO meta. In the meantime, it will display a ‘Bulk editing SEO meta started’ message, as shown below.

After a few seconds, refresh the page, and your SEO title and description will be edited. You can visit the post and check its SEO title and description.
4.6 Write Image Alt Text with AI Content AI
This option lets you generate alt texts for images in your posts and pages. To do this, select the posts for which you wish to generate alt texts for their images.
Next, choose the Write Image Alt Text with AI option from the drop-down menu and click the Apply button.

Once that is done, the page will reload and present you with a success message indicating that the Content AI has started generating the alt texts for your images.
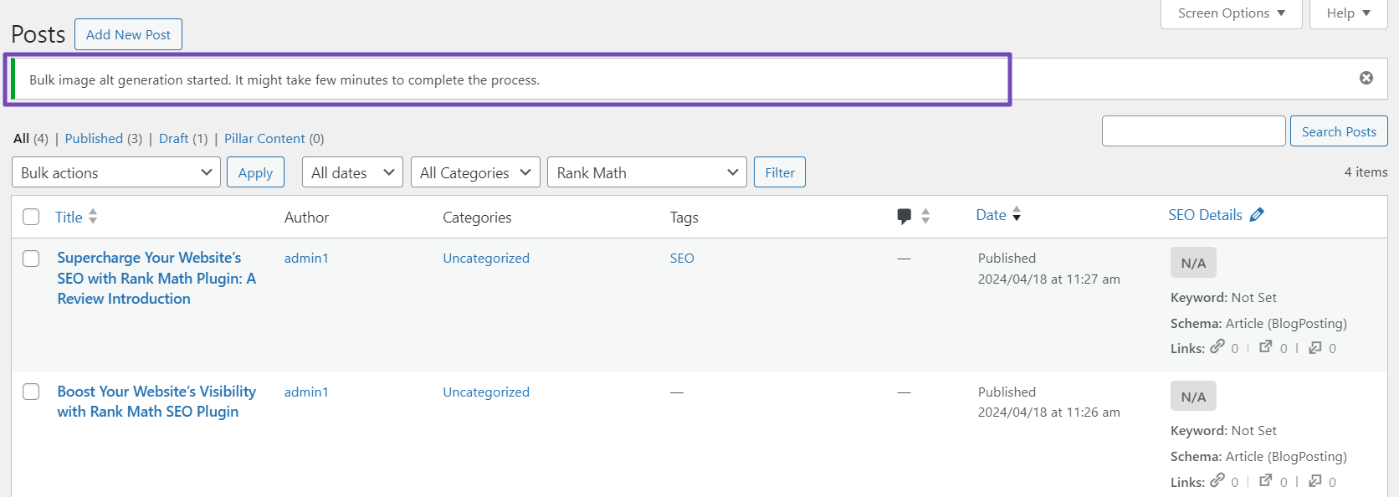
You will need to wait a few minutes, depending on the number of selected posts. After the wait time, you can check the posts to ensure the alt texts generated are accurate before updating them.
4.7 Set to Noindex PRO
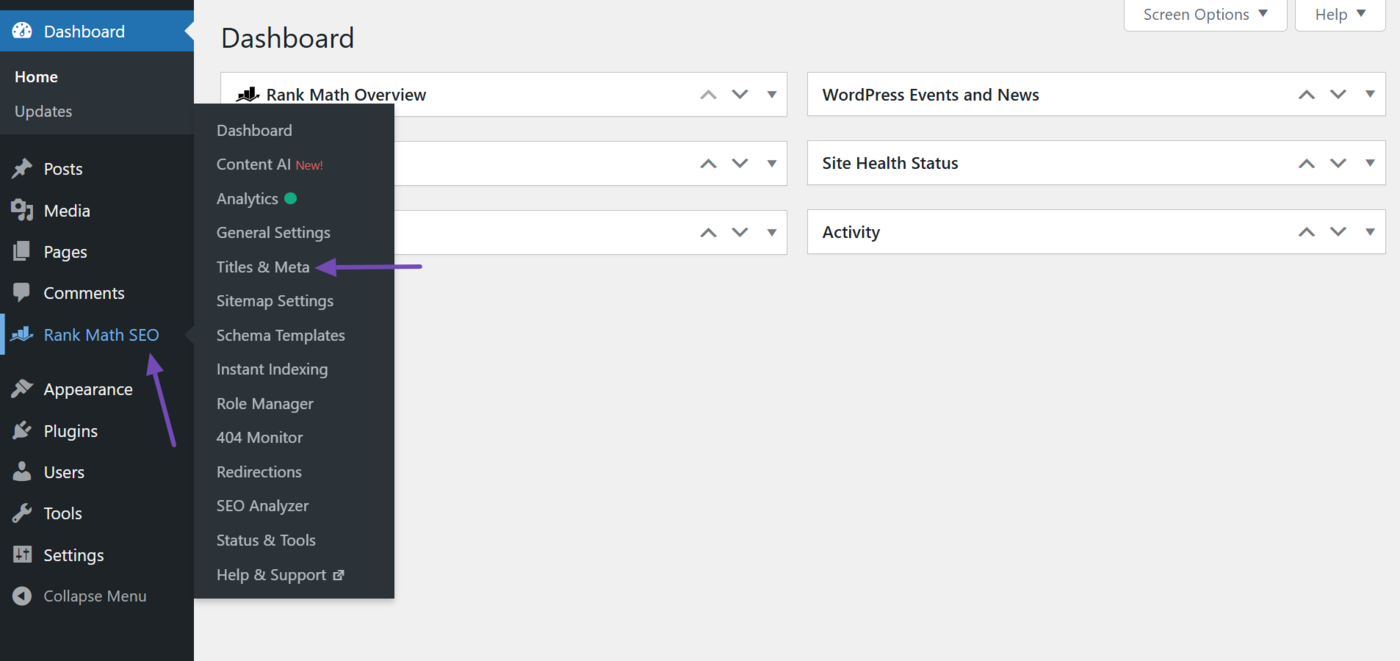
Rank Math gives you the option of configuring Global Meta for your website, which can then be customized for posts, pages, and custom posts. You will find these options in Rank Math SEO → Titles and Meta.

This bulk action lets you change the robots meta applied to posts. Specifically, you can set multiple posts, pages, or custom posts to noindex, which means search engines won’t index those specific posts.
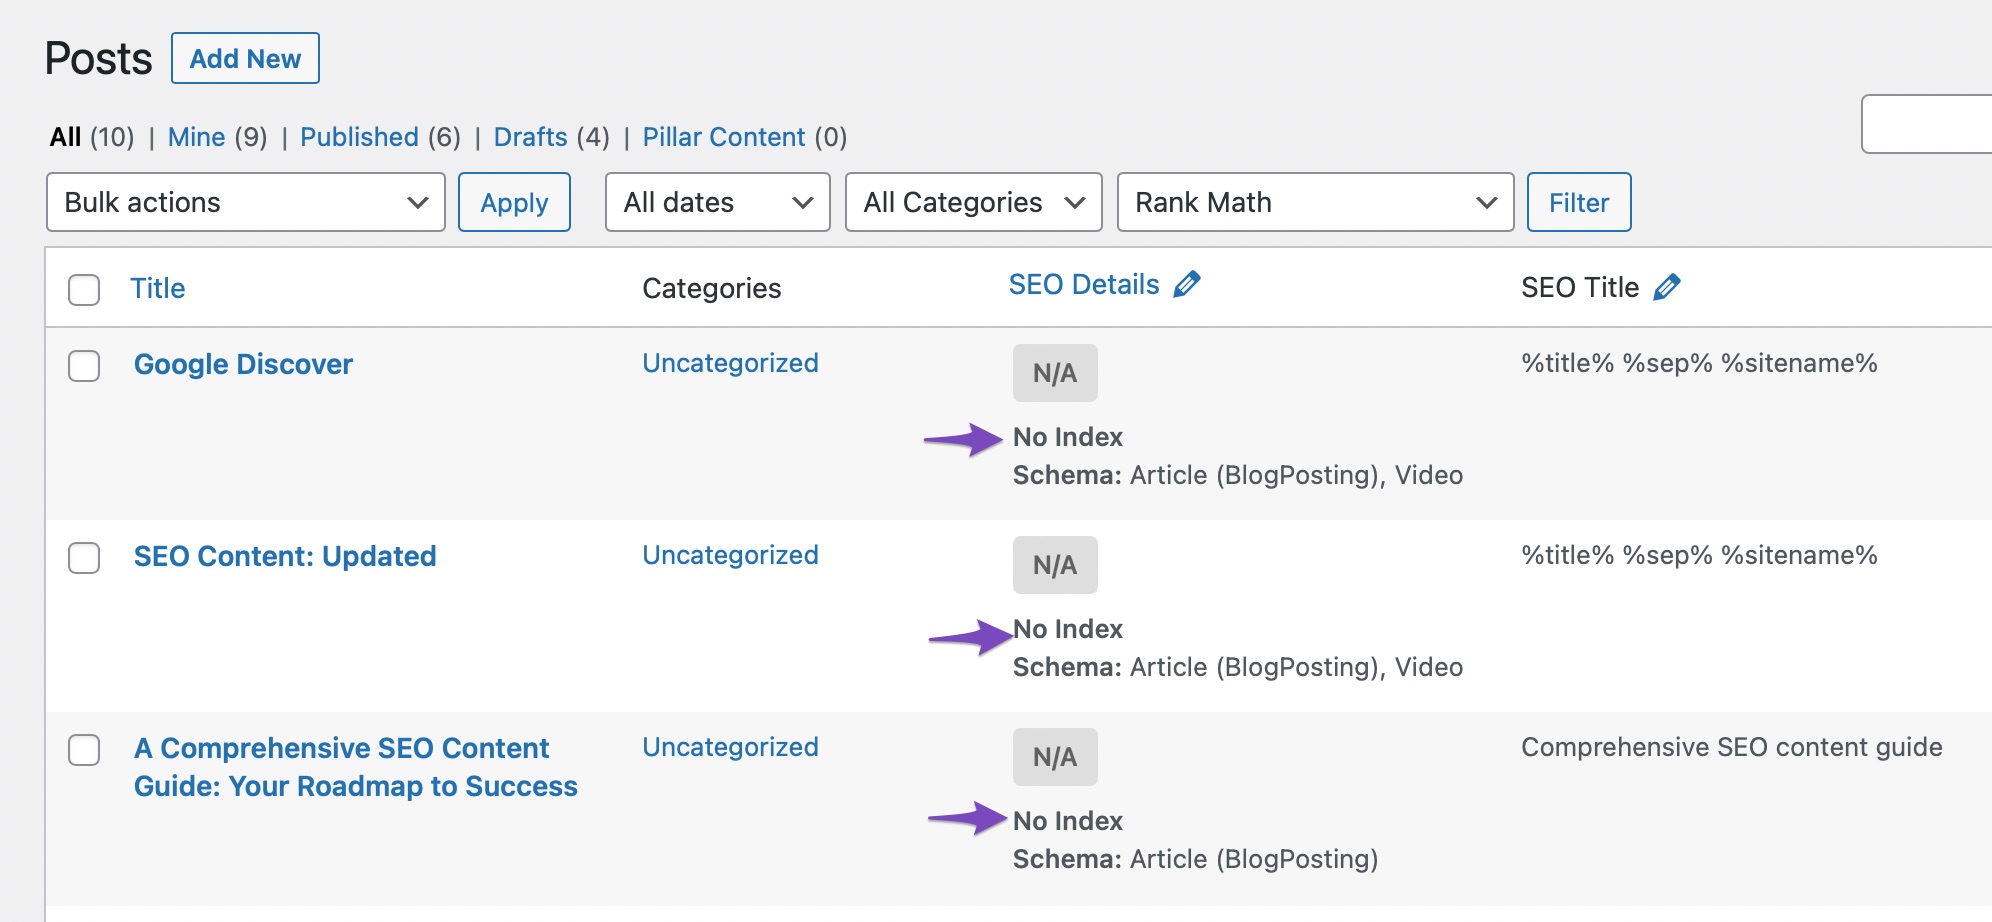
To use this bulk action, filter and select the posts you want to set to no-index. Then select the bulk action and click the Apply button next to it.
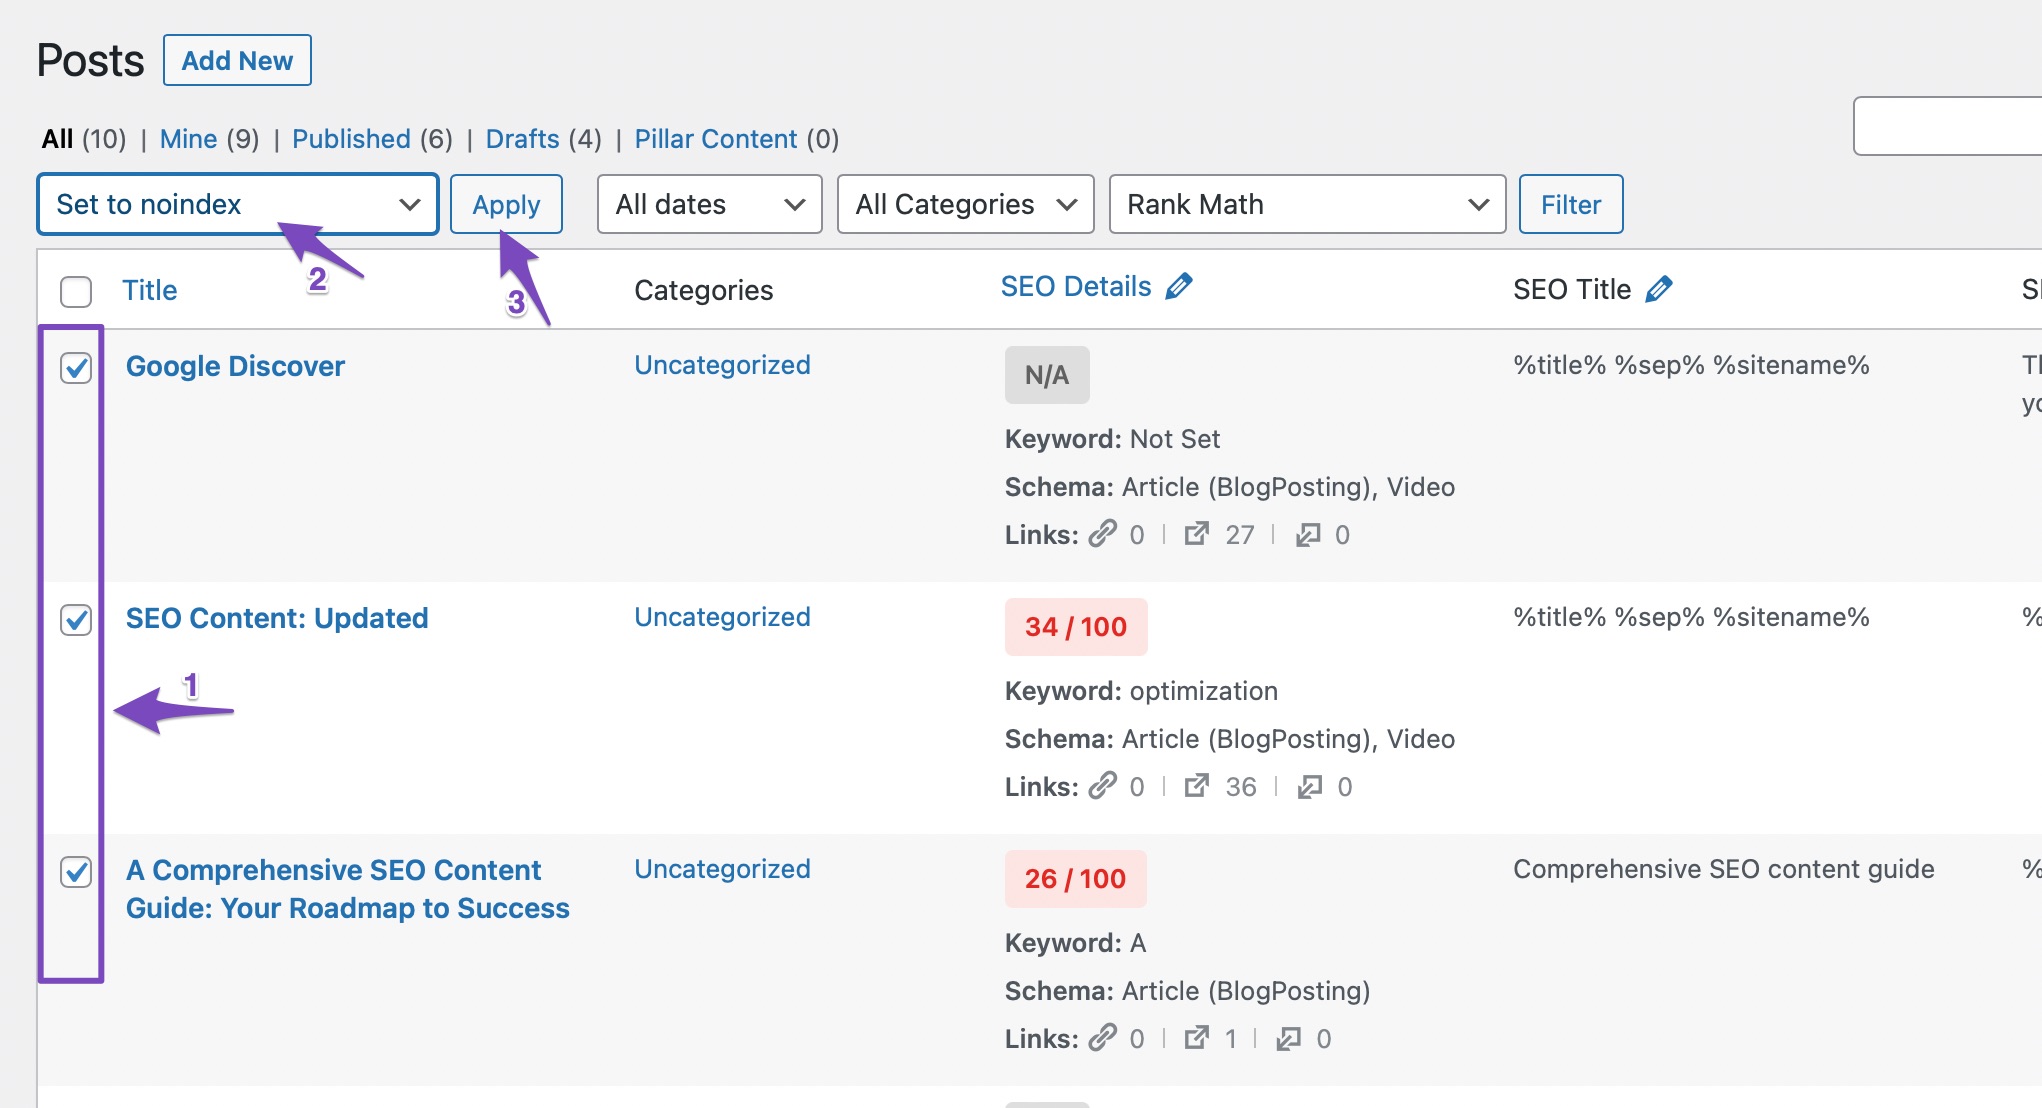
The page will refresh, and you will see a confirmation notice on the top of the screen. You will also be able to see the post’s status directly in the posts view.
4.8 Set to Index PRO
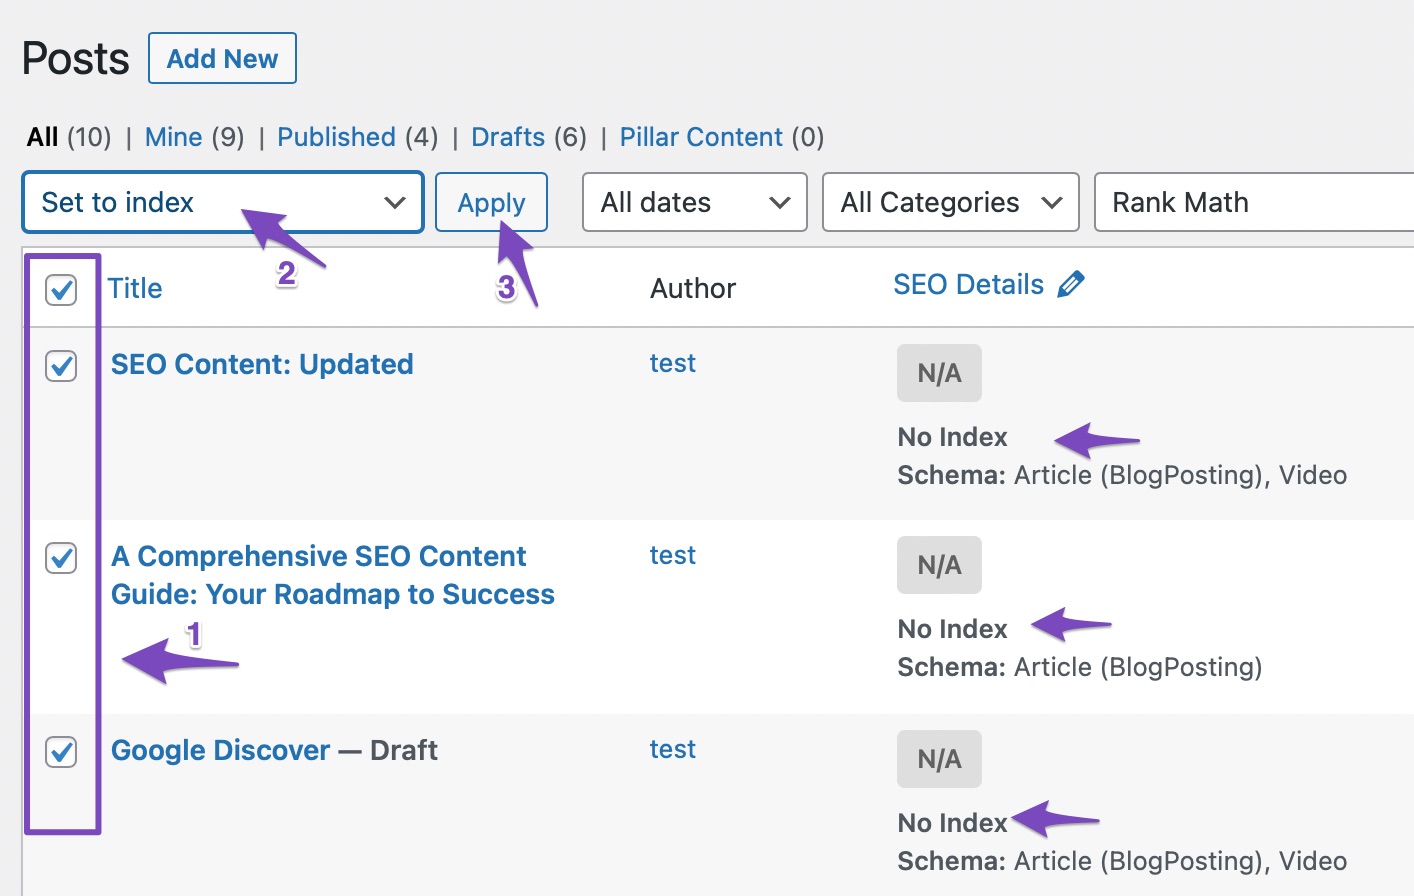
This bulk action works in the complete opposite way of the one we discussed above. This bulk action helps you set multiple posts to index, which means that search engines will be able to index the content.
The process to use the bulk action is the same. Select the posts you want to set to index, select the bulk action, then click the Apply button. Let us use the same posts that we used in the example above for this example as well.
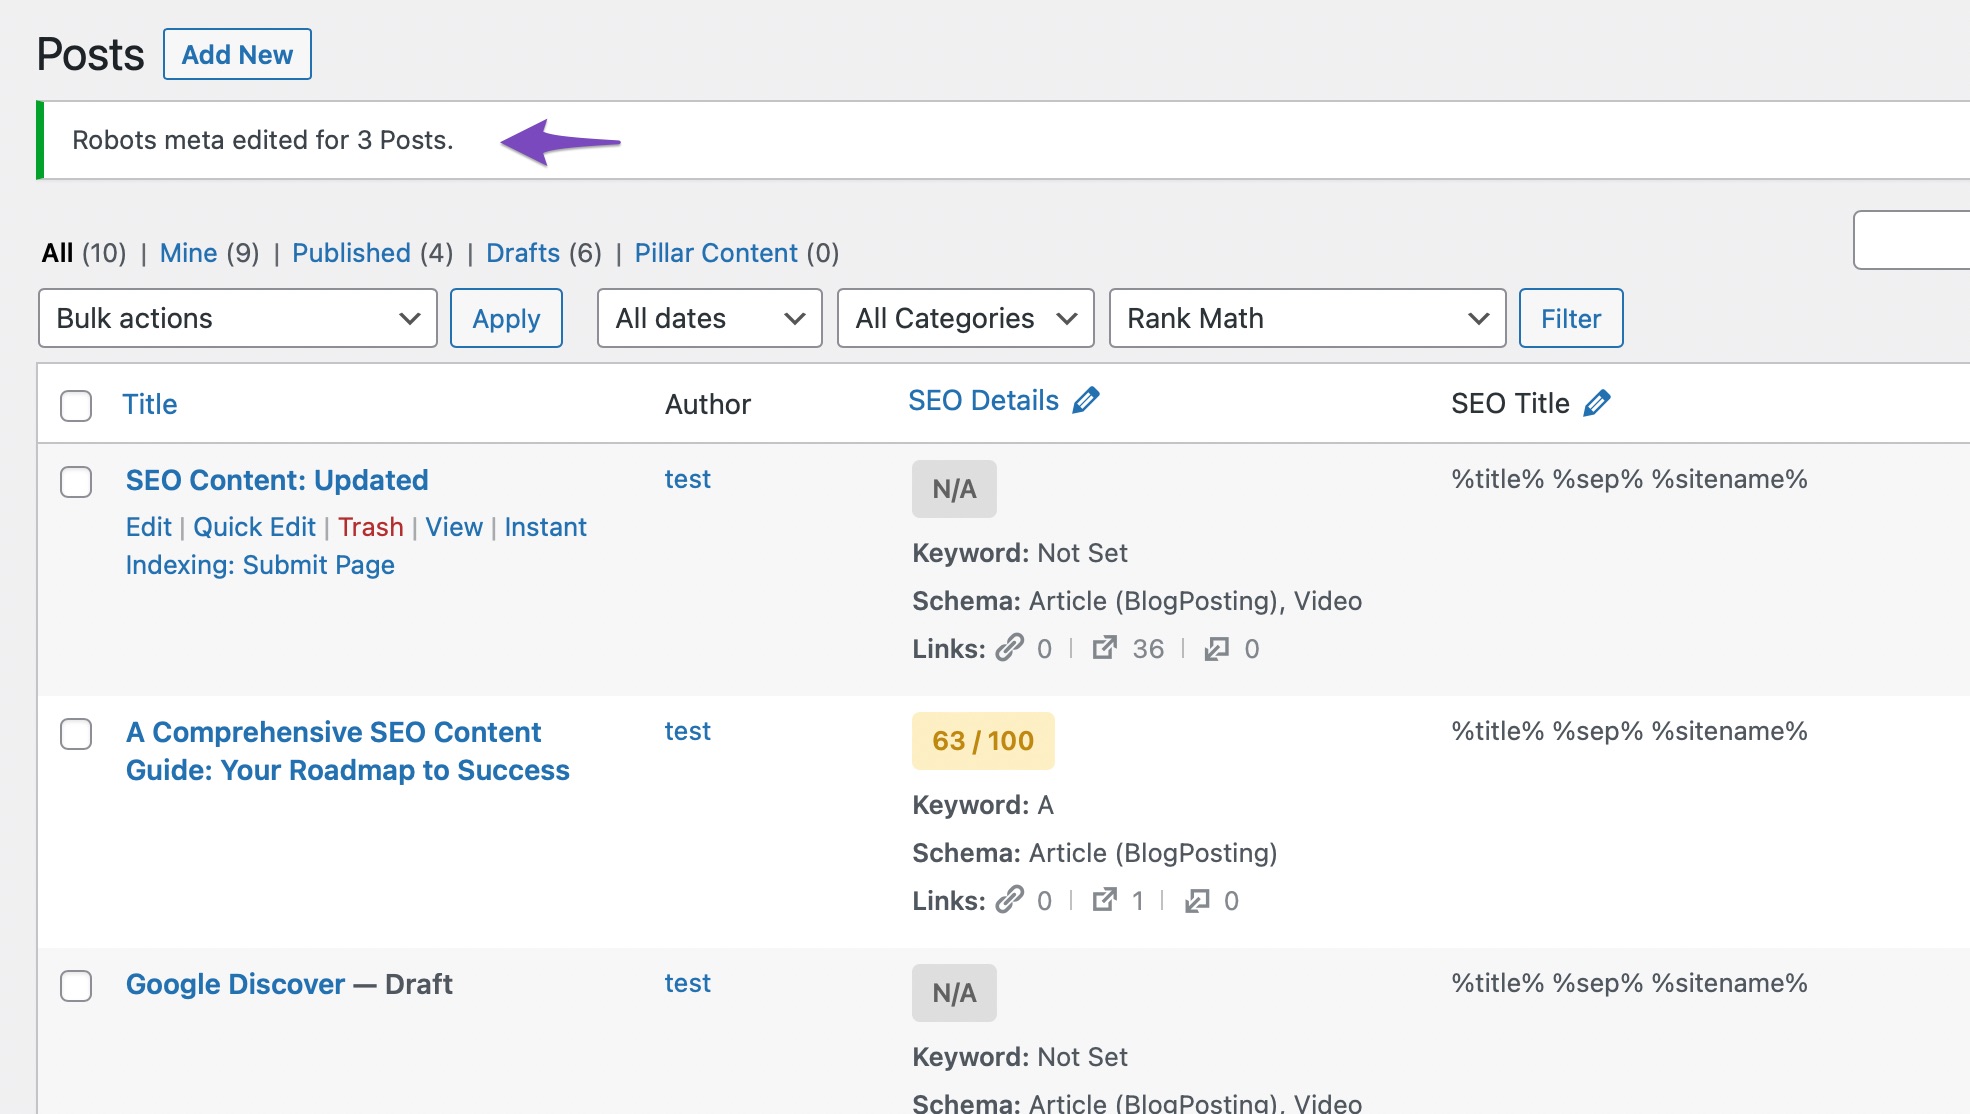
As expected, we saw a success notice appear on the screen, and the posts were once again set to index.
4.9 Set to Nofollow PRO
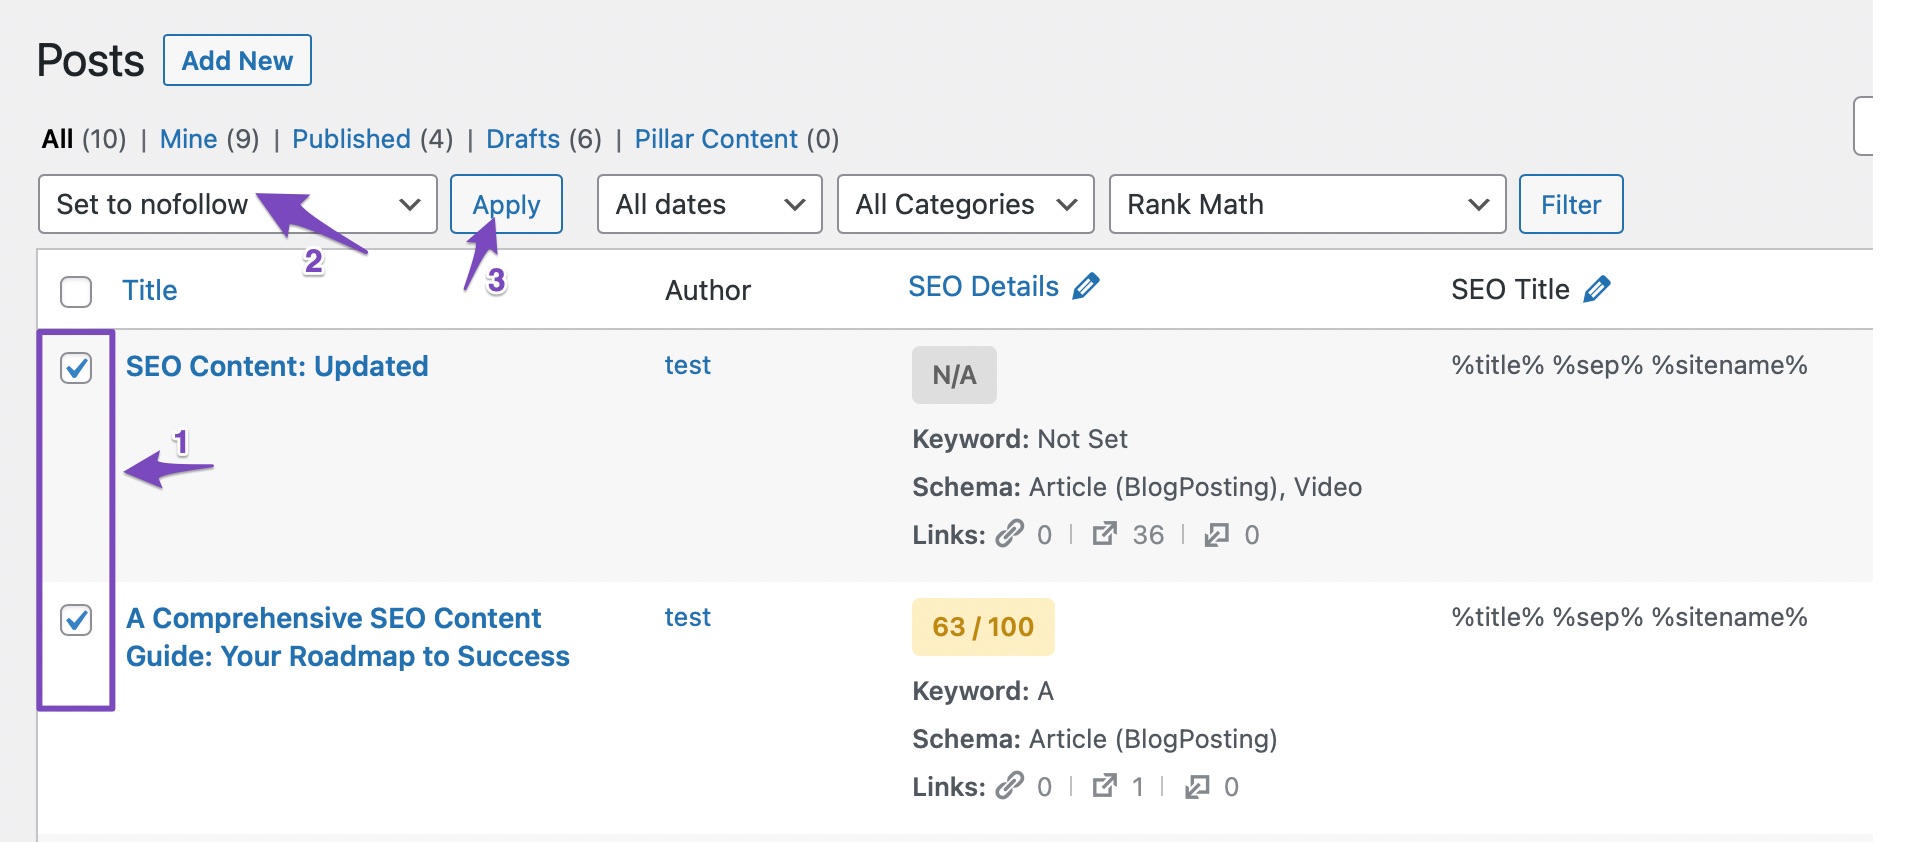
Nofollow is another robots-meta that you can set with the global meta options in Rank Math. When a post is set to nofollow, then search engines index the post but do not follow the links from the page. By using this bulk action, you can set all the selected posts, pages, and custom posts to nofollow instantly.
To use this bulk action, manually select the posts you want to apply the actions to, or use the filtering option to filter your posts, then select them. Once selected, use the drop-down menu to select the action, then click the Apply button.
You’ll see a confirmation message on the screen, which will include the number of posts that were affected.
4.10 Set to Follow PRO
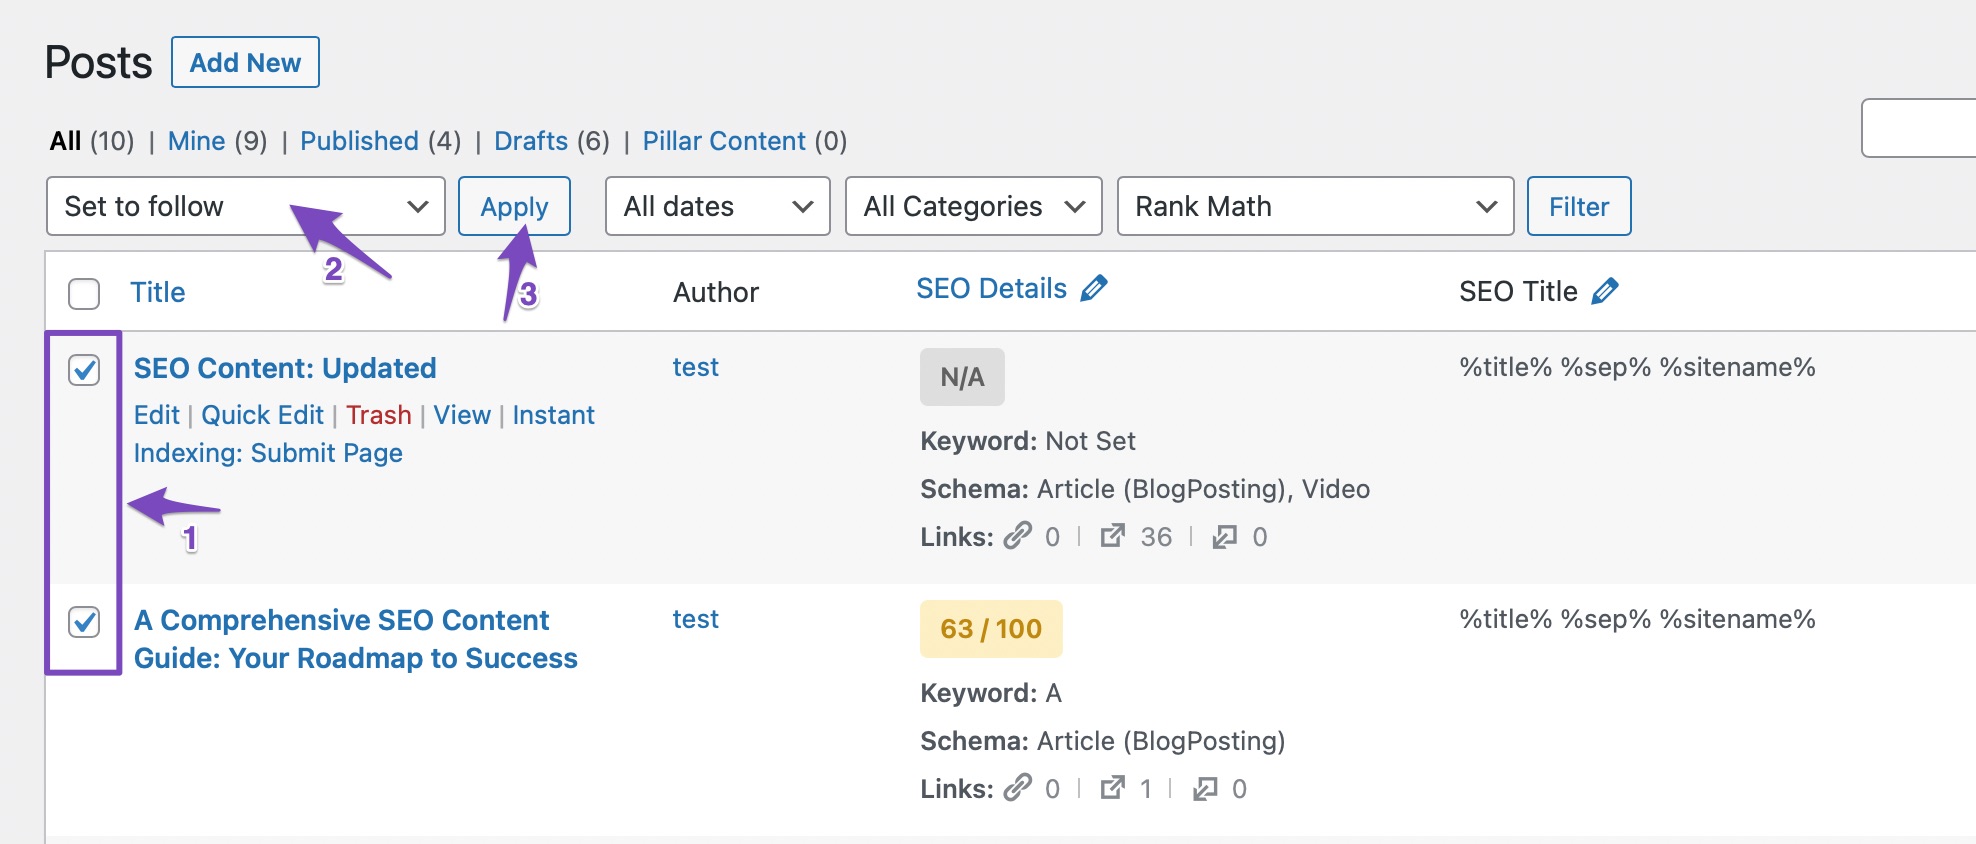
This bulk action works in the opposite way to the action above. When used on posts, this action will set all those posts to follow, which means that the search engines will follow all the links on the page.
To use the action, select the posts you want to apply the action on. You can also use the filtering options to filter the posts first, then select the posts. Once the posts are selected, select the action from the drop-down menu and click the Apply button.
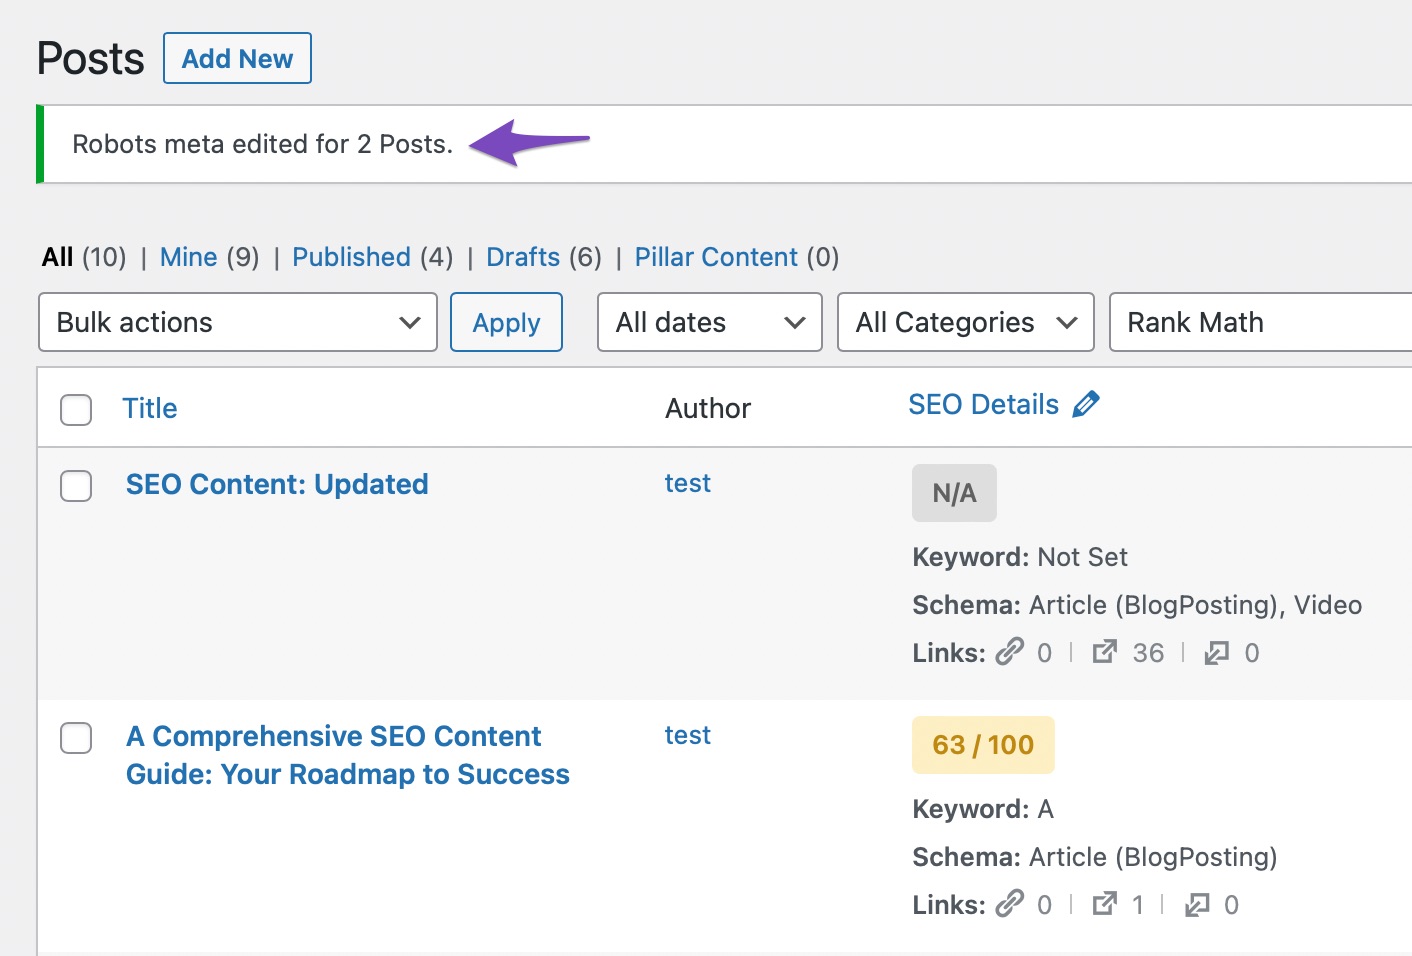
You should see a success notification on the screen, and the posts’ robots meta will be updated.

4.11 Remove Custom Canonical URL PRO
Custom canonicals should only be used on posts where you are using copied content from some other page on your or someone else’s website. It tells Google where the original piece of content is and that you are using copying content. This way, they will not penalize you for using copied content, and they will “discount” your content and not rank you.
If you have accidentally used the setting or if you no longer wish to have a custom canonical URL on multiple posts, you can use this option to remove the canonical URLs in bulk.
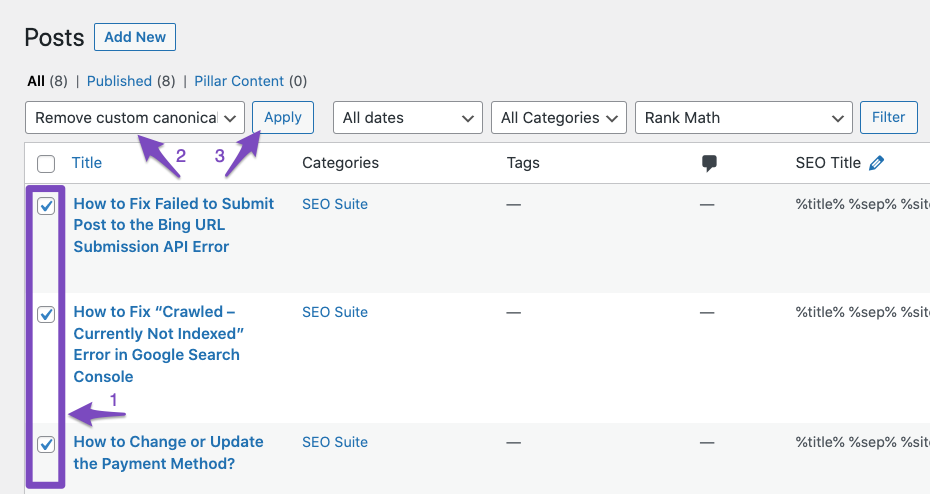
To use this bulk action, filter the posts from which you want to remove the custom canonical from or select the posts manually. Then, select the bulk action and click Apply.
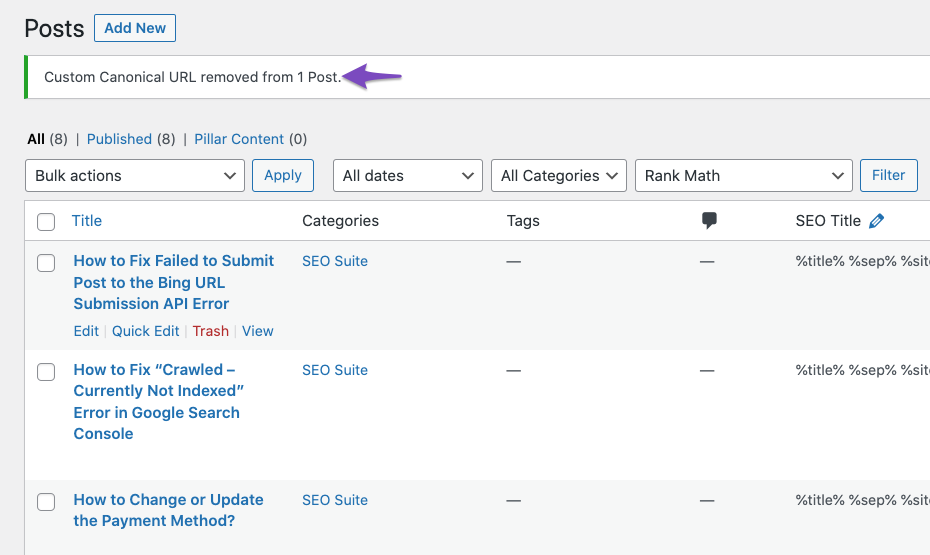
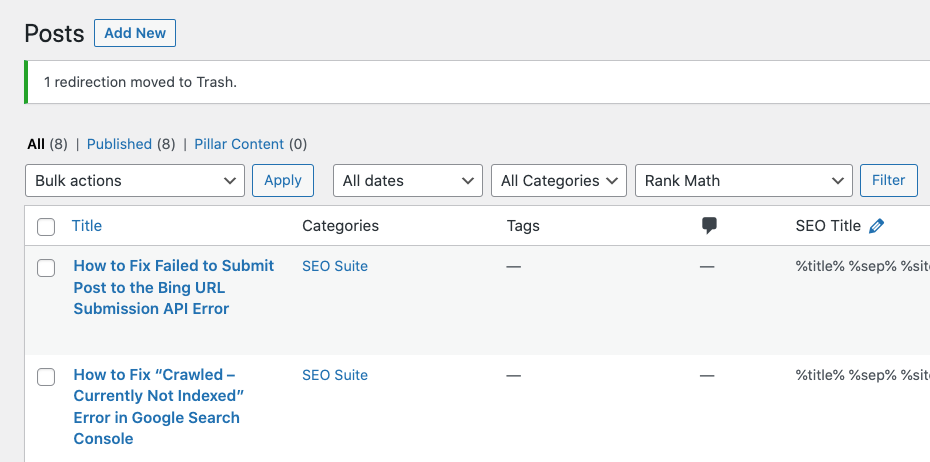
You should now see a notice with any custom canonical URL being removed. As you can notice, we had chosen 3 posts, but the notice shows only 1 post because only 1 out of the 3 posts had a custom canonical URL.
4.12 Redirect PRO
Redirects are a powerful way to manage your website’s broken links and architecture. It is a simple way to tell Google, “Hey, see that address, don’t go there. Go to this address instead.”
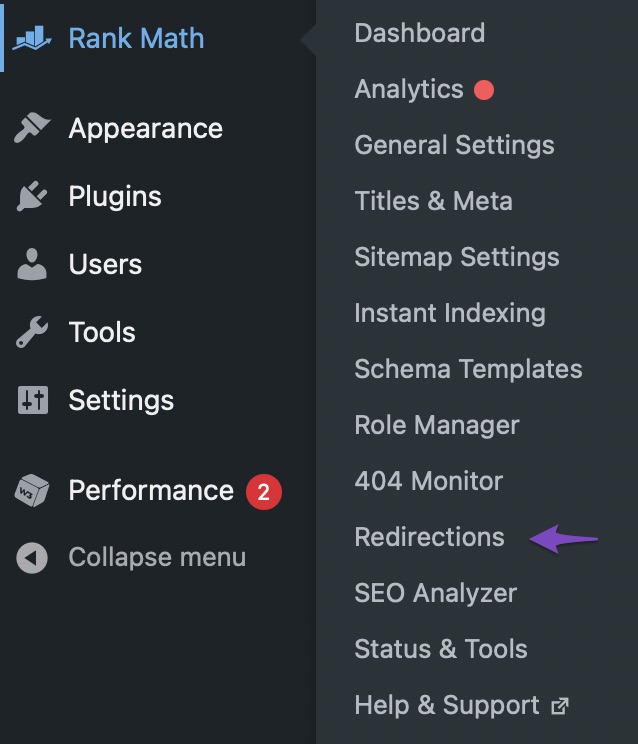
Rank Math has a powerful redirect manager built-in, which lets you create and manage redirects on your website. You’ll find all the settings in Rank Math SEO → Redirections.
Using the redirect manager, you can redirect multiple pages to a single URL. But, you don’t have the powerful filtering options that Rank Math offers.
To use this bulk action, filter the posts which you want to redirect or select the posts manually. Then, select the bulk action and click Apply.
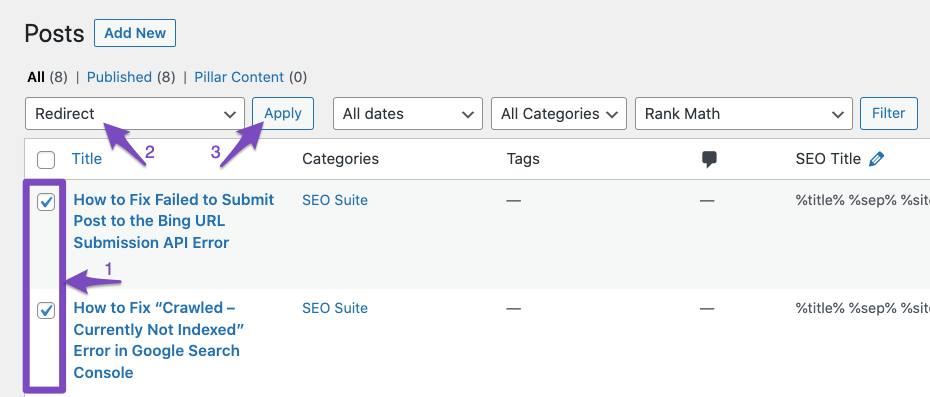
Rank Math will open up the redirect manager, and all the selected posts will be filled in already. You can then select the matching mode, destination URL, redirection type, and maintenance mode of the redirects. If you want to know what these are, read our knowledge base article on working with redirects in Rank Math.
Once you’ve configured the settings to your liking, click the Add Redirection button to save your changes.

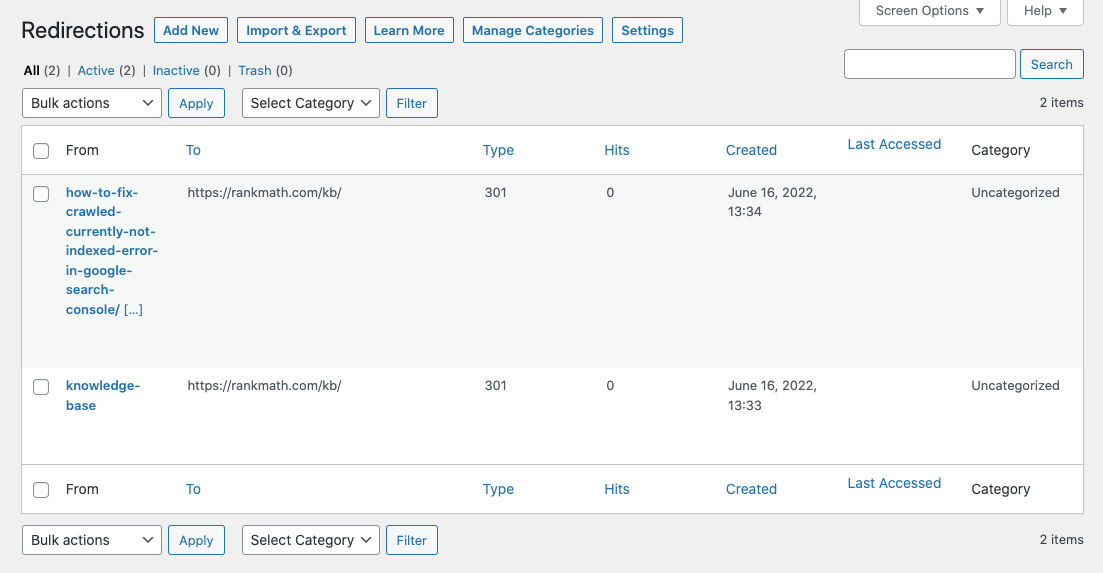
You will see the changes in the redirect manager. You can also edit, delete, or disable the redirect anytime you like.
4.13 Remove Redirection PRO
The remove redirection bulk action helps in removing redirects from posts. So, it works in the complete opposite way of the action above. These 2 actions combined can be used in powerful ways, and you’ve probably observed a few big websites use similar techniques. Let us give you an example.
Imagine that you’re running a celebrity website and have multiple posts on celebrity “X”. Suddenly, the news breaks that they announced their engagement. Since you’d want to drive all the traffic to the post about their engagement, all you have to do is filter out the post about the celebrity and create a redirect to the new post. This way, all the search and referral traffic would go to the new post. Once the news becomes cold, you can filter the posts again and remove the redirects for those posts.
To use this bulk action, filter or select the posts that you’d like to use this on. Then, select the action from the drop-down menu and click the Apply button.
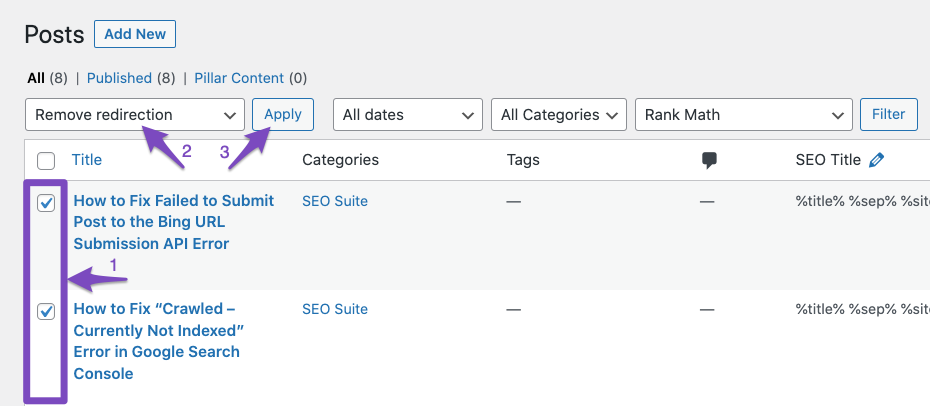
You should see a confirmation message on the screen, and the redirects from those posts will be removed. You can use this bulk action on the posts that do not have redirects, and it will have no effect. You will see the actual number of posts affected in the success message.
Please note that the redirects will also be removed from the redirect manager, as that was where the redirects were actually stored.
4.14 Remove Schema Markup PRO
Rank Math lets you pick a default Schema Type for your posts, pages, and even custom posts types. You will find this setting inside Rank Math SEO → Titles and Meta.
Once you set this global setting, all the posts, pages, or custom post types will automatically get the Schema type added to them. You can then customize the Schema on a per post basis.
In certain scenarios, there is a need to remove the Schema from the page, and that process has to be performed manually, unless you use this bulk action, of course!
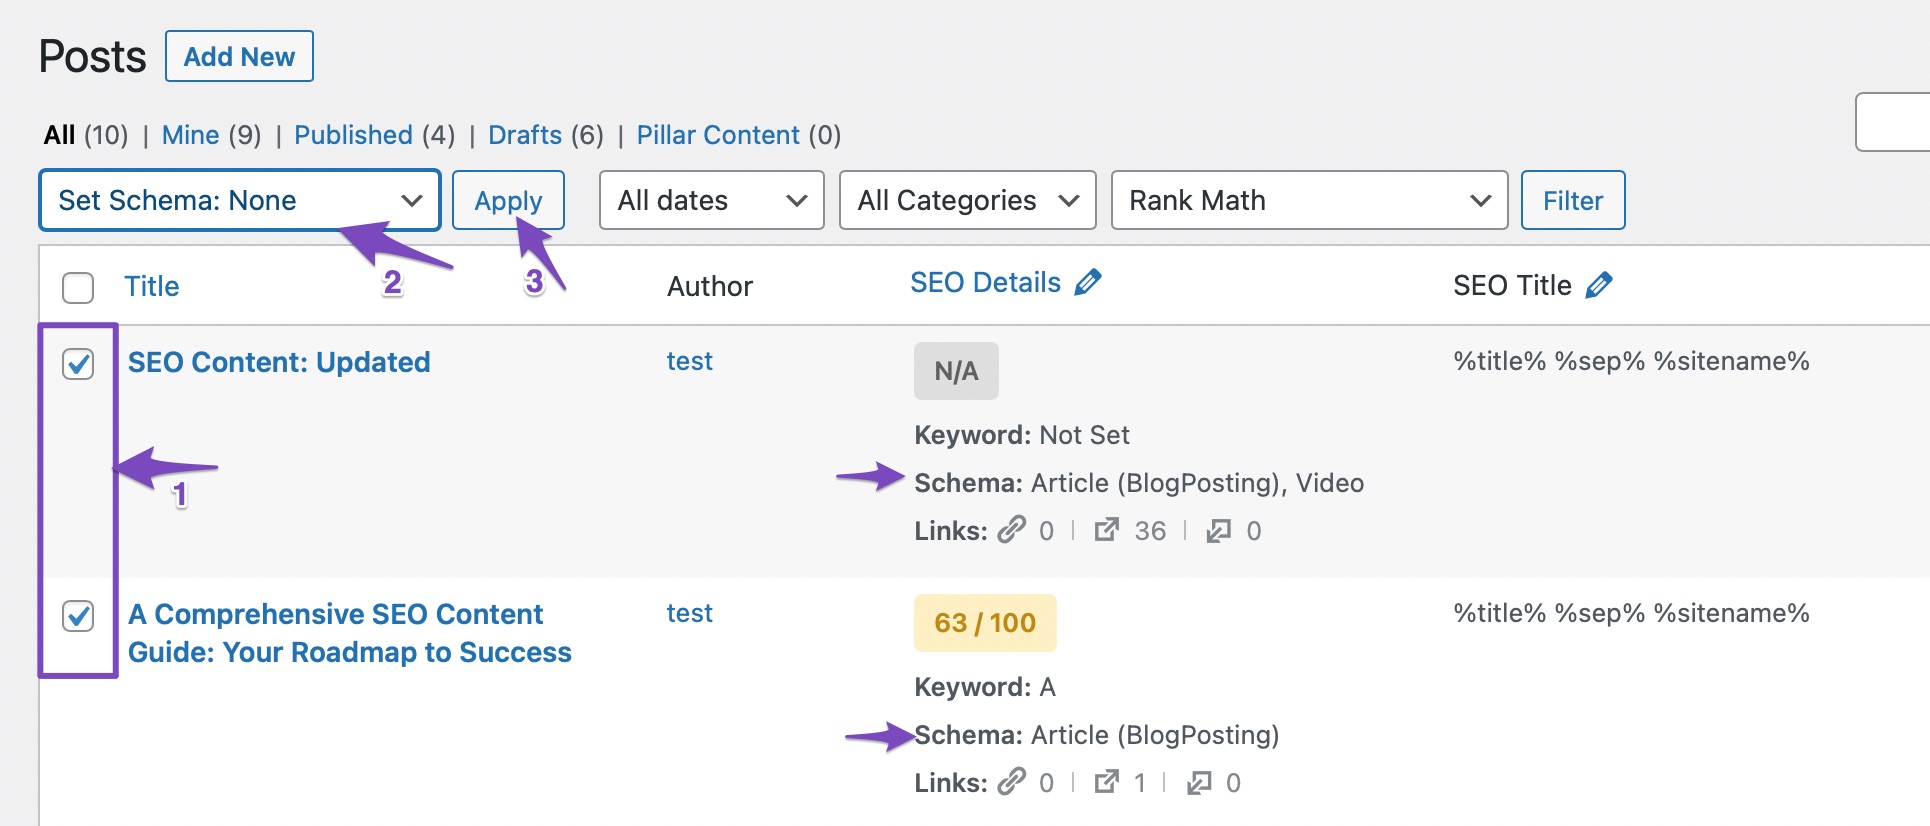
By using this bulk action, you can remove the Schema from all your posts, pages, and custom post types in a single click. To use it, filter and select or manually select the posts you want to remove the Schema from. Then select the bulk action from the drop-down menu and click the Apply button.
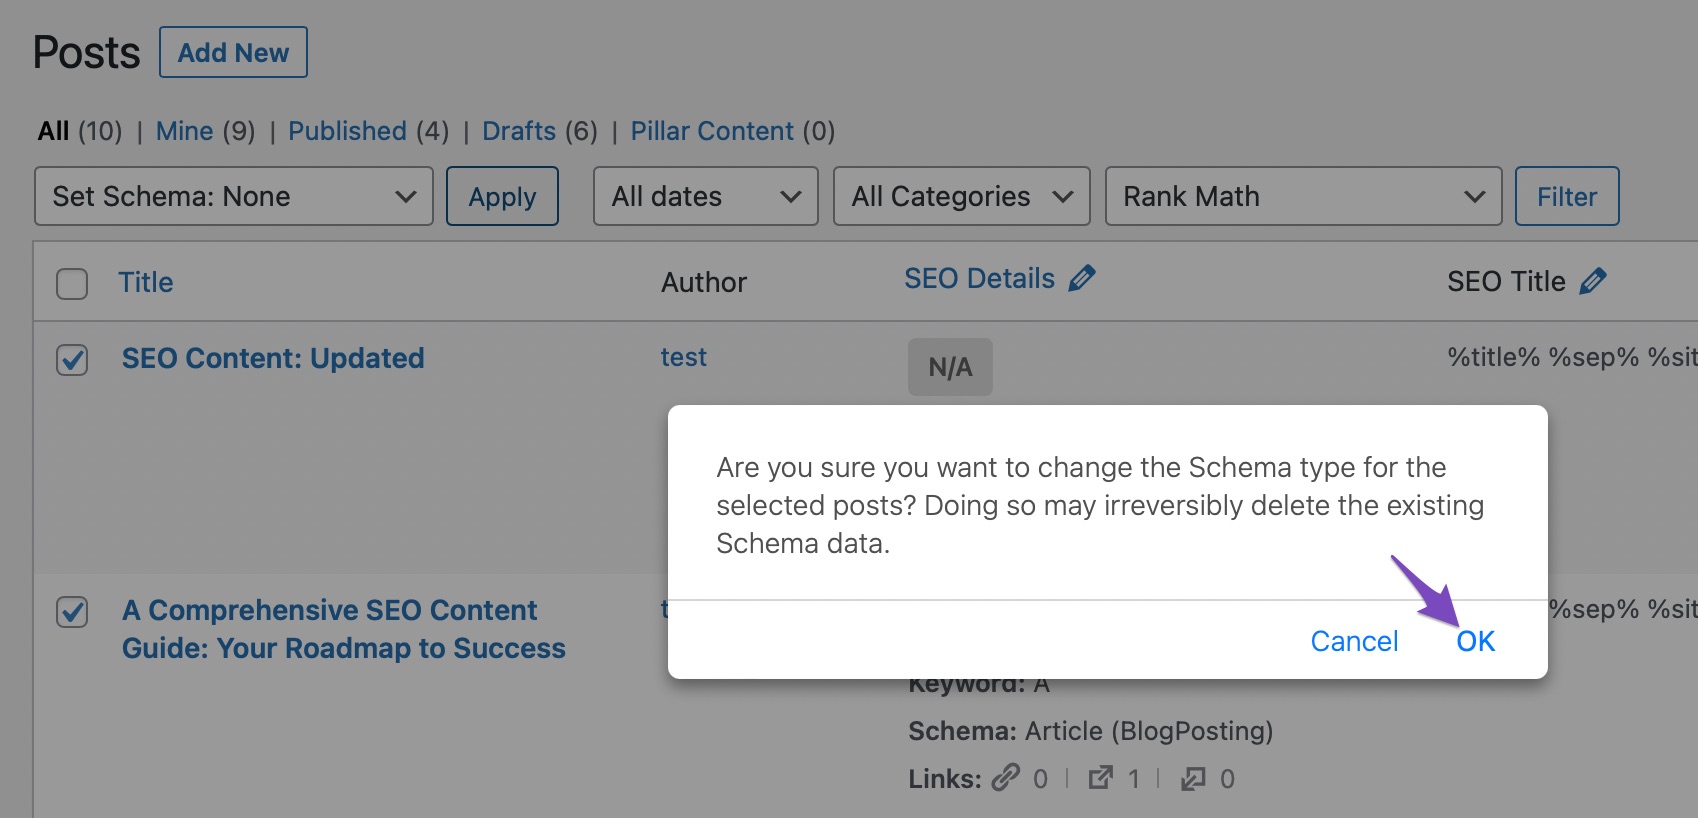
Now you’ll see a confirmation prompt at the top of the screen, as this action is irreversible, and all Schema added, including the custom Schema, will be removed. Click OK.
The page will refresh, and you should see the following success message on the screen.
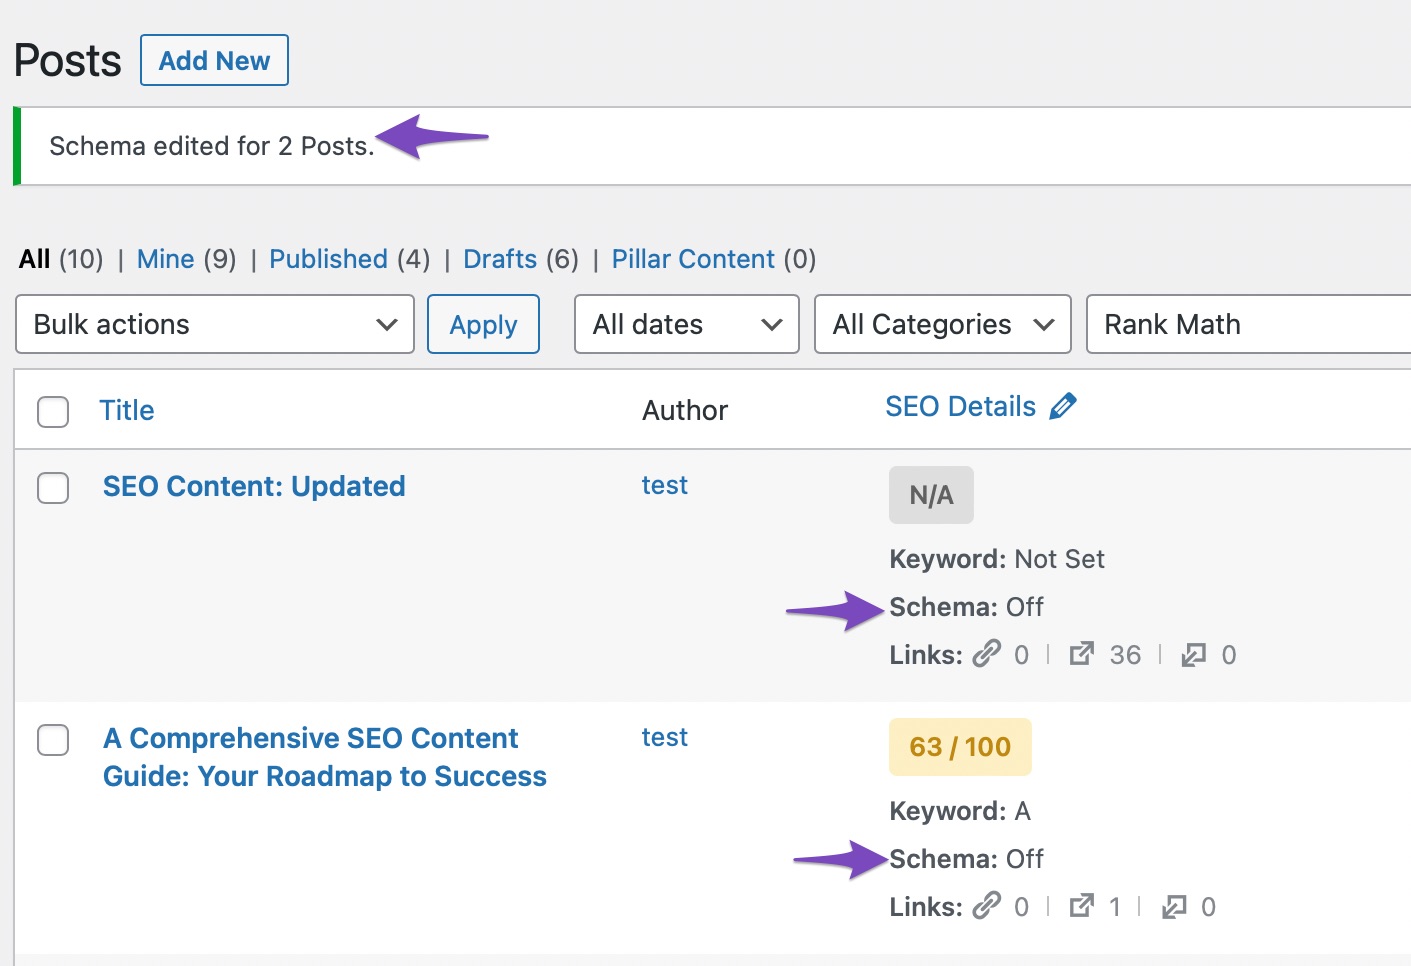
And if we check the Schema for any of the posts we used the bulk actions on, you’ll see that they have no Schema added.
4.15 Set Schema Markup to Default Type PRO
This bulk action helps you assign the default Schema to all your post types in a few steps. When you set up a global Schema for a post type, the Schema is automatically applied to it. But, if you have applied Schema manually to many of your posts, this bulk action, combined with the bulk action above, can help you apply the Schema correctly. You can use the Set Schema: None to remove the current Schema applied to those pages, then use this action to apply the default Schema to them.
To use this bulk action, select or filter the posts you want to use it on. Then, select the bulk action from the drop-down menu, and click the Apply button.
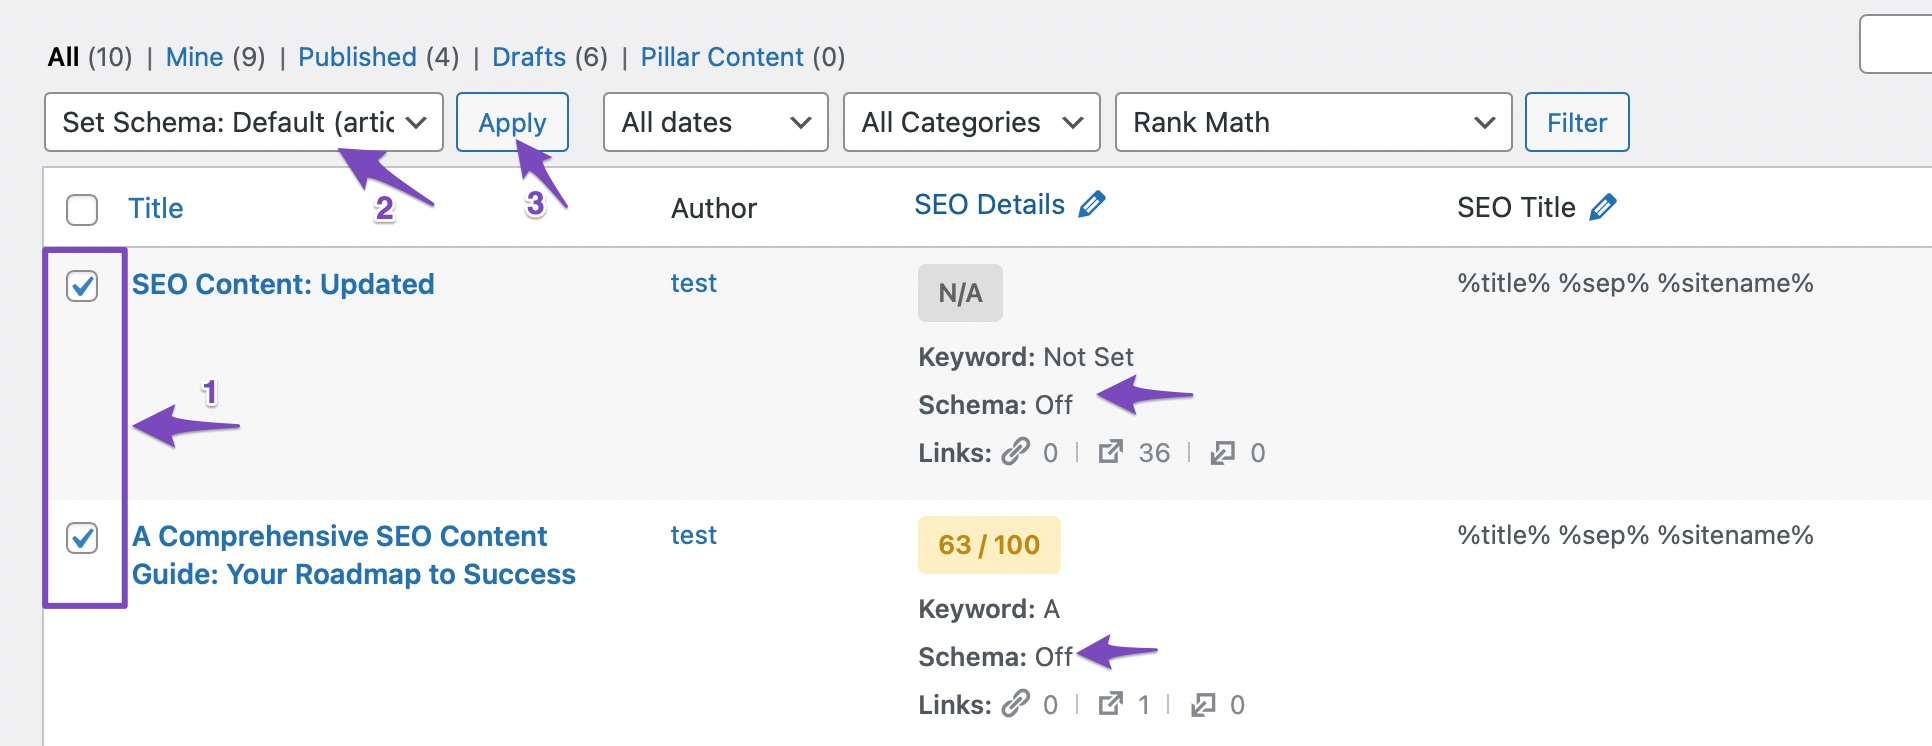
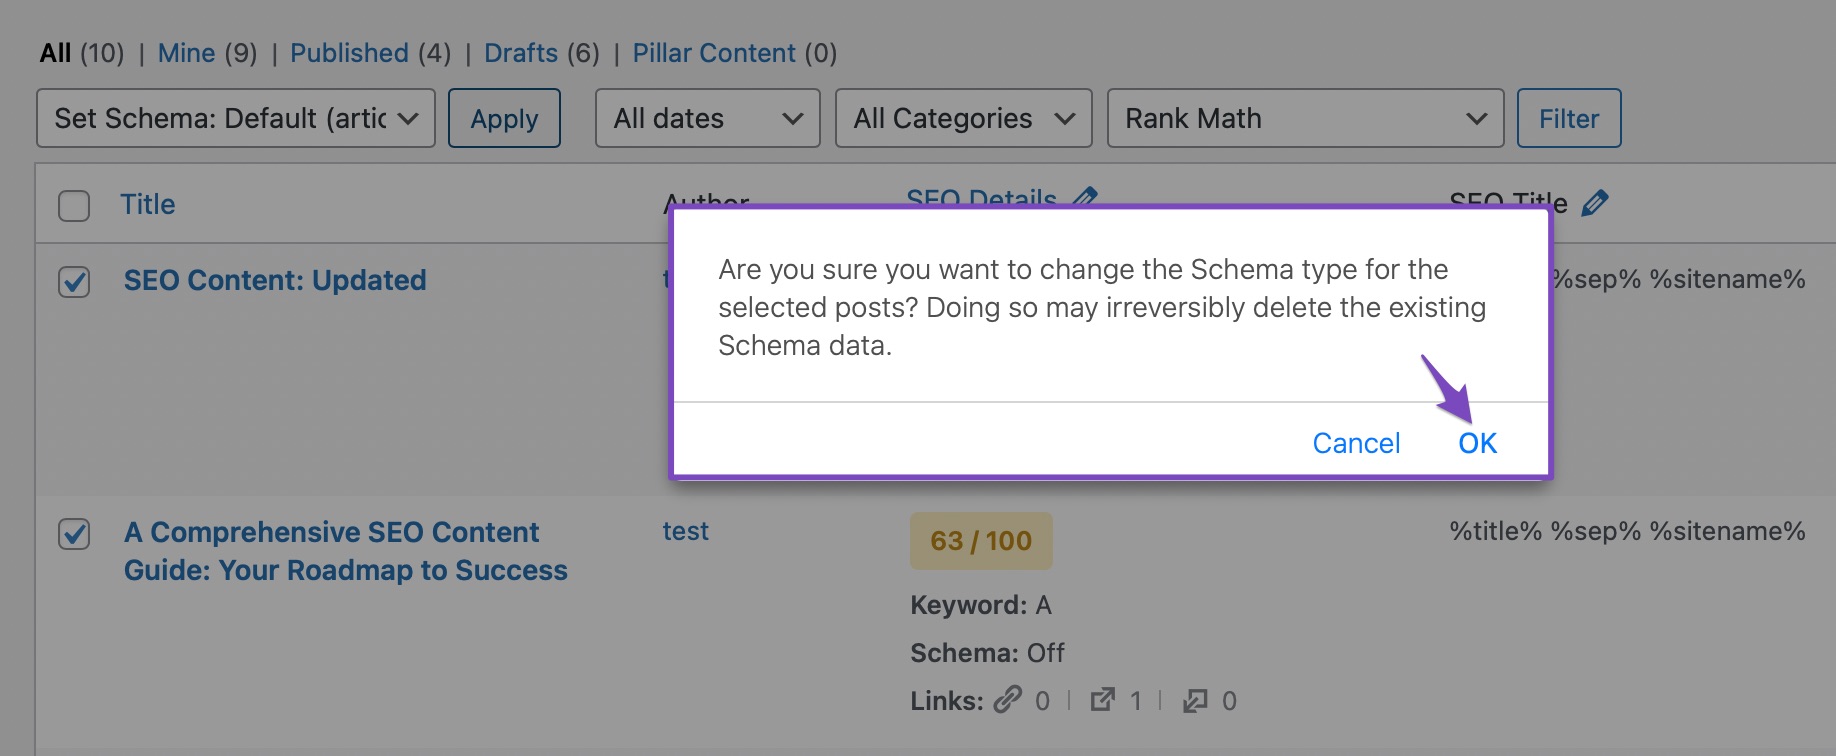
Now you will see a confirmation prompt, as any existing Schema will be removed and added with the default Schema set. Click OK.
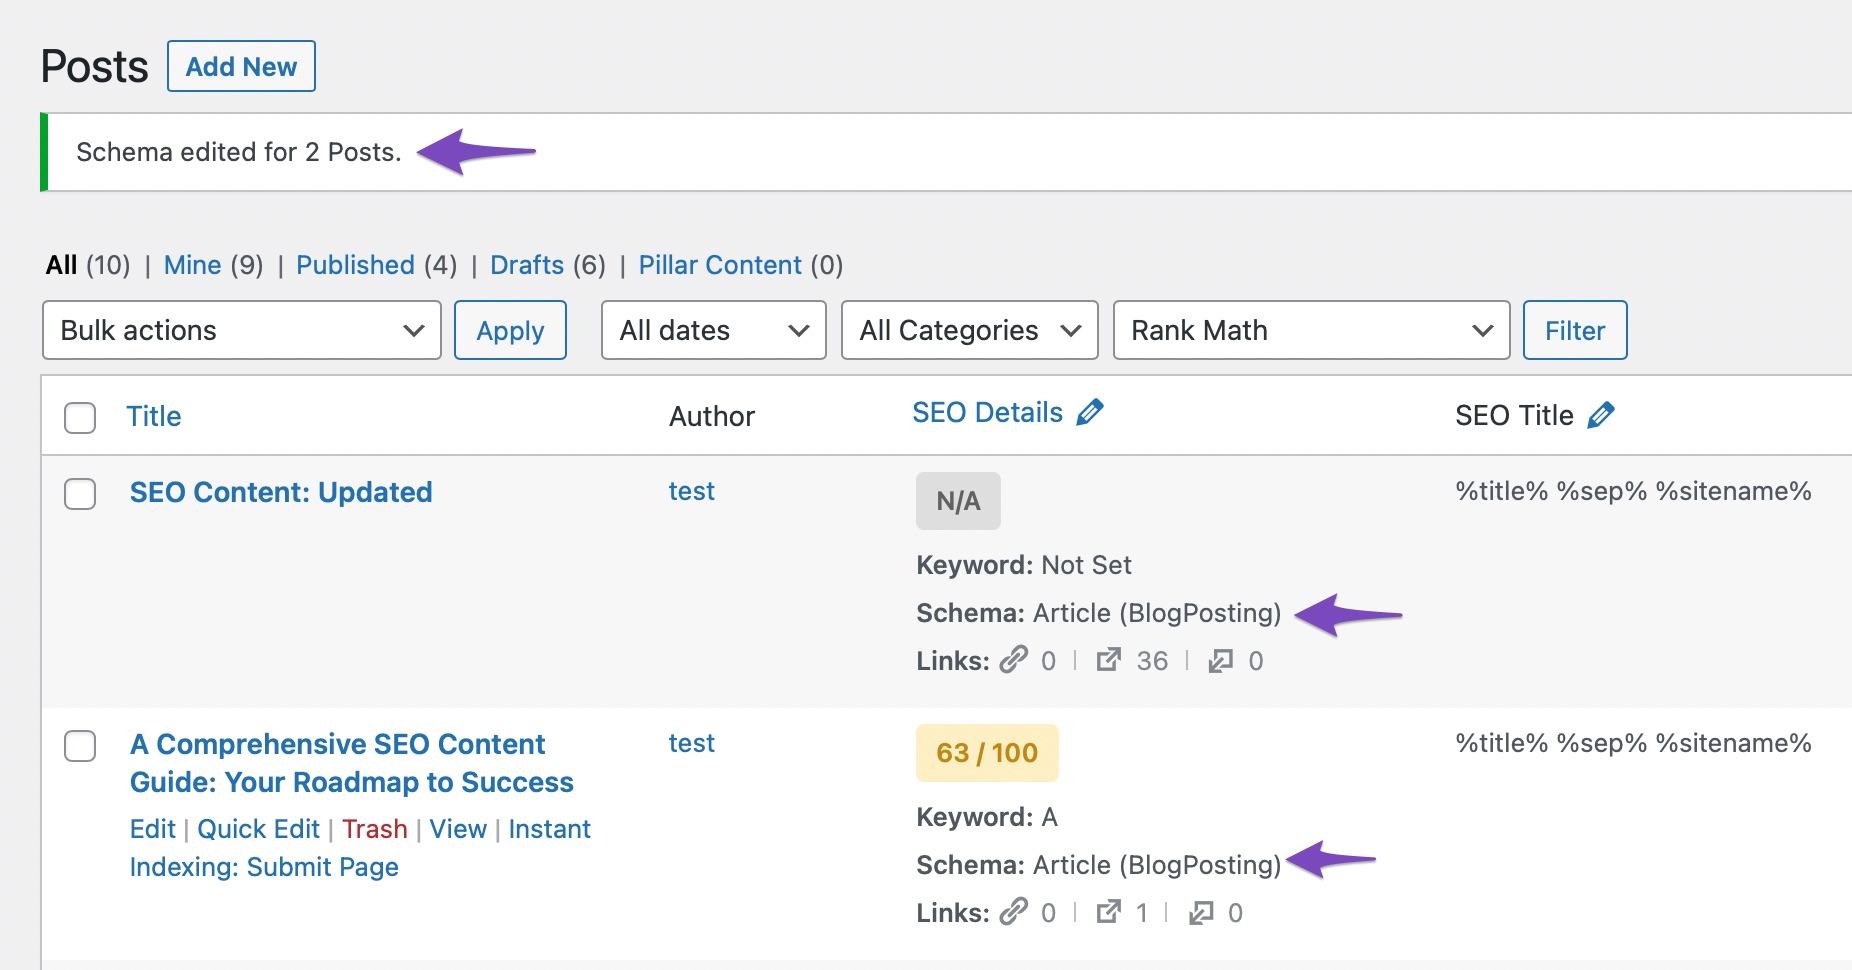
The page will refresh, and you will see a success notice on the screen. You will also notice the Schema type applied to the posts.
4.16 Determine the Search Intent of Your Focus Keywords PRO
Rank Math makes it easy to identify the search intent behind the focus keyword you’ve set in the Meta Box of your content. This feature helps ensure that your chosen keyword aligns with why you’re creating the content — and more importantly, with what users are actually searching for.
Normally, you would view the search intent inside the Meta Box of each post or page. But if you want to analyze this across multiple pieces of content at once, Rank Math also allows you to do it in bulk — which is especially helpful when managing several posts or pages.
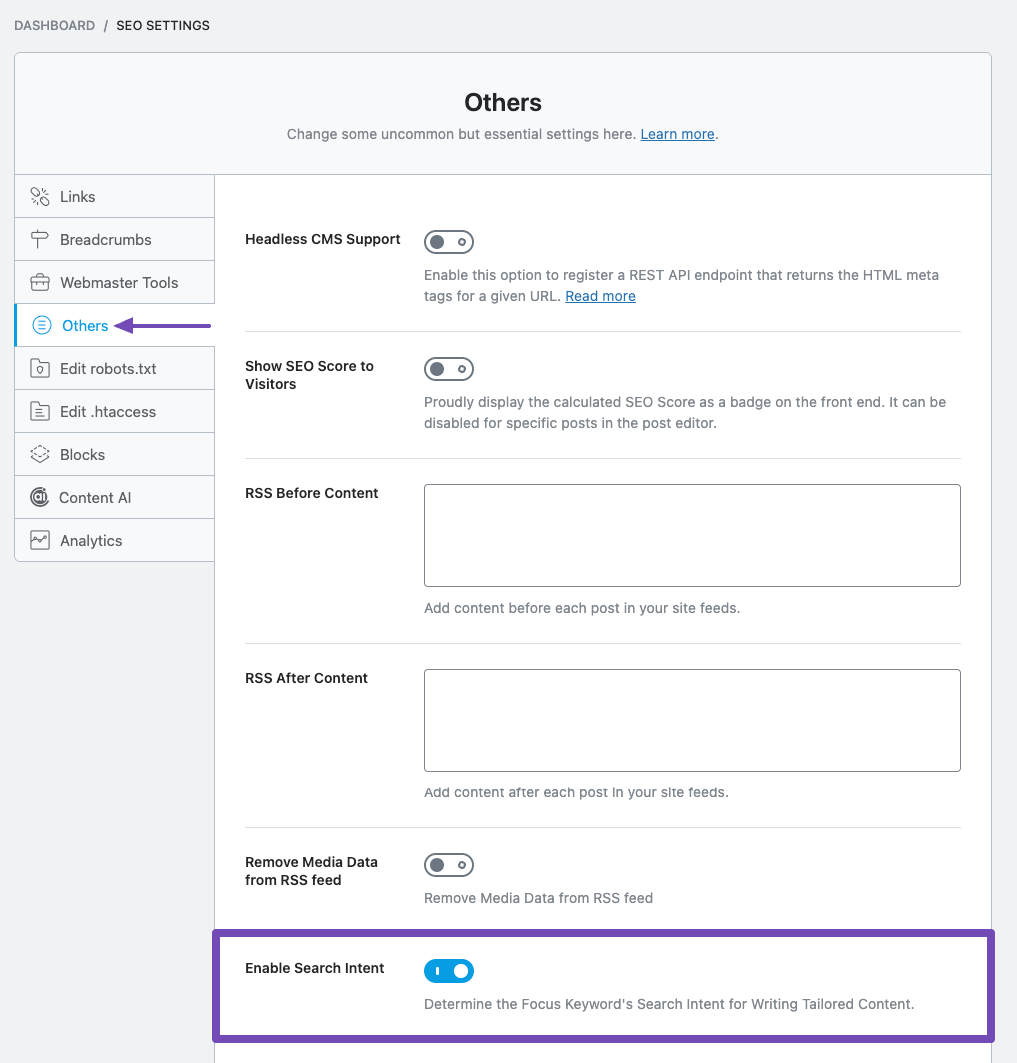
To get started, go to your WordPress dashboard and navigate to Rank Math SEO → General Settings → Others. Scroll down to the Enable Search Intent section and toggle it on.
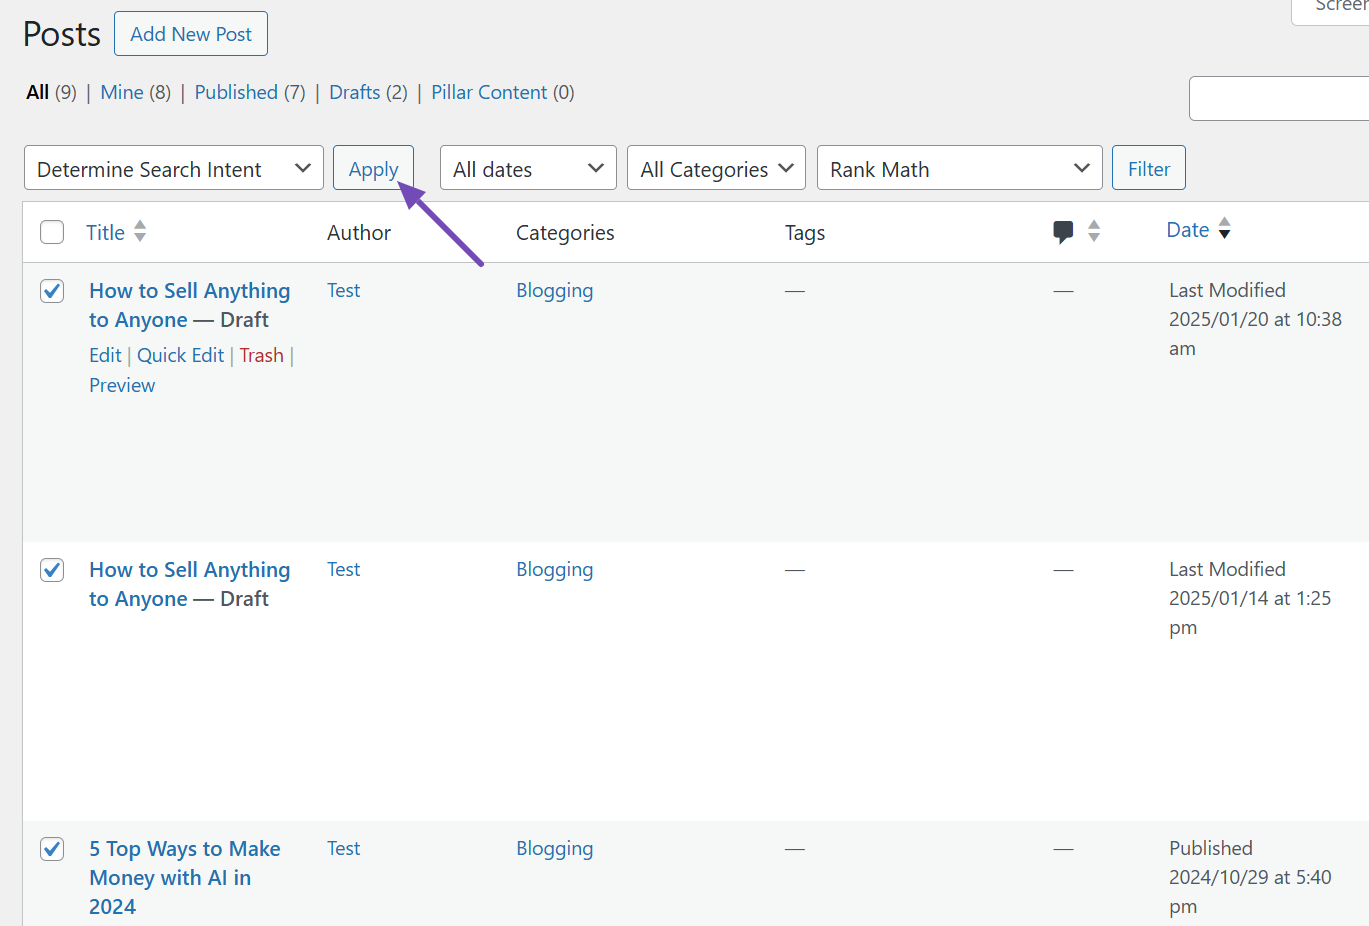
Next, go to All Posts or All Pages, and select the content you want to analyze. Ensure that each selected post or page has a focus keyword assigned. If not, you can easily add one directly from there, following the illustration below.
Once your selections are ready, open the Bulk Actions dropdown, select Determine Search Intent, and click Apply. Rank Math will then analyze the focus keyword for each selected post or page and assign a search intent accordingly.
After the process is complete, a success message will confirm that the search intent has been updated.
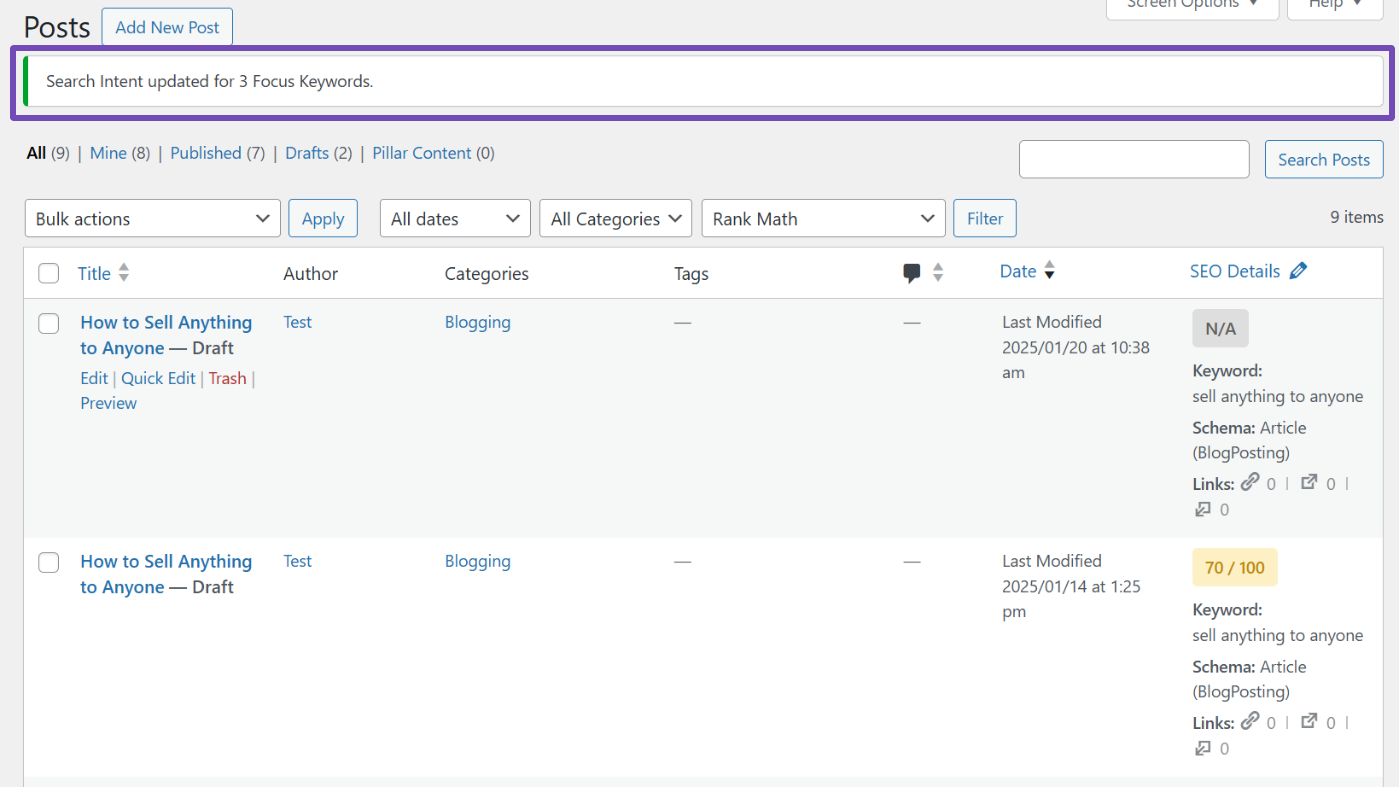
You can also hover over any focus keyword in the list to instantly view its detected intent in a tooltip popup, as shown below.
4.17 Submitting Pages/Posts in Bulk for Instant Indexing PRO
Rank Math’s Instant Indexing enables you to submit all pages, posts, or URLs with any content to those search engines that have enabled the IndexNow protocol. This means that you can submit and get your web content indexed even without configuring your site with any of these webmaster tools.
To do this, you need to enable the Instant Indexing module from Rank Math’s dashboard.
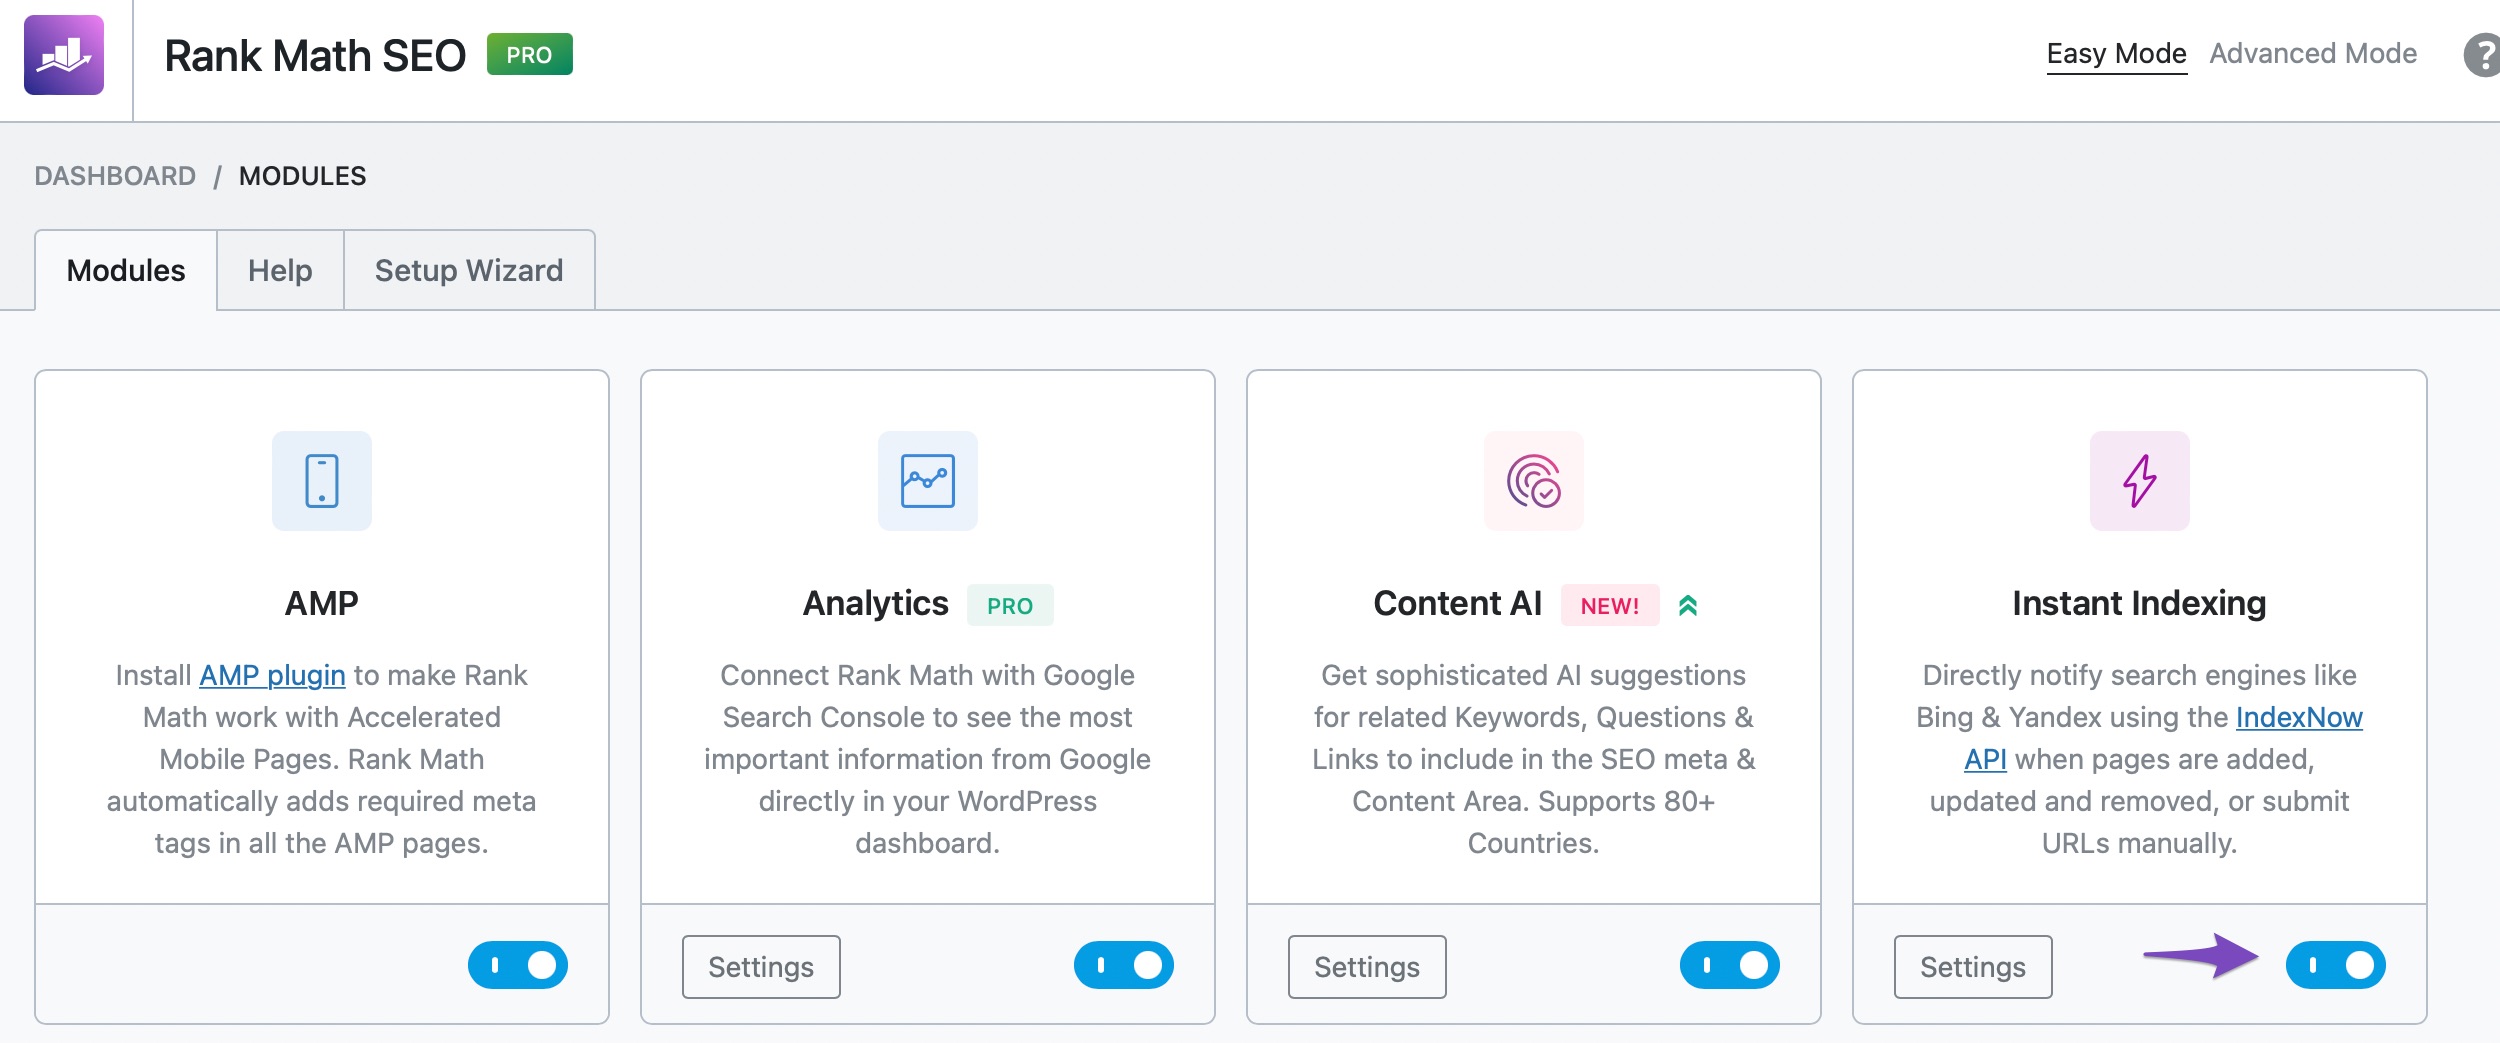
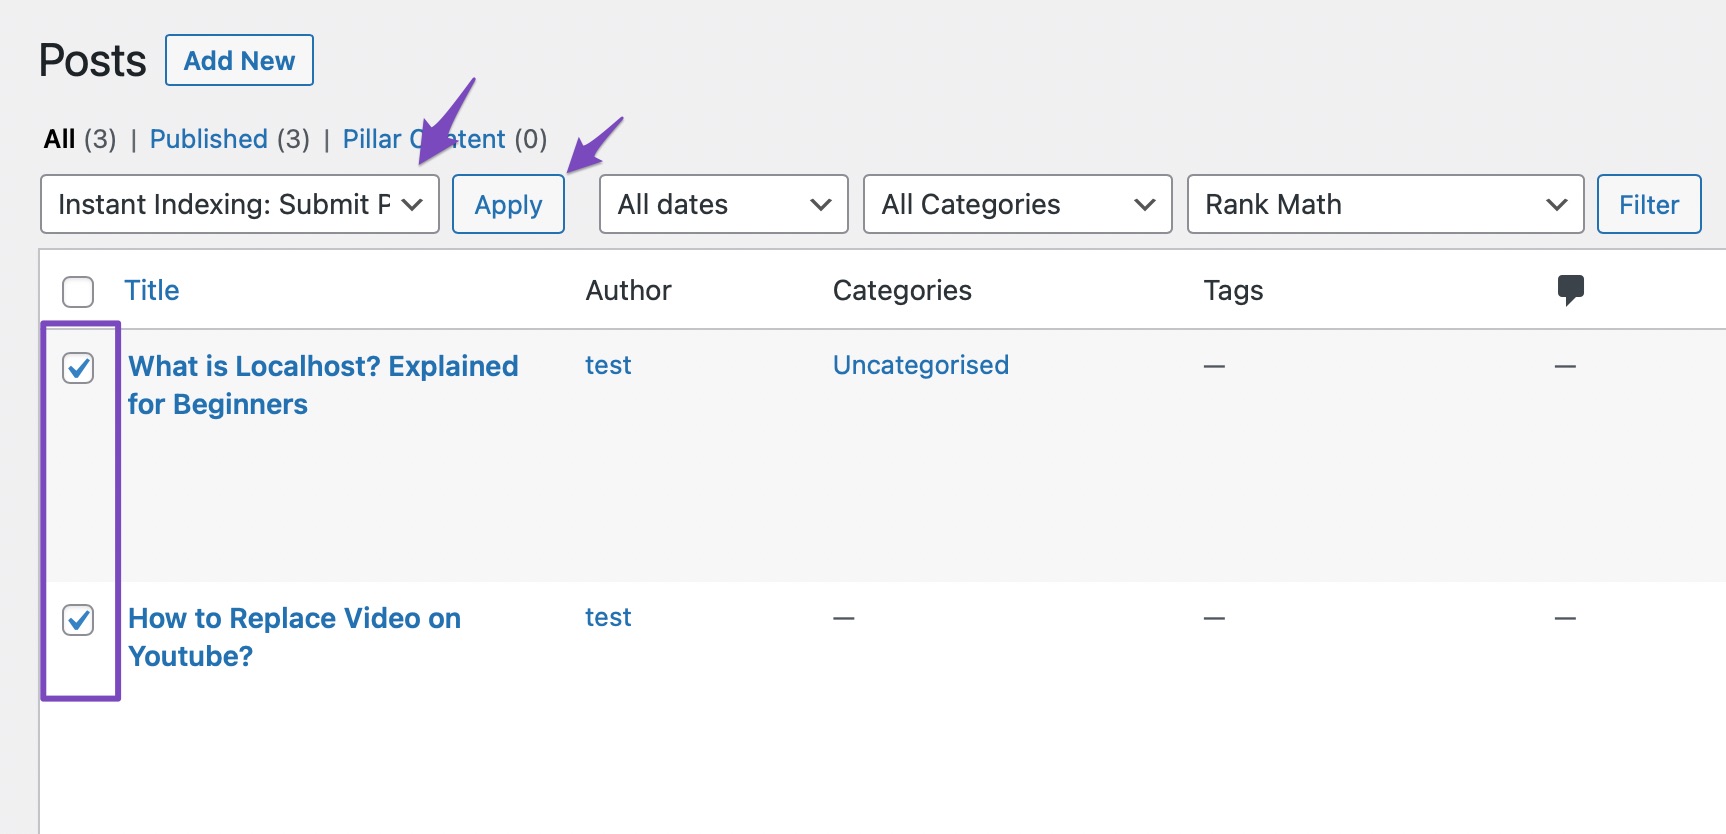
Once you enable the Instant Indexing module from Rank Math’s Dashboard, you are eligible to bulk submit posts/ pages for Instant Indexing. Go to Posts and select or filter the items you want to submit. Then, select Instant Indexing: Submit Pages from the drop-down menu as shown below, and click the Apply button. This bulk action helps you submit all web content for Instant Indexing and you don’t have to submit it again from webmaster tools.
5 AI Link Genius Bulk Actions PRO
The bulk actions menu in AI Link Genius lets you bulk edit your internal links. This is useful in many situations, such as when you want to delete specific links from your site.
To get started, head to Rank Math SEO → Link Genius → Links tab from your WordPress dashboard. (Make sure you have enabled the Link Genius module.)
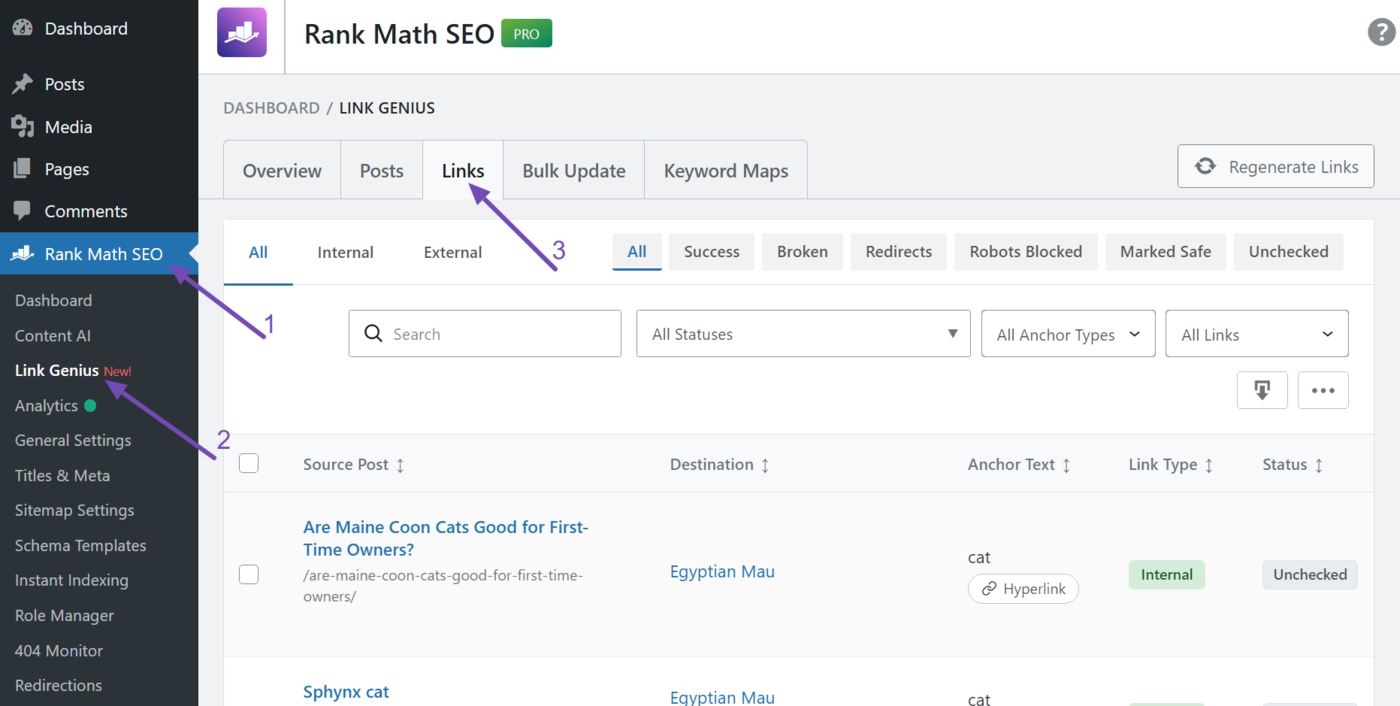
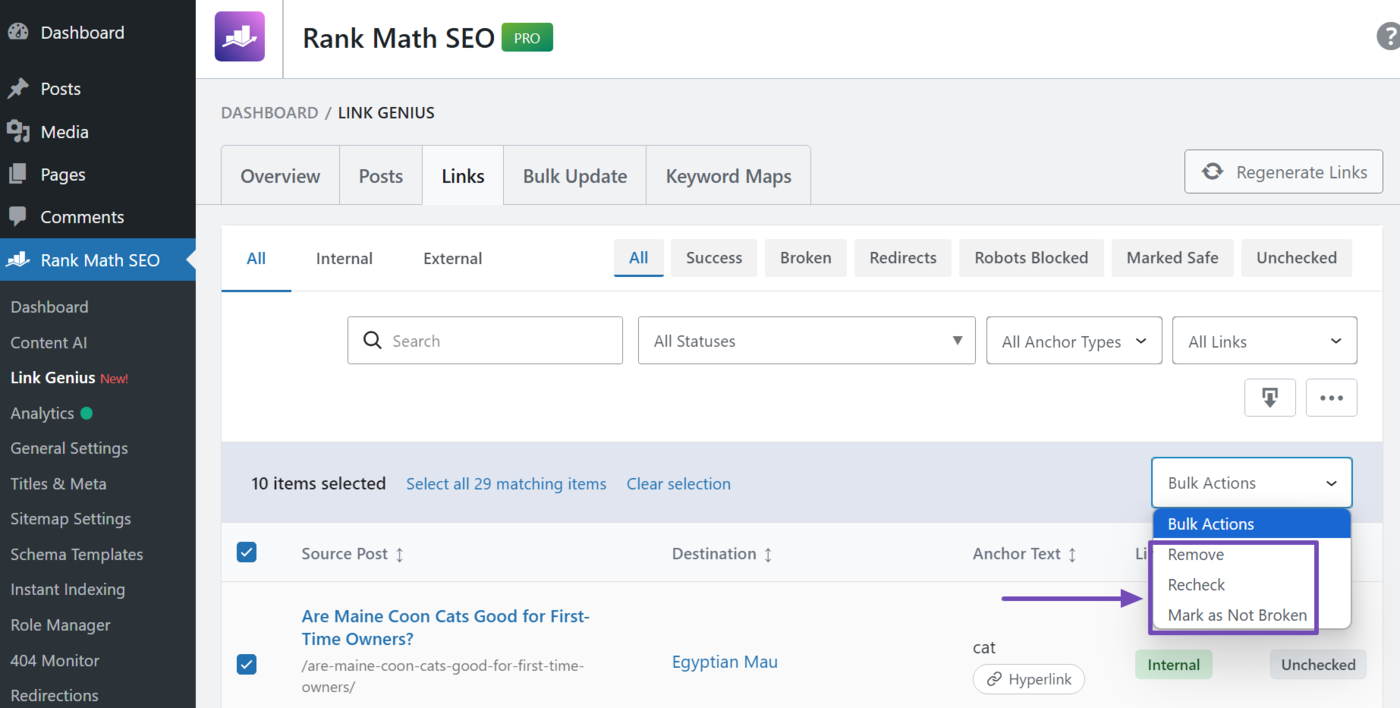
Now, select one or more links. The bulk actions menu will appear, as shown below. The available options include:
- Remove: Remove the link from the posts
- Recheck: Recrawl the links to check their HTTP status
- Mark as not broken: Mark the links as safe and unbroken
6 Bulk Update Tool PRO
The Bulk Update tool in AI Link Genius lets you update internal and external links across your site. You can bulk update link URLs, anchor texts, or both. For example, you could change an anchor text like “yoga poses” to “yoga postures” using this tool.
The bulk update tool also lets you narrow down specific links to update. For example, if you want to update links in certain articles but not others, you can select the posts where the changes should be applied.
To get started, head to Rank Math SEO → Link Genius → Bulk update from your WordPress dashboard.
You will now fill in the details of your link into the tool. You can refer to this guide on updating your links using the bulk update tool.
7 Filtering – How to Use Rank Math’s Filtering Options
From the surface, they may look like simple filtering options that you see inside WordPress. But under the surface, Rank Math has supercharged them with some amazing options. Let us show you the filtering options first; then, we’ll show you how to use them.

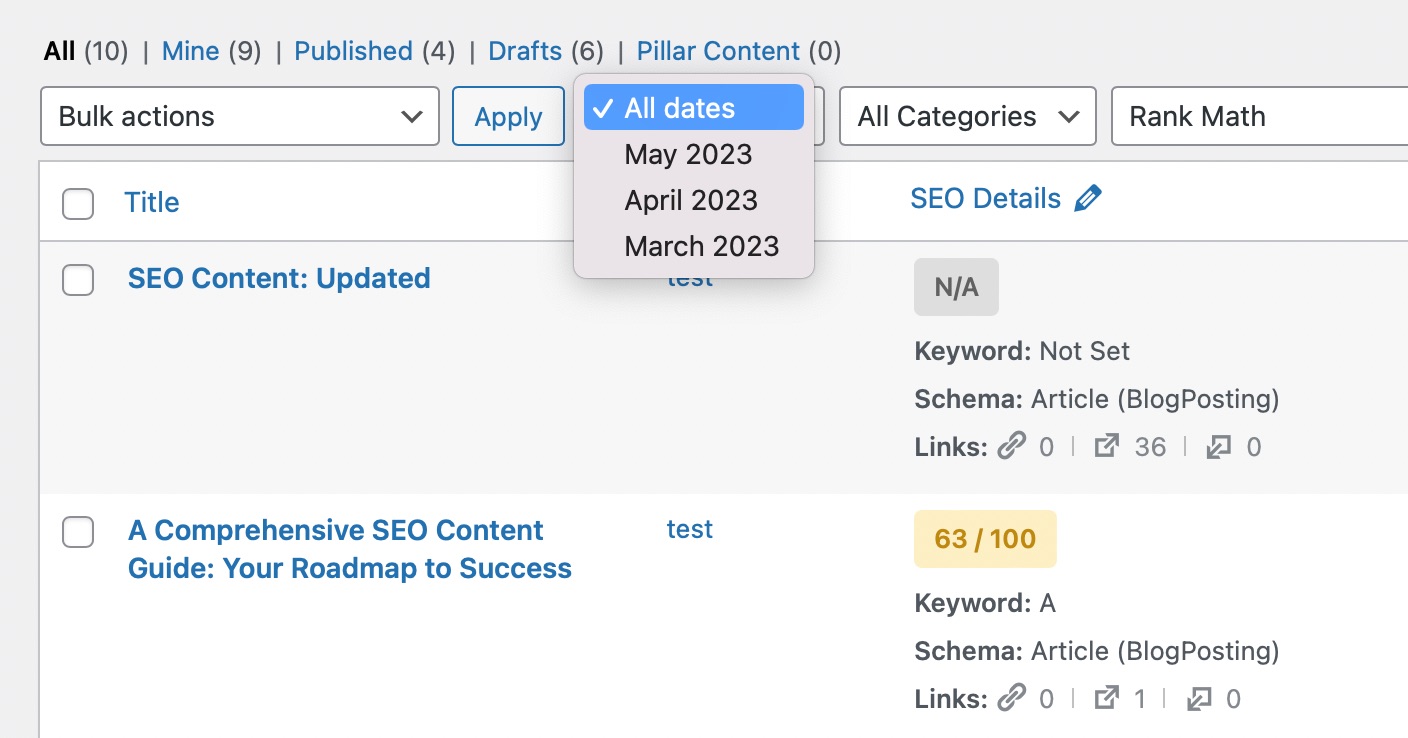
7.1 Date Filtering
The date filtering is the same that you’d find inside WordPress, and Rank Math does not change them. Using the date filtering, you’ll be able to filter your posts or pages by the month they were published in.
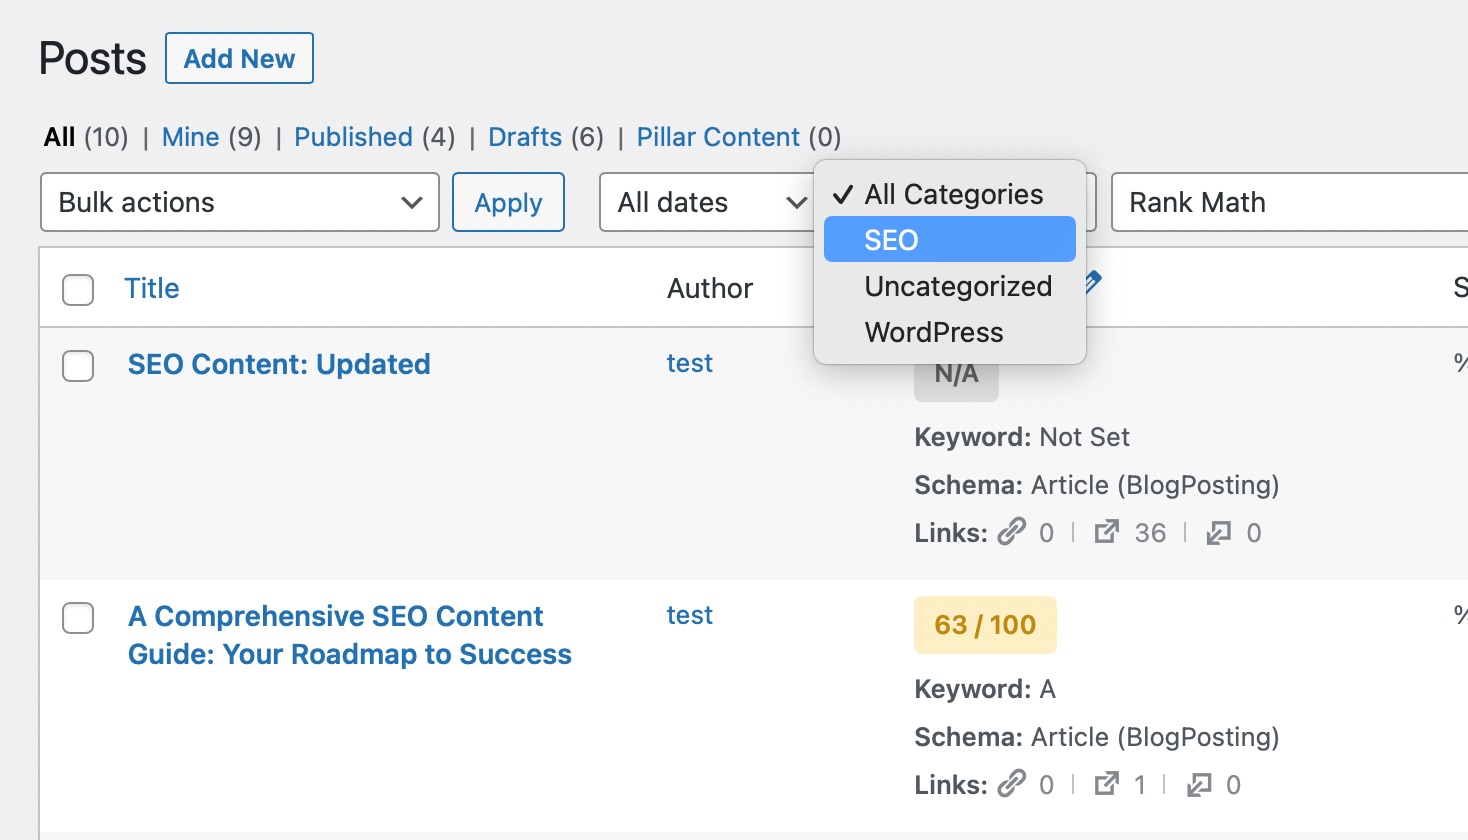
7.2 Category Filtering
The category filter is also straightforward, and Rank Math does not change it in any way. Using the category filter, you will be able to filter the posts based on the categories on your website.
7.3 Post Type Filter
This is the option where Rank Math works its magic. You can combine the date and category filtering options with the new filtering options to drastically improve your workflow. Let’s show you the available options.
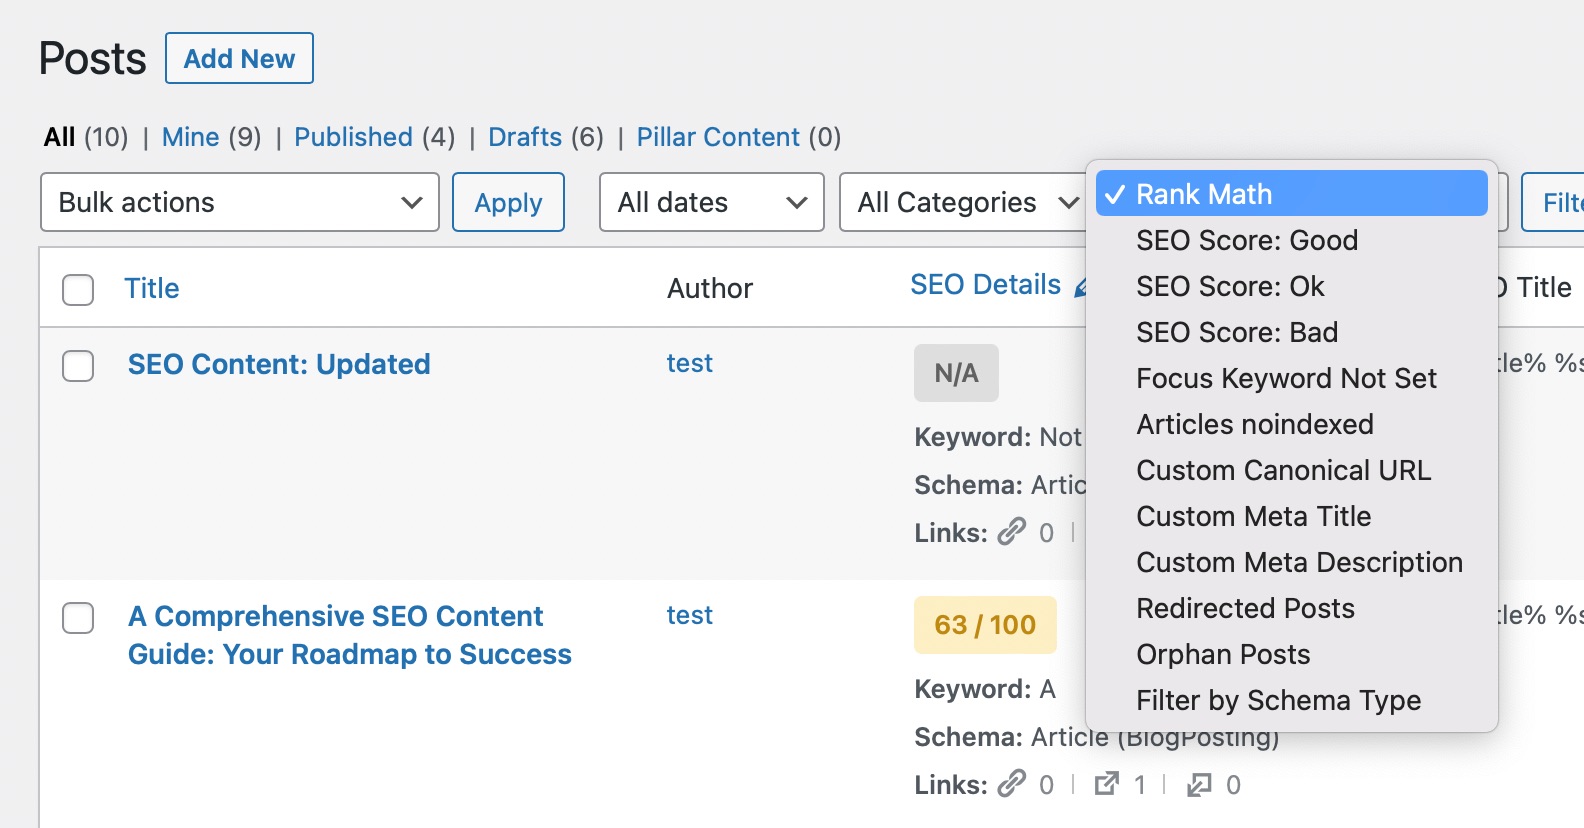
As you can see, these are some amazing filtering options. Let us tell you what each of these options lets you achieve.
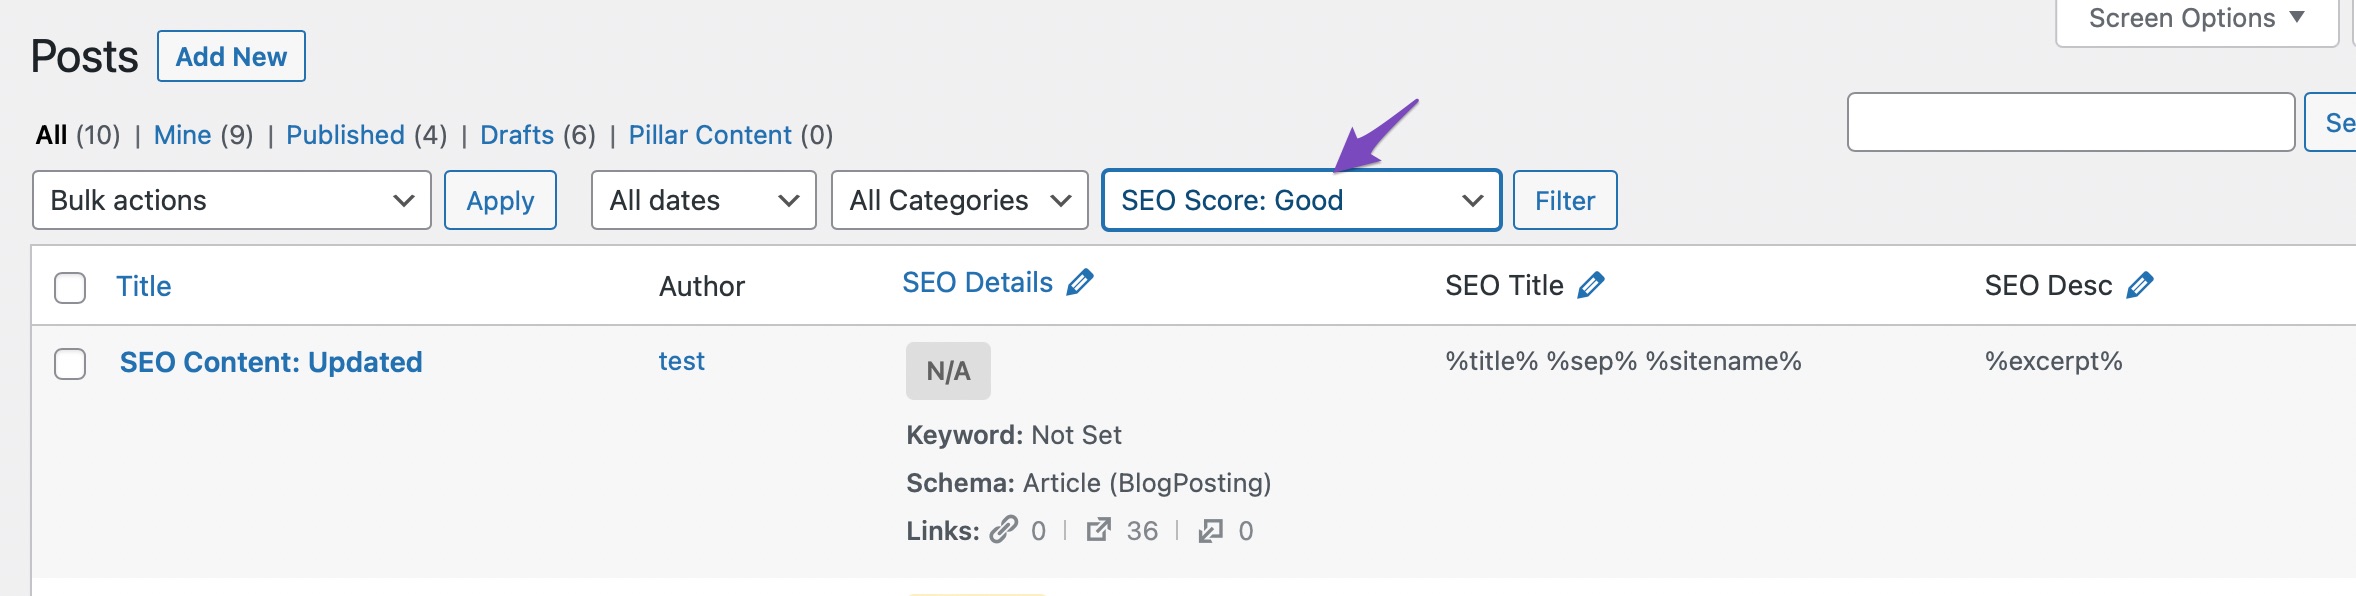
7.4 SEO Score: Good
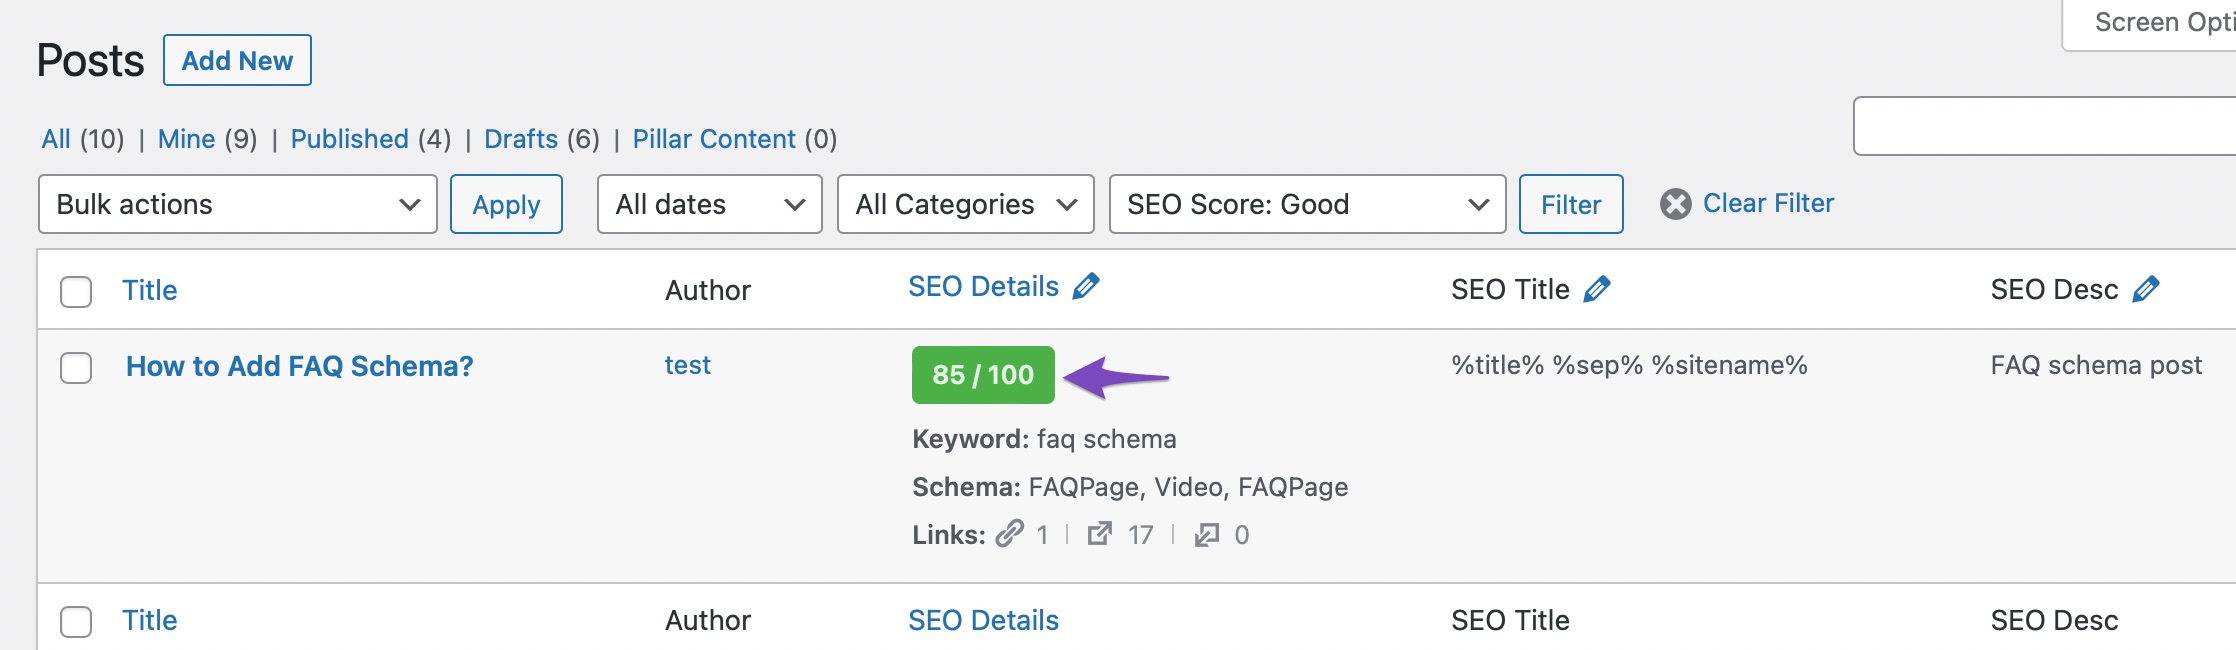
This option lets you filter only those posts on your website that have a Good SEO score with Rank Math. All you have to do is select the filter, then click the Filter button.
And Rank Math will find all the posts with a Good SEO score.
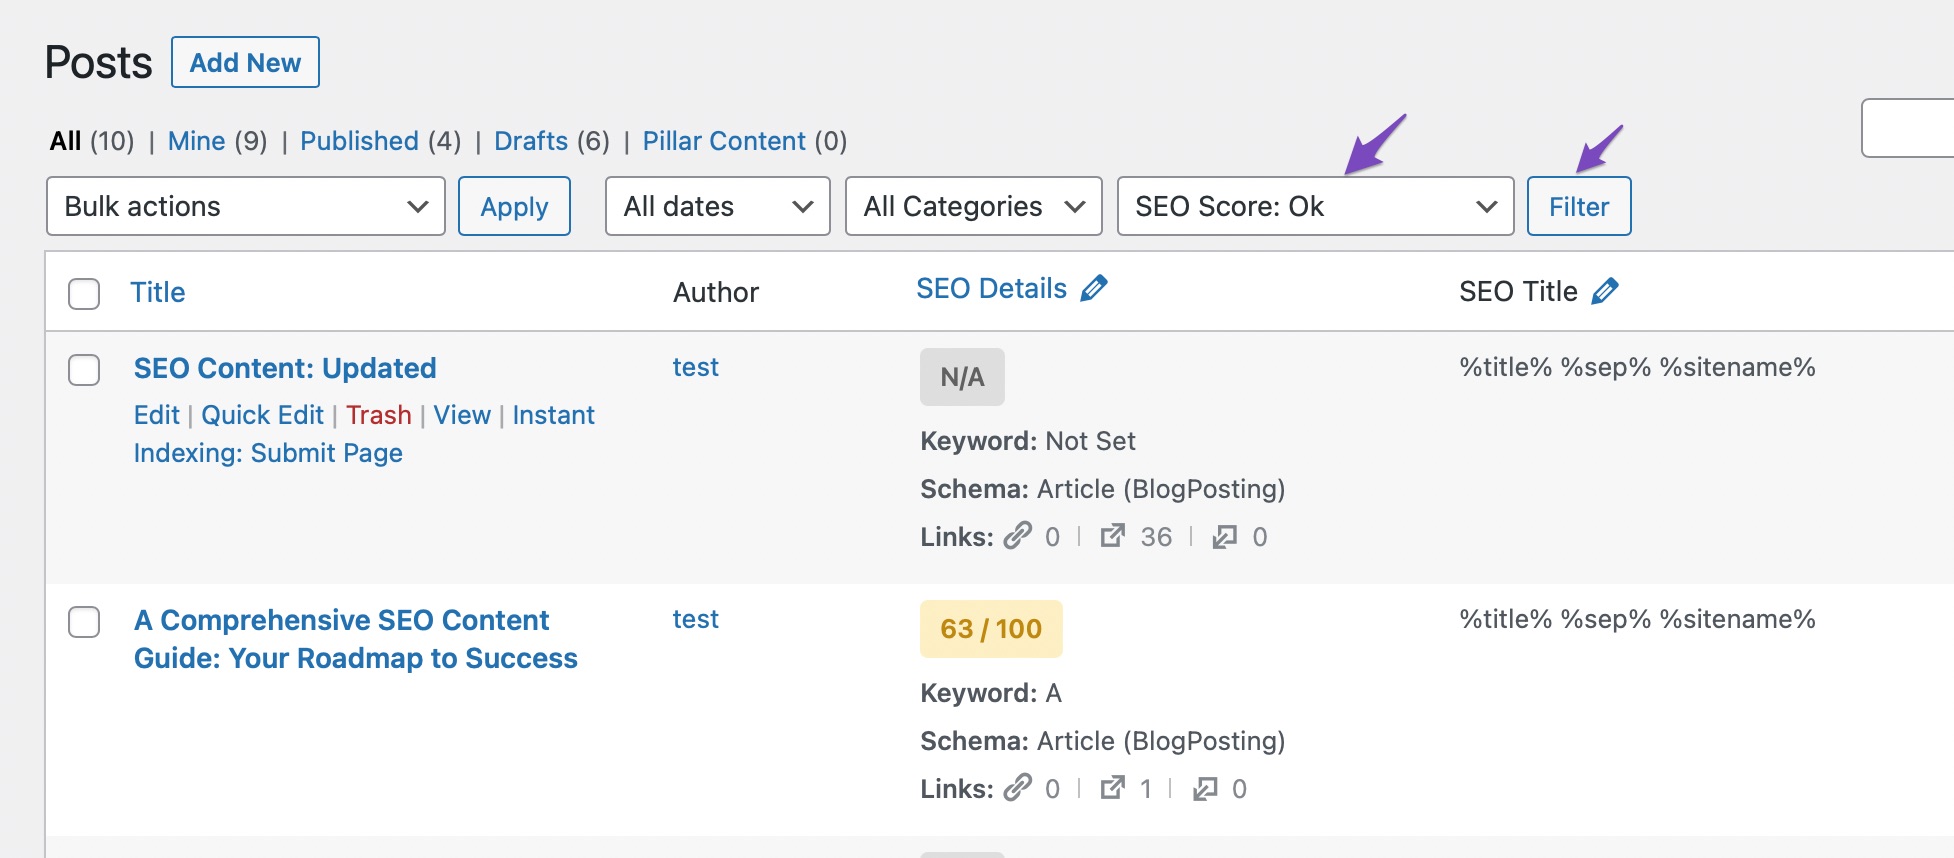
7.5 SEO Score: OK
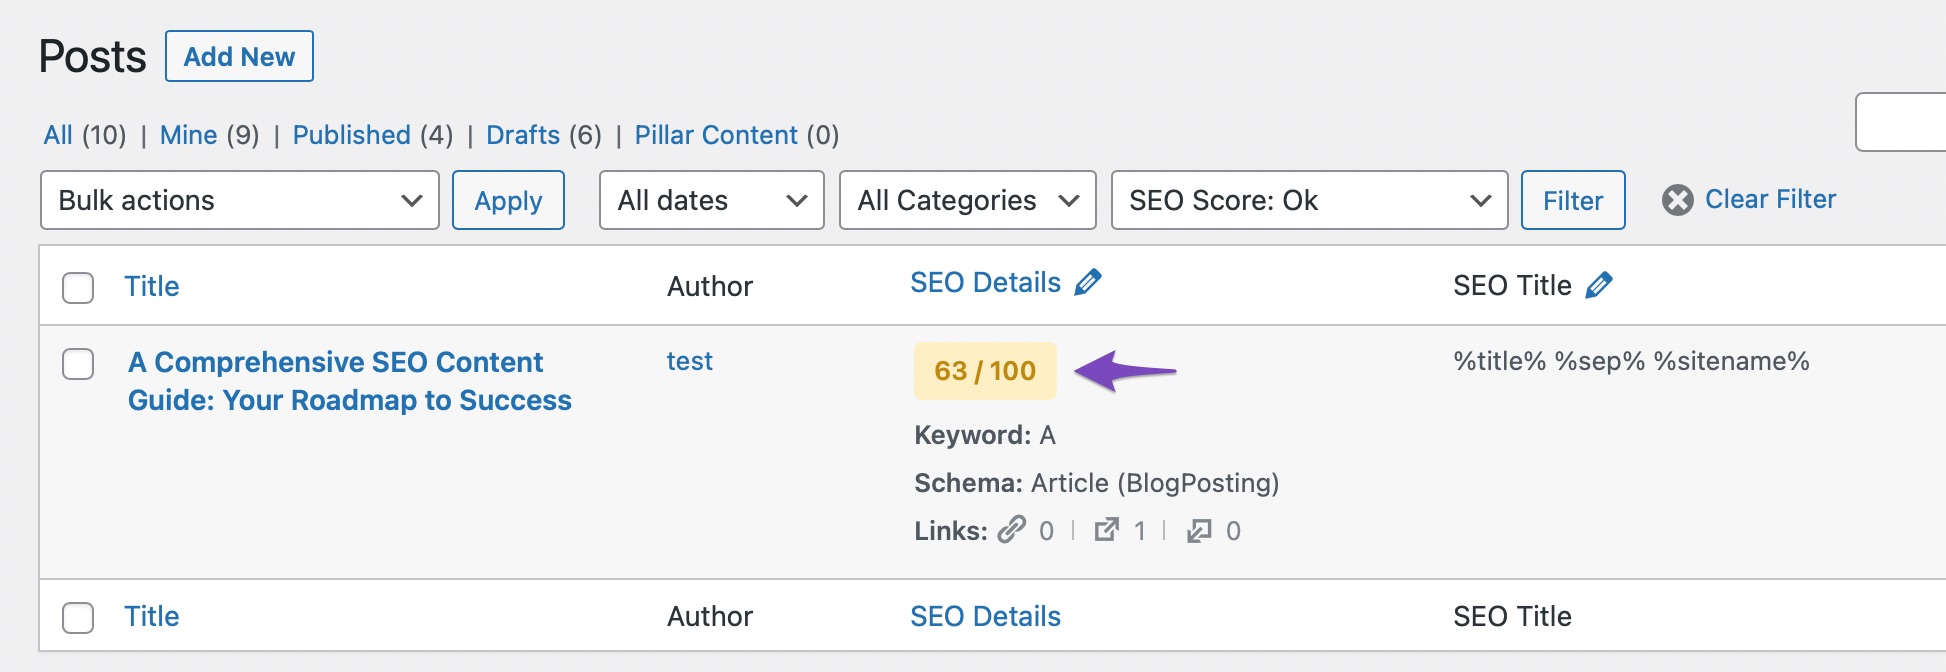
This filter option lets you filter the posts that have the OK SEO score assigned by Rank Math. Just select the filter, then click the Filter button.
And Rank Math will filter out the posts which have the OK SEO score.
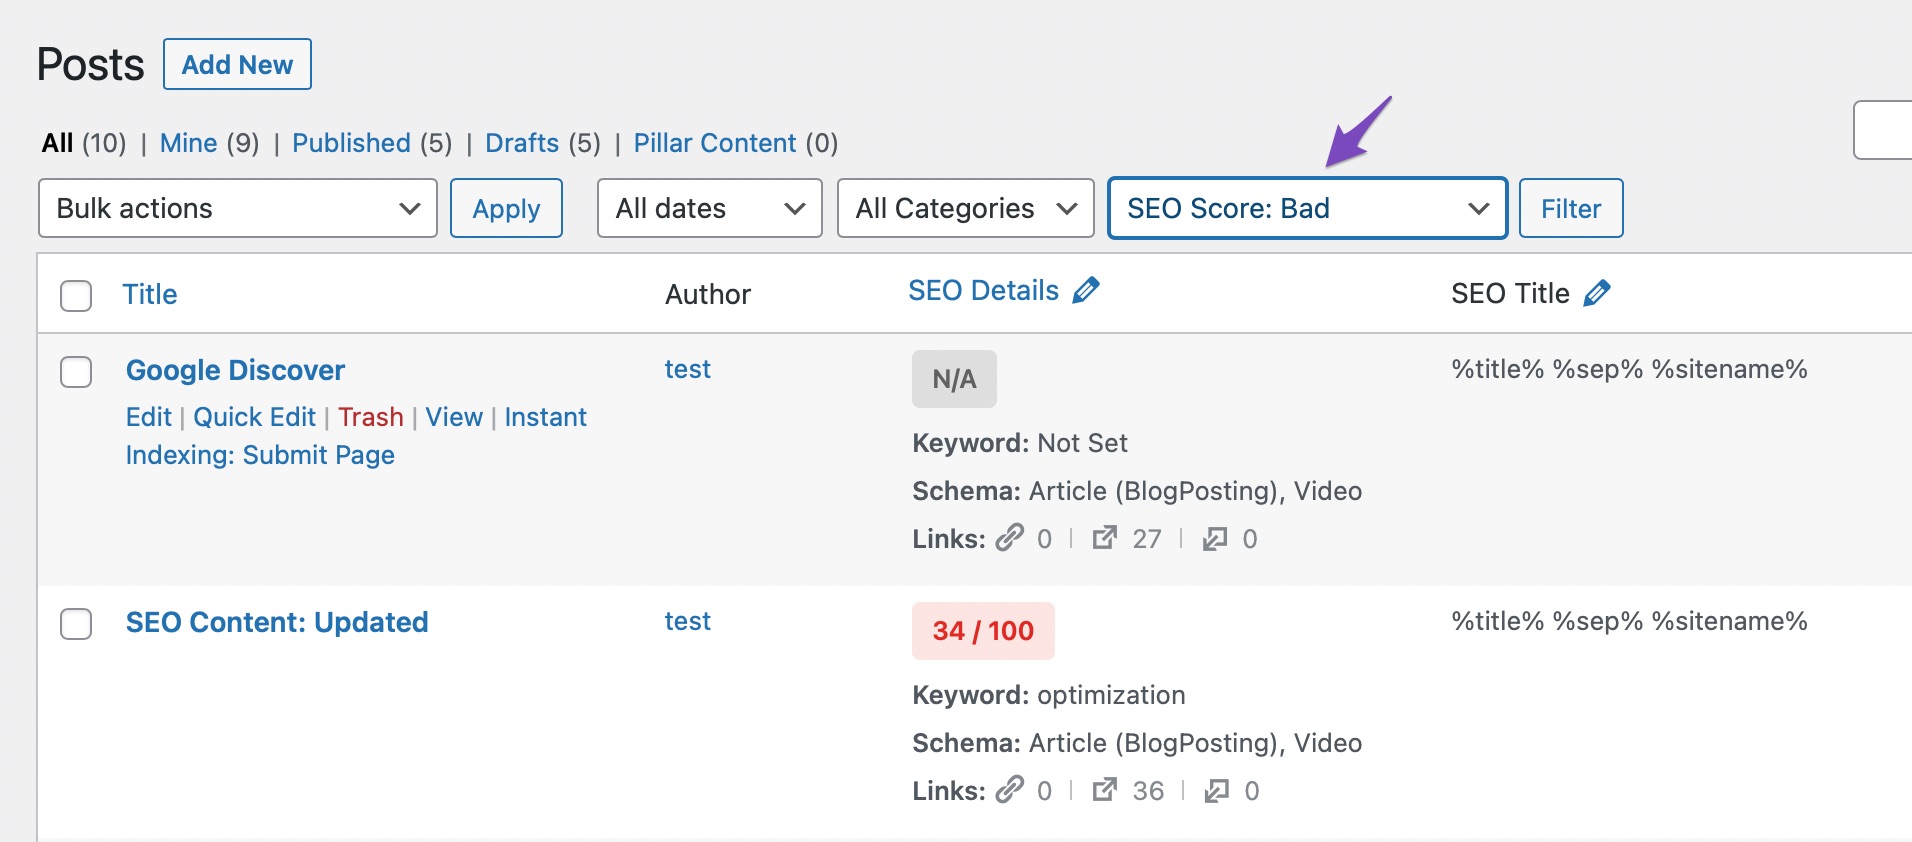
7.6 SEO Score: Bad
This option lets you filter only those posts that have a Bad SEO rating from Rank Math. To use the filter, select the option from the drop-down menu and then click the Filter button.
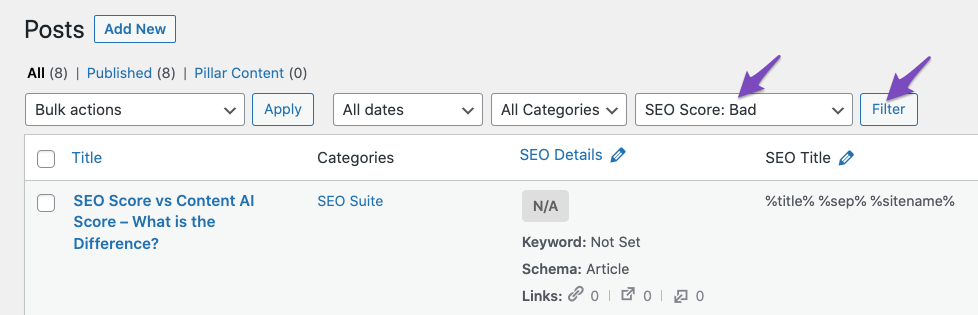
Rank Math will bring forth only those posts forward, which have a Bad SEO rating, similar to the example below.
7.7 Focus Keyword Not Set
This filter lets you find all the posts or pages on your website that don’t have a focus keyword set. As you can imagine, this feature is amazing for new websites or websites with a lot of content that have just started to optimize their posts properly.
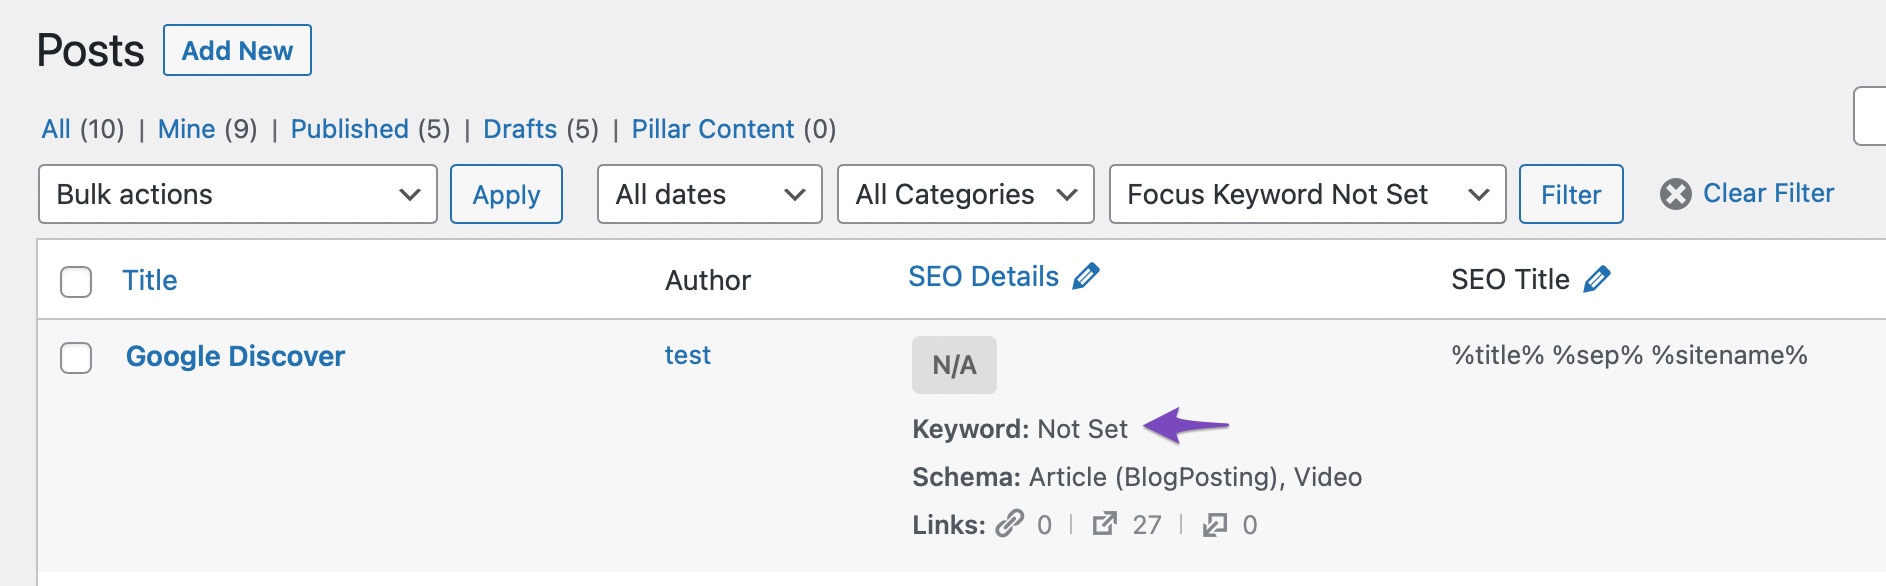
To use the filter, just select the option from the drop-down menu and click the Filter button.
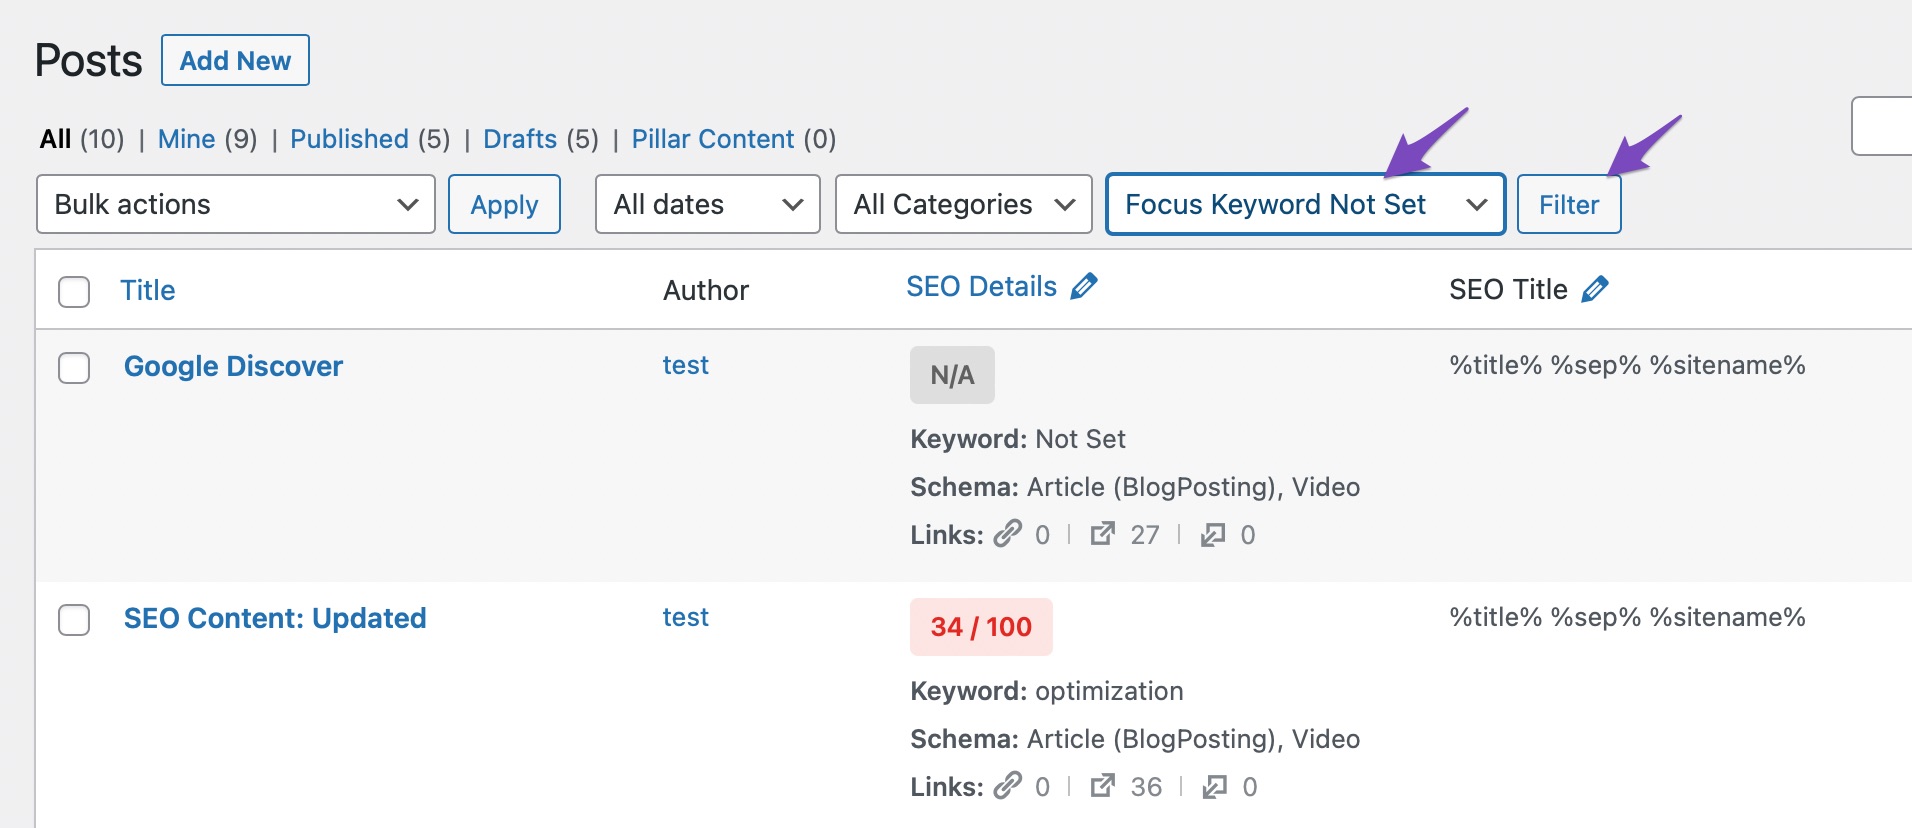
Rank Math will find and display all the posts on your website that don’t have a focus keyword set. Later in this article, we will also show you how you can utilize this feature to quickly add focus keywords to a lot of posts.
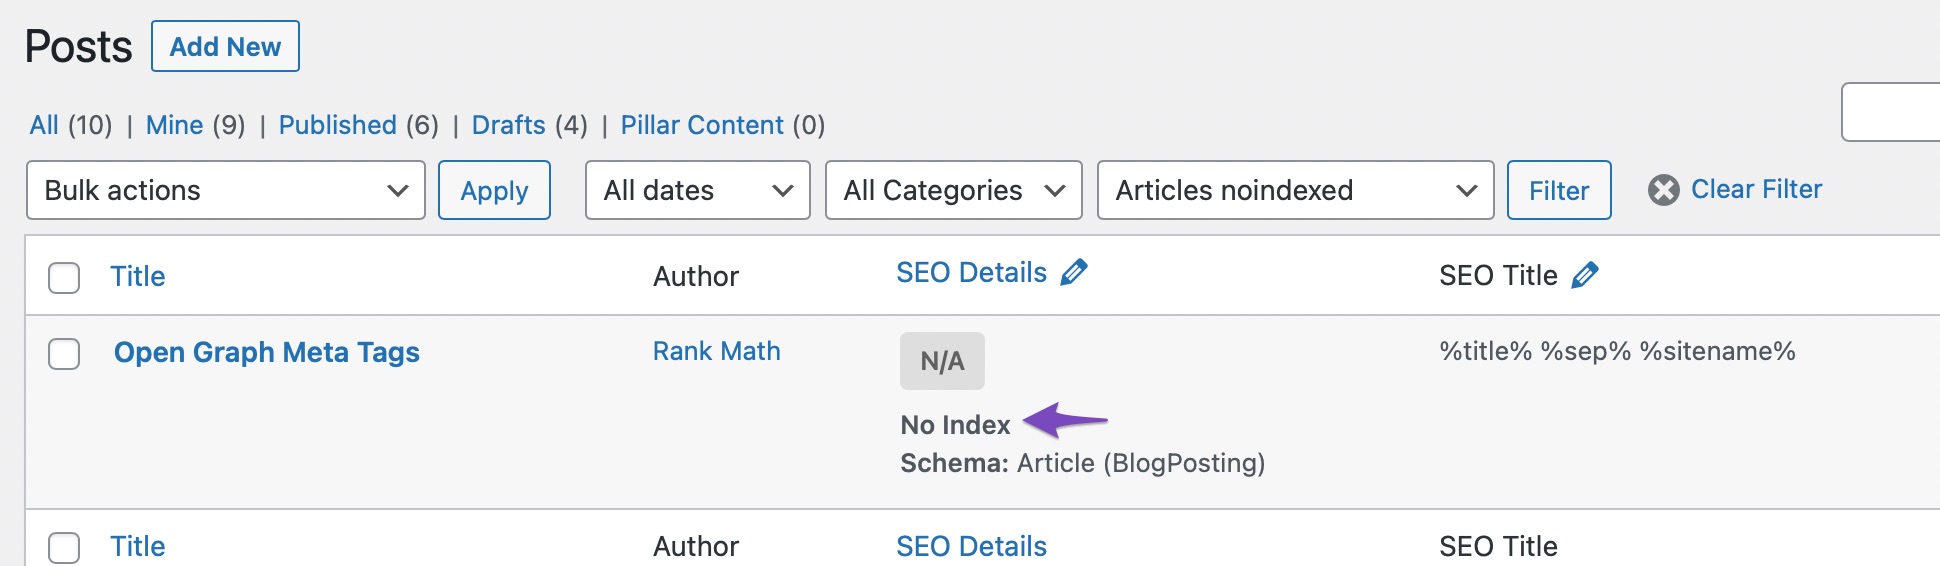
7.8 Article Noindexed
This filter helps you find all the posts or pages on your website that are set to noindex. Many times, you can set these up accidentally when setting up the Global SEO Meta. This filter lets you quickly find the posts and correct them. Even if you made no errors, this filter lets you quickly check that only the intended posts are being noindexed.
To use the filter, select the option from the drop-down menu, and click the Filter button.
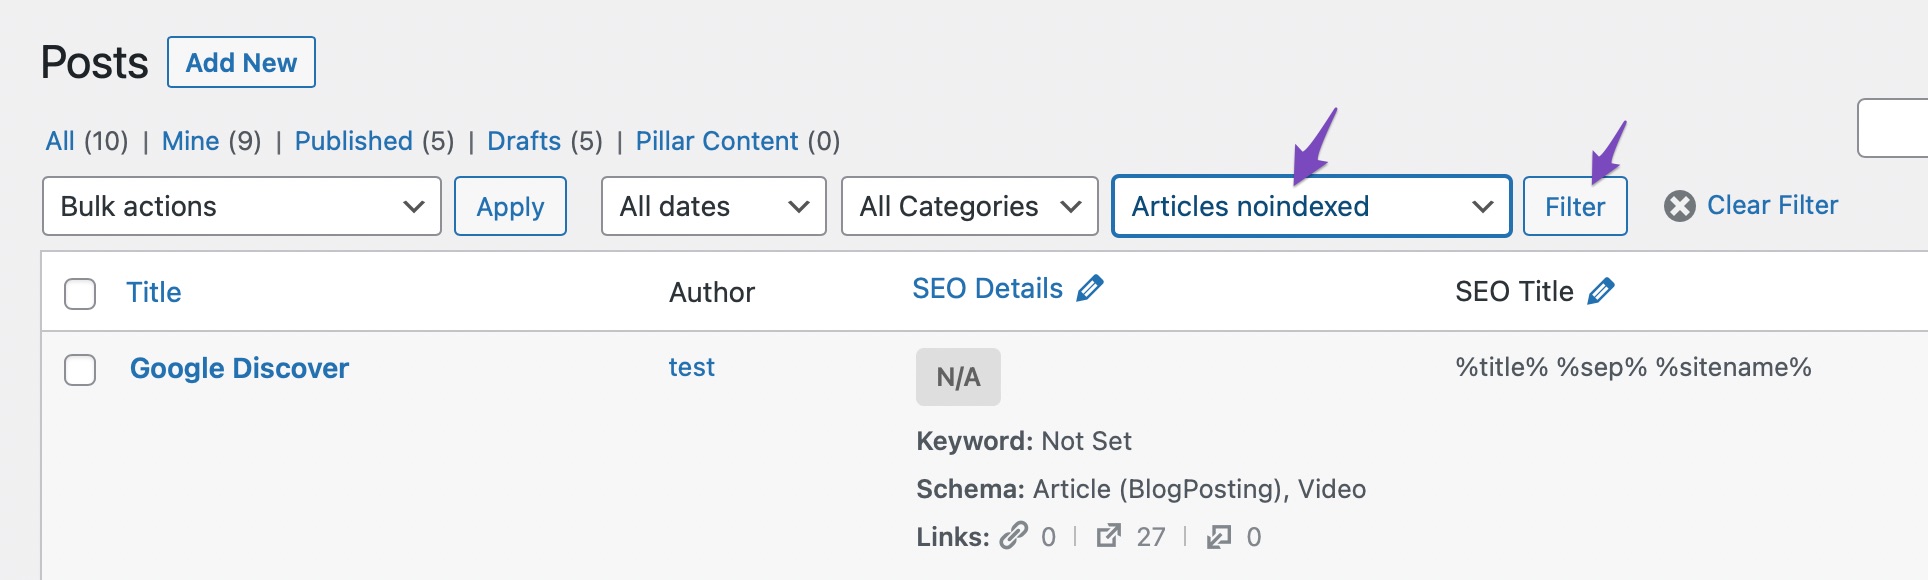
Rank Math will then return a list of posts that are noindexed.
7.9 Custom Canonical URL PRO
A canonical URL is an important tool in any webmaster’s toolkit. It is a property that helps search engines know the original source of a webpage. For example, If you have a post on your website which appears in more than one category, then you might have URLs like these:
https://yourwebsite.com/cateogry-1/post https://yourwebsite.com/category-2/post
In both these cases, the post would be the same. But, to Google, different URLs mean different posts.
Rank Math automatically adds a canonical URL to all your posts to avoid this issue. You can find the option inside Rank Math options under the Advanced Tab.
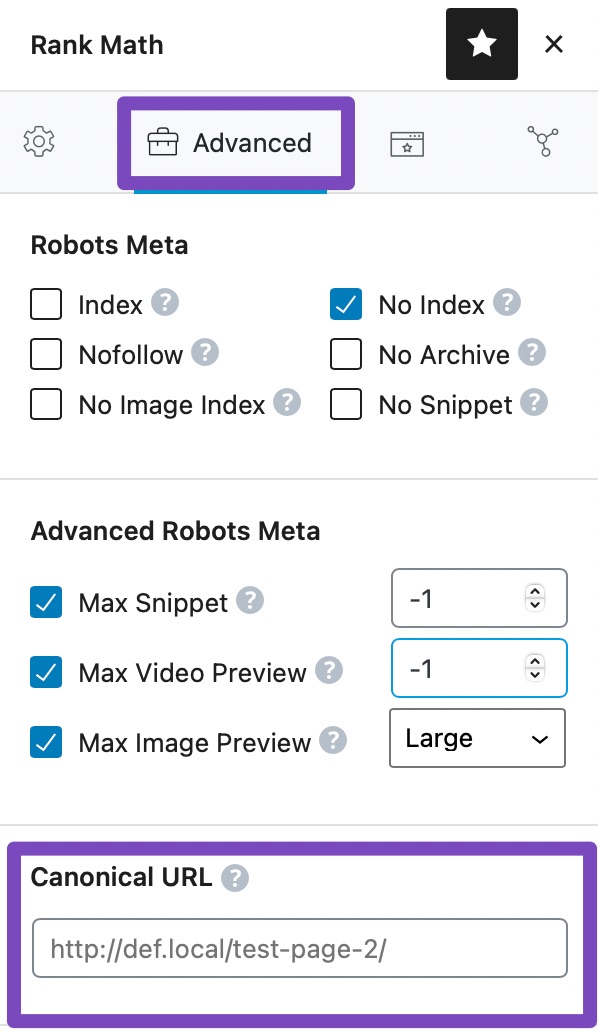
As you can also see in the image, Rank Math has set up a canonical URL that is displayed as a placeholder. You still have the option of going in and changing the URL.
And that is what this filter is designed for. It helps you quickly filter the posts that have a custom canonical URL set. To use this filter, select the option from the drop-down menu and click the Filter button.
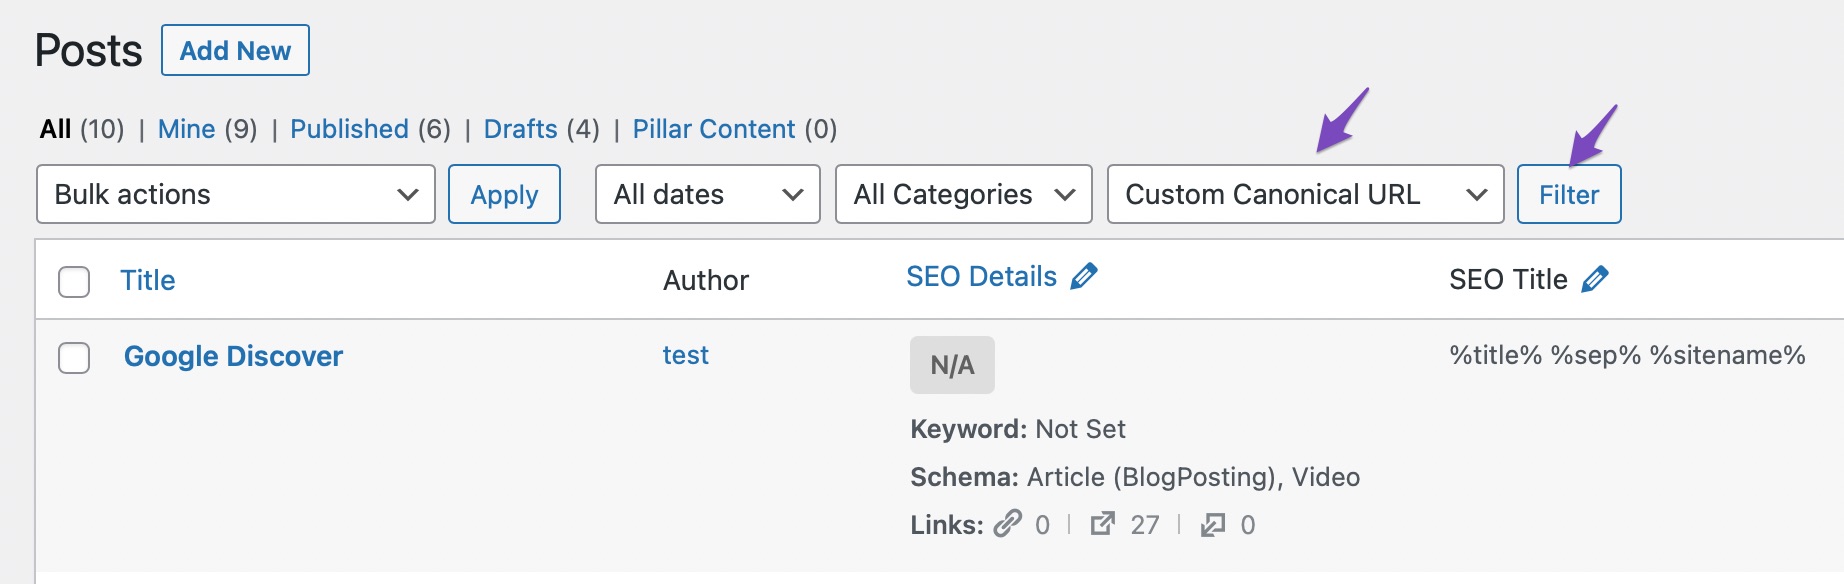
And Rank Math will filter and present the posts that have a custom canonical URL set.
7.10 Custom Meta Title PRO
Rank Math helps you set the optimal titles for your posts by letting you set a global SEO title for your posts. These settings can be found in Rank Math SEO → Title and Meta → Posts.
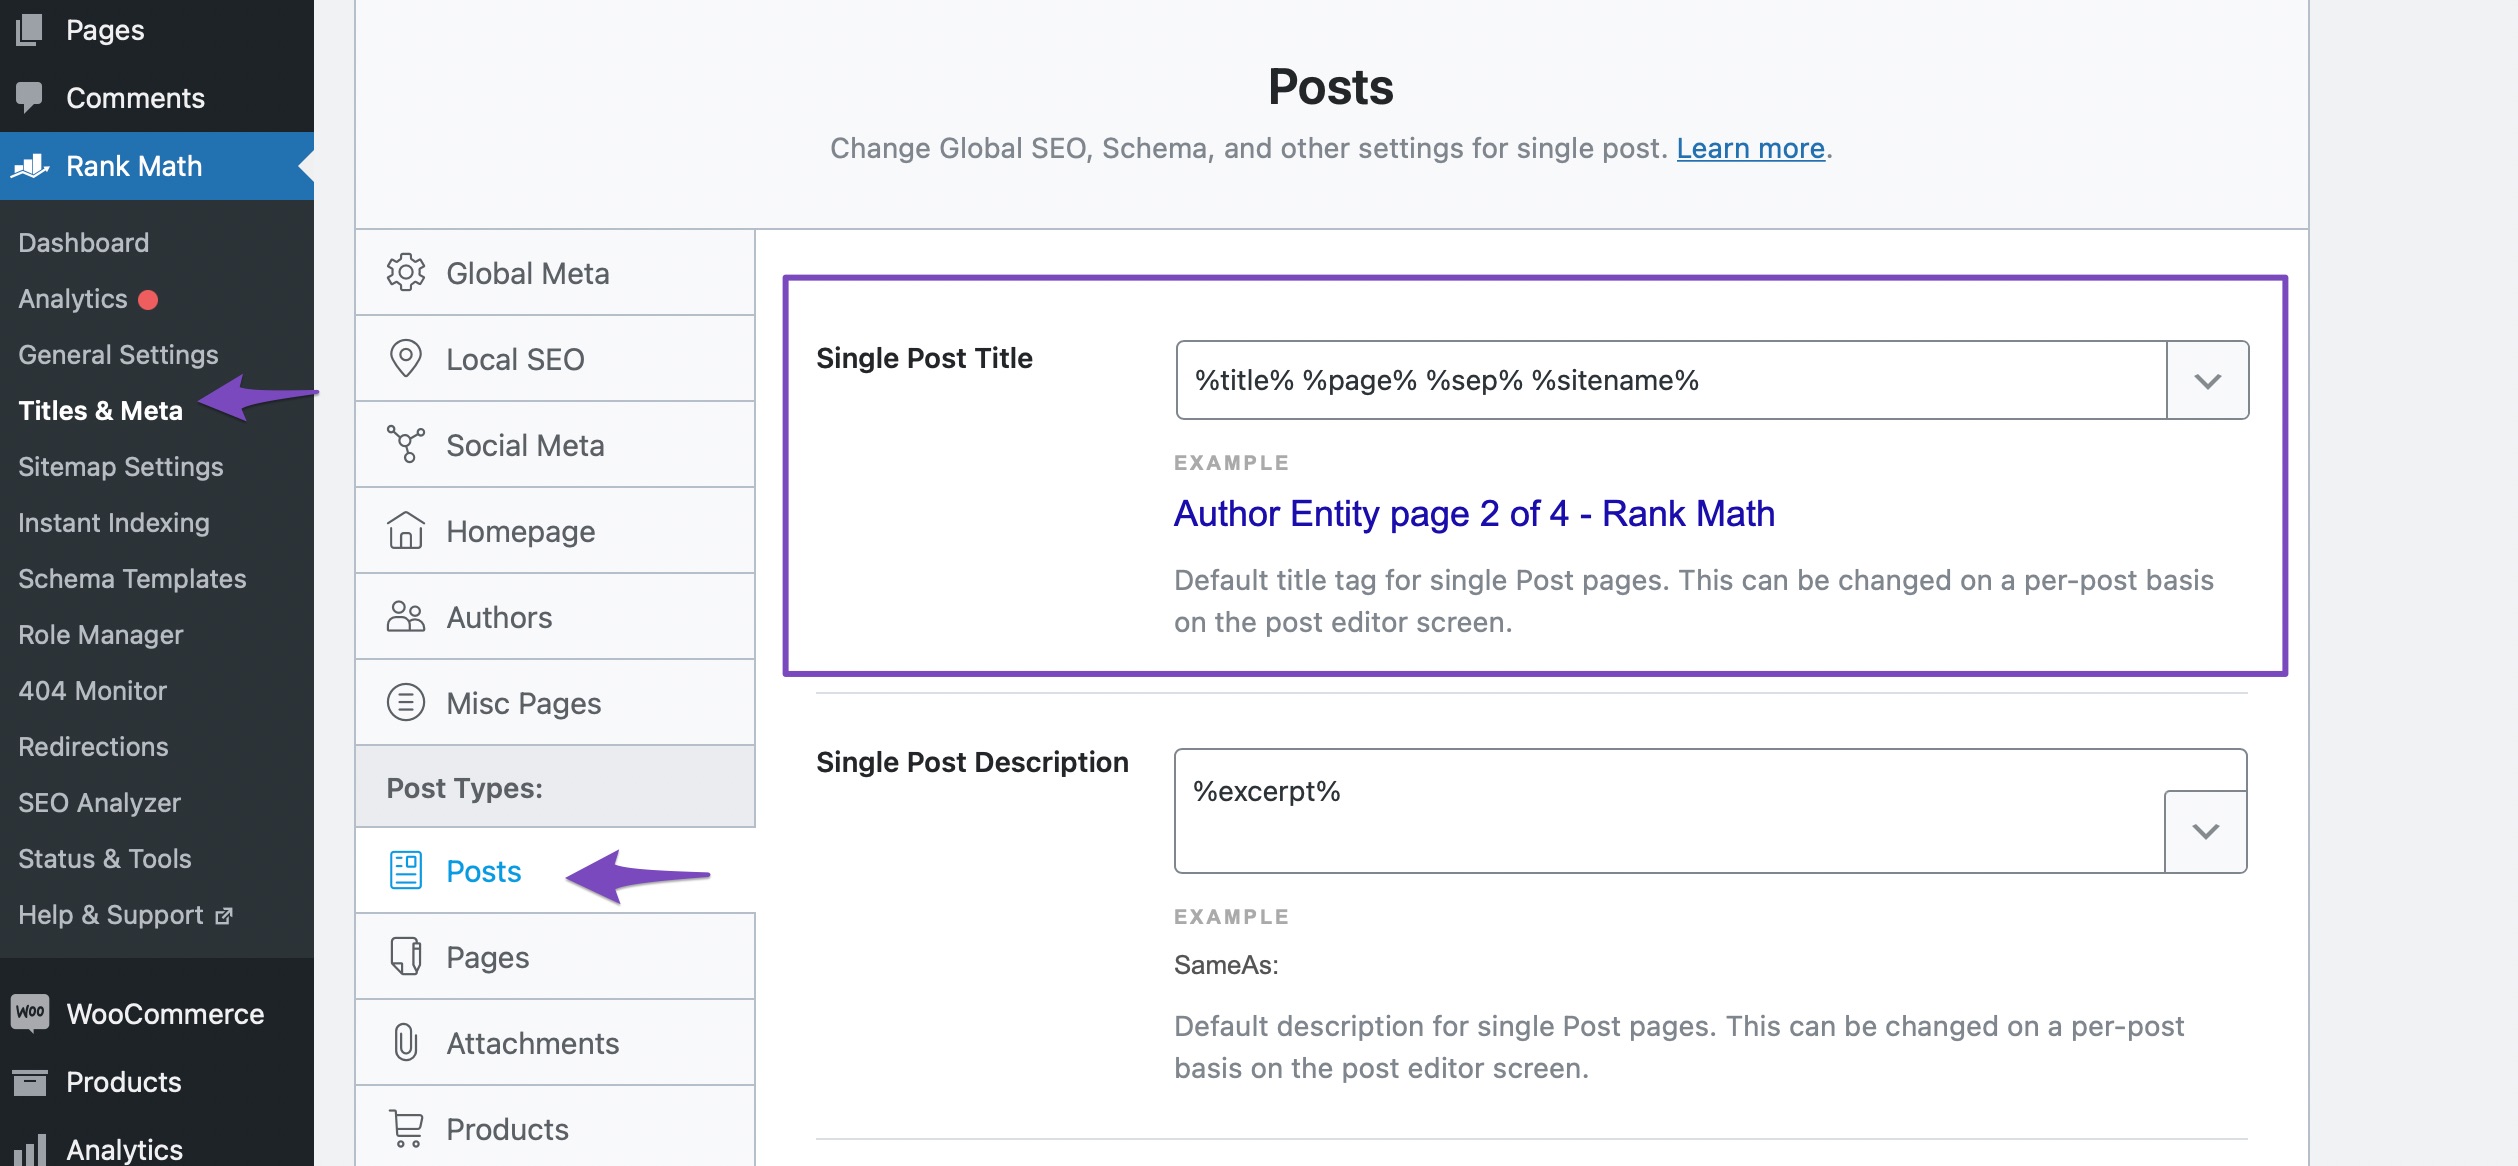
With the help of variables, you can setup optimized meta-titles for your posts, pages, and even custom posts easily. All the posts on your website inherit these options, and Rank Math then replaces the variables with their actual values, creating optimized meta-titles for your posts.
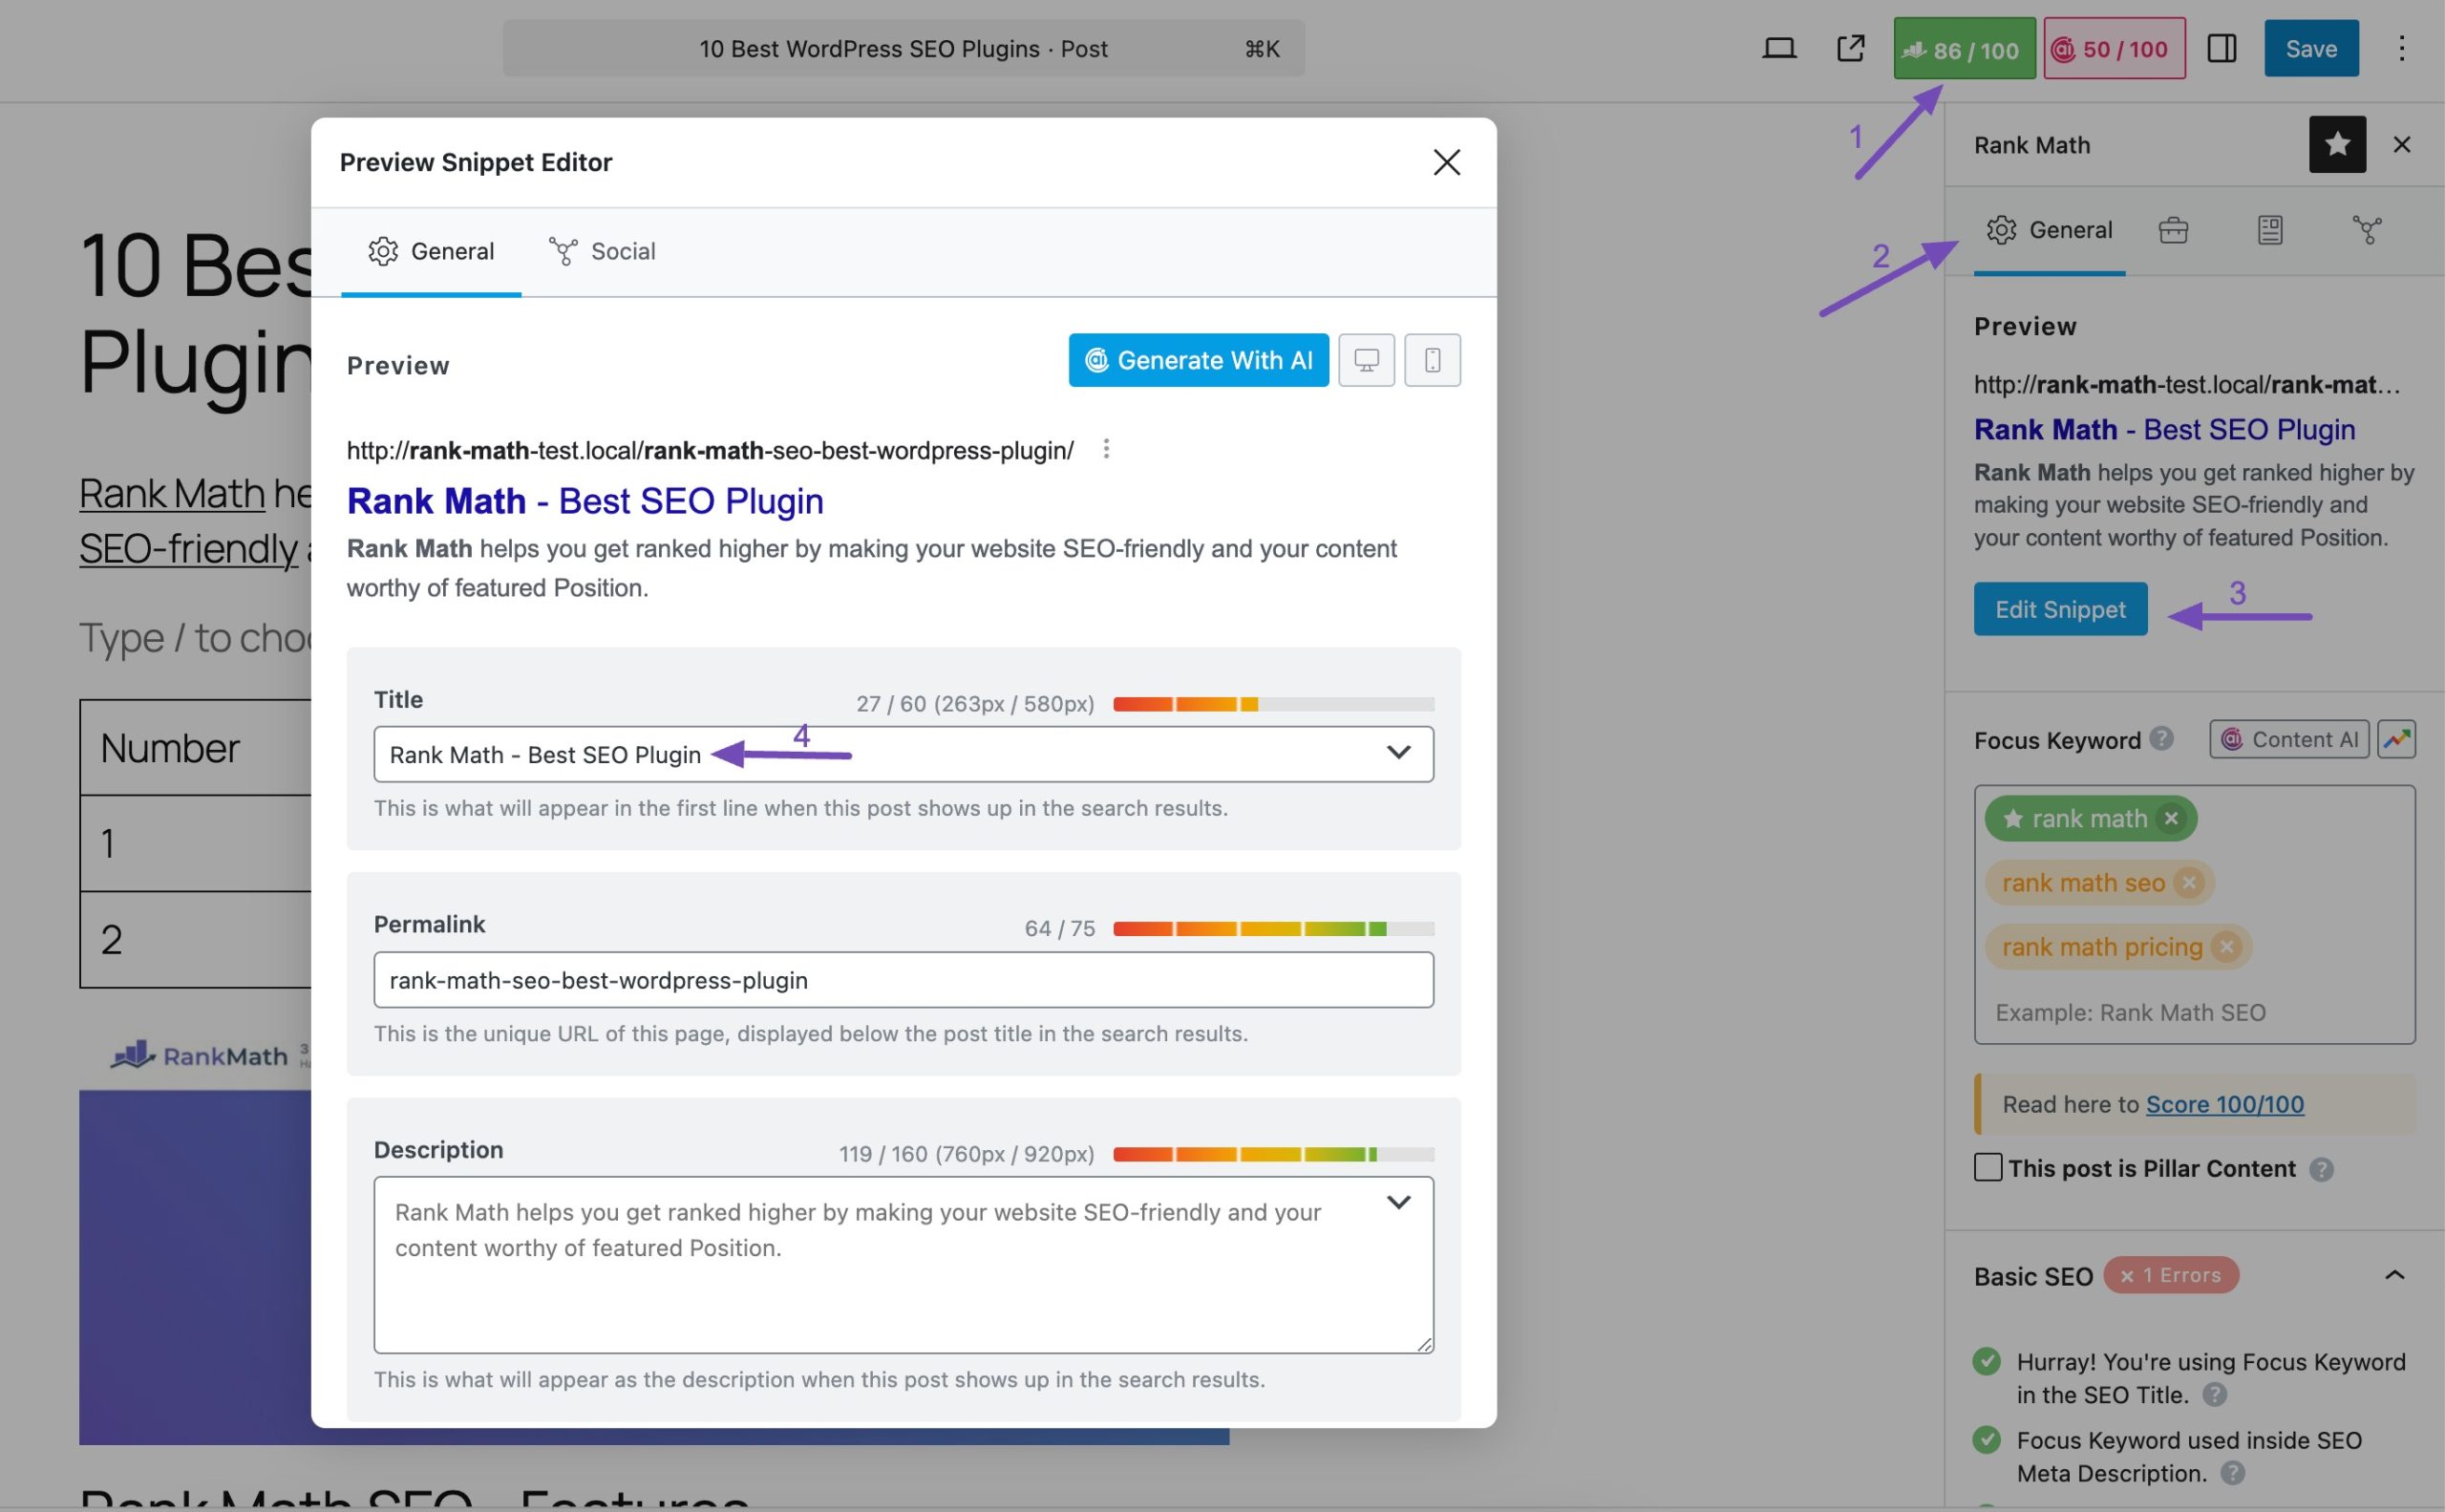
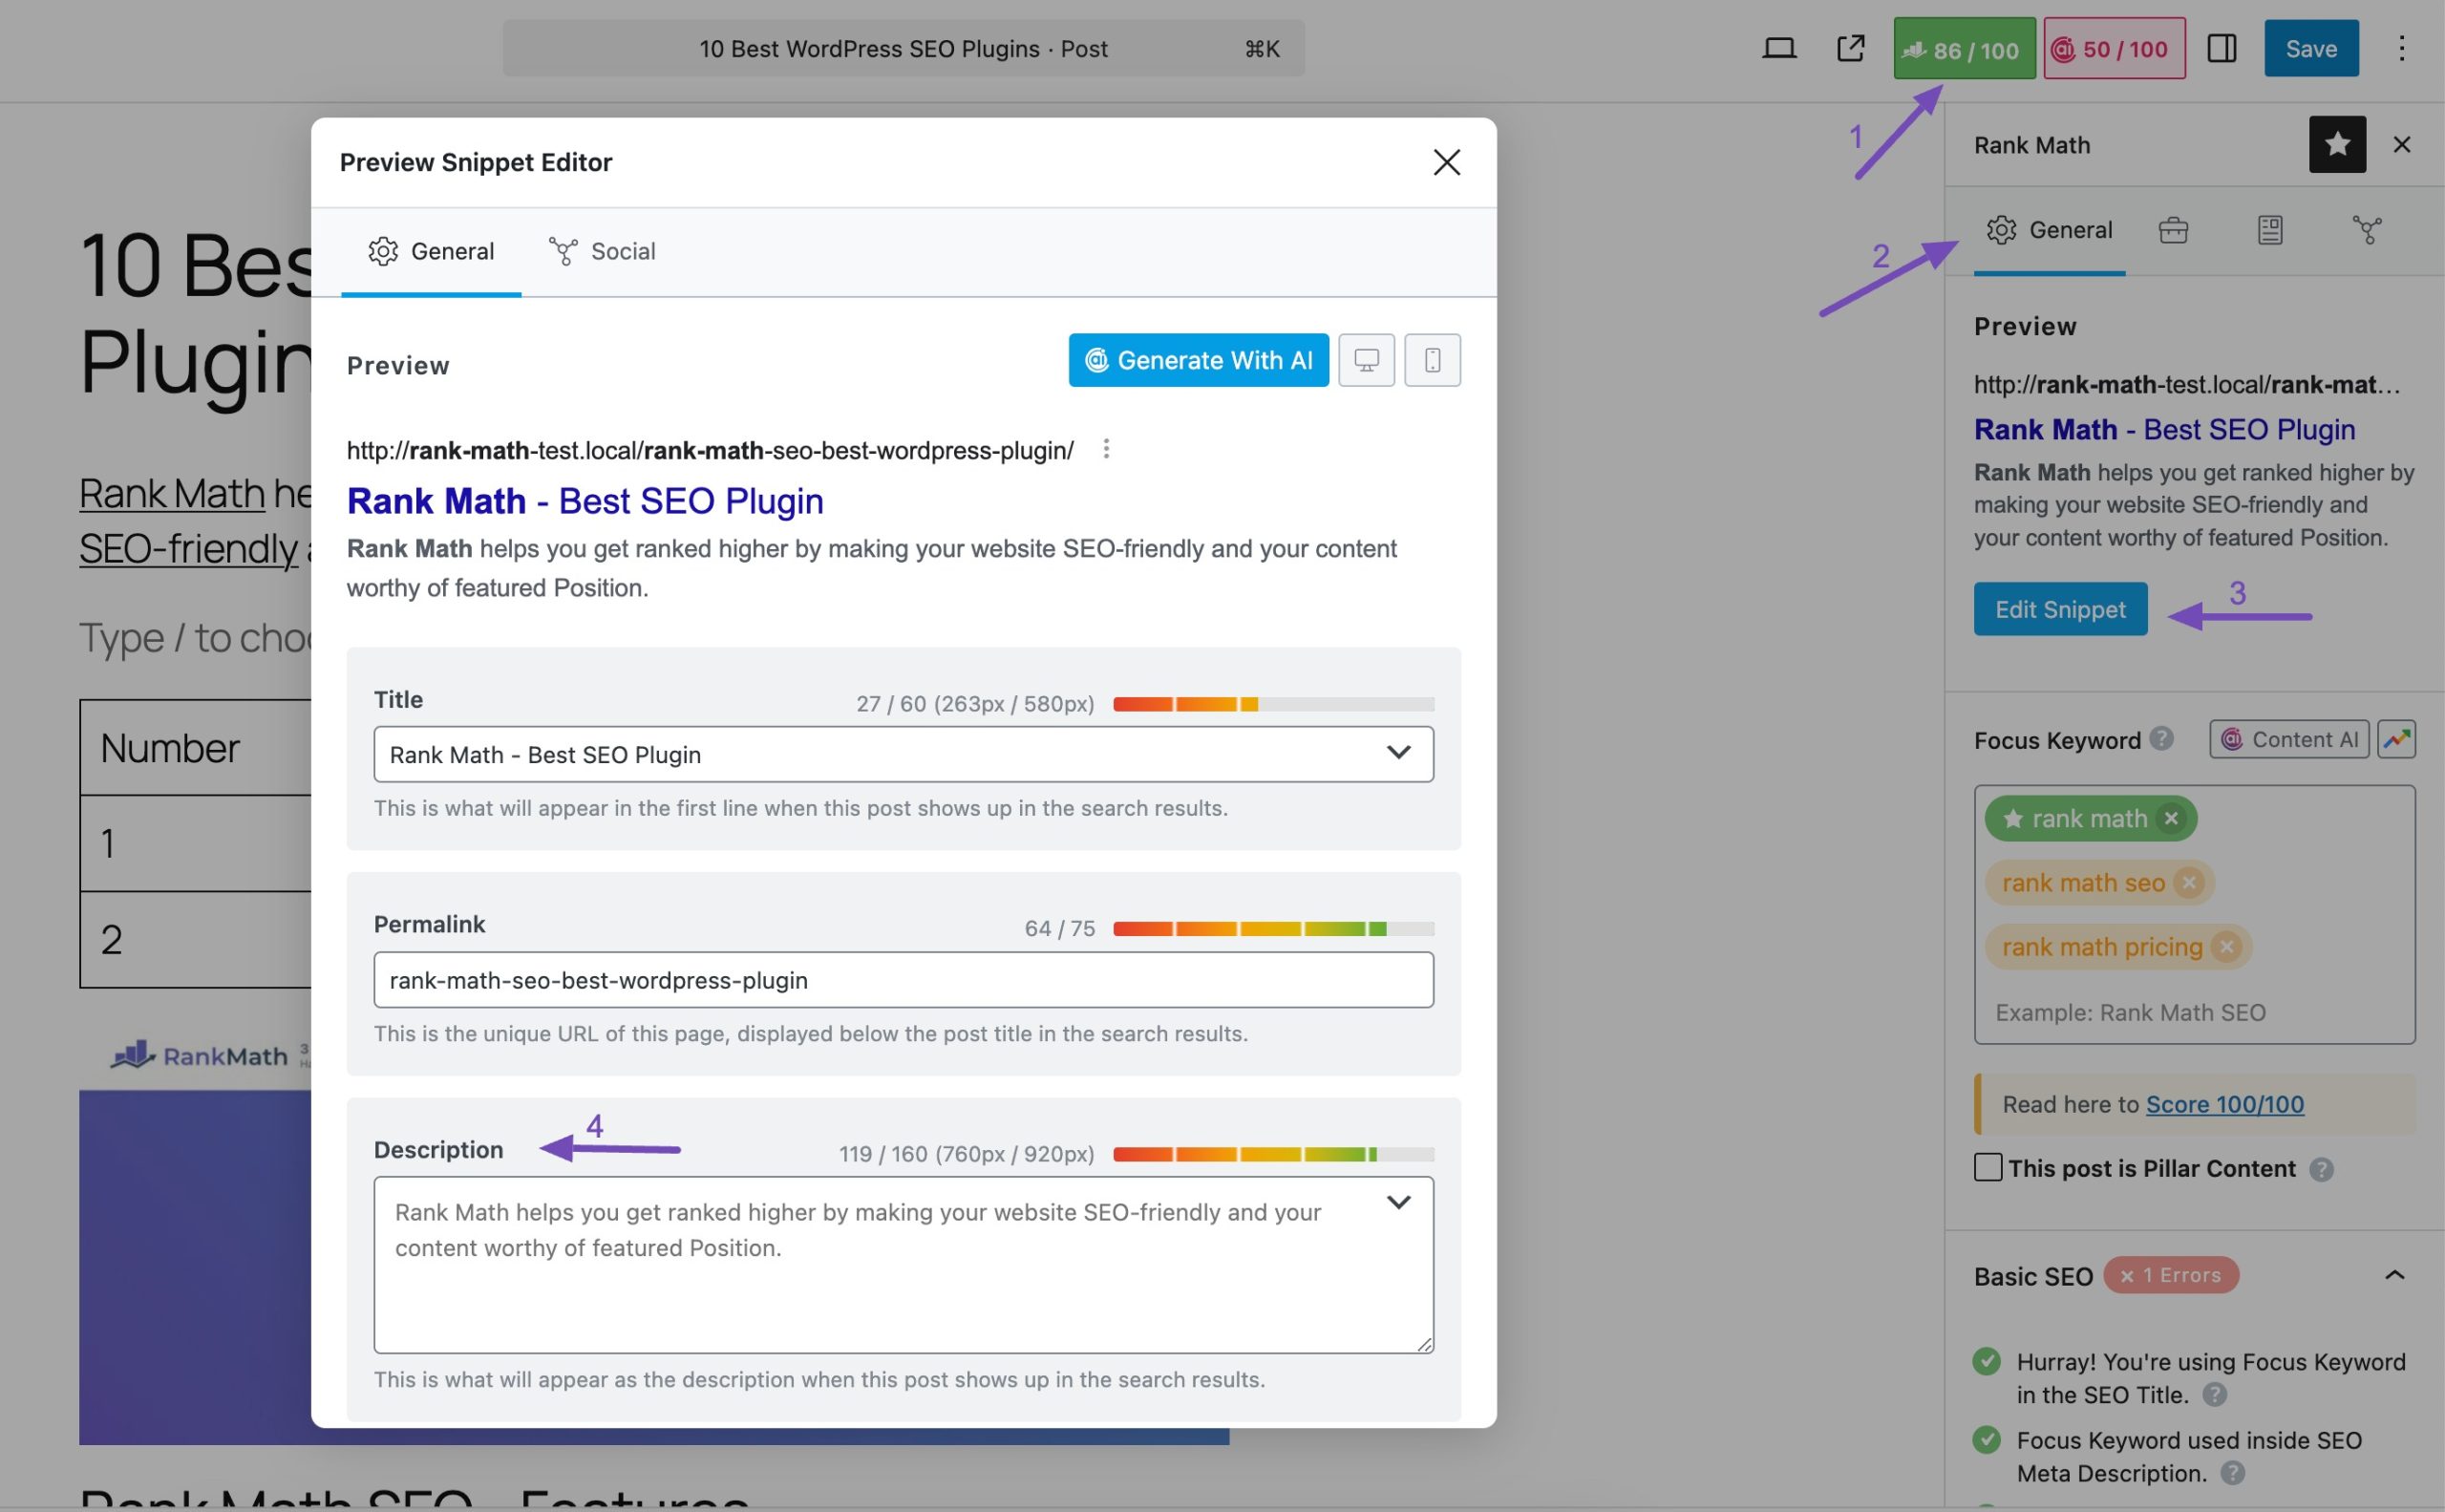
Of course, you have the option of customizing the meta-title for every post on your website as well. You will find that option on your post inside Rank Math’s General Tab by clicking the Edit Snippet button.
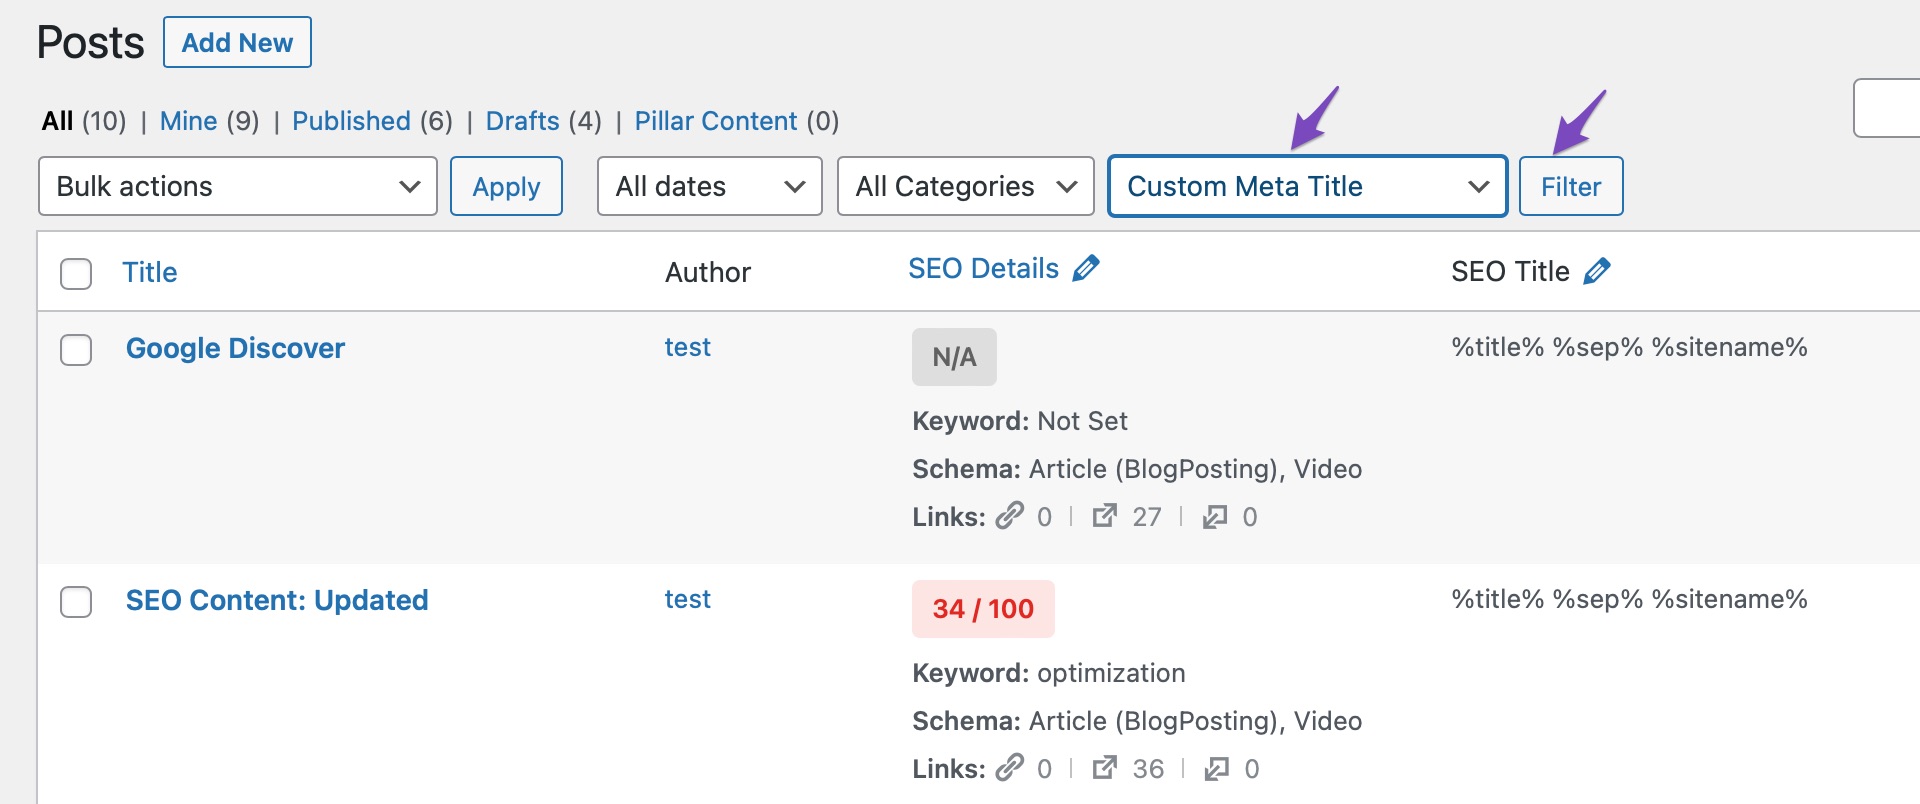
This filter in Rank Math lets you filter all the posts, pages, or custom posts that have a custom meta title set. Please note that this filter will filter the posts with a custom meta title, not a regular title. In fact, the regular post titles are always custom, as they are created by you.
To use this filter, select it from the drop-down menu, and click the Filter button.
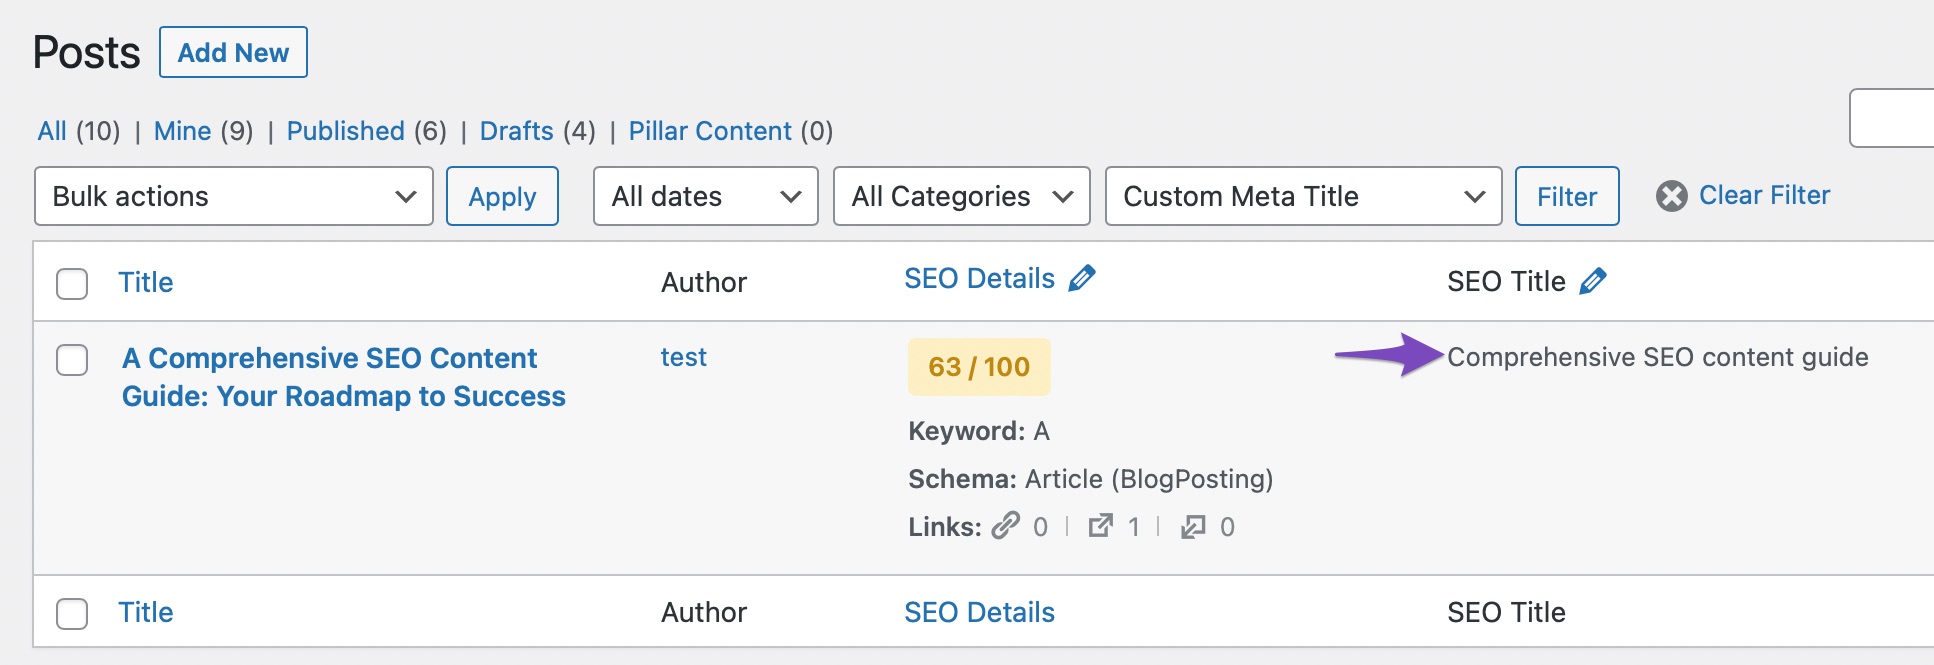
Rank Math will quickly find and display the posts with custom meta titles.
7.11 Custom Meta Description PRO
Rank Math lets you define global meta descriptions that are inherited by your posts, pages, and custom posts. You can find the configuration options inside Rank Math SEO → Titles and Meta → Posts.
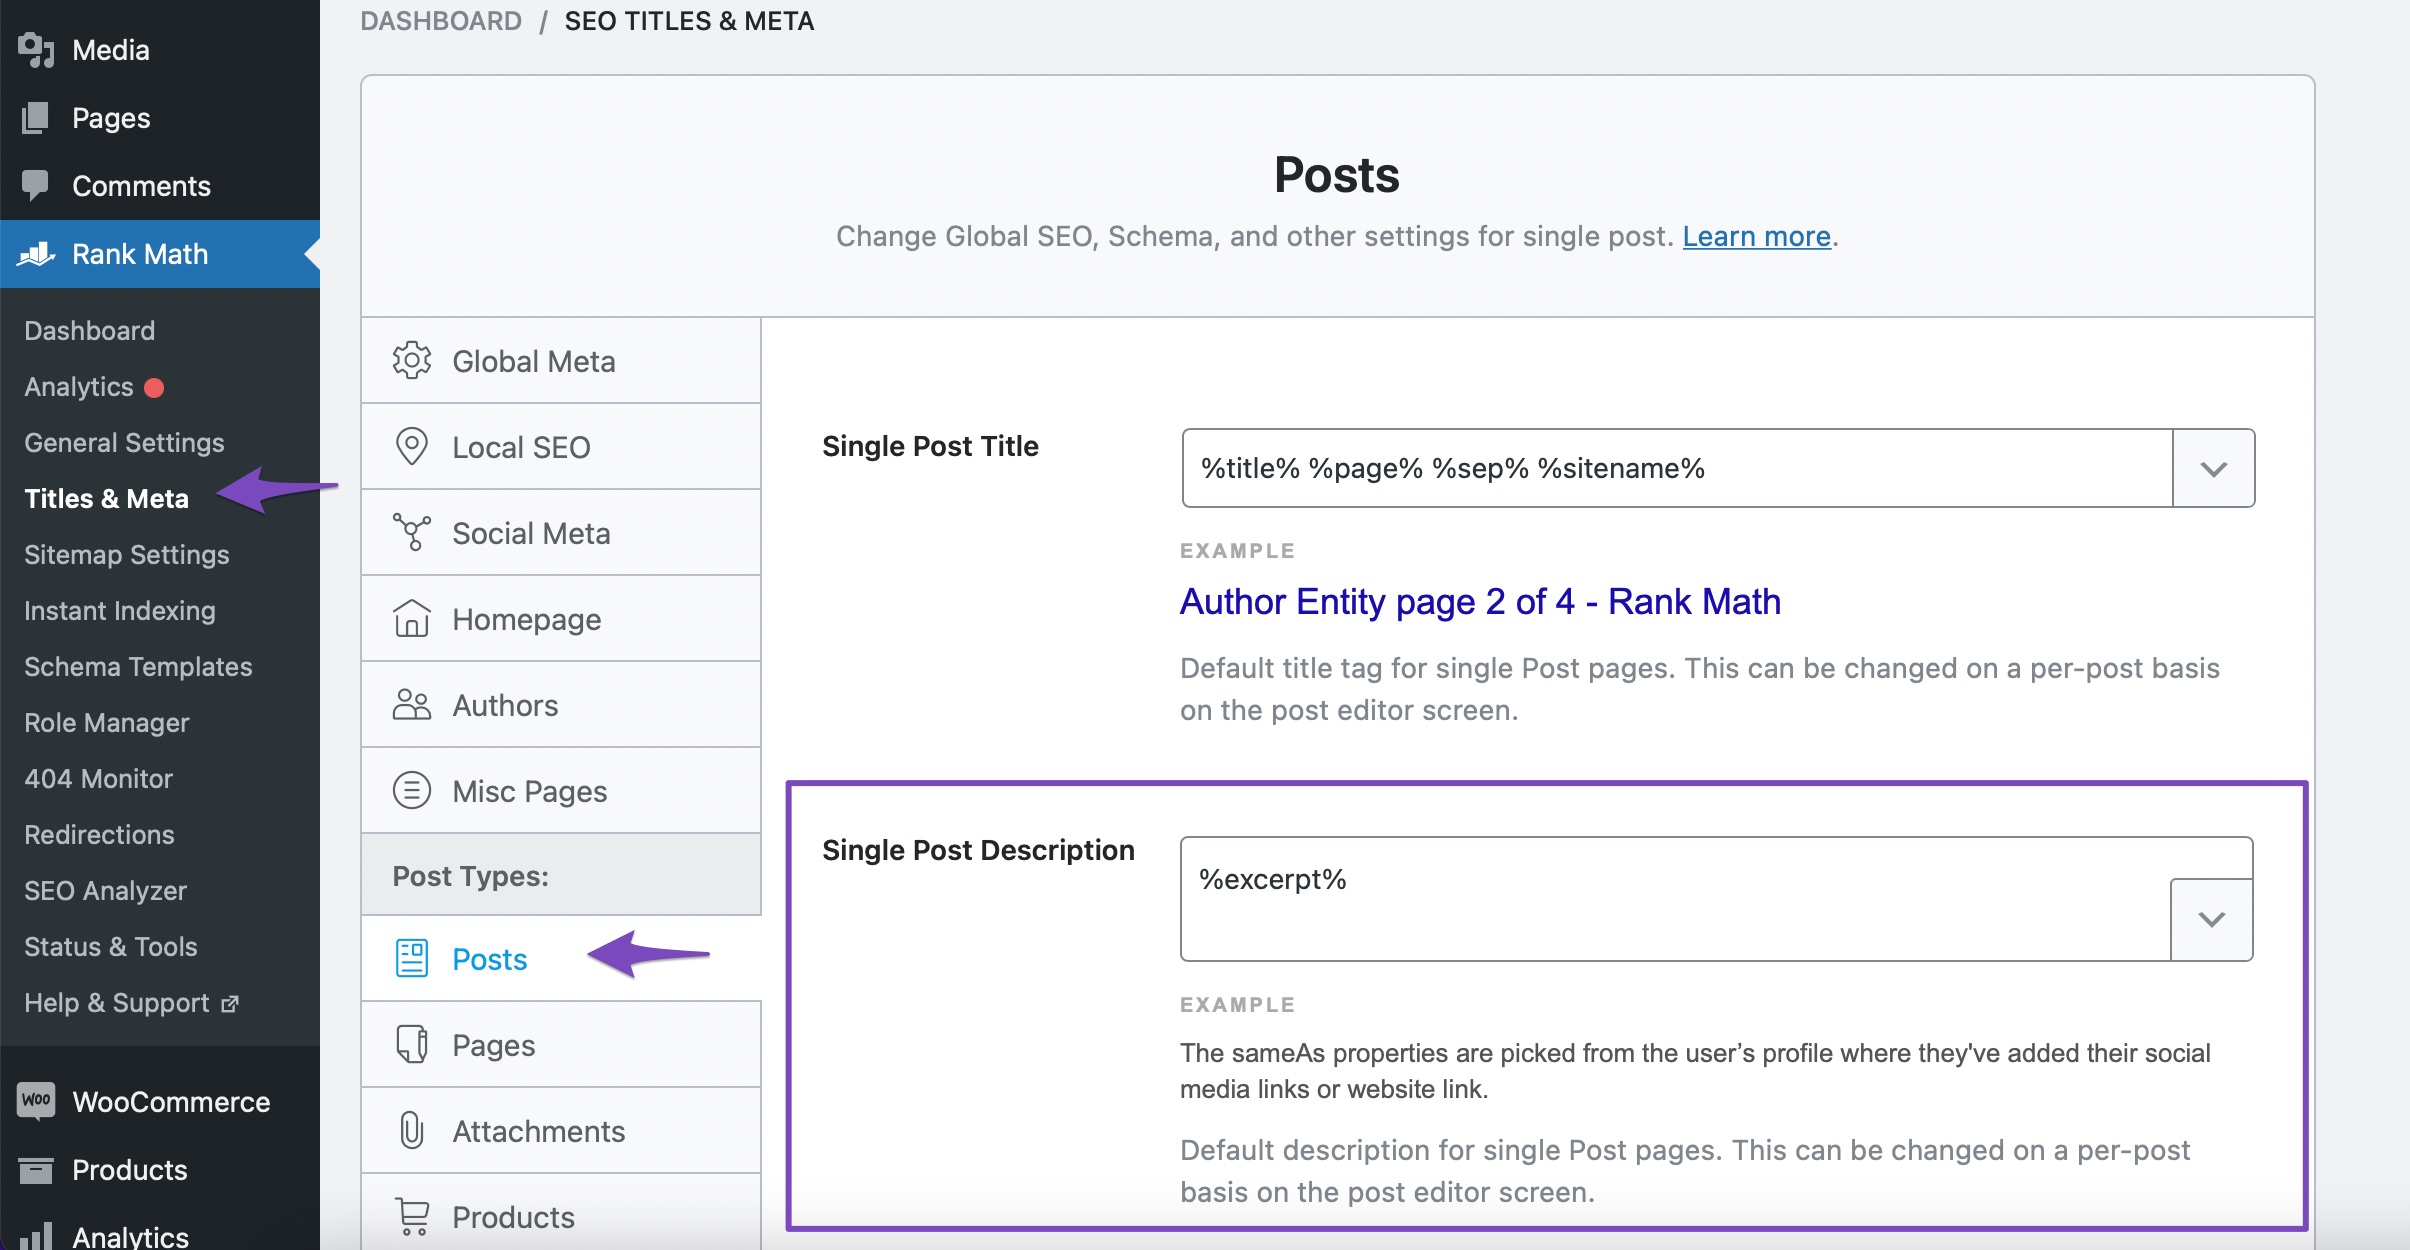
Here, you can use variables to create optimized meta-descriptions for your posts or pages, which are then used throughout your website. Of course, you can still use custom meta-descriptions on your website by navigating to the post and opening Rank Math’s General Tab. Inside the description setting, you can customize the meta-description using variables or static text.
The Custom Description Filter will help you find posts that have a custom description set. In other words, you can find posts that are not using the global meta description settings.
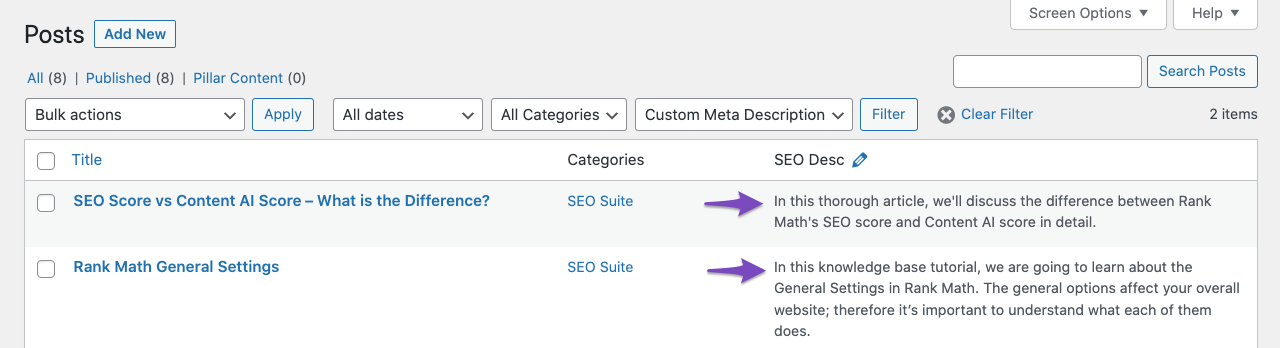
To use the filter, select it from the drop-down menu and click the Filter button.
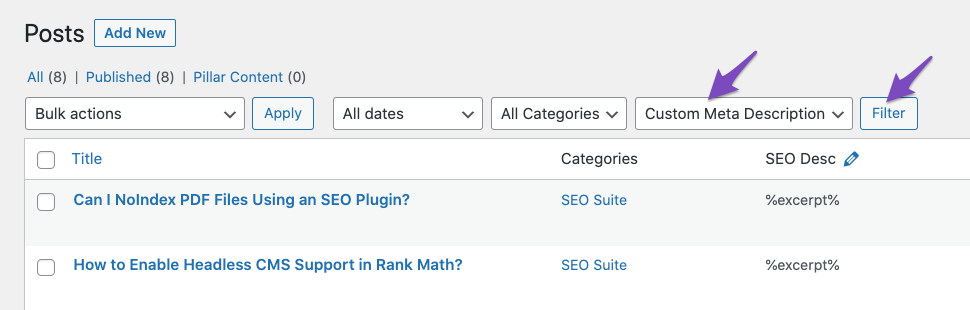
Rank Math will go to work and find the posts that have a custom description set.
Note: It is important to know and remember that this filter will find and filter the posts that have a custom meta-description, not the regular post description.
7.12 Redirected Posts PRO
Rank Math has a sophisticated redirection manager using which you can create and manage redirects on your website. You can find the redirection manager inside the Rank Math menu.
And, you can redirect posts quickly using the redirect option present on each post. You can find it under the Advanced Tab in Rank Math.
Redirects can be made for many reasons, but the important thing is to know which pages are redirected. What if you create a new post and change the redirect from old posts to the new one?
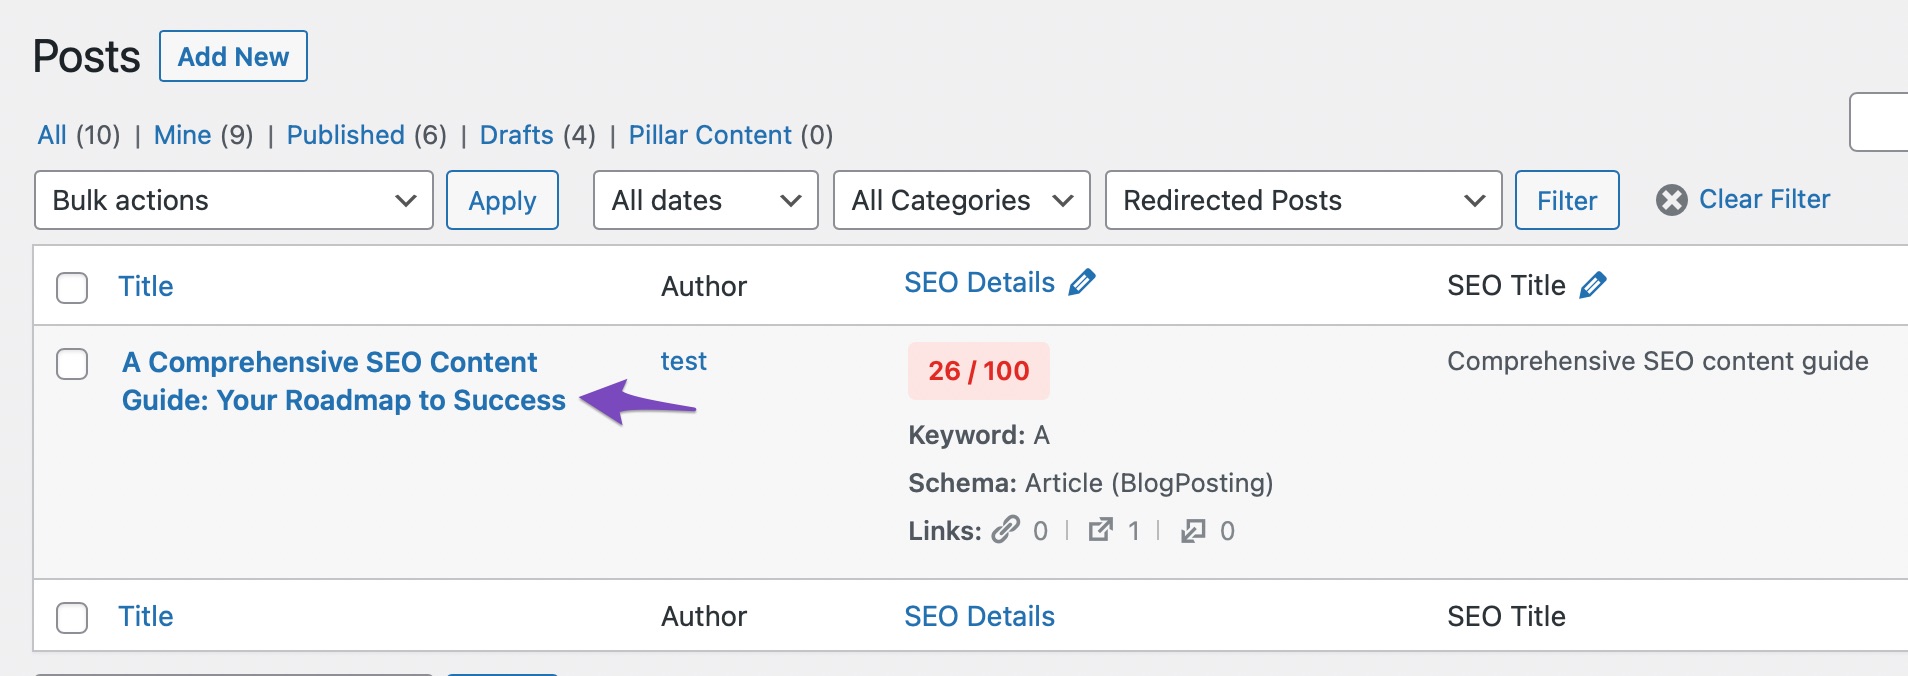
That is where this filter comes in. This filter will help you find the posts that are redirected to a different post. To use it, simply select the filter from the drop-down menu, and click the Filter button.
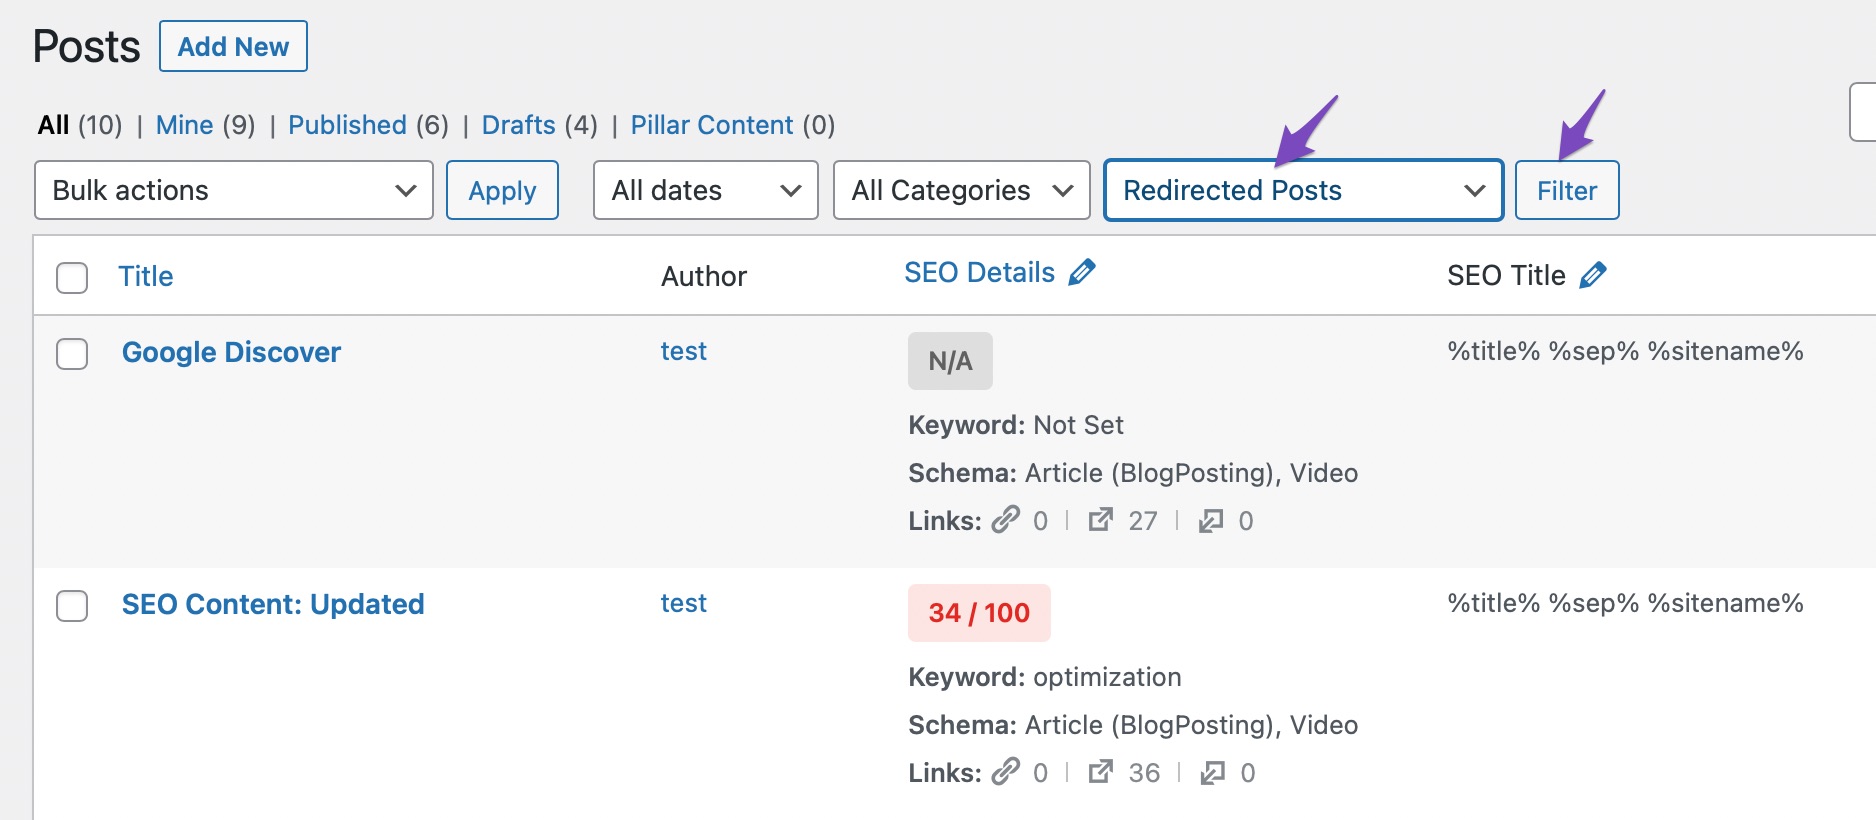
Rank Math will quickly find all the posts, pages, or custom posts (wherever you use the filter) that have a redirect set.
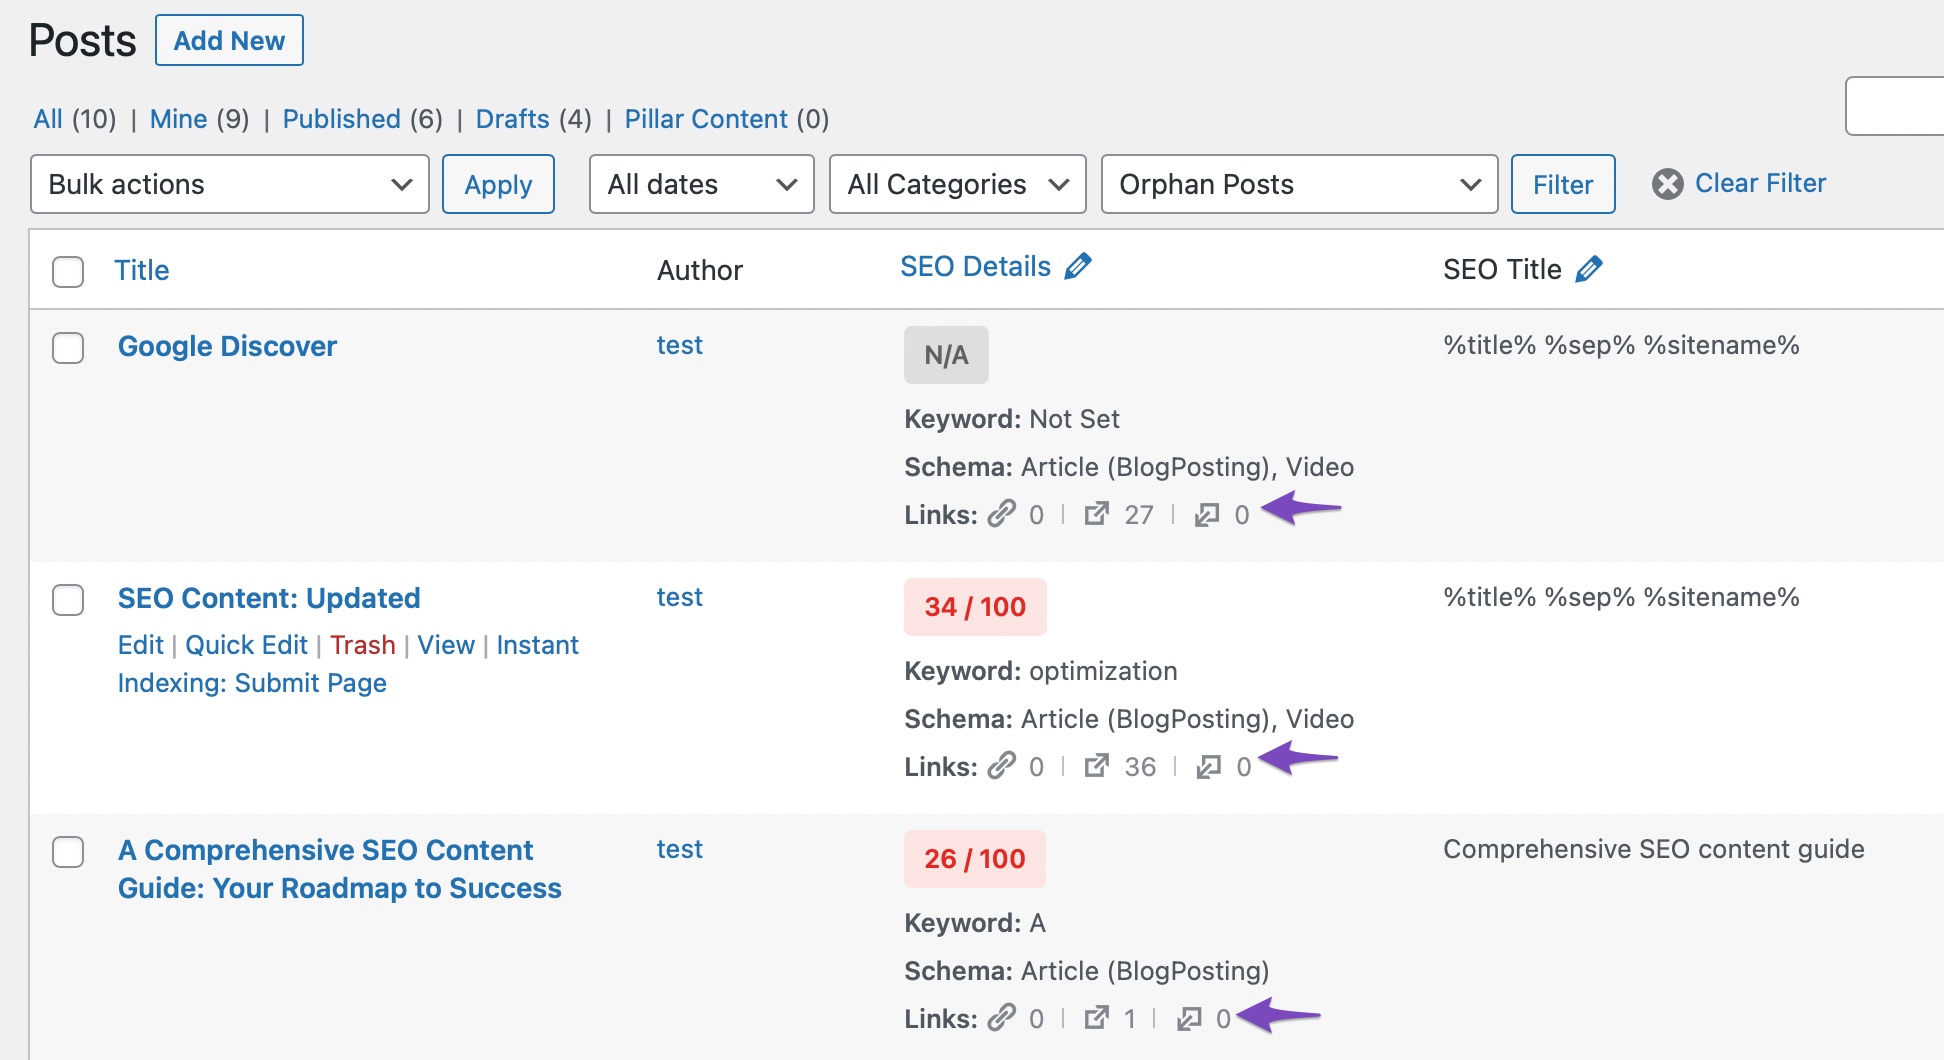
7.13 Orphan Posts PRO
It is no secret that links form the basis of the web, and search engines use them to navigate and index your website. That is why it is recommended that you add internal links from your posts to other posts so that they can be discovered, and link juice may also pass between them.
However, when you’re dealing with a lot of content, lapses happen. Sometimes you forget to add them, or sometimes you might not have been aware of how important this is. Both scenarios result in orphan pages.
Orphan pages are the pages that don’t have any incoming internal links to them. If you map out your website architecture, they will be floating in space.
Orphan pages are not good for SEO, that’s obvious. But, what many people don’t realize is that they are also low-hanging fruit for SEO wins. Just add simple links, and you have more traffic coming to them, right?
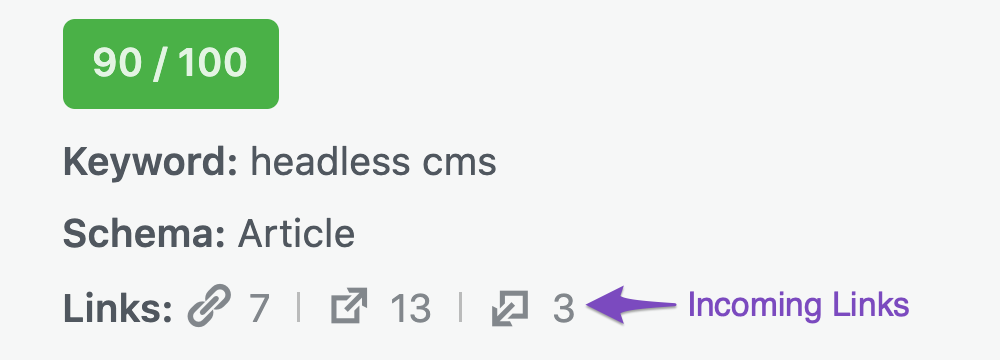
Technically, the answer is yes. But, the bigger challenge is finding orphan pages and quickly fixing them. In fact, Rank Math has a handy indicator that lets you know the exact number of incoming links a page has, but even that doesn’t help much when you’re dealing with a large number of pages.
That is where the value of this filter comes in. When you use this filter, Rank Math will quickly display all the posts, pages, and custom posts on your website that have no incoming links. In other words, you can filter orphaned pages. To use it, just select the filter and click the Filter button.
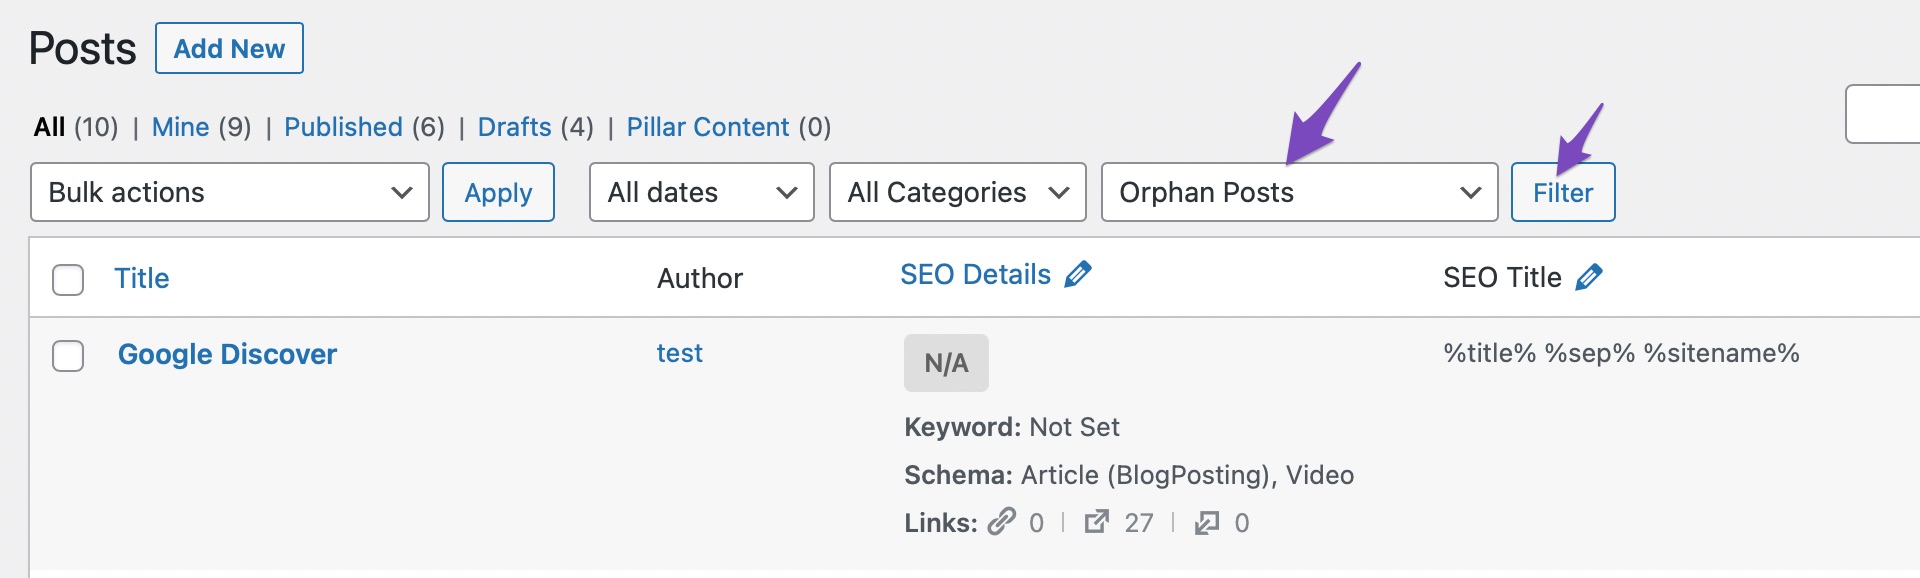
In just a few seconds, Rank Math will display only orphaned posts on the screen.
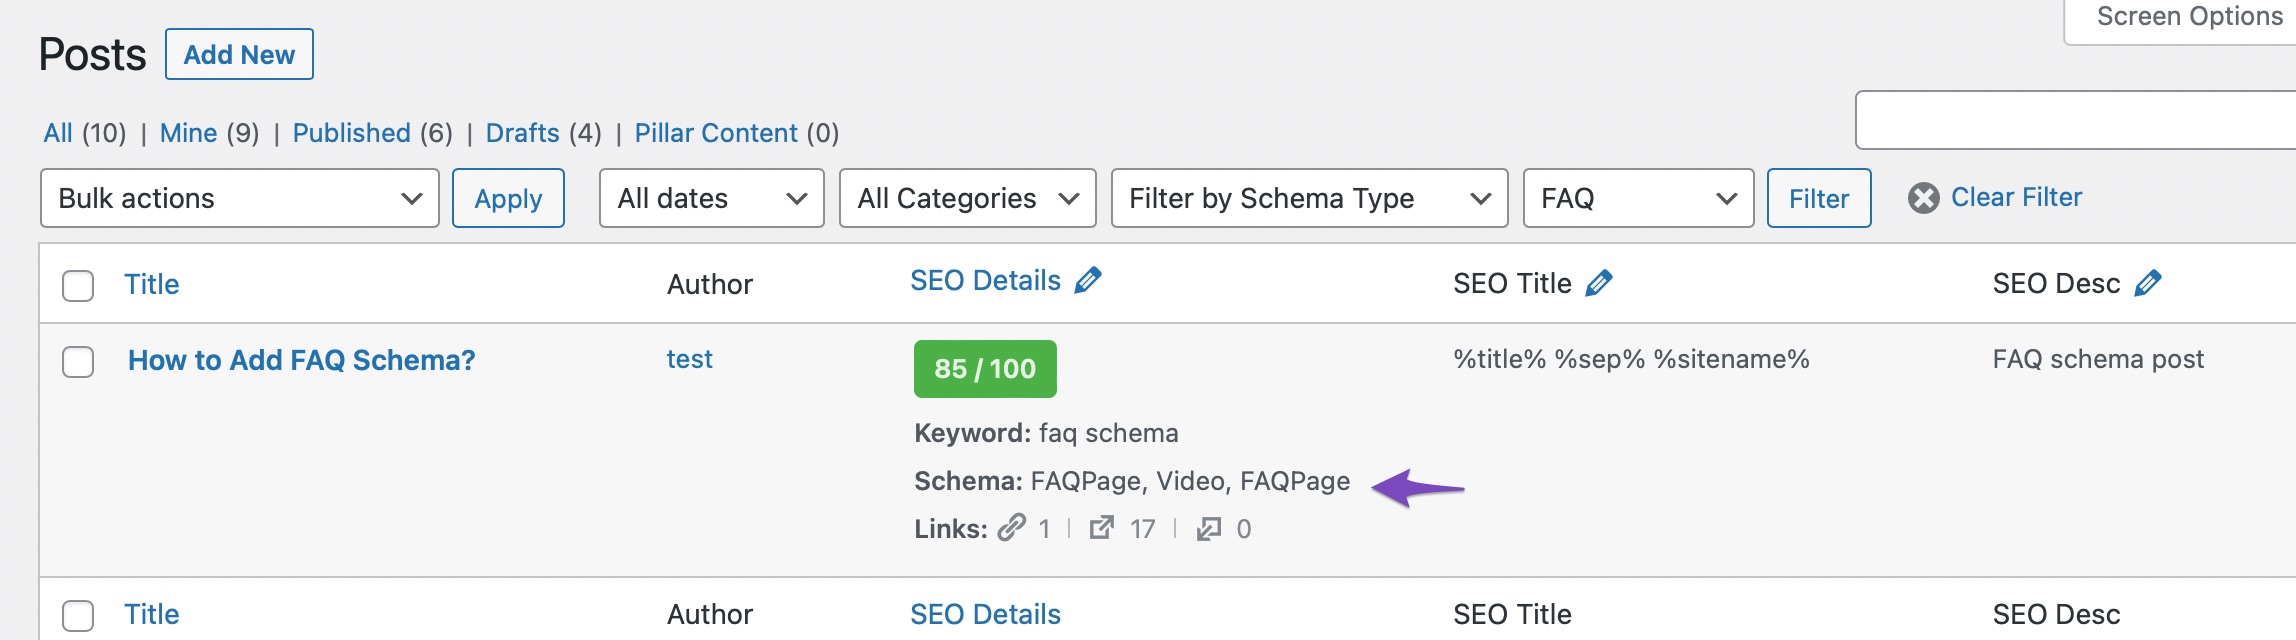
7.14 Filter by Schema Type PRO
Rank Math has beautiful support for Schema structured data. Not only can you set the default Schema type that is added to posts, pages, and custom posts, you can also customize the Schema data that appears on every post.
With Rank Math PRO, you can take that further by using Schema templates, advanced rules for displaying Schema, and even adding multiple types of Schema on a single post type.
With this filter, you can quickly see all your posts that are using a particular type of Schema. When you select this filter, you’ll see another menu appear by its side.
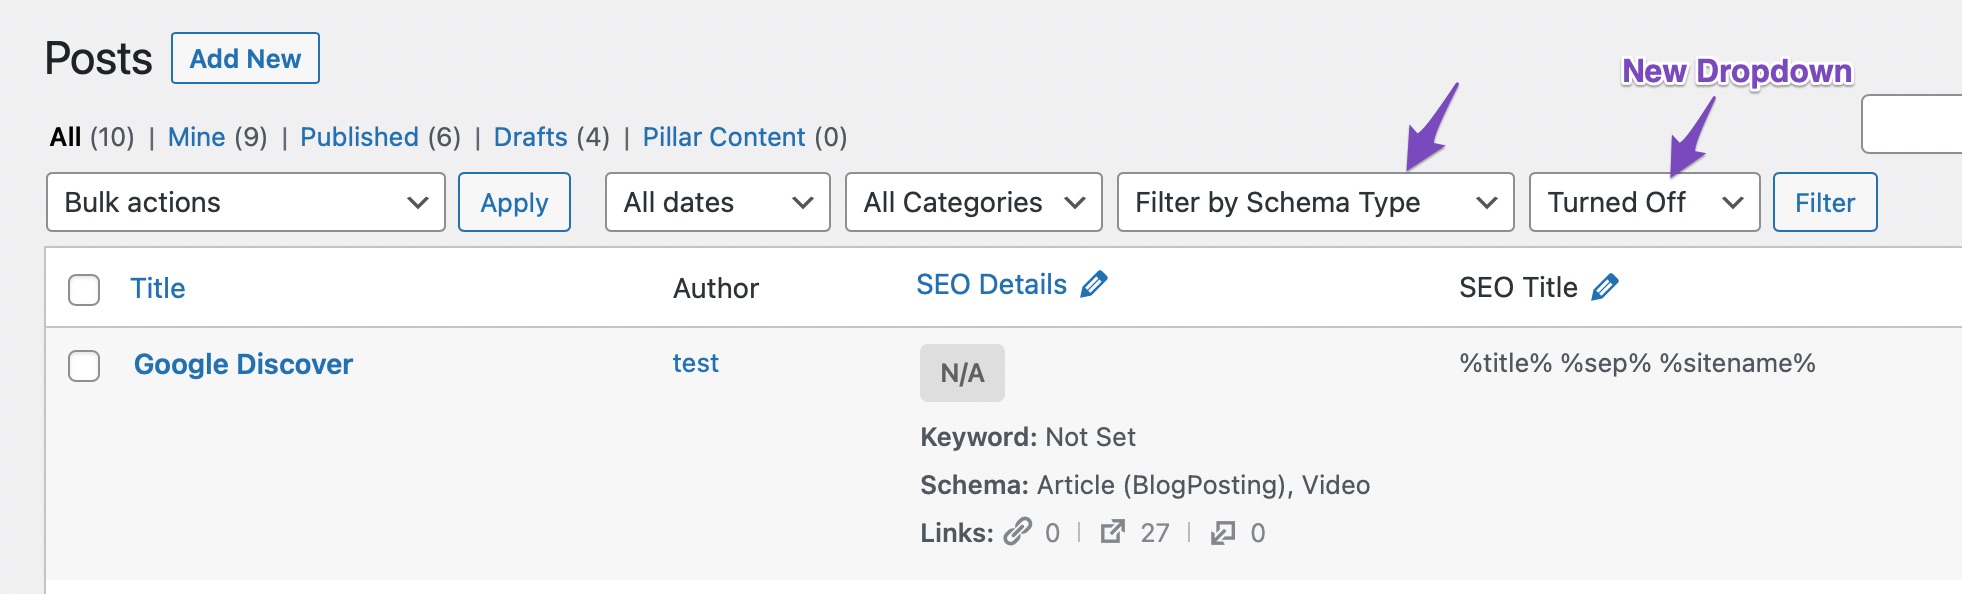
And that menu contains a list of all the Schema types supported by Rank Math.

So, to use this filter, all you have to do is select the Schema type you want to see posts for and click the Filter button.

And Rank Math will display only the posts with the particular Schema type.
8 Quick Editing – Using Bulk Editing to Optimize Content
Many times you might want to make changes to your posts or post types that the bulk actions cannot provide. For example, you cannot change or add focus keywords to multiple posts with bulk actions.
For these tasks, we’ve also built quick actions in Rank Math. They provide a fresh new way to optimize your post types, such as posts, pages, and other custom post types (CPTs), as well as taxonomies like categories and tags, and generally accomplish repetitive tasks that would take much longer to complete in the traditional manner.
This is where the power of bulk-editing actually comes into play. As we showed you above, you can use the bulk-editing mode to edit the SEO Details, SEO Title, and SEO Description fields in bulk. But, we need to clarify that you can only change the focus keyword on a post from the SEO details field, as the rest of the information there is just there for representation, you cannot edit it, even from inside the post.
Start by getting over to Rank Math SEO → Titles & Meta from your WordPress dashboard.
Next, head to the relevant post type or taxonomy and click on it. Bulk editing is available for multiple post types and taxonomies, including:
- Posts
- Pages
- Attachments
- Categories
- Downloads (for Easy Digital Downloads)
- Products (for WooCommerce)
- Tags
- Brands
- Topic tags
- Download categories
- Download tags
- Product categories
- Product tags
- RM Location categories
Let us click on Posts in this example.
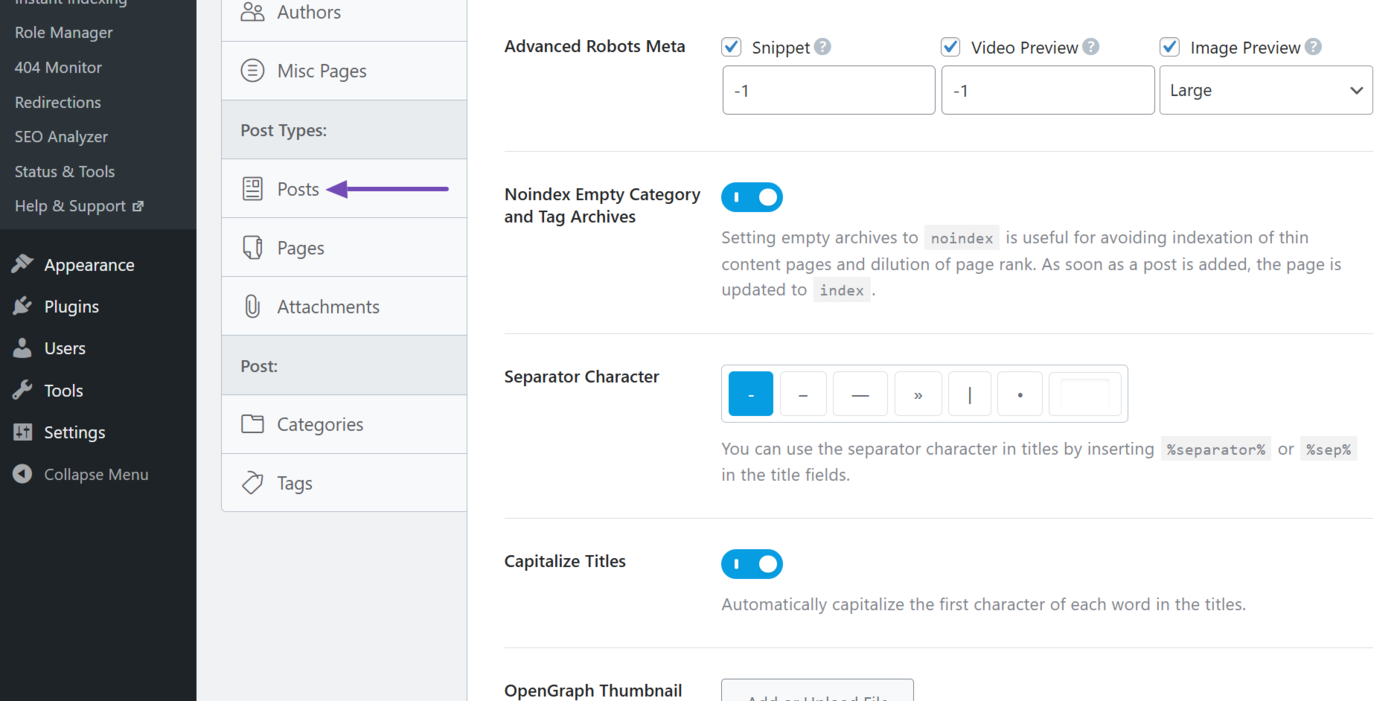
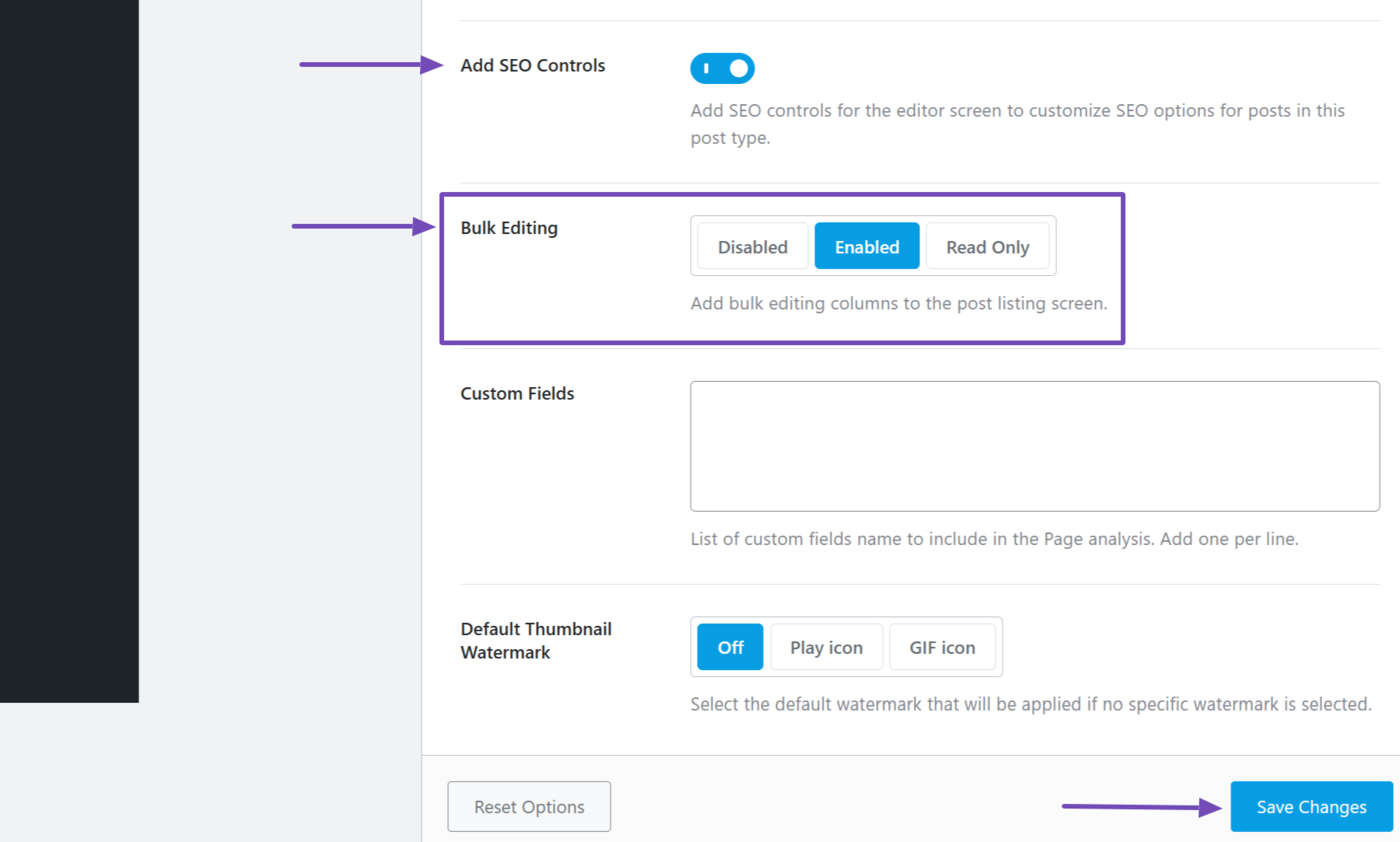
Now, scroll down and set the ‘Bulk Editing’ option to Enabled. Once done, click Save Changes.
Note: If Bulk Editing is not available, ensure to enable Add SEO Controls. The Bulk Editing option will become visible.
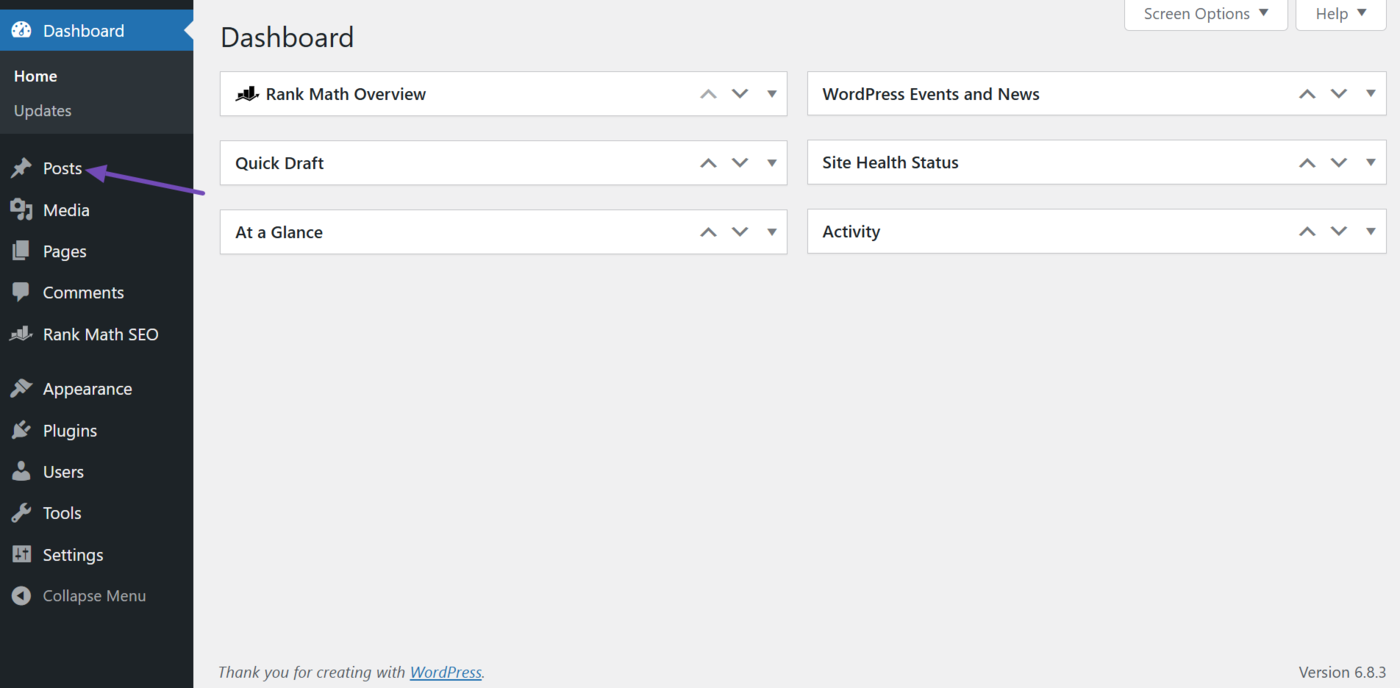
Now, you will see all the bulk edit options on your post, page, custom post type (CPT), or taxonomy screen. To view it, head to the post type or taxonomy. In this example, we will head to Posts.
To utilize the quick edit option, we will first enable all the fields in the post area. To do that, click the Screen Options button on the top right of the page.
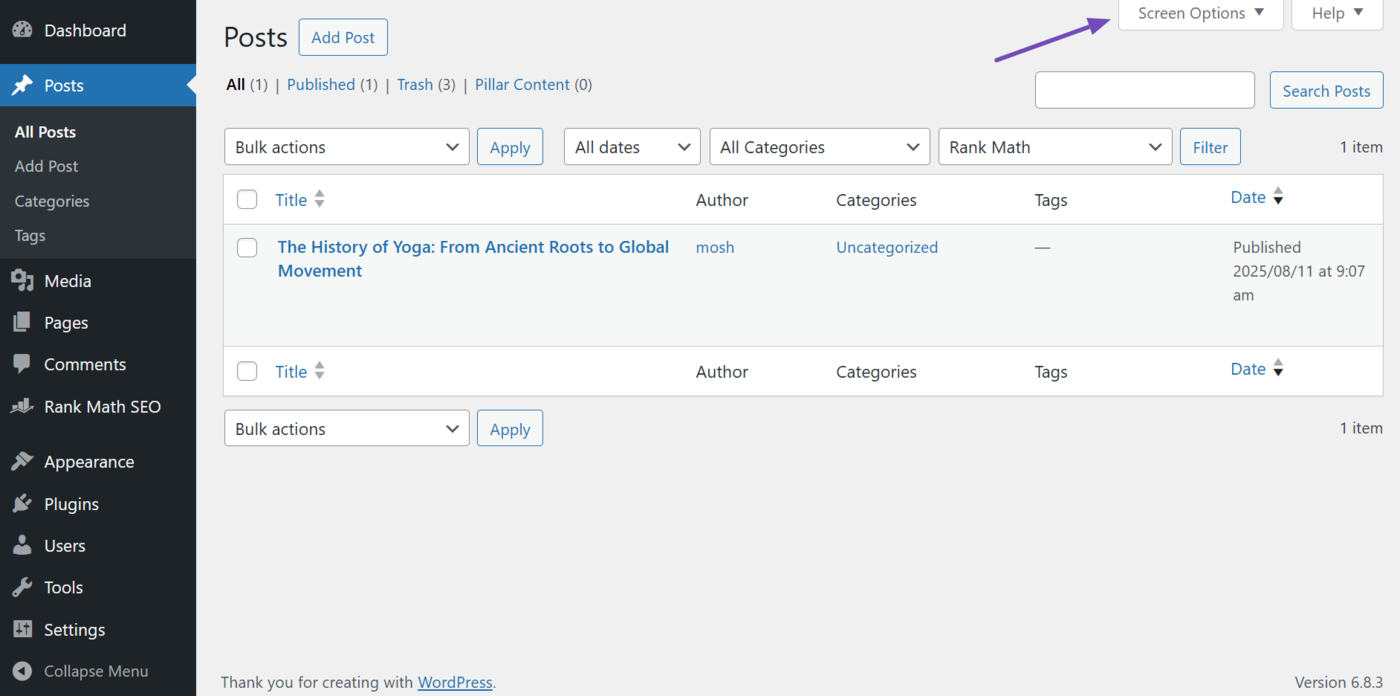
Once done, enable all the SEO-related fields there. You could enable all the fields, but the page becomes crowded in most cases.

Once enabled, the interface should look something like this.
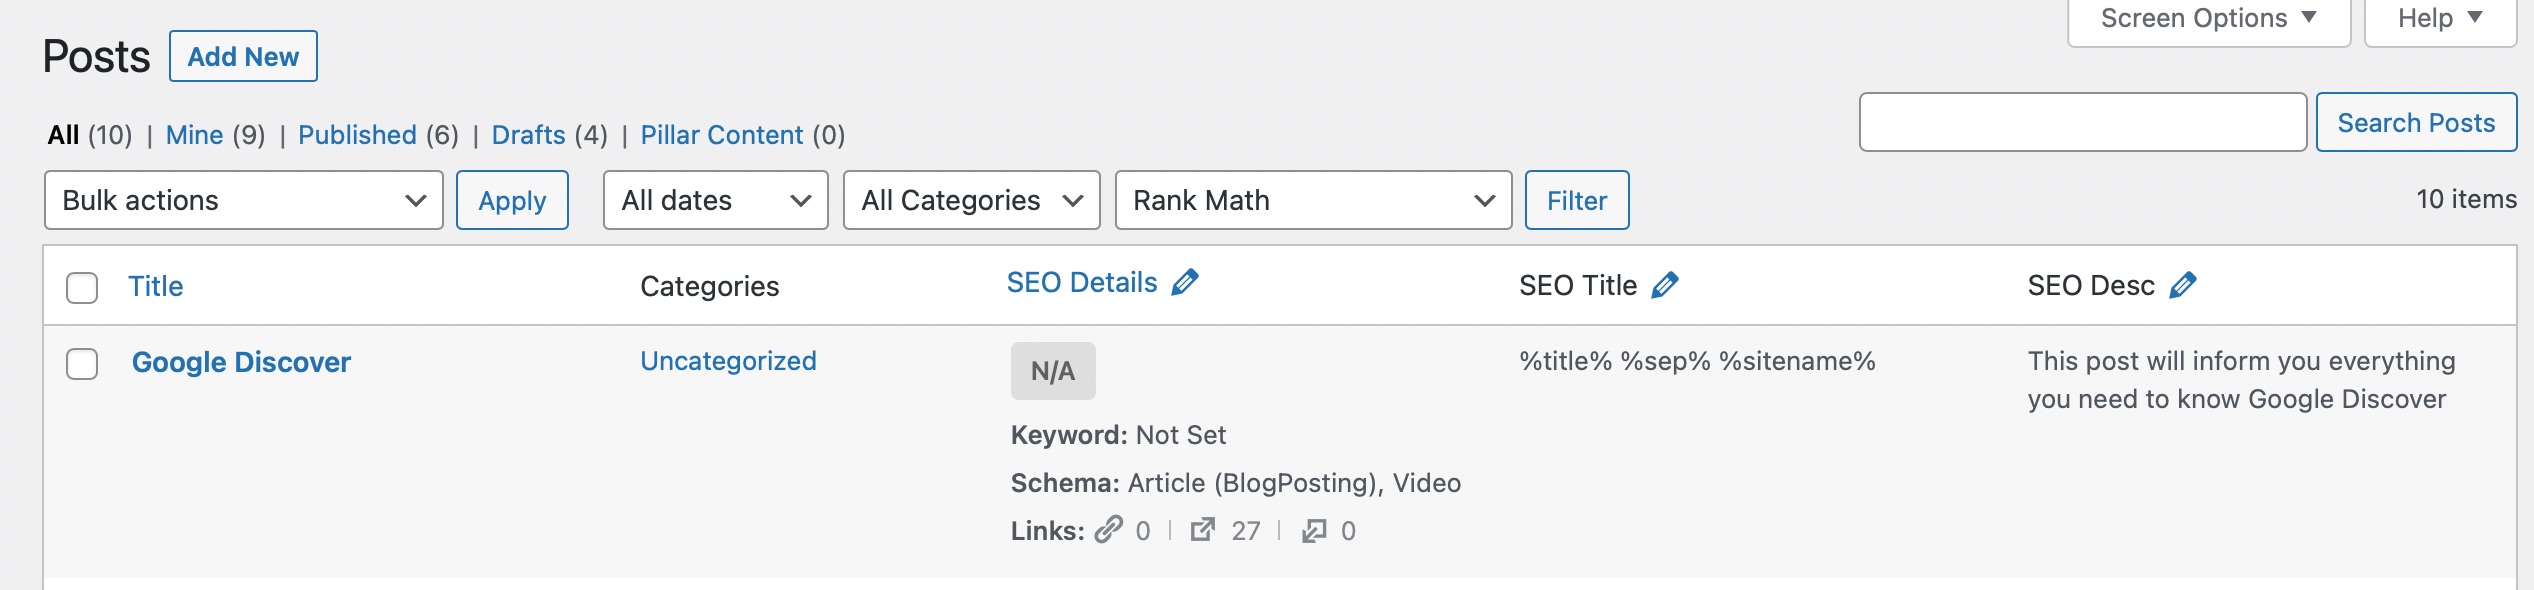
Now, all the fields in this section do not support quick editing features; we already mentioned that. But which ones do support it? It is simple to see that just by looking at the page. All the fields that have the pencil icon next to them are compatible with quick editing.

Let us look at all the different options and see what we can achieve with quick actions.
8.1 Quick Edit SEO Details
The focus keyword is one of the most useful features Rank Math offers. By adding what keywords you’re trying to rank for, Rank Math can give you specific suggestions for optimizing and ranking your post in the search engines. But, when you install Rank Math on a website that already has a lot of content, adding the focus keywords to all those posts can take a long time.
We made the process somewhat easy by letting you filter the post types that have no keywords set, but adding the focus keywords would still take time. With this quick edit feature, that problem goes away. By using this quick edit feature, you’ll be able to add focus keywords to your posts in a fraction of the time. Here is how you use it.
First, filter the posts you want to edit or add the keywords for. Then, click the pencil icon next to the SEO Details.
And the fields will become editable. The posts that did not have a focus keyword set will show a blank text field, and the posts with a focus keyword set will show their existing focus keywords.
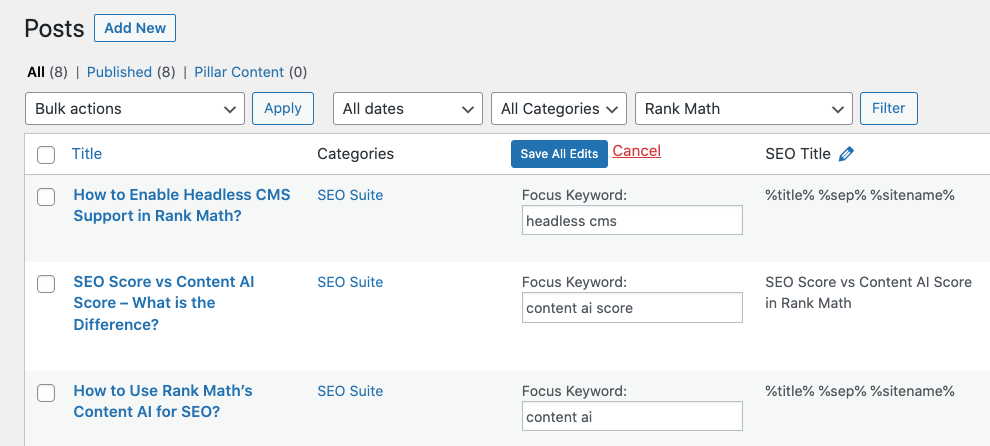
Now, all you have to do is enter the focus keywords for the posts. As you make changes, you’ll have the option to save changes to individual post’s focus keywords,
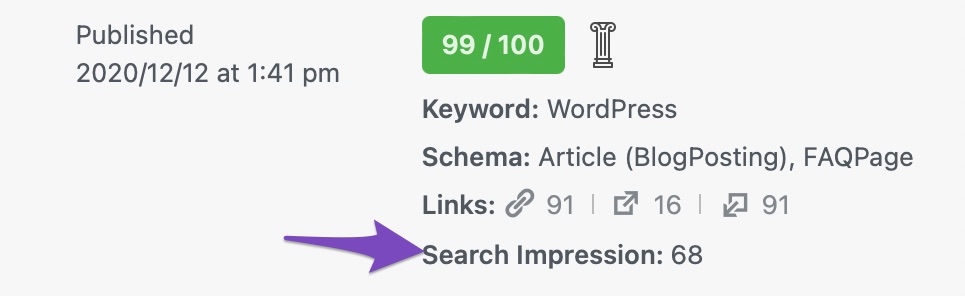
Rank Math also displays the corresponding search traffic data in the SEO Details column for each post (if available).
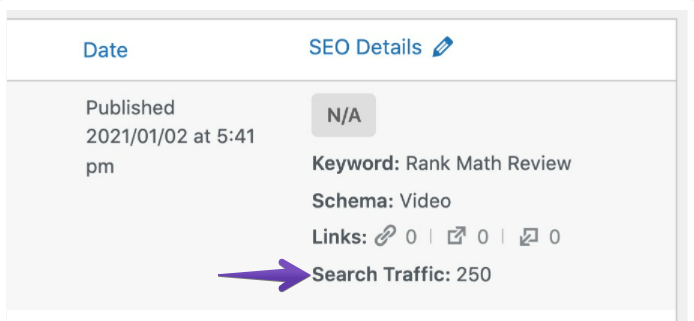
Note: This feature is only available for Rank Math PRO users. Also, it is required to connect the Analytics module from Rank Math with both Google Analytics as well as Google Search Console to fetch the search traffic data.
If only Google Search Console is connected with Rank Math’s Analytics, then it will only fetch the data related to search impressions.
8.2 How Focus Keywords Work with Quick Edits
You’re probably familiar that Rank Math lets you add up to 5 focus keywords to each post type (unlimited with a filter and in Rank Math PRO). Since you can edit, add, or delete the focus keywords from the post or the quick actions, it is important to understand how both of them work together. Let us take an example.
Let us take a post and set the following focus keywords to the post. (A, B, C, D and E)
When you check out the post on the All Posts page, you will see only the first focus keyword, which is expected behavior.

Now, with the quick actions to update the focus keywords, you will be able to do the following.
- Edit the primary focus keywords
- Add new secondary focus keywords
Yes, you cannot edit secondary focus keywords from the quick actions, only add them.
So, if we were to use the quick actions and change the focus keywords to (1,2,3,4 and 5) then these keywords would be added to the list of focus keywords.

Here is where it gets tricky. Rank Math supports 5 focus keywords per post, but that limit is not set in stone. In fact, you can change it to 10,20 or an unlimited number of keywords if you prefer. So, if the focus keyword limit is set to 5, here is what will happen when we save the focus keywords from the quick actions.
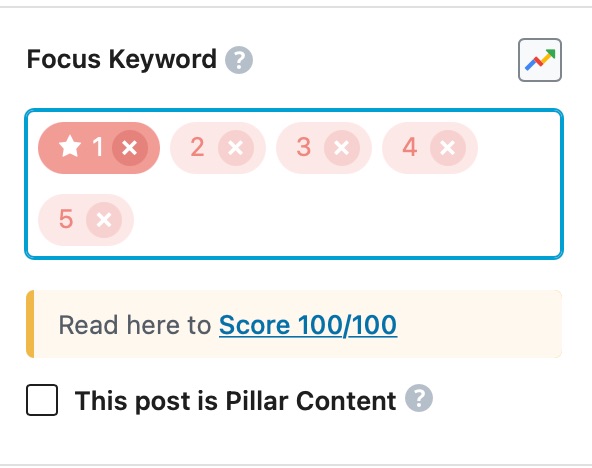
As you can see, all the focus keywords were replaced by the focus keywords set with quick actions.
But, if the focus keywords limit was not set to 5, this is what happened.

The existing primary focus keyword, “A”, was replaced, and the rest of the focus keywords were added to the list. Make sure to keep these differences in mind when working with quick actions on focus keywords.
8.3 Quick Edit SEO Title
The SEO title is one of the most important things that you should optimize as it is one of the key factors in how search engines rank and understand your content.
Rank Math has tools to help you optimize your SEO title in the most effective way possible. You can set up global templates for the SEO title using variables that create optimized titles for all your post types. You can also override the global template on a per-post basis for complete control.
The quick edit option for the SEO title takes this a step further. Combined with the powerful filtering options, you can quickly filter the posts that you want to update the SEO title for, then use the quick actions to update all of them in a single swoop. Let us show you how it works.
First, we need to filter the post type or taxonomy to the ones that we want to edit. For this demonstration, we will leave the default view in place. Next, we will click the pencil icon next to the SEO Title heading to enter edit mode.
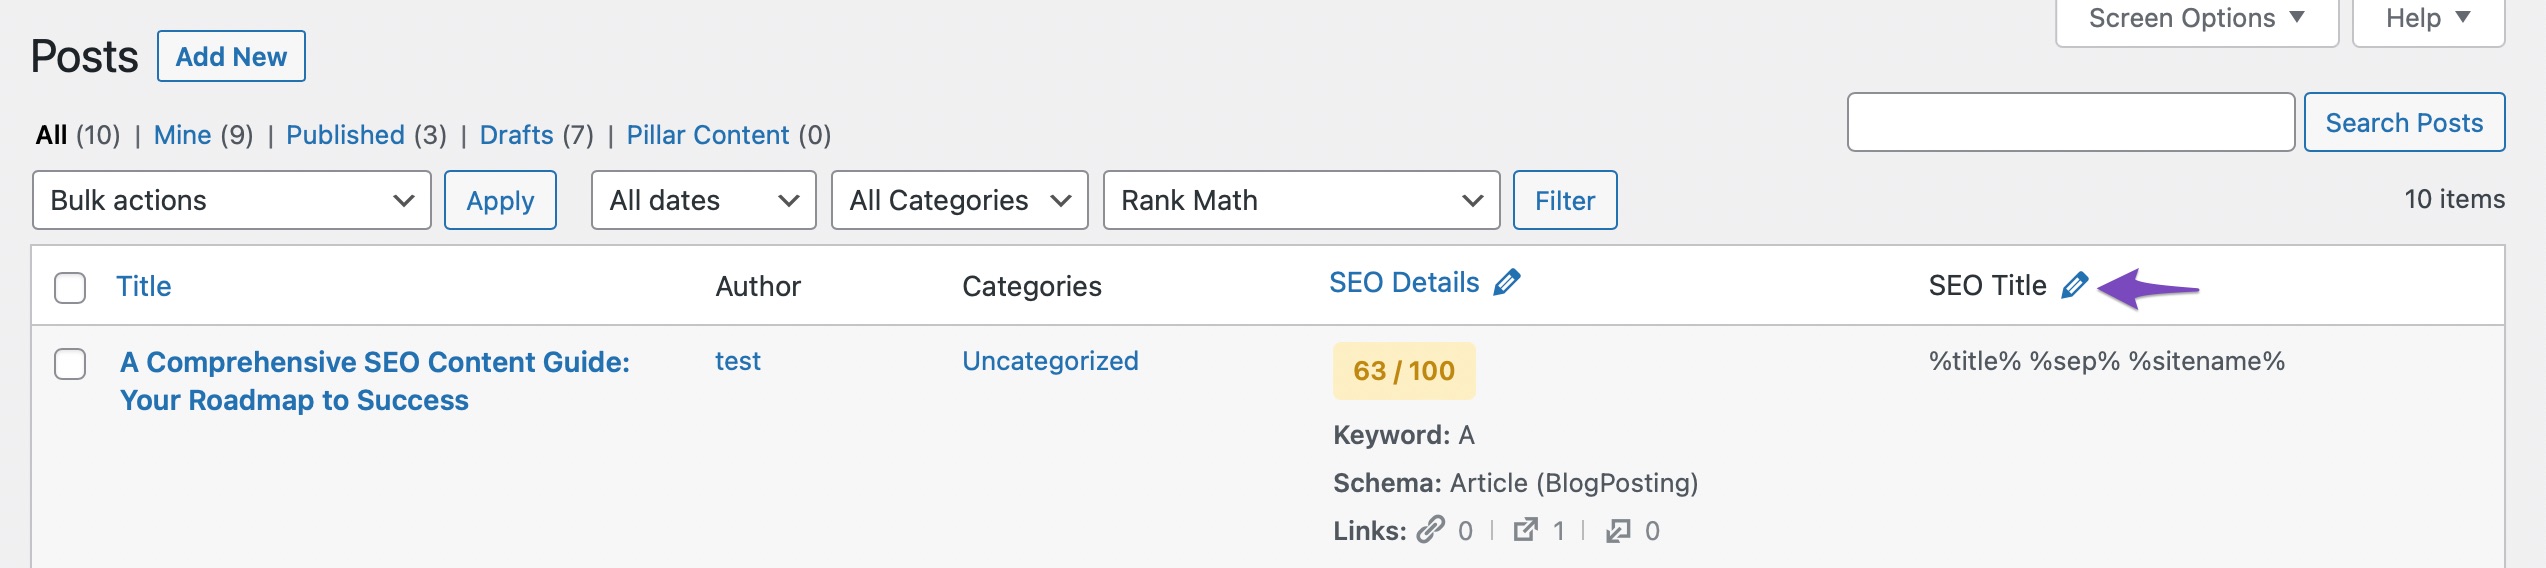
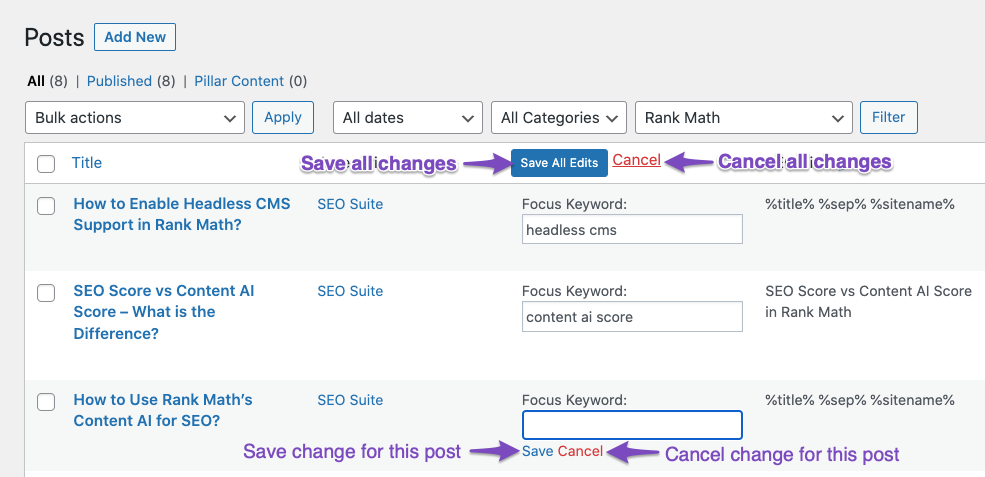
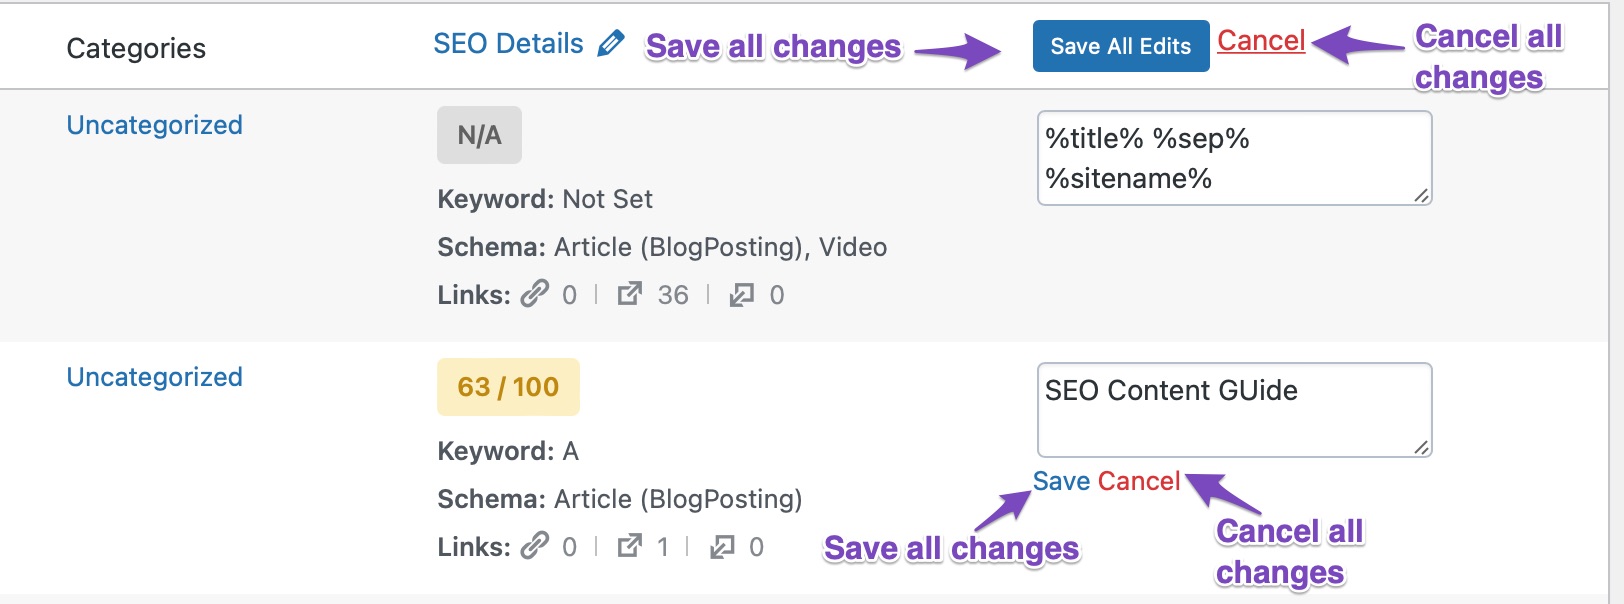
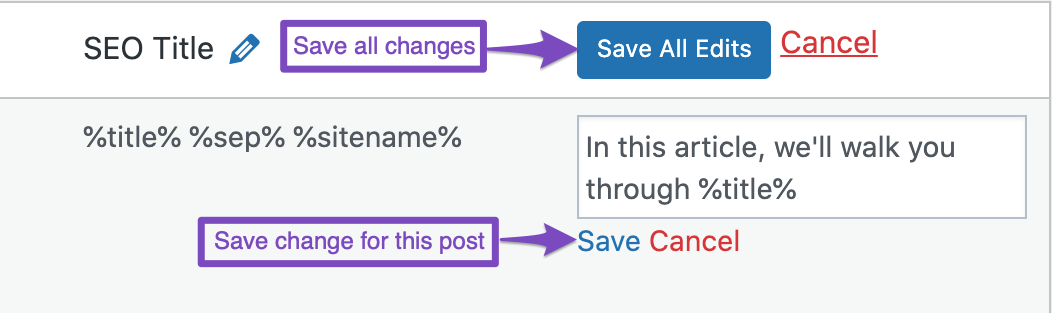
Upon clicking the icon, the SEO Title fields will become editable for all posts or taxonomies in the view. You can then edit the SEO Title for any of them. Once you make changes, you will have the option of saving or canceling all changes or saving or canceling the change to individual titles.
To make the changes, you can use any of the supported variables, plain text, or a combination of them.
8.4 Quick Edit SEO Description
The quick edit SEO Description option lets you quickly edit the SEO descriptions for multiple post types or taxonomies. To use it, click the pencil icon next to the SEO Desc (description) field.
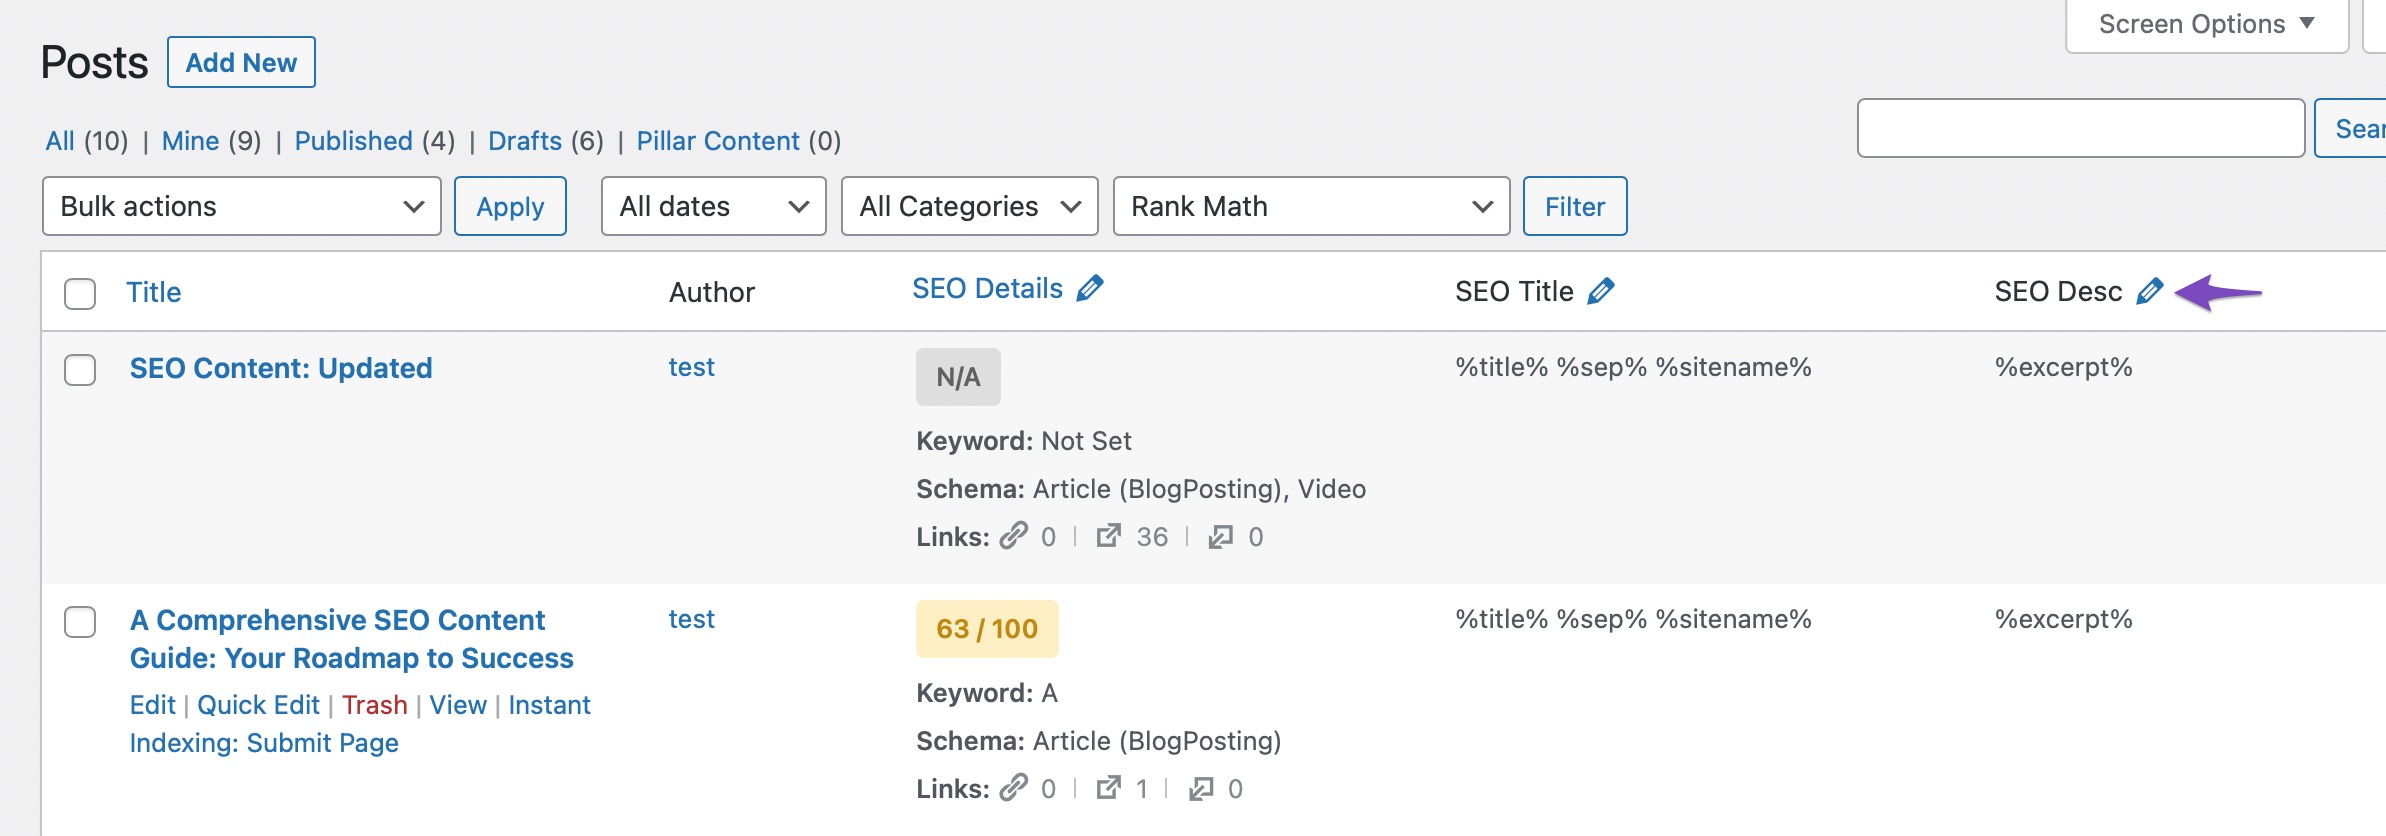
And you’ll see that all the SEO description fields become editable.
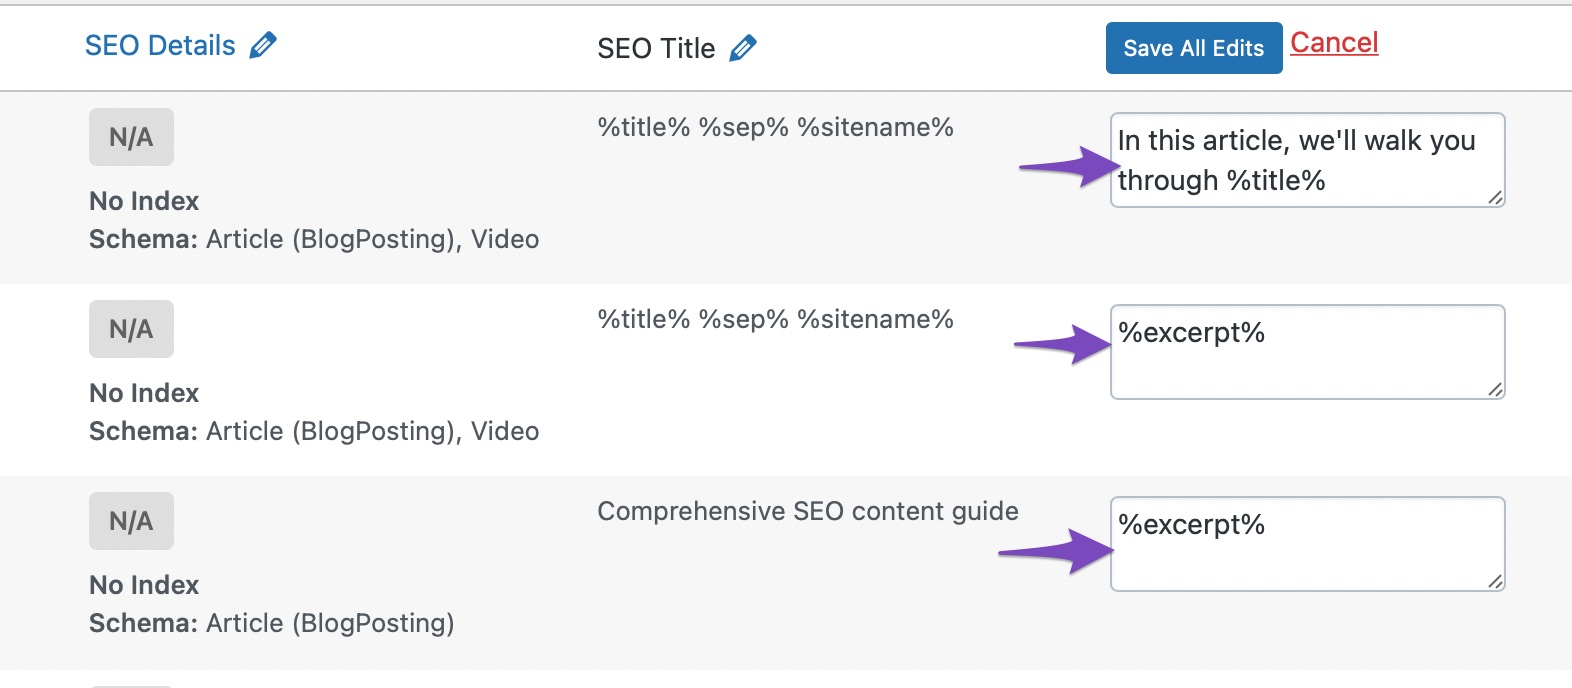
The fields will contain their current values, which may be custom values that you’ve set or global values. You can then edit the fields as you prefer by using variables, text, or a combination of both. Once you’ve made the changes, you have the option of saving the changes for individual SEO descriptions or saving all the changes.
8.5 Advanced Quick Edit Options PRO
We have extended the core Quick Edit option that comes with WordPress and made it more extensive and advanced. With these options we offer in the Quick Edit section, you can:
- Change the SEO Meta Title and Description Template on Multiple posts/pages/products/CPTs at once
- Update the robots meta tag of Multiple posts/pages/products/CPTs to Index, No Index, No Follow, No Archive, No Image Index, etc..
- Choose a primary focus keyword for multiple posts/pages/products/CPTs at once
- Update the canonical URL of multiple posts/pages/products/CPTs at once
- Choose a primary category for multiple posts/pages/products/CPTs at once
- Or, you can choose a pre-made template to auto-select pre-built options for all of the above (in case of Elementor)
Each of these options and what they do on individual posts has already been covered in the Advanced Meta tab section of our KB.
9 Bulk Editing Media
WordPress can have lots of types of media—images, audio files, and even video. But most website owners use images most commonly. All of this media is saved in the WordPress Media Library. Head over to the Media Library to explore the bulk editing options.

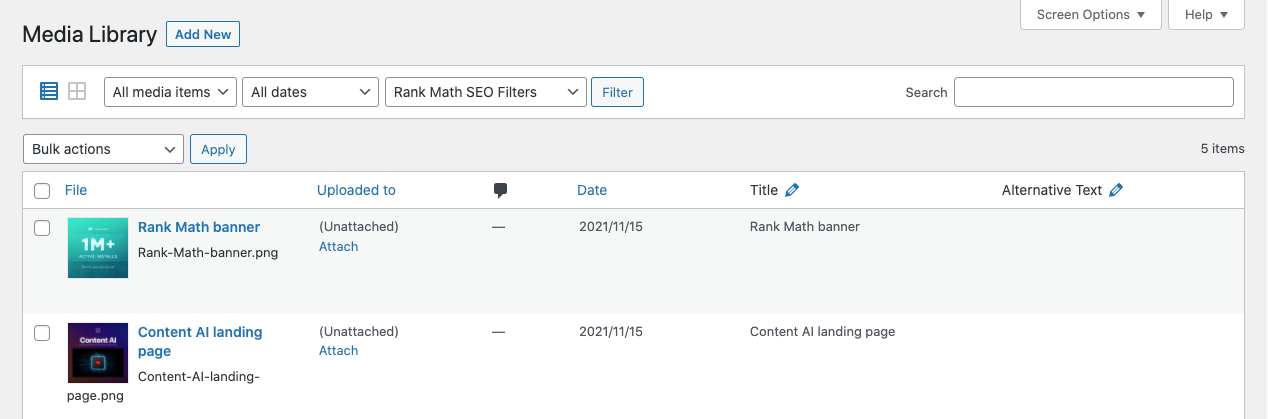
You should reach the media library, and depending on how you’ve set up your WordPress website, and the screen should look something like this:
You might be wondering that how you would use the bulk editing features if you can’t see any of the metadata of the media? The answer is pretty simple.
The default view of the Media Library is the thumbnail view, where you see the media’s thumbnails but not the metadata. To see the metadata, you have to switch to the list view by clicking the list icon on top of the screen.
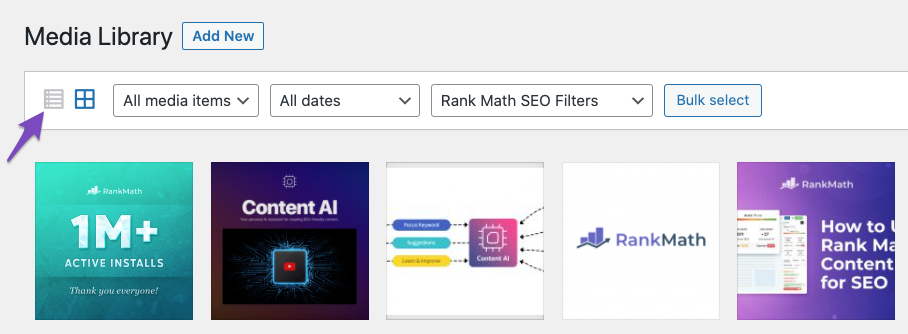
And voila, you should see a list-based interface, which should seem familiar if you followed the bulk editing options for pages or posts.
If your page looks different, or if you don’t see all the options on the page like the image above, don’t worry; just check the Screen Options menu and see if you have all the options enabled.
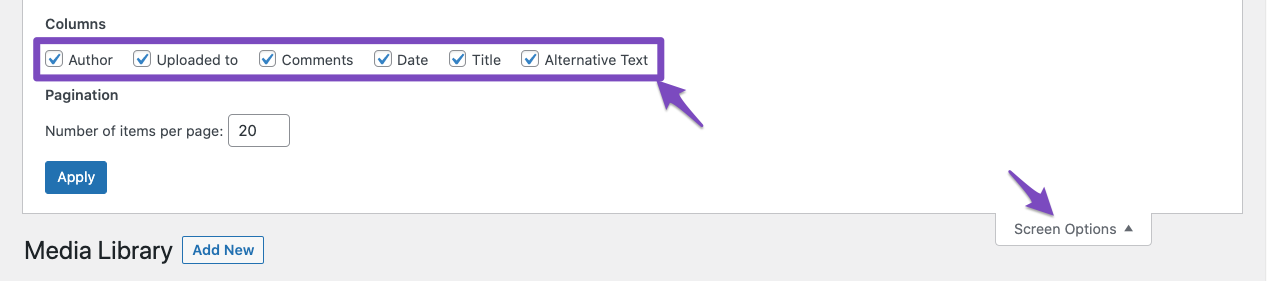
In case if you’re unable to find the TItle and Alternative Text options here, then ensure you’ve
- Disabled the Redirect Attachments option under WP Dashboard → Rank Math SEO → General Settings → Links
- Enabled the Bulk Editing option under Rank Math SEO → Titles & Meta → Attachments.
9.1 Bulk Editing Titles
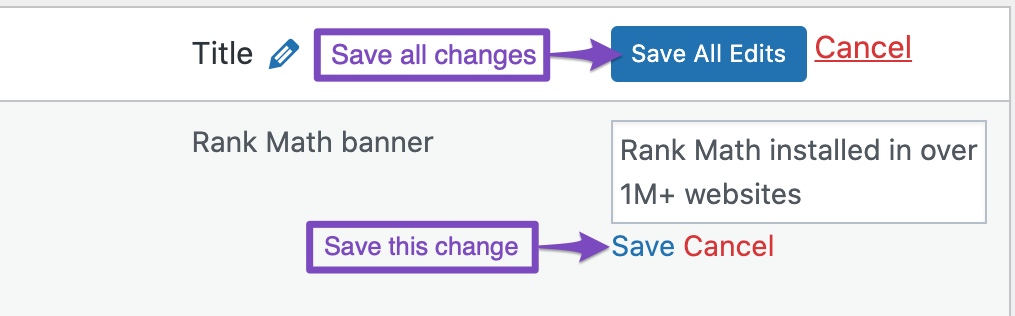
To enable bulk editing on the image titles, click the pencil icon present at the top of the screen.
As you’ve seen with other bulk edits, the titles of the images transform into editable fields, similar to this.
All you have to do now is edit the image titles and save them individually or together; however, you prefer.
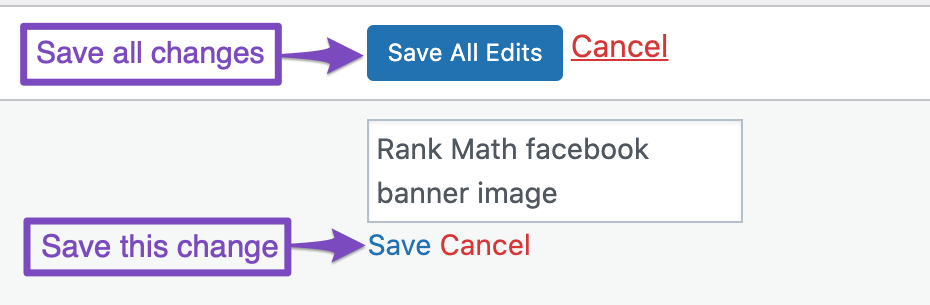
If you made a mistake during the editing process, you could also click the “Cancel” link next to the Save All Edits button to discard any changes and try again.
9.2 Bulk Editing Alternative Text
Bulk Editing the Alternative Text for images is no different. Click the pencil icon to enter edit mode.
As expected, the existing alt texts will transform into editable text fields.
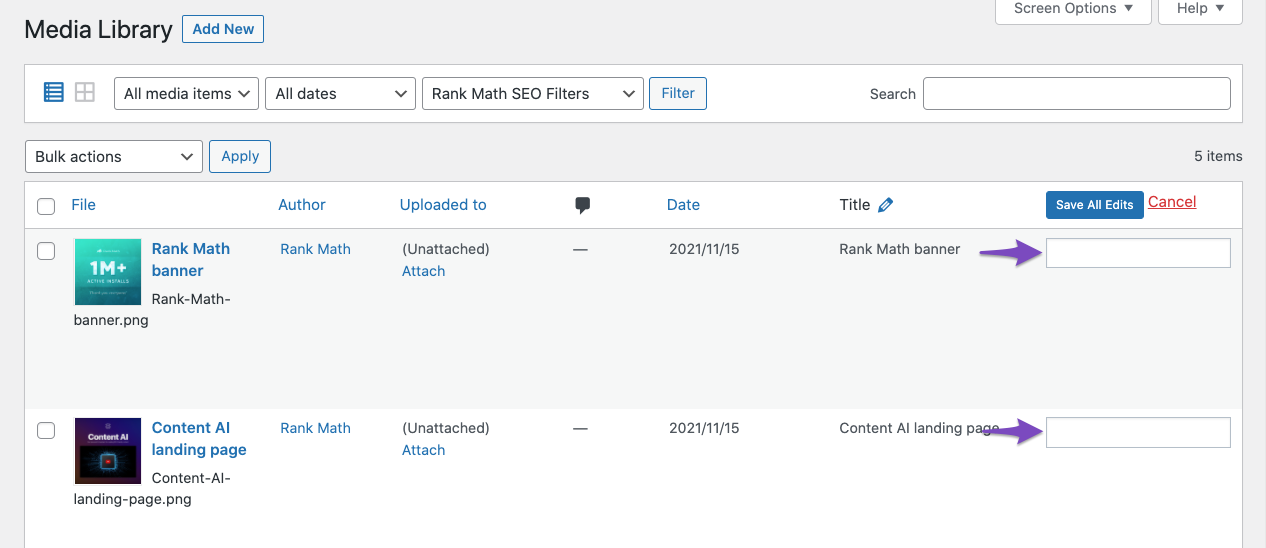
Here, you can edit, add, modify, or delete the alt text of any of your images.
You can then save each change that you made, discard each change that you made, save all the changes you made, or discard all the changes you made.
10 Working with WooCommerce and Other Custom Post Types
Till now, we’ve explained the filtering, bulk actions, and quick actions only for posts. But, many websites don’t use only posts. They use pages and custom posts as well. Some examples of custom posts would be forums, topics, replies, products, downloads, etc. These custom posts can be created by plugins such as WooCoommerce, Easy Digital Downloads, BuddyPress, and other products. You can even create your own custom post types by using plugins or by adding some code to your website.
We are pleased to tell you that most of the features that we discussed in this article are supported for all pages and custom post types. Here are a couple of screenshots from a few popular plugins. Here is one with WooCommerce.

And here is one with Easy Digital Downloads.
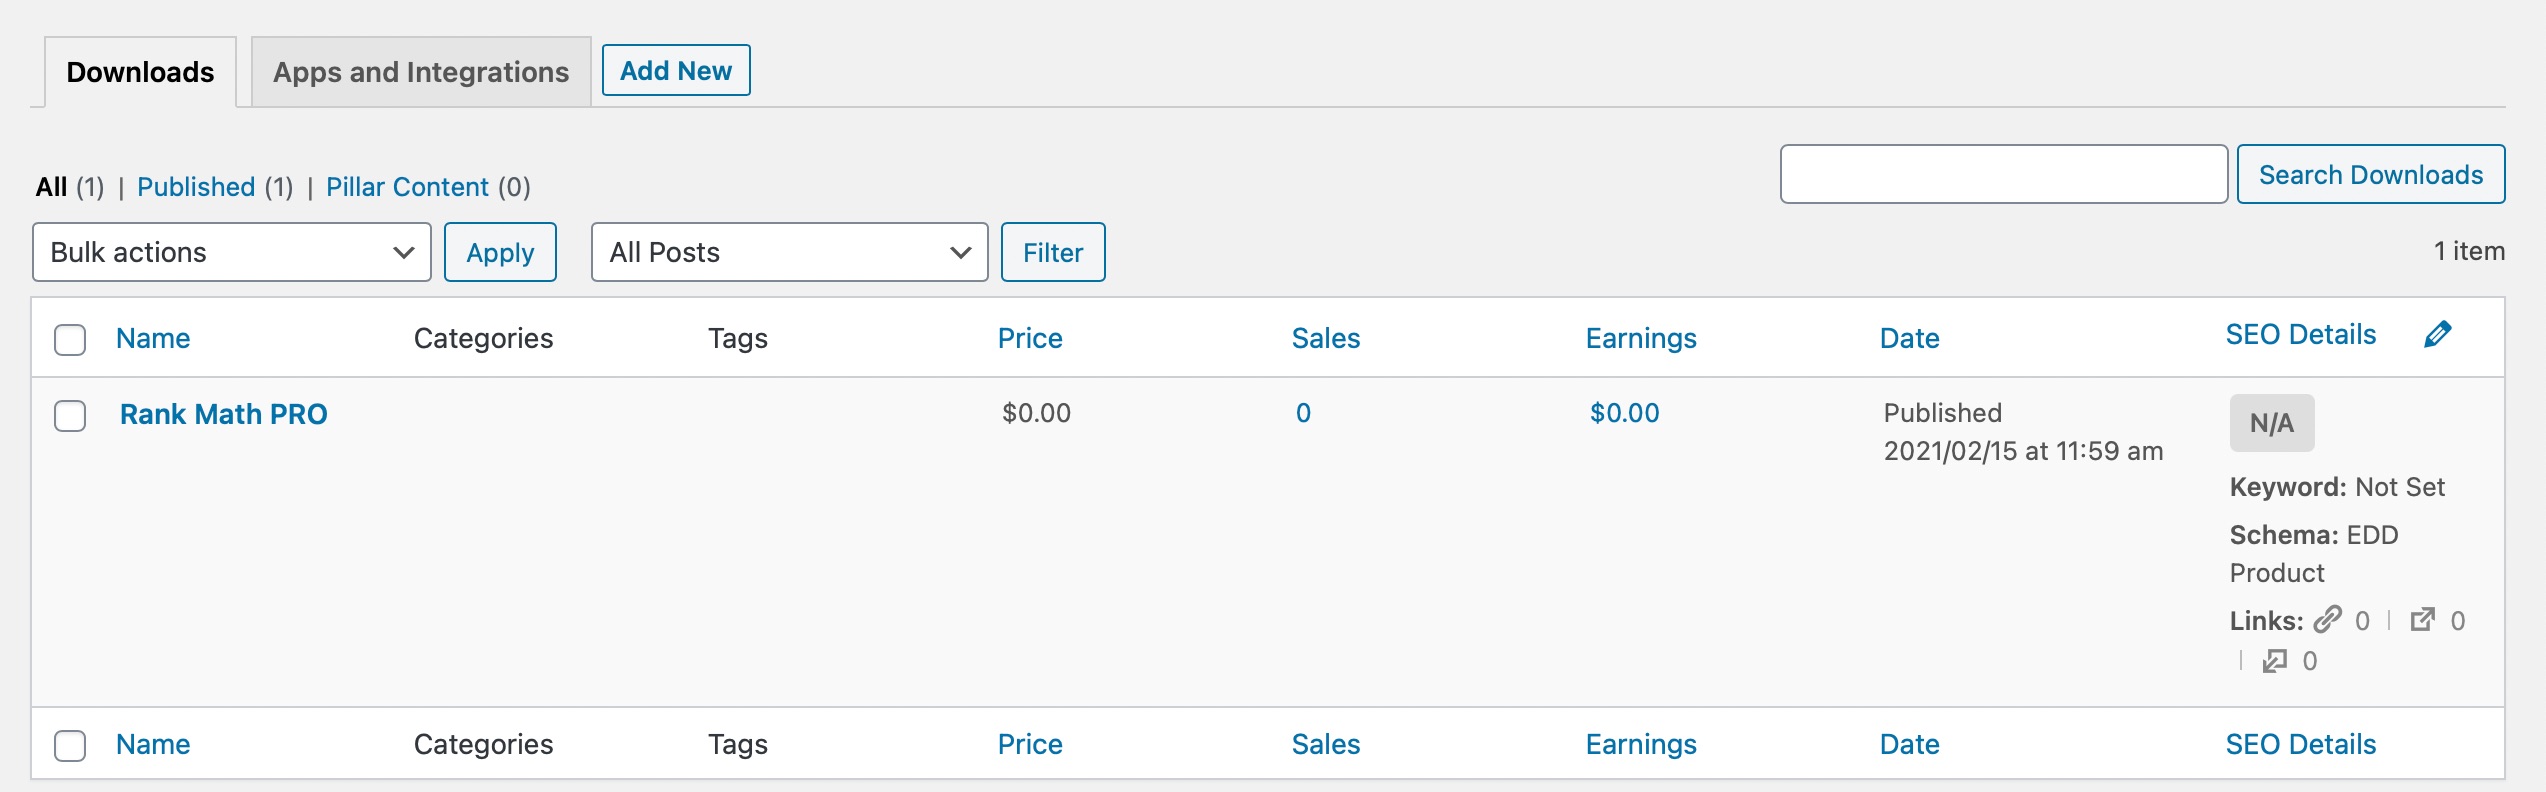
As you can see, you can use bulk actions, filters and quick action in both cases.
11 Using Filters, Bulk Actions, and Quick Actions Together
While the filters, bulk actions, and quick actions are powerful features, the true value of these features is only realized when you start using them together. Once you master that skill, you will be able to make optimizations to your website faster than ever, and your competitors will be left wondering how you’re leaving them in the dust.
While there are hundreds of scenarios that you use these features for, here are some practical scenarios that we want to highlight to give you some food for thought.
- Filter all the posts that don’t have focus keywords set and use quick actions to set them quickly
- Filter all posts from a category that were redirected, then remove their redirects with a bulk action
- Quickly filter posts that were updated recently, then update their focus keywords
- If you update your global SEO settings, quickly filter posts that have custom titles or descriptions set and update them
- Quickly redirect all posts from a particular category to a specific post
- Find all orphaned posts and add internal links to those posts
- Find all posts with a specific Schema type and add another Schema type to them quickly
And many more.
These features are infinitely powerful, and we would highly recommend that you invest some time in getting to know these features better. Once you understand their power and start utilizing them, your views on how to manage your website will surely change.
12 Conclusion
With the new filtering and bulk editing options, Rank Math has solved one of the biggest pain points in managing and optimizing posts on your website. With these amazing updates, the already amazing Rank Math is more powerful than ever.
Now, it is up to you! Start using these features and making big leaps in how you optimize your website and gain traffic. If you have any questions or doubts, the Rank Math forum is just a click away. If you have some feedback you’d like to share, the Rank Math Facebook Group is another great place to hang out.