Are you experiencing slow performance, clutter, or functionality issues with your WordPress site?
Despite trying different solutions and plugins, are you still unable to find a resolution?
If you find yourself in such situations, you need to reset your WordPress site to its original state. Although resetting your site may seem intimidating, especially with a lot of content and plugins, it can be a simple process if you follow the correct steps.
In this post, we’ll discuss how to reset your WordPress site, covering essential steps such as data backup, content and plugin removal, and restoring your site to its initial state.
So, without any further ado, let’s get started.
Table Of Contents
1 When to Reset Your WordPress Site
The decision to reset your WordPress site should not be taken lightly, as it involves deleting all content, themes, plugins, and settings.
However, there are specific scenarios where a reset can be beneficial. Here are some instances:
- Testing and Development: If you use your WordPress site for testing or development purposes, a reset can provide a clean starting point, eliminating unwanted data and conflicts.
- Security Breach or Hacked Site: In the unfortunate event of a security breach or hacking, a reset can effectively remove any injected malicious code or backdoors, restoring your site’s integrity.
- Website Cleanup: Accumulated unnecessary data, outdated themes, and unused plugins can hamper performance and expose security vulnerabilities. Resetting your site allows you to eliminate clutter and optimize your website.
- Major Configuration Issues: Persistent misconfigurations or conflicts between themes and plugins can cause significant problems. If troubleshooting efforts fail, a reset can help eliminate problematic elements and start fresh.
- Starting or Rebranding: A reset provides a practical approach when rebranding or changing your website’s focus. By wiping existing content and design, you can create a new site aligned with your new vision and goals.
2 When Not to Reset Your WordPress Site
While resetting a WordPress site can be a helpful solution in certain situations, sometimes it’s best to avoid performing a reset.
Here are some scenarios to keep in mind:
- Content and Data Loss: Avoid resetting your website if it contains substantial content, customer data, or user-generated content, as it permanently deletes posts, pages, comments, and media files. Always have a backup before considering a reset.
- Established Website: Resetting a WordPress site can negatively affect user experience and search engine rankings, especially for established sites.
- Customizations and Settings: Resetting your site may cause you to lose extensive customizations to its theme, appearance, or functionality. Instead of resetting, try fixing specific issues to avoid the time and effort required to recreate those customizations.
- Ecommerce and Membership Sites: Resetting can have severe consequences for online stores or membership sites, leading to lost sales, disrupted subscriptions, and user dissatisfaction.
- Temporary Issues: If facing temporary issues like plugin conflicts, theme compatibility problems, or minor configuration errors, resetting might be an overkill solution.
3 How to Reset Your WordPress Site
There are various ways to reset your WordPress site, and you can select the one that best suits your needs and preferences.
You can either choose to reset it manually or use a plugin. However, it is essential to back up your website completely before initiating the reset process to ensure you can quickly restore it in case of any problems.
3.1 Reset Your WordPress Site Using a Plugin
If you prefer a simple and convenient way to reset your WordPress website, using a plugin is an excellent option.
A popular choice among users is the WP Reset plugin, which enables you to reset your entire site or specific parts effortlessly.
To begin, install and activate the WP Reset plugin from the WordPress repository.
Read our step-by-step guide on installing WordPress plugins for detailed instructions.
After activation, navigate to Tools → WP Reset from your WordPress dashboard. From this section, you can reset your entire site, including content, settings, and customizations.

If a complete site reset seems drastic, you can reset specific elements, like the database or theme settings. However, it’s essential to create a snapshot before proceeding.
A snapshot serves as a copy of all WordPress database tables, both standard and custom, stored in the site’s database.
Snapshots prove useful for identifying changes made by plugins to the database or swiftly restoring the development environment after testing database-related modifications.
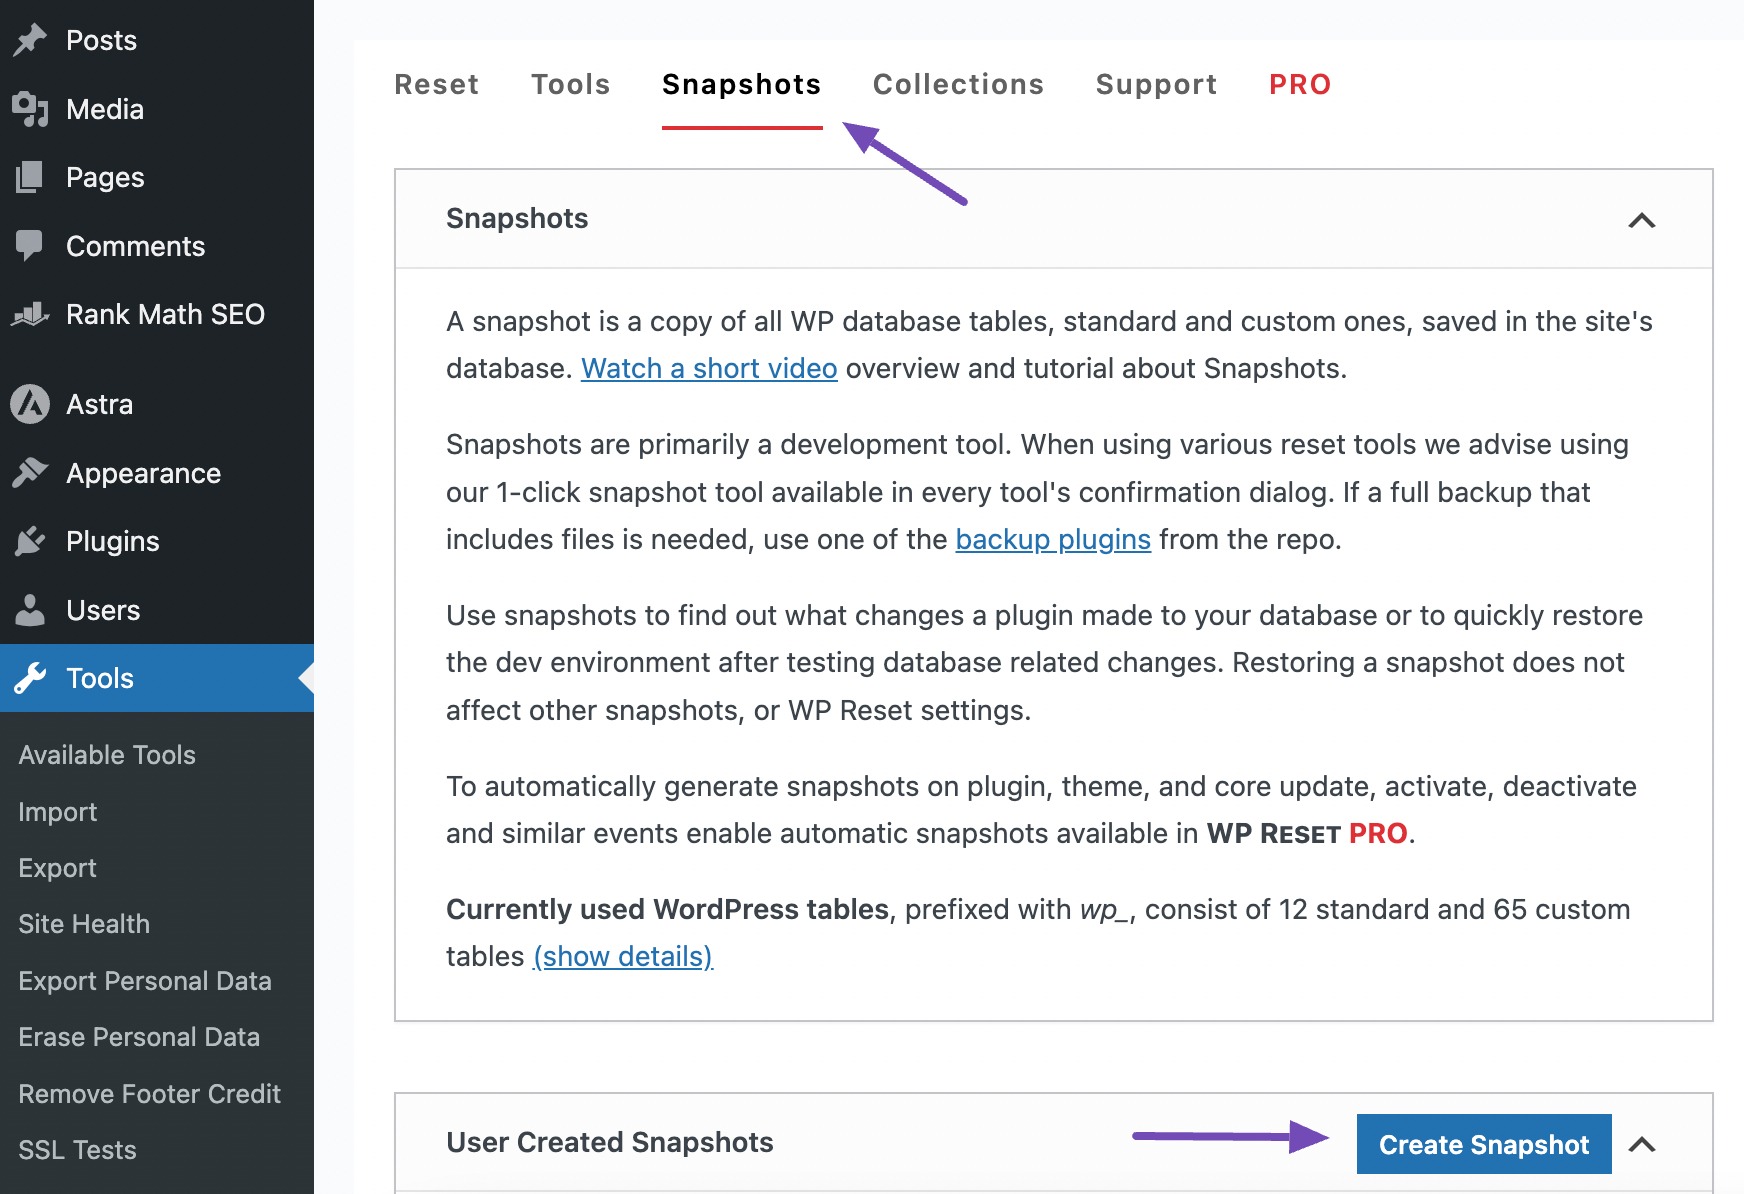
To create a snapshot, navigate to the Snapshots tab on the WP Reset page and click the Create Snapshot button, as shown below.
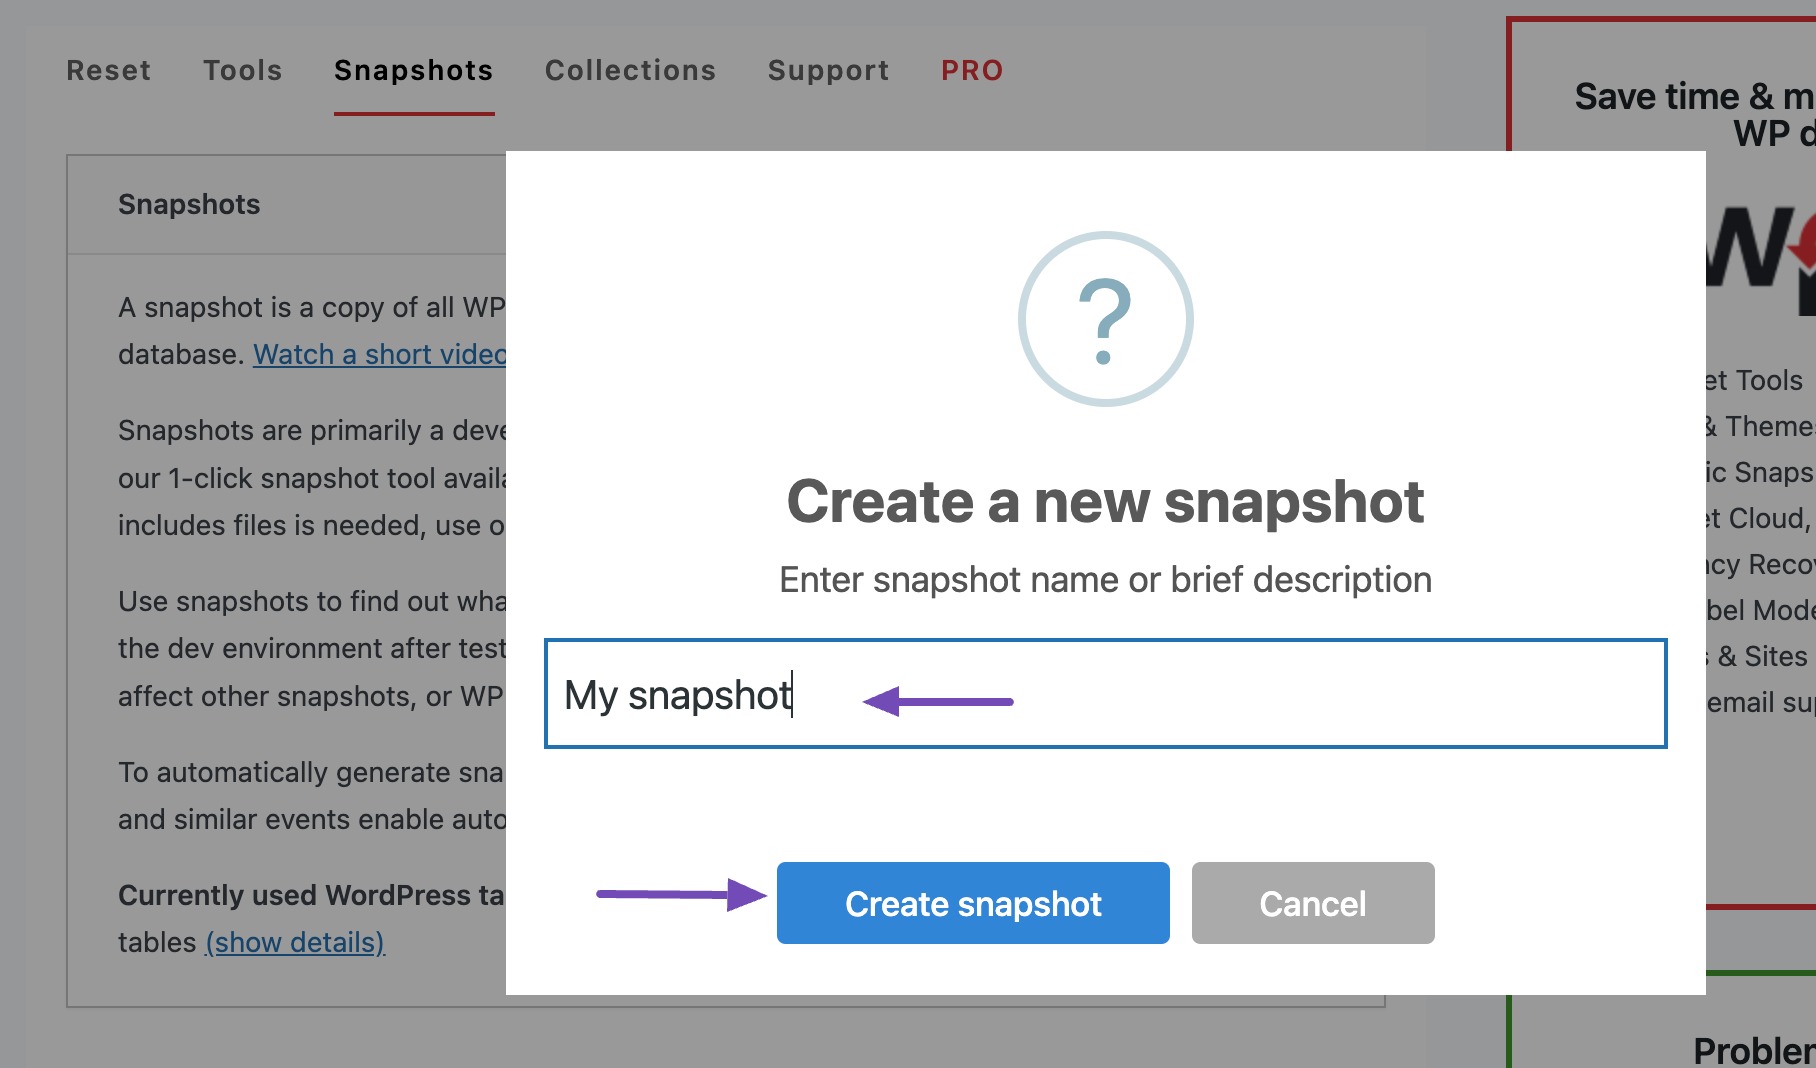
Upon clicking the Create Snapshot button, a popup field will appear, asking you to enter a brief name or description for the snapshot.
Next, click on the Create snapshot button.
A snapshot will be generated by the plugin.
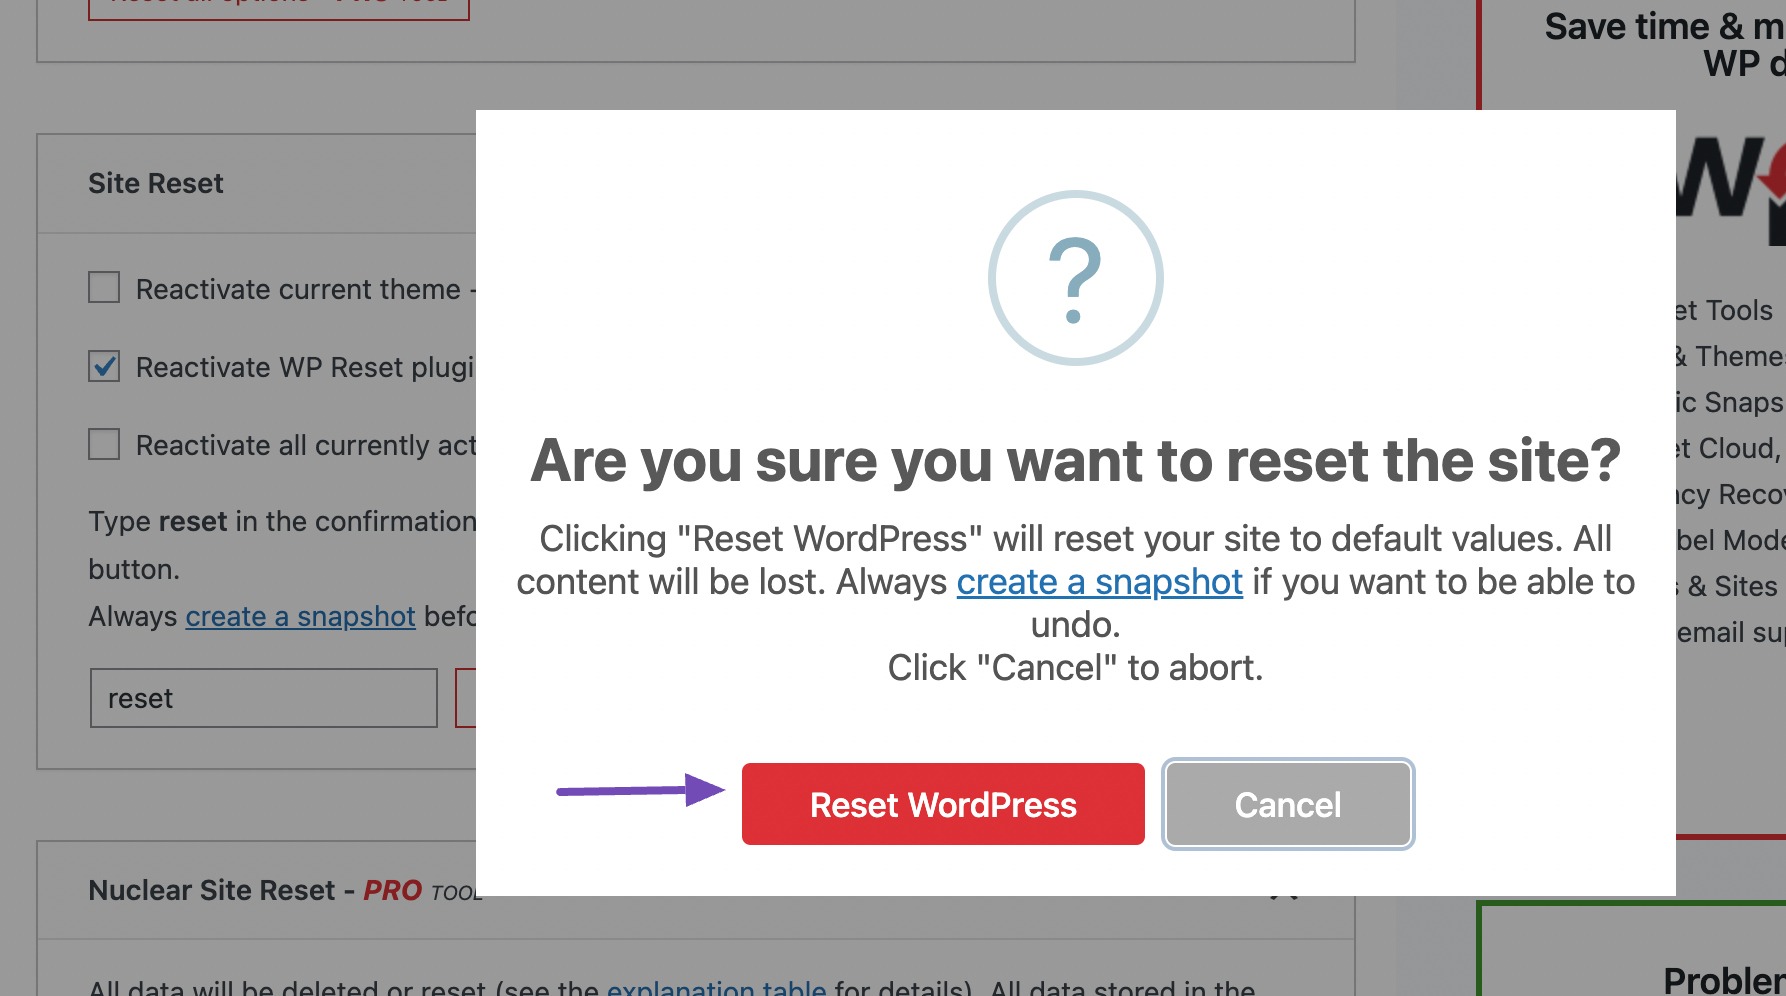
Once the snapshot is created, you can proceed to reset your website. Navigate to the Reset tab on the page and scroll down to the Site Reset section.
After making your desired selections, enter reset in the provided field and click the Reset Site button.
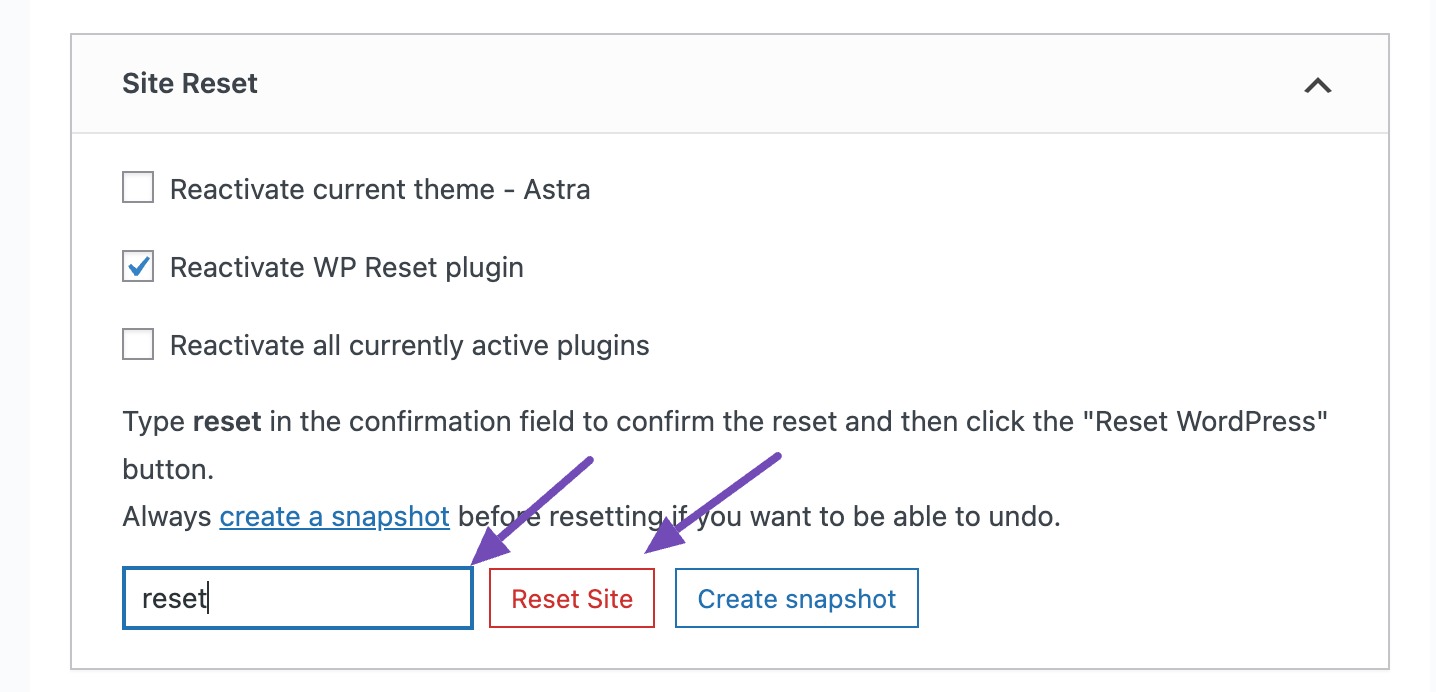
It will display a confirmation message. Once done, click the Reset WordPress button to proceed with the reset.
If you want to recover these files after the reset, you have two options: restore your backup files or use the snapshot feature.
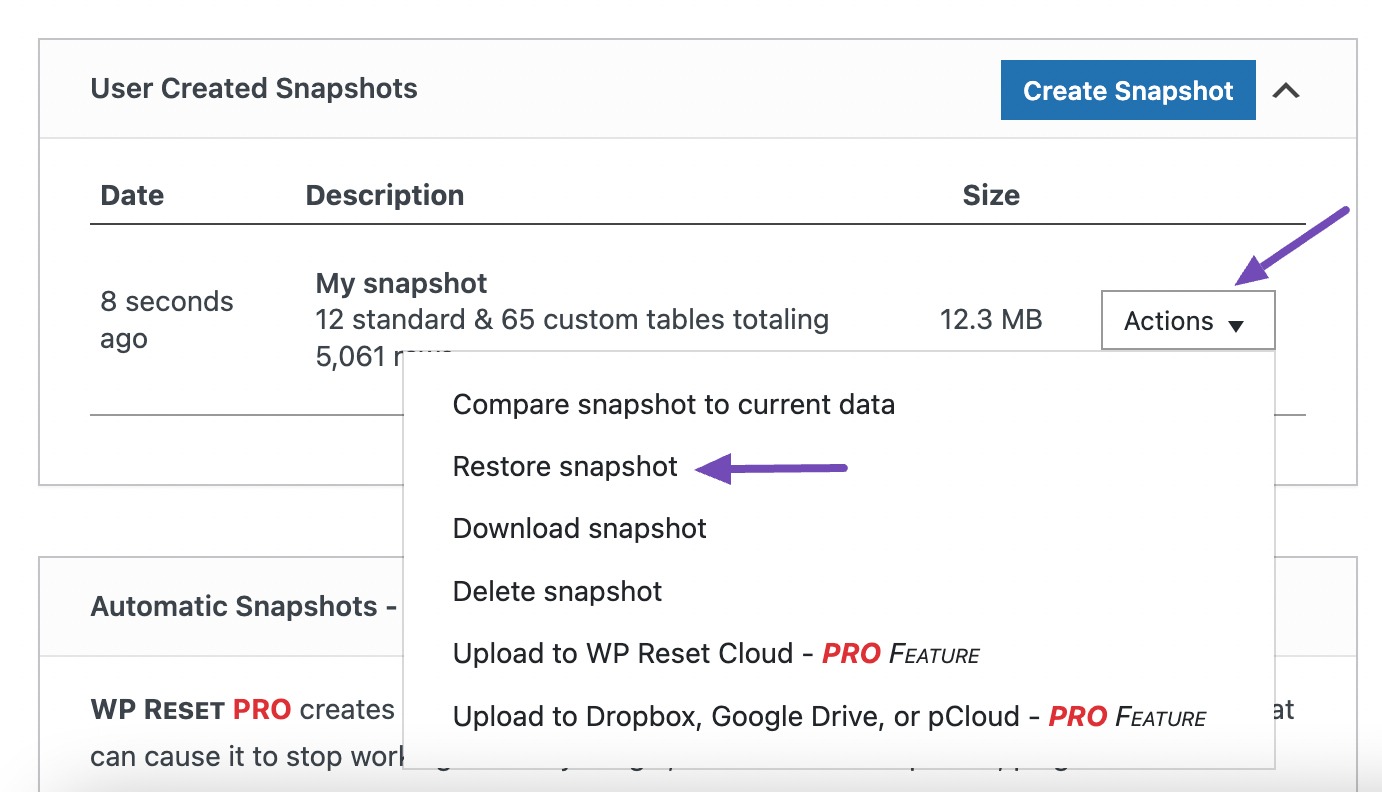
To use the snapshot, navigate to the Snapshots tab on the WP Reset page and scroll down to the User Created Snapshots section.
Click on the dropdown menu next to the Actions button and select the Restore snapshot option.
A confirmation message will appear on the screen. Click on the Restore snapshot button to restore the snapshot on your website.
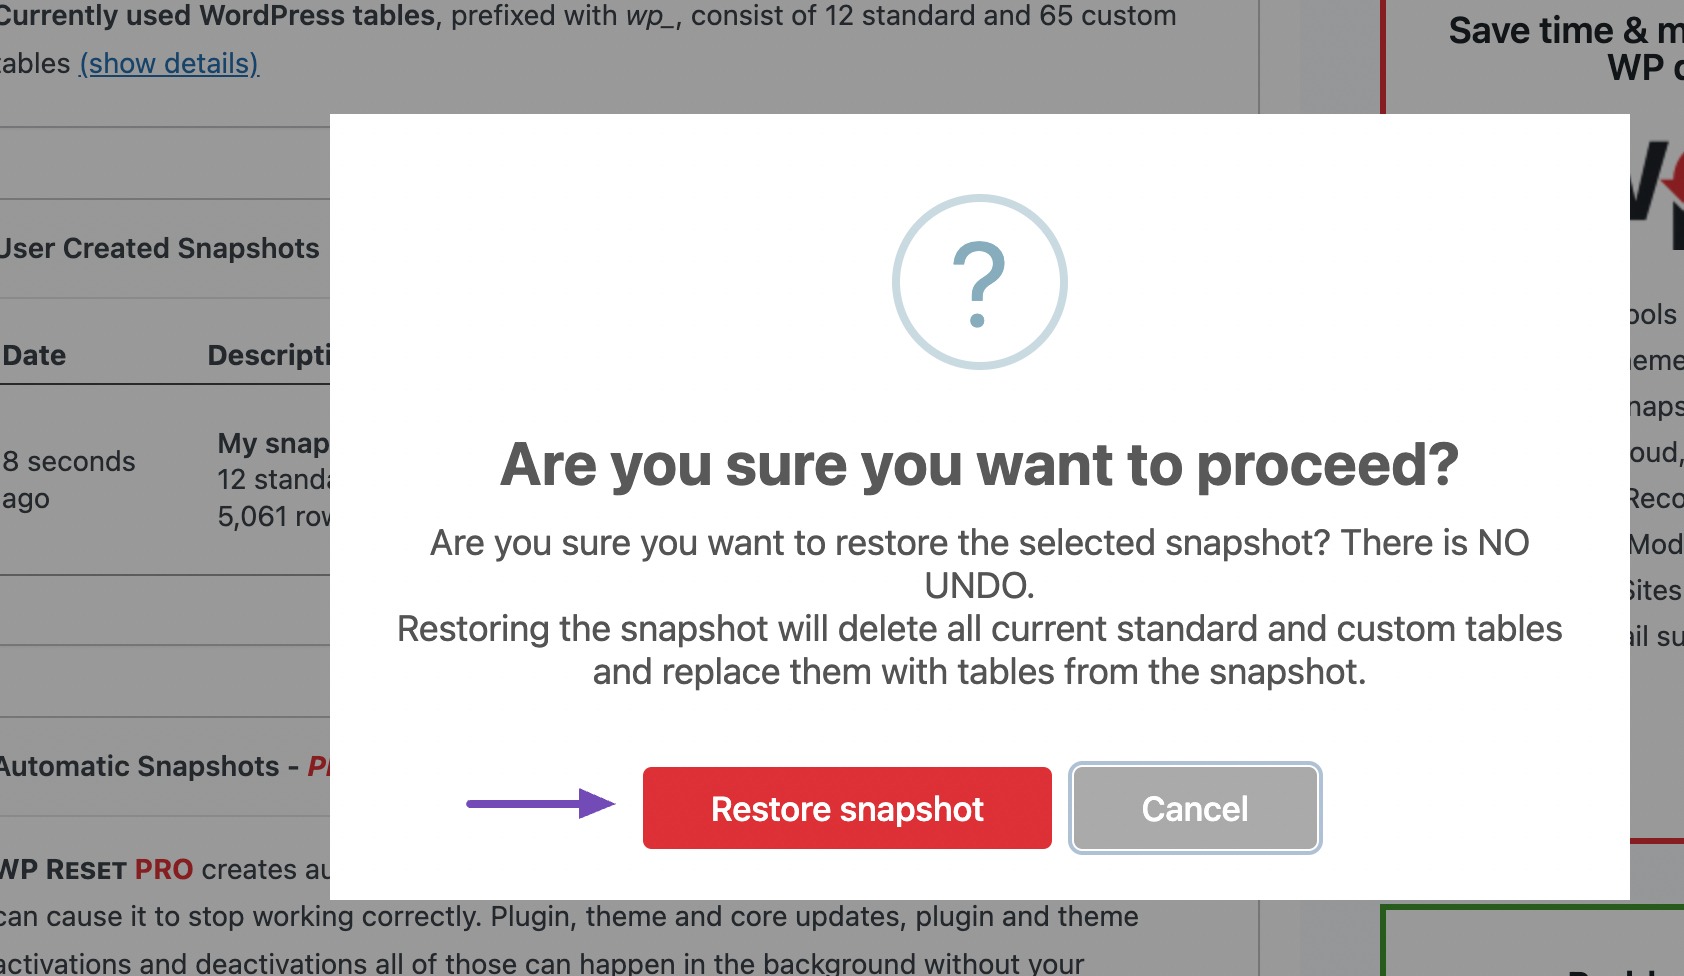
After successfully restoring the snapshot, a confirmation message will appear on your screen, redirecting you to the WordPress login page. Simply log back into your site.
It’s important to note that you should only restore the snapshot if you choose not to reset your WordPress website again. Otherwise, leave it as it is after the reset and proceed with other tasks.
3.2 Reset Your WordPress Site Manually
This method involves completely removing all files and data associated with your website, allowing you to start fresh without the need for a plugin.
Access Your WordPress Database and Delete It
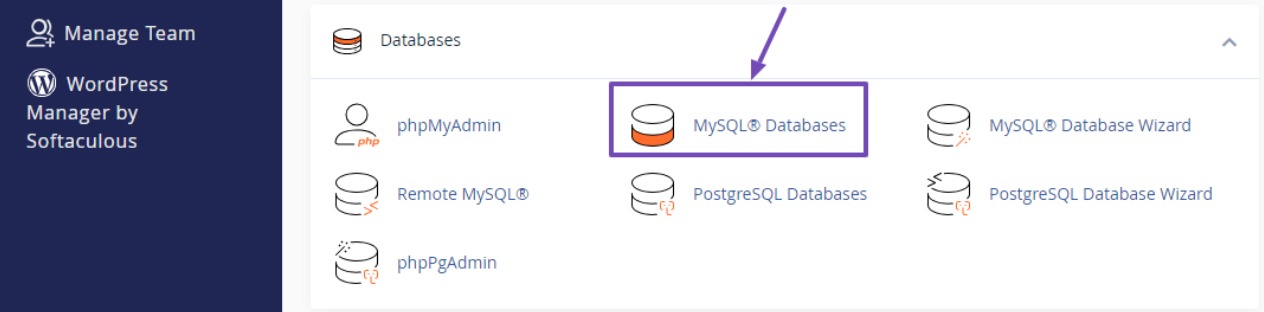
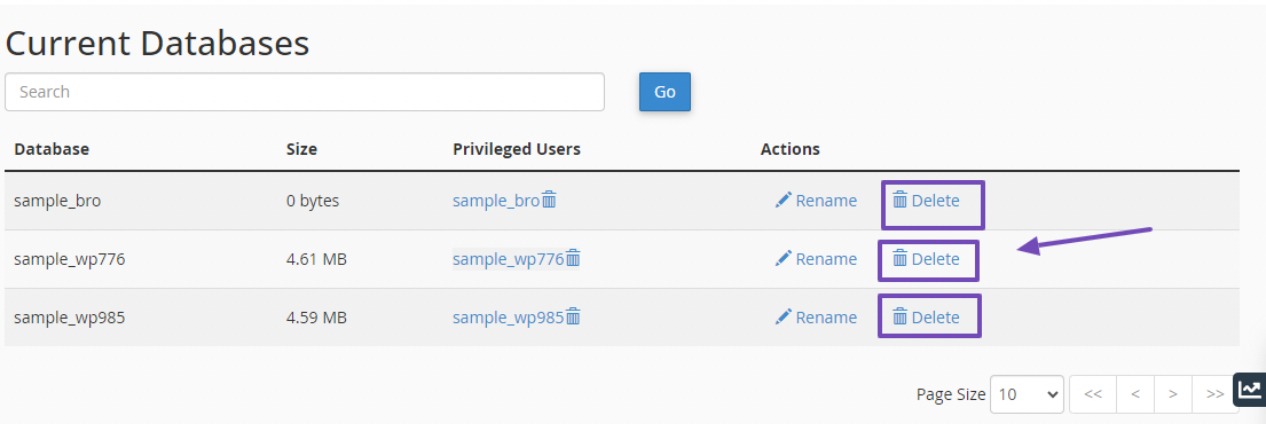
To reset your WordPress site manually, navigate to your WordPress website database through your hosting panel or cPanel. Navigate to the MySQL Databases option.
Next, locate the Current Databases section.
Look for the specific database associated with the WordPress website you wish to reset and delete it by clicking the Delete button next to it.
If you’re dealing with multiple databases and are uncertain which one is associated with the WordPress site you intend to reset, navigate to the file directory or public_html using the File Manager.
Locate the wp-config.php file, right-click on it, and choose View, as shown below.
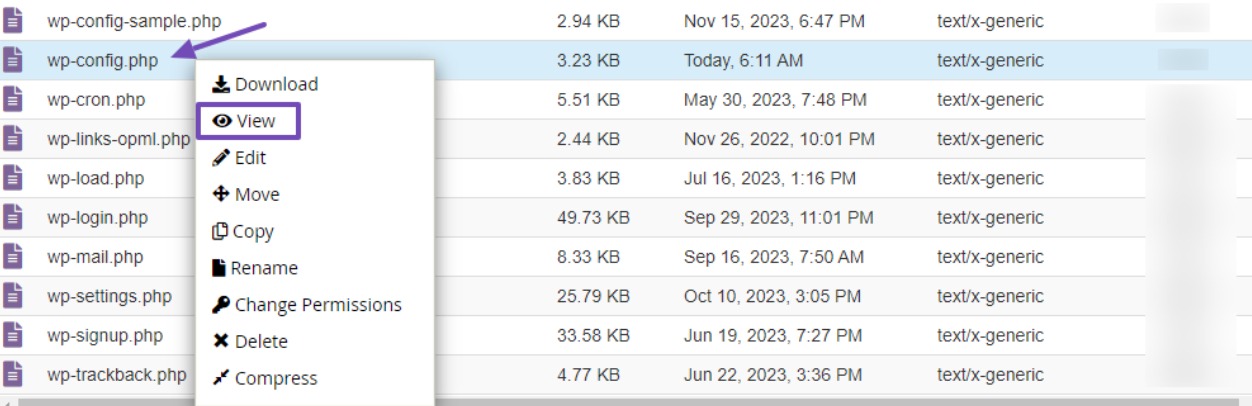
The wp-config.php file will now open in a new window; make a note of three essential details: the database name, username, and password.
Keep in mind that the database name visible in this window is the one you’ll be removing from the MySQL database page.
Create a New WordPress Database
As mentioned earlier, it is advised only to delete the database while leaving the database user and password unchanged.
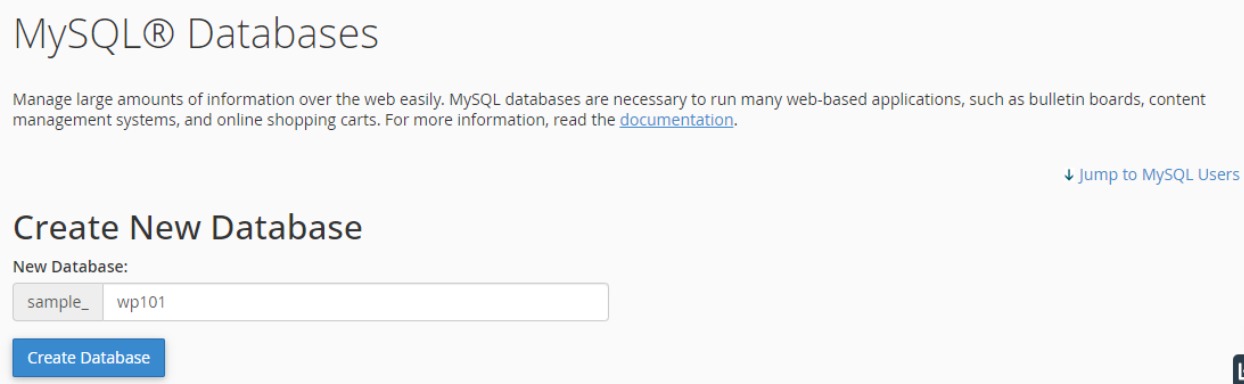
After deleting the site’s database you wish to reset, you will need to create a new database and grant the old database user privileges.
To create a new database, enter the desired name for the new database and click on the Create Database button, as shown below.
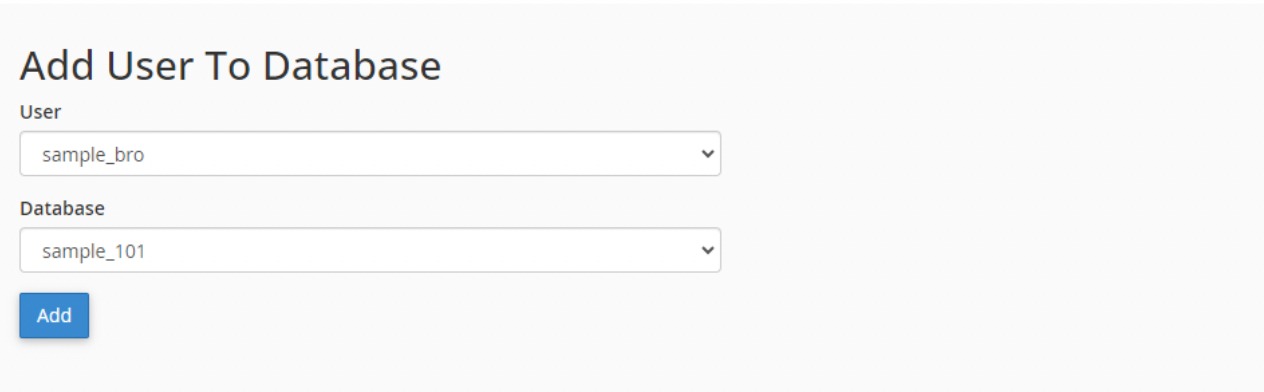
Once you’ve created the new database, find the Add User To Database option. Toggle the list to choose the user for the newly created database. Select the database user of the WordPress site you intend to reset, then choose the new database.
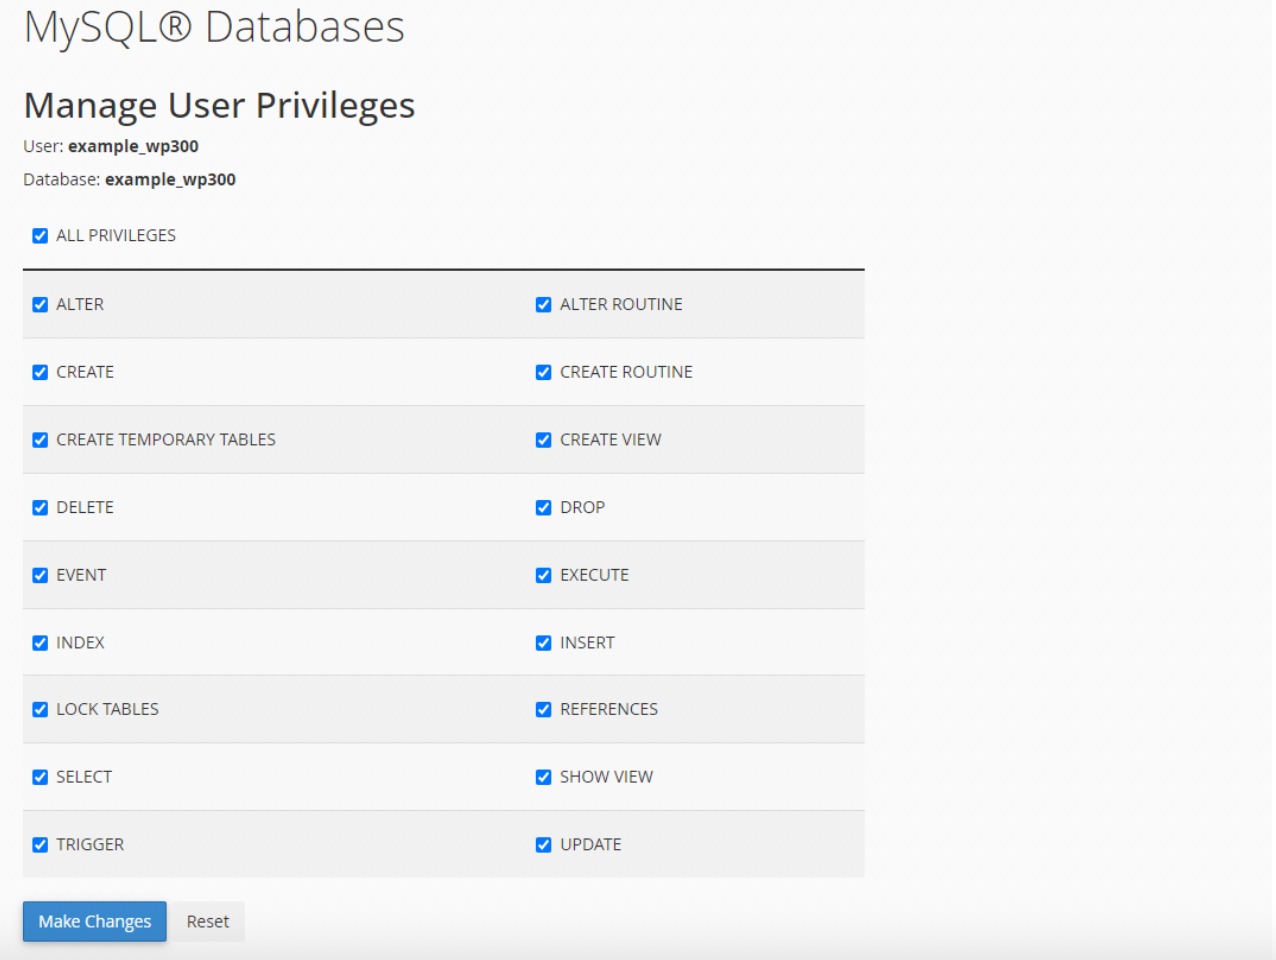
Once done, click the Add button. This will redirect you to the page where you can grant privileges.
On the Manage User Privileges page, simply check the box next to ALL PRIVILEGES. Scroll to the bottom of the page and click the Make Changes button to grant all privileges to the user.
Delete Your WordPress Files
After granting privileges to the database user, proceed to delete all your WordPress files.
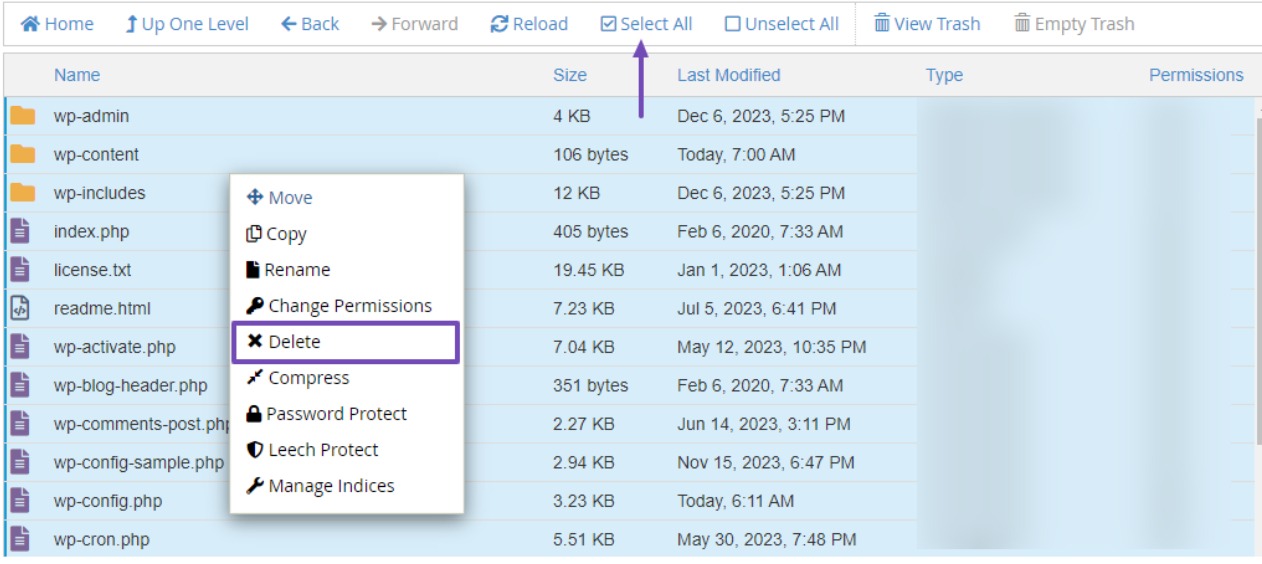
To do so, access the File Manager and navigate to the public_html or to the domain root directory.
Select all the WordPress files, right-click, and click the Delete option.
To retain specific files such as themes, images, or plugins before the reset, navigate to the wp-content folder. Hover over the desired file, right-click, and choose the option to compress it.
Once compressed, find the compressed file, right-click, and select the Download option. Some files may allow immediate download without compression. Download these files, and you’ll reupload them after the website reset.
After deleting files, it’s time to reinstall a new WordPress website.
Reinstall WordPress
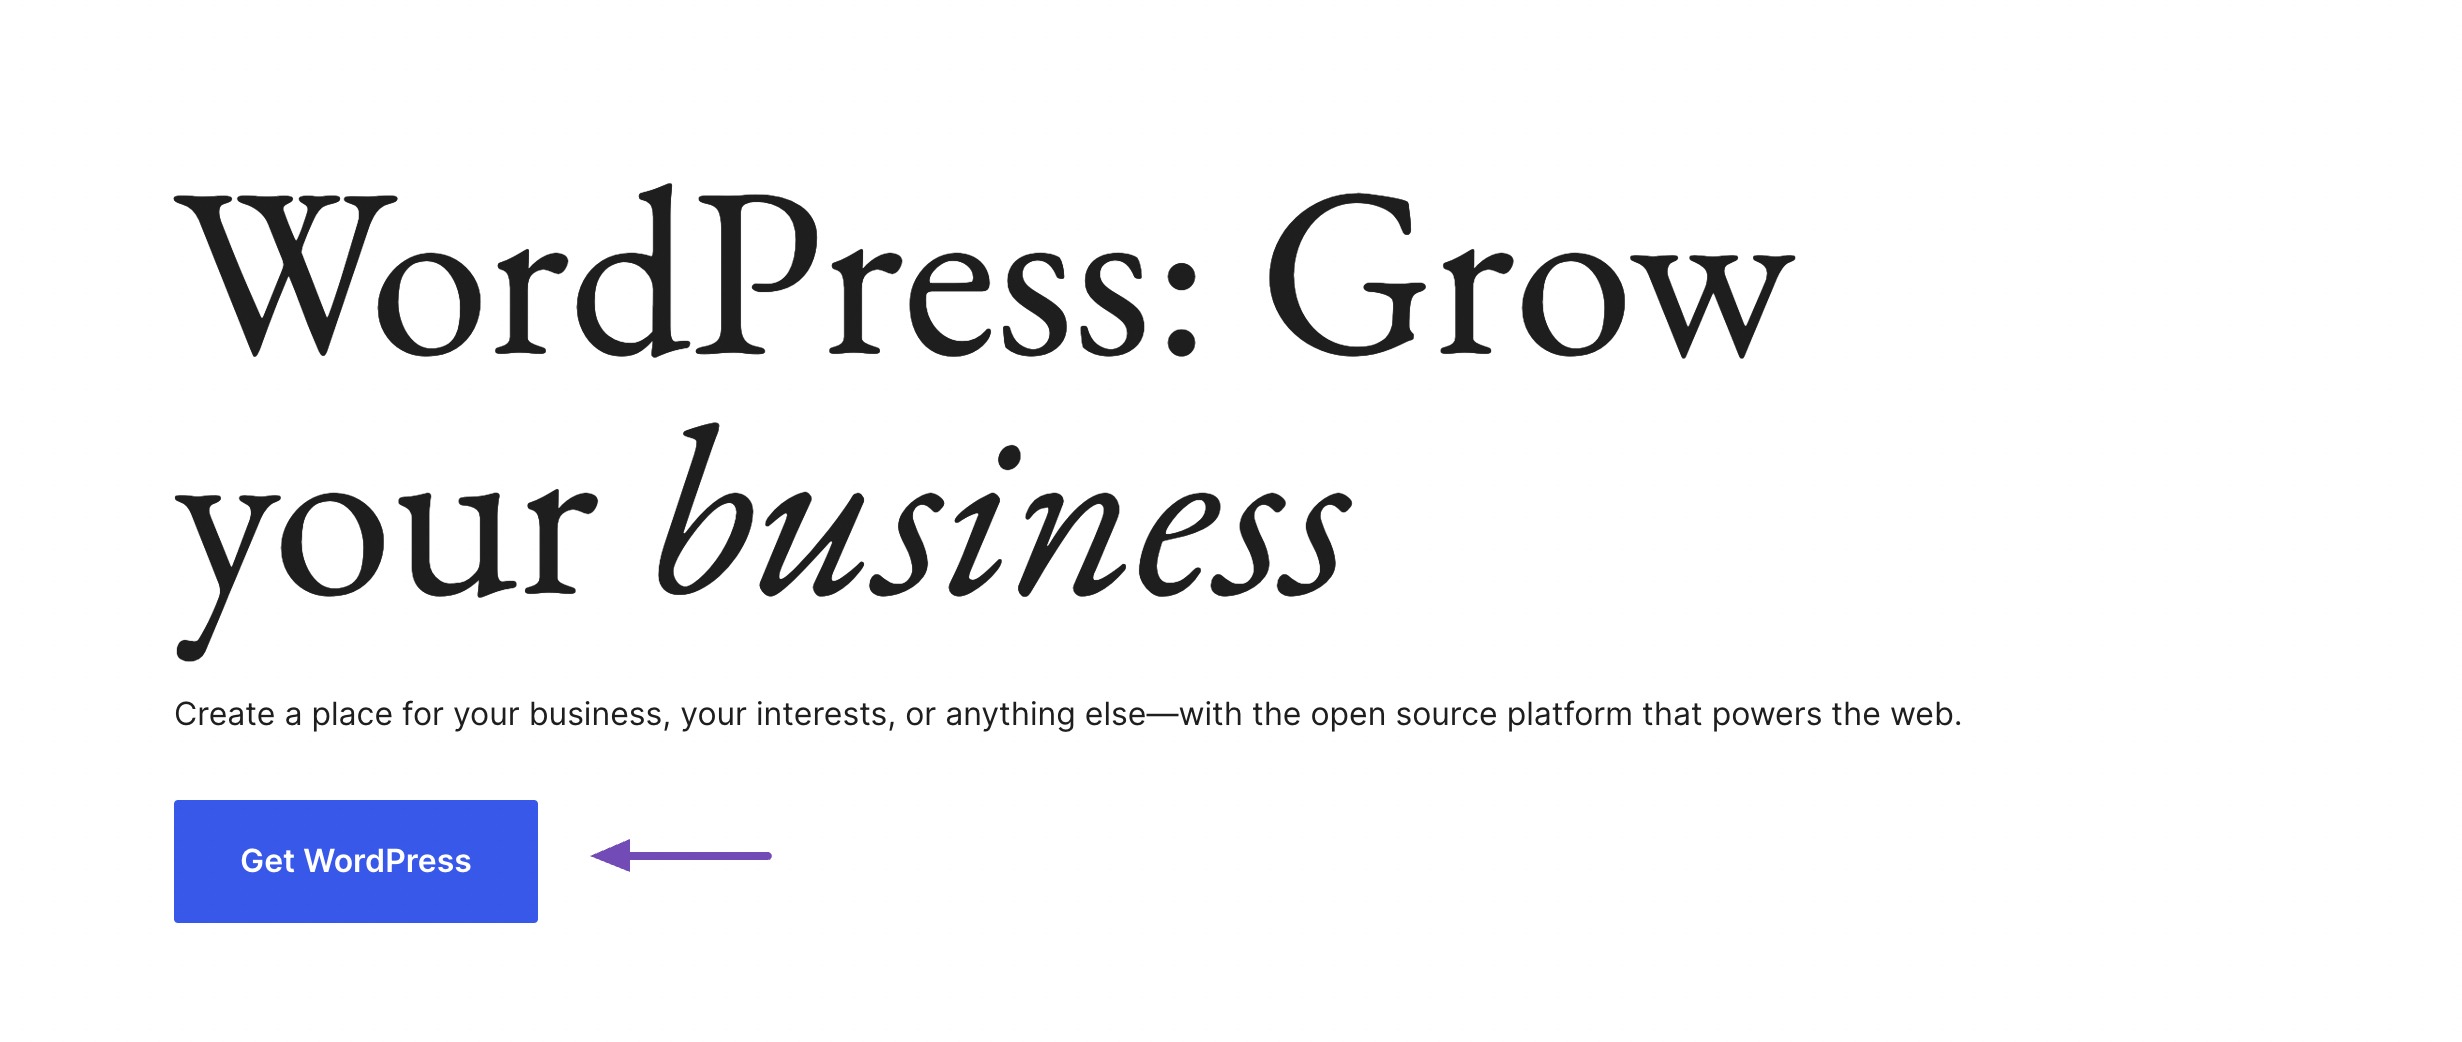
To reinstall WordPress, download the latest version from the wordpress.org website. Scroll down on the WordPress website, and click the Get WordPress button.
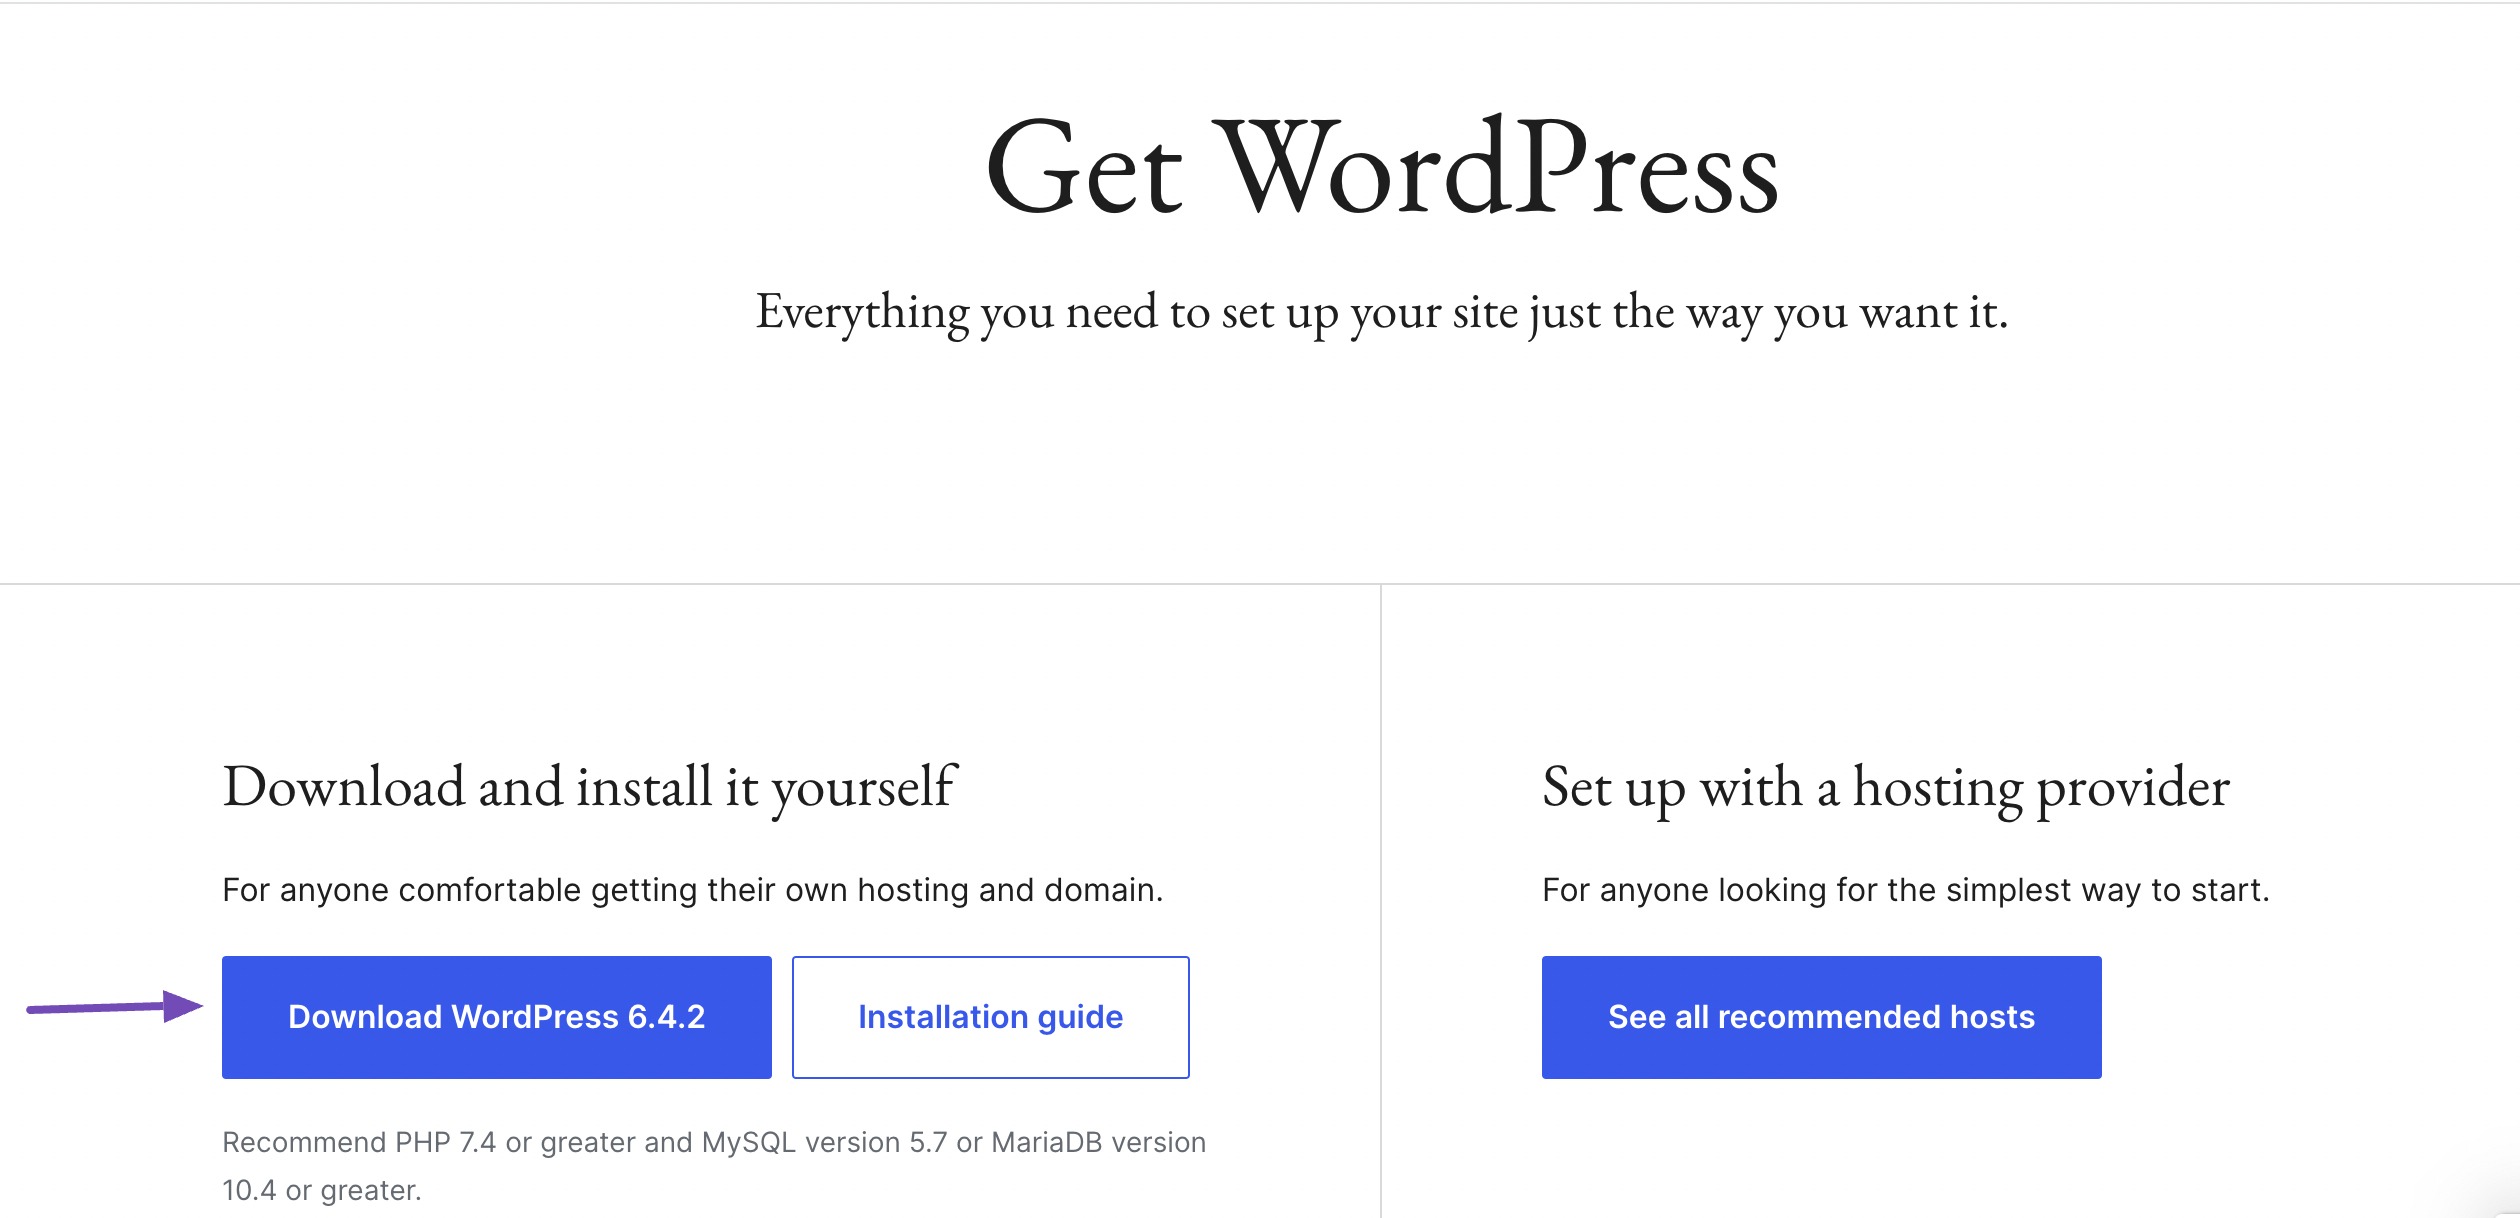
You’ll be directed to a page where you can download the WordPress script. Click the Download WordPress button, and the WordPress files will be downloaded to your computer.
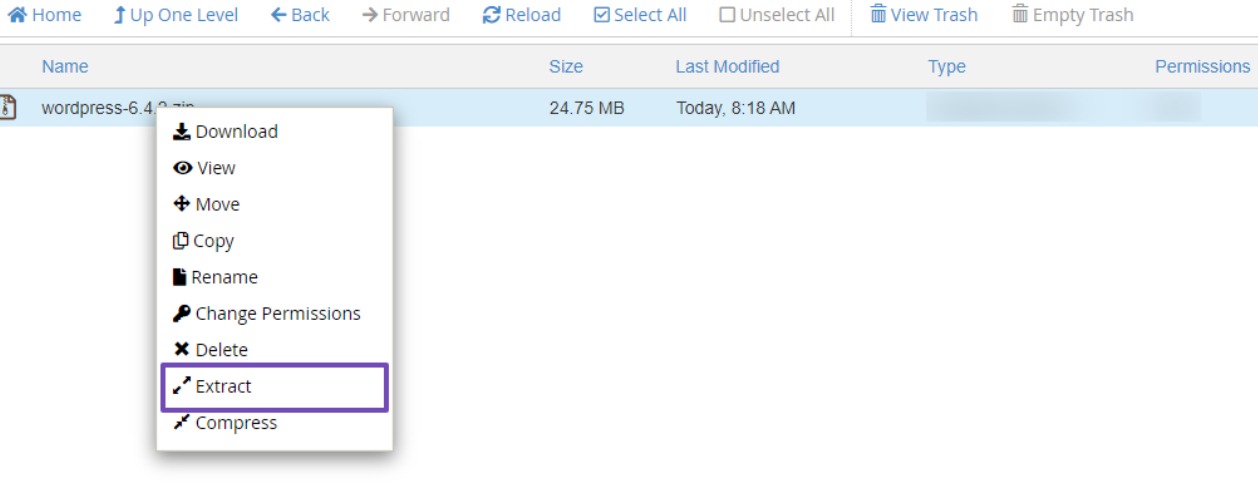
Now, return to your website’s root directory or public_html and upload the downloaded WordPress script zip file.
After a successful upload, refresh the page, and the file will be visible. Right-click on it and choose the Extract option. Confirm the directory, and the file will be extracted accordingly.
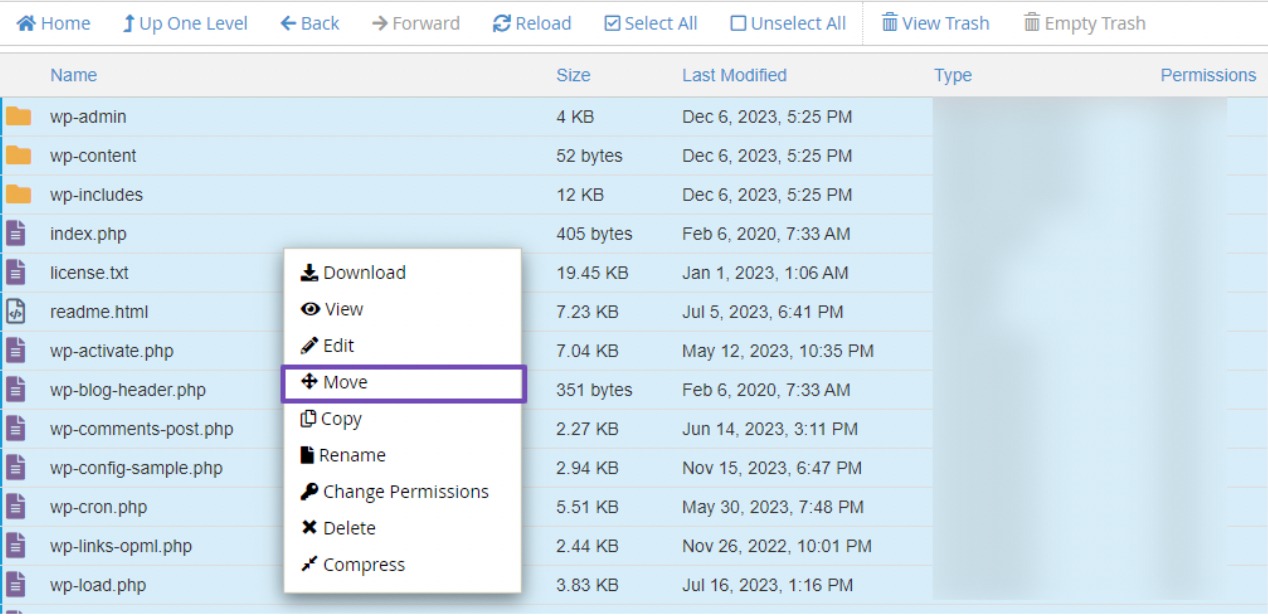
Once the WordPress file is extracted, a ‘WordPress’ folder will appear. Click to open the folder where you’ll find the WordPress files. Select all of them, right-click on the page, and choose the Move option.
Next, a popup will appear, requesting the file path. Remove ‘wordpress’ from the file path so it reads like this:
/public_html/Once ‘wordpress’ is removed, click the Move Files button to proceed.
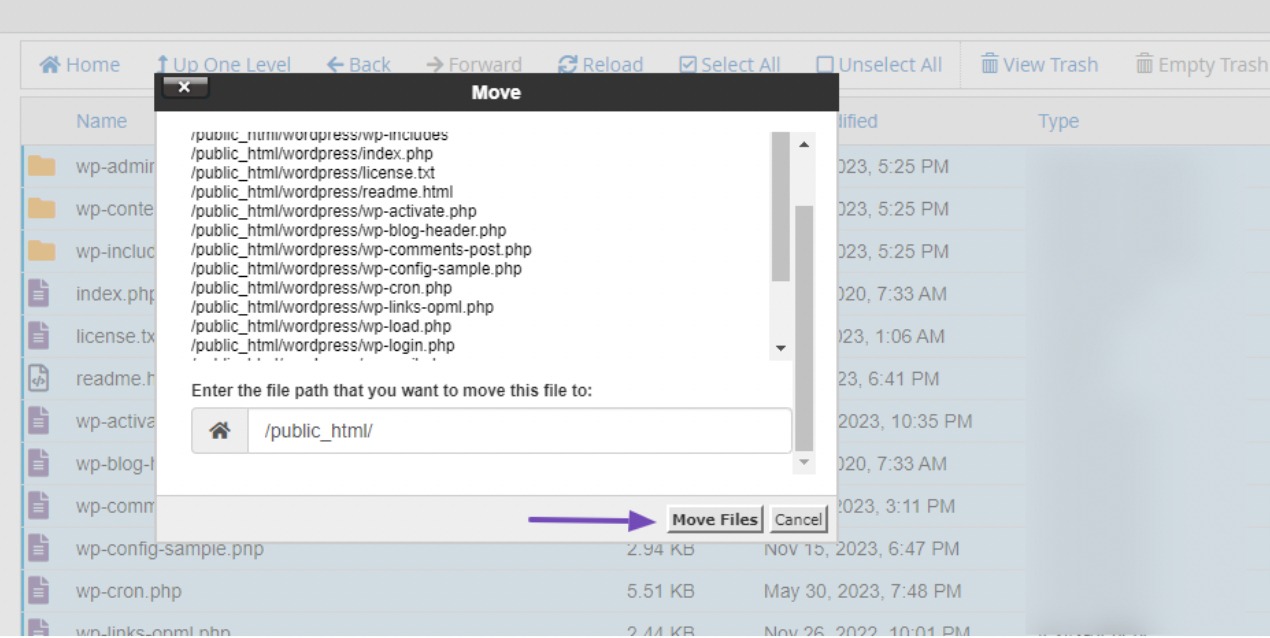
By moving these files, they will be transferred directly to the public_html folder.
To maintain proper organization, return to the public_html folder and delete both the downloaded WordPress zip file and the WordPress folder that contains these files.
Once you have completed this step, you can search for your WordPress website’s login URL or use the following URL: https://yourwebsite.com/wp-admin/setup-config.php.
Remember to replace yourwebsite with your actual domain name.
Setup Configuration for the Installed WordPress
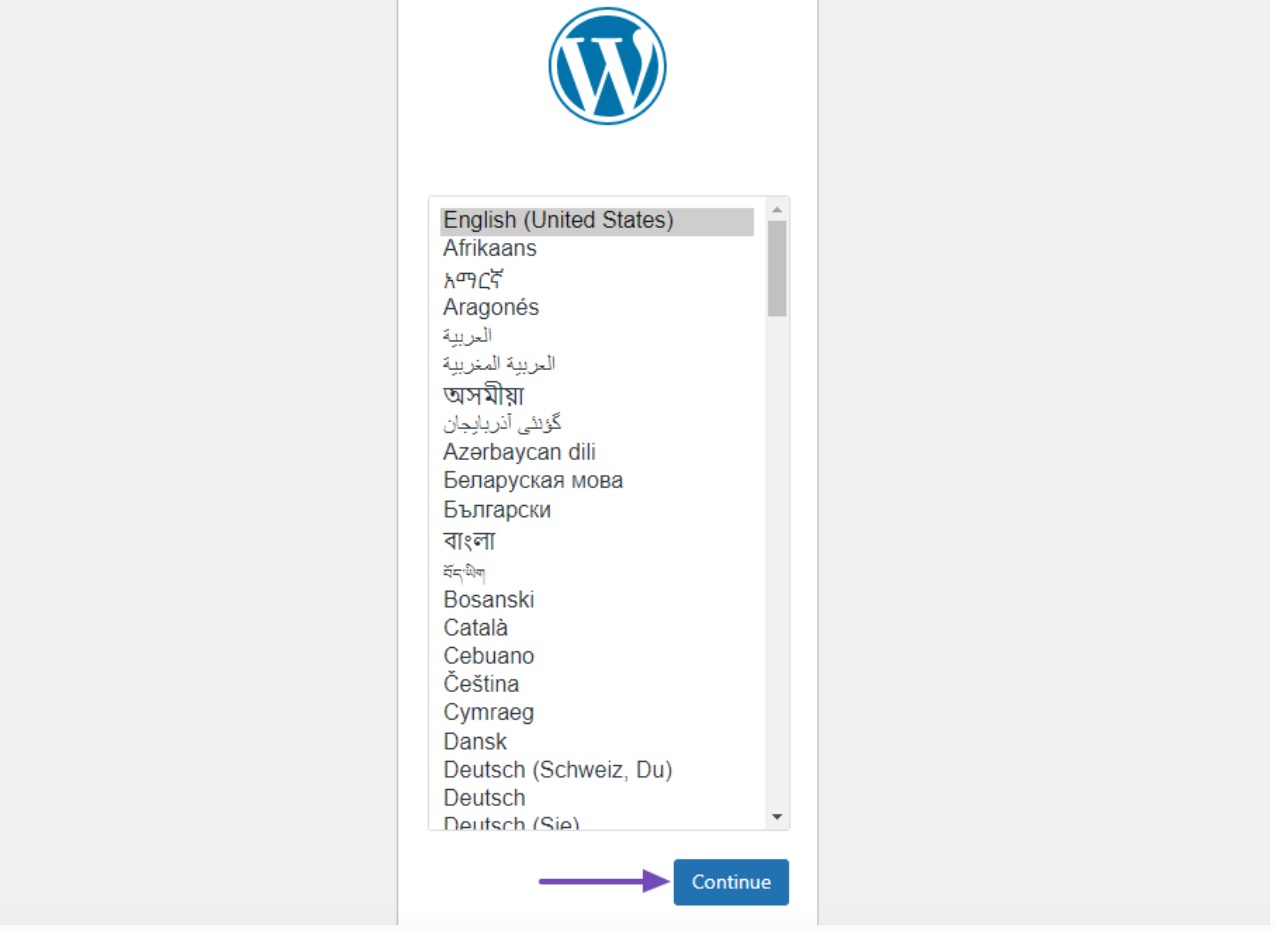
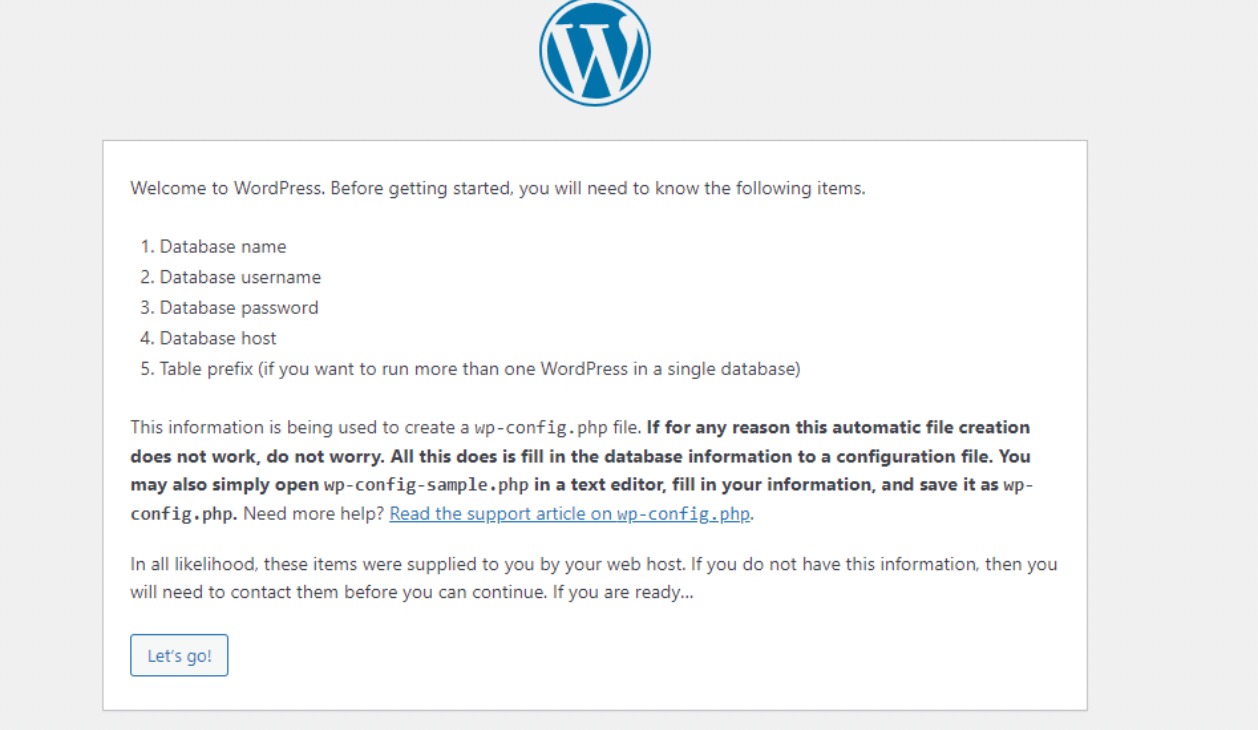
After entering the URL, the WordPress setup configuration will be displayed. Select your preferred language and click on the Continue button.
Next, click the Let’s go! button, as shown below.
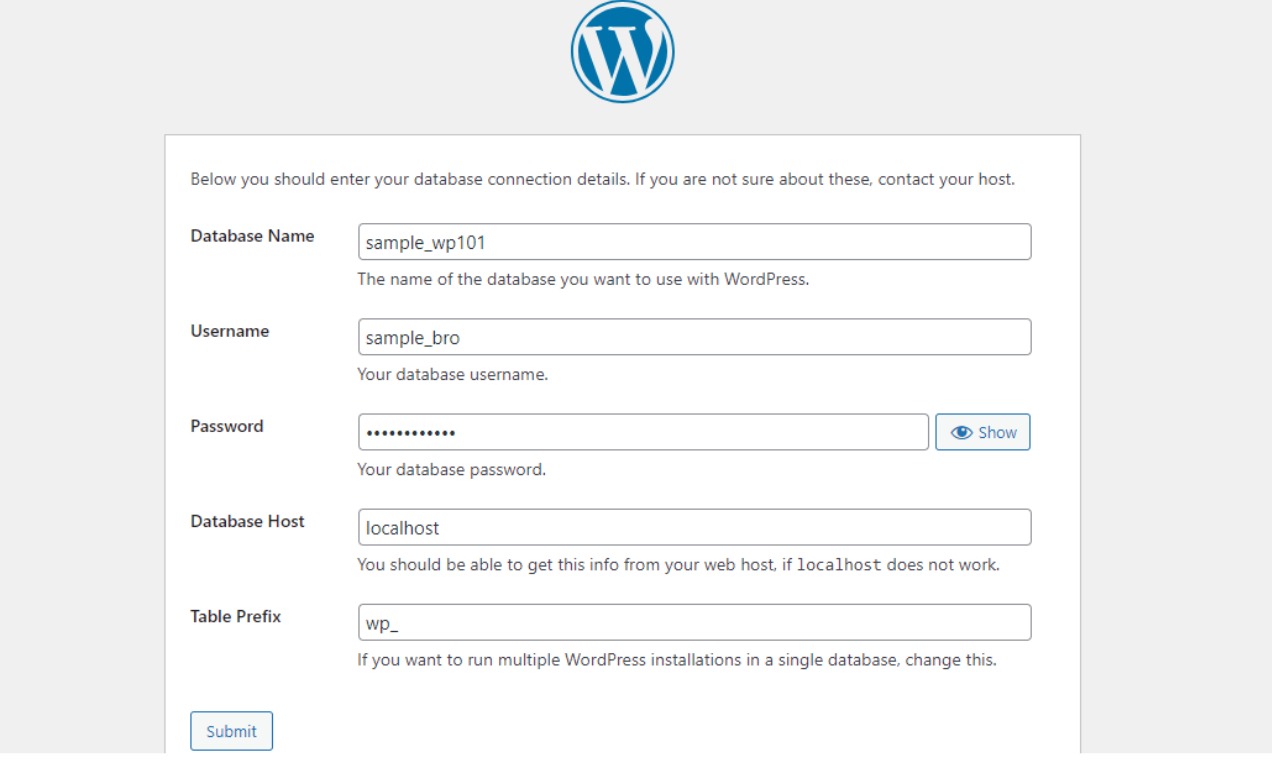
In the next step, you’ll be asked to provide the database connection details you saved earlier.
Use the name of the newly created database, and for the username and password, enter the details from the WordPress site you reset. Once you have provided these details, click on the Submit button.
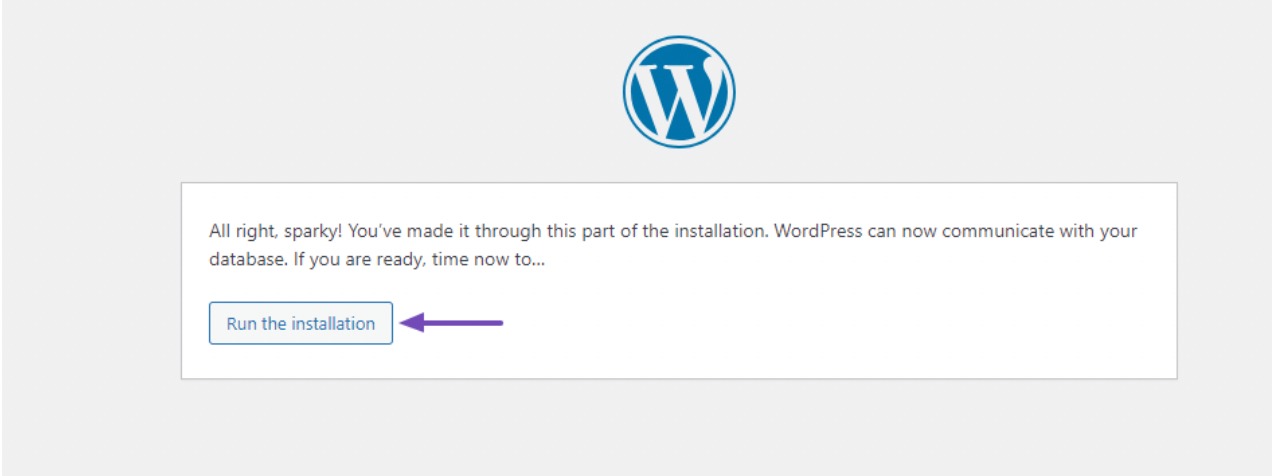
After successfully submitting the details, a success message will appear. Proceed by clicking on the Run the Installation button.
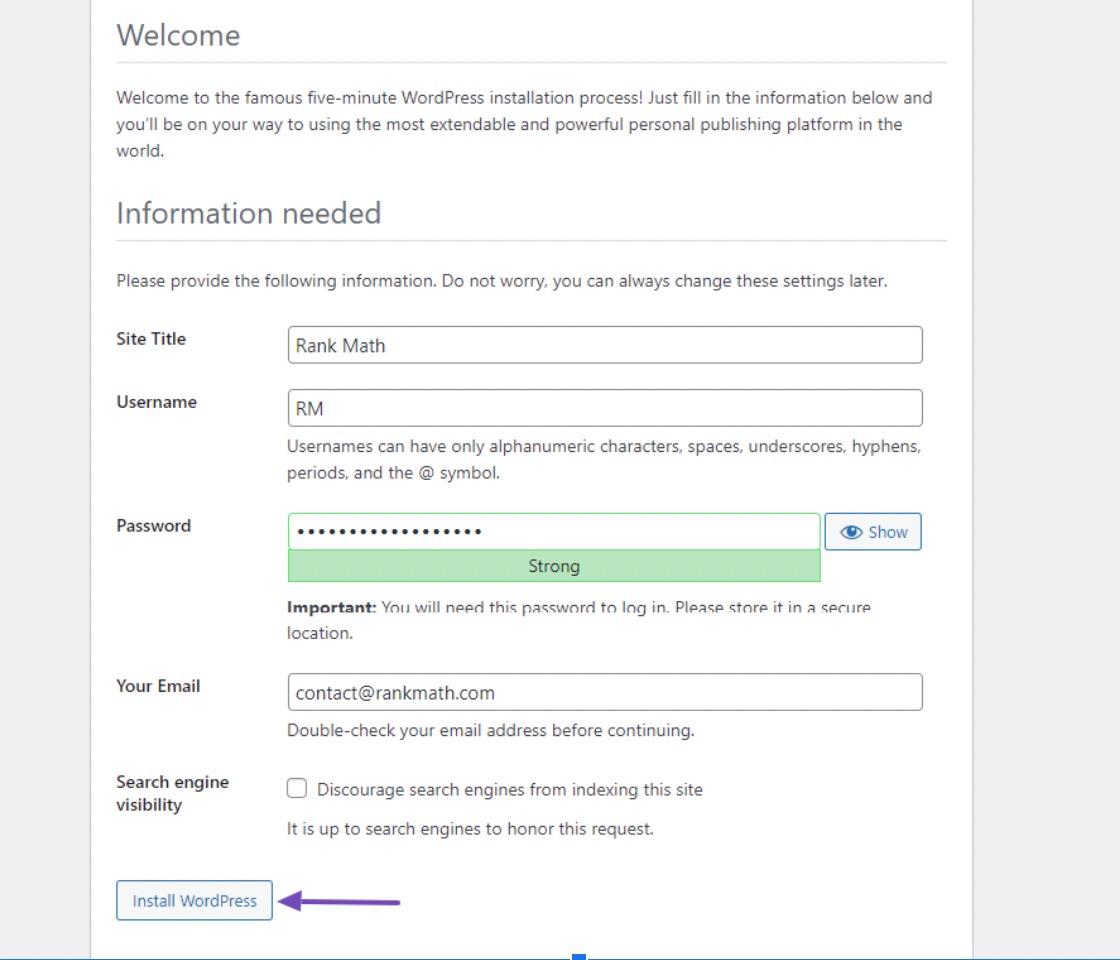
To finish installing WordPress, you need to provide some important details, such as the site name, username, password, email address, and whether to discourage search engine indexing. Then, click the Install WordPress button to start the process.
After running the installation, your site login link will appear. Click on it to log in to your WordPress website. Use the username and password you created recently to log in.

4 Frequently Asked Questions
Is there a way to schedule a reset for my WordPress site?
No, WordPress does not offer a scheduled reset feature. Resets must be initiated manually.
Will resetting my site remove any customizations made to the WordPress core files?
Yes, any changes made directly to WordPress core files will be lost upon reset. It’s best practice not to edit core files directly; instead, use child themes or plugins for customizations.
Does resetting my WordPress site affect my SEO rankings?
If you reset your WordPress site and remove all content, it will affect your SEO rankings as all your URLs will change or lead to non-existent content. Plan your SEO strategy accordingly post-reset.
Can I undo a WordPress site reset if I change my mind?
No, once you reset your WordPress site, the action cannot be undone unless you have a complete backup that you can restore.
What happens to my WordPress site’s users after a reset?
After you reset your WordPress site, you’ll lose all user accounts except the administrator account you’re currently logged in with. If you need to retain user data, ensure you have a backup before proceeding.
After resetting, how do I prevent the same issues from occurring again?
Identify what caused the issues initially and address them, whether it’s a problematic plugin, theme, or custom code. Ensure you only use reputable and well-maintained WordPress core files and follow best practices for WordPress security and updates.
What should I do if my site is not working correctly after the reset?
Ensure that you have followed all steps correctly. If problems persist, check with your hosting provider or seek assistance from a professional.
5 Conclusion
Resetting your WordPress site is a significant step that effectively wipes the slate clean, allowing you to start from scratch.
Whether you’re looking to troubleshoot issues, declutter your site, or just begin anew, the process is irreversible, so it’s necessary to back up your data before proceeding.
By using a plugin like WP Reset or manually resetting your site through your hosting control panel and reinstallation, you can achieve a fresh WordPress setup.
Remember to reconfigure your themes, plugins, and customizations after the reset and implement a solid strategy to avoid future issues.
With your WordPress site reset, you can rebuild and enhance your web presence with a clean foundation.
If you like this post, let us know by Tweeting @rankmathseo.