
Writing a blog post can feel overwhelming when you don’t know where to start. You might have a great idea, but shaping it into a clear, useful article isn’t always easy. That’s why having go-to templates makes such a difference.
With the right structure in place, you can focus more on your ideas and less on worrying about how to organize them.
In this post, you’ll find 9 blog post templates you can rely on whenever you’re stuck or simply want to save time. Each one gives you a simple framework to follow, so you can write faster and share your thoughts with confidence.
So, without any further ado, let’s get started.
Table Of Contents
1 Blog Post Template 1: Query Post Structure
A query post is designed to answer a specific question your readers are searching for online. Think of it as someone coming to you for quick, straightforward advice. Your goal is to give them a clear, useful answer in a way that’s easy to follow.
Here are a few examples of questions that make great query posts:
- How many days do herbs need to dry before storing?
- How do you start a vegetable garden in your backyard?
- What’s the best way to clean hardwood floors?
- How can you tell if a diamond is real?
- What are the safest ways to travel with a pet?
Most query posts are concise, usually between 800 and 1,300 words. Writing one is a lot like answering a friend’s direct question with practical advice.
For instance, imagine someone asks you, ‘How do you start a vegetable garden at home?’ You can respond: Choose a sunny spot, clear the area, and test your soil.’
That’s your quick answer. Then, you’d naturally expand on each step to give them the details they need.
Structure of a Query Post
Keep it brief (about three sentences). Set the context and show readers you understand their problem.
For instance, ‘Starting a vegetable garden can be a fun and rewarding project. But if you’re unsure where to begin, don’t worry. In this guide, I’ll walk you through the essential steps to start your garden.’
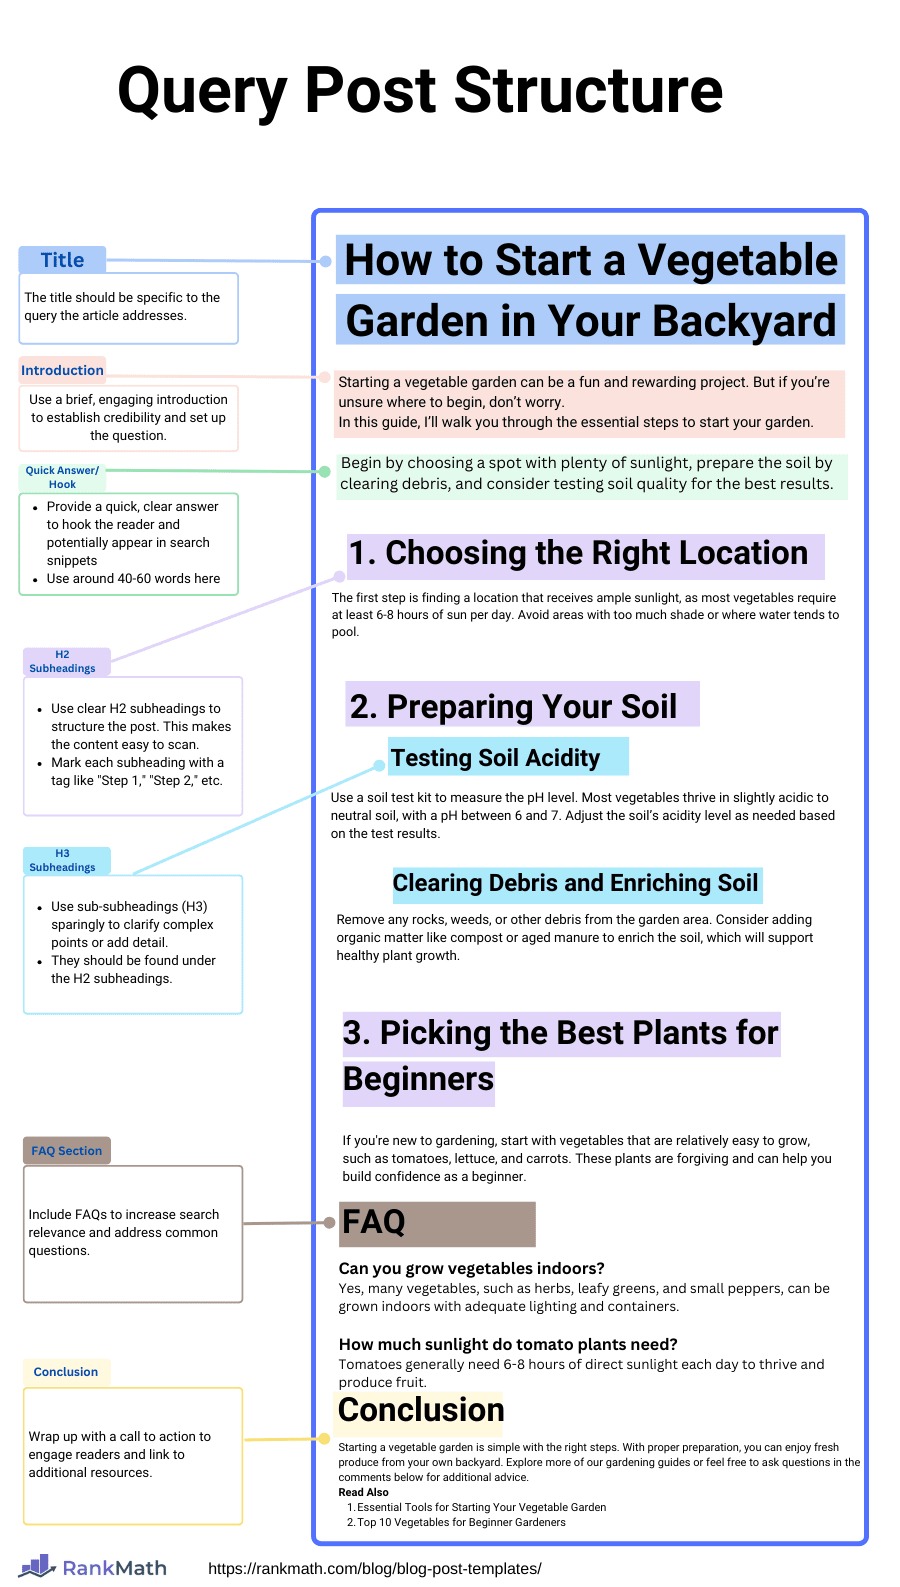
Give readers the immediate answer upfront; this boosts your chance of being featured as a Google snippet.
For the garden example, say, ‘Begin by choosing a spot with plenty of sunlight, prepare the soil by clearing debris, and consider testing soil quality for the best results.’
Add a phrase like, ‘But there’s more to it! Here’s a step-by-step guide to ensure your garden thrives,’ to signal readers that you’ll dive deeper into each step.
Structure the post with subheadings (H2 tags) to break down the process. For instance:
- Choosing the Right Location
- Preparing Your Soil
- Picking the Best Plants for Beginners
- Watering and Fertilizing Essentials
If needed, you can further break down these sections with sub-subheadings (H3), like ‘Testing Soil Acidity’ or ‘Sunlight Requirements for Leafy Greens.’ This makes the post easy to scan and keeps each section focused.
You can also include frequently asked questions (FAQs) at the end of your query post article. They enhance the post’s search visibility and help answer additional reader questions.
You can find these questions by checking Google’s People Also Ask section or using our Content AI, which suggests FAQs relevant to the topic.

Wrap up the post with final thoughts and include links to other helpful articles or resources. Also, encourage your readers to explore more or engage by asking questions in the comments.
2 Blog Post Template 2: How-To Post Structure
A How-To blog post template is a detailed guide designed to help readers accomplish a specific task or achieve a desired outcome.
Unlike query posts focusing on answering a single question, how-to guides provide a step-by-step process breakdown.
These posts are often formatted as lists, offering clear instructions on performing a task, and may include additional insights to make the process easier for the reader.
Structure of a How-To Post
A How-To post is one of the most practical blog formats you can use. Unlike a query post that answers a single question quickly, a How-To guide walks readers through a step-by-step process so they can complete a task from start to finish.
Let’s consider an example: How to Build a Birdhouse.
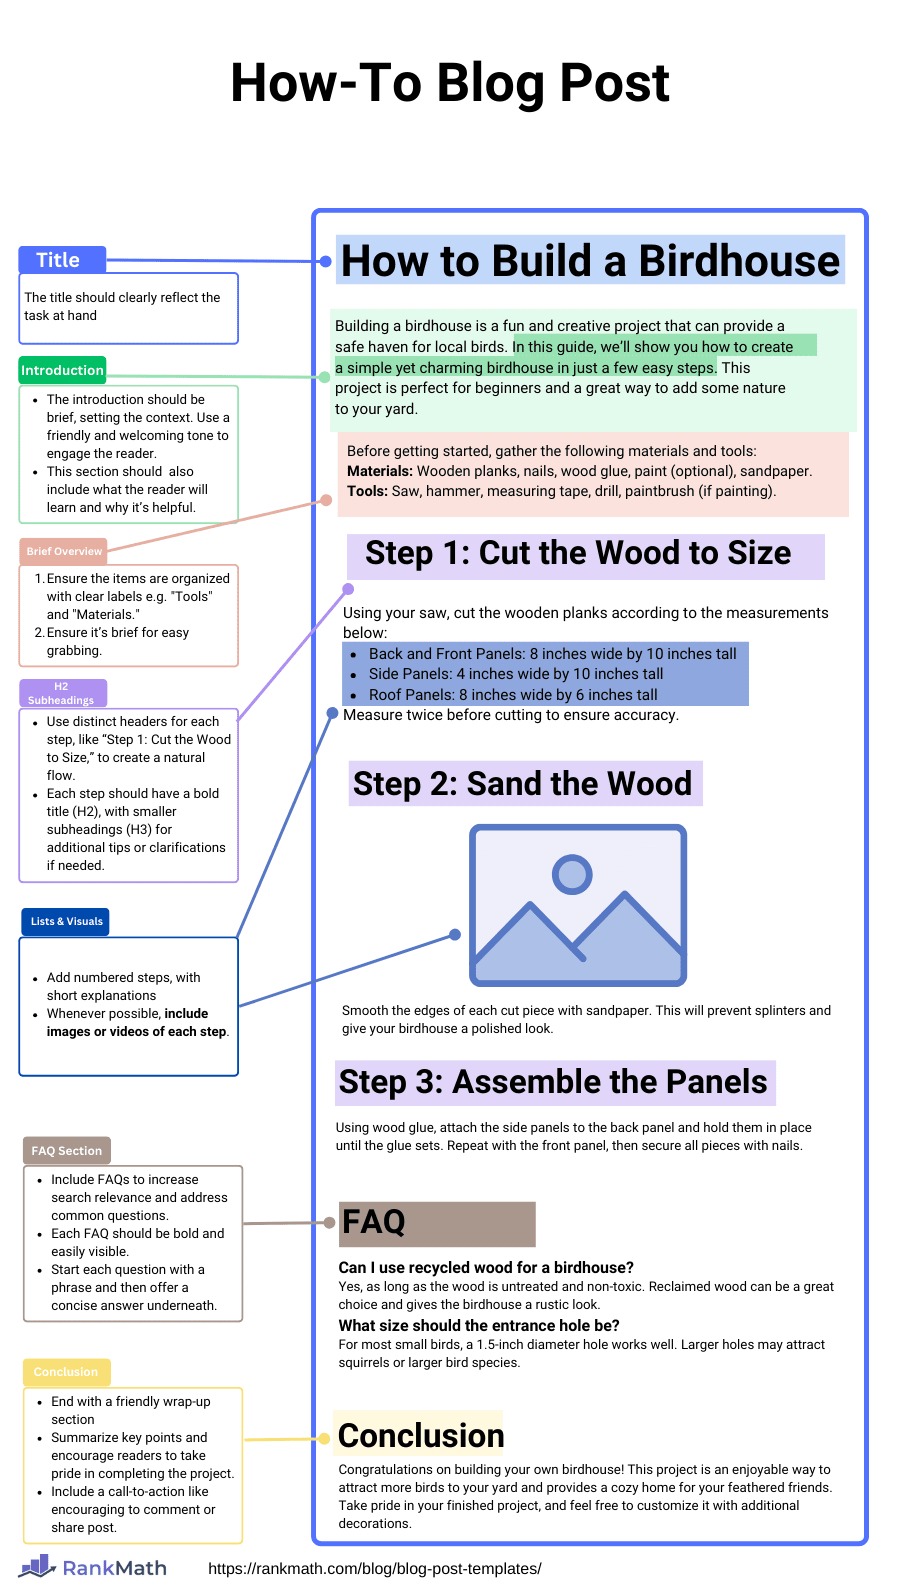
Begin by introducing the task at hand. My example will involve explaining what the birdhouse is for and why it’s a rewarding project. A simple description of the finished product (a birdhouse) will assure the reader they’re in the right place.
Give readers everything they’ll need before they begin. For a birdhouse, that can include:
- Wooden planks
- Nails or screws
- Hammer or drill
- Sandpaper
- Wood glue
Listing these upfront saves readers from starting the process unprepared.
Break down the process into clear, easy-to-follow steps. Each step should be titled with an H2 heading (e.g., Step 1: Cut the Wood to Size), followed by a detailed description of how to complete the step.
Each step should focus on the task, with enough detail to ensure the reader can follow along. If necessary, you can add additional context to clarify certain actions.
Whenever possible, include images or videos of each step. This allows the reader to check if they’re on the right track visually. For instance, show an image of the wooden planks with clear markings on where to cut.
If it’s a complex task, consider recording a video of the process and embedding it in the post. A video can highly enhance the learning experience for the reader.
Once all the steps are complete, conclude the post by summarizing the process and encouraging the reader to take pride in their finished project. This is where you can add any final tips or considerations.
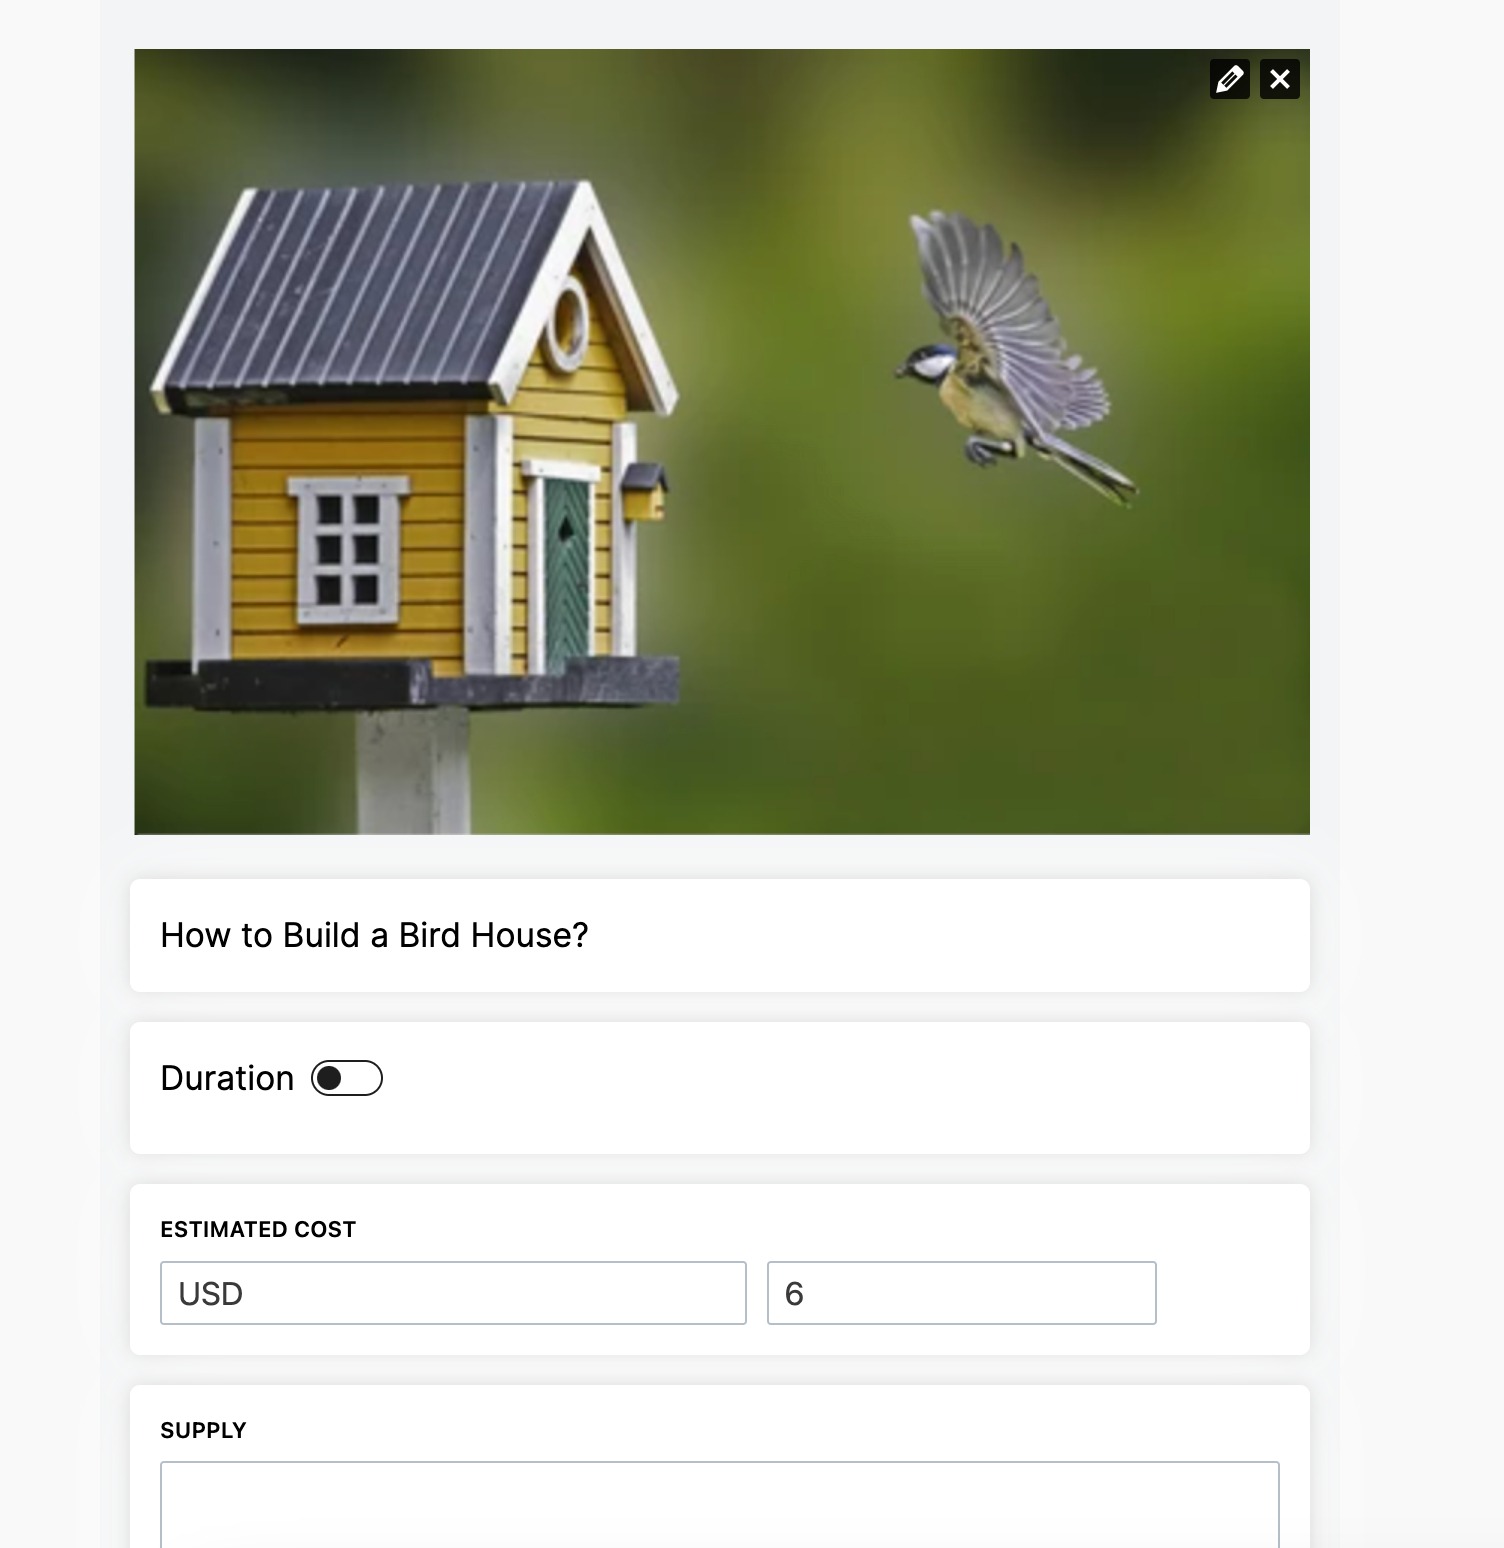
If you’re using a plugin like Rank Math, consider adding a How-To Schema to enhance your post’s search visibility. The Schema will help search engines recognize your content as a step-by-step guide, and it may improve your chances of being featured as a rich snippet in search results.
With Rank Math, you can easily add this Schema through the HowTo block.
Once you’re in the editor, add a new block to the post using the + button to see all the available blocks, or search for HowTo using the / shortcut, and you’ll see the HowTo block as shown below.
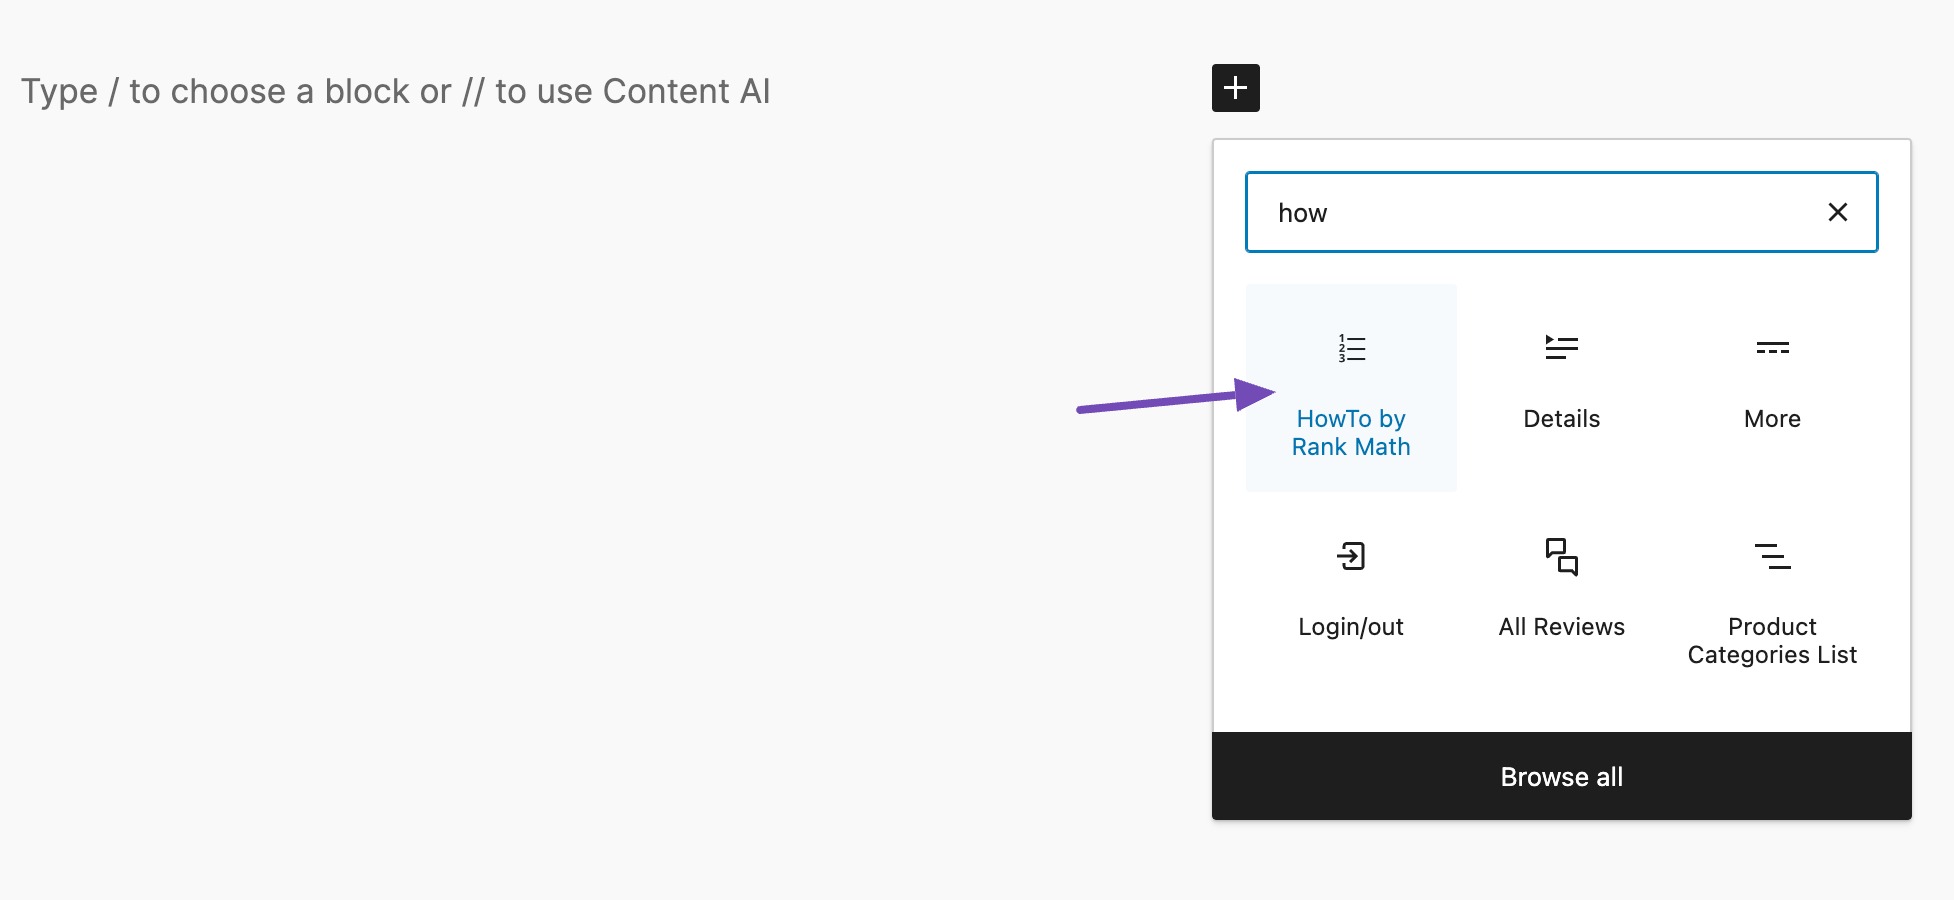
Just fill out the necessary details, such as the tools and materials and the steps in the process.
If the task is complex or commonly generates questions, include an FAQ section to address any uncertainties.
3 Blog Post Template 3: Listicle Post Structure
A listicle is one of the easiest and most effective blog formats you can use. Instead of writing long paragraphs, you organize your ideas into a clear list, making the post simple to scan and enjoyable to read.
You can use listicles to share tips, highlight resources, or even compare products. The style works because readers know exactly what to expect; they can skim through the list or dive deeper into the sections that interest them most.
Depending on your goal, there are three main types of listicles:
- Information-Heavy Listicles: Best when your readers want detailed explanations. For example: ’10 Proven Strategies to Improve Your Sleep.’
- Visual-Heavy Listicles: Perfect for step-by-step tutorials, design inspiration, or recipes where images do most of the explaining. Example: ‘7 Easy Hairstyles with Step-by-Step Photos.’
- Product-Heavy Listicles: Great for recommendations or reviews. Example: ’15 Best Budget Laptops for Students in 2026.’
Each type serves a different purpose, so you can choose the structure that matches your reader’s needs and your content goals.
Let us now discuss the three types of listicle post structures in detail.
4 Blog Post Template 4: Information-Heavy Listicles
An information-heavy listicle is perfect when you want to teach readers something in depth. Instead of a quick skim, your audience comes looking for detailed insights on a specific topic, for example: ‘Why Learning a Second Language is Beneficial.’
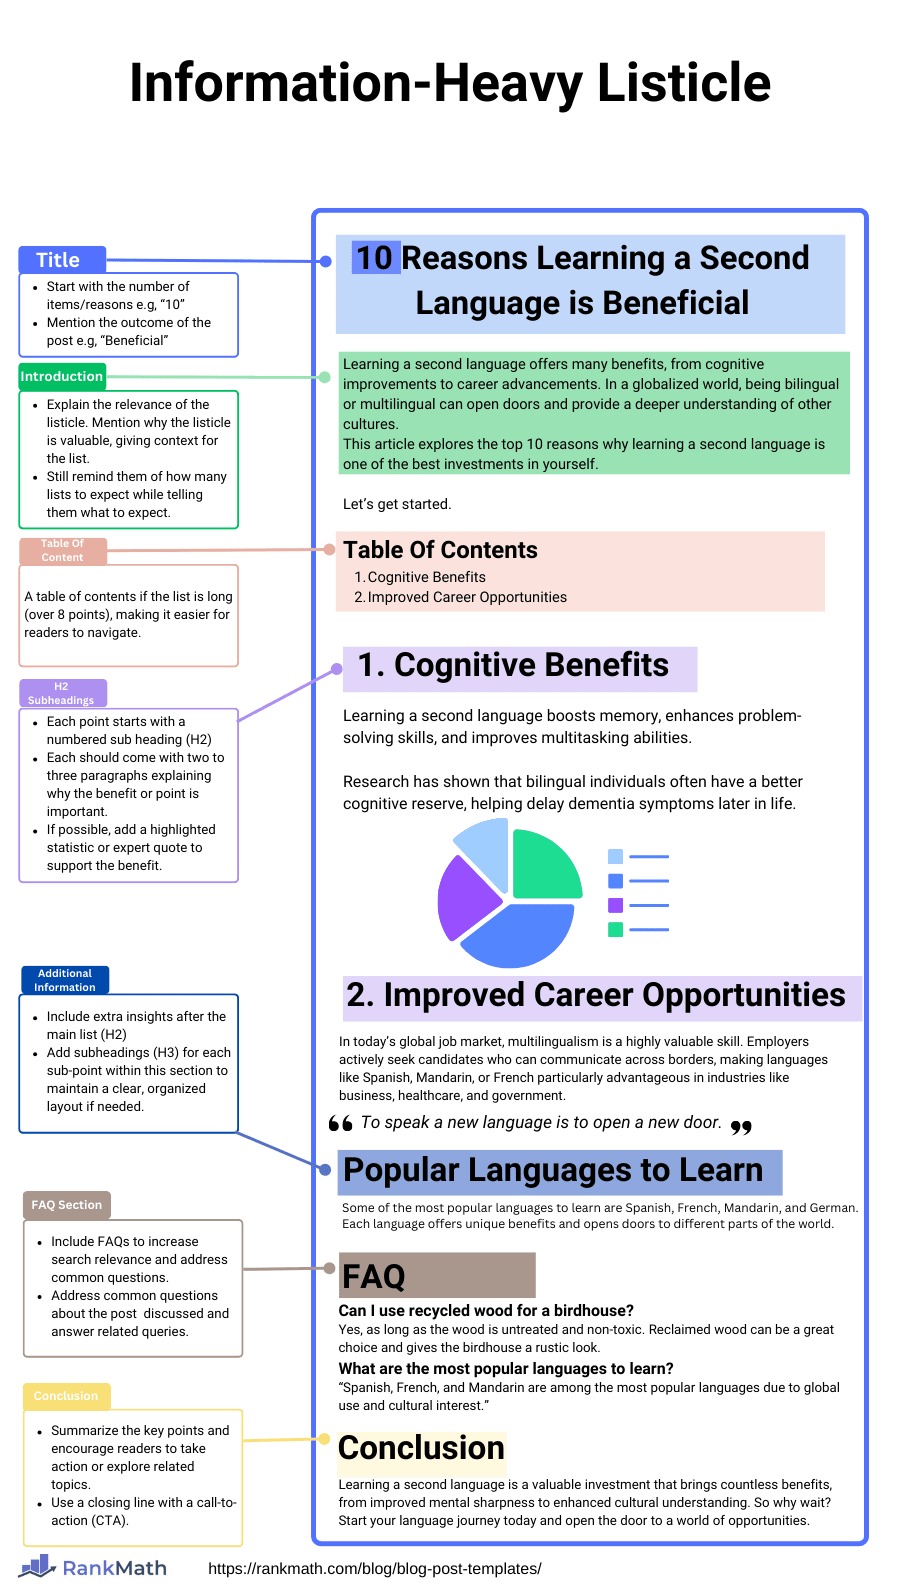
Start with a short introduction that explains why the topic matters. If your list is long, consider adding a table of contents so readers can jump to the section they care about.
Each point should get its own heading for clarity. For example:
- Cognitive Benefits
- Improved Career Opportunities
Under each heading, include two to three paragraphs that explain why the point is important and how it impacts the reader.
After your main list, you can expand with related insights. For example:
- Challenges of Learning a New Language
- Popular Languages to Learn
Wrap up by adding FAQs to add extra value. For example:
- How long does it take to learn a second language?
- Which languages are easiest for beginners?
By the end, your reader should feel like they have a well-rounded understanding of the topic, not just a surface-level overview.
5 Blog Post Template 5: Visual-Heavy Listicles
Sometimes your readers need to see the information instead of just reading about it. A visual-heavy listicle is perfect for topics like travel, events, or lifestyle inspiration where images bring the content to life.
Take this example: ‘Best Cities to Visit in Spring for Cherry Blossoms.’ Your audience is probably looking for destination ideas, and stunning photos will capture their attention right away.
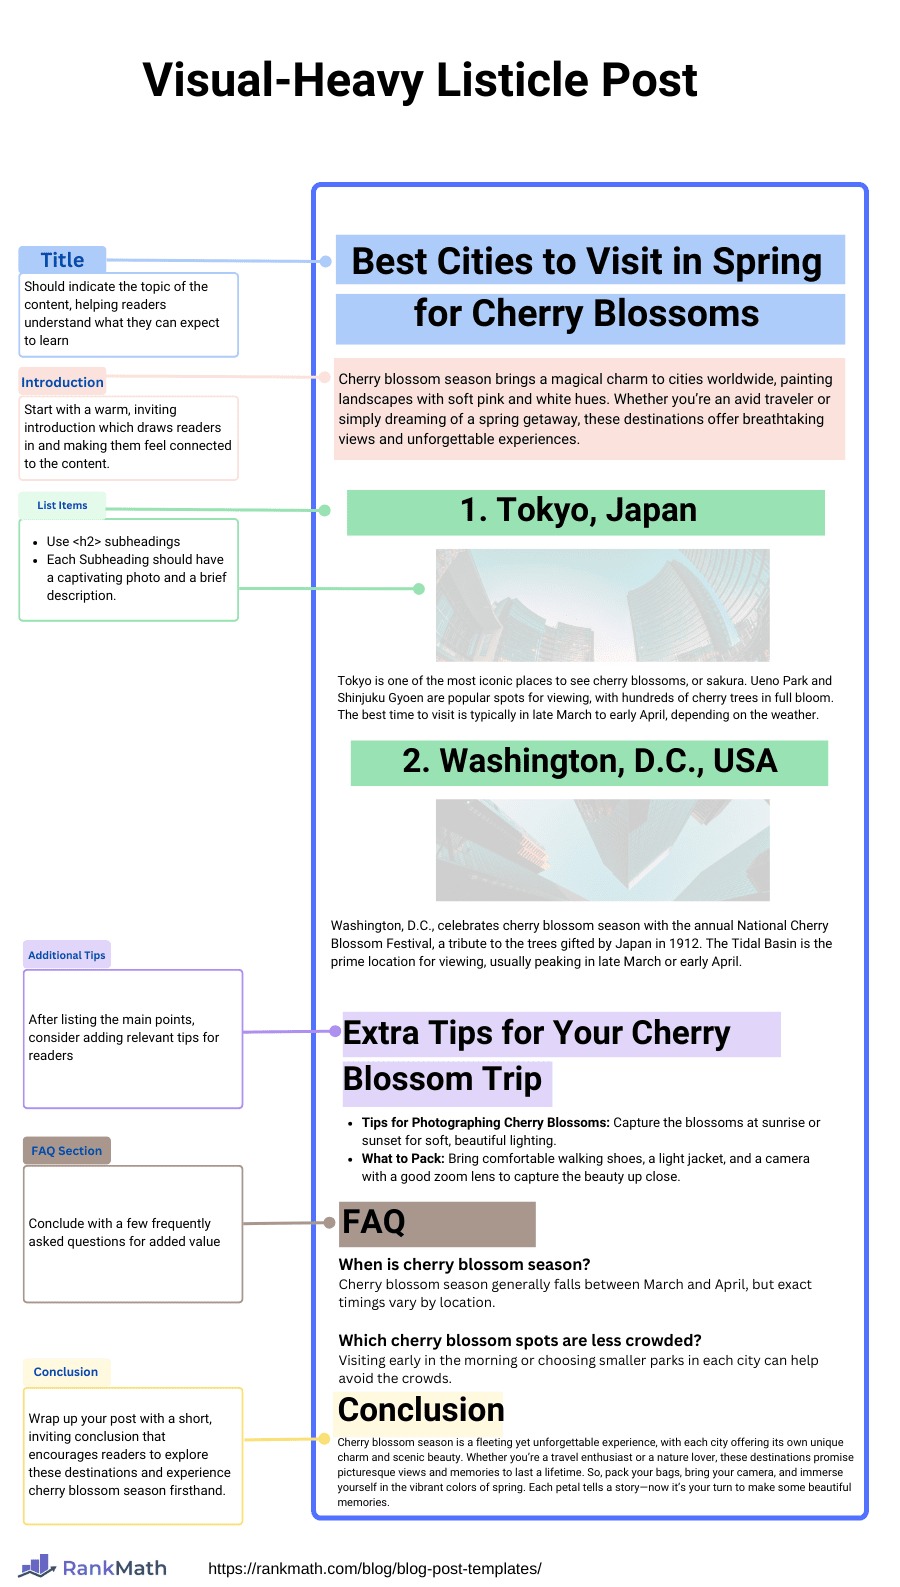
Begin with a brief introduction highlighting the appeal of cherry blossom season, then list each city as a separate item with an H2 heading, such as Tokyo, Japan, or Washington D.C., USA.
Each destination (or item) should get its own heading, paired with an image directly below it. For example:
- Tokyo, Japan
(Insert image of cherry blossoms near Tokyo Tower)
Add a short description about why Tokyo is a top spot, the best viewing locations, and when to visit. - Washington, D.C., USA
(Insert image of blossoms along the Tidal Basin)
Include viewing tips, peak bloom dates, and local events.
At the end, you can add bonus sections such as:
- Tips for Photographing Cherry Blossoms
- What to Pack for a Spring Blossom Trip
While a table of contents isn’t necessary in this case, an FAQ section addressing common questions, like When is cherry blossom season?, can add extra value.
6 Blog Post Template 6: Product-Heavy Listicles
A product-heavy listicle is perfect when your readers are ready to make a purchase. This format helps them compare options, understand the pros and cons, and make an informed decision.
Take this example: ‘Best Laptops for Graphic Designers.’
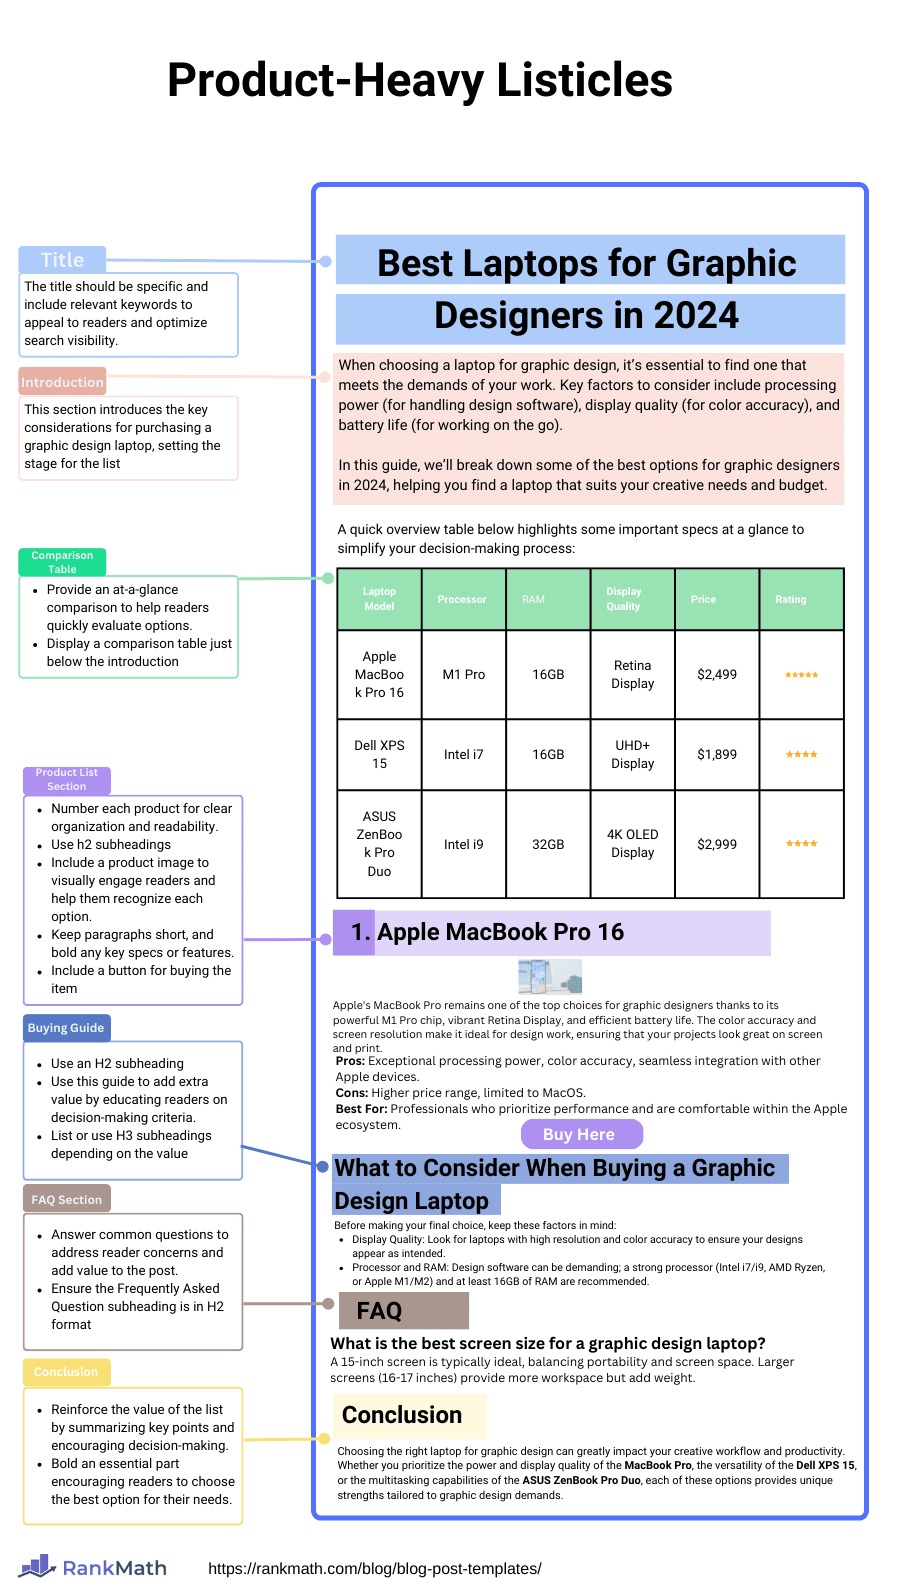
Start with an introduction outlining what graphic designers should look for in a laptop, such as processing power, display quality, and battery life.
Adding a comparison table at the top with key specs (like processor, RAM, price, and rating) allows readers to evaluate options at a glance quickly.
List each product with a clear heading:
- 1. Apple MacBook Pro 16
Include a few paragraphs covering:- Key performance features
- Pros and cons
- Who it’s best for
- Links for purchase or further review
- 2. Dell XPS 15
Follow the same format to maintain consistency and help readers compare easily.
To help readers make an informed decision, consider adding a Buying Guide or related details, like What to Consider When Buying a Graphic Design Laptop at the end.
Include an FAQ section answering common questions about graphic design laptops.
This structure caters to both curiosity and buying intent, making it easy for readers to compare products while helping them decide on the best option for their needs.
7 Blog Post Template 7: Review Post Structure
Writing a review post is about sharing your honest experience with a product while helping your readers make informed decisions. To do this effectively, you need to focus on authenticity, clarity, and structure.
Not every product needs a review. If a product already has extensive reviews on Amazon, Walmart, or other sites, it may not add value. Focus on unique or niche products, like specialized courses, niche software, or exclusive items, where your perspective matters.
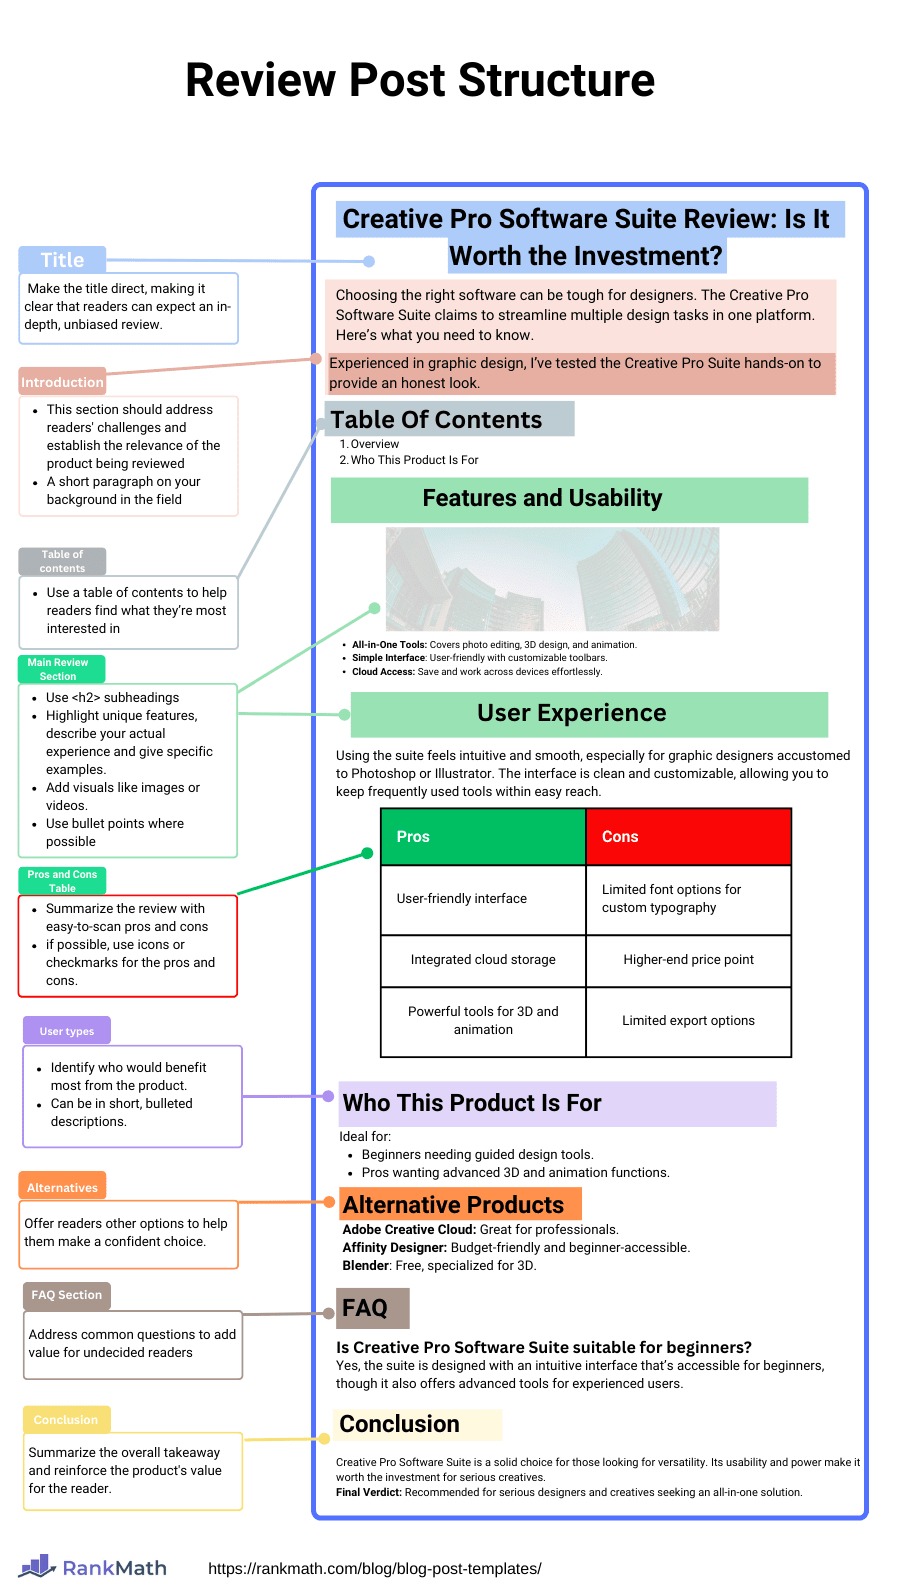
Start by addressing common frustrations or challenges the product aims to solve. This sets the context for why readers might be interested.
Adding a table of contents helps navigation, especially in lengthy posts, while an About the Author section can establish credibility by explaining your experience with the product.
Showing evidence of product ownership, such as photos, can build trust with readers.
The main body should cover your unique experiences and opinions about the product, comparing it with similar items if relevant. For instance, in a review of Creative Pro Software Suite, discuss how it stands out among similar graphic design tools, mentioning its unique features or user interface, and share why it may or may not suit different user profiles.
An overview section with a summary, including pros and cons, is valuable for readers wanting quick insights. Here, adding internal links to related content, such as alternative products or comparison posts, can help readers evaluate their options.
Following this, create a section on Who This Product is For to clarify whether it suits general users, professionals, or niche audiences. If the product is complex, provide a setup or usage guide, potentially linking to a detailed How-To post if necessary.
Grading the product in areas like usability, features, and support options can help readers make an informed choice, followed by a separate section for pros and cons.
Consider adding a brief background on the product and its company towards the end—most readers are likely familiar with these details already, but it can be useful for those less informed.
If readers are still undecided, include an Alternatives to [Product] section with a comparison table of similar items, like listing comparable graphic design software.
Finally, conclude with a verdict on whether the product is worth buying, along with an FAQ section to address common questions.
A well-structured review post prioritizes essential information at the top, leaving background details for the end.
Schema markup can enhance visibility on search engines by adding star ratings, pros and cons, or other relevant information.
With Rank Math’s Schema Generator, you can select the appropriate Schema, whether for software, course, or product reviews, and input accurate information for optimal SEO and visibility in search results.
8 Blog Post Template 8: Comparison Post Structure
A comparison post helps your readers make informed choices between two or more similar products or services. For example, you might compare Rank Math vs. Yoast or Rank Math vs. Yoast vs. AIOSEO.
By highlighting the strengths and weaknesses of each option, you make it easier for your audience to decide which one fits their needs best.
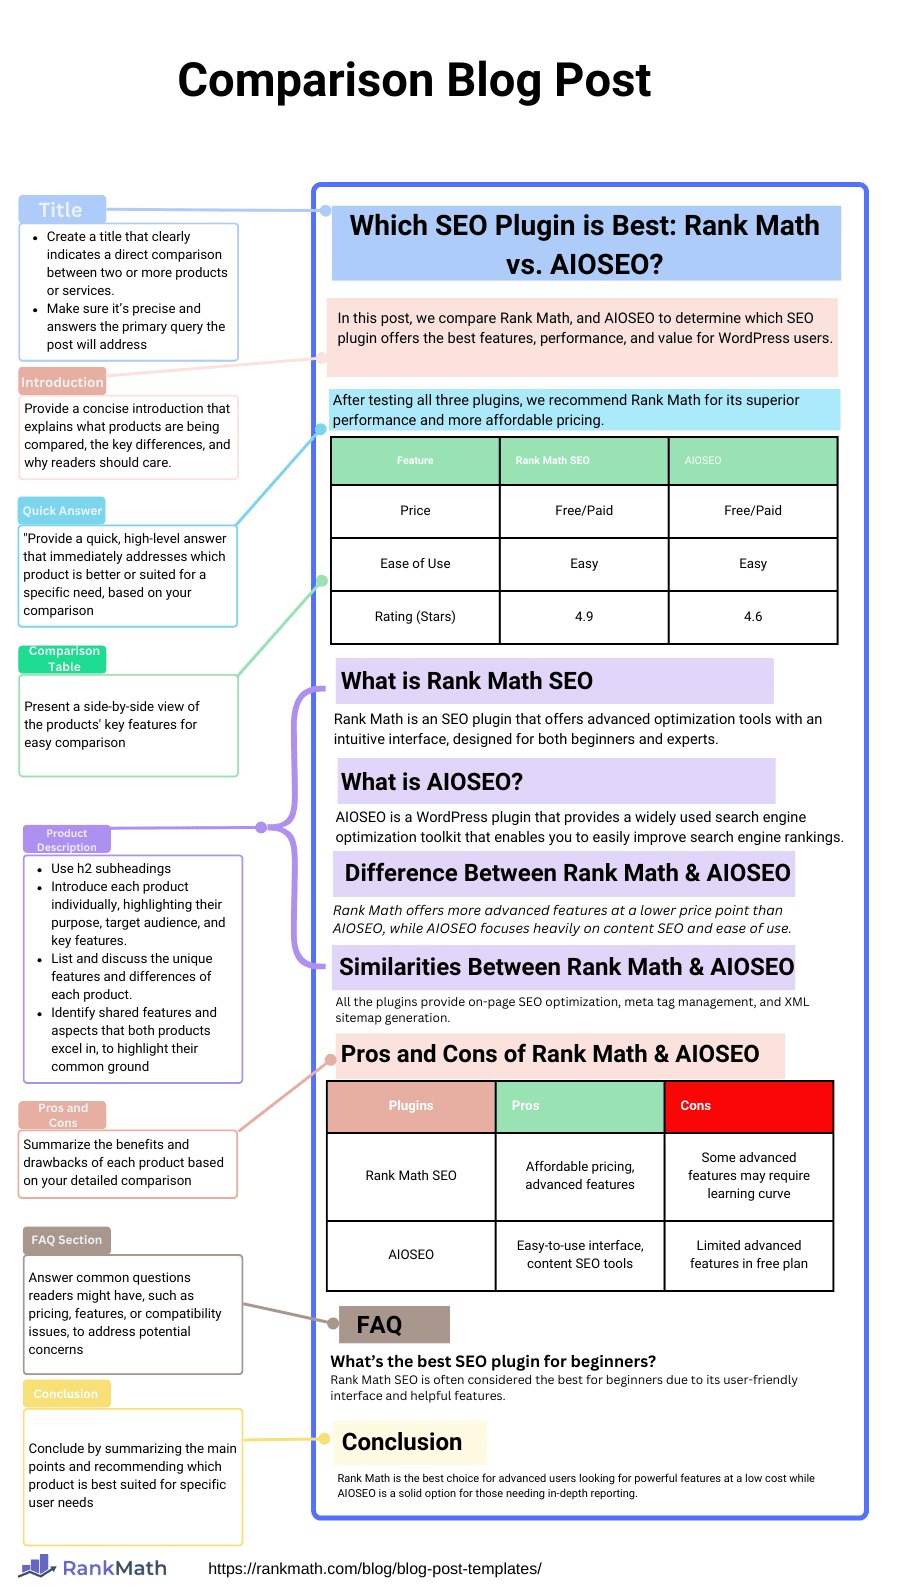
Begin with a brief introduction (around 200 words) that frames the comparison. Address the main question upfront: Which product is better? Provide a concise summary (about 60 words) for readers who want a quick recommendation without reading the full post.
Include a comparison table highlighting key attributes such as:
- Features
- Pricing
- Performance metrics or unique research data
This lets your readers quickly scan and compare products side by side.
Create sections to introduce each item:
- What is Product A? – Overview, key features, and purpose.
- What is Product B? – Overview, key features, and purpose.
Next, the core analysis includes sections like ‘How are they different?’ and ‘How are they similar?’ where you compare features side by side. Each feature, such as ease of use or integration options, is discussed in detail, helping readers understand how each product performs in specific areas.
Following the detailed comparison, sections on the Pros and Cons of each product can help summarize strengths and weaknesses.
Conclude with a Verdict and Summary where you can provide insights to recommend which product is better for different needs. A FAQ section can also be included to address common questions readers may have.
9 Blog Post Template 9: Roundup Post Structure
A roundup blog post template brings together insights, opinions, or recommendations from multiple experts on a specific topic.
This format lets your readers access a variety of perspectives in one place, adding credibility and actionable value to your blog.
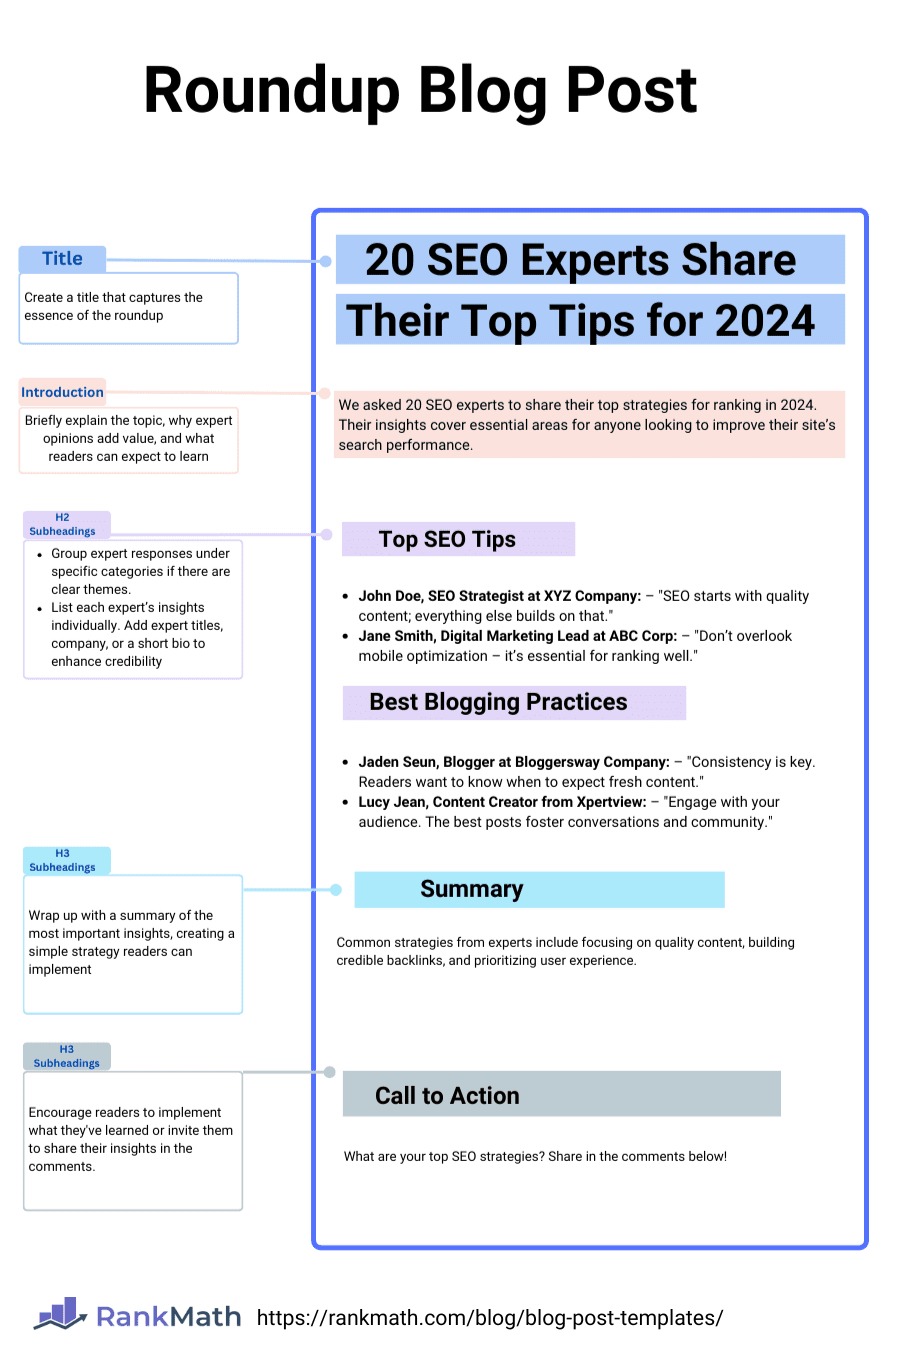
Start with an introduction by explaining the topic and why expert insights matter.
For example:‘We asked 10 top SEO professionals to share their best tips for improving website rankings. Here’s what they had to say.’
This sets the stage and helps your readers understand why they should trust the collected advice.
If experts’ responses share common ideas, group them under thematic headings:
- Top SEO Tips
- Content Marketing Best Practices
- Link Building Strategies
Under each heading, include the responses that align with that theme. This makes it easy for readers to identify widely accepted ideas.
If no clear patterns emerge, list the experts’ answers individually. You can order them by:
- Popularity or recognition
- Expertise relevance
- Random order, if preferred
Wrap up by highlighting the most important takeaways. Summarize the key points or provide a simplified strategy your readers can apply immediately.
Wrapping Up: The Power of a Strong Blog Post Template
A strong blog post template can be your secret weapon for creating high-quality, consistent content that resonates with your audience.
By following a template, you make the writing process smoother, keep your posts aligned with your brand’s voice, engage readers effectively, and support your SEO goals.
Remember, blog post templates are just a starting point; you can always customize them to fit unique topics, trends, or your own creative style.
With the right foundation, your blogging process can become faster, more enjoyable, and more impactful, helping you consistently deliver content your readers value.
If this post helped you, share your thoughts by tweeting to @rankmathseo. We’d love to hear how you use templates in your blogging journey!