![How to Easily Create a WordPress Backup? [5 Easy Methods]](https://rankmath.com/wp-content/uploads/2023/12/How-to-backup-WordPress-site-960x504-1.jpg)
When you’re running a WordPress site, one of the smartest things you can do is create regular backups.
No matter how secure or well-optimized your website is, unexpected issues like hacking, server crashes, or even a small mistake during an update can put your data at risk. Without a backup, you can lose all your hard work in seconds.
The good news?
Creating a WordPress backup is easier than you might think.
In this post, you’ll learn five simple methods to create a WordPress backup so you can protect your content, stay prepared, and restore your site quickly whenever needed.
Without any further ado, let’s get started.
Table Of Contents
1 What is a WordPress Backup?
A WordPress backup is simply a complete copy of your website that you can use to restore it if something goes wrong. It acts as a safety net against data loss, website errors, cyber-attacks, or unexpected issues that could put your site at risk.
When you back up your WordPress site, you need to focus on two main parts: files and the database.
- Files include your WordPress core files, themes, plugins, uploaded media, and code files like PHP and JavaScript. These determine how your site looks and functions.
- Database contains your site’s content, such as posts, pages, comments, settings, and user information.
Together, these two elements give you everything you need to recreate your website exactly as it was before a problem occurred.
While backups protect you from crashes and errors, they also provide peace of mind. Whether you’re updating plugins, changing themes, or making big site adjustments, having a backup ensures you can quickly restore your site if something doesn’t go as planned.
2 Why Should You Create a WordPress Backup?
Creating a backup isn’t just a precaution; it’s a necessity. Here are the key reasons why:
- Protection from hacks and malware: Even with strong security in place, no website is completely safe. If your site is compromised, a backup lets you restore a clean, working version within minutes.
- Recovery from mistakes: Updates can go wrong, and files can be accidentally deleted. With a backup, you can quickly undo errors and get your site back to normal.
- Safeguard against server or hosting failures: Hosting providers aren’t immune to crashes or technical problems. Relying solely on your host’s backup system might leave you without the latest version of your site. Keeping your own backups puts you in control.
- Peace of mind during updates: Updating plugins and themes is essential, but it can sometimes cause conflicts. A backup ensures you can roll back safely if something breaks.
Backups act as your website’s safety net. A small effort today can save you from hours of stress and potential data loss tomorrow.
3 Methods to Backup Your WordPress Website
Think of your WordPress site as having two key parts: the database, which acts like the brain storing all your content and settings, and the files, which form the body, your themes, plugins, images, and code that bring your site to life. To fully protect your site, you need to back up both.
Below are some of the most effective methods you can use.
3.1 Using a WordPress Backup Plugin
The easiest way to back up your site is with a plugin. One popular choice is BackWPup, a free and beginner-friendly tool that lets you back up, restore, and even migrate your site.
First, install and activate the plugin on your WordPress website.
Once activated, access the plugin’s dashboard by navigating to the menu settings and clicking the Add new job from your WordPress dashboard.
Navigate to the General tab and assign a name to your backup job. This name is for internal use, making it easier to identify different jobs on your website.
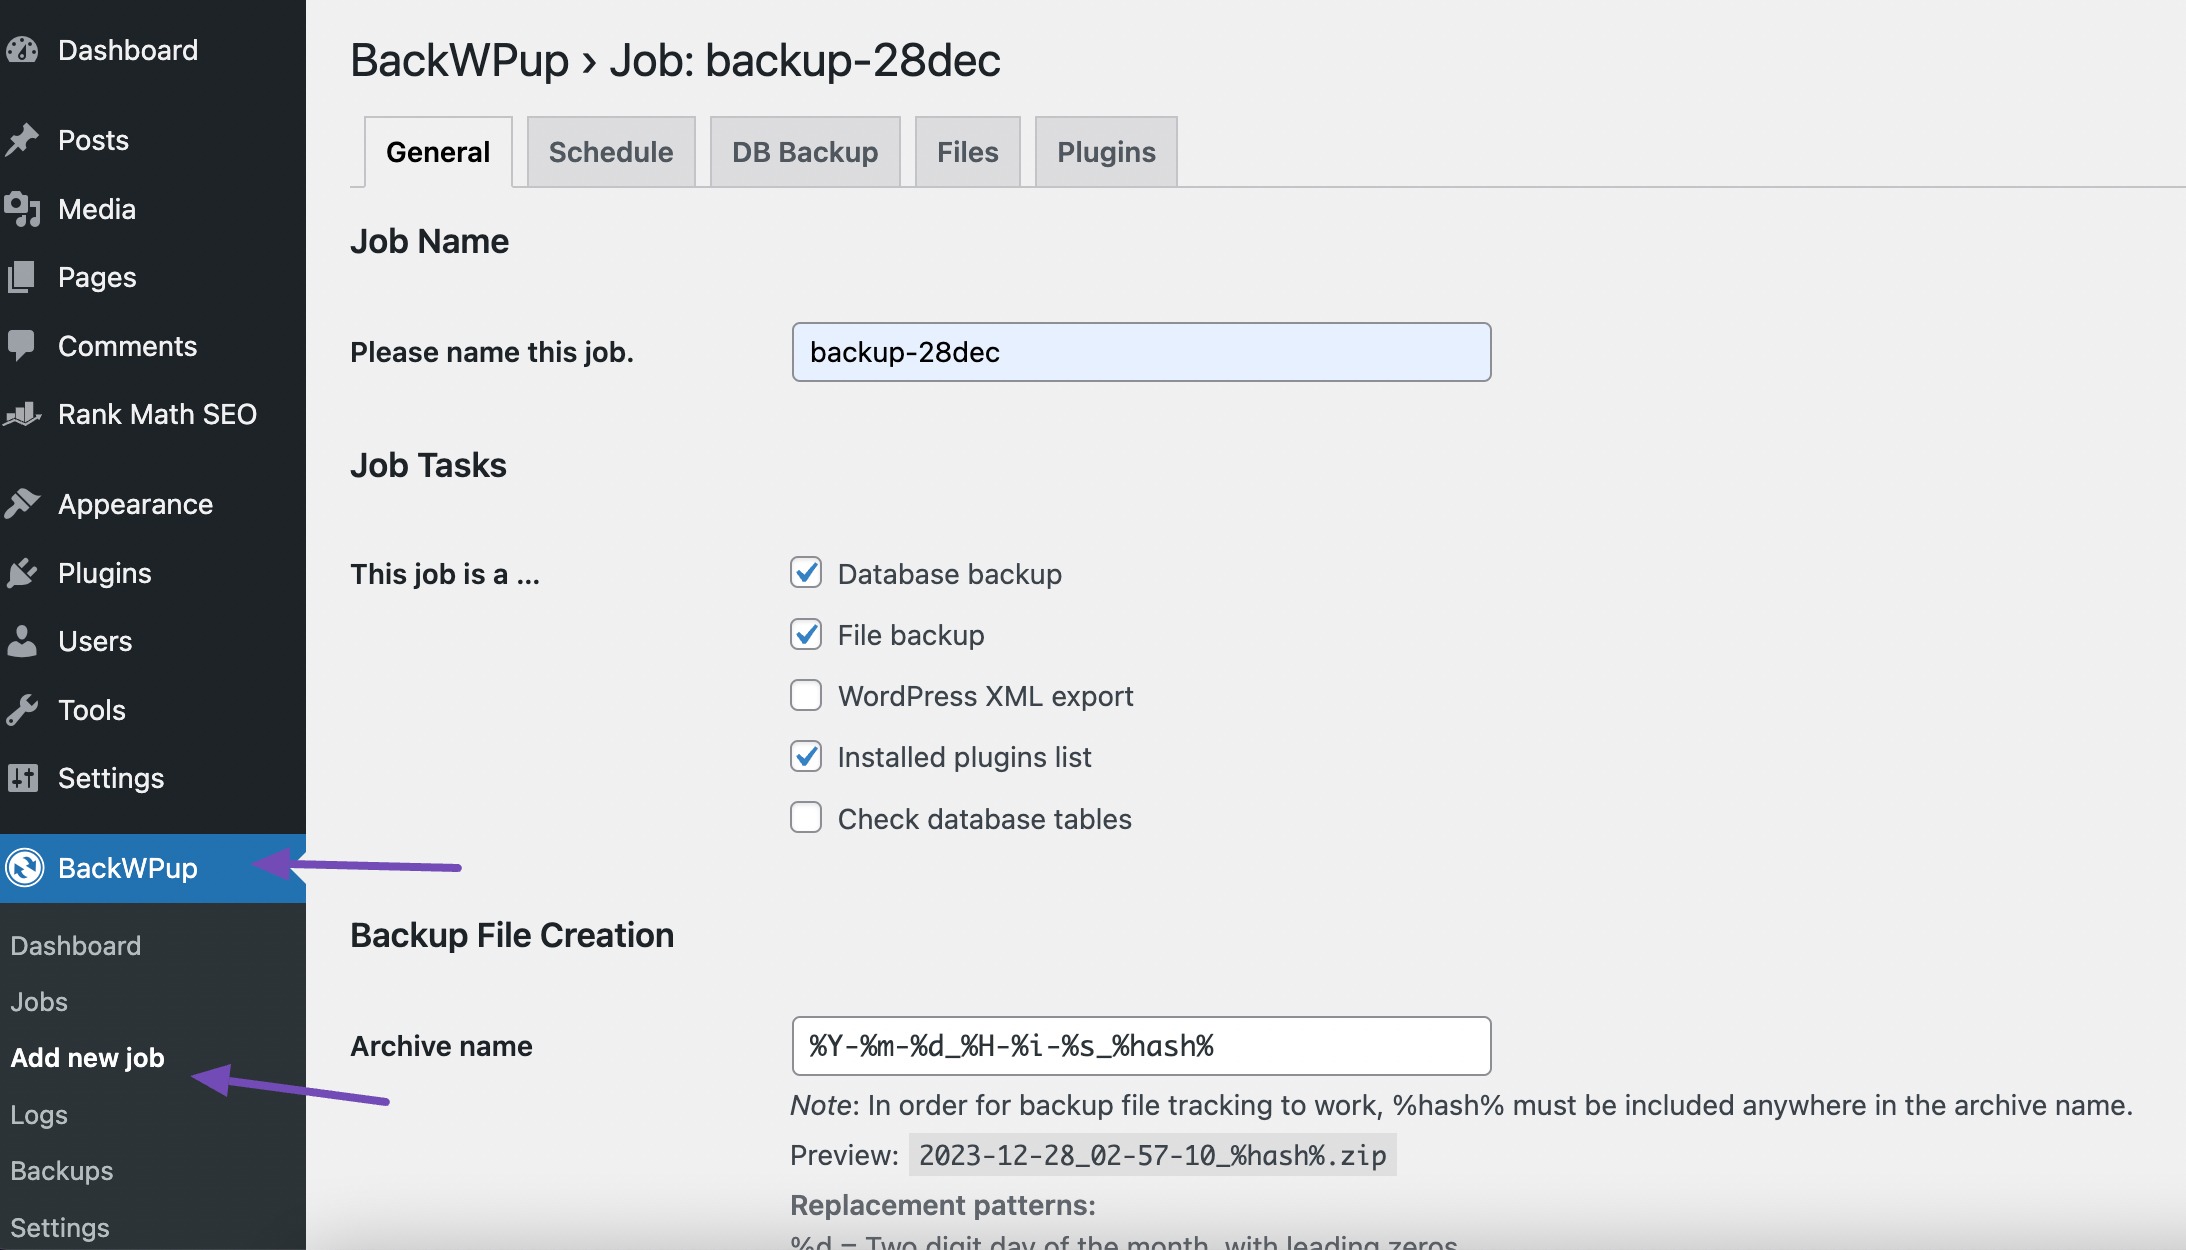
Now, decide the type of backup tasks you want to perform by selecting options like database backup, file backup, WordPress XML Export, or a list of installed plugins from the Job Tasks menu.
If you wish to optimize and check the database file during the backup, check the box for the Check database tables option.
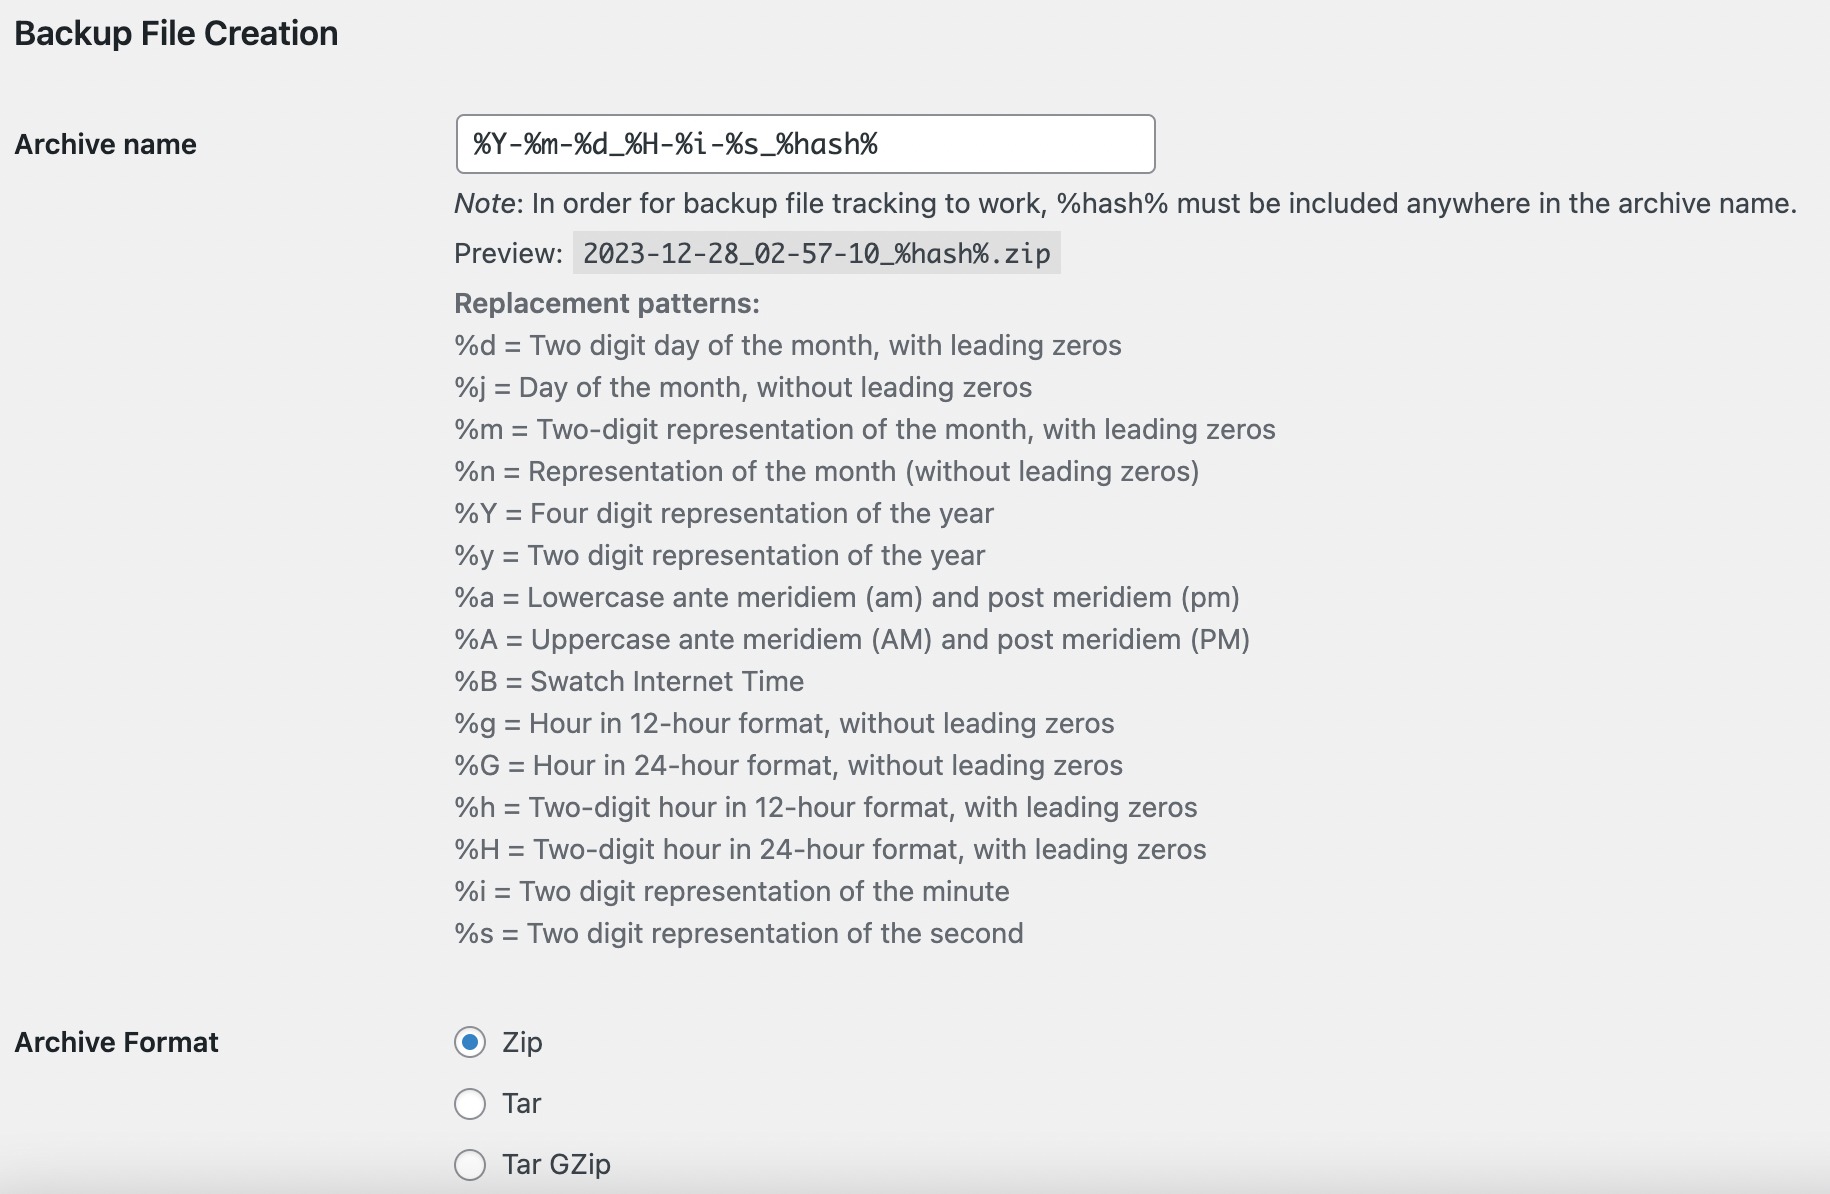
Then, provide a name for the job and choose the Archive format type; the default is Zip, but you can also go for Tar Gzip or Tar archive.
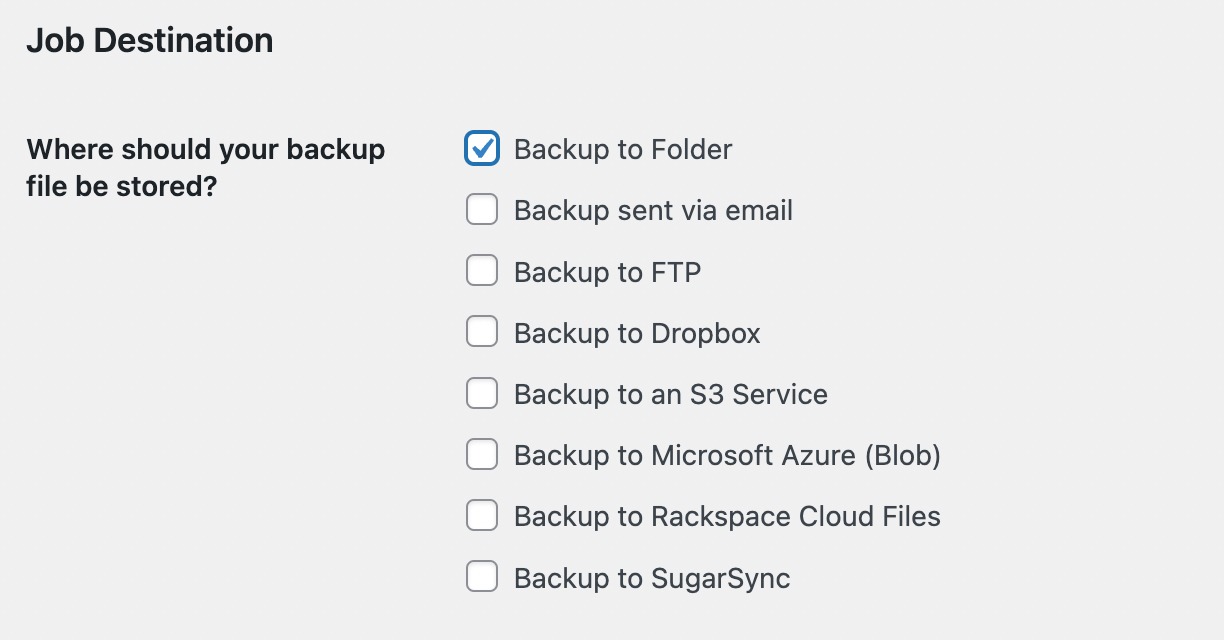
Lastly, decide where to store the backup files in the Job Destination section. BackWPup gives you various options, including storing them on your server, sending them via email, backing up to FTP, Dropbox, Amazon S3, and more.
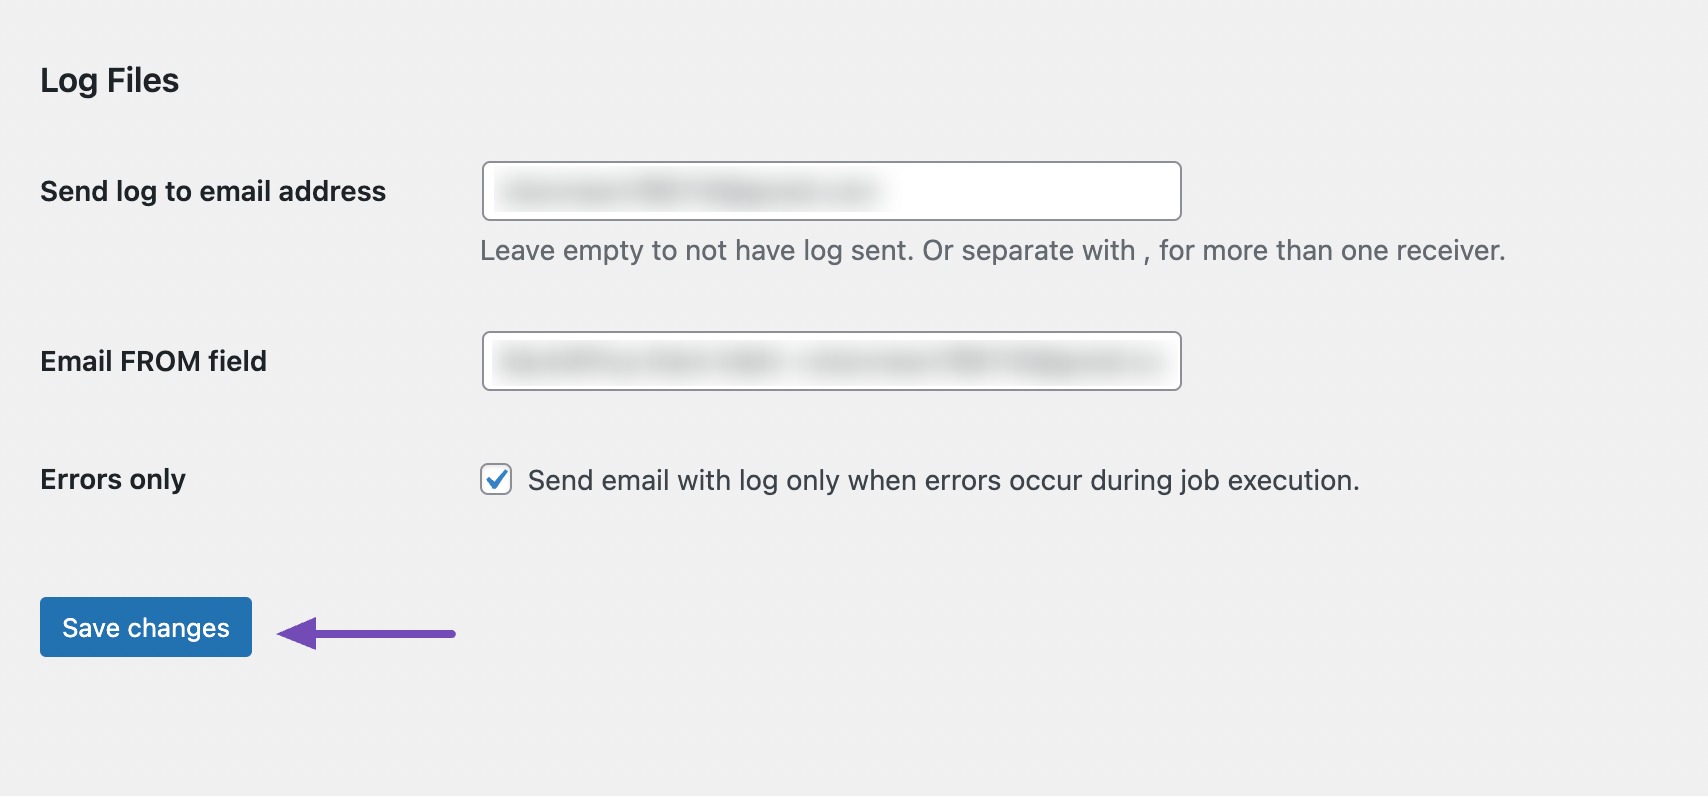
Once you’ve configured everything, click the Save changes button, and there you go, you’ve successfully set up backup jobs to run whenever you need them!
3.2 Manual Backing Up Your WordPress Site Using cPanel
Manually backing up your WordPress website involves taking a hands-on approach to ensure the safety of your site’s data without relying on plugins.
Note: The exact steps may vary depending on the hosting provider.
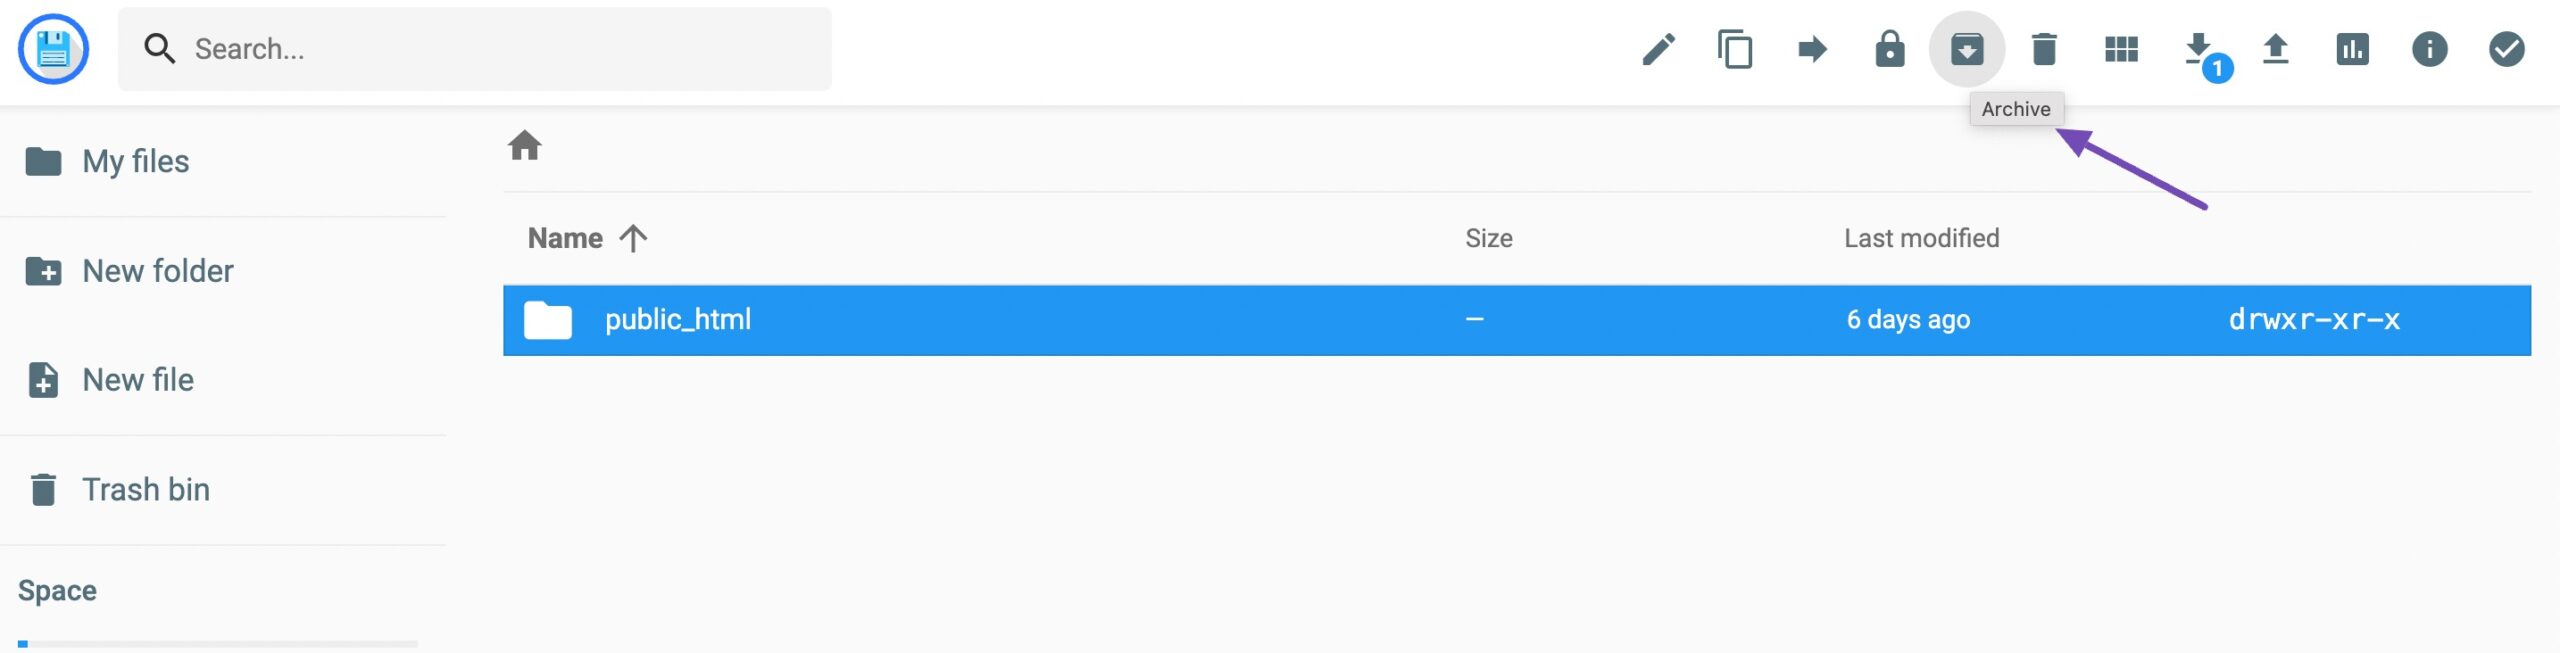
Login to your hosting dashboard and navigate to the File manager option, as shown below.

Select the Archive option located at the top of the screen.
Next, select the zip option, as shown below.
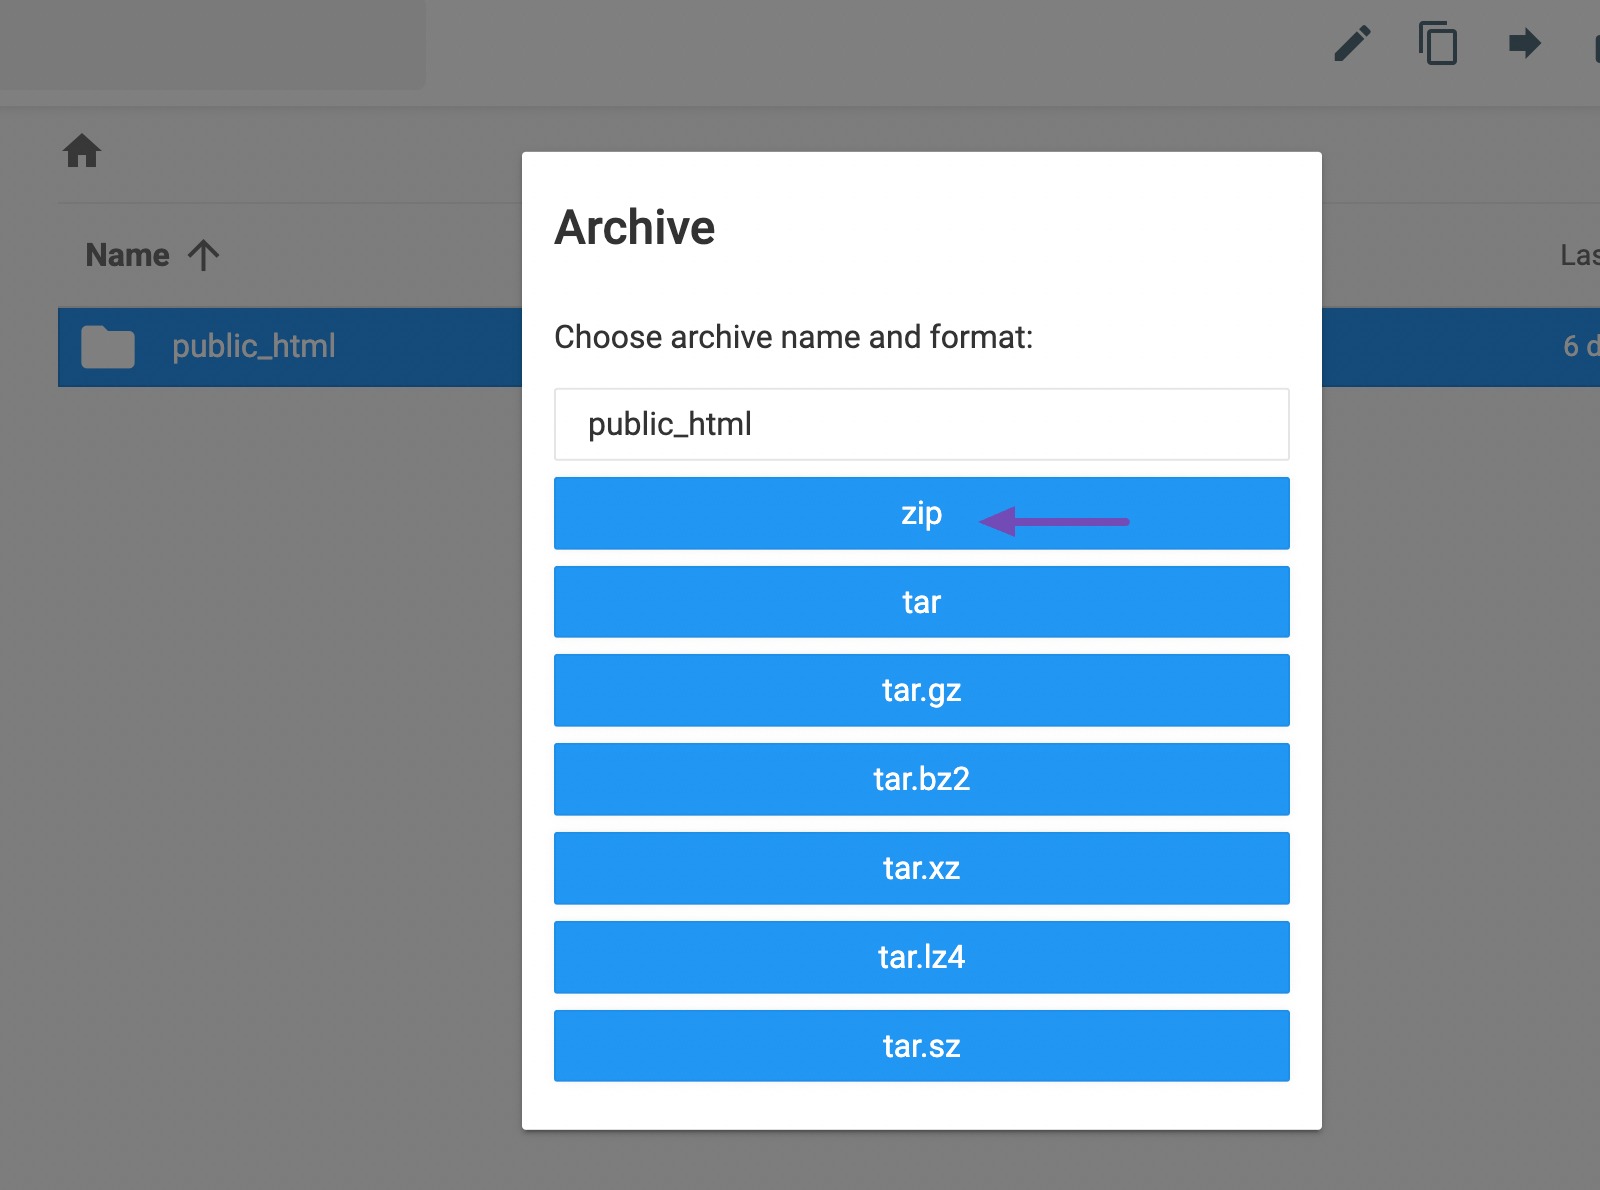
Your website files will be compressed into a zip file in a few seconds.
Next, click the Download option, as shown below.
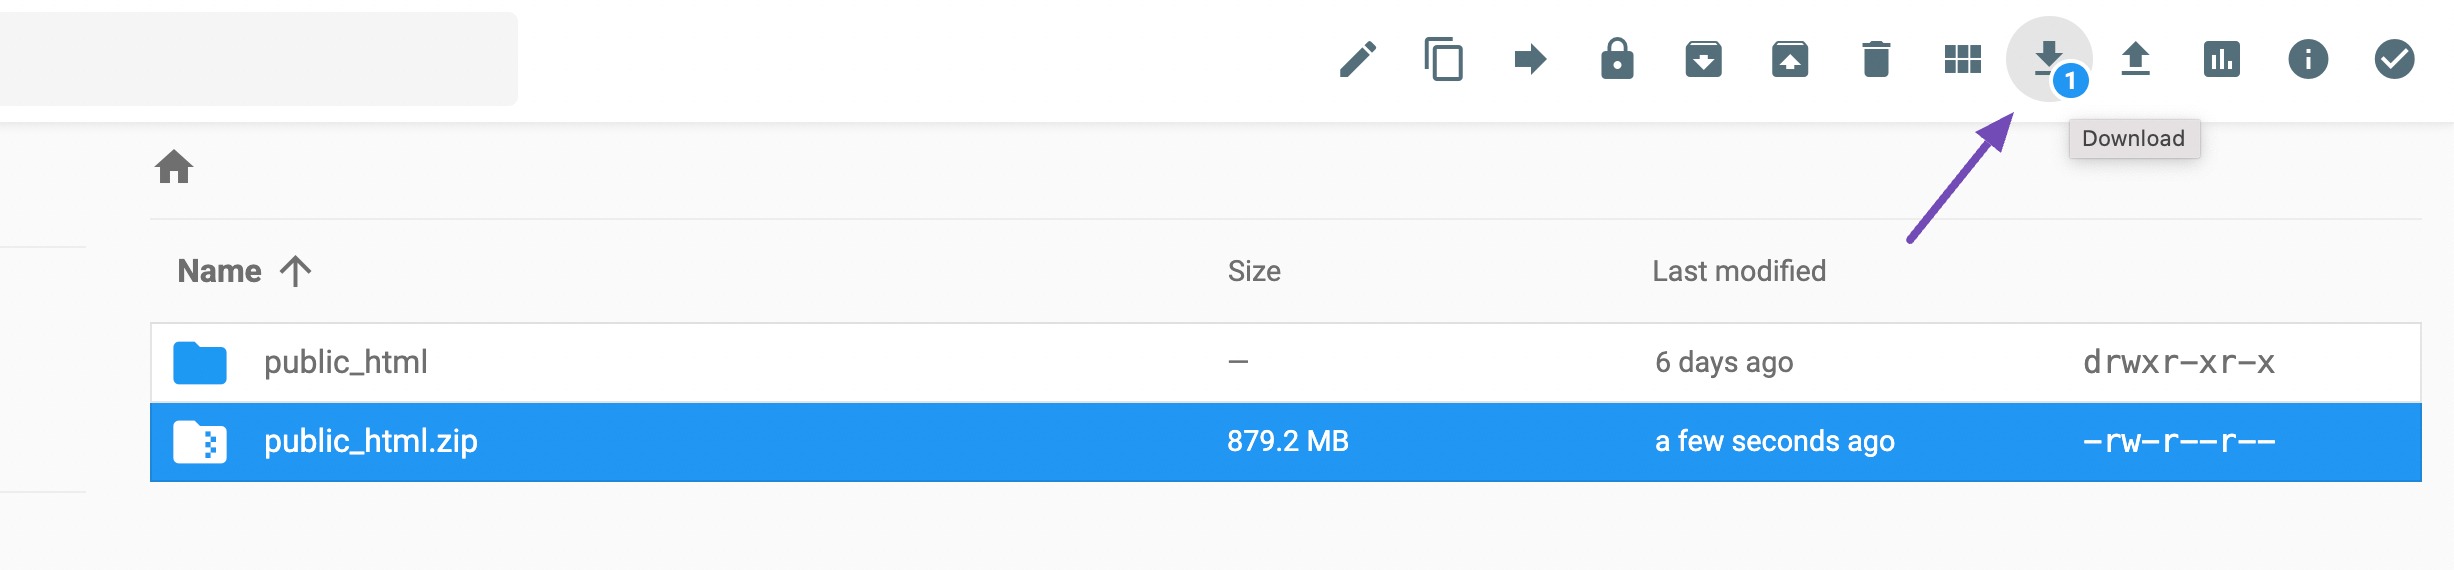
After compressing the file, it’s important to save it in a secure location. This way, if your site encounters errors or security issues, you can readily utilize the compressed file as a backup and effortlessly restore your content.
2.3 Manual Backup Your WordPress Site Using FTP
If you do not wish to access the cPanel, you can use FTP to take a backup of your site.
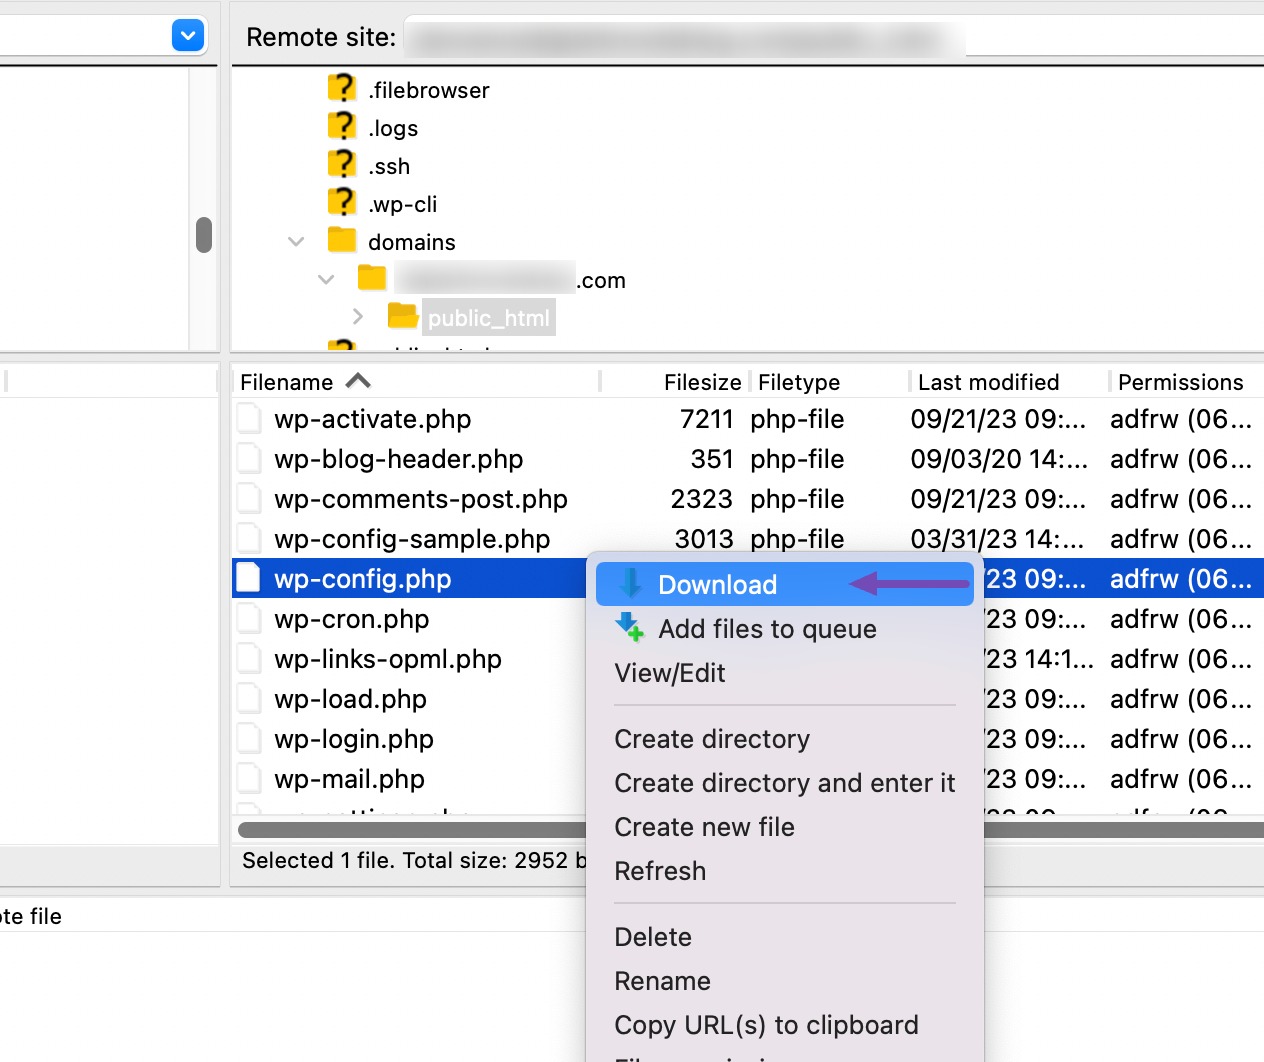
Once you’re connected with your FTP client, like FileZilla, navigate to the root directory of your website. Next, right-click on the file or the folder you want to backup, and select the Download option.
If you wish to download the entire website, click on your root folder and simply download it.
2.4 Manual Backup WordPress Databases
To manually back up your database, log in to the cPanel of your hosting service.
Next, navigate to Databases → phpMyAdmin, as shown below.
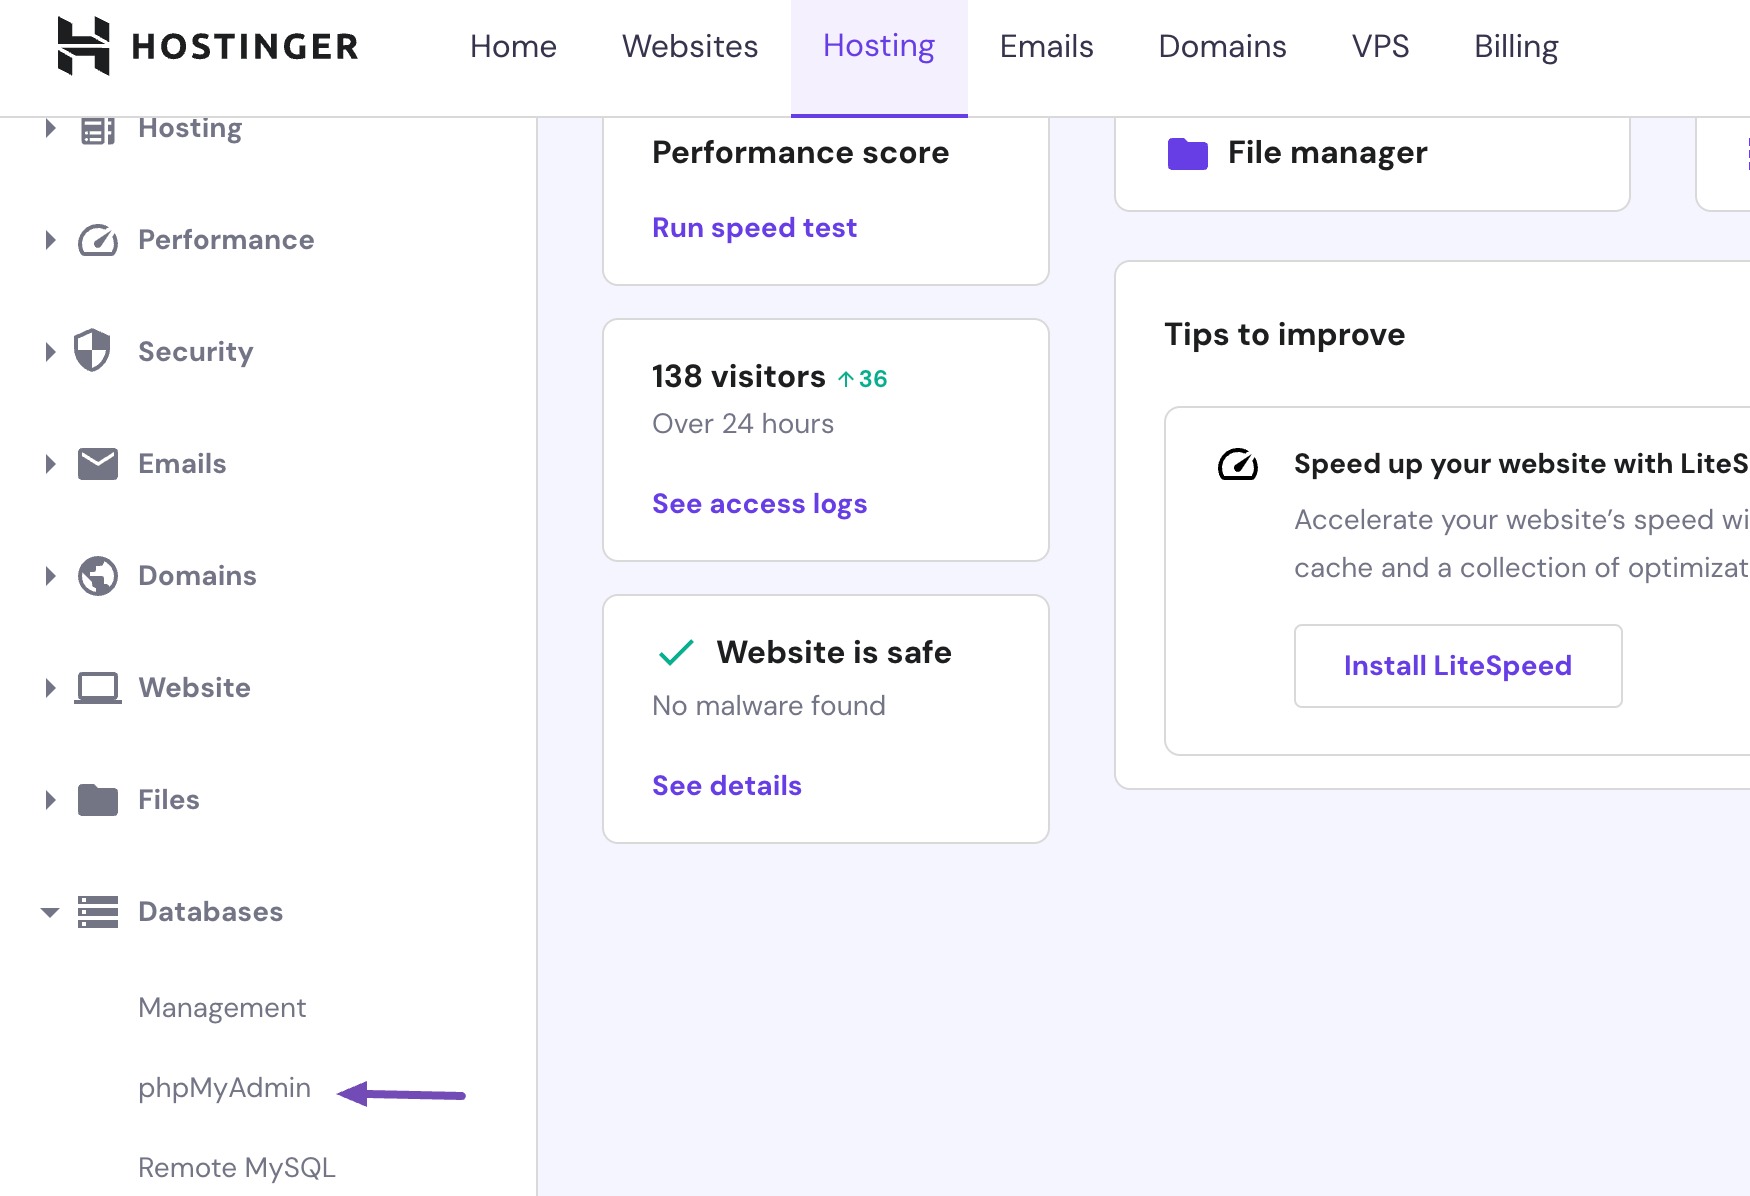
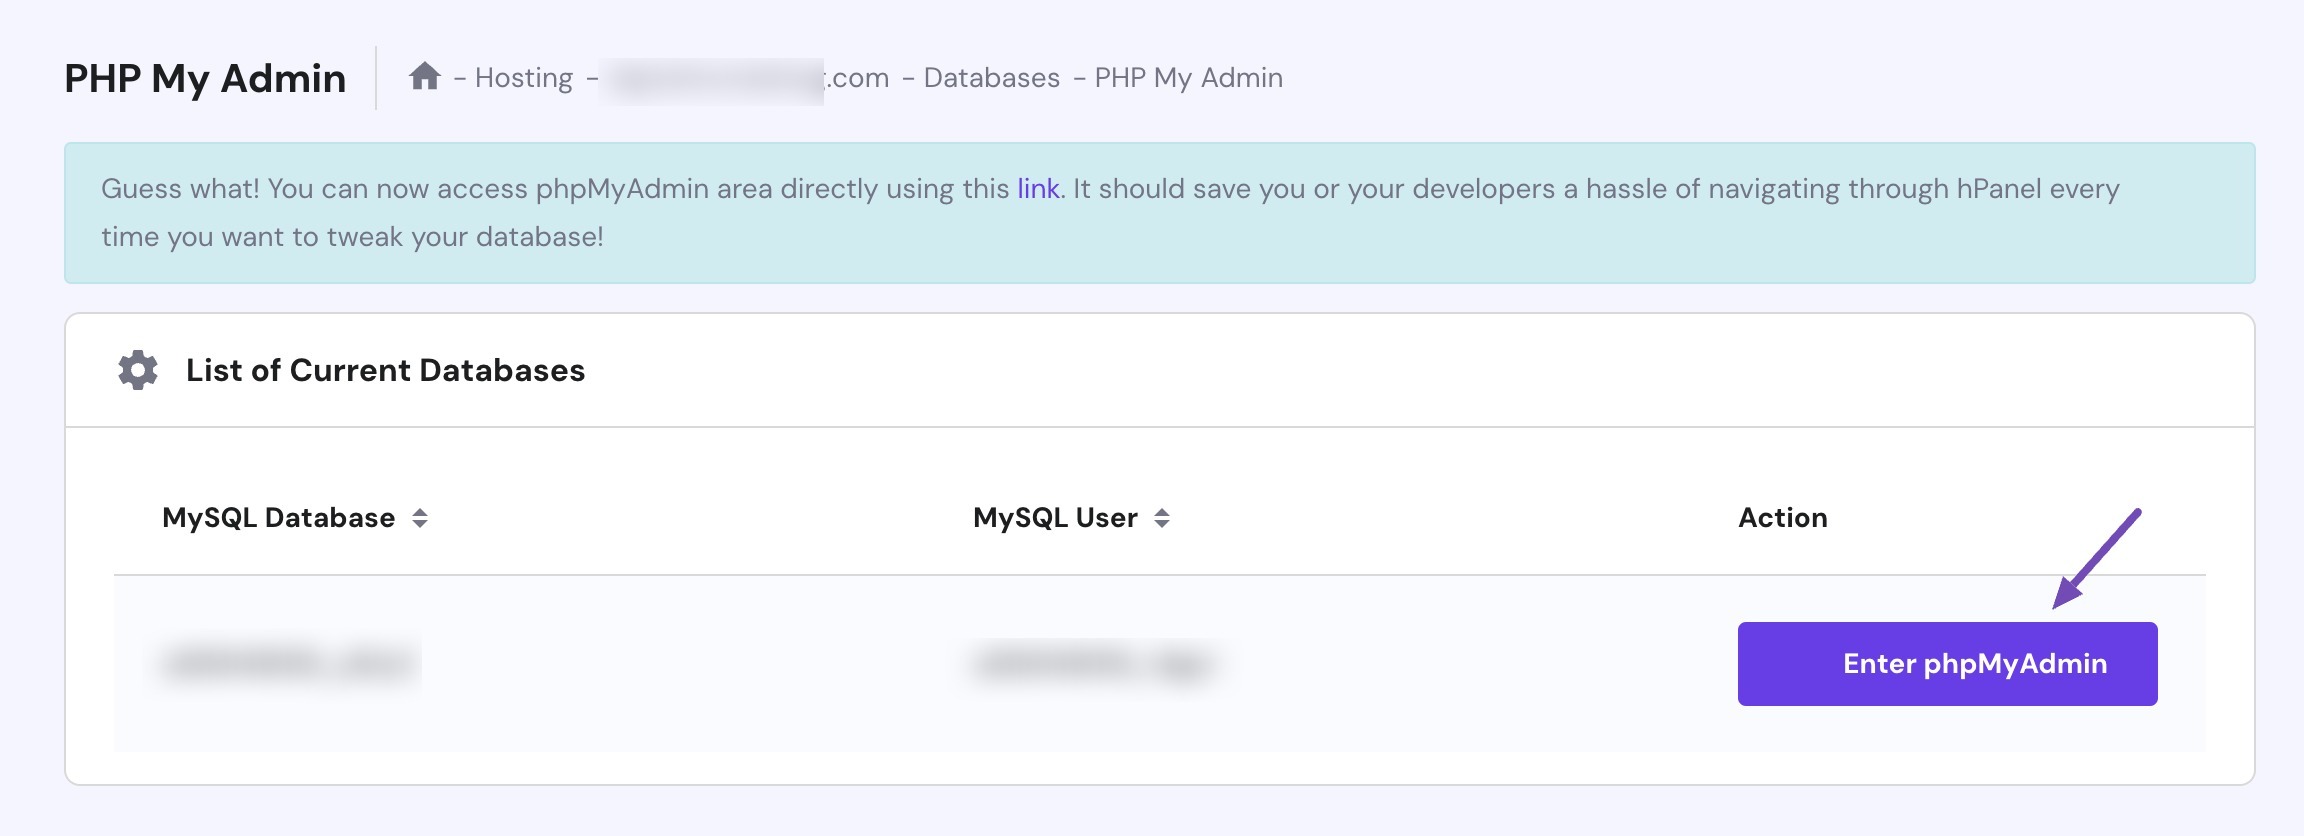
Find your site’s database name in the List of Current Databases and click the Enter phpMyAdmin button.
Next, navigate to the Export tab, keep the settings as they are, and click the Export button.
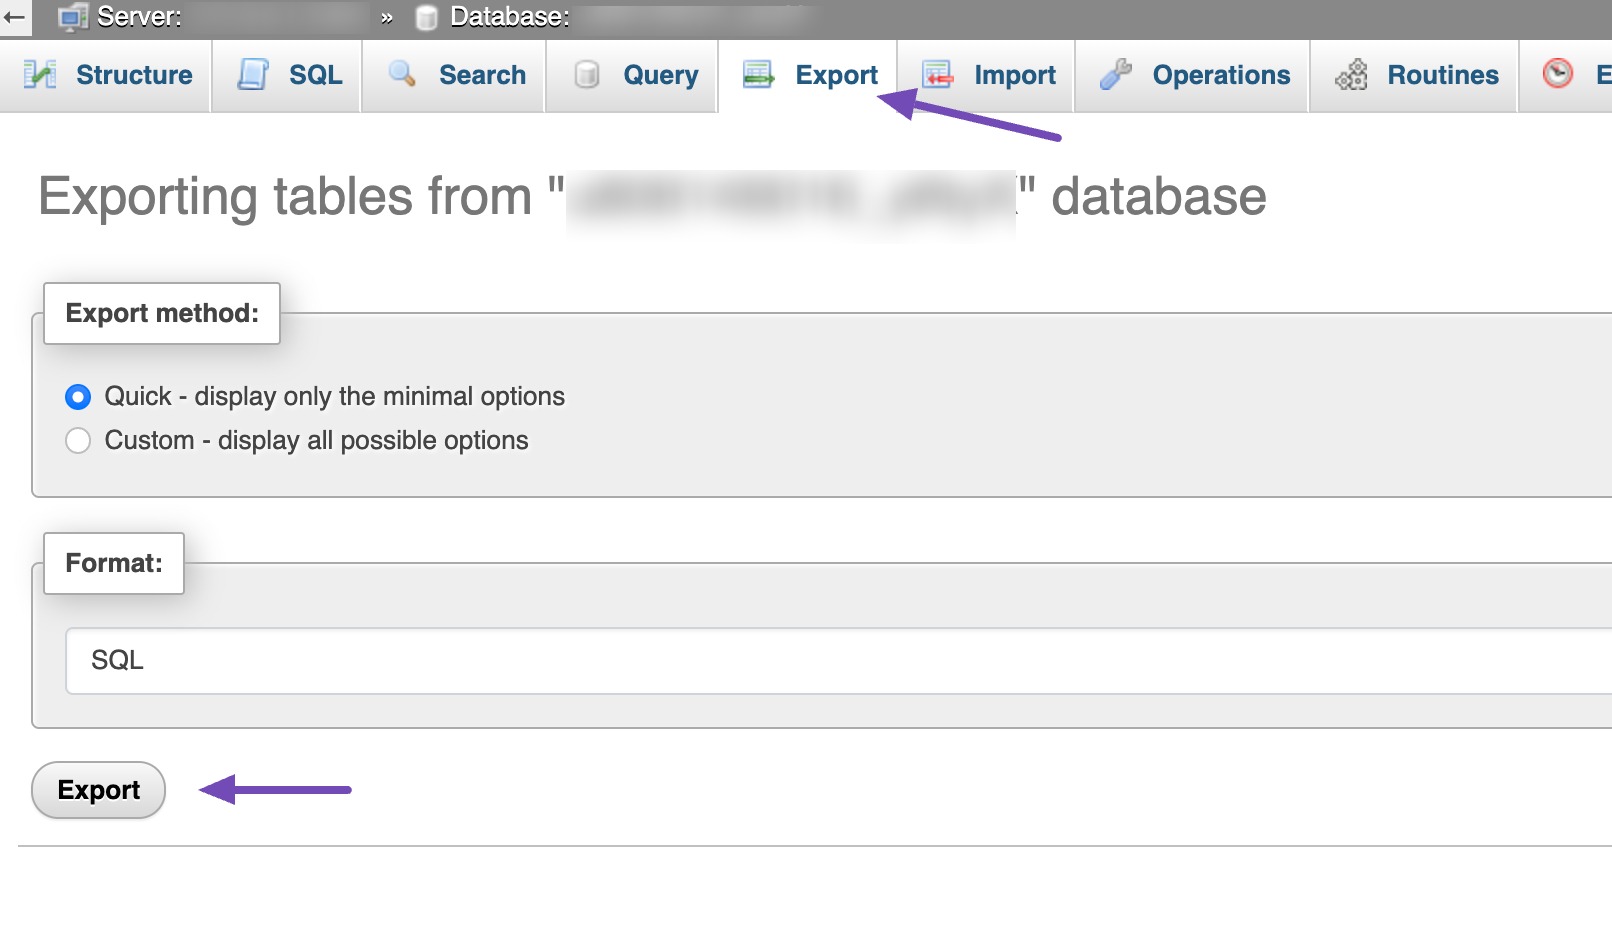
Your SQL database file will be downloaded to your computer. You can keep this file safe in a secure location.
2.5 Automatic Backup Services Offered by Web Hosts
Many web hosting providers include automatic backups as part of their hosting plans. These backups are usually created on a set schedule, giving you an extra layer of protection without any extra effort.
That said, it’s important to check how reliable your host’s backup system is and how easy it is to restore your site if something goes wrong.
In most cases, you’ll need to contact your hosting provider to access or restore a backup, which can sometimes delay recovery. Since most hosts back up entire servers rather than individual sites, getting the latest version of your website isn’t always guaranteed.
For this reason, while host backups are convenient, you shouldn’t rely on them alone. Setting up your own backup system ensures you always have quick access to your files and database, giving you full control when you need it most.
3 How to Restore Your WordPress Website from a Backup
Restoring your WordPress site means rolling it back to a previous working state using your saved backup files. Depending on how you created the backup, there are different ways to restore it.
3.1 Restoring With a Plugin
The restore feature of the BackWPup plugin is integrated into BackWPup PRO, allowing you to initiate the restore process directly from your WordPress backend.
All you need is a backup created with BackWPup.
Even if your website is destroyed and you can’t access your backend anymore, as a PRO user, you also get a standalone restore app for such situations.
3.2 Restoring With cPanel
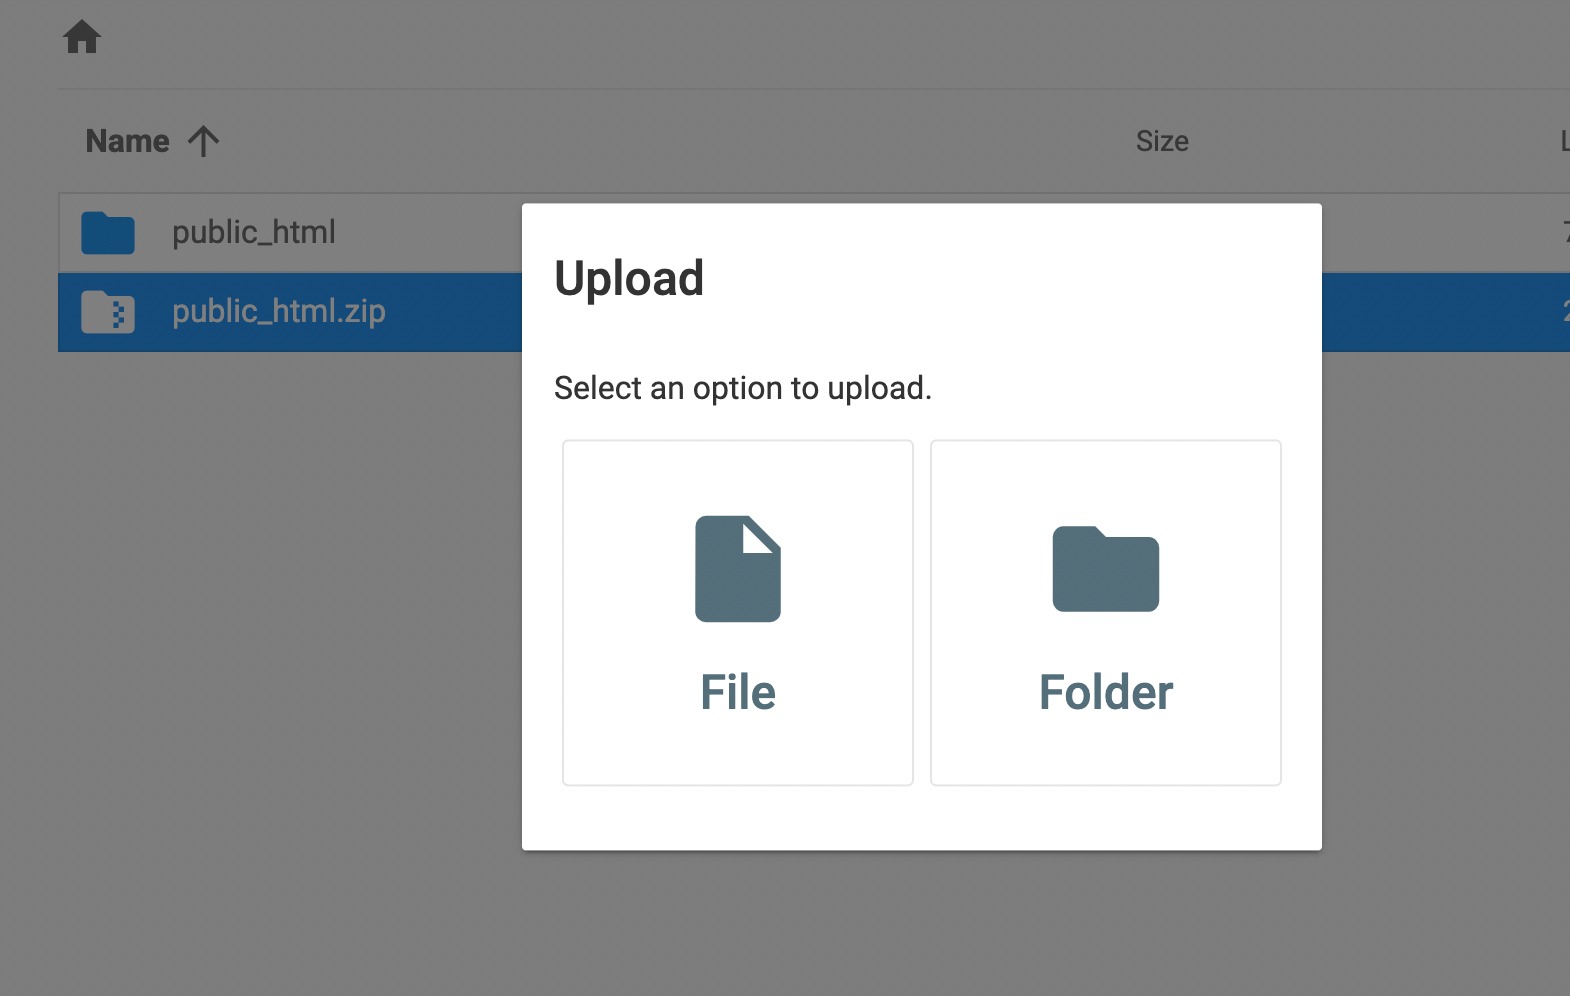
To restore the backup file, log in to your cPanel and access the File Manager of your hosting service. Click the Upload option at the top. It will redirect you to a page for uploading the file.
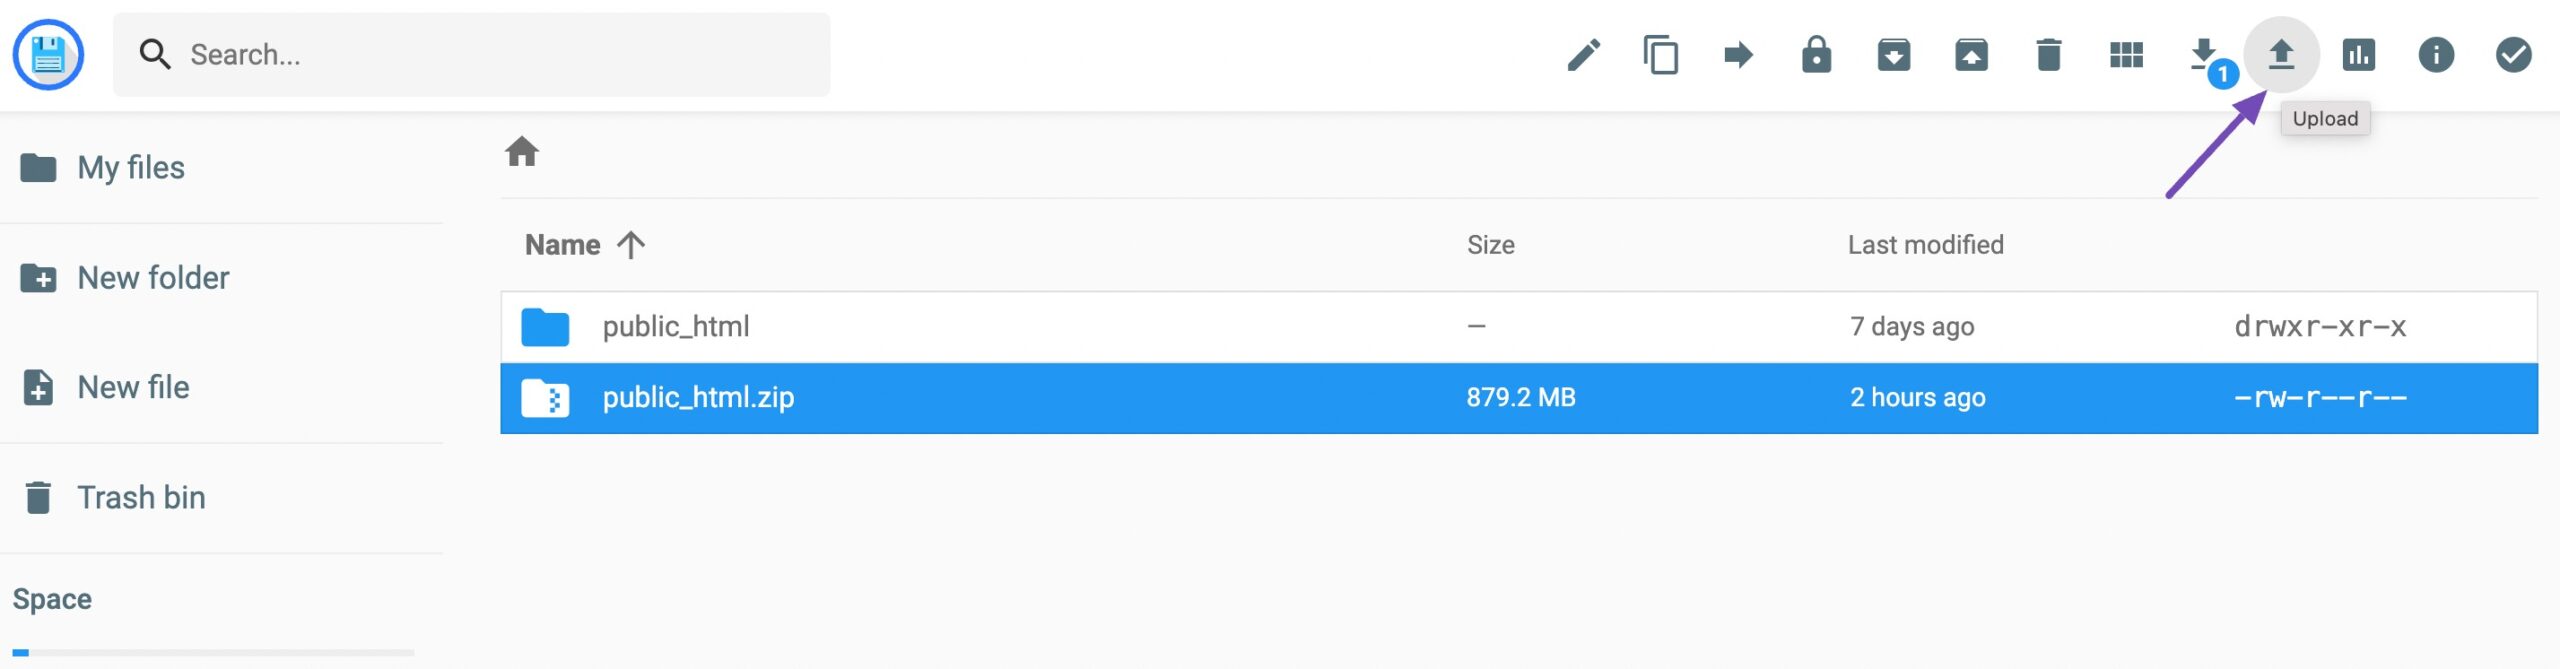
Ensure you check ‘Overwrite existing files,’ then click the File button to upload the public_html zip file.
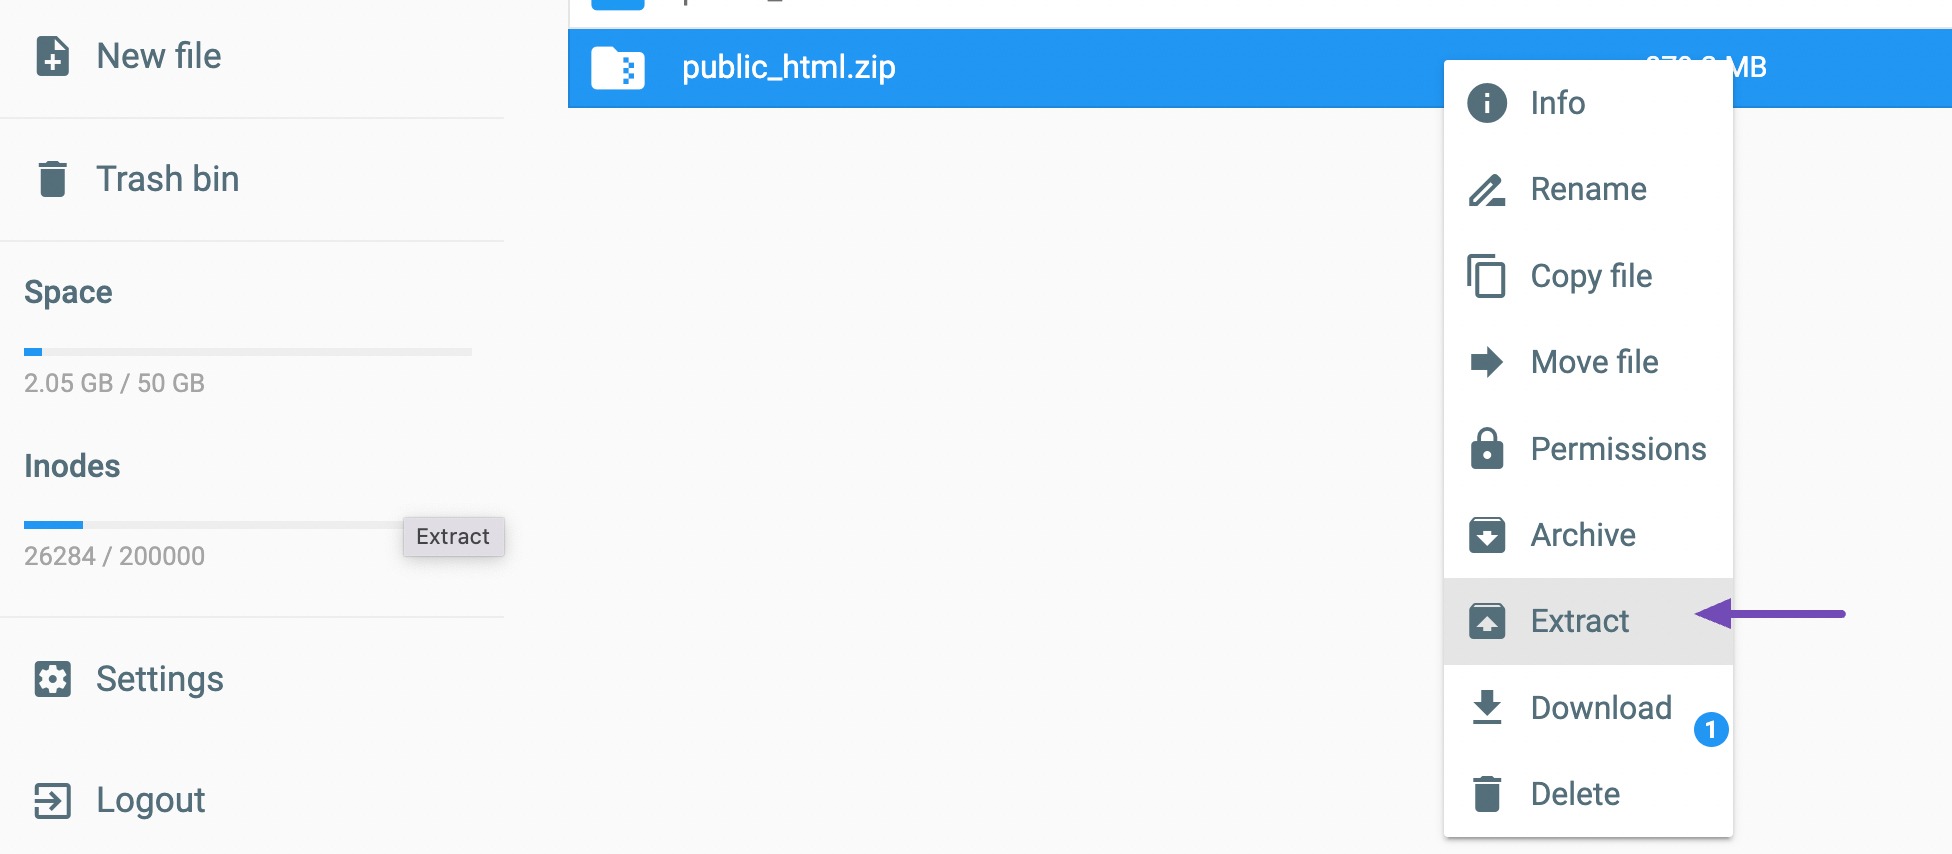
Once the file is uploaded, right-click the file and click on the Extract option to initiate their functionality.
3.3 Restoring With FTP
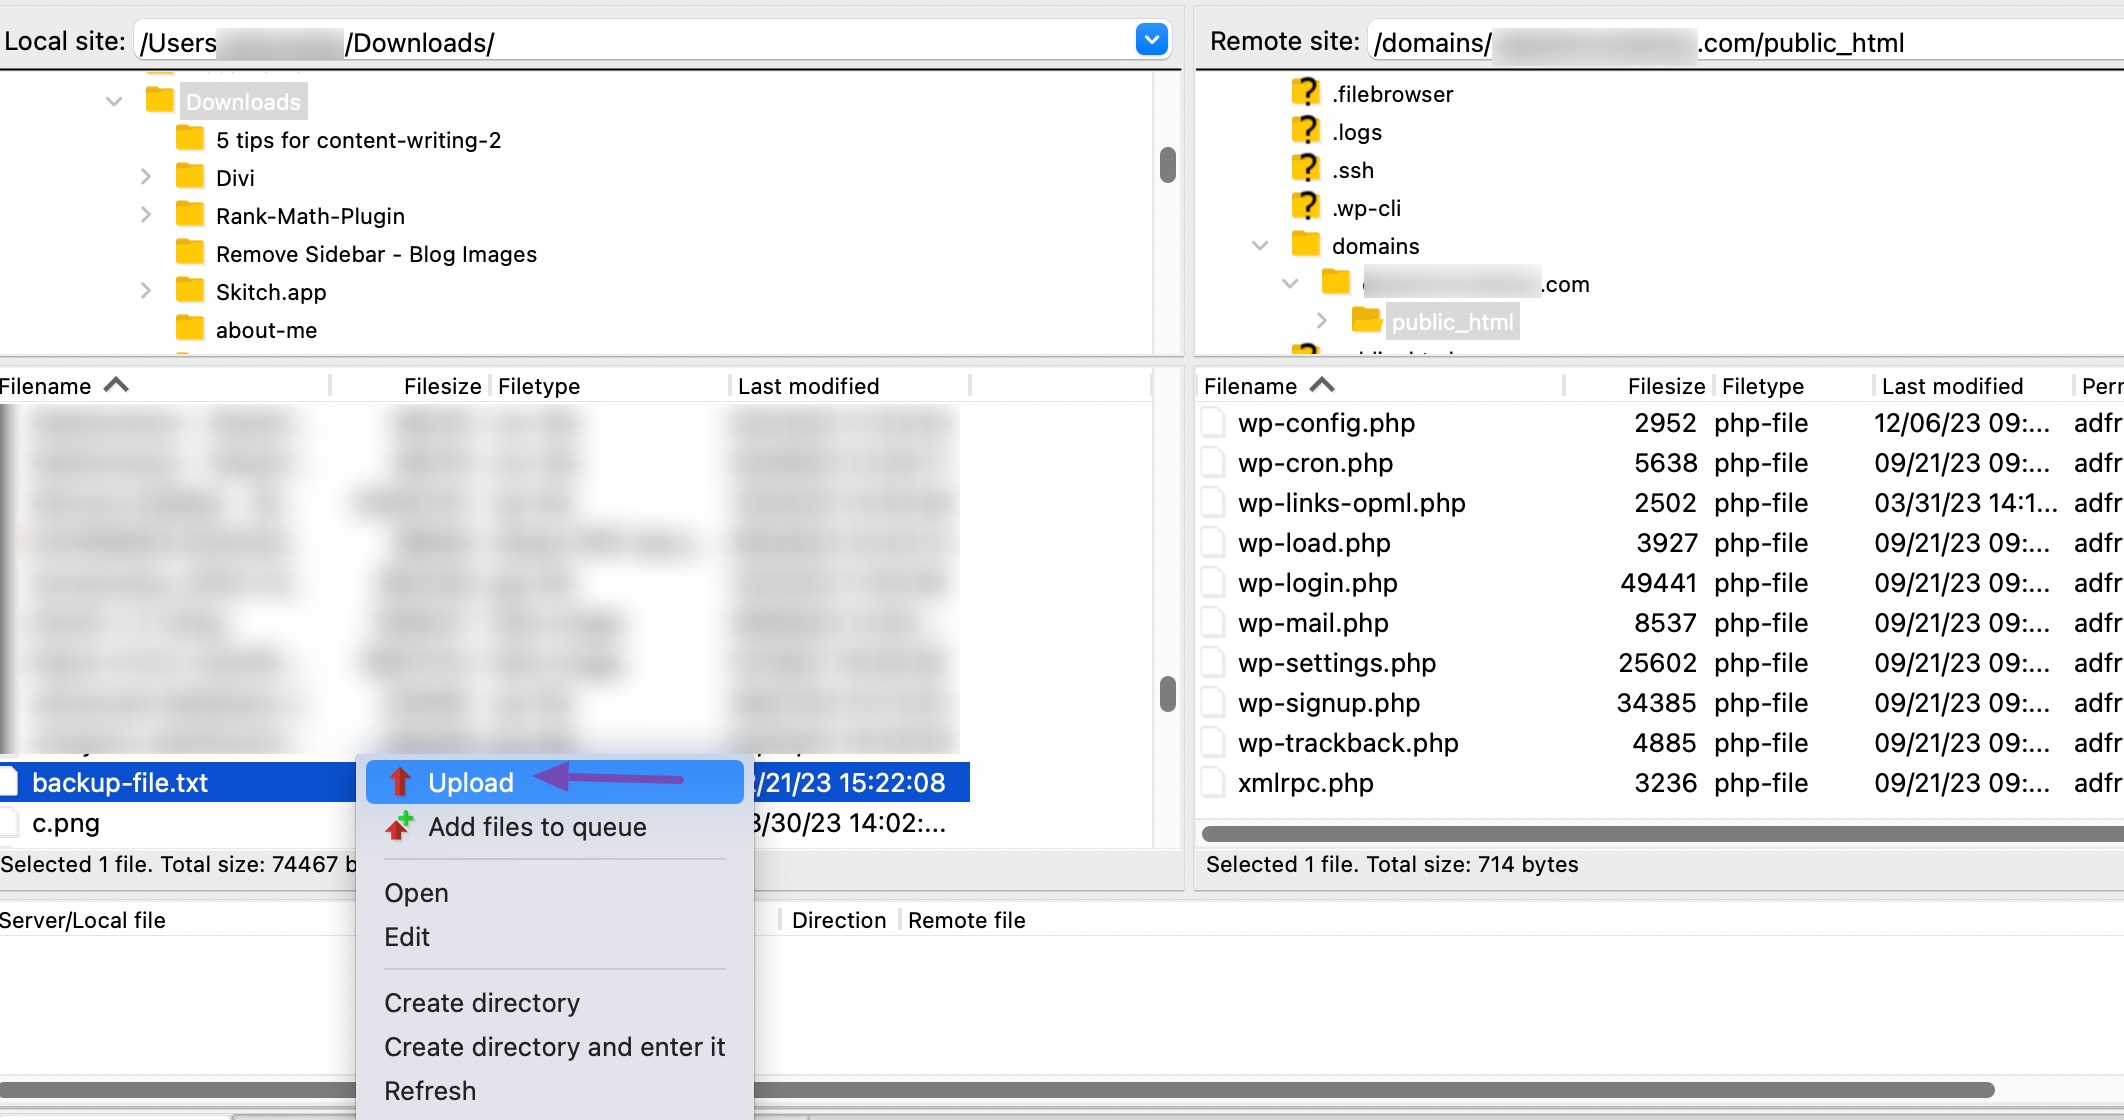
In order to restore the backup using FTP, connect to your hosting server using your FTP credentials.
Navigate to the directory on the server where your WordPress files are stored. On your local site, find the backup files, select them, right-click, and click the Upload option to upload them to the server directory.
3.4 Restoring Database From phpMyAdmin
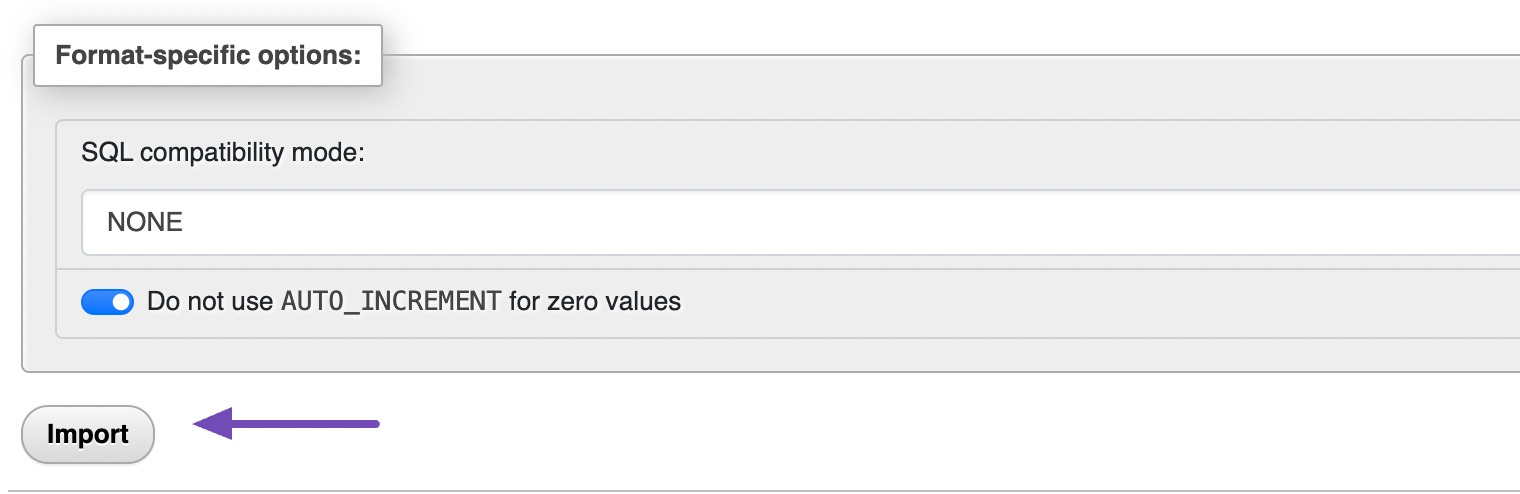
To restore the database, navigate to phpMyAdmin in your cPanel. Click on the Import button to import your database, which is already in SQL format.
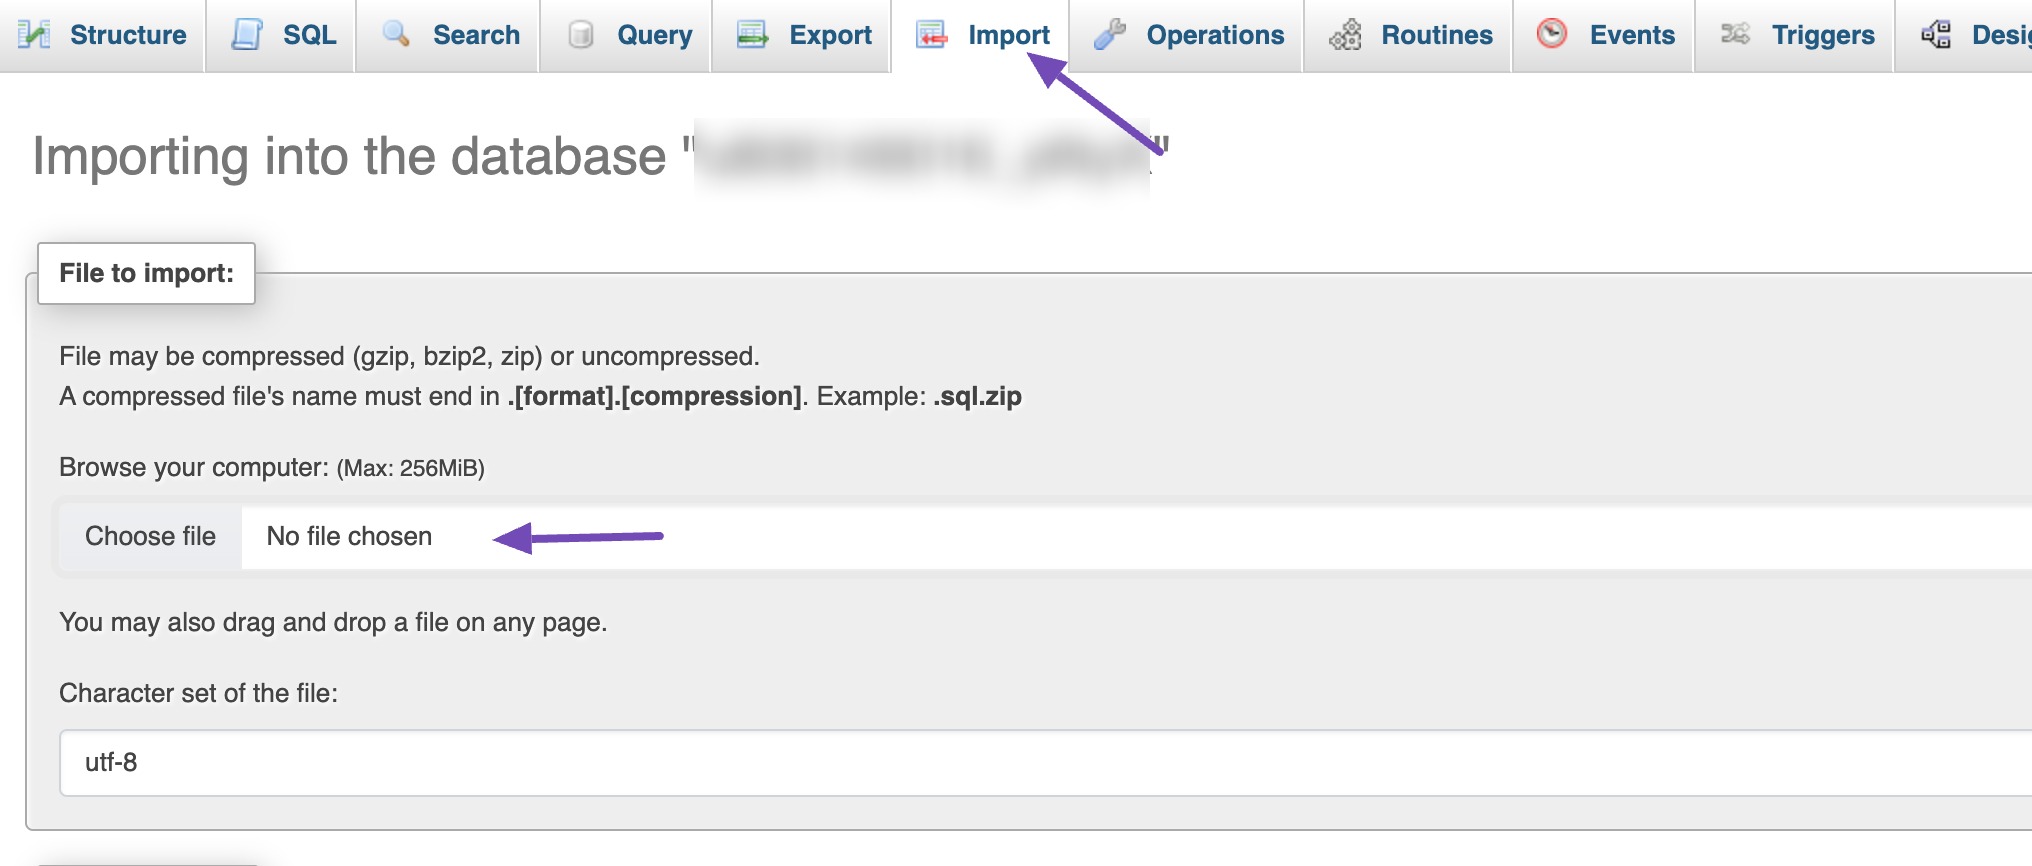
Select the SQL backup file and click the Import button to upload and restore the database.
4 Conclusion
Backing up your WordPress site is one of the simplest and most effective ways to protect your content and hard work.
From cyberattacks to accidental deletions or server crashes, a backup gives you the peace of mind that you can restore your site quickly without losing valuable data.
The key is consistency; set up a regular backup routine, store your files securely, and always test your site after restoring to make sure everything works as expected.
Start backing up your site today and keep your online presence safe. 🚀
If you like this post, let us know by tweeting @rankmathseo.