A well-organized content calendar is the backbone of any successful content marketing strategy. It helps you plan, schedule, and streamline your content creation process, ensuring that your message reaches the right audience at the right time.
However, building a content calendar from scratch can feel overwhelming. That’s where Content AI steps in to simplify the process.
With Content AI, you can create a tailored content calendar that aligns with your goals in just a few clicks.
In this knowledgebase guide, we’ll walk you through how to use Content AI to create an effective content calendar and keep your strategy on track.
Note: If you run out of credits, you can subscribe to a Content AI plan that suits your needs. To enable the Content AI module, navigate to Rank Math SEO → Dashboard → Modules in your WordPress dashboard.
1 Access RankBot
To begin creating your content calendar, you’ll use RankBot within Content AI. This AI eliminates guesswork by offering pre-built prompts that can be easily customized to suit your needs.
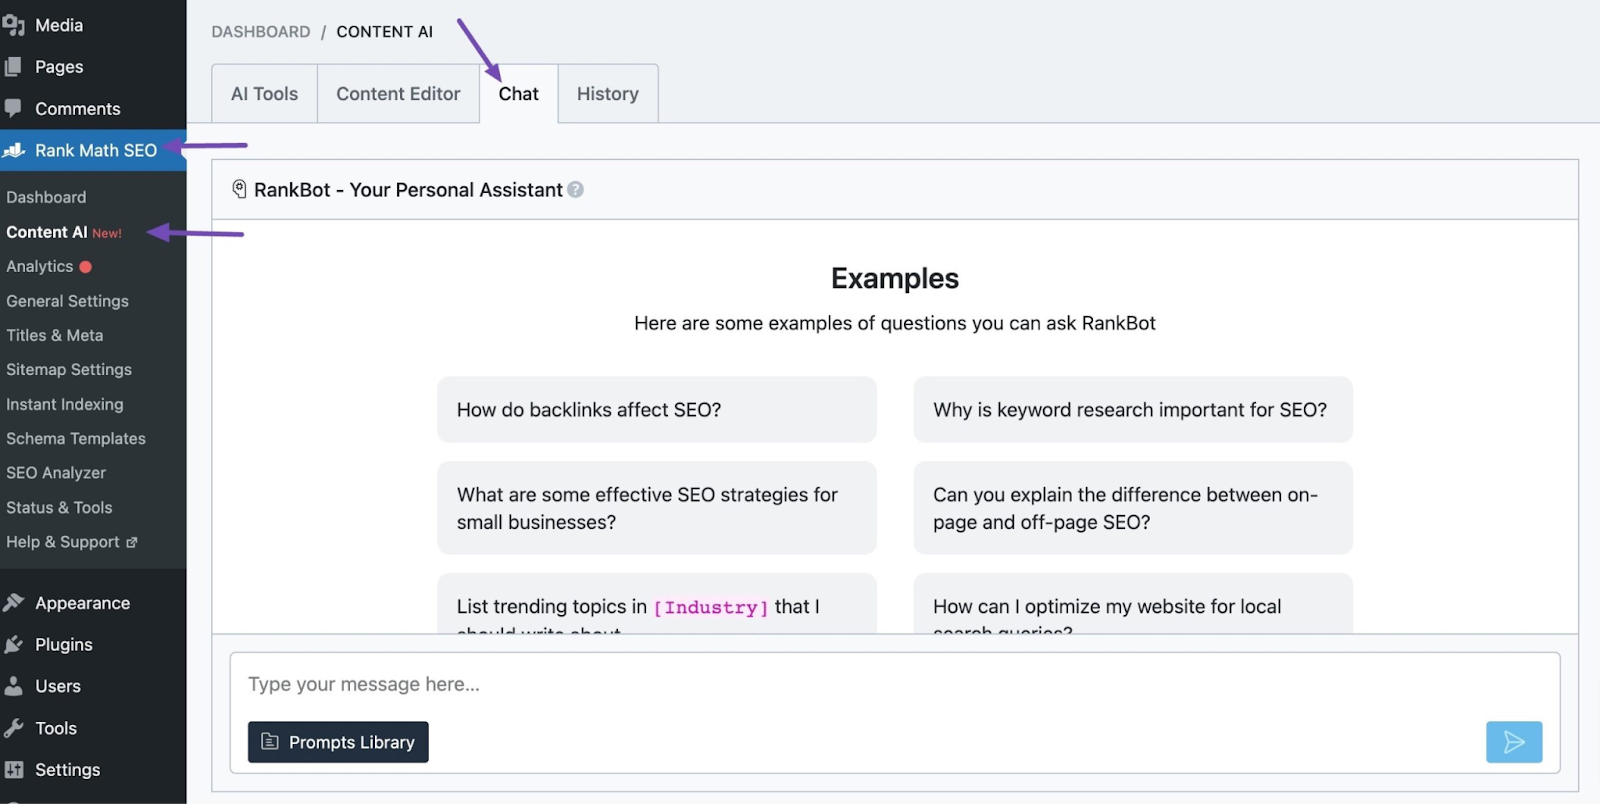
To access RankBot, navigate to Rank Math SEO → Content AI → Chat from your WordPress dashboard.
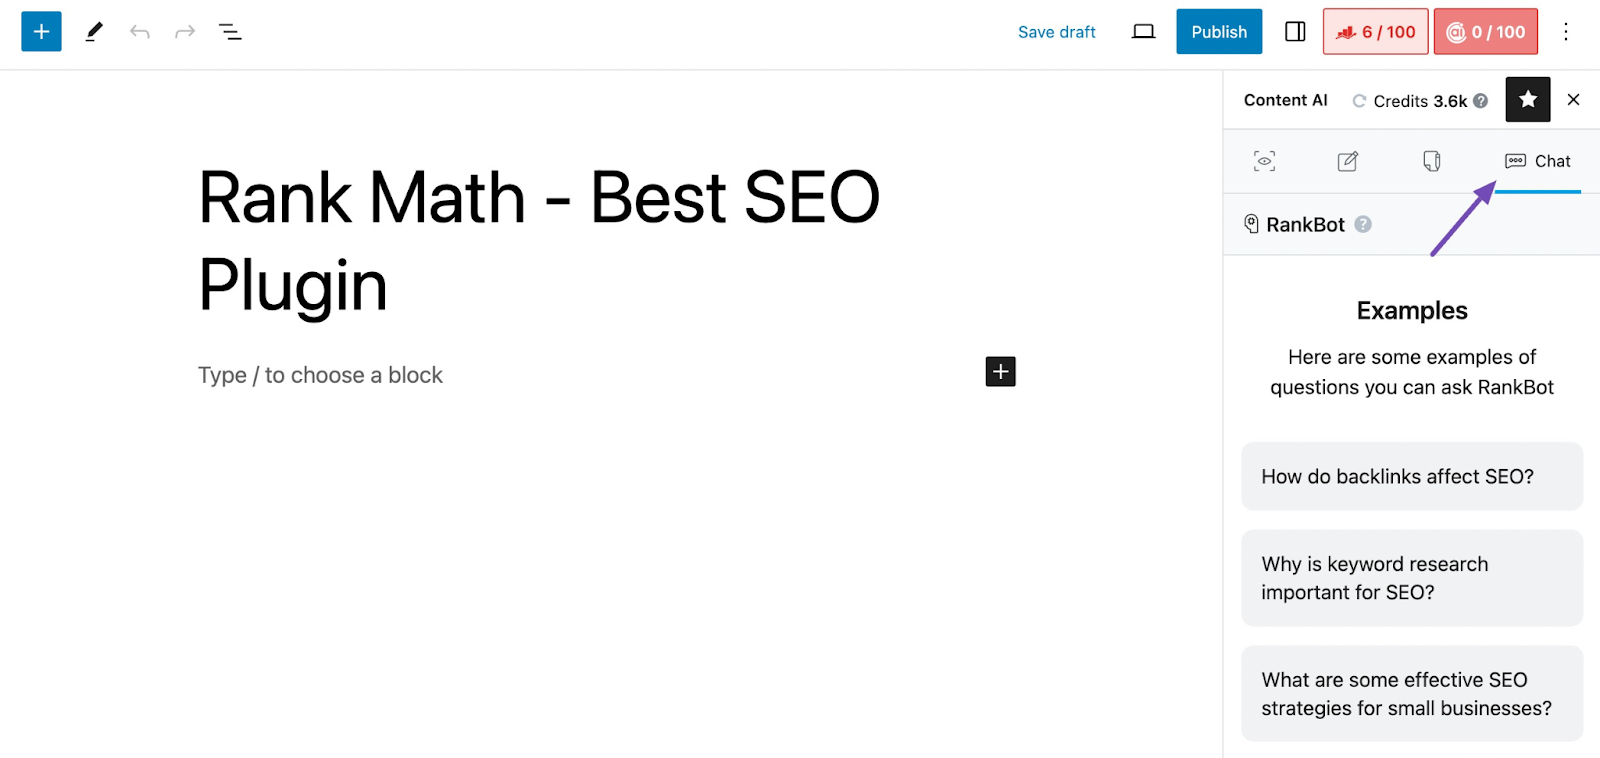
Alternatively, you can access RankBot directly from your WordPress Editor, whether you’re using the Block or Classic Editor.
Locate the page or post you’re working on and click the Content AI icon. In the Content AI Metabox, click the Chat icon to open RankBot.
Once you’ve accessed RankBot, you’re ready to start building your content calendar.
2 Create Your Content Calendar
Before starting your content calendar, ensure you’ve completed thorough keyword research and selected the perfect target focus keyword for this plan.
Once you’re ready, click the Prompts Library button in RankBot.
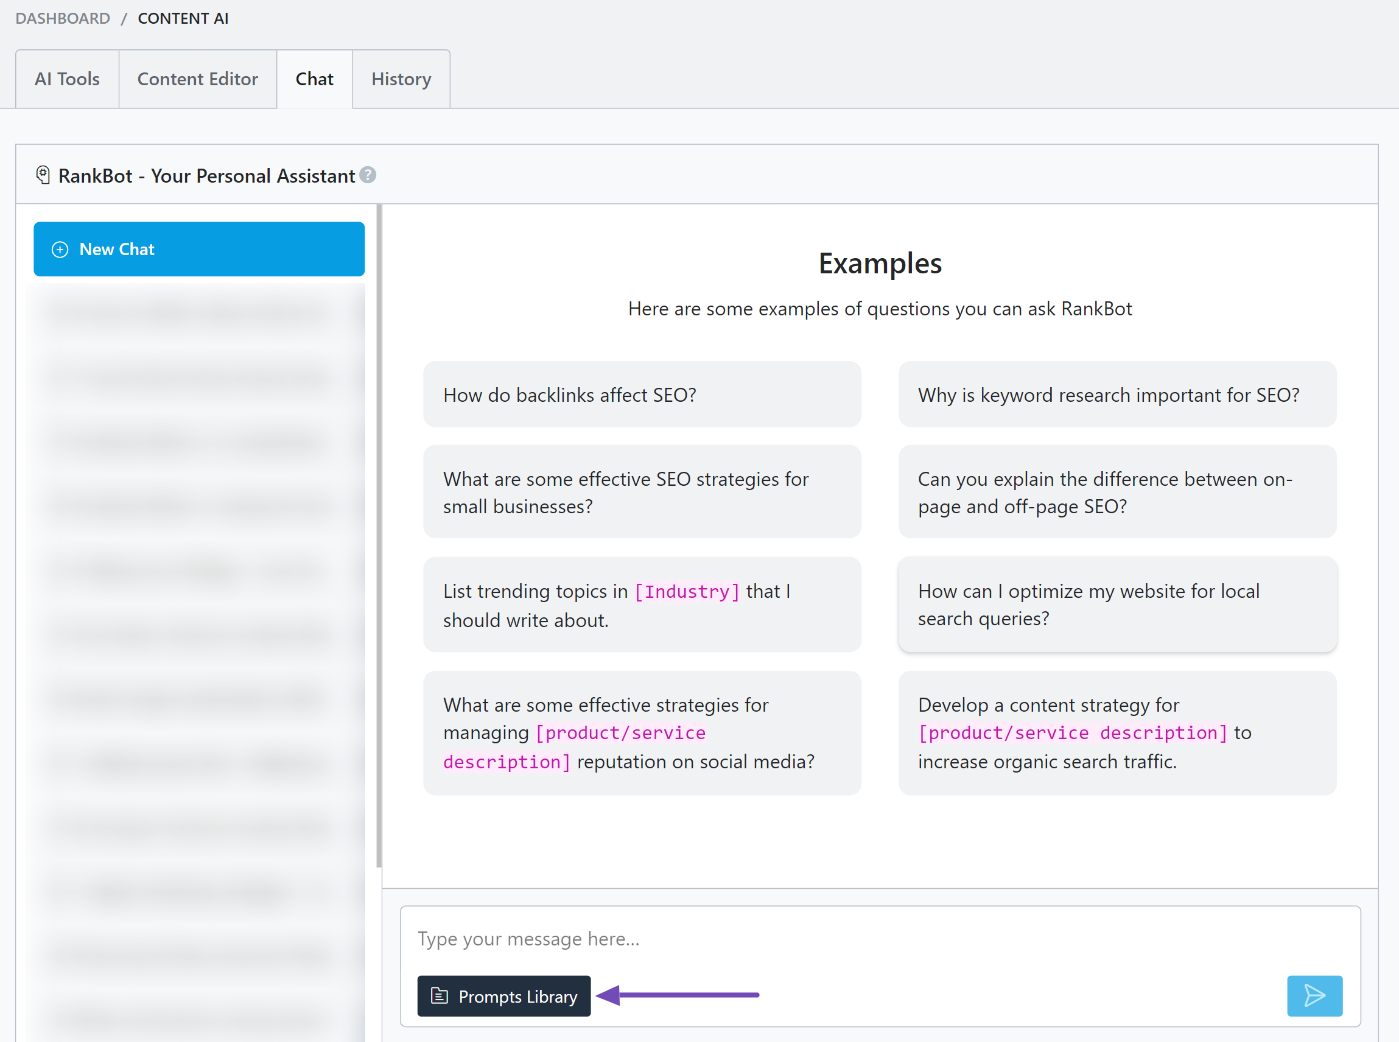
This action will open the prompt list. Use the search bar to locate the “Monthly Content Calendar” prompt.
When the prompt appears, select it and click the Use Prompt button beneath the preview section, as shown below.
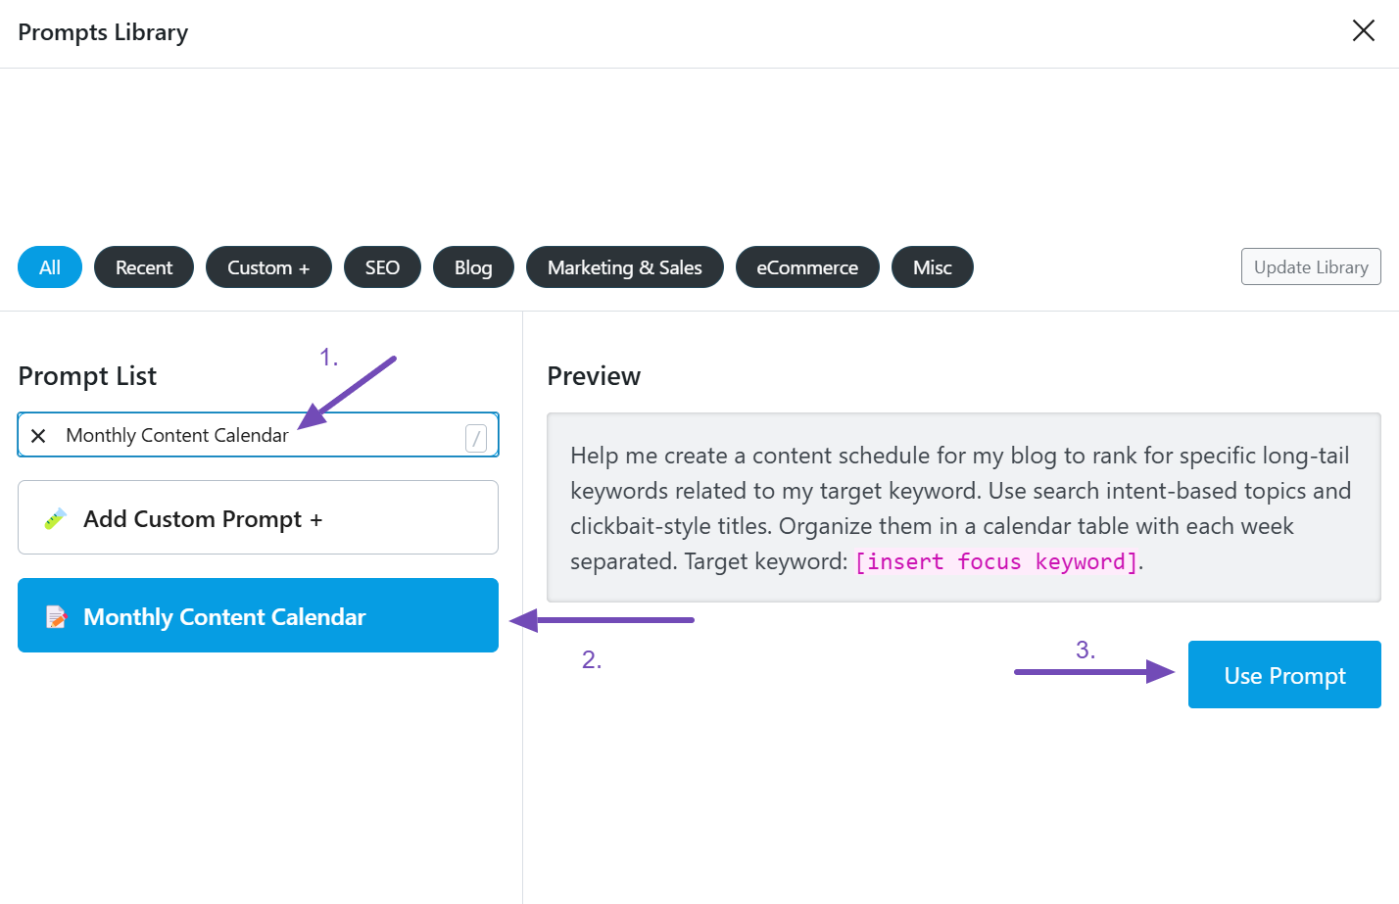
This will automatically add the prompt to the RankBot chat interface, preparing it for customization.
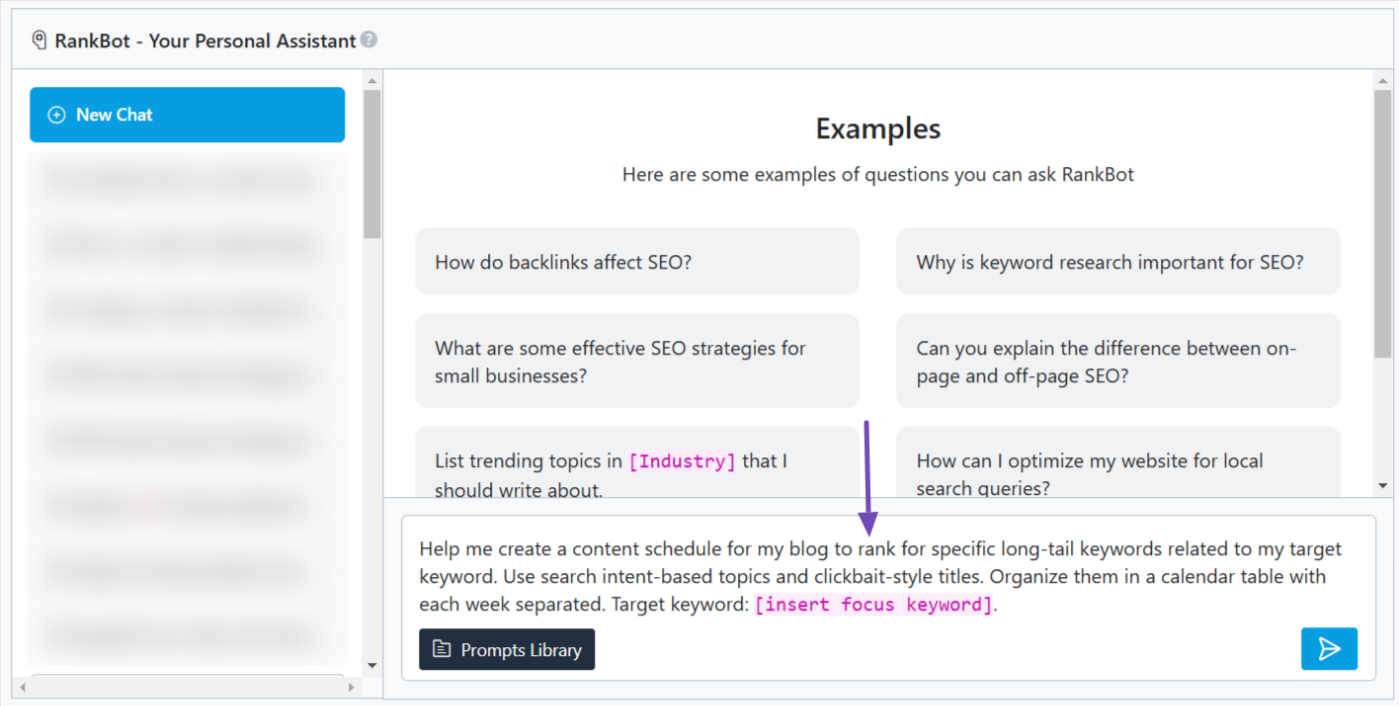
Now, examine the prompt closely. You’ll notice it leaves a single placeholder, which you’ll need to fill in before sending it to RankBot.
The placeholder is [insert focus keyword]. Here, you’ll enter the main focus keyword you’ve already researched—the keyword you aim to rank for in search engines. This will help the AI generate relevant long-tail keywords and content topics.
For example, if your target keyword is “digital marketing tips” and your goal is to rank for associated long-tail keywords, you might modify the prompt like this:
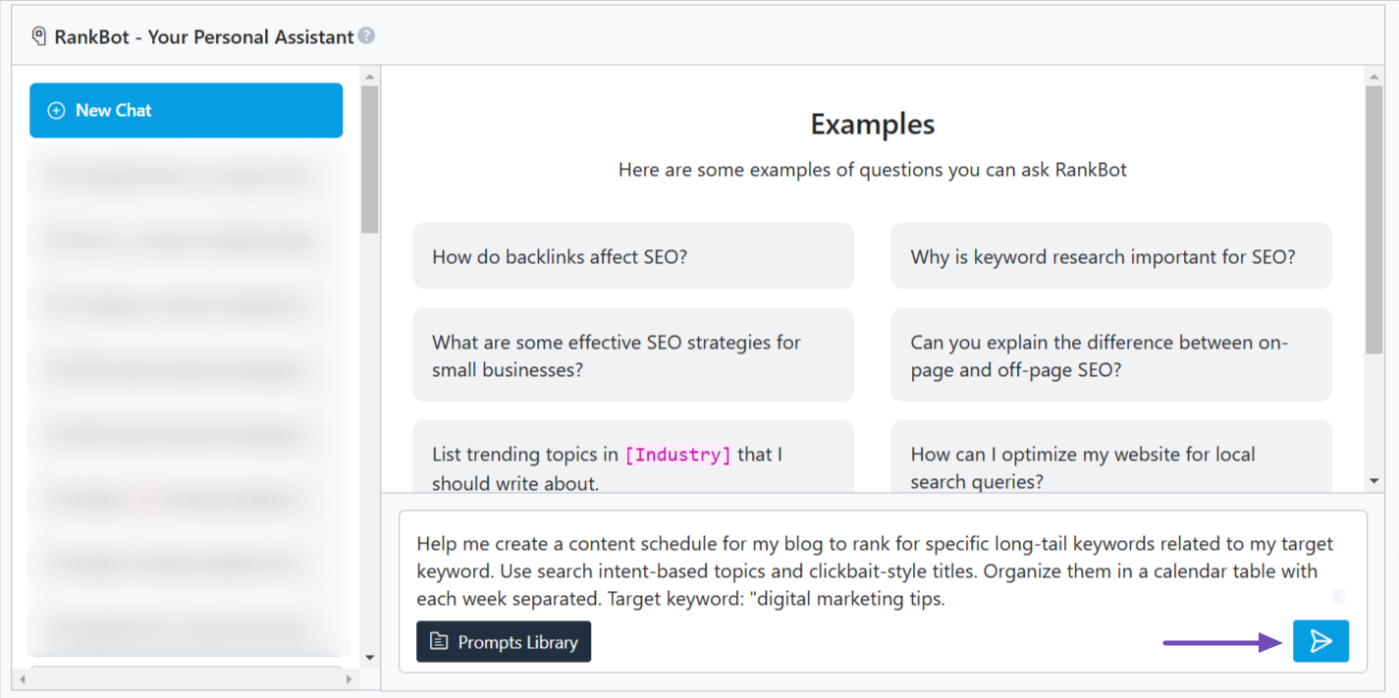
“Help me create a content schedule for my blog to rank for specific long-tail keywords related to my target keyword. Use search intent-based topics and clickbait-style titles. Organize them in a calendar table with each week separated. Target keyword: ‘digital marketing tips.'”
After customizing the prompt, add it to the chat interface and click the Enter icon to proceed, as illustrated below.
Once you’ve sent the prompt, RankBot will generate several blog topics, each with corresponding long-tail keywords and search intent. These topics may be arranged in a weekly schedule, formatted like this:
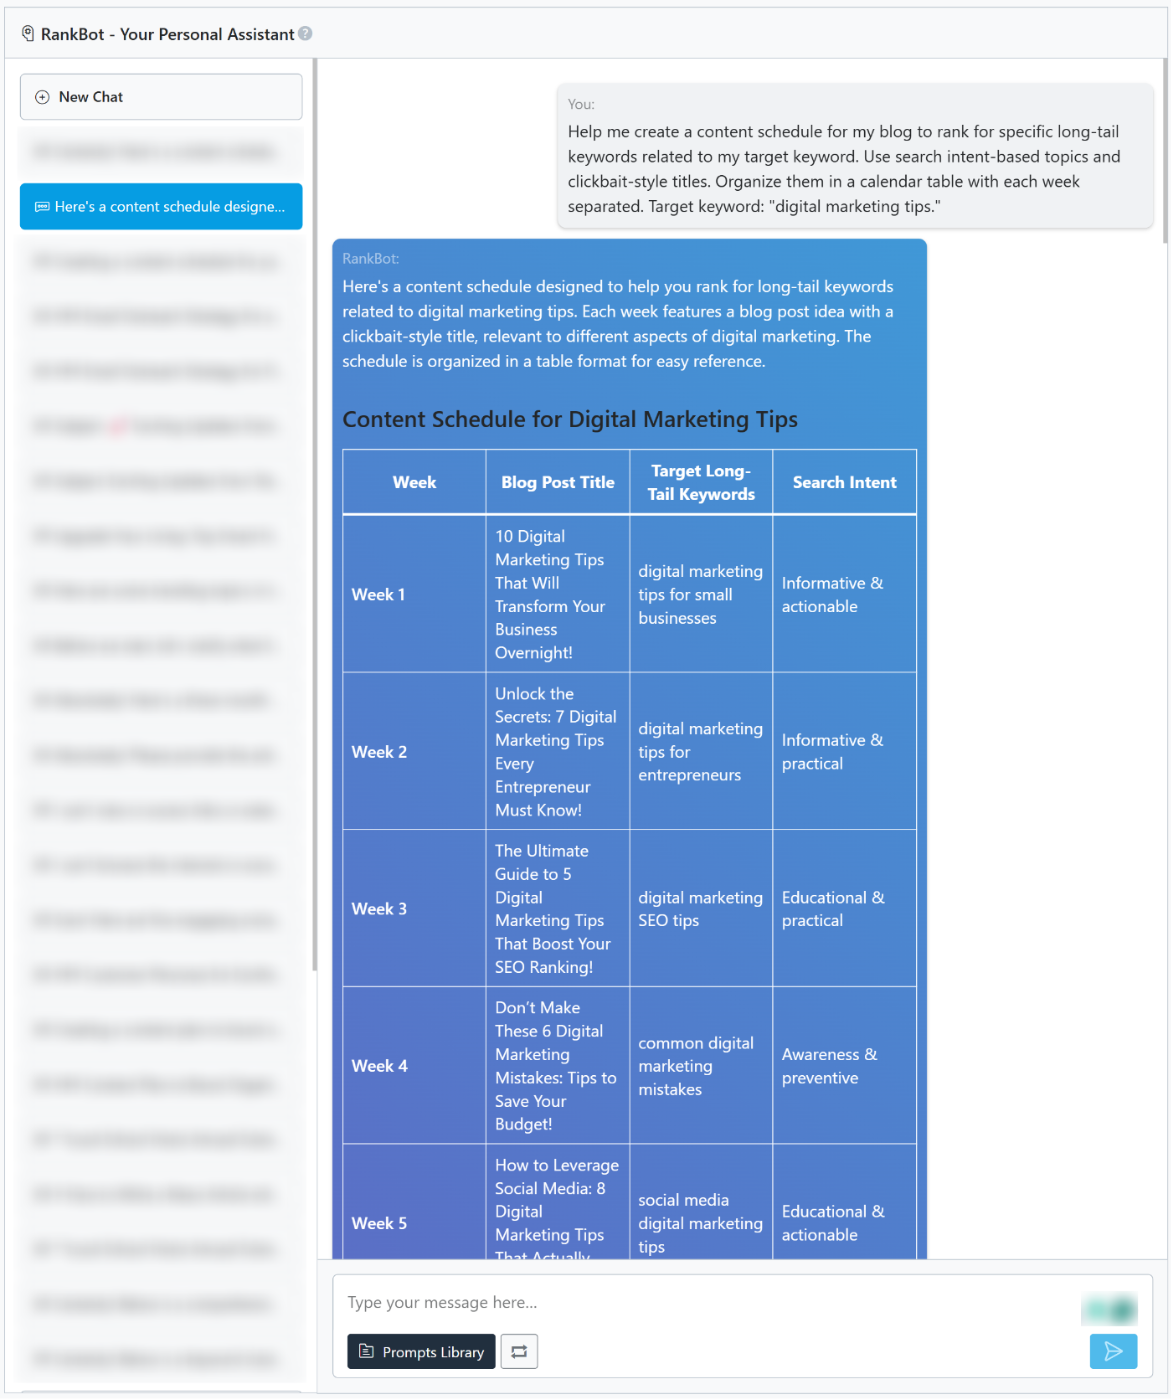
Now that you’ve created a content schedule in a calendar table using RankBot, it’s time to include it in your calendar.
3 Add or Import Your Content Schedule to Your Calendar
There are two ways to add your content schedule to your calendar:
- Add it directly to your calendar.
- Arrange it in a Google Sheet and import it as a CSV file.
4 Adding Directly to Your Calendar
For this tutorial, we’ll use the Google Calendar, where you can start by
4.1 Creating an Event
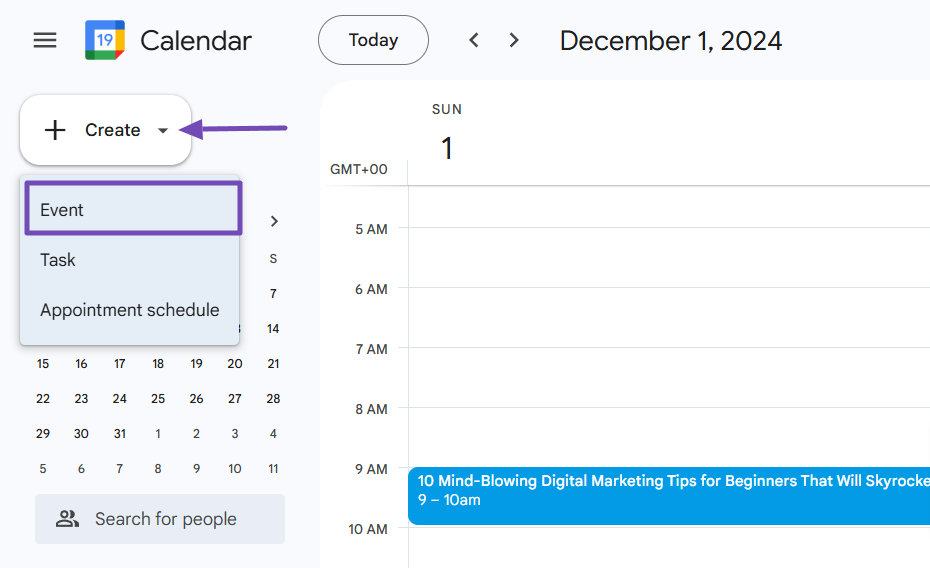
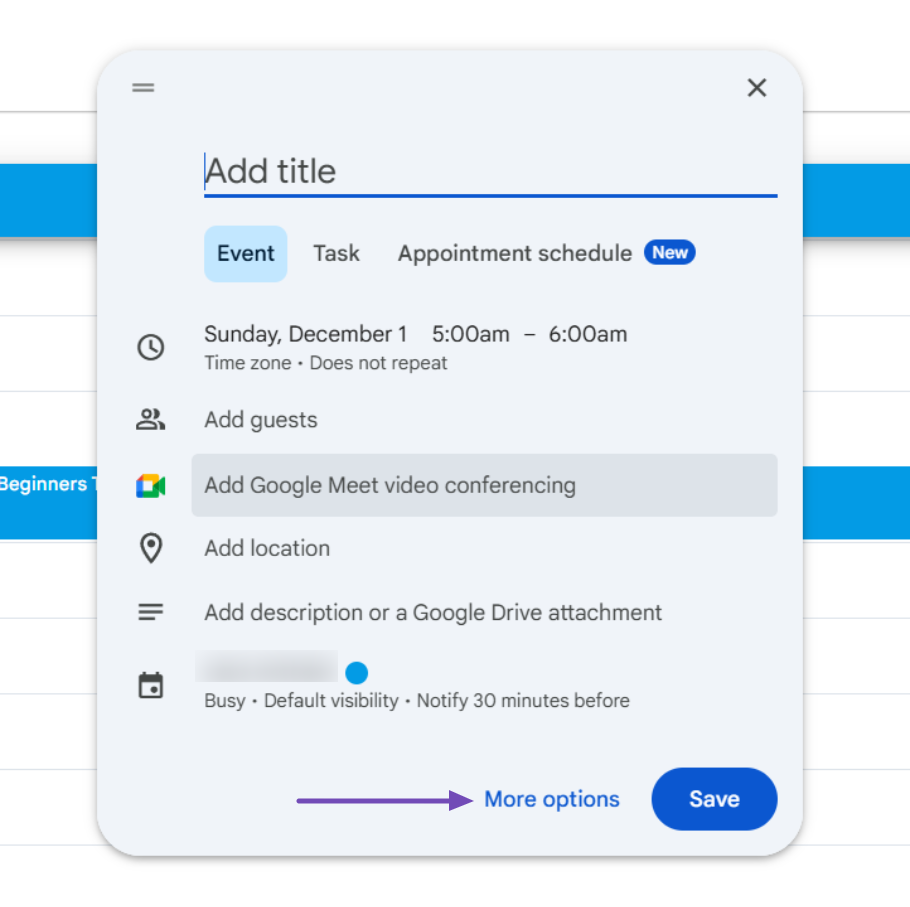
To add the schedule directly, open Google Calendar and click the + Create button in the top-left corner of the interface. From the available options, select Event, as shown below.
4.2 Setting Up Event Details
This action will open a simplified event settings panel. For more customization, click the More options link to access a broader range of settings.
On the More options page, follow these steps to set up your weekly content calendar:
- Title: Enter the blog post title.
- Date/Time: Specify when you’ll work on or publish the post, including start and end times. Ensure your time zone is accurate.
- Description: Add the long-tail keywords and search intent information for reference.
Once you’re done, click Save to confirm your changes. Any additional customizations beyond this are entirely up to your preferences.
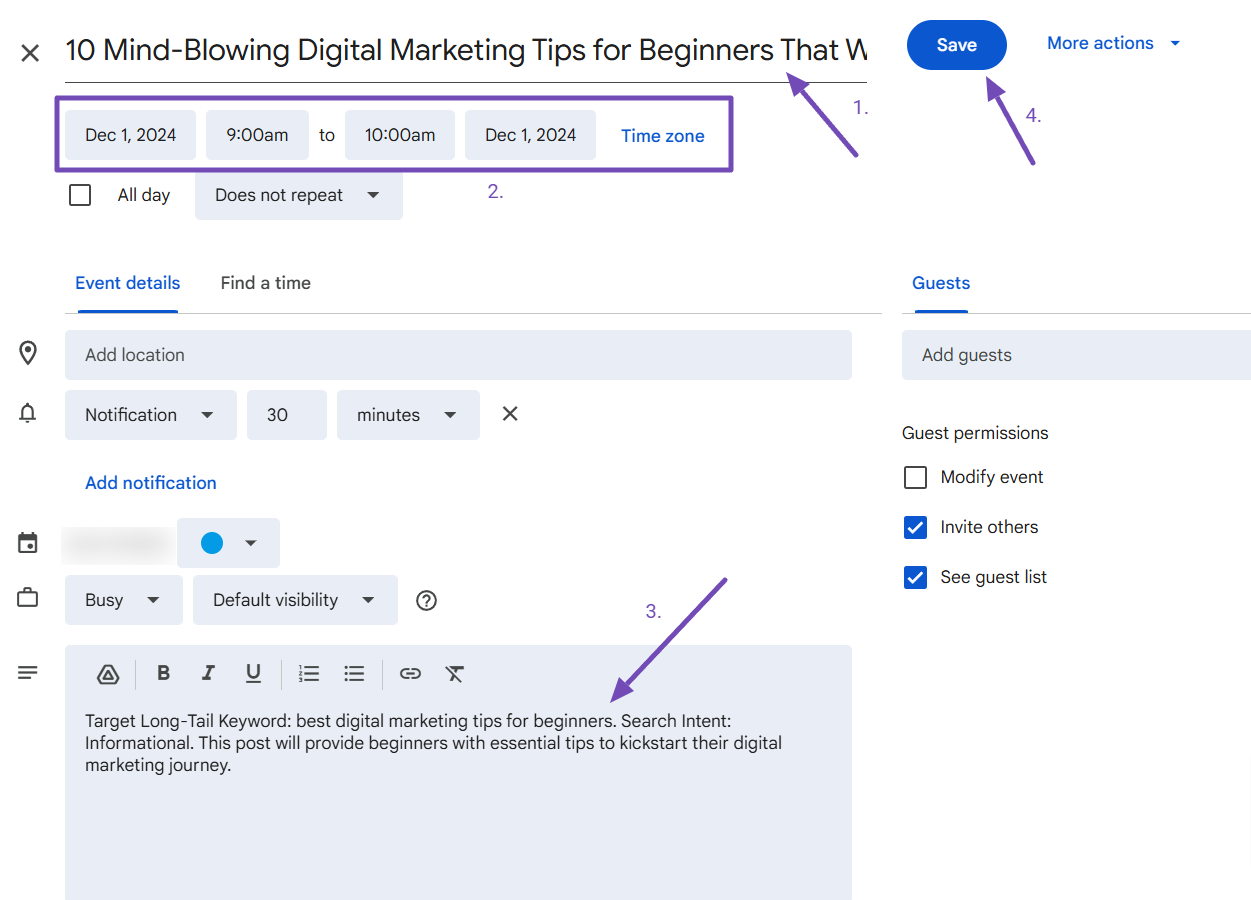
Using the same method, you can add other content schedules from RankBot to your weekly calendar.
4.3 Importing Content from RankBot
However, this process can sometimes be challenging or time-consuming, right? Don’t worry—we’ve got you covered!
We’ve created a prompt you can use with RankBot to generate a content schedule formatted for direct import into Google Calendar. This eliminates the need for manual customization of weekly schedules.
Here’s the prompt:
Help me organize the weekly schedule. I need it arranged by title and start date, beginning from December 1, 2024 (formatted as 2024-12-01), with each entry set for 9:00 AM in the time zone (GMT+00:00) Coordinated Universal Time. Additionally, include the target long-tail keywords and relevant search intent information in the description. This should be formatted so that I can import it directly into Google Calendar.
Once RankBot generates the content schedule in a table format, provide this prompt as a follow-up to have it convert the data into a compatible Google Calendar format. You can adjust the prompt’s date, time, and time zone to suit your preferences.
When you enter this prompt on RankBot, it will provide the weekly schedule details in a format and also outline steps for saving and importing it to Google Calendar, as shown below.
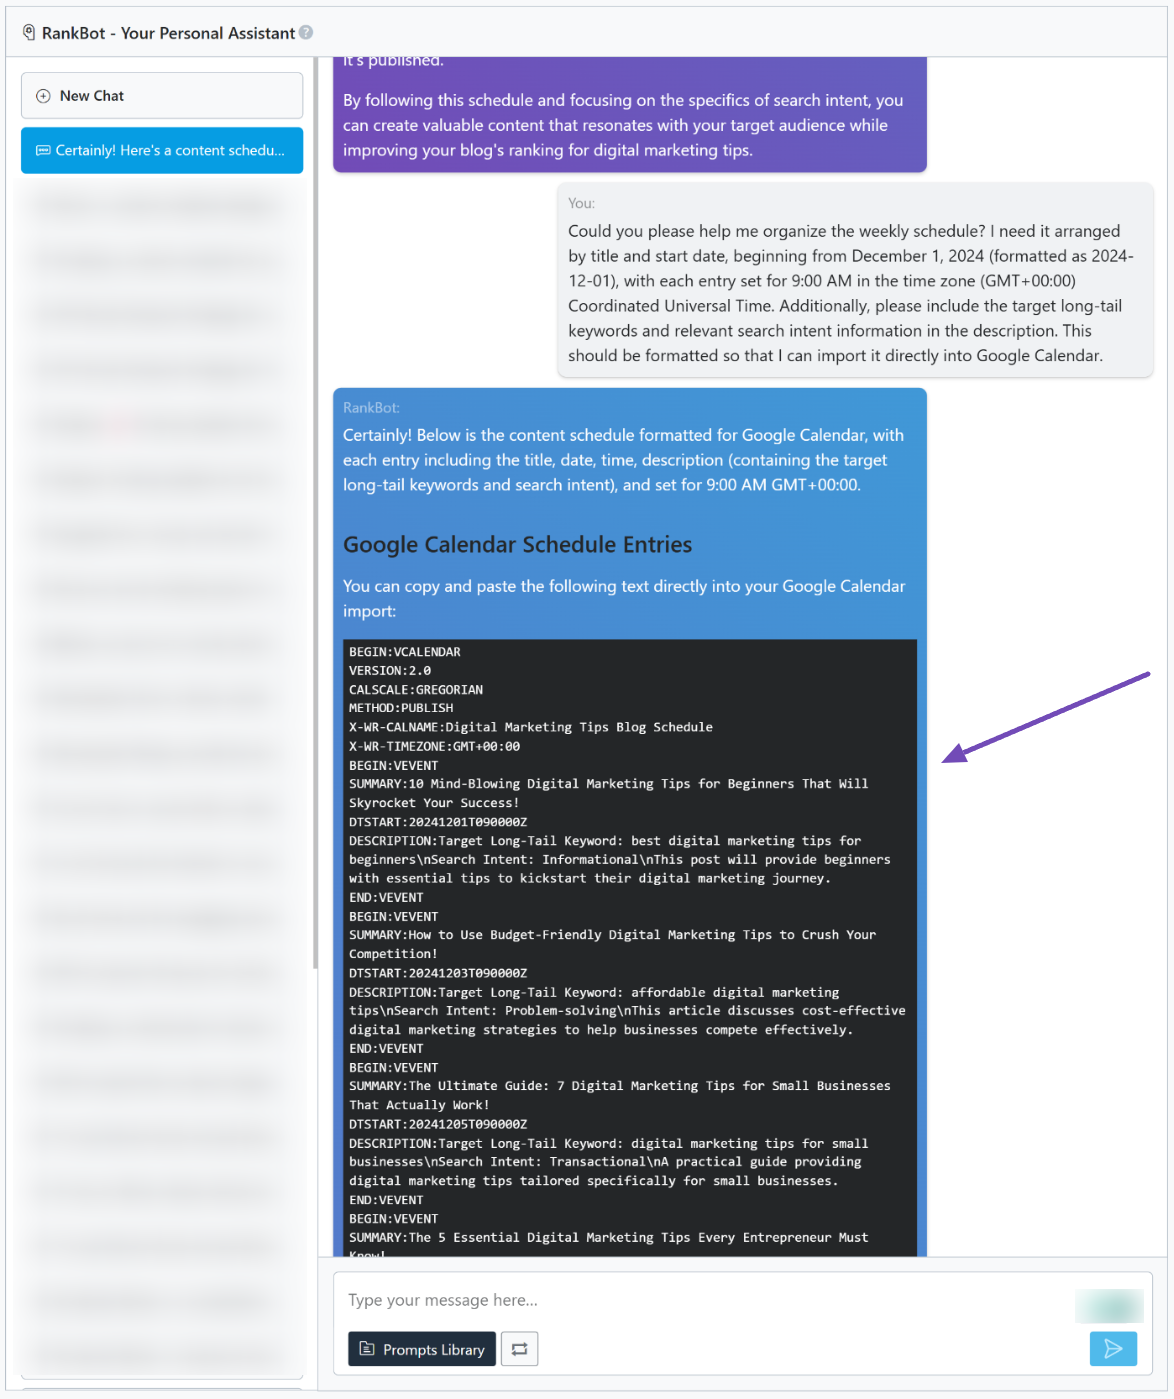
But here’s a quick overview: You only need to copy the content displayed on a black background, paste it into a text editor like Notepad, and save it as a .ics file (e.g., MyContentSchedule.ics). Once that’s done, visit Google Calendar and import the file. That’s all!
Here’s how:
4.4 Importing the Generated Schedule
When you visit Google Calendar, click the gear icon (⚙️) in the top-right corner and select Settings.
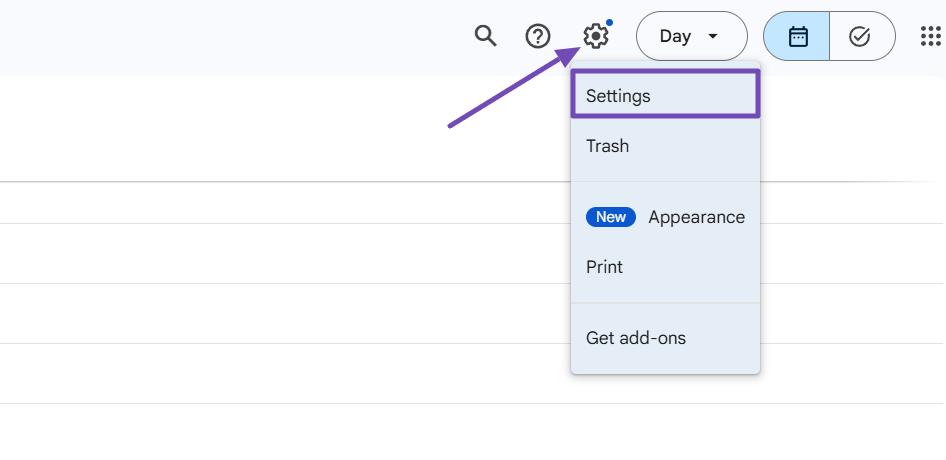
Next, scroll down slightly and select the Import & export option from the left-hand menu. Under Import, click Select file from your computer and upload the .ics file you saved from your text editor.
Then, choose the calendar where you want to add the events (or create a new one) and click the Import button to add the file to your calendar.
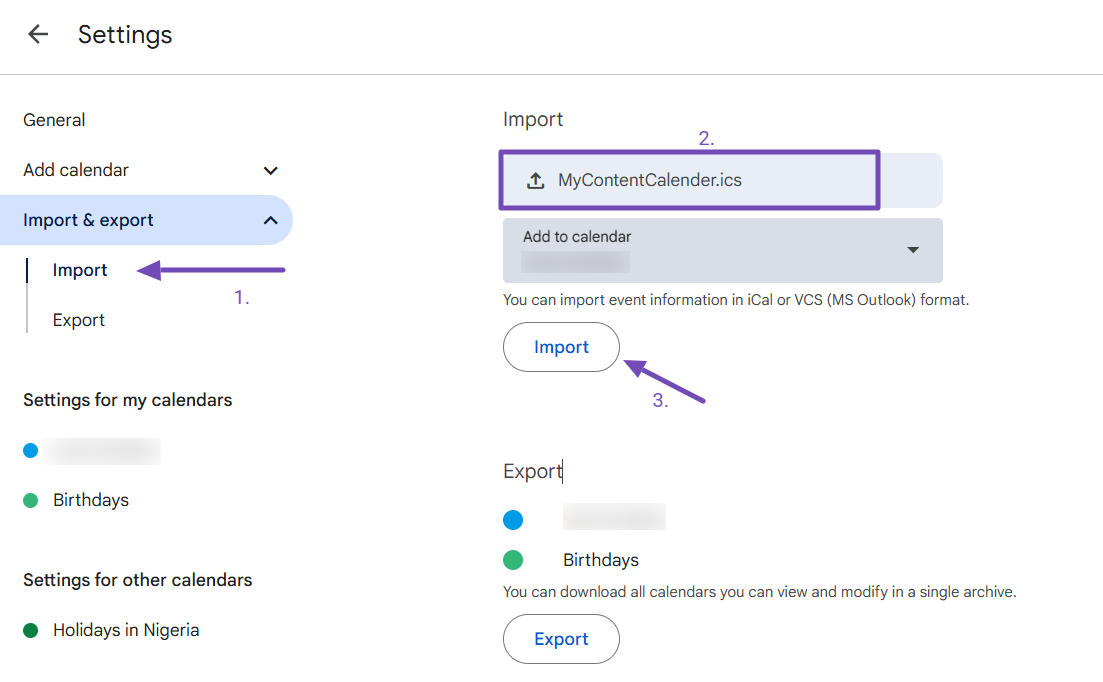
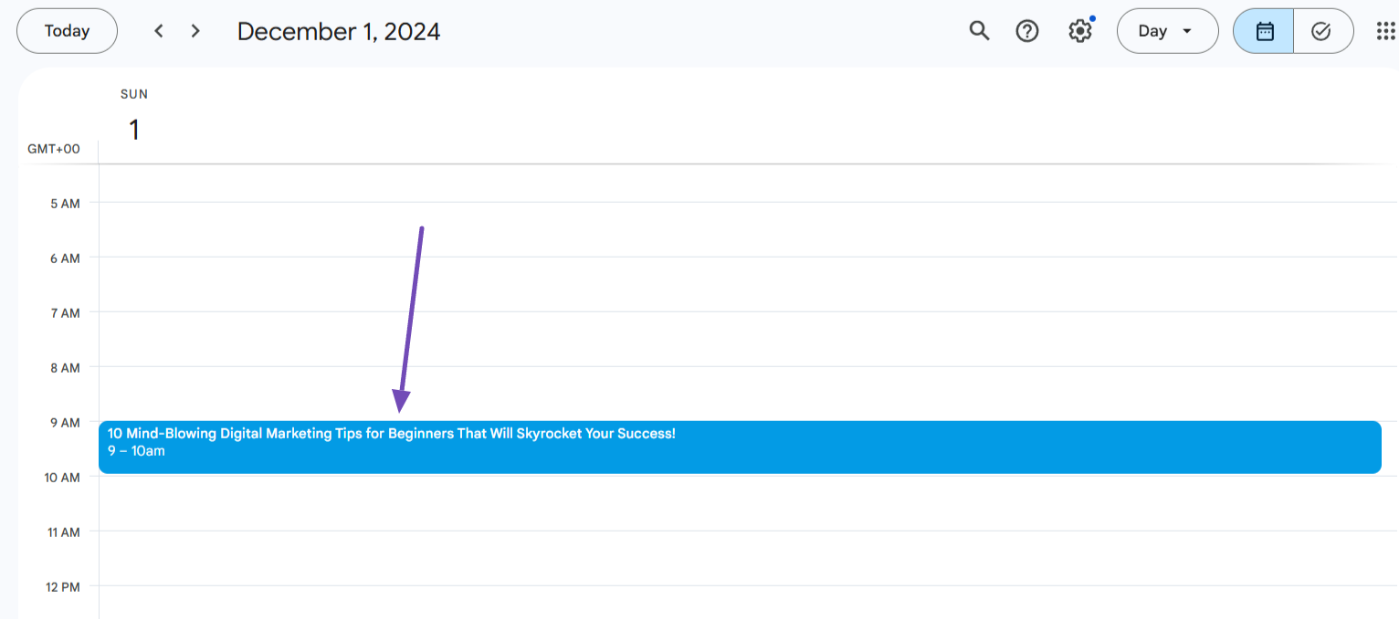
Once completed, you’ll see a popup indicating whether the import was successful. If all the content was imported correctly, visit your calendar homepage and navigate to the first date you specified in the file. You should see that the content schedule and all the details it contains have been successfully imported.
To ensure everything aligns with your preferences or expectations, consider checking each week’s content to verify it was imported correctly.
What if you want to format the content table in your Google Sheet first before adding it to your calendar? If so, you will want to follow the following steps.
5 Adding a CSV file to Your Calendar
Now, instead of adding the events manually, you can also use a CSV to upload in bulk.
To obtain the CSV file, you will first need to format the content schedule table in Google Sheets. After that, you can upload it to your calendar. Here’s how to schedule it:
5.1 Create a Spreadsheet
Create a spreadsheet in Excel or Google Sheets with the following columns
- Subject: The blog title.
- Start Date: The date you plan to start the schedule (e.g., 2024-12-01).
- Start Time: The time you want the event to start (e.g., 9:00:00 AM).
- Description: Include both the long-tail keyword and search intent info.
- Location: Optional (you can leave this blank).
- End Date: The date one week after the start date.
Once you’ve arranged this in Excel or Google Sheets, it should look like this:
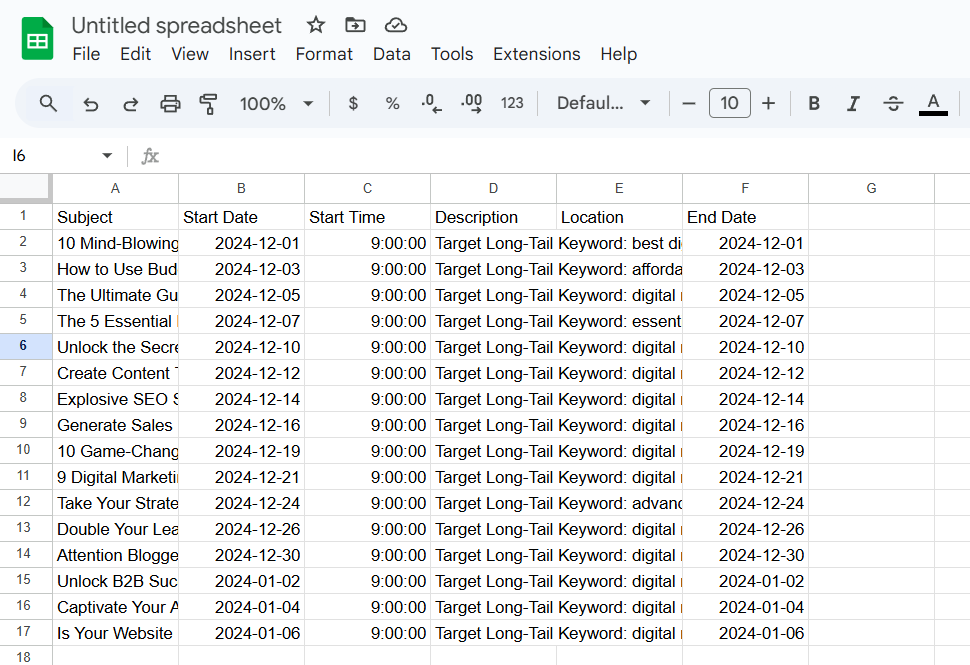
Remember, the Location field should be empty, but you can fill it in if you want to add a location to the content calendar schedule.
5.2 Use RankBot for Formatting
Now, you might think formatting this in a spreadsheet manually could take some time. No worries—RankBot can help! You can ask RankBot to provide a working format so that you can just save it as a file and import it into Google Calendar.
To do this, use the following prompt in RankBot:
“Arrange the weekly content schedule into a Google Sheets-compatible format for a CSV file import into Google Calendar. Ensure the time zone is GMT+00:00, and events start at 9:00 AM. Include the following columns: Subject: The blog title. Start Date: The date of publication. Start Time: The time of 9:00 AM (GMT+00:00). Description: Brief details about the blog post. Location: Leave this blank. End Date: One week after the Start Date.”
Be sure to adjust the prompt to your preferences, considering the date, time, and format.
Once you send the prompt to RankBot, it will generate the working format for you. After that, simply copy the content (only the text displayed with a black background) into a text editor, like Notepad, and save it.
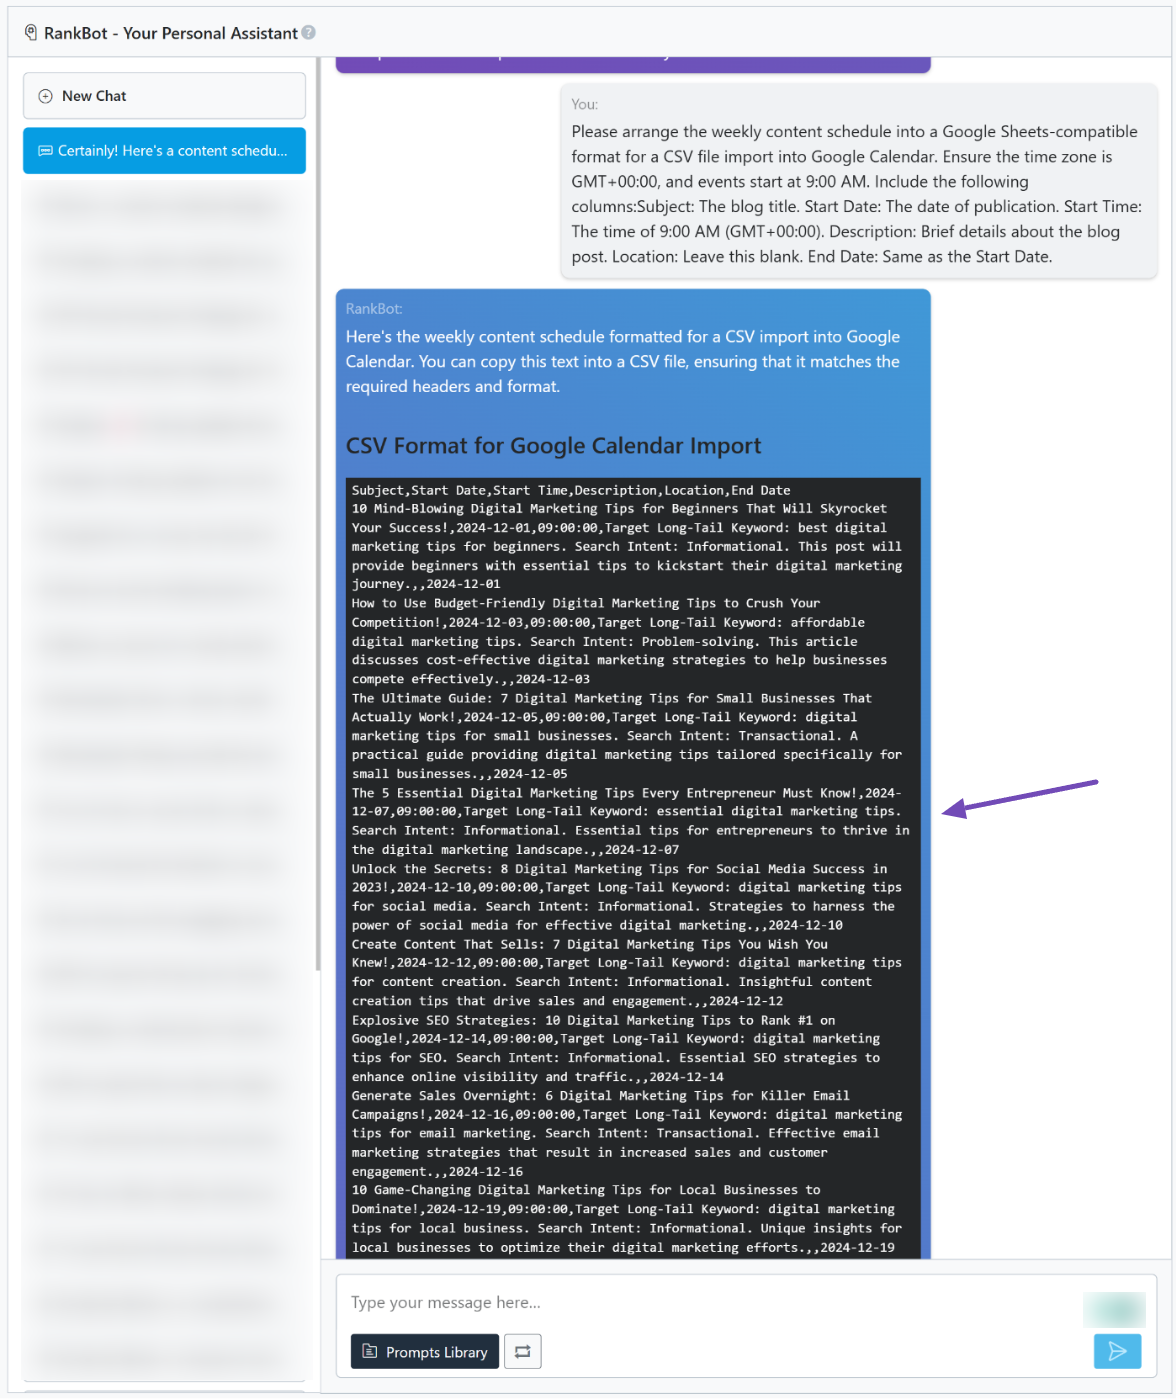
Once you’ve saved the file, make sure to save it with a .csv extension (e.g., MyContentPlan.csv).
5.3 Import the CSV into Google Sheets
After saving, go to Google Sheets, select File from the top left corner, and choose the Import option. Next, navigate to the Upload tab and use the Browse button to import the file into Google Sheets.
Once the file is successfully imported, you should see the content arranged correctly in the spreadsheet.

To add the content schedule to your calendar, you can either manually input the content, as we discussed earlier, or export it in CSV format from Google Sheets and import it into your calendar using the same method we covered.
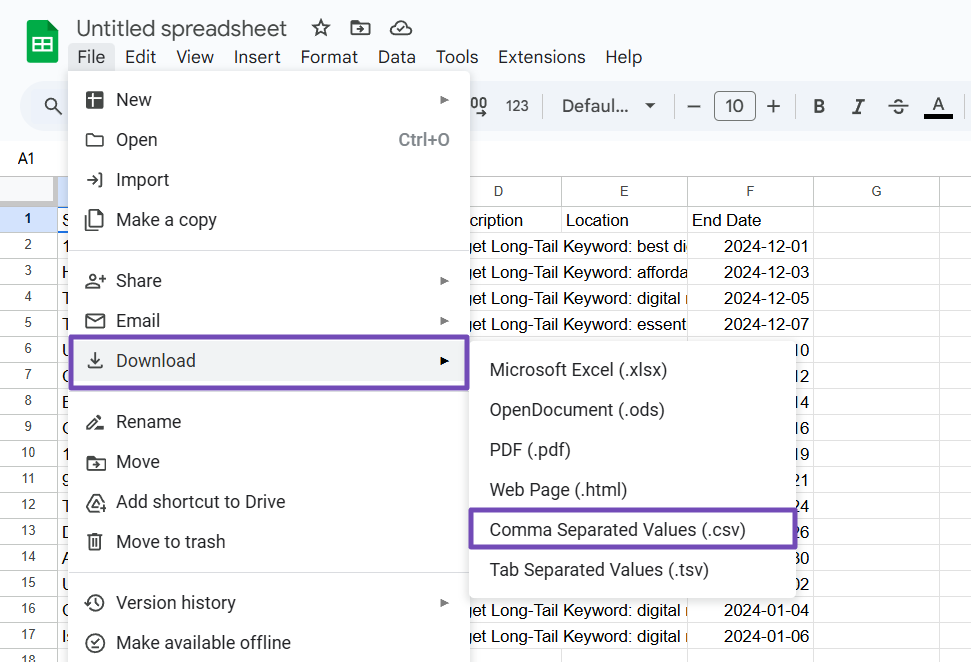
After importing the content schedule into Google Calendar, each week (or based on your setup) will display the content topic, which will align with the start time you set.
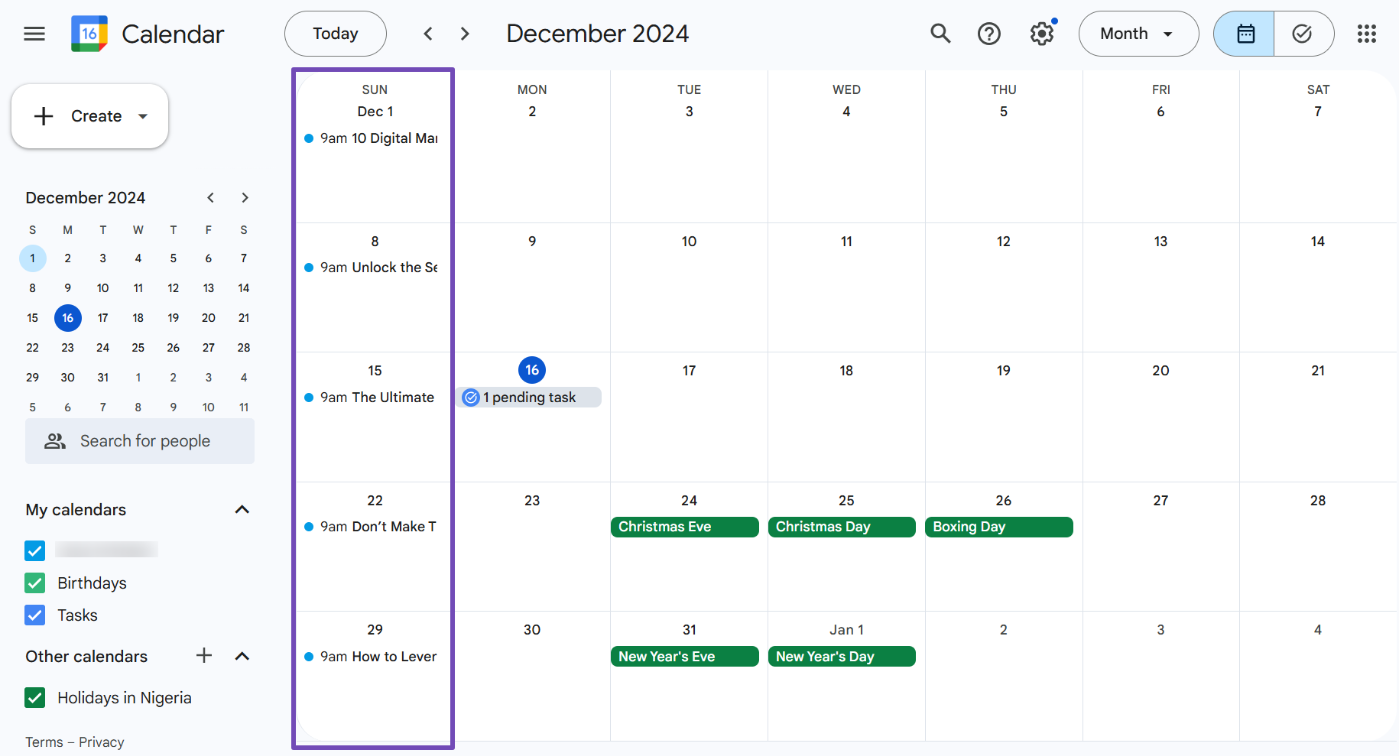
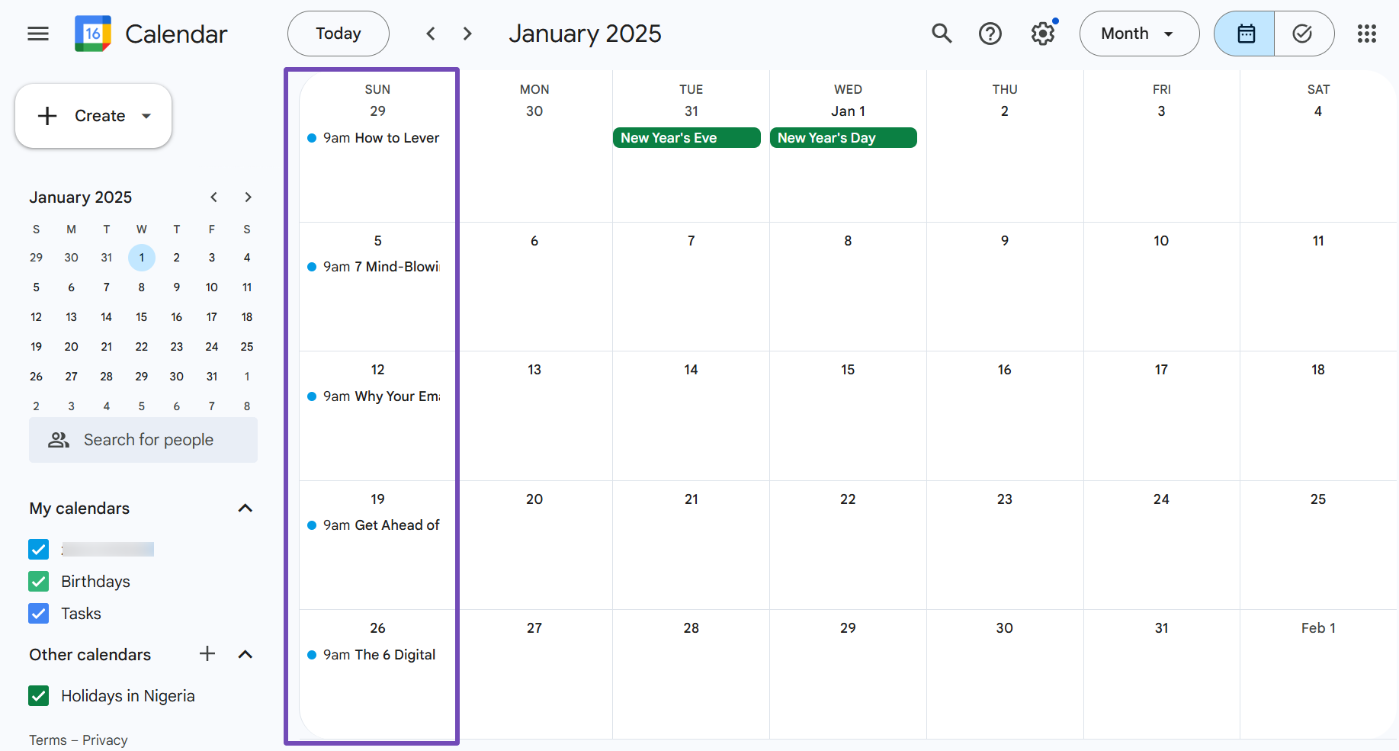
For instance, we created a weekly content schedule starting December 1st at 9:00 AM. To verify what we’ve imported, we will group them based on each month so that you can see everything clearly.
For December 2024:
Next, for January 2025:
The last entry is for February 2025:
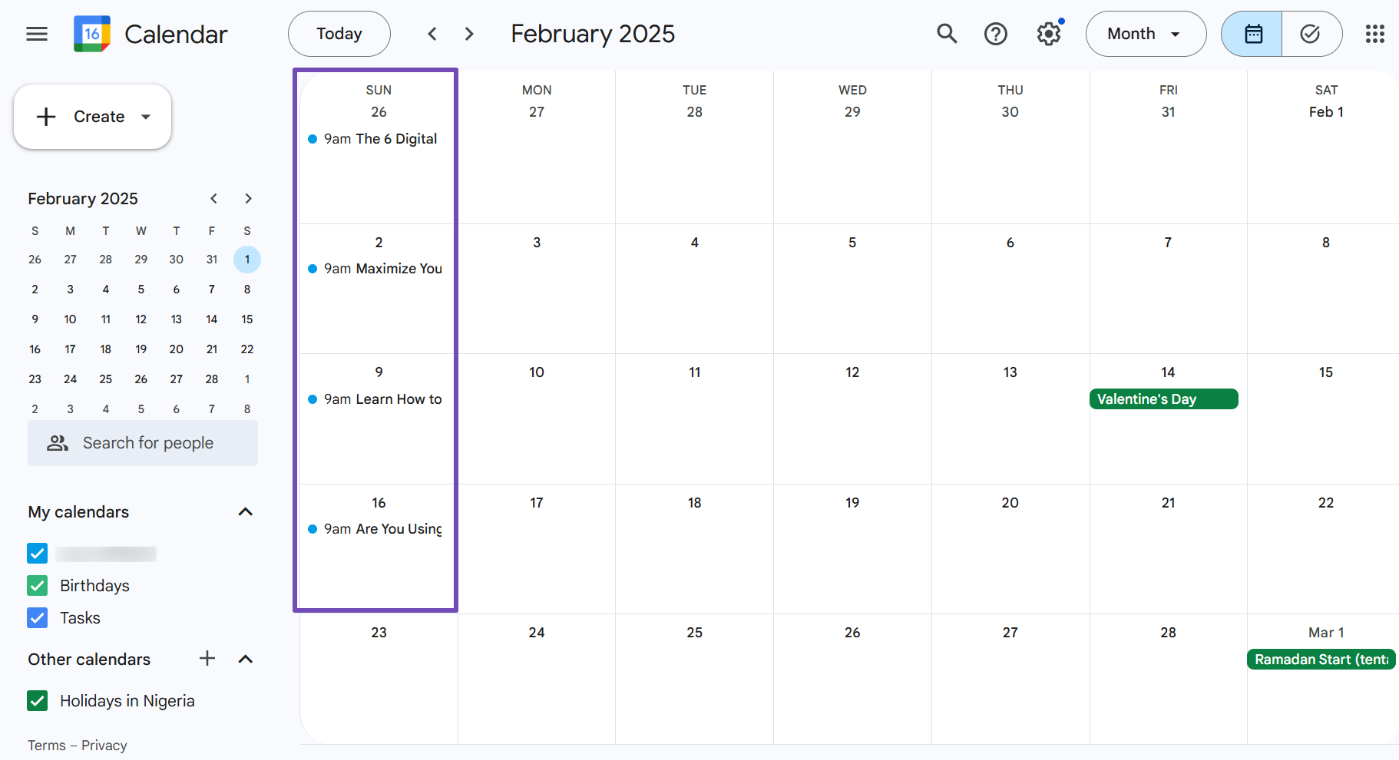
From this, you can see that it worked perfectly as a weekly content schedule. Keep in mind that yours will appear based on your specific requests.
Note: Check the imported content on your calendar to ensure it aligns with your expectations. If you’re using RankBot to generate other formats to speed up the process, make sure to continue the prompts in the same chat. This way, RankBot will understand your request and provide the most accurate response.
And that’s it! You’ve successfully created your content calendar using Content AI. If you have any questions about RankBot or Rank Math, feel free to reach out to our dedicated support team—they’re available 24/7, 365 days a year.