When you build a website with WordPress, the footer often gets overlooked, but it’s one of the most important areas of your site.
The footer is the section at the very bottom of your pages, and it can include details like copyright information, navigation links, contact info, or even widgets and social icons.
By editing the footer, you can make your site look more professional, improve navigation, and add helpful details for your visitors.
Before we dive into the specifics of editing the footer, it’s important to understand what a footer is and why it’s important. So, let’s dive into the world of WordPress footers!
Table Of Contents
1 What is a WordPress Footer?
A WordPress footer is the section at the very bottom of your website that shows up on every page. When you scroll down, it’s the last thing your visitors see.
In most themes, the footer usually contains details like copyright text, Powered by WordPress, links to important pages, or widgets such as social media icons, contact info, or a newsletter signup form.
Here’s an excellent example of a footer from the MyThemeShop website.

You can think of it as a place to add finishing touches to your site, like navigation links, branding elements, or legal information.
By customizing your footer, you make your website look more professional and provide visitors with quick access to the details they may be looking for.
2 Benefits of Adding a Footer
Adding a footer to your WordPress website comes with several advantages.
- Better User Experience: When visitors scroll to the bottom of your site, they often expect to find something useful. A footer lets you add quick links, contact details, or other resources so visitors don’t feel stuck at the end of a page. This makes it easier for them to keep browsing without frustration.
- Stronger Branding: Your footer is a space where you can build your brand. Adding your business name, logo, copyright notice, or social media links helps build trust and makes your website look more polished. By replacing the default “Powered by WordPress” text with your own branding, you show professionalism and credibility.
- SEO Benefits: A footer can also give your SEO a boost. Adding internal links in this section helps search engines understand the structure of your site. This improves navigation for visitors and can even help you rank higher in search results.
With that in mind, let’s now see what you can include in your website footer.
3 What to Include in Your Website Footer?
Your website footer doesn’t have a one-size-fits-all formula. What you include depends on your goals and audience.
However, here are some common elements that you can consider adding to your website’s footer:
- Contact Information: Share your address, phone number, email, or even a contact form so visitors can easily reach you.
- Social Media Icons: Add links to your social profiles to encourage people to connect with you on different platforms.
- Site Navigation: Include quick links to key pages like Home, About, Services, Products, or Blog so users can find what they need without scrolling back up.
- Legal Pages: Link to your Privacy Policy, Terms of Service, or Return Policy to build trust and stay compliant with regulations.
- Copyright Notice: Add a simple copyright line to show ownership of your content and make your site look professional.
- Lead Capture Form: Invite visitors to subscribe to your newsletter or sign up for updates to grow your email list.
- Recent Posts or Articles: Showcase your latest blog posts to keep visitors engaged with fresh content.
- Call to Action: Use your footer as an opportunity to guide users, whether it’s signing up, booking a call, or checking out your services.
4 Methods to Edit the Footer in WordPress
Most WordPress themes come with the capability to edit the footer section, allowing you to tailor it to your web design requirements. In this section, we’ll look at some of the most effective ways to modify the footer in WordPress.
4.1 Using a Theme Customizer
With the built-in theme customizer feature, you can change your footer by adding new navigation links, changing the colour scheme, and even removing the “Proudly powered by WordPress” message.
Here’s how to edit a footer in WordPress using a theme customizer.
4.1.1 Editing Theme Credit in the Footer Area
To edit the WordPress footer, log in to your dashboard and navigate to Appearance → Customize, as shown below.

This will open the Customizer interface with your current theme.

The option to customize your footer will differ depending on the theme you’re using. In this case, we’re using the Schema Lite theme by MyThemeShop.
Next, navigate to the Theme Options → Footer, as shown below.

You’ll see a text box in the WordPress Customizer. You can now edit the text and match it to your website design.

Once done editing the text, click on the Publish button to save the changes.
4.1.2 Adding Footer Widgets Using the WordPress Theme Customizer
To add new blocks to your footer widgets in the Customizer, navigate to Appearance → Customize from your WordPress dashboard and click on Widgets, as shown below. This will show you the active widgets you can add to your footer.

Select one of the footer sections where you want to add blocks to your website. Once done, click the Plus icon in your theme Customizer and select the block you wish to add to your footer widget.
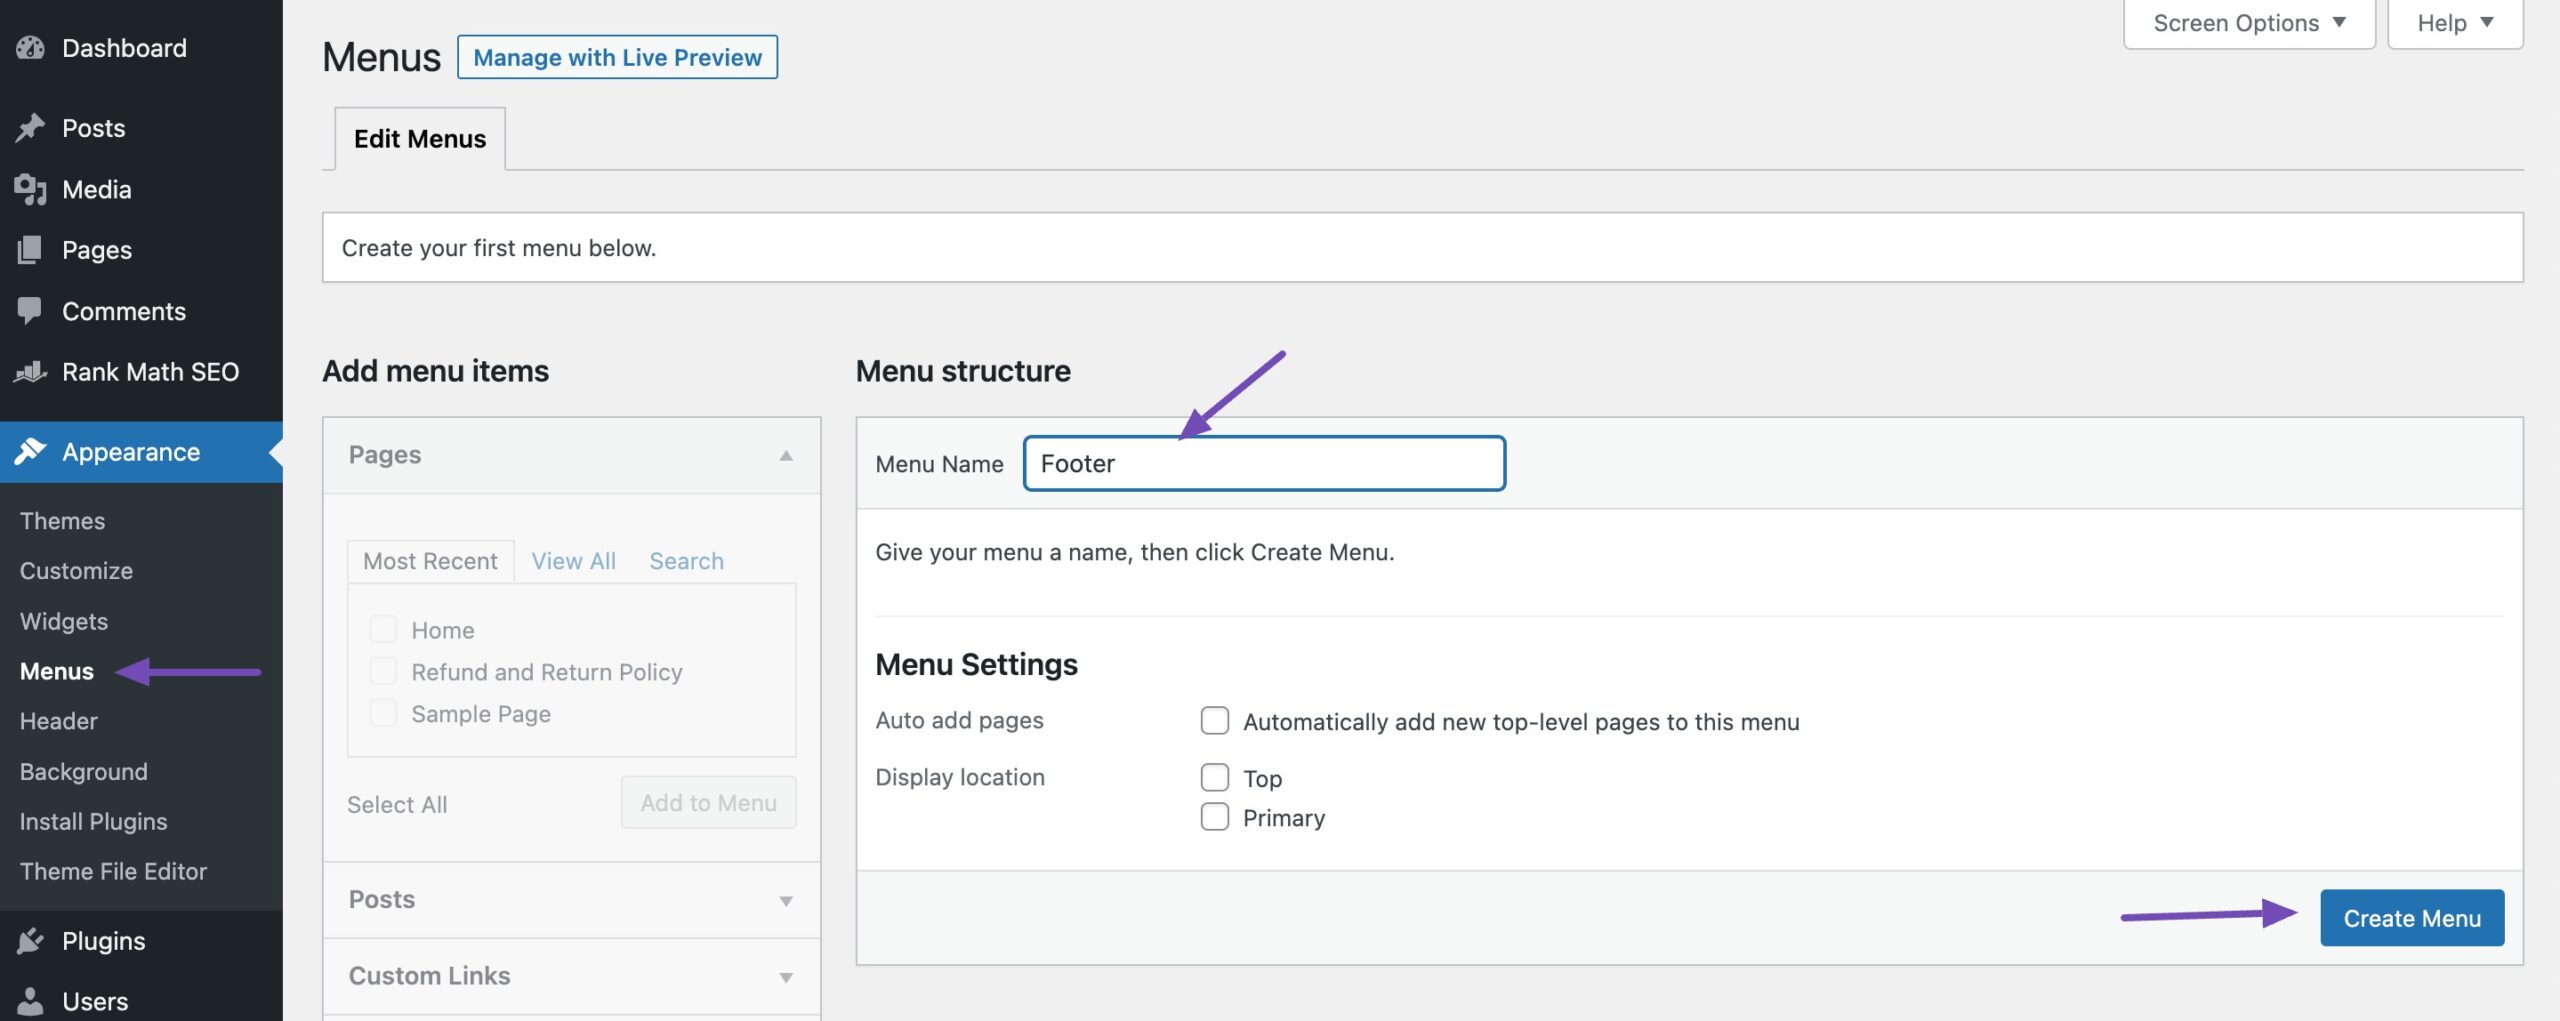
In this case, let’s add a navigation menu. If you have not created a navigation menu before, you need not worry. Simply head over to the Appearance → Menus page from your WordPress dashboard.
WordPress will ask you to add a name for your new menu.
Enter a name that helps you easily identify your menu, select the relevant footer location, and click the Create Menu button.
You can select the pages, posts, or categories from the left-hand column to add them.
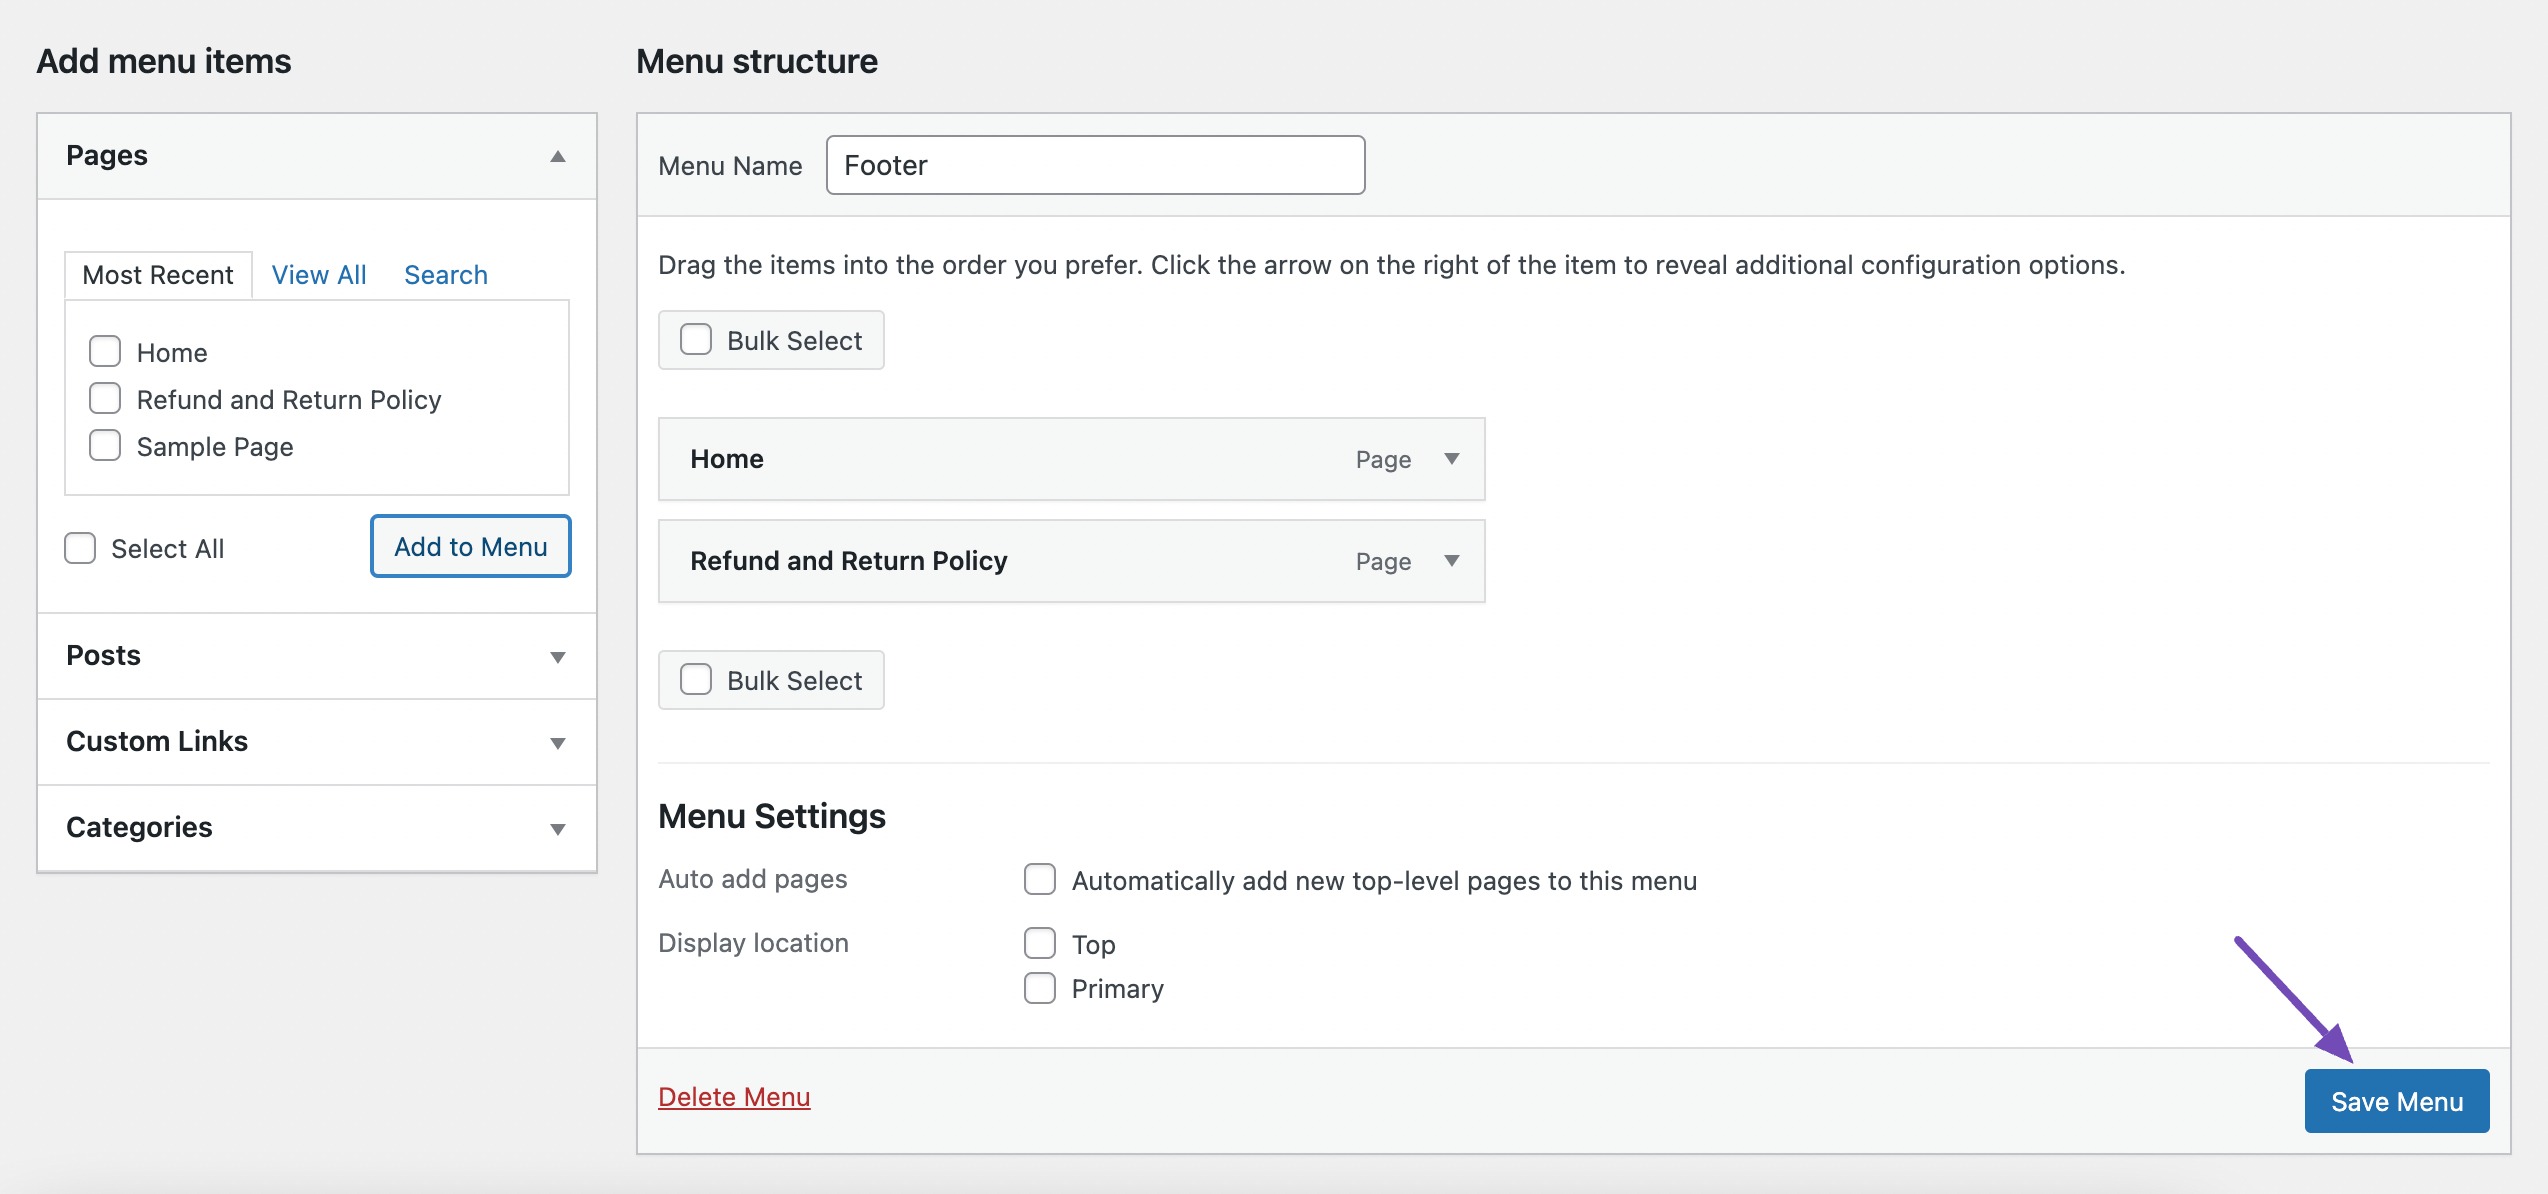
Your menu is now ready to be added to the WordPress footer widget area.
Select the title for your menu, then select the menu item, and the block will be automatically added to your footer widget, as shown below.

You can then follow the same procedure to add blocks to your widgets, and don’t forget to click on the Publish button to save your changes.
4.2 Customizing Footer Using Widgets
Most WordPress themes come with the capability to add widgets to your footer section. Using this tool, you can add widgets to your footer section and customize it to match the feel and look of your business website.
To add one, navigate to Appearance → Widgets from your WordPress dashboard.

Next, in the Footer section, click on the Plus icon. A pop-up widget will appear with all the blocks you can add to your footer.

Now, in this case, let’s add a logo and a short paragraph providing your visitors with additional details about your business.
So select the Image block.

Upload your website logo from your media files or locally from your computer.

Once you’ve added the image, press the Enter key on your keyboard to add a new paragraph section. Add text about your company and click the Update button.

Open one of your website pages to see how the footer widget looks to a visitor.

You can then follow the same process to add other footer widgets to your website, like a footer navigation menu and a call to action (CTA).
4.3 Editing the Footer Using the WordPress Full Site Editor
The WordPress block themes do not support the theme customizer tool. But that doesn’t mean you can’t edit your footer and customize it.
In this section, we’ll show the most straightforward way of doing it using the block editor.
First, navigate to Appearance → Editor from your WordPress dashboard.

The site editor will open your default homepage in the Block Editor. Now, locate the footer section, which will be located at the bottom of the page.
Click on the footer block, and click Edit in the toolbar, as shown below.

The editor will open the footer, as shown below. From here, you can edit the default “Proudly powered by WordPress” message and replace it with your custom text.

Not only can you edit the default text in the footer bar, but you can also add other footer blocks.
For example, you can add social icons or even a footer menu. To add either, hit the Plus icon where you want to add your new block. After that, search for the block, say Social Icons.
Click the Plus icon again and choose the social icon you want to add.
Next, enter the URL to your social media profile.
Follow the same process to add other social media icons, and once done, click on the Save button.
You can then visit your website’s homepage to see how your footer bar appears to visitors.
4.4 Using a Footer Plugin
Using plugins is another easy method to edit the footer of your WordPress website. Using this plugin, you can edit the theme credit and remove the “Proudly powered by WordPress” message in your website footer.
In this section, we’ll use the Remove Footer Credit plugin. First, install and activate the plugin.
To do so, navigate to Plugins → Add Plugin section from your WordPress dashboard. In the search bar, search for the Remove Footer Credit plugin. Next, click on the Install Now button to install the button.

Once the plugin is installed and activated, navigate back to your website’s homepage and go to the footer section of the page. Refer to our dedicated tutorial on installing plugins in WordPress.
Right-click on the footer element and then select the Inspect option.

Next, under the Elements tab in the Developer tools, locate the theme credit, if any and “Powered by WordPress” code snippets. Copy the code snippet.

Now, navigate to Tools → Remove Footer Credit from your WordPress dashboard. Paste the copied code snippet into the Step 1 field of the plugin.

Once done, click on the Save button located at the bottom of the page.
And that’s it! This will remove the “Proudly powered by WordPress” message and the theme credit text in your page footer.

Below we’ve listed a few other plugins that you can use to edit your WordPress footer:
4.5 By Modifying Your Theme’s footer.php
If the previous methods do not work for you, you can remove the “Proudly powered by WordPress” footer text using your theme’s PHP. Depending on the theme, this method requires removing the credit code from its footer.php file.
Note: Before editing the code in your footer.php file, we recommend you first take a backup of your website, as it allows you to restore your site functionality if you break it by mistake while directly editing it. Refer to our dedicated tutorial on backing up the WordPress site.
To edit a branded footer in the footer.php file, navigate to Appearance → Theme File Editor from your WordPress dashboard. Continue by clicking the footer.php link on the page’s right sidebar.

Next, locate the “powered-by” code snippet in the file and delete it. Click on the Update File button to save your changes.
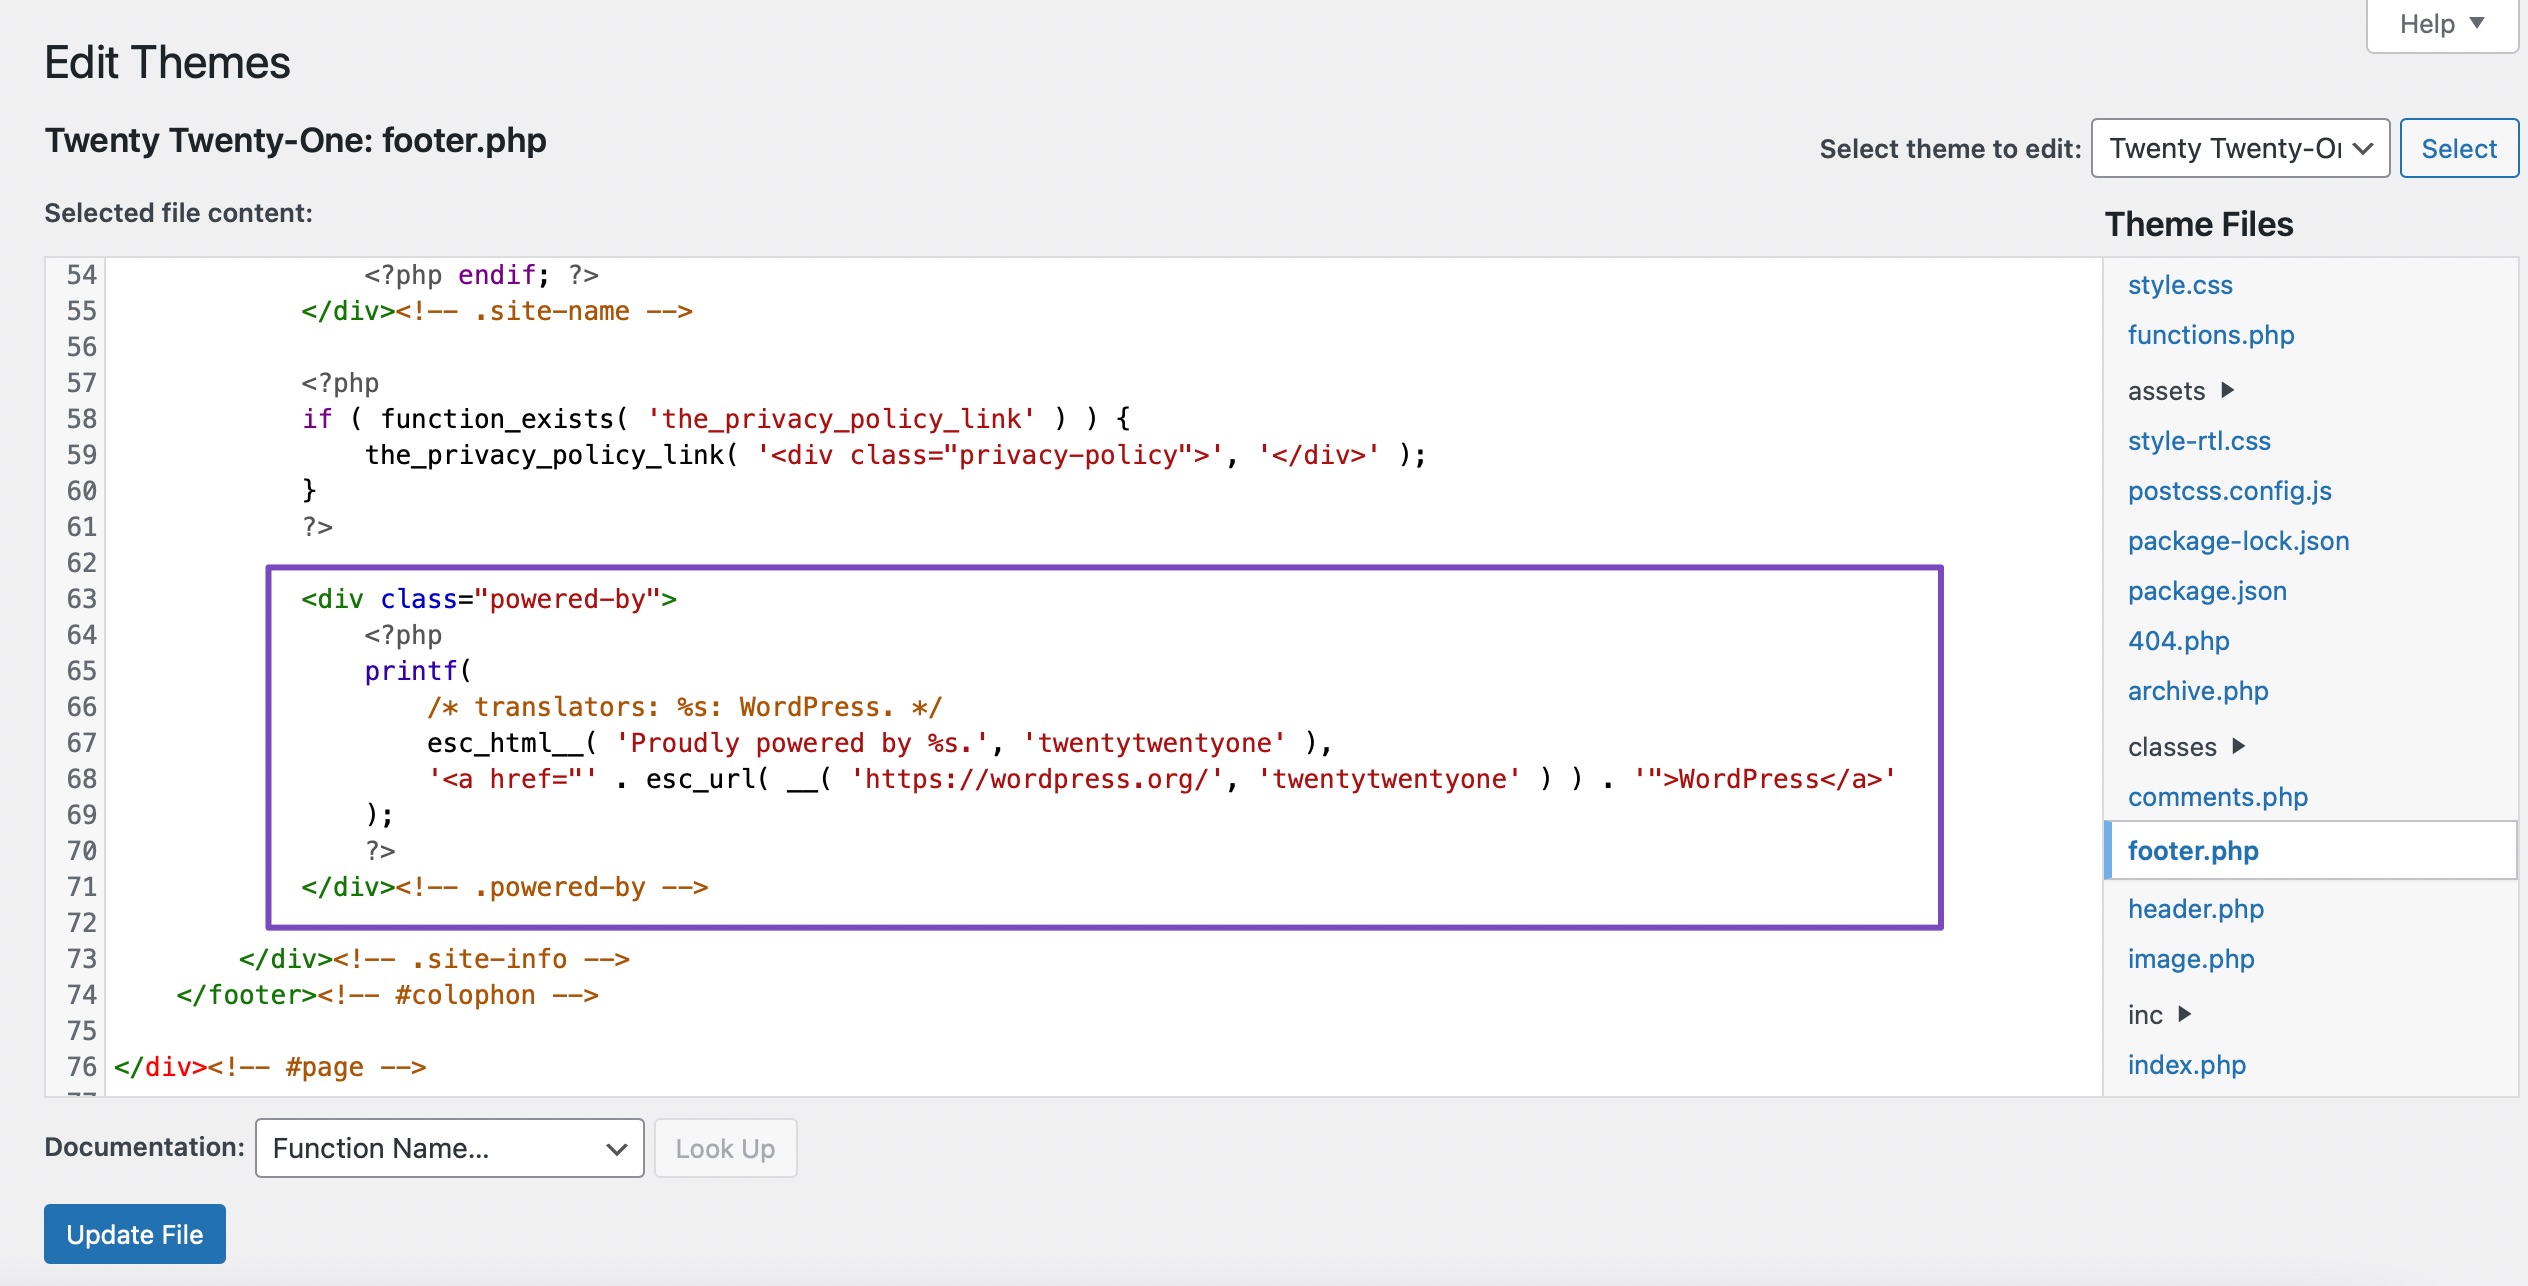
This will remove your WordPress website’s footer “Proudly powered by WordPress” message.
5 Conclusion
Adding a footer to your WordPress website is more than just a design choice; it’s a chance to improve navigation, build trust, and strengthen your brand. By including useful elements like contact details, social media links, legal pages, or calls to action, you make your site more professional and user-friendly.
Take the time to customize your footer so it matches your goals and gives visitors exactly what they need at the end of the page. A well-thought-out footer can turn casual visitors into loyal followers, customers, or subscribers.
Does your website have a custom footer? If yes, did you use either of the methods to create one? Let us know by tweeting @rankmathseo.