
Noindex is a directive that tells search engines not to include a page in their search results. In WordPress, you can apply it to a single post, an entire post type, or your whole site.
The noindex tag takes a few seconds to apply. It is also easy to get wrong, and a misplaced noindex tag can quietly remove your most valuable pages from Google and AI platforms.
In this guide, we’ll cover what the noindex tag is, how it works, when you should use it, and how to noindex a page in WordPress step-by-step. We will also cover how the noindex tag differs from nofollow and disallow directives, and how to confirm a noindex directive actually took effect.
Already using Rank Math? Jump to the step-by-step instructions.
Noindex Guide at a Glance:
1 What Is a Noindex Tag and How Does It Work?
A noindex tag is a piece of code in a page’s HTML that tells search engines not to include that page in their search results. Some AI platforms, including Google Gemini, AI Overviews, and Copilot, also avoid using noindexed pages in their responses.
In WordPress, you noindex a page by adding a noindex meta tag to the page’s <head> section:
<meta name="robots" content="noindex">You can also target specific crawlers. For example, this tag tells only Googlebot not to index the page:
<meta name="googlebot" content="noindex">For non-HTML files, such as PDFs and images, where there is no <head> section to edit, you apply noindex as an HTTP response header instead of an HTML tag.
X-Robots-Tag: noindexYou can restrict the X-Robots-Tag header to specific crawlers by putting the user agent token before the directive:
X-Robots-Tag: googlebot: noindex2 Why Would You Noindex a Page?
You would noindex a page when it serves a purpose for visitors but offers no value in search results. You may also noindex a page for security, legal, SEO, or user experience reasons.
Common examples of pages to noindex include:
- Archive pages: Category, tag, and date archives often repeat content from your posts and can create thin or duplicate pages
- Thank-you pages: Confirmation pages that follow a form submission or purchase offer nothing to a searcher
- Internal search results: These can generate an endless number of near-duplicate URLs
- Member-only content: Gated content can’t be read by searchers, so it shouldn’t appear in search results
- Admin and login pages: There’s no reason for your login screen to appear in Google
- Thin or duplicate content: Pages that repeat content found elsewhere on your site add no value to search results
- Internal documentation pages: These pages are meant for your team and should be kept out of public view
- Staging and development sites: A staging copy of your site should never compete with the live version in search results
Note: The noindex tag prevents indexing, not crawling. Google may still crawl a noindexed page, but it won’t appear in search results. To prevent crawling, block all crawlers (or specific crawlers) using your robots.txt file. However, do not use both on the same page, as search engines can’t see the noindex tag on a page they can’t crawl.
3 How to Noindex a Page in WordPress
You can add the noindex tag to a page by editing its code, using the WordPress settings, or using an SEO plugin like Rank Math. We have detailed them below, from most to least recommended.
3.1 Using Rank Math (Recommended)
You can noindex a page, multiple pages, a specific post type, or even your entire website using an SEO plugin like Rank Math.
This is the preferred method because it is quick, requires no coding knowledge, and supports multiple page builders. It also stores the setting in your site’s database, so the noindex tag stays in place when you update your theme.
To get started, install Rank Math if you haven’t already. Then, click Rank Math SEO and select Advanced Mode.
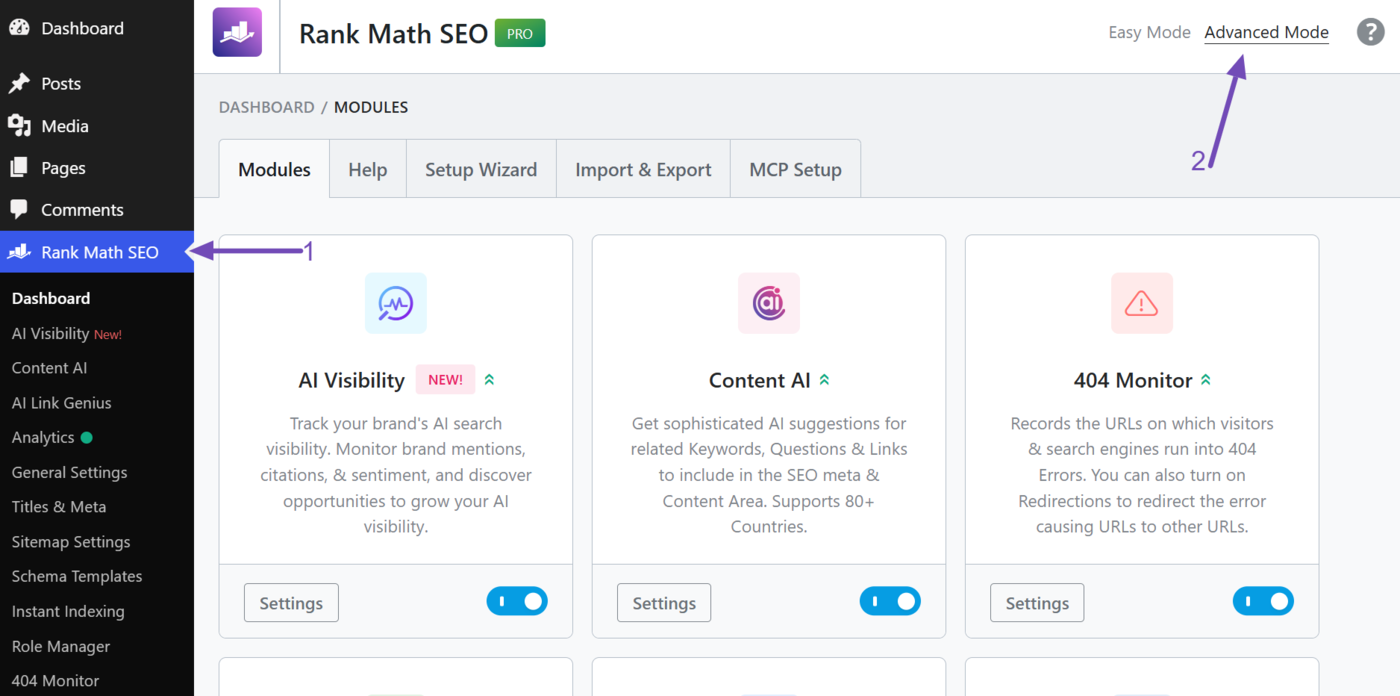
Now, follow the links below to noindex a single page, multiple pages, taxonomies, post types, or your entire website.
- Noindex a Post or Page in the Block Editor
- Noindex a Post or Page in the Classic Editor
- Noindex a Post or Page Using Quick Edit PRO
- Noindex a Post or Page Using the Admin Bar
- Noindex a Post or Page in Elementor
- Noindex a Post or Page in Divi
- Noindex Multiple Posts or Pages Using Bulk Actions PRO
- Noindex Your Author Archives
- Noindex Your Homepage, Taxonomies, or an Entire Post Type
- Noindex Your Entire Website
a. Noindex a Post or Page in the Block Editor
Head to the post or page you want to set to noindex. Once done, click the Rank Math SEO icon.
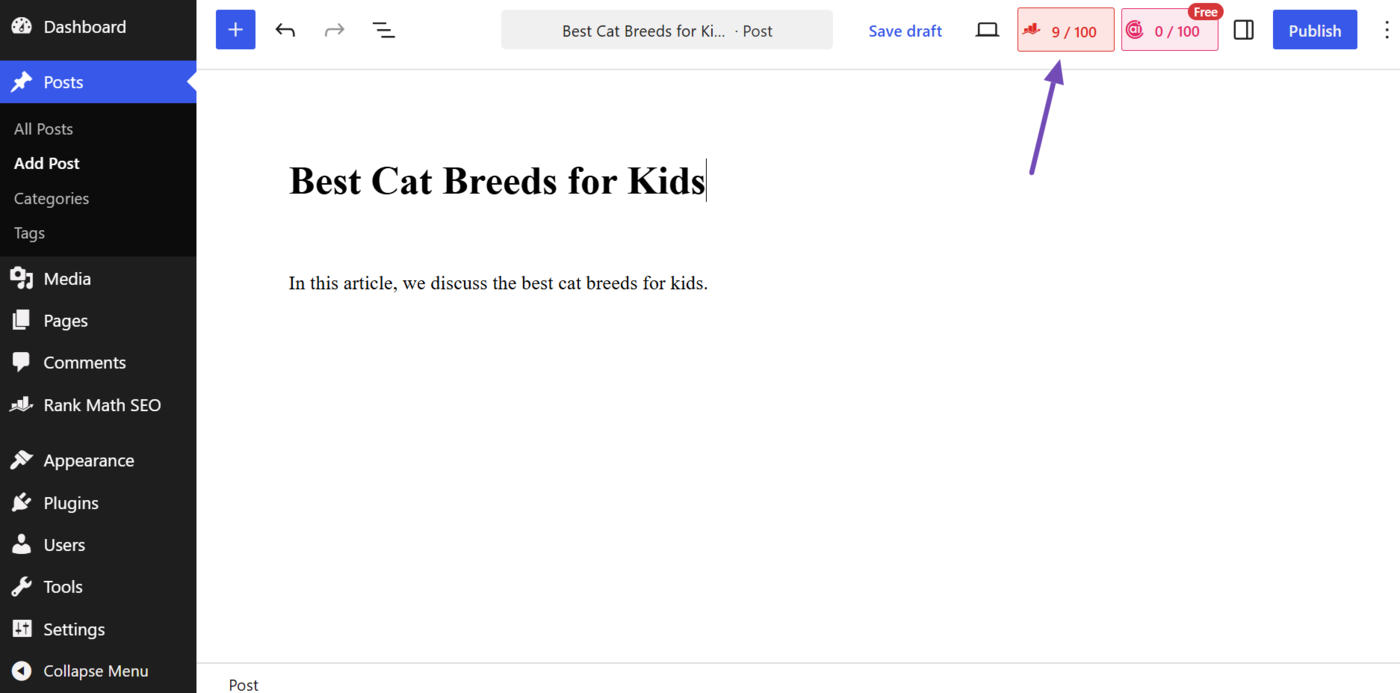
Next, click the Advanced icon.
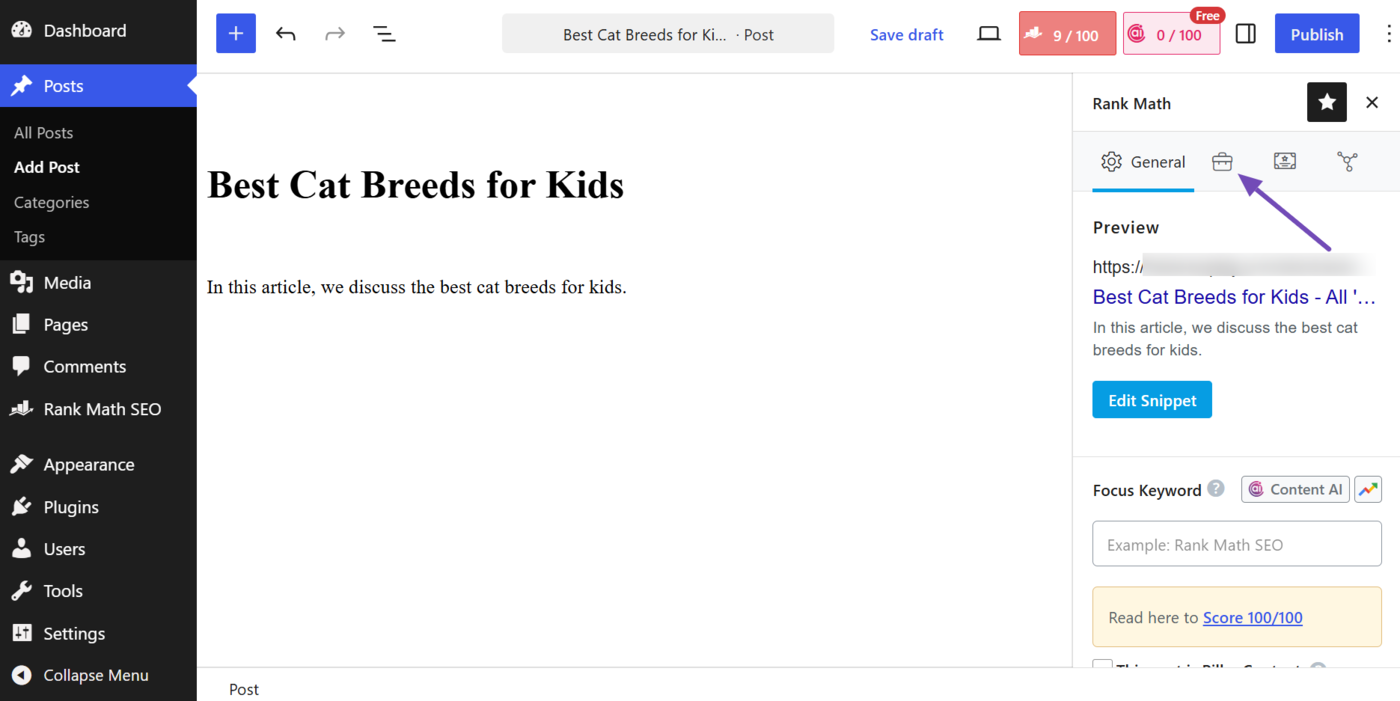
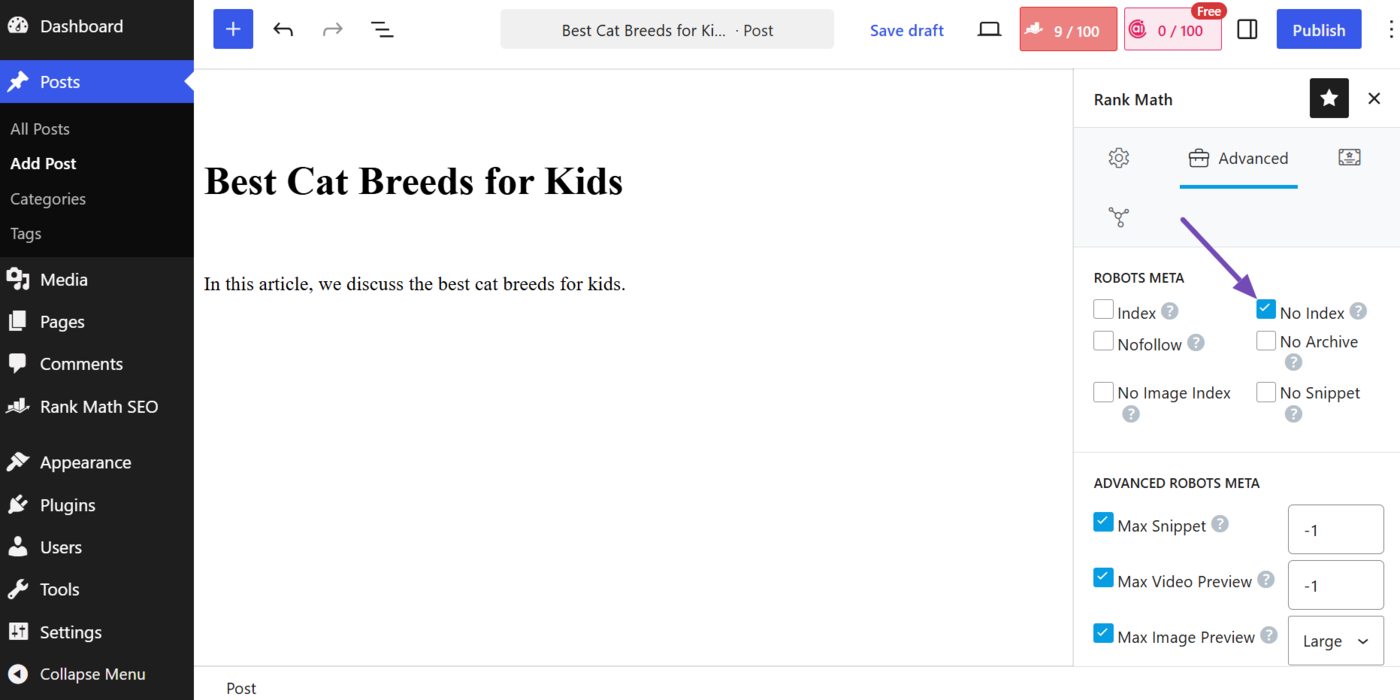
Once done, select No Index, as shown below. You can now publish or update the page to save your changes.
b. Noindex a Post or Page in the Classic Editor
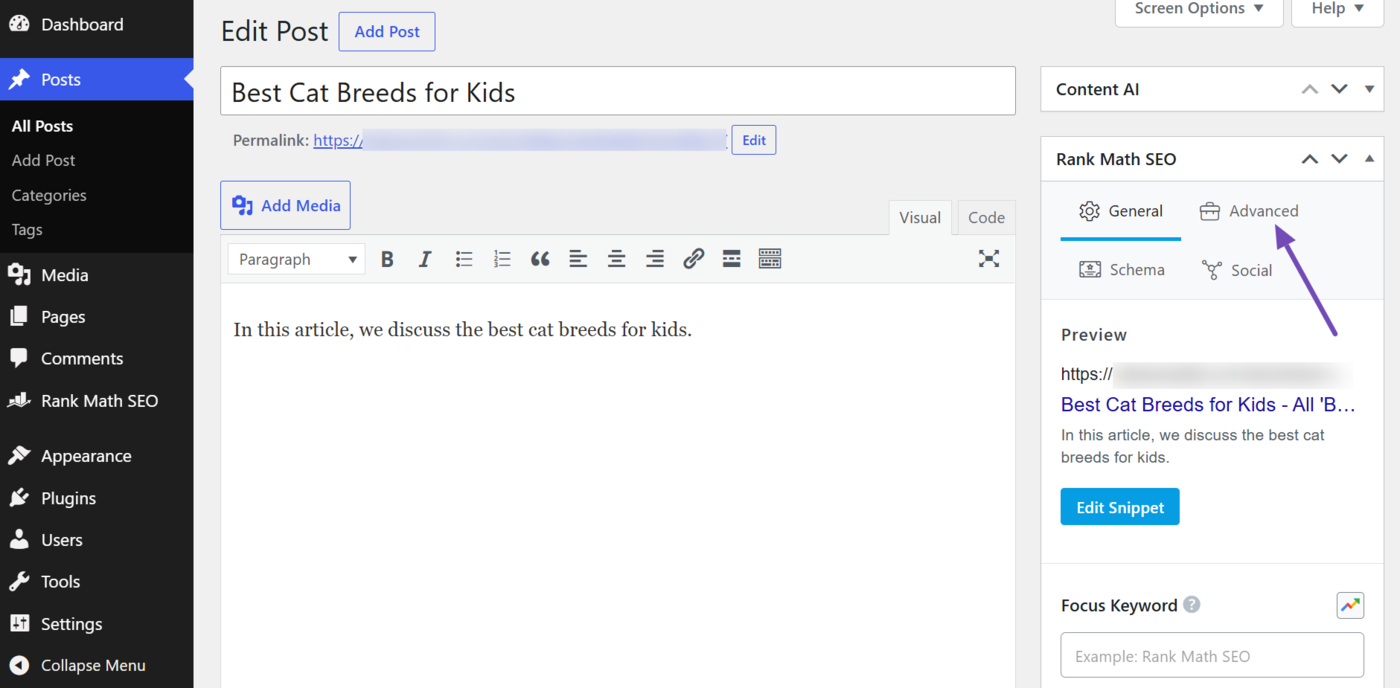
Head to the post or page in the WordPress Classic editor. Next, navigate to the Rank Math SEO panel and click Advanced.
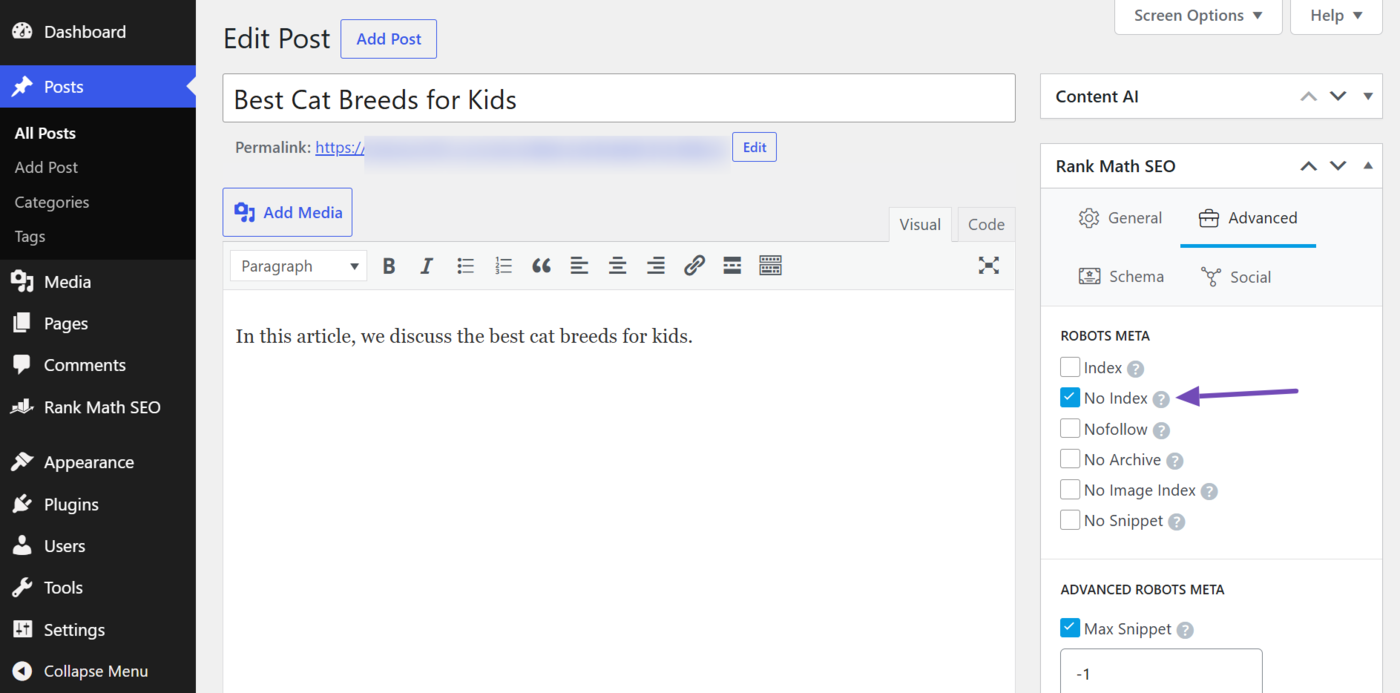
Then select No Index, as shown below. Once done, update or publish the post to save your changes.
c. Noindex a Post or Page Using Quick Edit PRO
If you have Rank Math PRO, you can quickly set your posts and pages to noindex without opening them. You will do this using the Quick Edit option on the All Posts or All Pages screen.
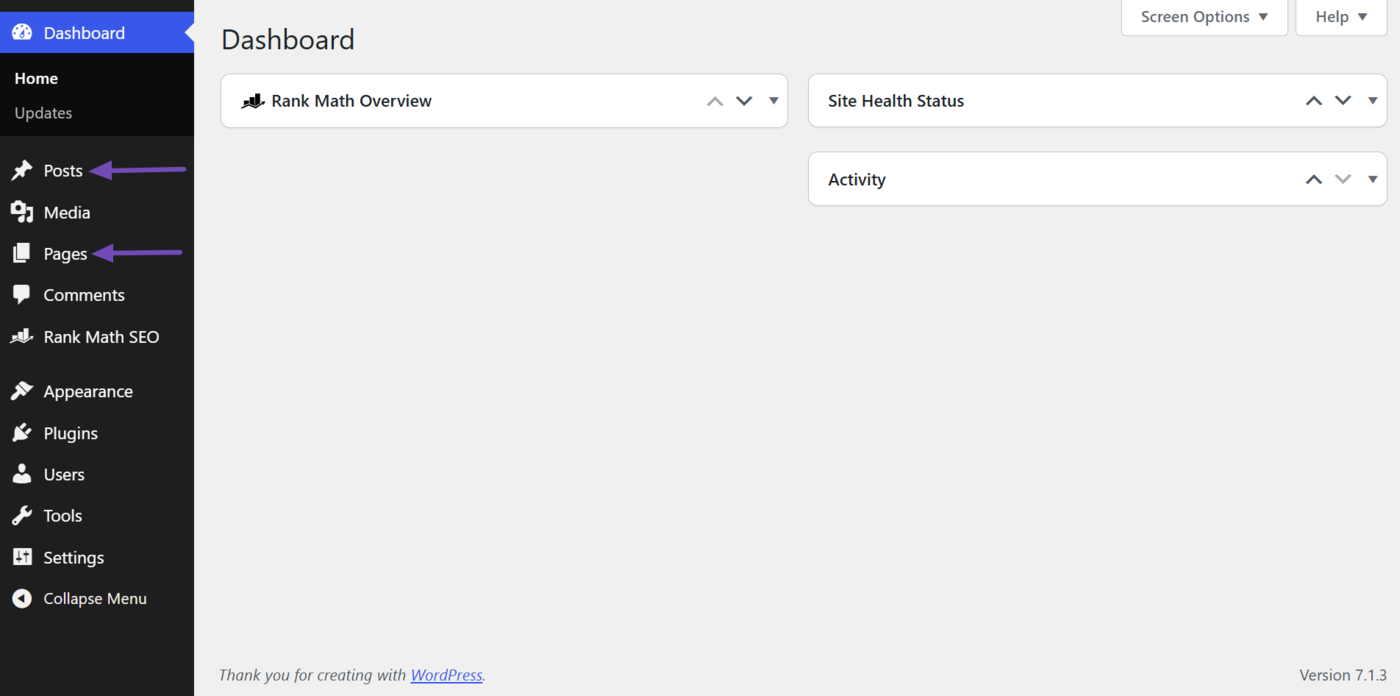
To get started, head to the All Posts or All Pages screen.
- To go to the All Posts screen, click Posts from your WordPress dashboard
- To go to the All Pages screen, click Pages from your WordPress dashboard
Note: This option is also available for other post types, including products.
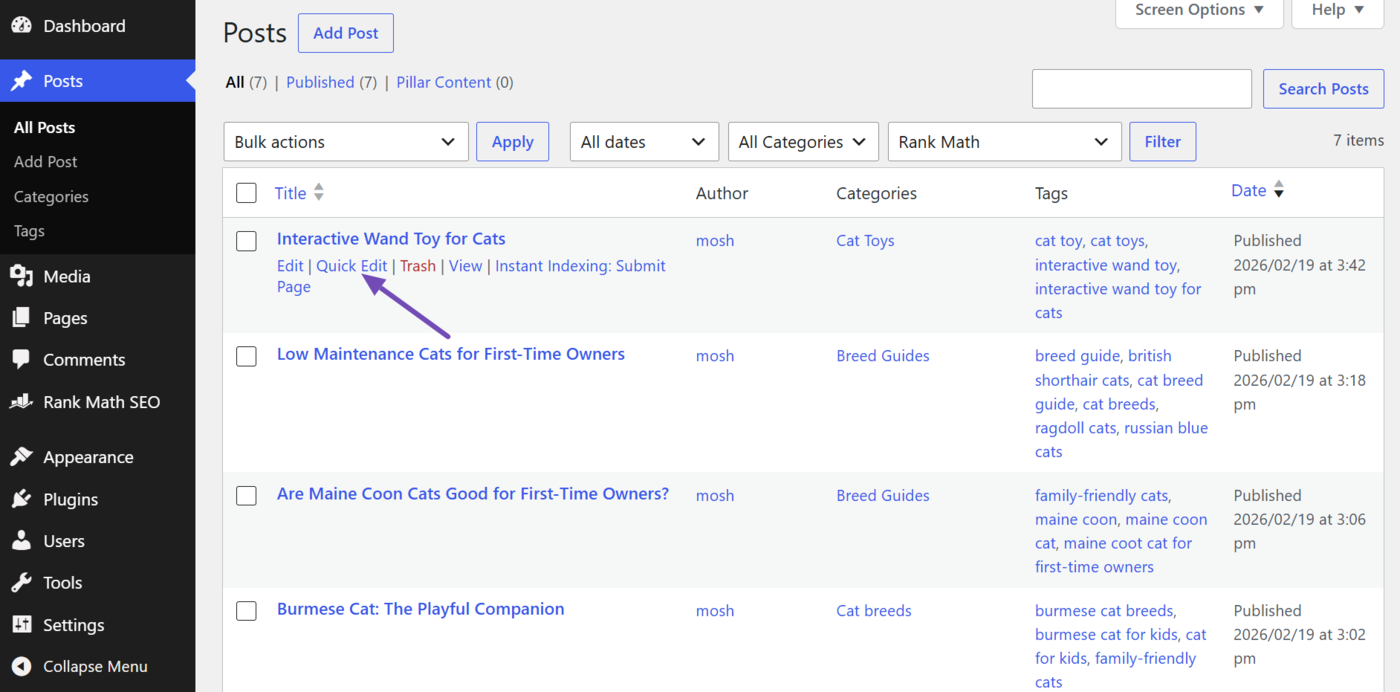
Next, hover over the post or page title and click Quick Edit.
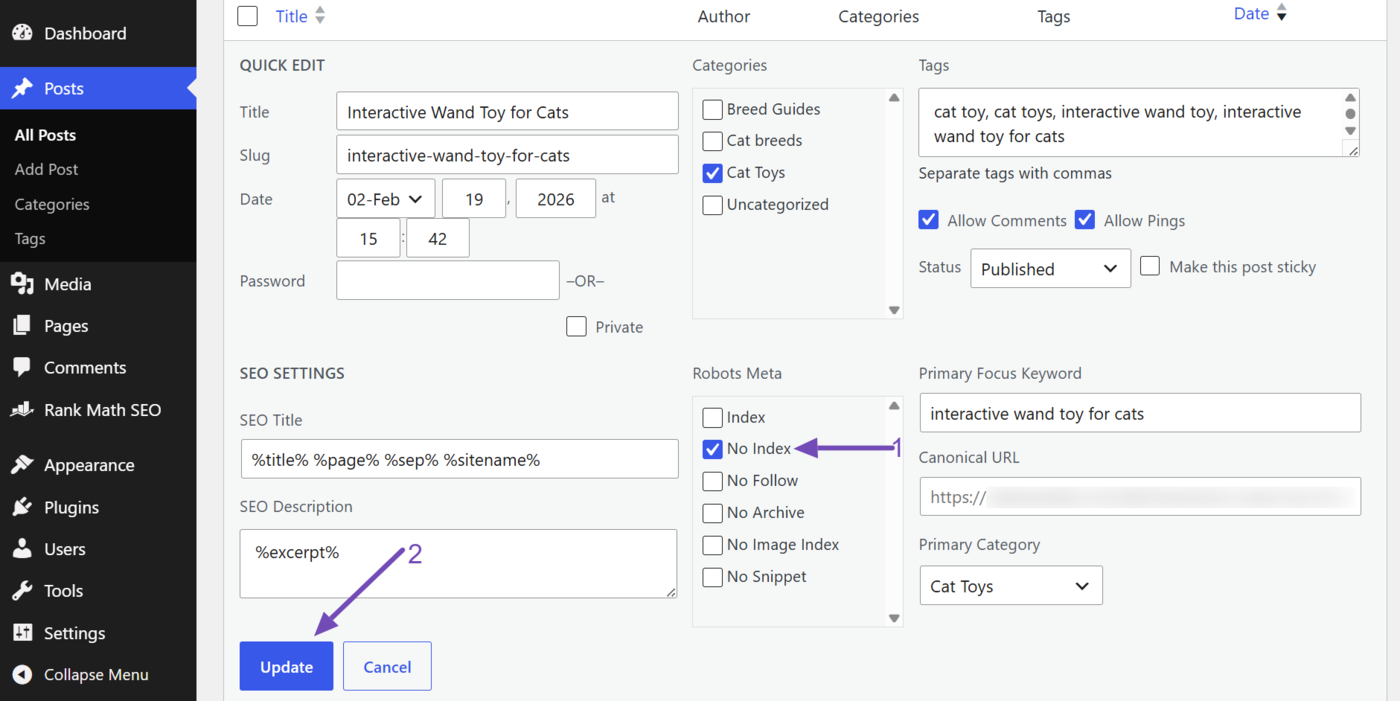
Next, head to the Robots Meta section and select No Index. Then, click Update to save your changes.
d. Noindex a Post or Page Using the Admin Bar
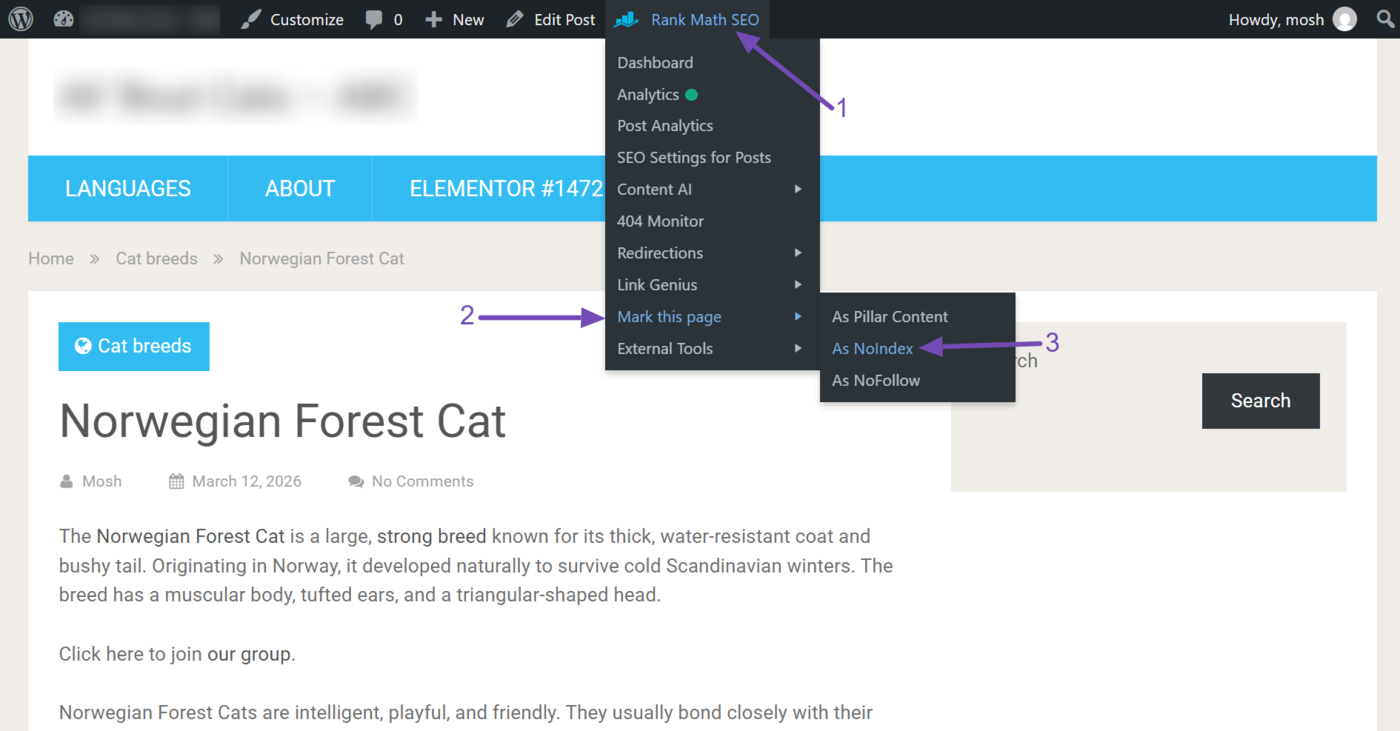
You can also set a post to noindex using the admin menu bar at the top of the post or page. To do this, hover over Rank Math SEO → Mark this page and click As NoIndex, as shown below.
e. Noindex a Post or Page in Elementor
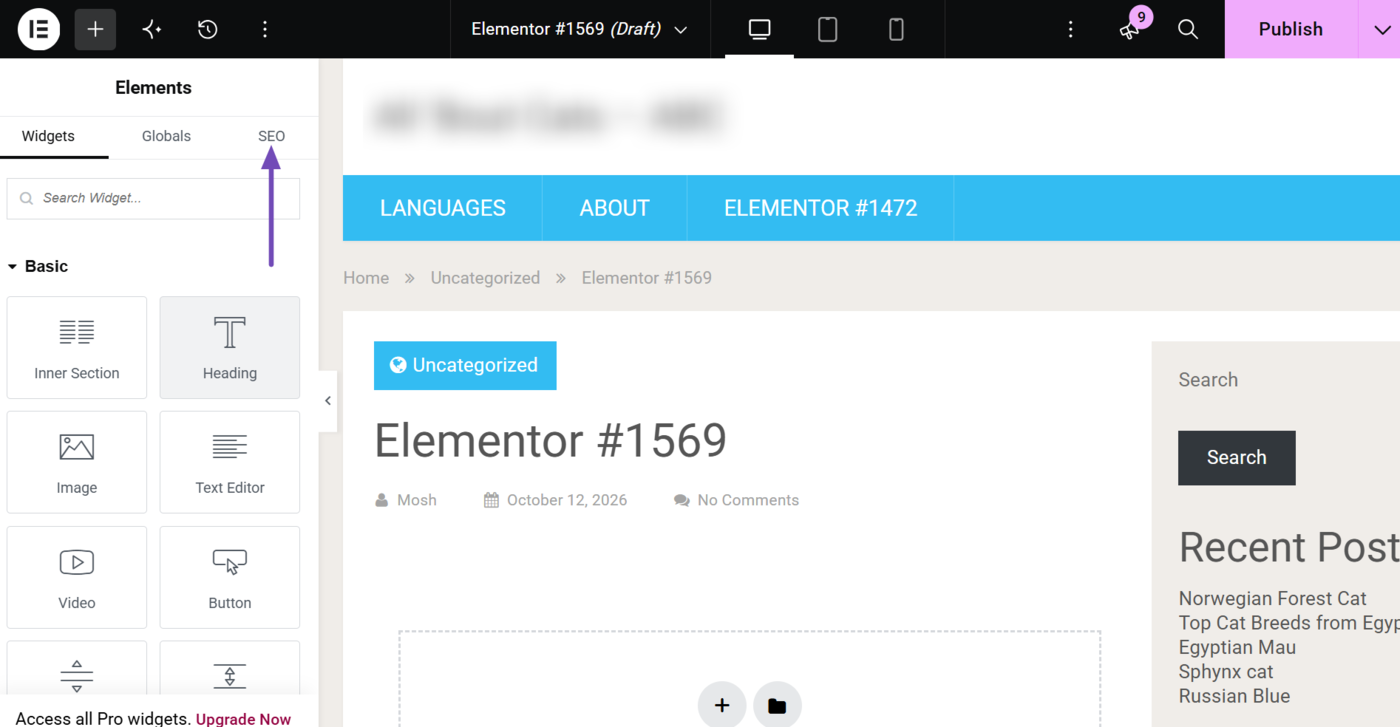
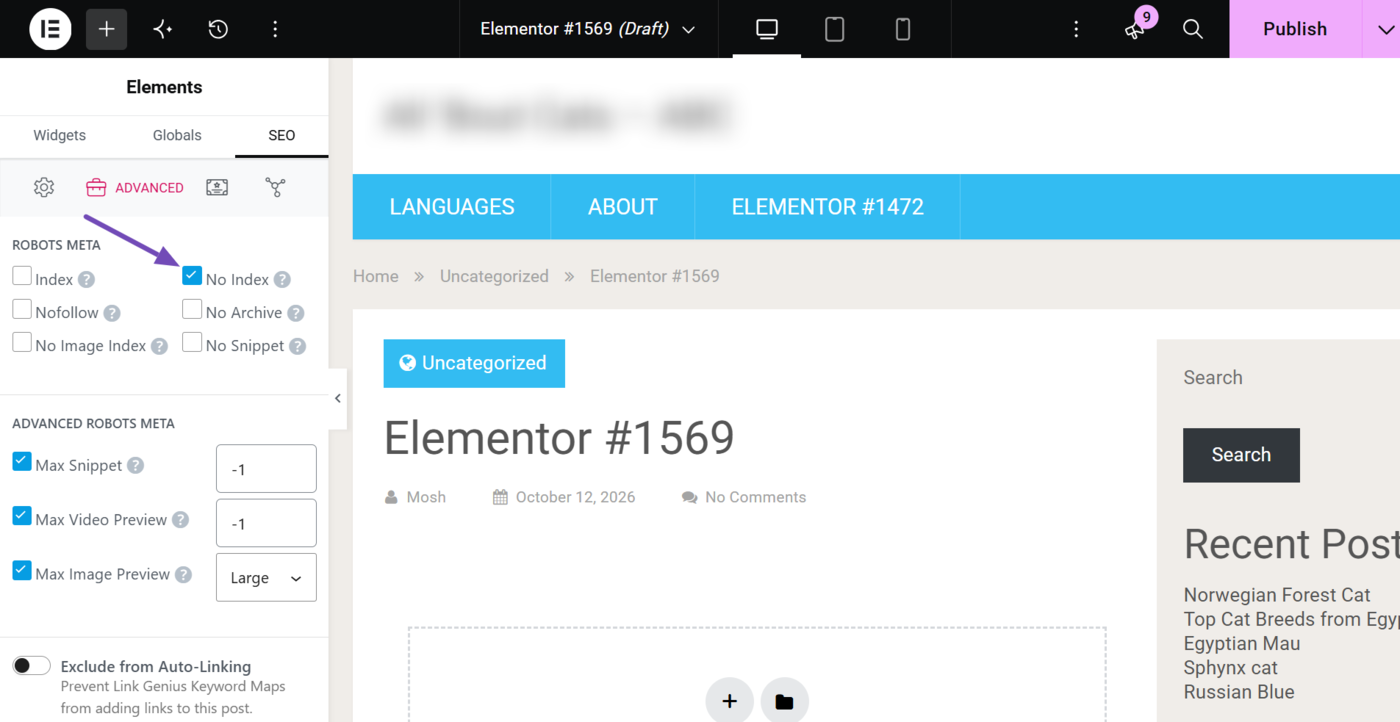
If you use Elementor, head to the post in the Elementor editor. Then click SEO, as shown below.
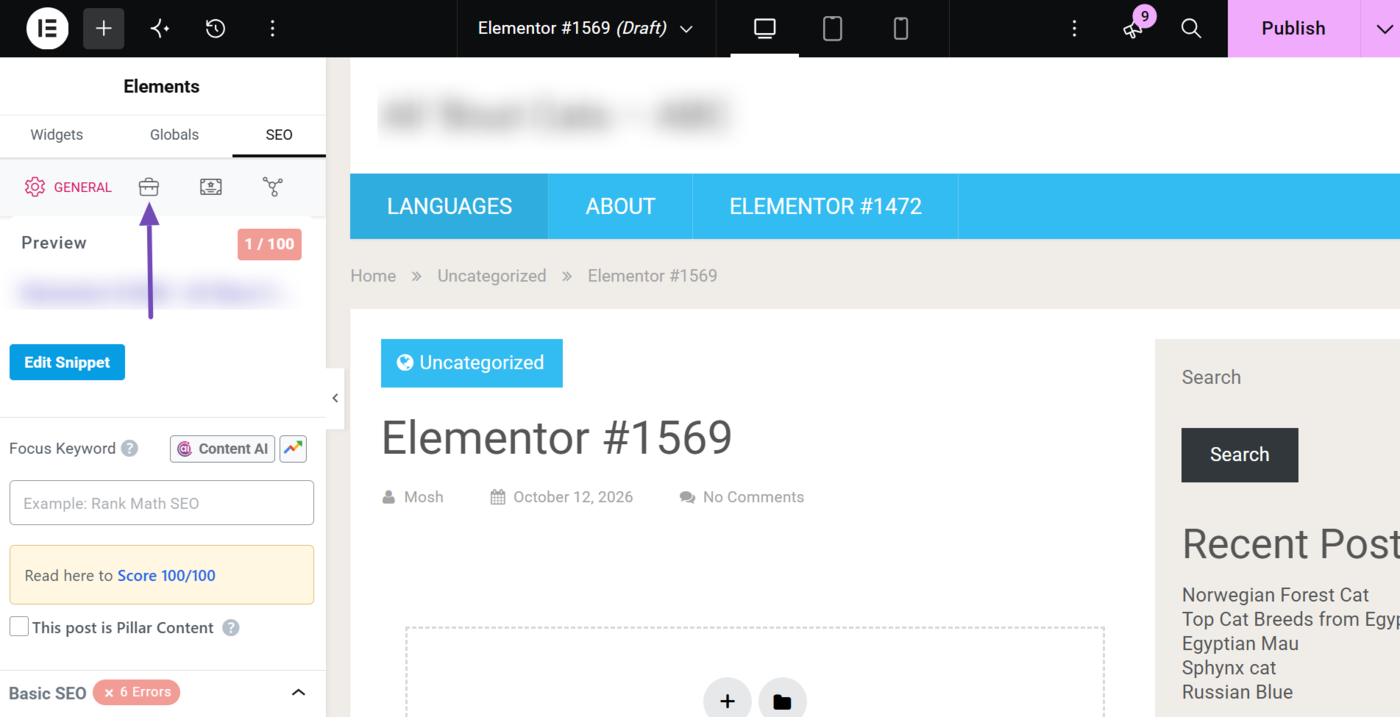
Next, click the Advanced icon.
Select No Index. Once done, update or publish the post to save your changes.
f. Noindex a Post or Page in Divi
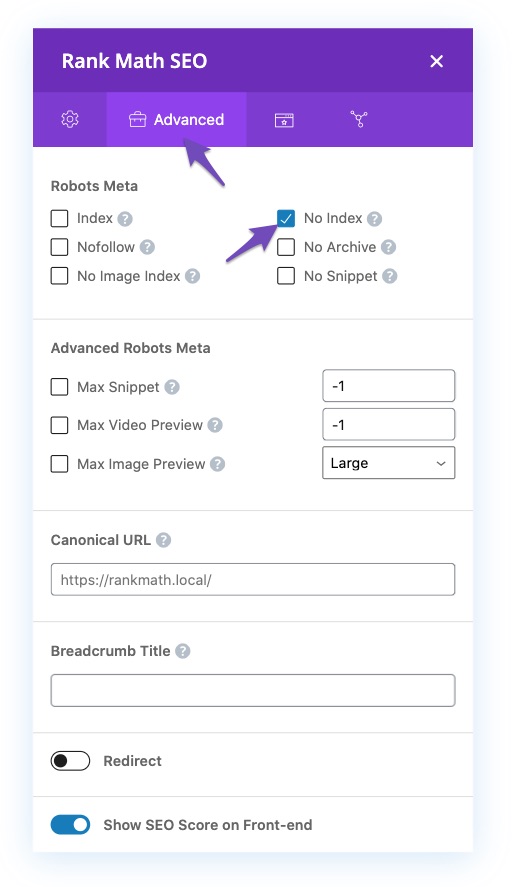
If you’re using Divi Builder, open the post or page using the Divi editor. Then click the Rank Math SEO icon. Once done, navigate to the Advanced tab and select No Index, as shown below.
g. Noindex Multiple Posts or Pages Using Bulk Actions PRO
Rank Math PRO users can set multiple posts or pages to noindex using the Bulk Actions menu. This lets you noindex them all at once without having to visit each individual post or page.
To get started, head to the All Posts or All Pages screen.
- To head to the All Posts screen, click Posts from your WordPress dashboard
- To head to the All Pages screen, click Pages from your WordPress dashboard
Note: This option is also available for other post types, including products.
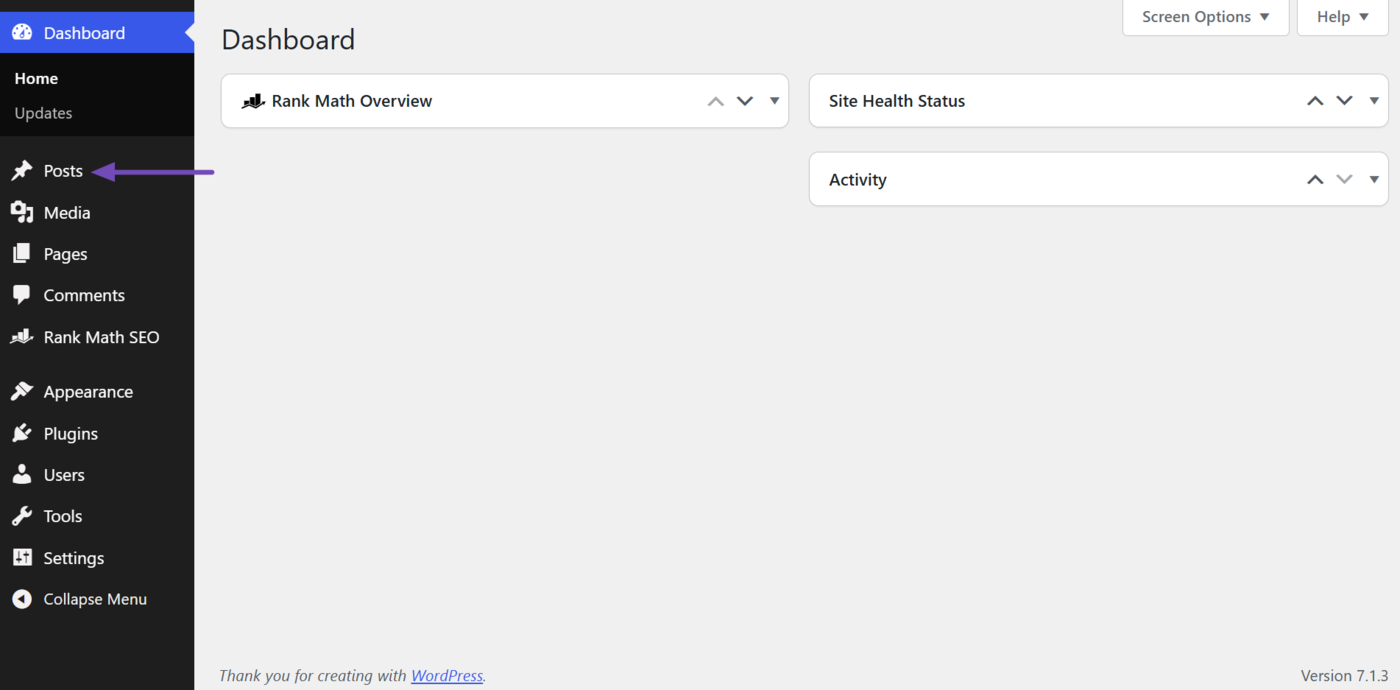
For this example, let’s go to the All Posts screen. Click Posts from your WordPress dashboard, as shown below.
Now, select all the posts to set to noindex. There are two ways to do this:
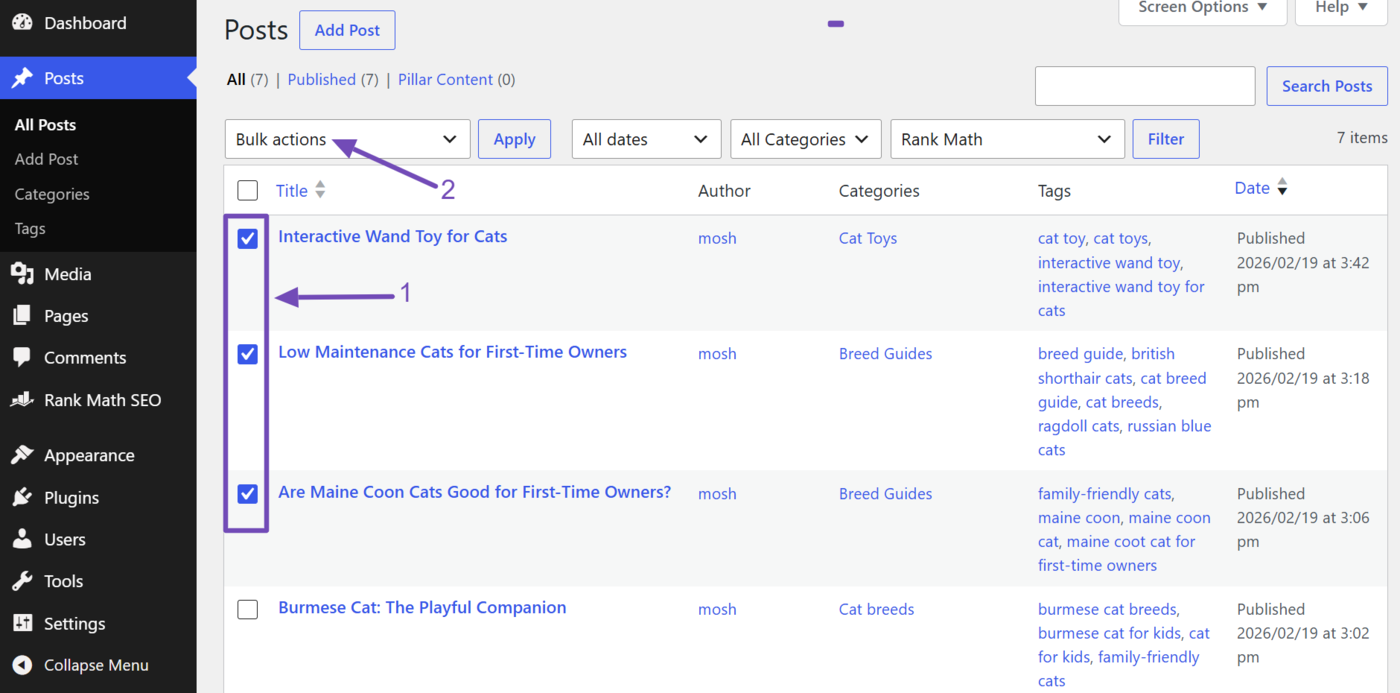
To noindex all visible posts on the screen, select the checkbox in the top-left corner. Then click on the Bulk actions menu, as shown below.
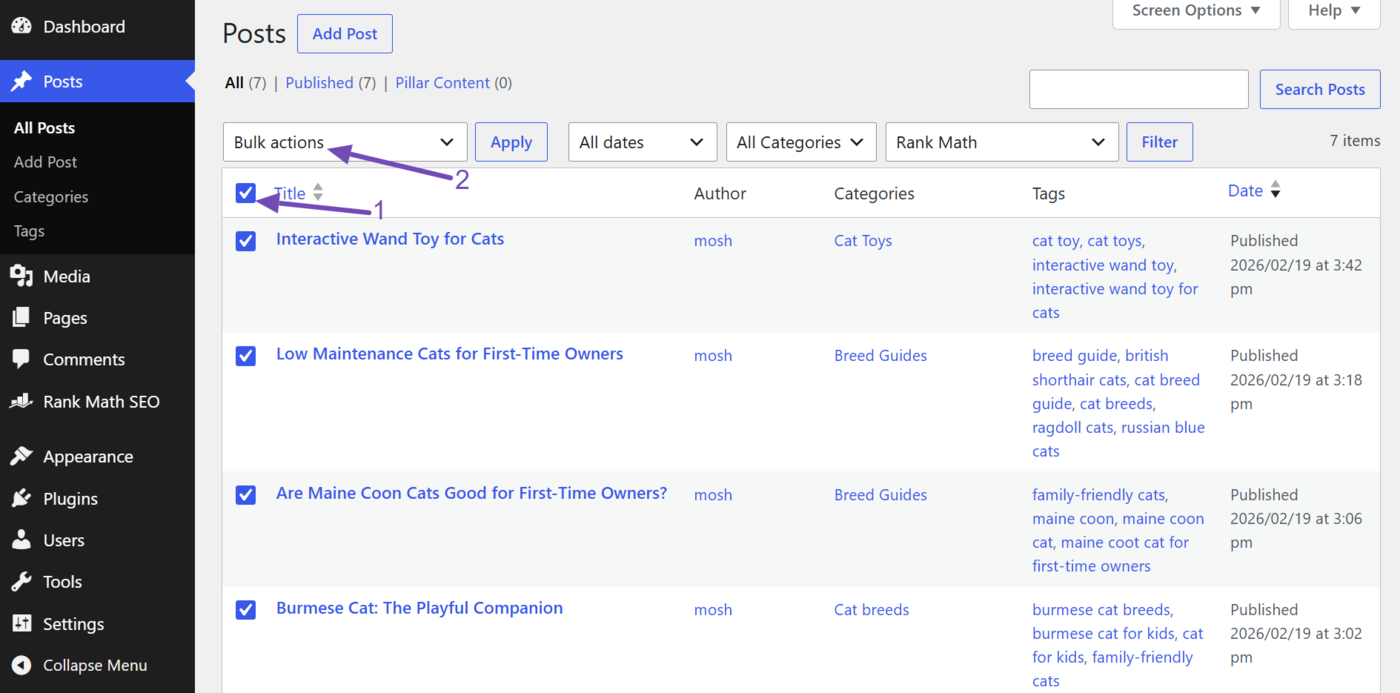
To noindex multiple posts, select the checkbox in front of each post title. Then, click the Bulk actions menu.
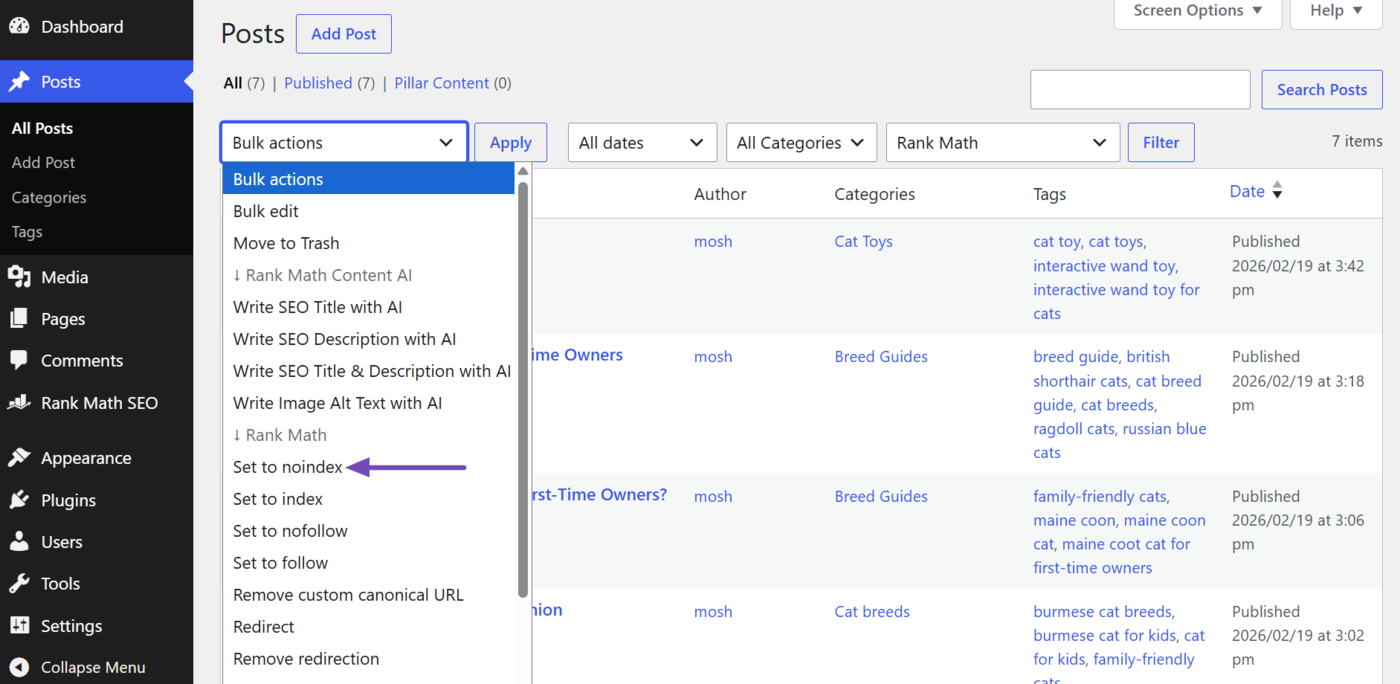
Next, choose the Set to noindex option from the Bulk actions drop-down menu.
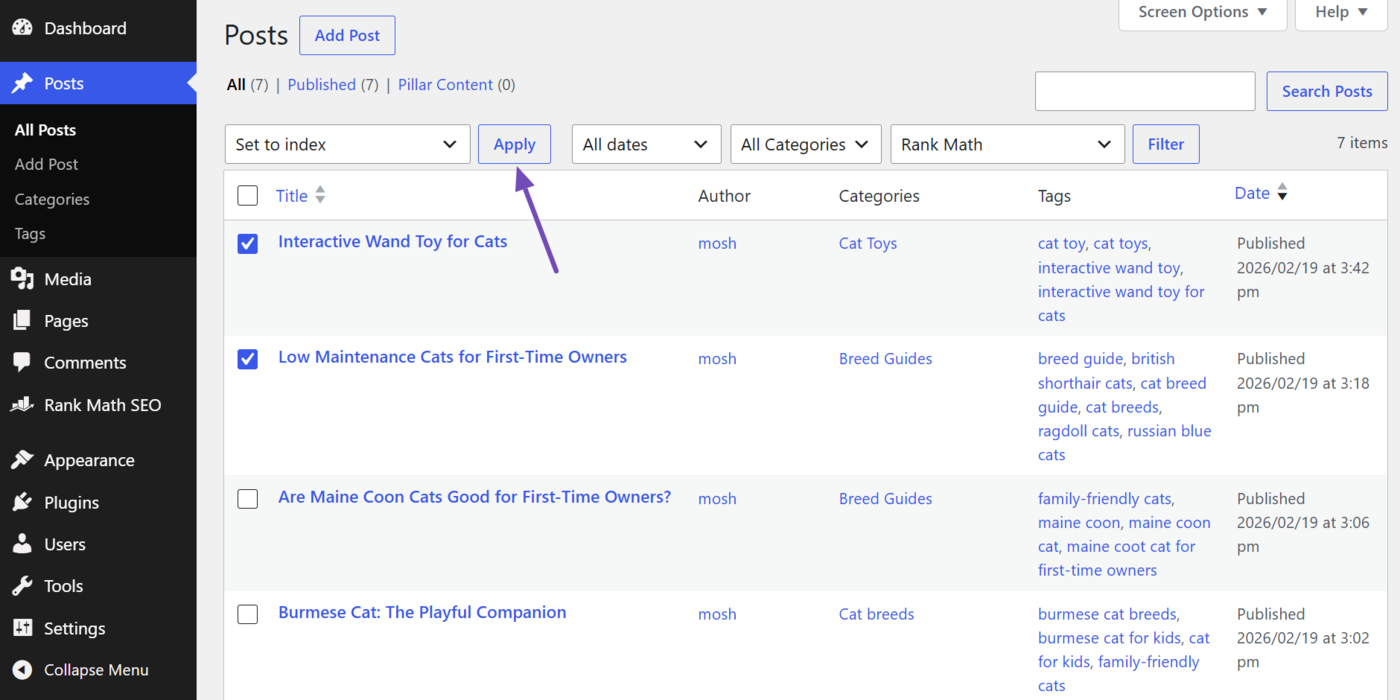
Once done, click Apply. Now, all selected posts will be set to noindex.
h. Noindex Your Author Archives
Author archives list every post written by a specific author. On single-author sites, they often duplicate your blog page, so noindexing them keeps that duplicate content out of search results.
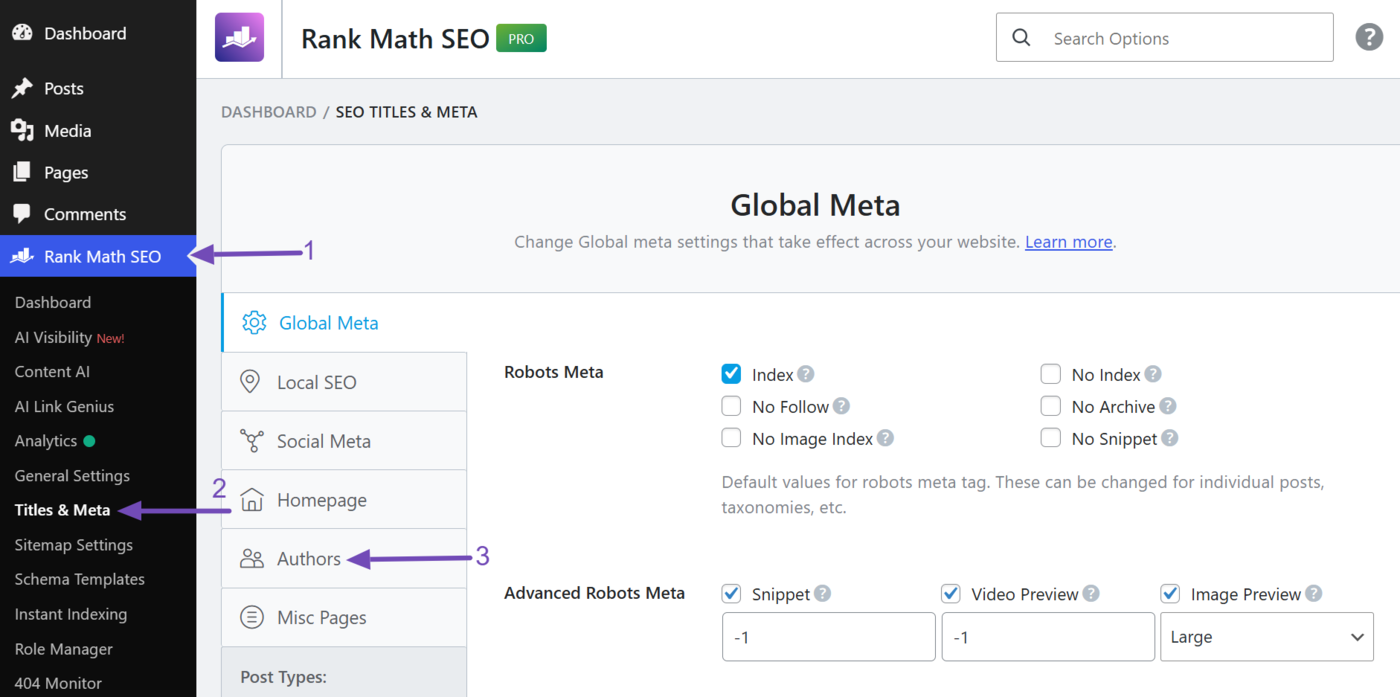
To get started, head to Rank Math SEO → Titles & Meta from your WordPress dashboard. Then, click Authors.
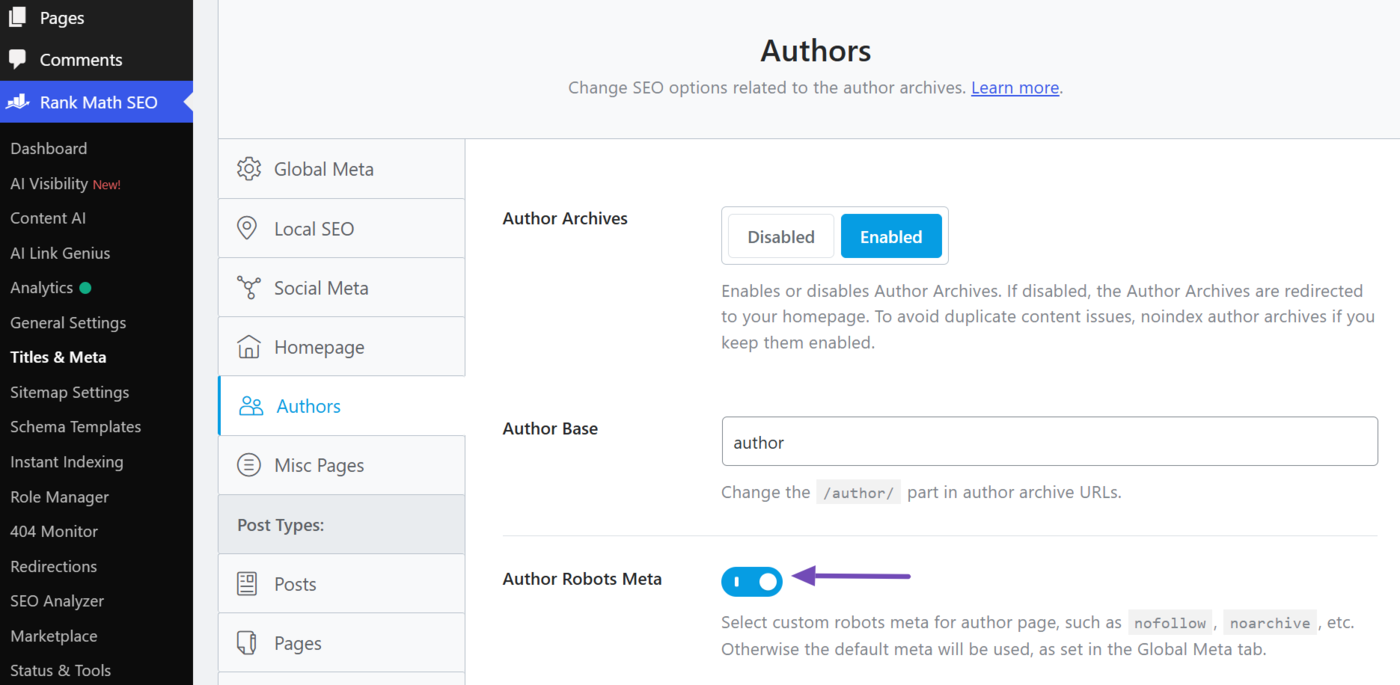
Once done, enable the Author Robots Meta option.
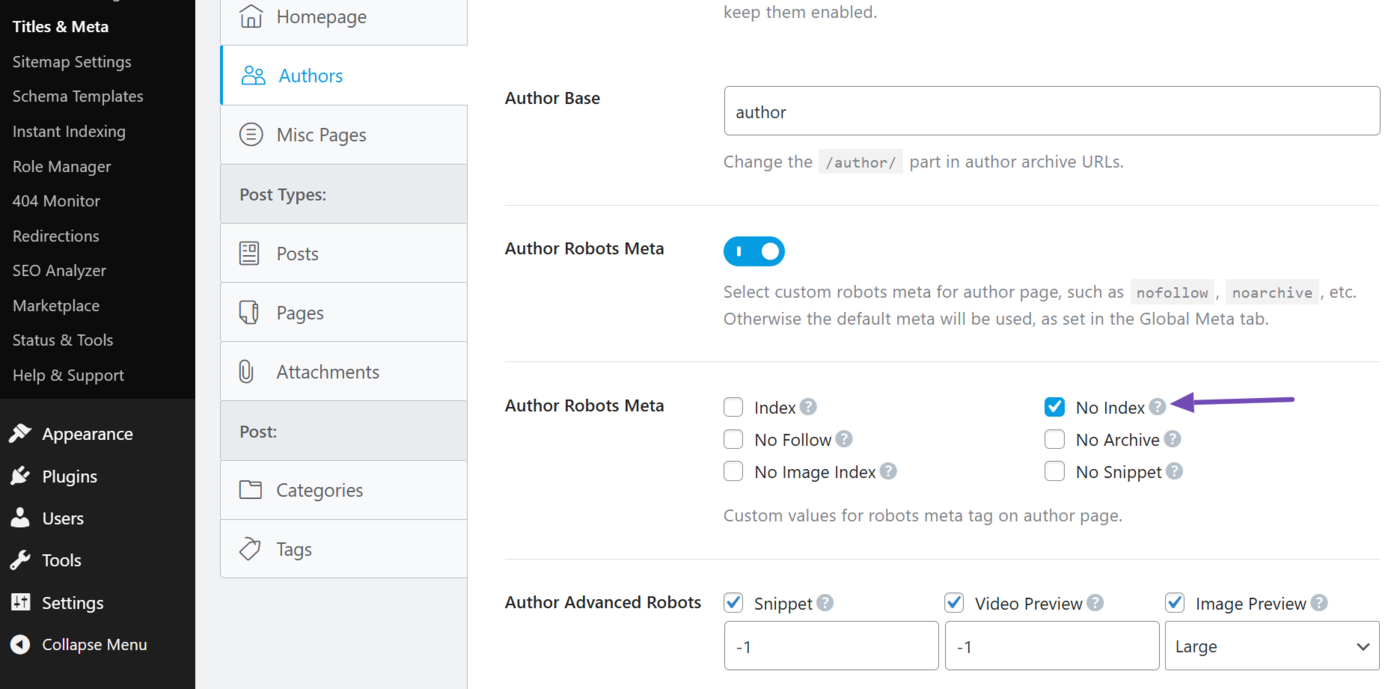
Now, select No Index from the Author robots meta options. Then, scroll down and click Save Changes.
i. Noindex Your Homepage, Taxonomies, or an Entire Post Type
You can also set your homepage, taxonomy pages, or an entire post type to noindex.
Note: While this method sets the selected post type to noindex, you can still override it for individual posts by setting their robots meta to Index.
To get started, head to Rank Math SEO → Titles & Meta from your WordPress dashboard.
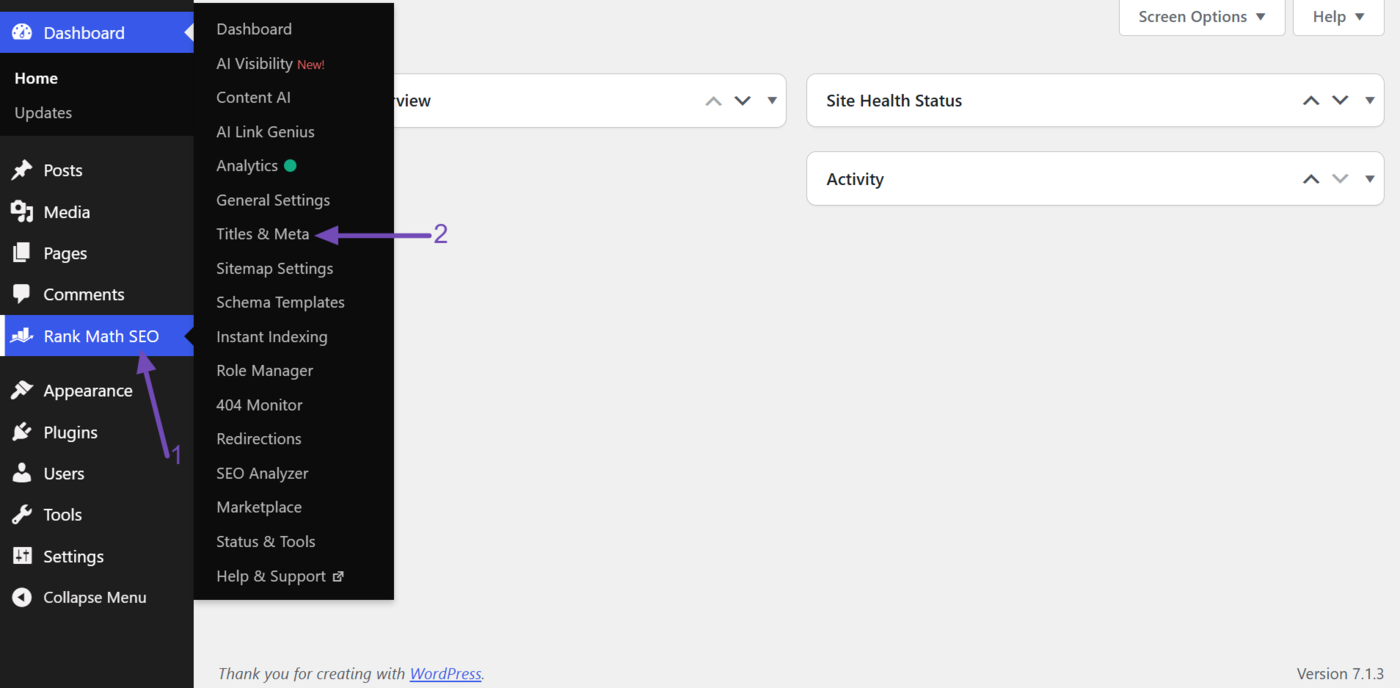
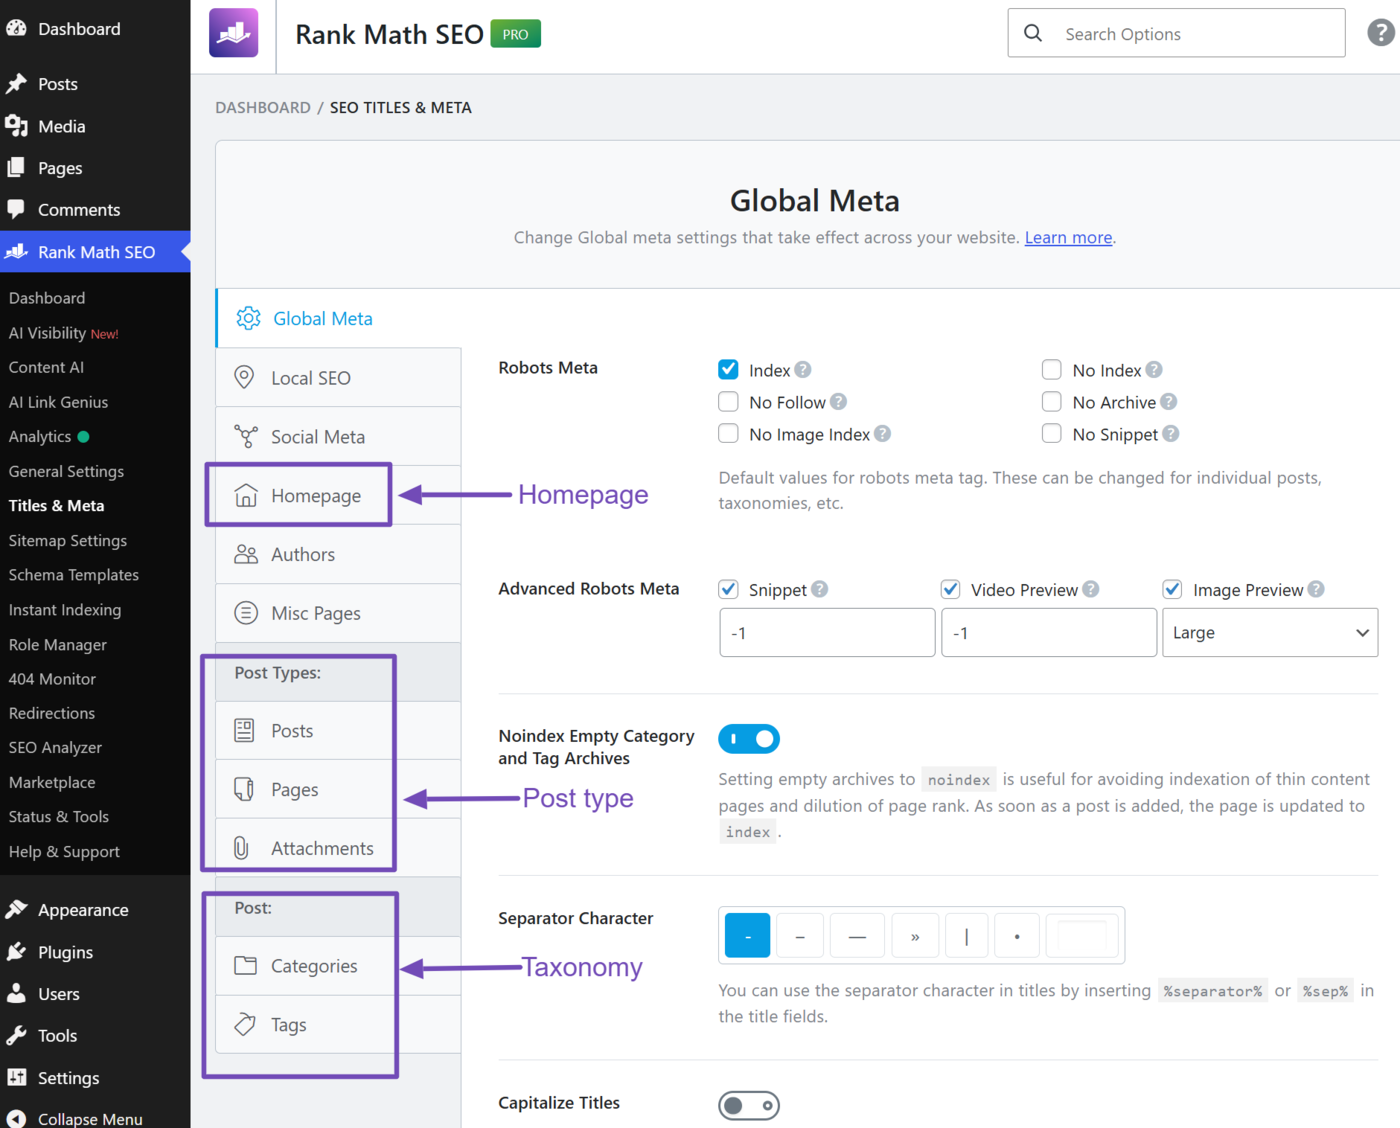
Next, select the post type (posts, pages, or attachments) or taxonomy (categories or tags) you want to noindex. To noindex your homepage, select Homepage.
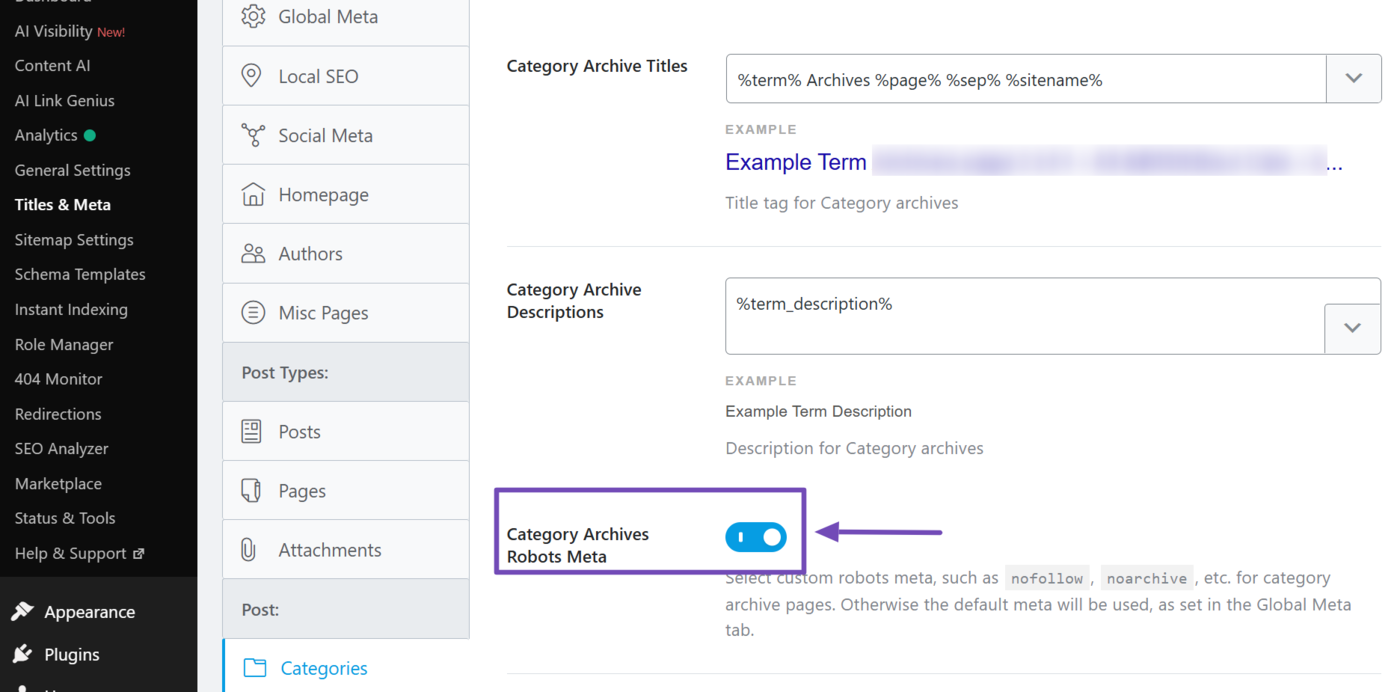
For this example, we will select Categories.
Now, scroll down and enable the Robots Meta option. The specific name will differ depending on the homepage, post type, or taxonomy. For example:
- If you clicked Posts, it will be Post Robots Meta
- If you clicked Homepage, it will be Homepage Robots Meta
- If you clicked Categories, it will be Category Archive Robots Meta
Ensure it’s enabled, as shown below.
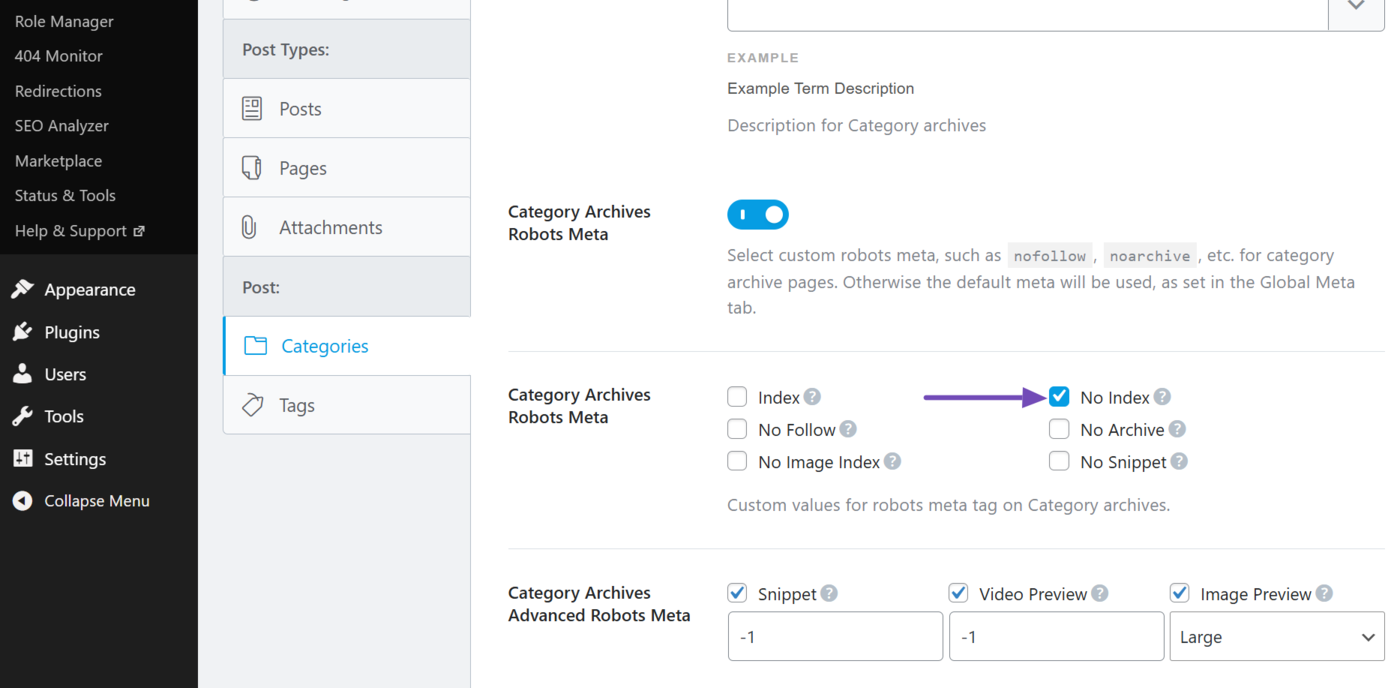
The robots meta options will appear underneath the Robots Meta option. Select No Index. Then, scroll down and click Save Changes.
j. Noindex Your Entire Website
You may want to noindex your entire website while it is still under development, or if you run a staging copy of your live site. This keeps unfinished or duplicate pages out of search results until you are ready to launch.
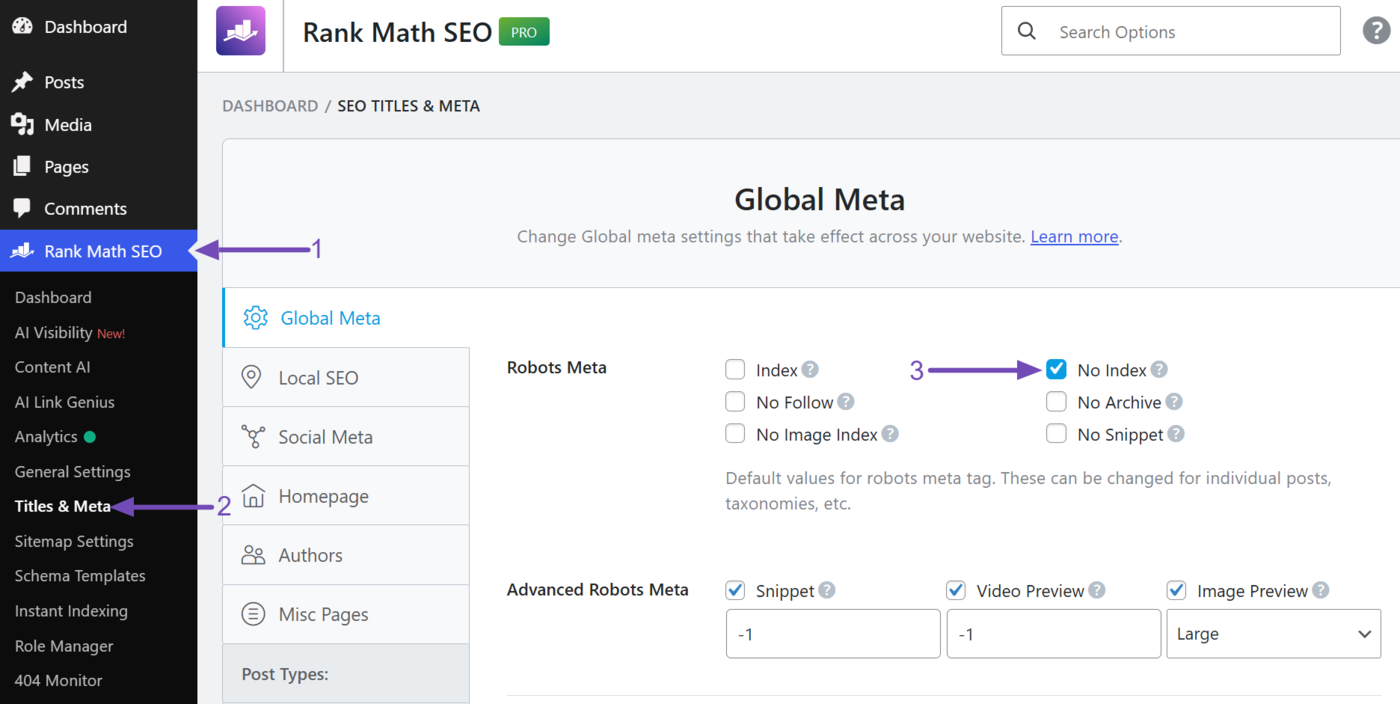
To set your website to noindex, head to Rank Math SEO → Titles & Meta from your WordPress dashboard.
In the Global Meta tab, select No Index. Once done, scroll down and click Save Changes.
Note: Remember to switch this setting back to Index when your site goes live. Otherwise, your entire website will stay out of search results.
3.2 Using the WordPress Settings
You can also noindex your site using WordPress settings. However, this method applies to your entire site, since you can’t noindex specific pages this way.
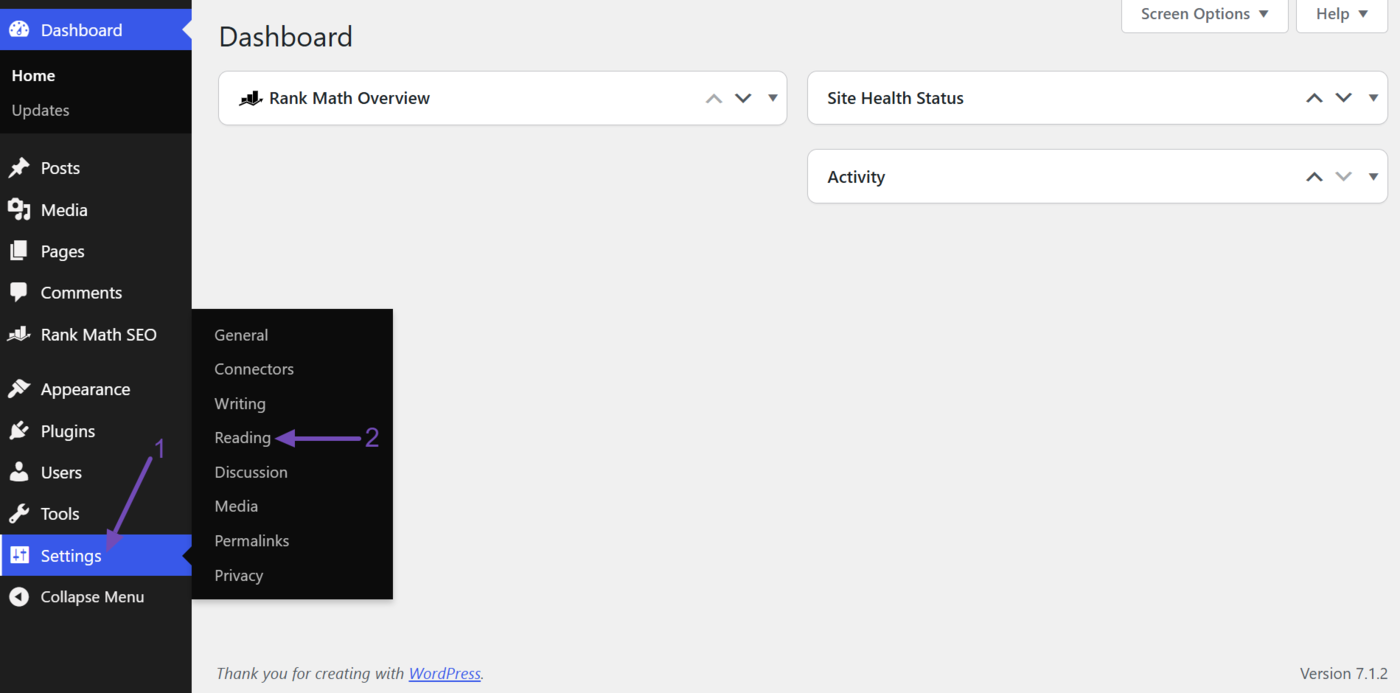
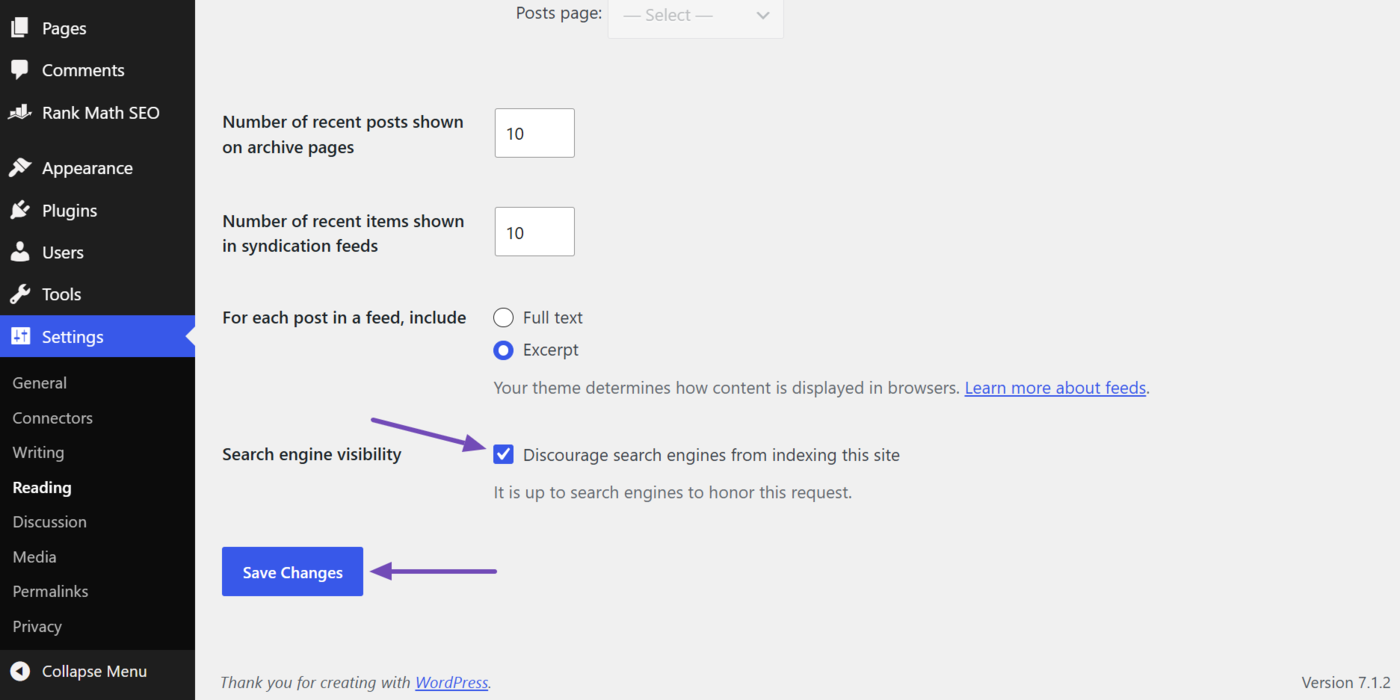
To get started, go to Settings → Reading from your WordPress dashboard.
Next, scroll down and enable Discourage search engines from indexing this site. Once done, click Save Changes. Your entire website is now set to noindex.
3.3 Adding the Tag Manually
You can also add the noindex tag directly to your site’s header.
Warning: We recommend using this method with caution. Since header.php loads on every page, this method noindexes your entire website, not a single page. The noindex tag will also be lost whenever you update your theme.
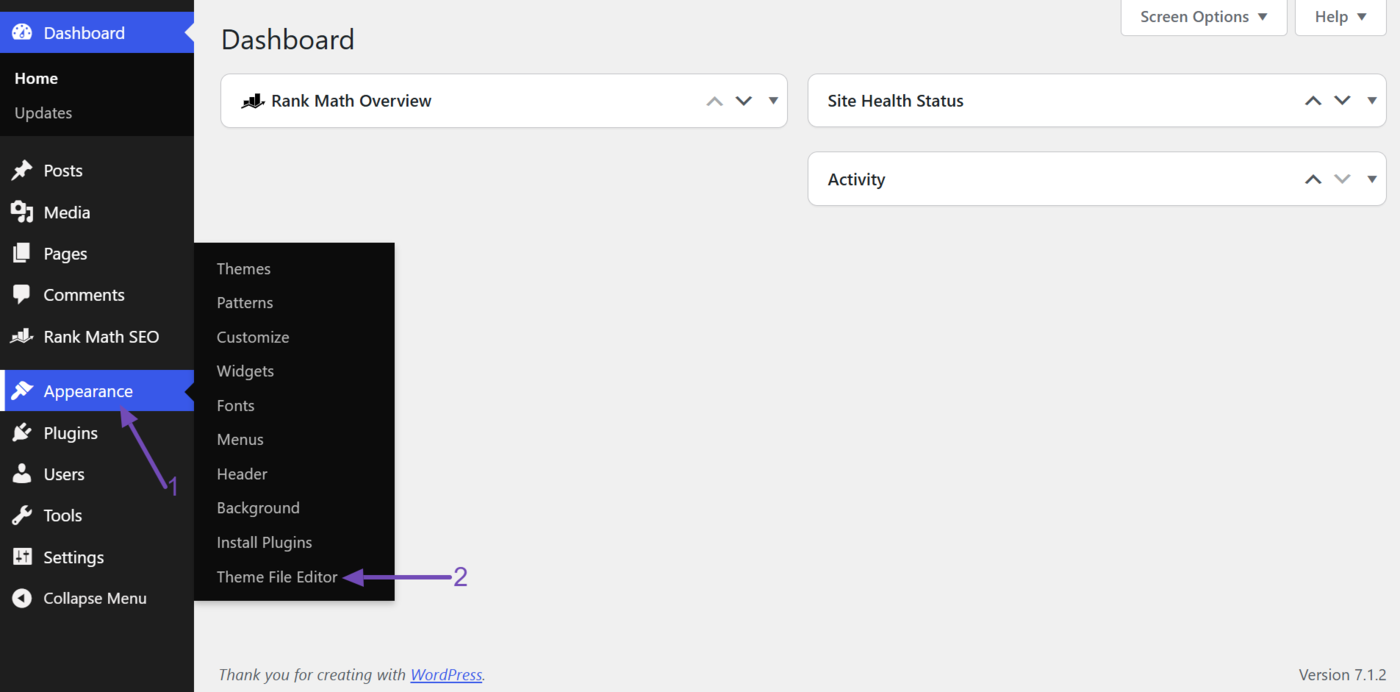
To get started, go to Appearance → Theme File Editor in your WordPress dashboard.
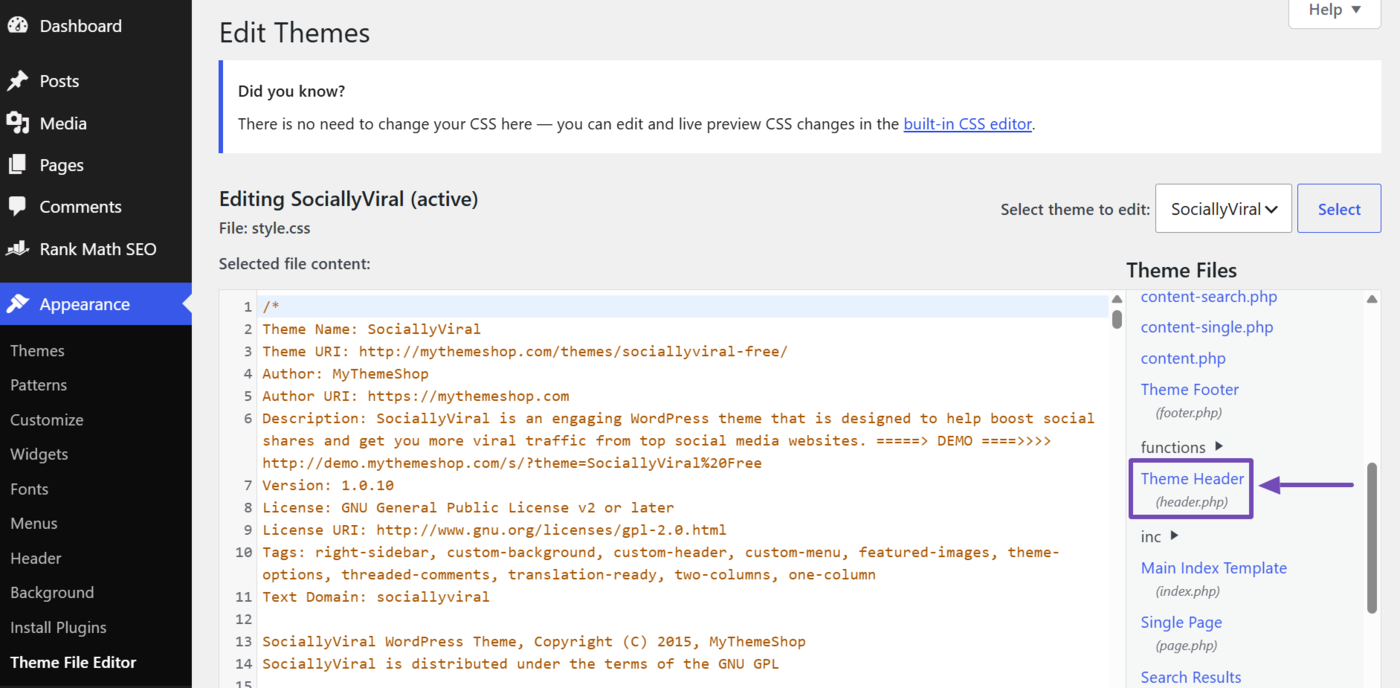
Then open the header.php file.
Paste the following code just above the closing </head> tag. Once done, click Update File.
<meta name="robots" content="noindex">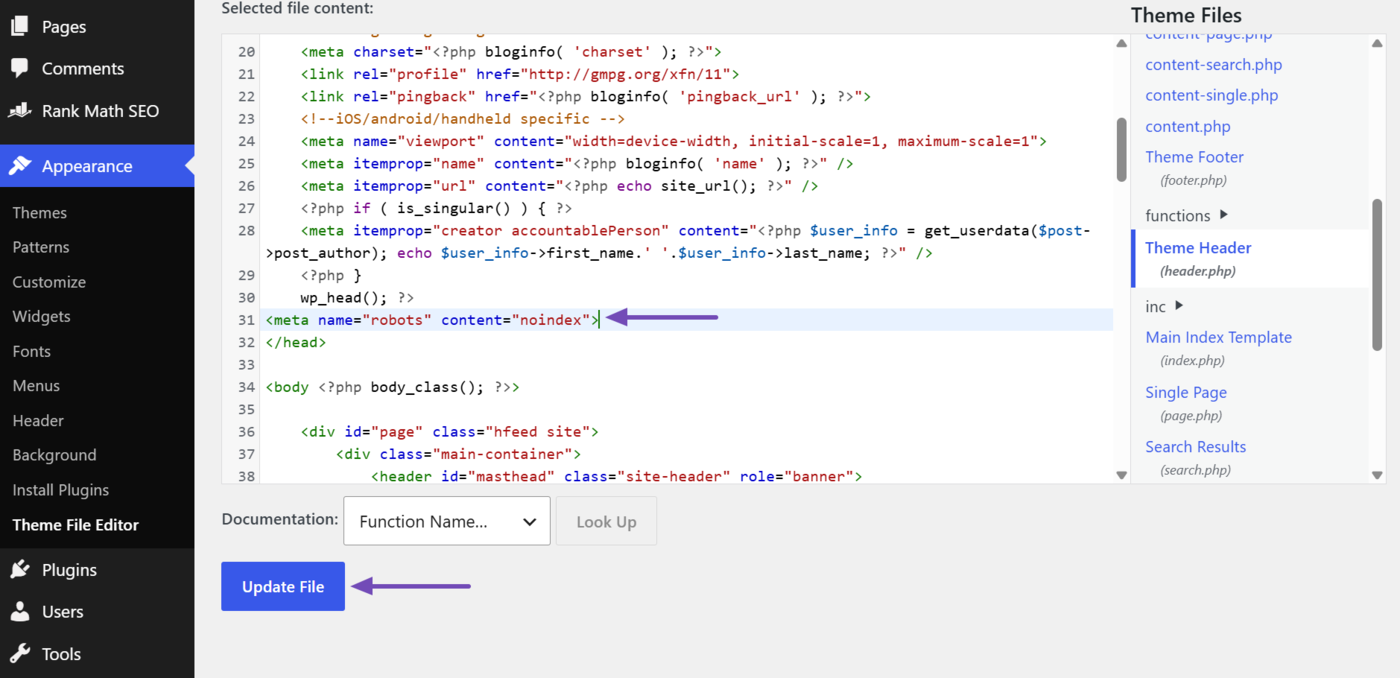
4 Noindex vs. Nofollow vs. Disallow
Noindex, nofollow, and disallow are three different but commonly confused directives. Here’s what each one does:
- Noindex: Tells search engines to keep a page out of search results
- Nofollow: Tells search engines not to follow a link or the links on a page
- Disallow: Tells search engines not to crawl a page or section of your site
We will now explain how the nofollow and disallow directives compare to the noindex tag and when to use them.
4.1 Noindex vs. Nofollow
Noindex tells search engines not to include a page in search results, while nofollow tells them not to follow a link or the links on a page.
The nofollow directive prevents links from passing authority (link equity) to the pages they point to. You can apply it to individual links or to an entire page, in which case every link on that page is treated as nofollow.
Here’s what the nofollow directive looks like when applied to an entire page:
<meta name="robots" content="nofollow">And here’s what it looks like when applied to a specific link. In this case, it is an attribute of the link:
<a href="https://example.com" rel="nofollow">Example website</a>The noindex and nofollow tags are independent of one another, so a page can carry both at the same time. If you want a page out of search results and want its links to stop passing authority, use:
<meta name="robots" content="noindex, nofollow">In summary, use noindex if you want a page out of search results, and use nofollow if you want a page to stay in search results but don’t want its links to pass authority.
4.2 Noindex vs. Disallow
Noindex tells search engines not to index a page, while disallow tells them not to crawl it. You add the noindex tag to the <head> section of a page’s code, whereas you add the disallow directive to your site’s robots.txt file.
For example, this disallow directive tells all search engines not to crawl a site:
User-agent: *
Disallow: /
Meanwhile, this disallow directive tells only Googlebot not to crawl a site:
User-agent: Googlebot
Disallow: /
Use disallow for pages you don’t want search engines to crawl, such as login and payment pages. In contrast, use noindex for pages you want search engines to crawl but not index, such as thin content pages and internal search results pages.
In summary, if your goal is to keep a page out of search results, use the noindex tag. However, if you do not want search engines to crawl a page at all, use the disallow directive.
Warning: Don’t use the noindex tag with the disallow directive. Search engines can’t crawl a disallowed page, so they will never see its noindex tag. As a result, the page may still be indexed if other pages link to it.
5 How to Check if a Page Is Noindexed
Setting a page to noindex is only half the job. You need to confirm it actually worked; otherwise, you may assume a page is hidden while Google keeps indexing it.
You can check if a page is noindexed using Rank Math’s SEO Analyzer, Google Search Console, or your browser’s page source.
5.1 Using the Rank Math SEO Analyzer
Rank Math’s free SEO Analyzer lets you quickly check whether a page is noindexed, without logging in to your WordPress dashboard or Google Search Console.
To get started, head to the Rank Math SEO Analyzer. Then enter the page’s URL and click ANALYZE.
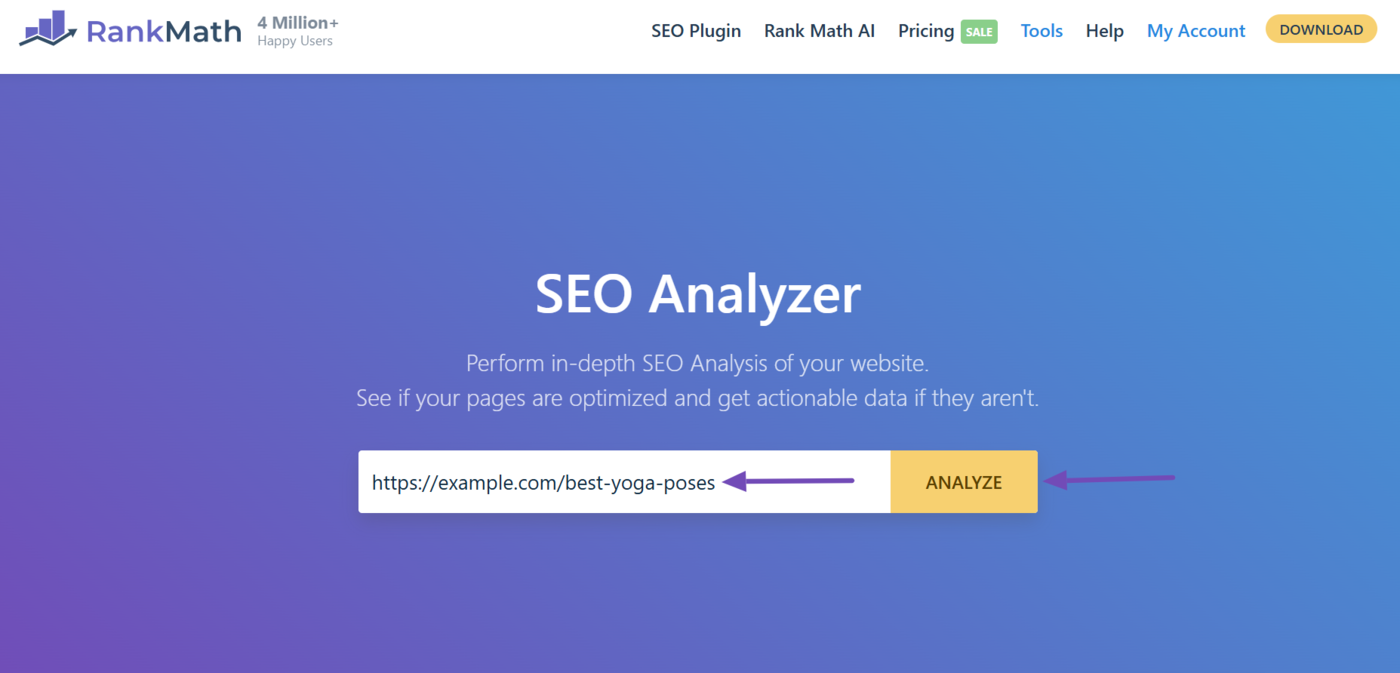
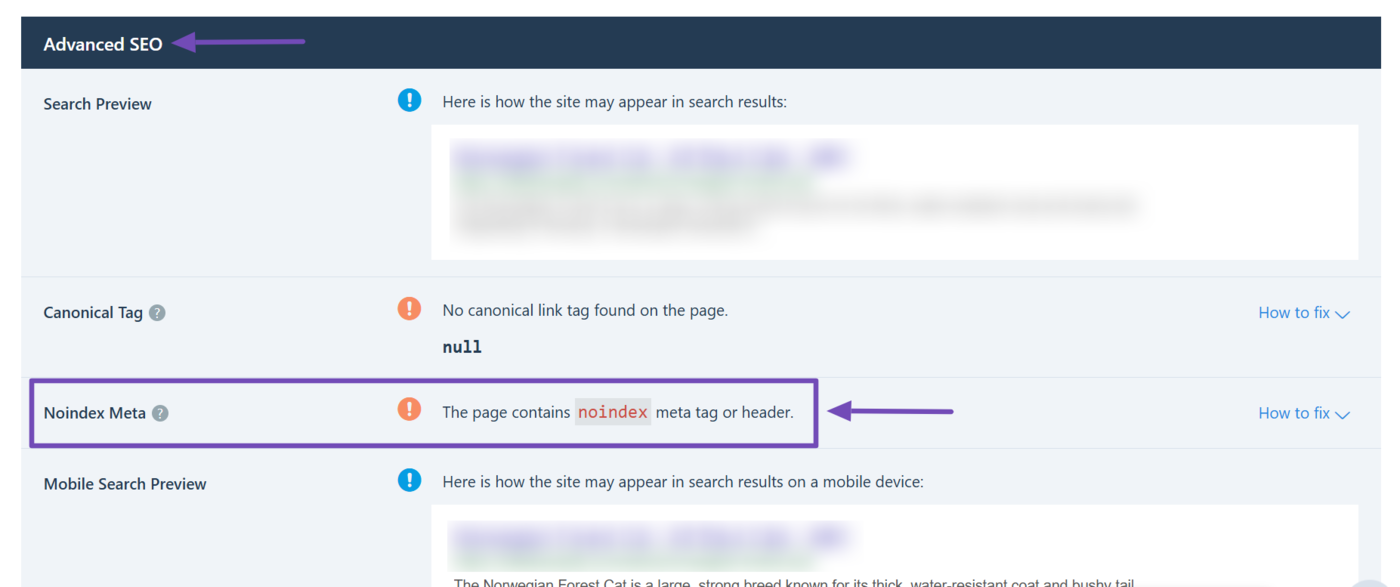
Rank Math will analyze the page and display the results.
Scroll down to the Advanced SEO section and find the Noindex Meta report. If the page is noindexed, it will contain a “The page contains noindex meta tag or header.” message.
5.2 Using Google Search Console
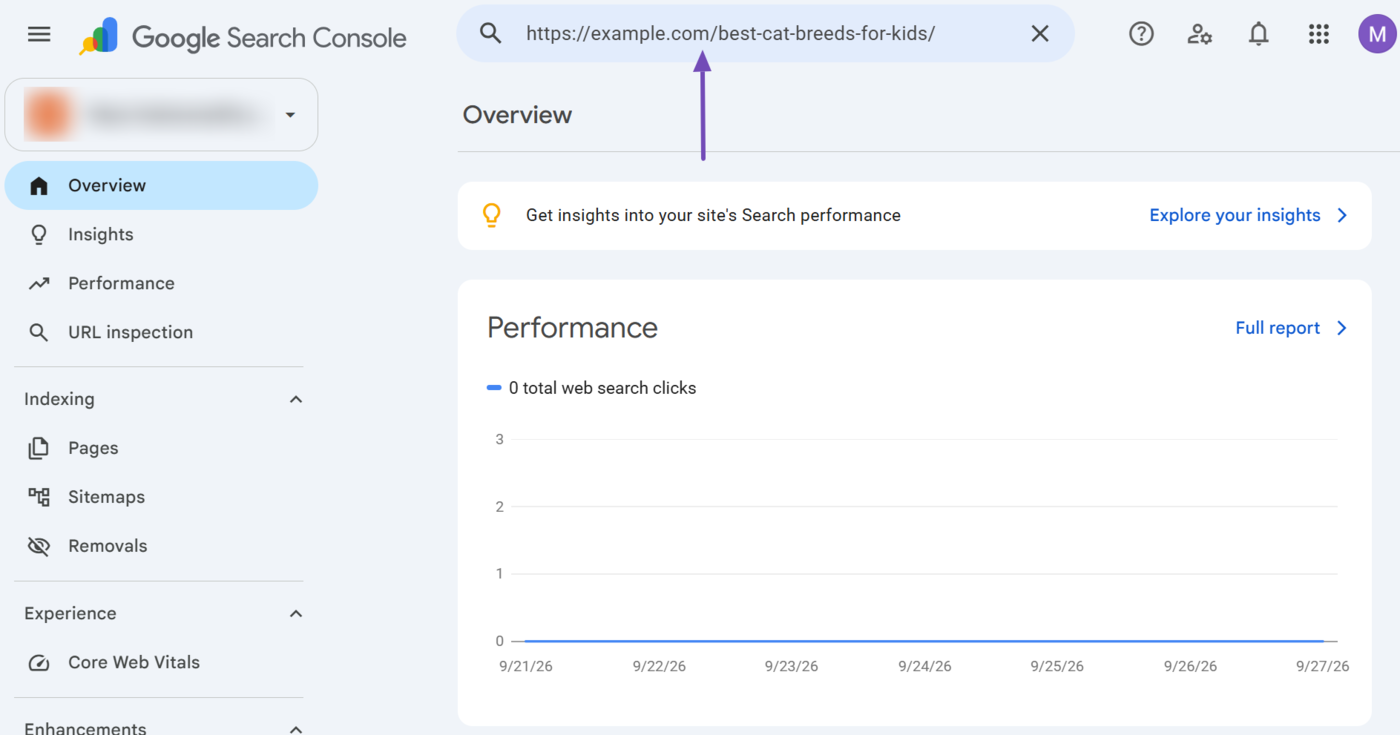
Google Search Console lets you check the noindex status of a page exactly as Google sees it.
To get started, head to the Google Search Console account connected to your site. Then enter the page’s URL into the URL inspection tool, as shown below.
Next, click TEST LIVE URL.
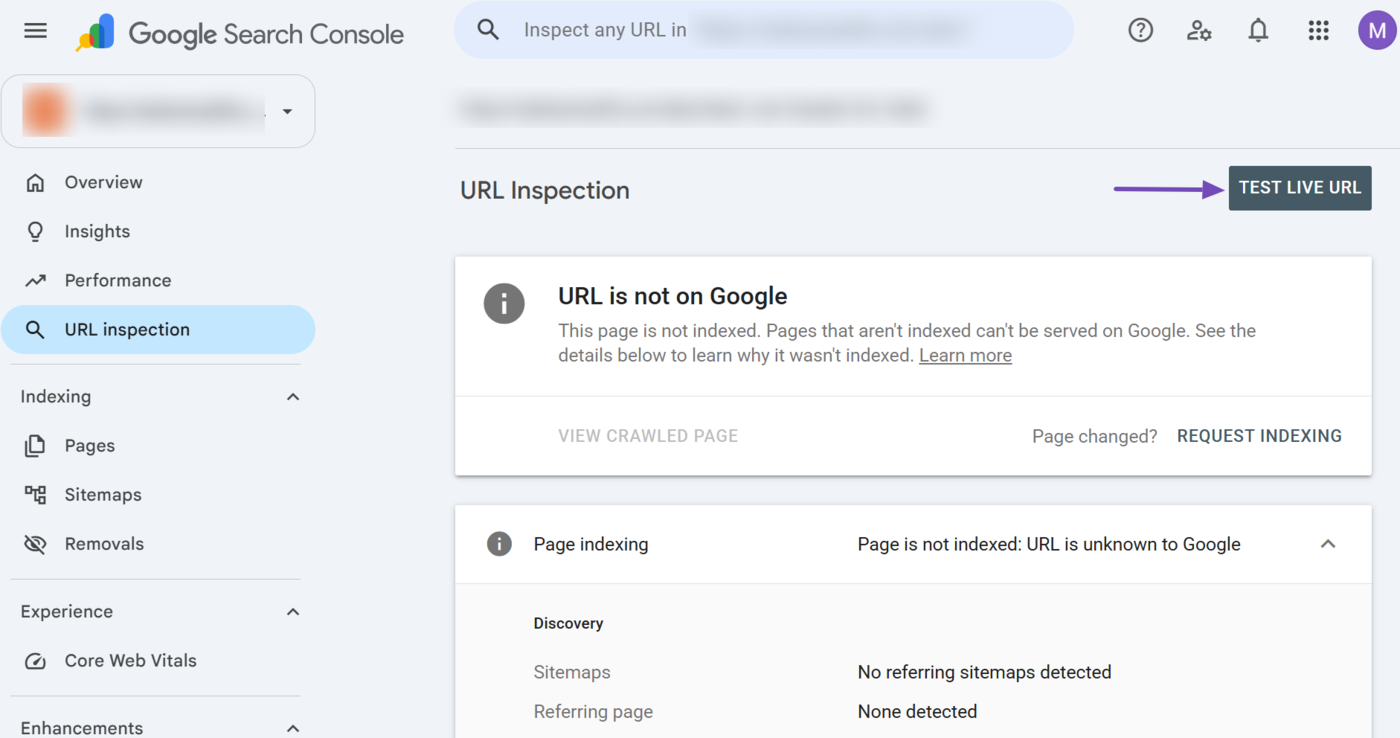
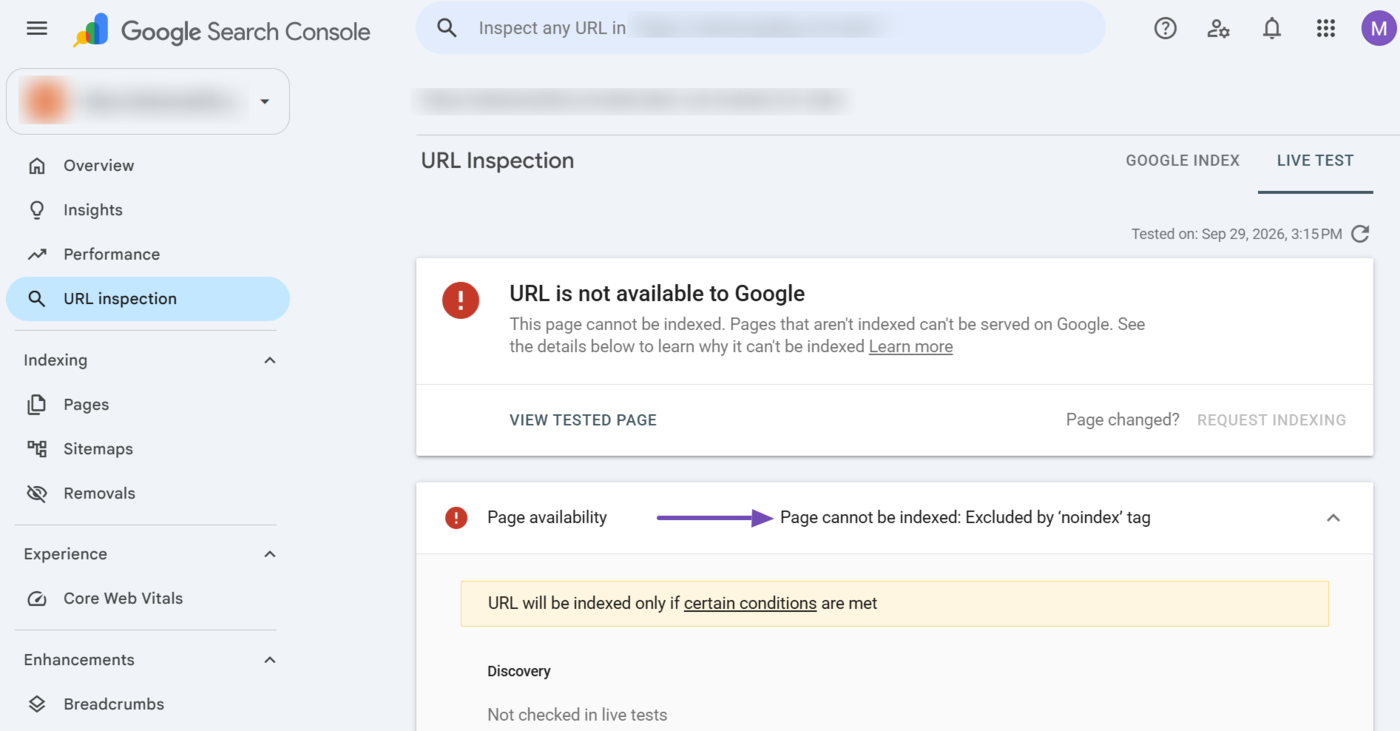
Google will run a live test on the URL. If the page contains a noindex tag, the report will return a “Page cannot be indexed: Excluded by ‘noindex’ tag” status, as shown below.
5.3 Using Your Browser’s Page Source
You can also confirm a page is noindexed by checking its source code. This method is instant and doesn’t require any third-party tool.
Note: This method won’t detect noindex applied as an X-Robots-Tag HTTP header. To check for that, use Rank Math’s SEO Analyzer or Google Search Console.
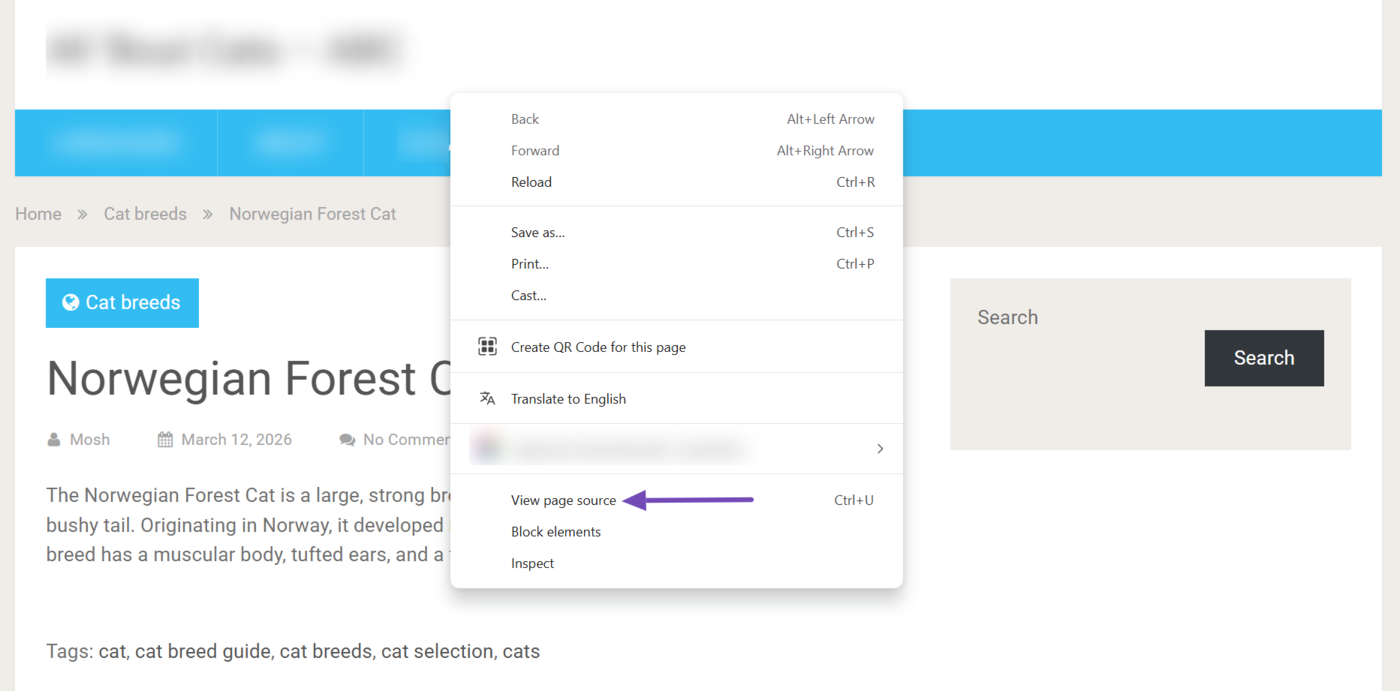
To get started, open the page in your browser. Then, right-click anywhere on the page and select View page source.
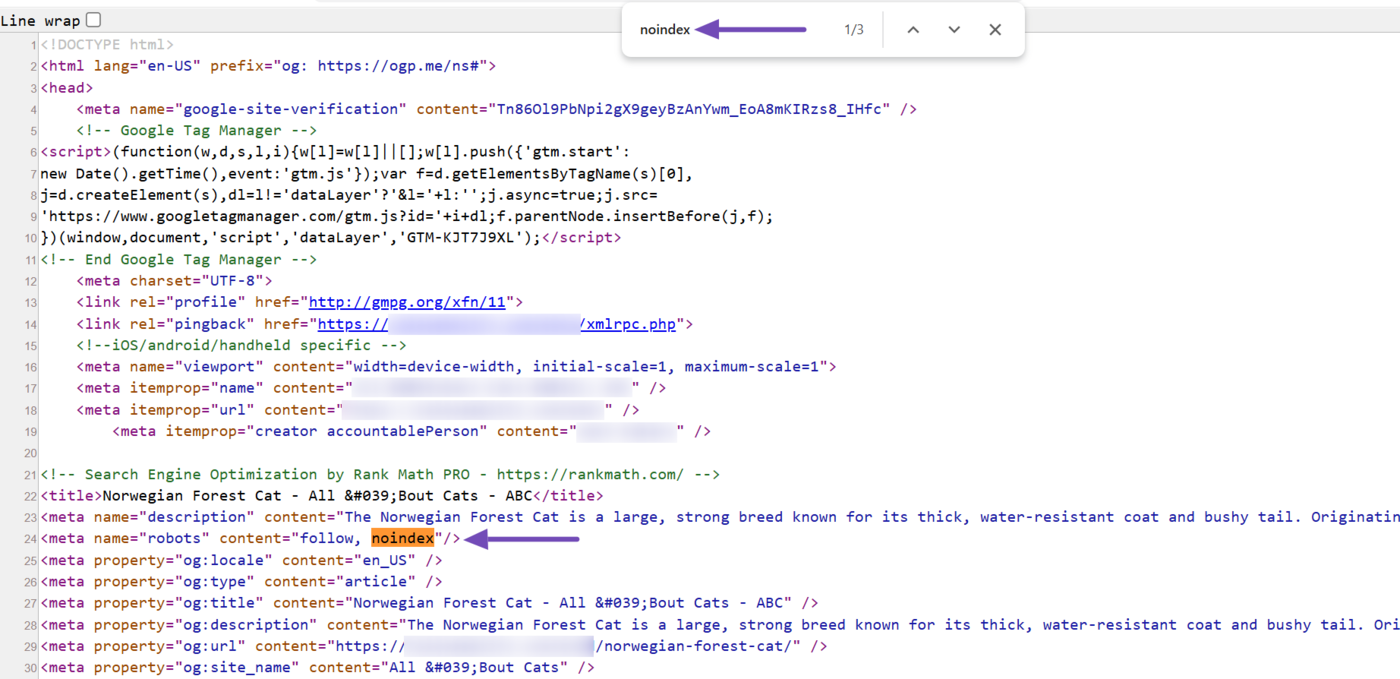
Next, press Ctrl + F and search for “noindex.”
If the page includes a noindex tag, it will be highlighted, as shown below. If noindex is not highlighted, then the page does not contain the tag.
That is all you need to know about adding the noindex tag to your WordPress site. If you have any questions about using Rank Math to do it, you’re always welcome to contact our dedicated support team, who are available 24/7, 365 days a year.