Do you want to make your WordPress site more powerful without touching a single line of code? Plugins are the key.
With just a few clicks, you can add new features, improve your SEO, speed up your site, or even give it a fresh new look.
Initially, I thought installing plugins might be complicated, but it’s actually one of the easiest ways to customize your site. And now, I’ll walk you through the exact steps so you can do it too.
In this post, you’ll learn how to install a WordPress plugin step by step and make sure it works smoothly on your website.
Table Of Contents
1 Importance of WordPress Plugins for Website Functionality
If you’ve ever wished your WordPress site could do more without diving into code, plugins are your best companion. They let you add new features, boost performance, and customize your site with just a few clicks.
Think about it: want to rank higher on Google? An SEO plugin can help. Worried about hackers? A security plugin has your back. Need your site to load faster? Performance plugins can speed things up by caching files and optimizing images.
And that’s just the start. With thousands of plugins available, you can personalize your site however you like, add sliders, contact forms, live chat, or anything else that makes your visitors’ experience better.
The key, though, is to choose wisely. Installing too many plugins, or ones that aren’t well-coded, can slow your site down. So, focus on quality over quantity.
Now that you understand how powerful plugins are, let’s look at the easiest ways to install them on your WordPress site.
2 How to Install a WordPress Plugin
We’ll now discuss how to install a WordPress plugin on your website.
2.1 Install a WordPress Plugin Using Search
The easiest way to install a WordPress plugin is by using the built-in plugin search feature.
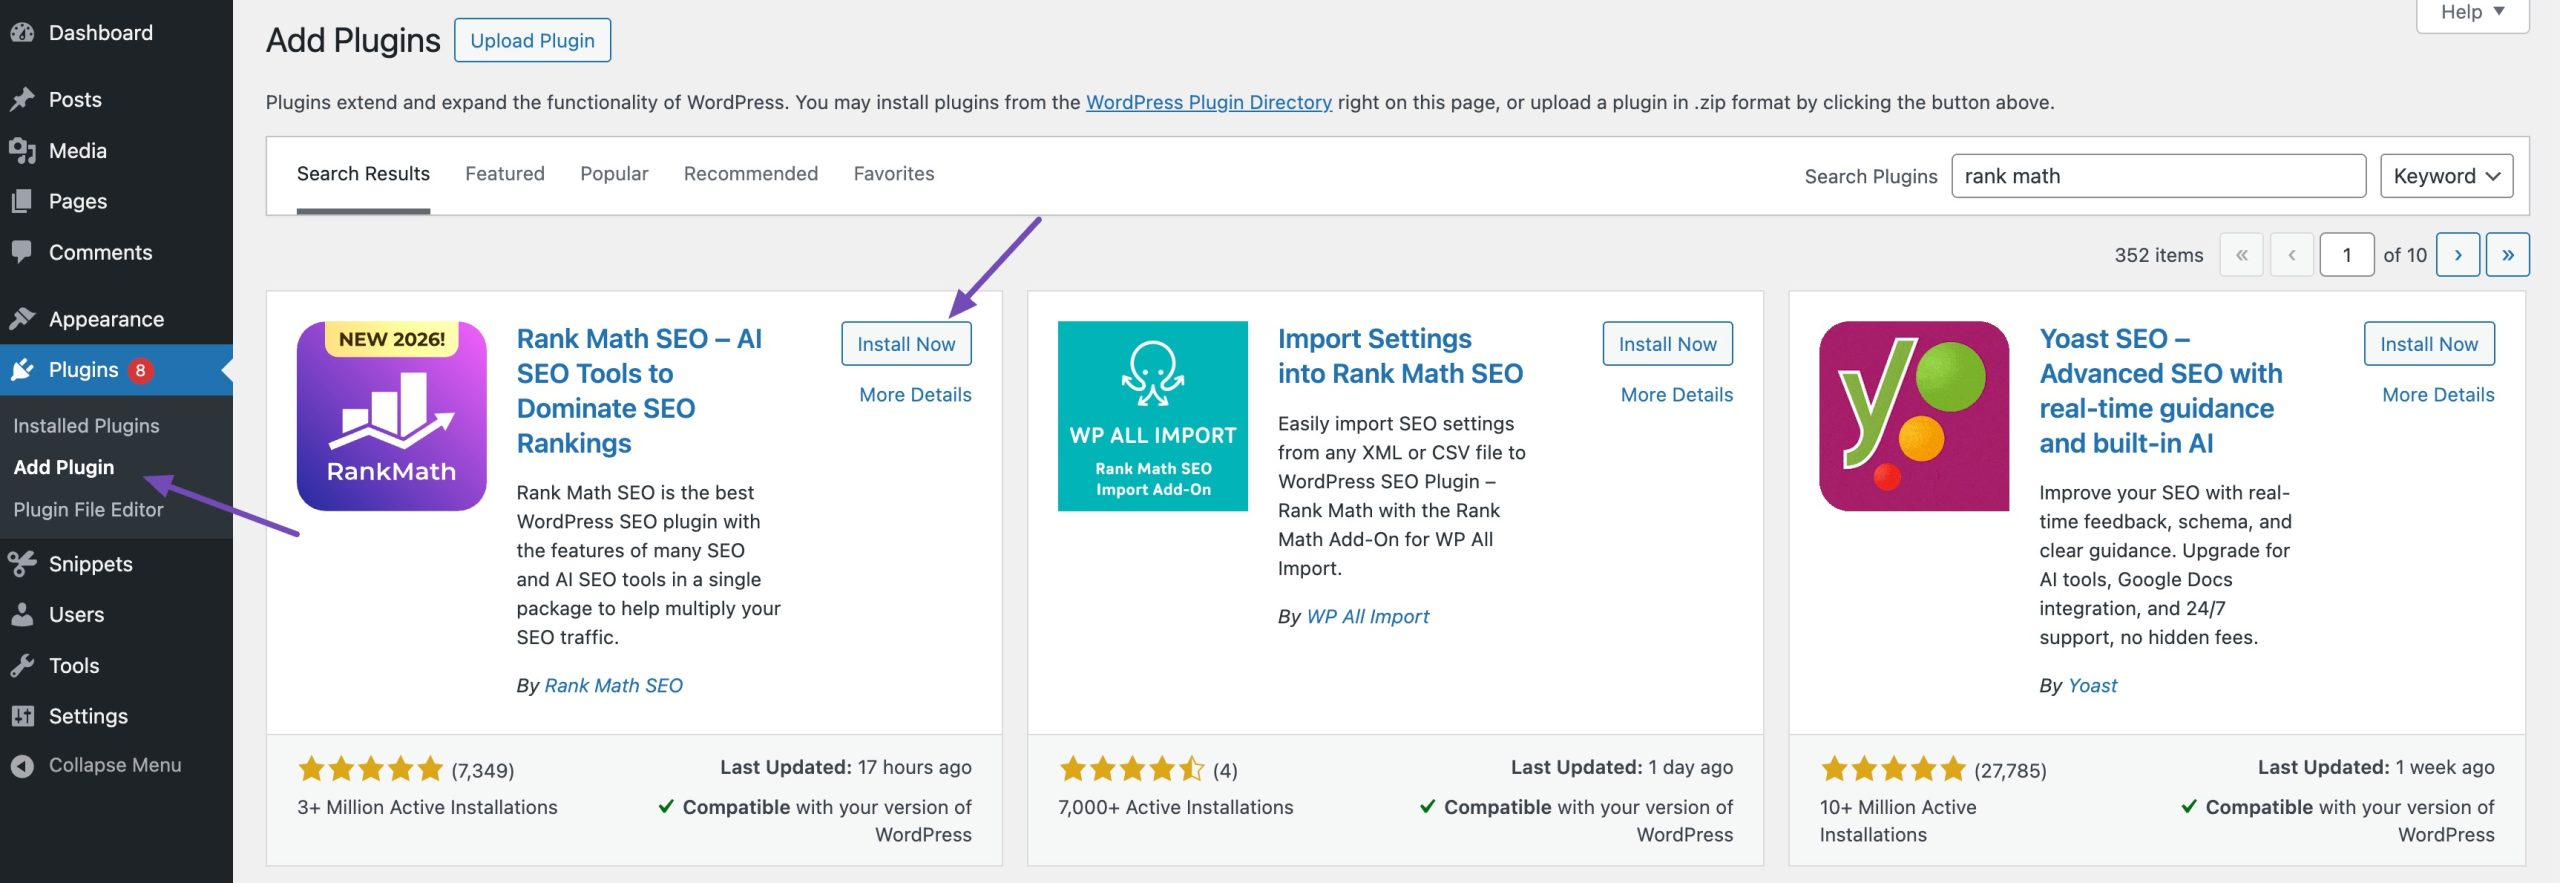
First, navigate to the Plugins → Add Plugin page from your WordPress dashboard.
Next, use the search bar in the top-right corner to find the plugin you need. A list of matching plugins will appear. Once you’ve located the plugin, click Install Now. You can also click the plugin name to view more details about it. A WordPress plugin will now be installed on your site, but it will not work unless you activate it.
Once the installation is complete, click the Activate button to activate the plugin on your site.
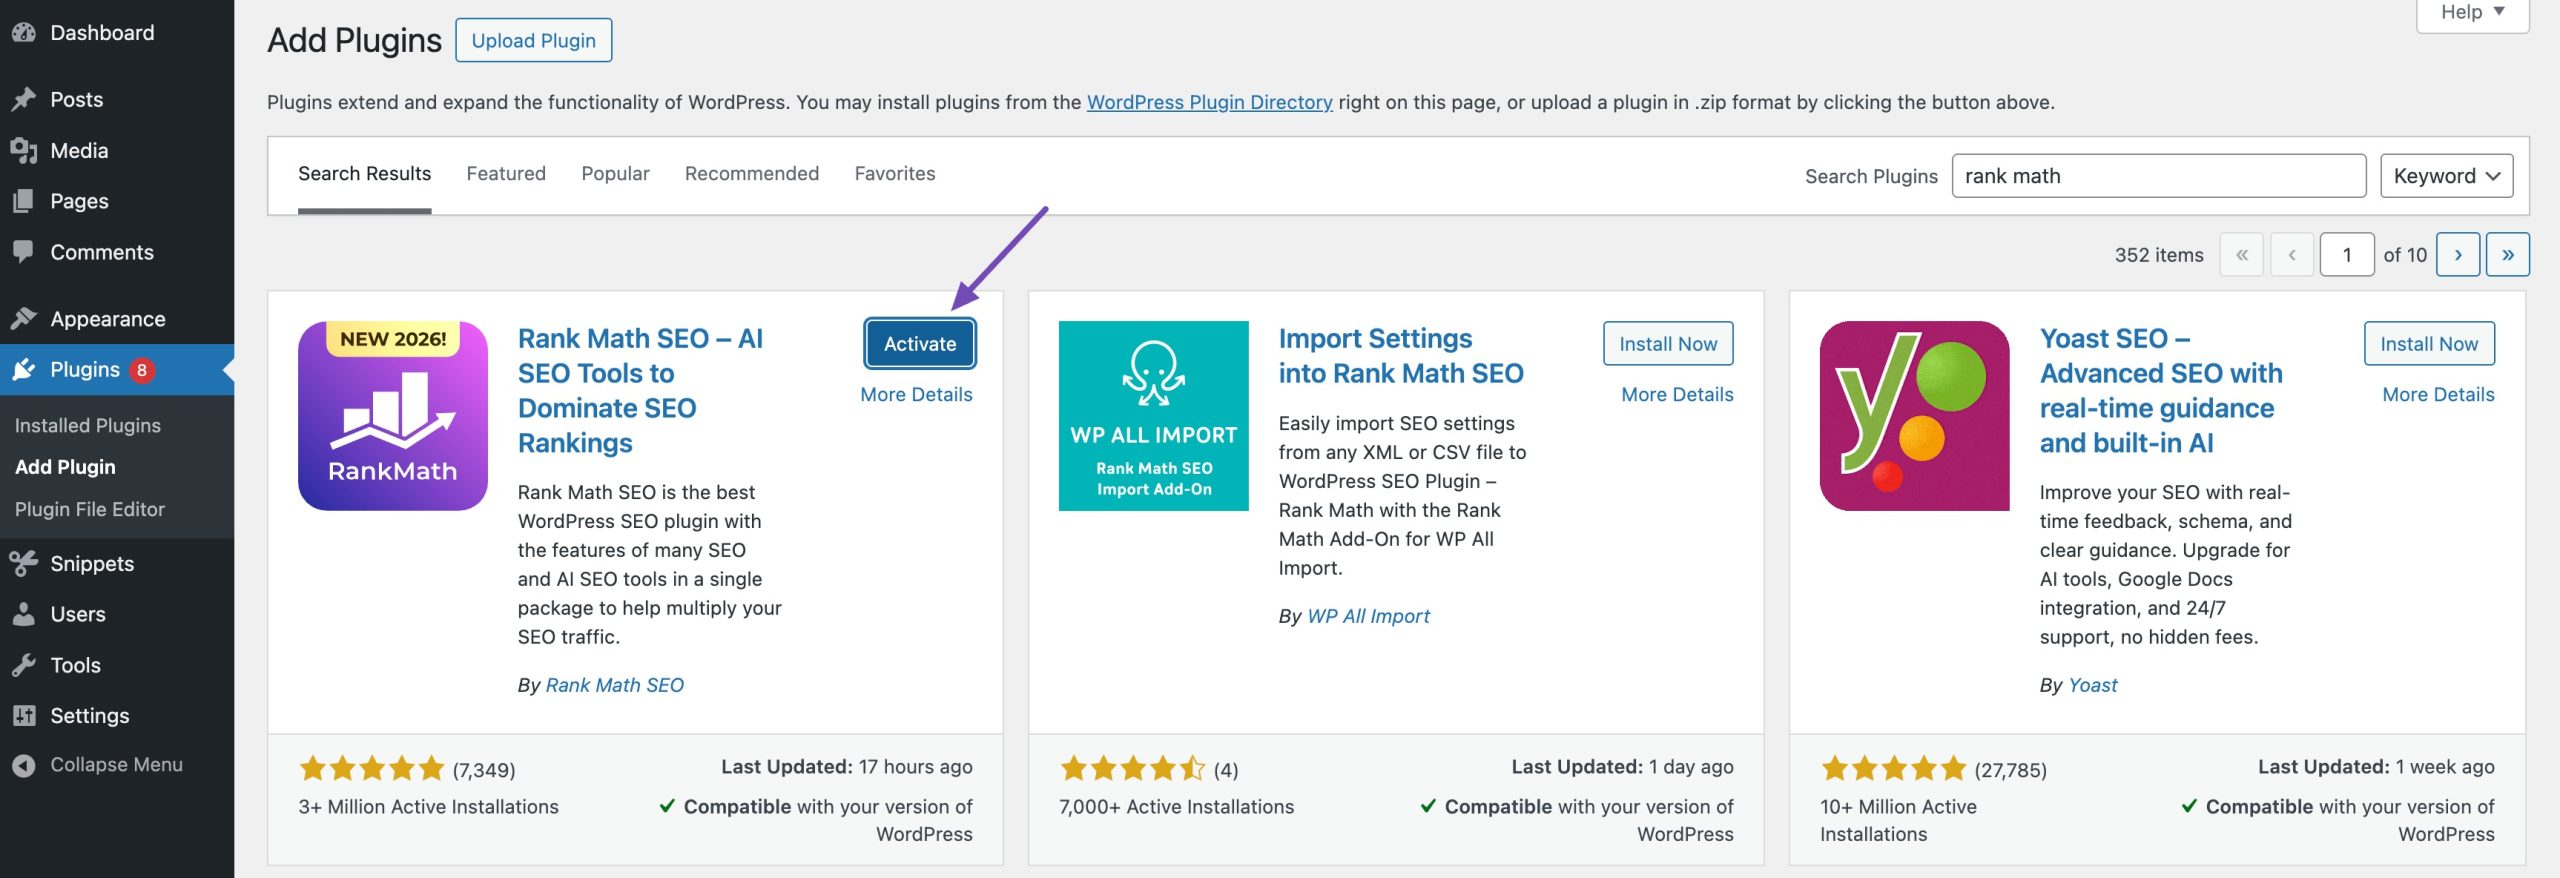
Once the plugin is activated, your plugin is ready to use! You can now access its settings and customize it to fit your needs.
2.2 Manually Install a WordPress Plugin Using the Admin Plugin Upload
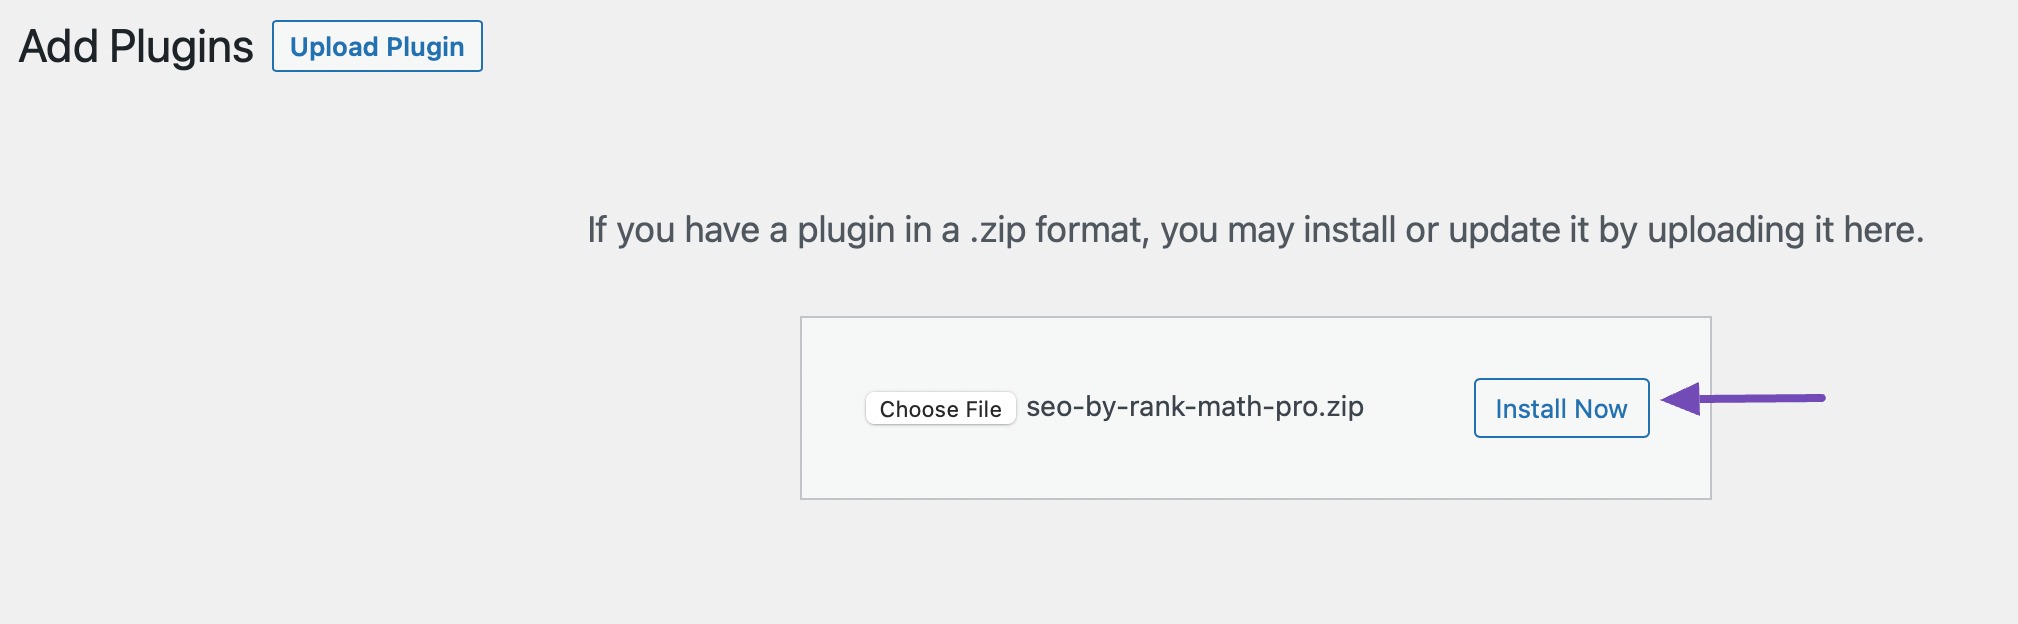
While the plugin search method is the easiest way to install a WordPress plugin, there are times when you may need to upload one manually. This is especially useful for third-party or premium plugins unavailable in the WordPress Plugin Directory.
To manually install a plugin, navigate to Plugins → Add Plugin from your WordPress dashboard. At the top of the page, click the Upload Plugin button. Next, click Choose file and select the plugin’s zip file from your computer.
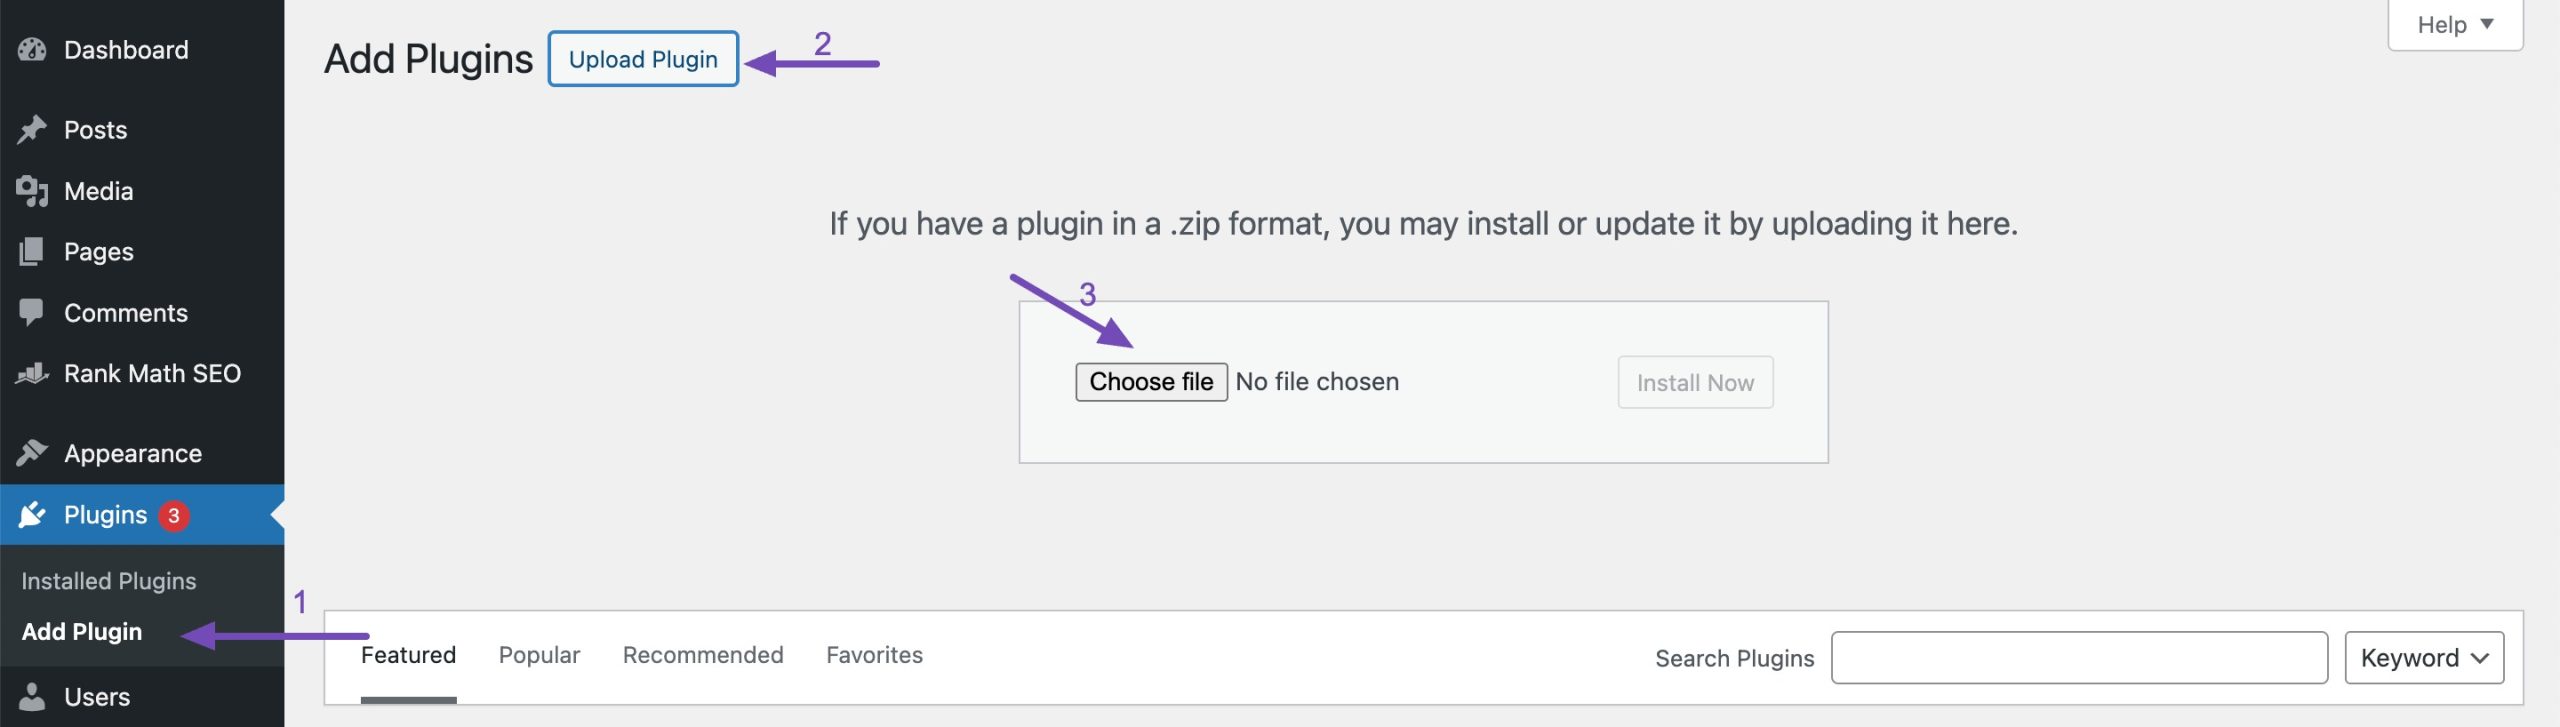
Click Install Now to install the plugin manually.
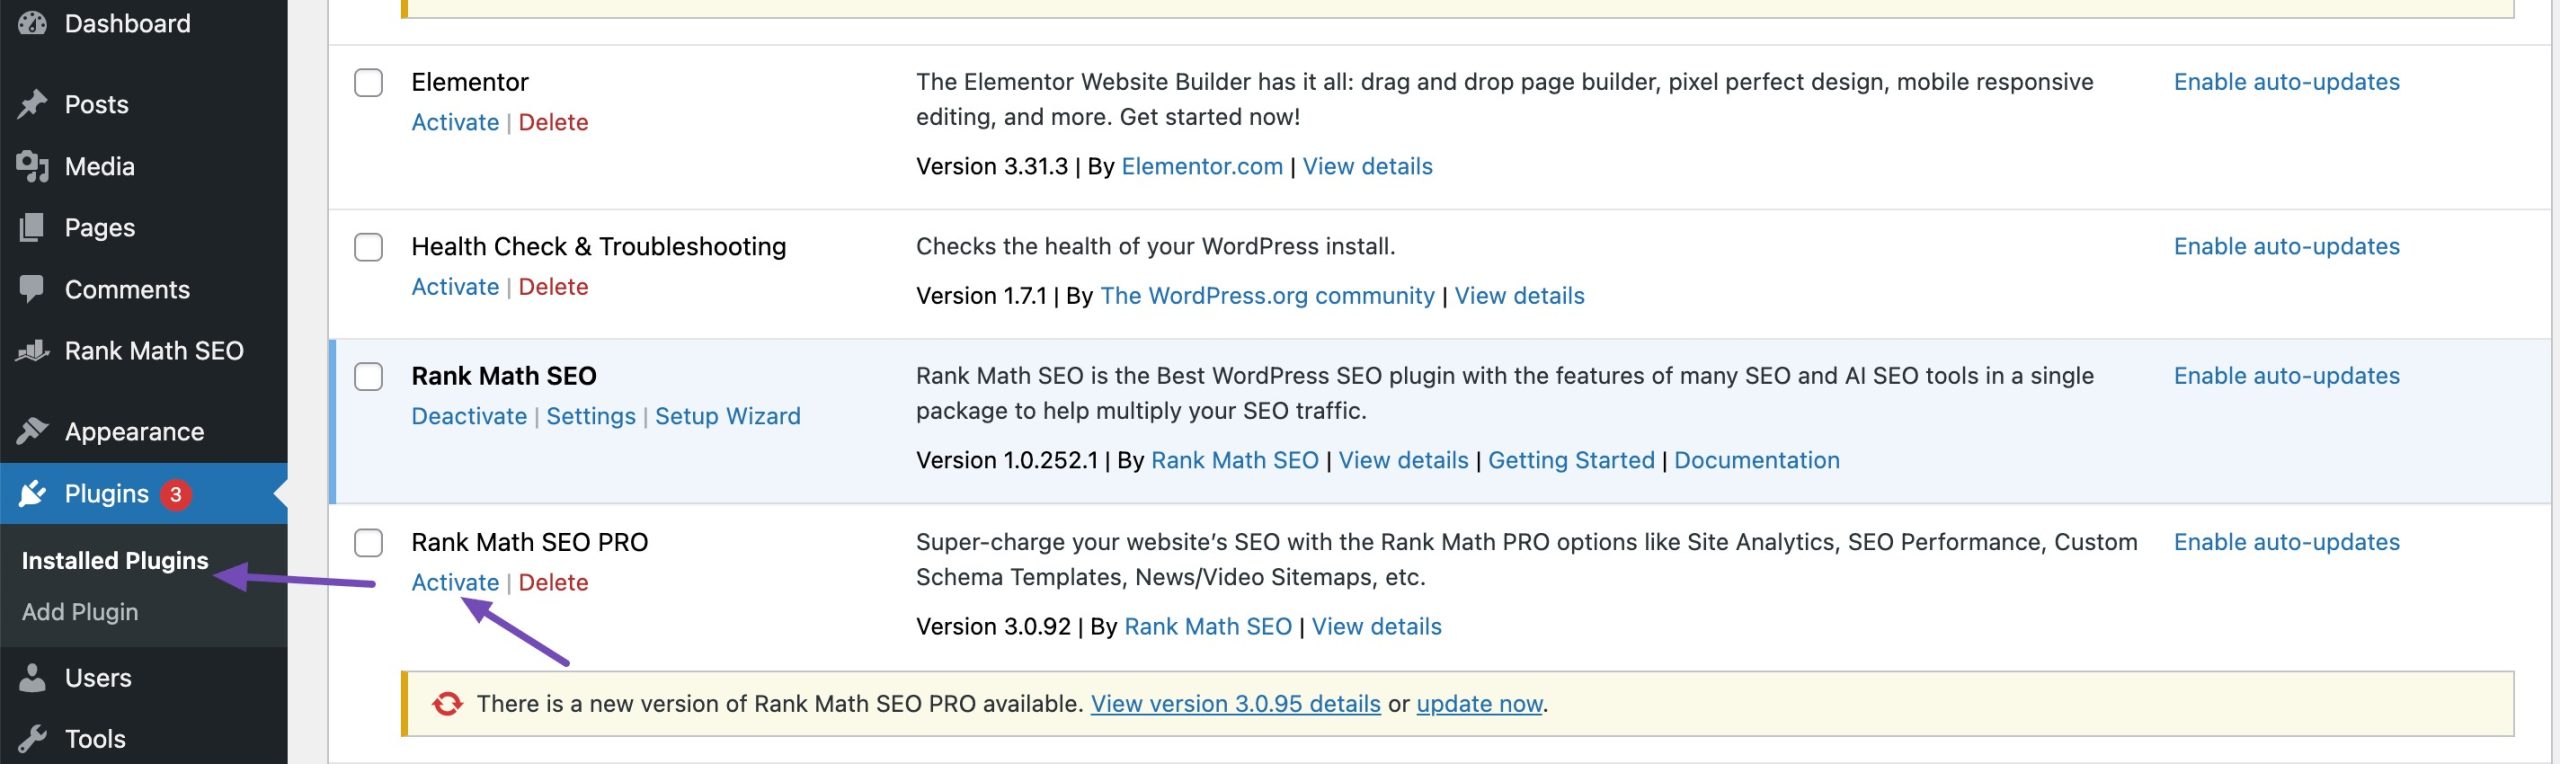
WordPress will upload and install the plugin automatically. When the installation is complete, you’ll see a success message.
Finally, click the Activate Plugin button to enable it on your website. Once activated, you can access the plugin’s settings and use its features.

2.3 Manually Install a WordPress Plugin Using FTP
If you’re facing issues installing a plugin through the WordPress dashboard, using FTP (File Transfer Protocol) is an alternative method. This approach allows you to upload plugin files directly to your web server.
Start by downloading the plugin ZIP file from a trusted source. Make sure it is compatible with your WordPress version. Next, extract the ZIP file on your computer; this will create a folder containing the plugin files.
Open your FTP client (such as FileZilla) and connect to your web server using your FTP credentials, which typically include the server address, username, password, and port (usually 21).
Once connected, navigate to the /wp-content/plugins/ folder on your website. Then, upload the extracted plugin folder by either clicking the Upload button or dragging the folder into the plugin’s directory. This will begin the file transfer process.

The FTP client will transfer the plugin files to your server. Wait until the transfer is complete. It may take a few moments, depending on the size of the plugin.
Once the upload is finished, go to your WordPress dashboard. Navigate to Plugins → Installed Plugins. You should see the newly uploaded plugin listed there. Click the Activate link to enable the plugin’s functionality.
That’s it! You’ve successfully installed a WordPress plugin using FTP. Remember to check the plugin settings and configure it as needed via the WordPress dashboard. Additionally, keep your plugins updated to ensure security and compatibility with your WordPress version.
2.4 Install a WordPress Plugin Using WP-CLI
Another efficient way to install a WordPress plugin is by using WP-CLI (WordPress Command Line Interface). This method is especially useful for developers who prefer command-line operations over the WordPress dashboard.
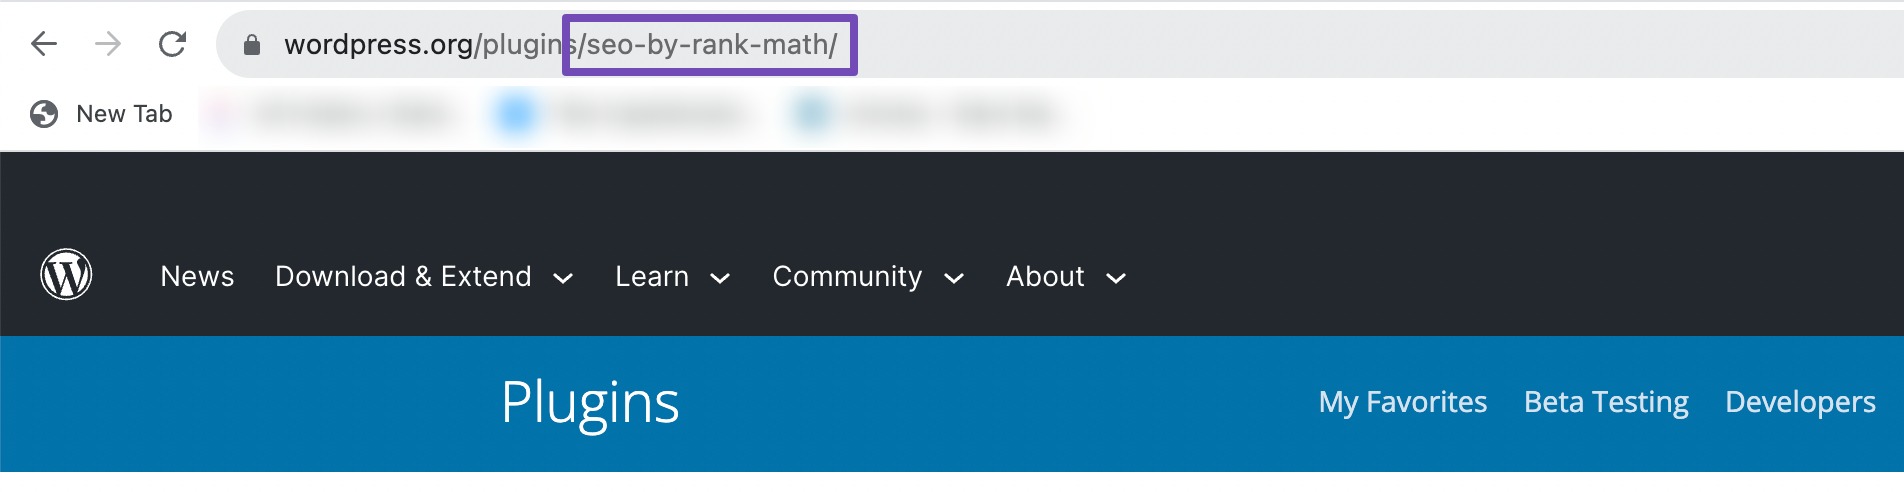
To get started, launch WP-CLI and enter the appropriate command to install a plugin. You’ll need to know the exact plugin name, which corresponds to its folder name in the WordPress Plugin Repository or Git.
For instance, in this example, the name is seo-by-rankmath.
So, in the command line, you’ll need to enter the following:
wp plugin install seo-by-rankmath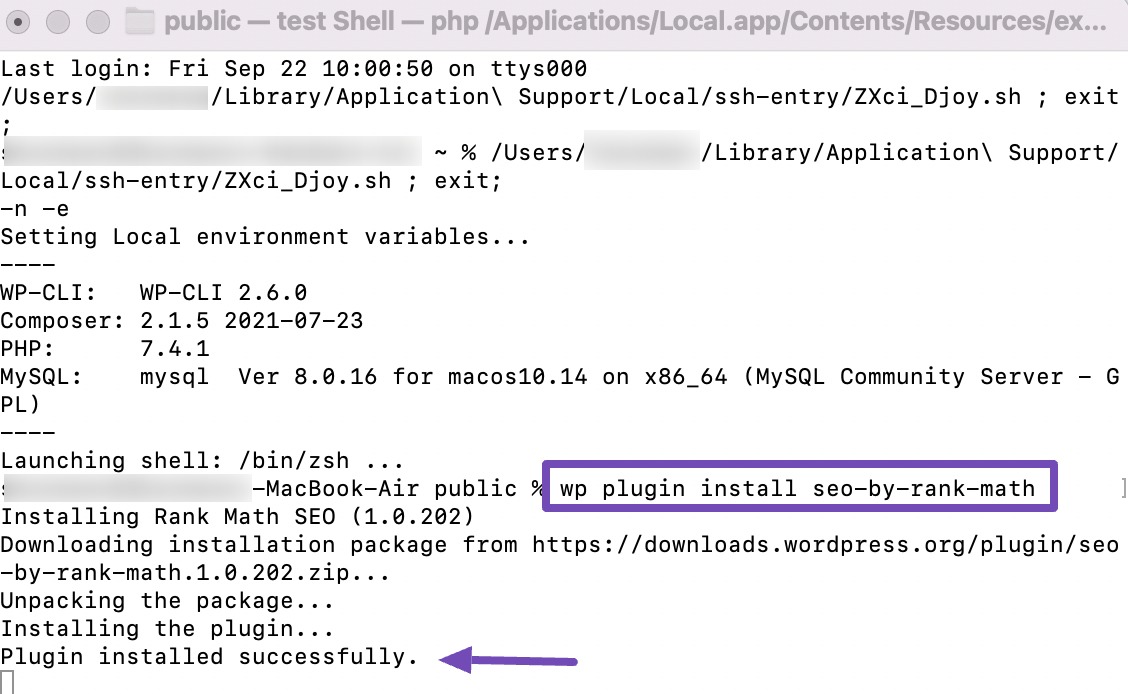
To activate the plugin, run the below command:
wp plugin activate seo-by-rankmath
This command downloads and activates the plugin instantly, making the installation process quick and easy.
3 Frequently Asked Questions
How do I choose the right plugin for my website?
Consider factors like compatibility with your WordPress version, user reviews, the developer’s reputation, update frequency, and whether the plugin meets your needs.
What should I do if a plugin conflicts with my theme or other plugins?
If you encounter conflicts, start by deactivating the problematic plugin. Check if the issue persists. If not, individually reactivate other plugins and your theme to identify the conflicting element. You can seek help from the plugin’s support or the WordPress community.
Are there any risks involved in installing WordPress plugins?
While most plugins are safe, there is a risk associated with poorly coded or outdated plugins. These can potentially cause conflicts, security vulnerabilities, or slow down your website. Researching and choosing plugins wisely and regularly updating them to avoid risks is important.
Can I install a plugin from a third-party source?
Yes, you can manually install a WordPress plugin from a third-party source by uploading the plugin ZIP file through the WordPress dashboard.
Navigate to Plugins → Add Plugin → Upload Plugin.
What should I do before I install a WordPress plugin?
Before installing a plugin, it’s essential to back up your website, especially if the plugin may have a significant impact. This ensures you can revert in case of issues.
How do I update a WordPress plugin?
To update a plugin, go to Plugins in your dashboard. If updates are available, click Update Now next to each plugin.
Can I install multiple plugins at once?
WordPress allows you to install multiple plugins at once. Select the plugins you want to install and then choose the Install option.
4 Wrapping It Up
By now, you can see just how powerful WordPress plugins are when it comes to customizing and improving your website. Plugins give you the flexibility to build a site that truly fits your needs, without touching a line of code.
I’ve walked you through the importance of choosing plugins wisely and shown you how simple it is to install them step by step. Now it’s your turn, start experimenting with the right plugins, and keep your site running smoothly.
Remember, the right plugins don’t just add functionality, they help you create a site that grows with your goals.
If you like this post, let us know by tweeting @rankmathseo.