What Is Critical Rendering Path?
The critical rendering path is the sequence of steps the browser follows to convert HTML, CSS, and JavaScript code into a visible webpage. In other words, it refers to the steps the browser takes to convert code like this:
<!DOCTYPE html>
<html lang="en">
<head>
  <meta charset="UTF-8" />
  <meta name="viewport" content="width=device-width, initial-scale=1.0" />
  <title>Adorable Group Of Dogs Seen Playing With A Balloon</title>
</head>

<body>
  <header>
    <h1>Adorable Group Of Dogs Seen Playing With A Balloon</h1>
  </header>

    <video width="640" height="360" controls>
      <source src="https://yourdomain.com/dogs-playing-with-a-balloon.mp4" type="video/mp4">
    </video>

    <p>This is just like watching toddlers playing around! This group of cute dogs was seen playing with a balloon!</p>
</body>
</html>
Into a visible and rendered webpage like this:

Rendering itself is the process by which the browser converts HTML, CSS, and JavaScript code into the visual content webpage that you see. The exact steps the browser follows during this process are collectively referred to as the critical rendering path.
Without completing the critical rendering path, the browser cannot display the webpage, which means the user will see a blank screen.
How the Critical Rendering Path Works
The critical rendering path consists of a series of steps, starting with building the DOM and CSSOM, executing relevant JavaScript on them, and turning them into the visible webpage that we see. We will explain it in more detail below.
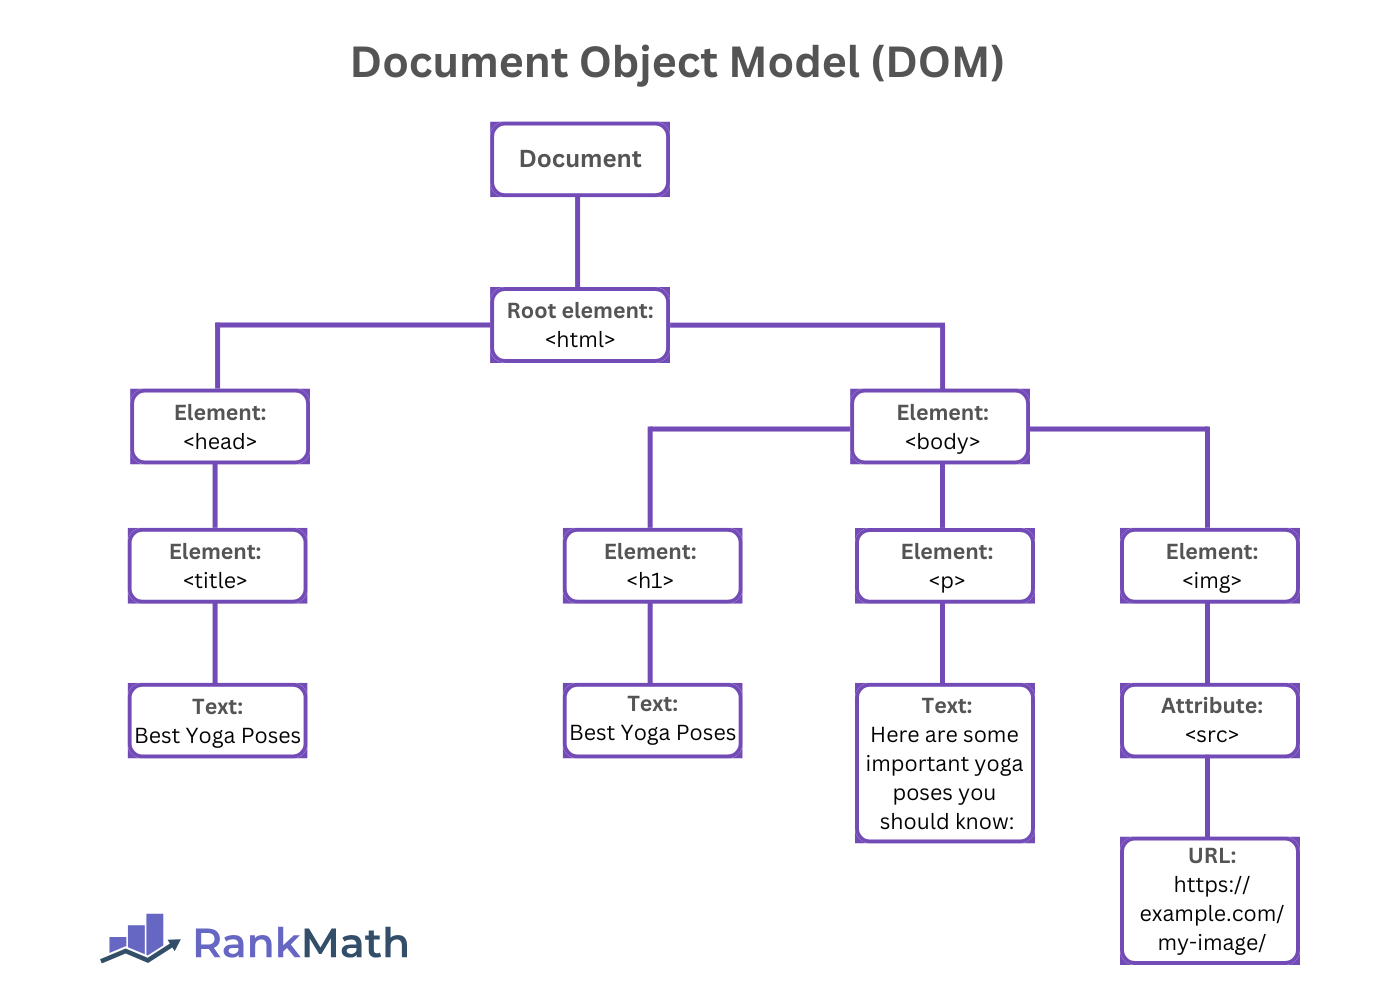
1 Parse the HTML Code to Build the DOM
The first step is to parse the HTML to build the DOM. Parsing refers to the process of reading the HTML code and converting it into a structured format that the browser can understand and manipulate.
The browser starts reading and parsing the HTML file from top to bottom. Therefore, the higher an HTML code is positioned, the earlier it is read and parsed.
On the other hand, the DOM (short for Document Object Model) is a tree-like structure that represents all the HTML elements on the page.
Each HTML tag, such as the <title>, <p>, y <img> tags will become individual nodes on this tree. That way, the browser can understand the relationship between the elements in the HTML code.
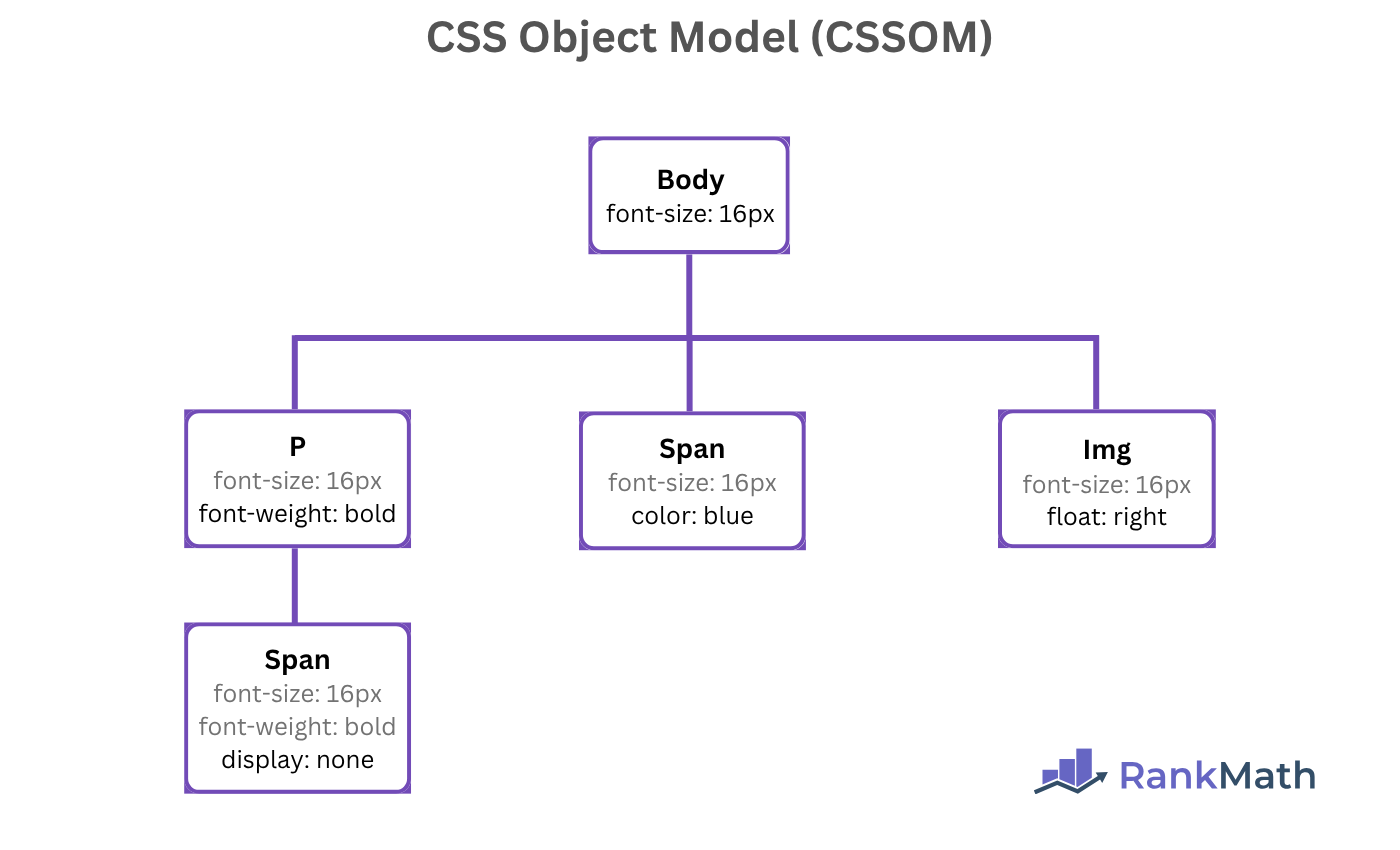
2 Parse the CSS Code to Build the CSSOM
While parsing the HTML to build the DOM, the browser also begins parsing the CSS files to build the CSSOM.
The CSS (Cascading Style Sheets) code defines the visual style and layout of the webpage. So, it controls the colors, fonts, spacing, and other elements that determine how the text, media, and other content on the page appear to visitors.
CSSOM, for its part, stands for CSS Object Model and is essentially the CSS version of the DOM. The browser creates another DOM-like tree (this time, for CSS) that maps CSS rules to the elements they apply to.
3 Execute JavaScript to Modify the DOM and CSSOM
At some point during the loading process, the browser pauses parsing the HTML and CSS to download and execute JavaScript files. These scripts are then run to modify the DOM or CSSOM, adding, removing, or changing elements as needed.
This step is essential for websites that rely on JavaScript for dynamic content or interactivity. However, it is not required for static sites that do not depend on JavaScript to render their content.
Once done, the browser will return to parsing the HTML and CSS code into the DOM and CSSOM.
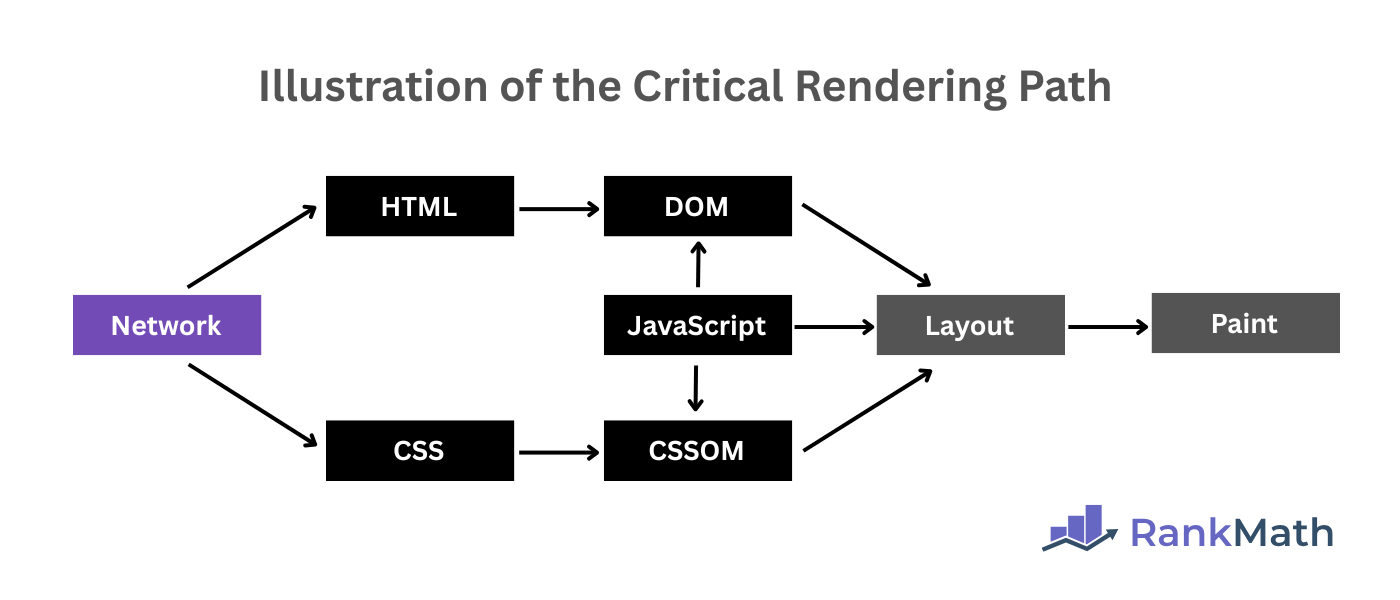
4 Combine the DOM and CSSOM into the Render Tree
The browser then merges the DOM and CSSOM to create a new structure, known as the render tree.
This render tree only contains rendered HTML and CSS content that will be displayed to the user. This means elements like the <head> tag of the HTML code are not included since they will not be shown to the user.
5 Calculate the Layout
Once the render tree is complete, the browser will calculate the layout of the webpage using the render tree. That is, it calculates the position of the elements on the webpage and determines where each element should appear.
6 Paint Elements to the Screen
The browser starts painting the page after calculating the layout. That is, the browser starts to fill in pixels on the viewer’s screen with the elements on the webpage. That includes the text, colors, images, and borders.
This step is not definite and can be repeated if elements on the page change dynamically, such as during animations or when the user interacts with the webpage.
In the case of complex pages, the browser may split the elements into layers. It then combines these layers in the correct order to produce the final image shown on screen. This improves performance and ensures the webpage paints correctly.
How to Optimize for the Critical Rendering Path
The critical rendering path has a significant impact on your experiencia del usuario y page load speed. In fact, multiple page experience metrics, such as Elementos vitales web básicos, are directly influenced by the efficiency of the critical rendering path.
Page experience itself is a factor de clasificación. Therefore, it is crucial to optimize your critical rendering path to ensure it does not negatively impact your user experience and search engine rankings.
1 Minify Your Code
Minificación is the process of reducing and optimizing code to improve its efficiency. This includes steps such as removing redundant code and unnecessary characters, including spaces, comments, and line breaks.
This reduces the file size and speeds up the time it takes to be delivered to the browser, which ultimately improves your page speed and user experience.
2 Inline Critical CSS Code
Place critical CSS code within the HTML code. This is particularly useful for above the fold content, as it reduces the number of HTTP requests the browser must make before applying critical styles and layout on the page.
Meanwhile, non-critical styles, such as those used for below the fold content, can remain in the CSS file, where they will be loaded separately.
3 Defer Non-Essential Scripts
JavaScript can block the rendering of a webpage. You can reduce the chances of that happening by adding the defer o asíncrono attributes to non-essential JavaScript files.
This delays the execution of the scripts and ensures the browser can quickly return to parsing the HTML and CSS codes. The deferred scripts can then be executed after the HTML and CSS codes have been completely parsed.
4 Lazy-Load Assets
Lazy loading is the practice of delaying the loading of images, videos, and other non-essential resources until they are needed. For example, you can lazy load images that appear below the fold so that they only load when the user scrolls down.
This reduces initial page load time and saves bandwidth. It also lowers the amount of work the browser must perform during the critical rendering path.
5 Preload Essential Code
Preloading rel=preload is an instruction that tells the browser to fetch key resources early in the loading process. It is useful for fonts, important images, or scripts that will be needed immediately after the initial render.
Ensure to include rel=preload en your code. This helps prevent delays after rendering and ensures the browser can quickly access resources when needed.