Rank Math „Titel und Meta“ Optionen und Einstellungen
In diesem Wissensdatenbank-Artikel werden wir Rank Maths behandeln Titel- und Meta-Einstellungen. Wie Sie wahrscheinlich wissen, spielen Titel und Meta eine wichtige Rolle dabei, wie Suchmaschinen Ihre Inhalte verstehen. Daher ist es wichtig, dass sie optimiert werden. Die Titel- und Metafunktionen von Rank Math helfen Ihnen, die Titel aller Ihrer Beiträge zu optimieren, unabhängig von der Größe Ihrer Website.
Lass uns anfangen.
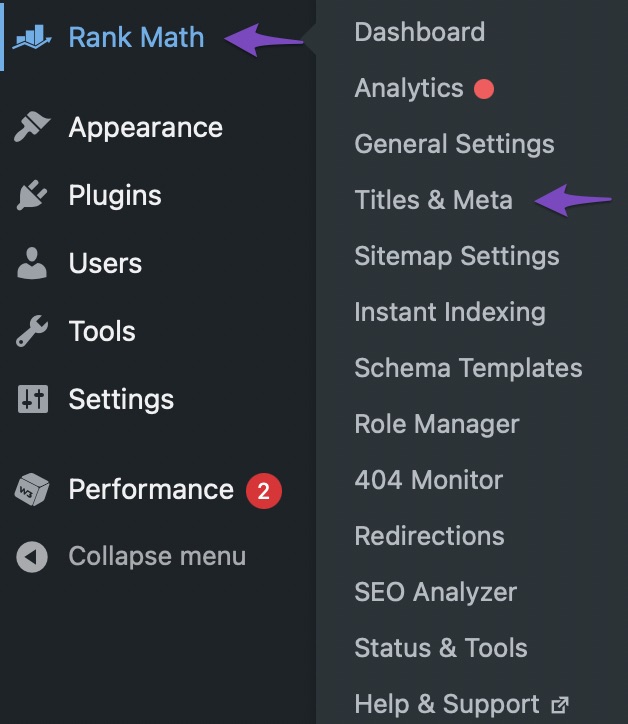
Gehen Sie zunächst zu den Optionen „Titel und Meta“, indem Sie im WordPress-Menü mit der Maus über die Einstellungen von Rank Math fahren und auf „Titel und Meta“ klicken.
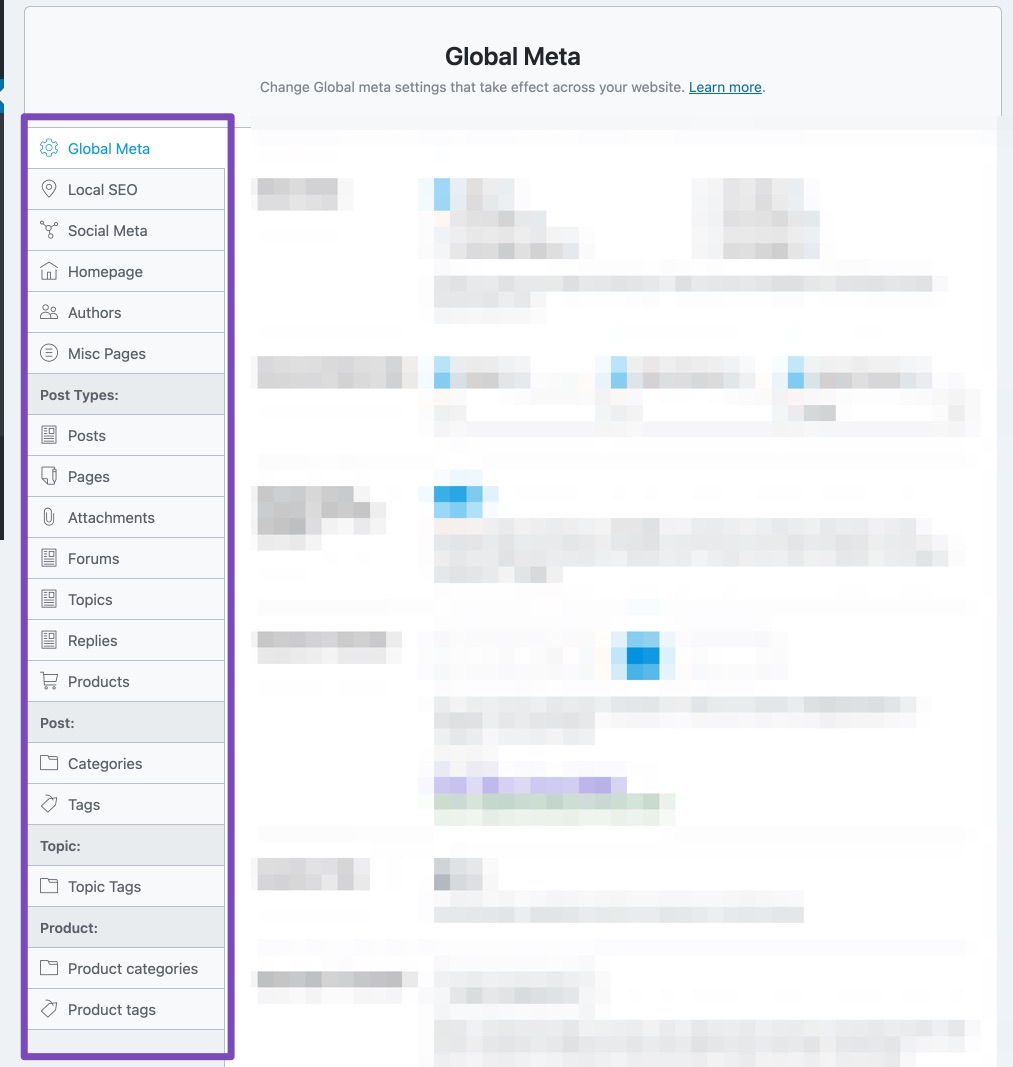
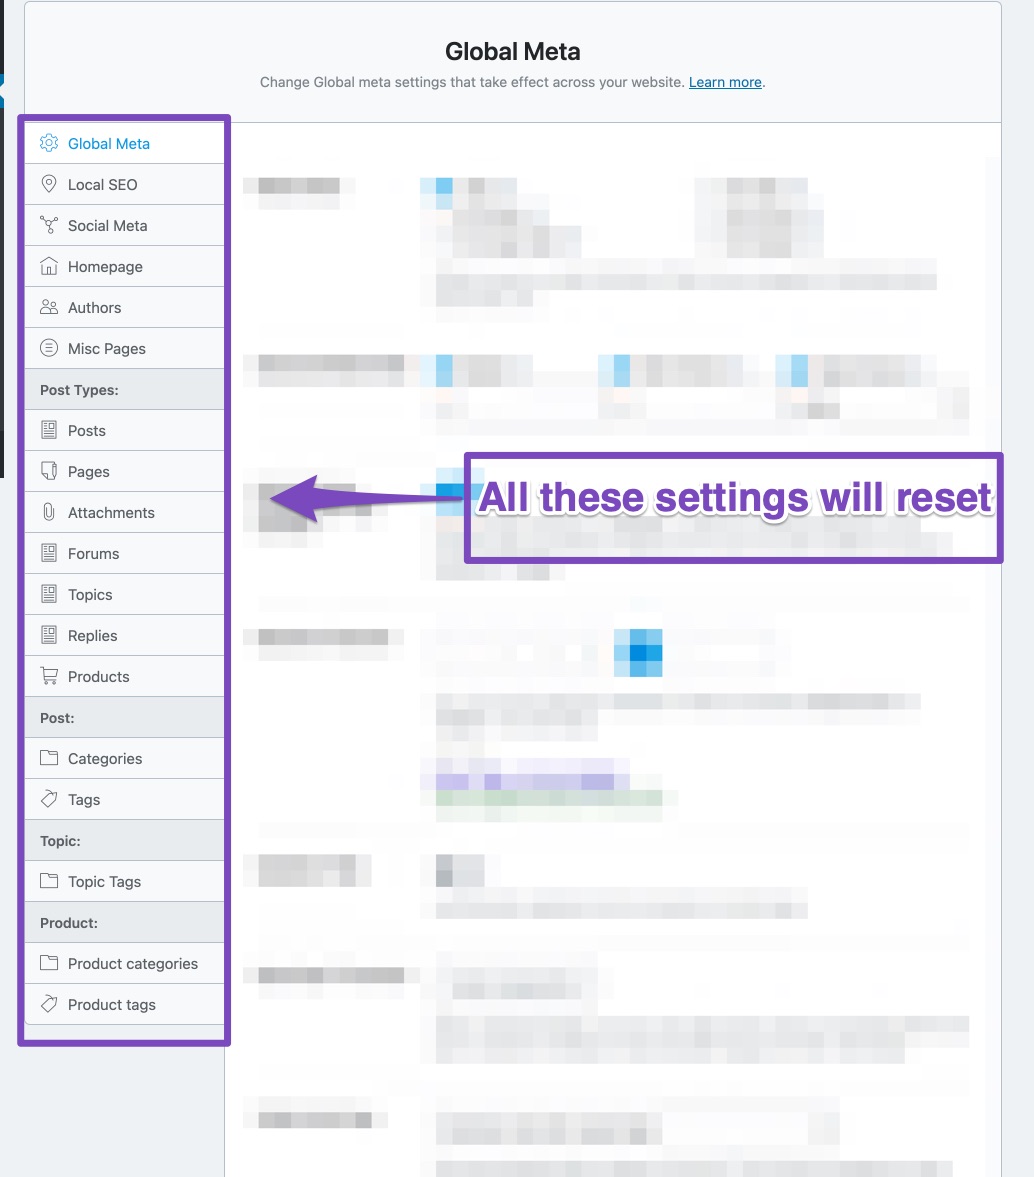
Die Optionen „Titel“ und „Meta“ werden angezeigt. Alle verschiedenen Einstellungen wurden in Abschnitte unterteilt, um die Navigation zu erleichtern. Hier ist eine Liste aller Abschnitte in den Titel- und Meta-Einstellungen.
Wie Sie sehen, gibt es unzählige Möglichkeiten, diese zu verstehen und zu optimieren. Außerdem werden Ihnen möglicherweise nicht alle Optionen angezeigt, die Sie hier sehen. Dies liegt daran, dass einige Optionen nur sichtbar sind, wenn das entsprechende Plugin installiert ist. Beispielsweise würden Sie die Abschnitte „Produktkategorien“ und „Produkt-Tags“ nicht sehen, wenn Sie WooCommerce nicht installiert haben.
Wenn Sie sich im einfachen Modus befinden, stehen Ihnen möglicherweise einige der erweiterten Optionen möglicherweise nicht zur Verfügung. Sie müssen in den erweiterten Modus wechseln, um auf alle Einstellungen zuzugreifen. Hier finden Sie eine vollständige Liste Optionen, auf die nur im erweiterten Modus zugegriffen werden kann von Rank Math.
Sie haben es vielleicht nicht bemerkt, aber es gibt zwei Möglichkeiten, auf die Einstellungen zuzugreifen. Der offensichtlichste Weg besteht darin, zum entsprechenden Abschnitt zu gehen und dann auf die gewünschte Einstellung zuzugreifen.
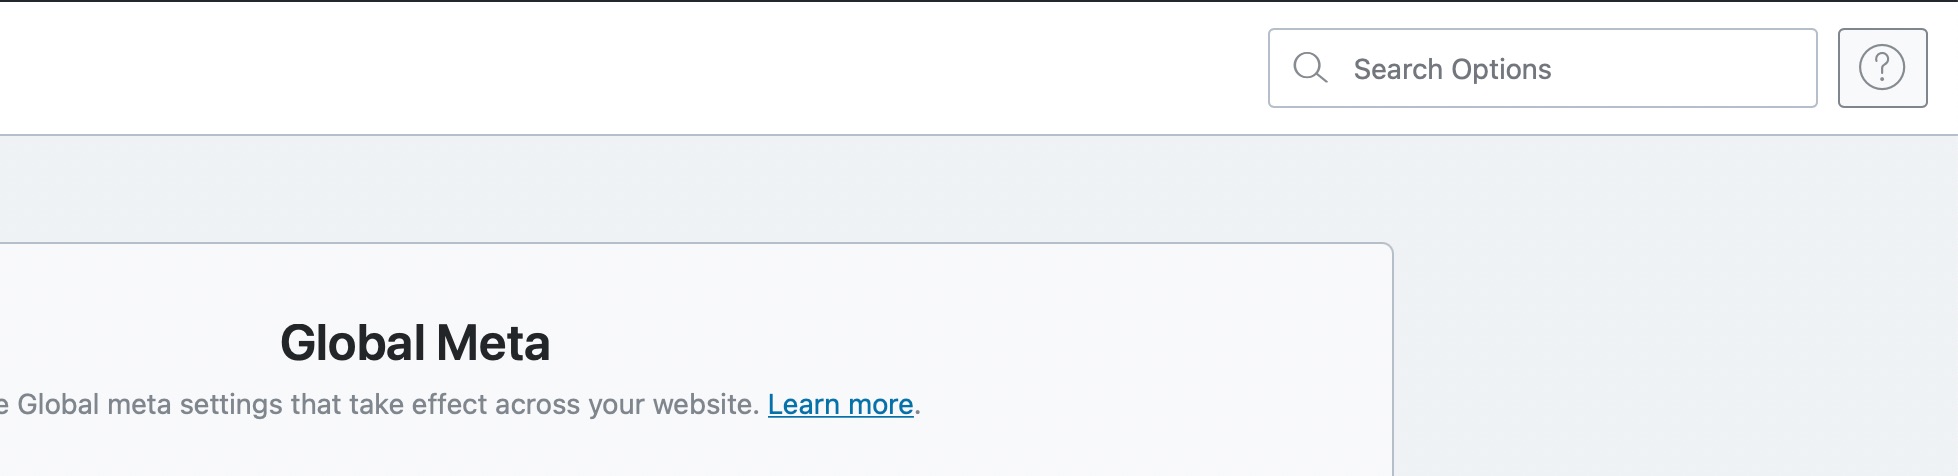
Die andere Methode ist die Verwendung des Suchfelds, das sich oben auf der Seite befindet.
Das Suchfeld ist AJAX-basiert. Das heißt, sobald Sie mit der Eingabe des Einstellungsnamens beginnen, wird dieser fast augenblicklich gesucht und angezeigt. Hier ist ein Beispiel.
Die Suchoption ist sehr praktisch, und wenn Sie sich erst einmal mit den verschiedenen Einstellungen vertraut gemacht haben, wird es Ihnen möglicherweise leichter fallen, Ihre Einstellungen zu finden.
2 Die Auswirkungen dieser Einstellungen verstehen
Es ist wichtig zu verstehen, wie sich diese Einstellungen auf Ihre Website auswirken. Wenn Sie Ihre Titel- und Meta-Einstellungen einrichten, wird eine erstellt Standardeinstellungen Dies wird für Beiträge, Seiten und andere Beitragstypen verwendet, die Sie möglicherweise haben. Dadurch wird sichergestellt, dass für jeden Beitrag auf Ihrer Website eine gewisse Optimierung vorgenommen wird. Wenn Sie neue Beiträge oder Seiten erstellen, können Sie dann alle Einstellungen pro Beitrag überschreiben.
Nachdem Sie es nun verstanden haben, beginnen wir mit der Diskussion des ersten Abschnitts, des Abschnitts „Globale Meta“.
3 Globale Metaeinstellungen
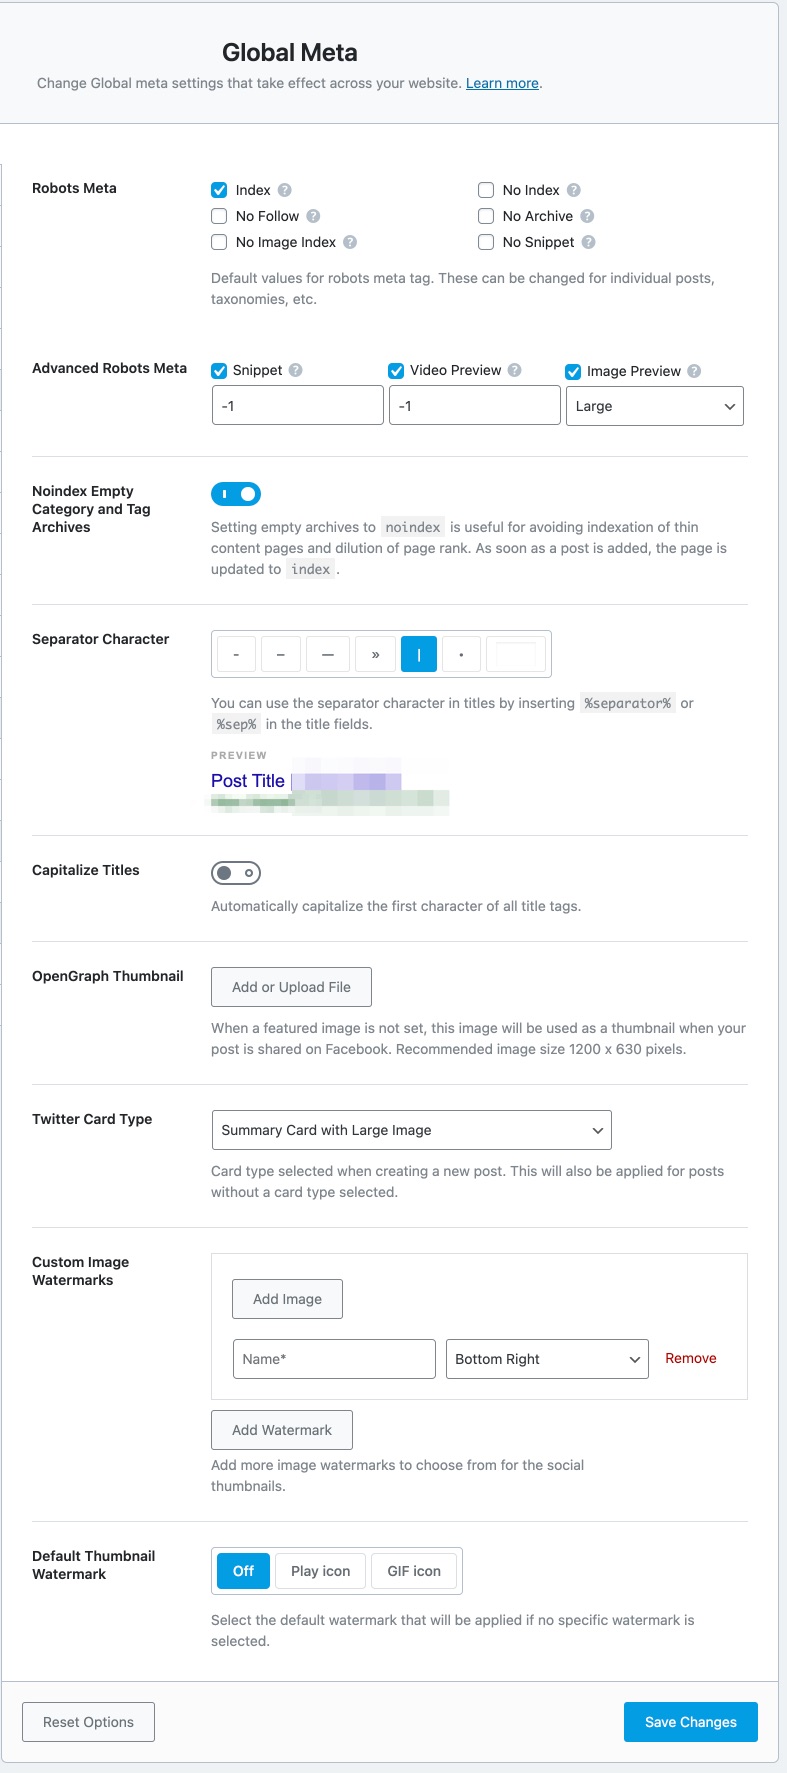
Mithilfe der globalen Metaeinstellungen können Sie die Standardtitel- und Metaeinstellungen für alle Seiten Ihrer Website festlegen. Hier sind die Optionen, die im Abschnitt „Globale Meta“ verfügbar sind.
Lassen Sie uns die einzelnen Optionen besprechen.
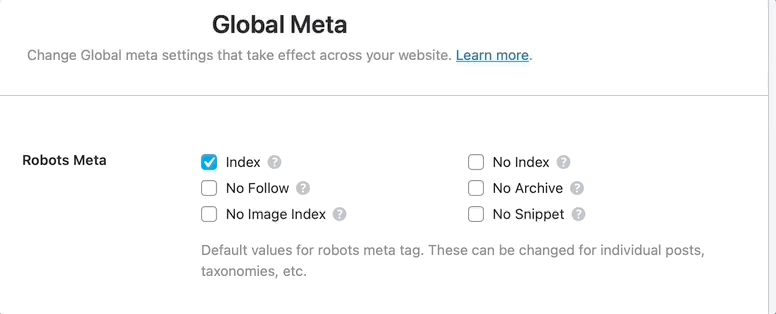
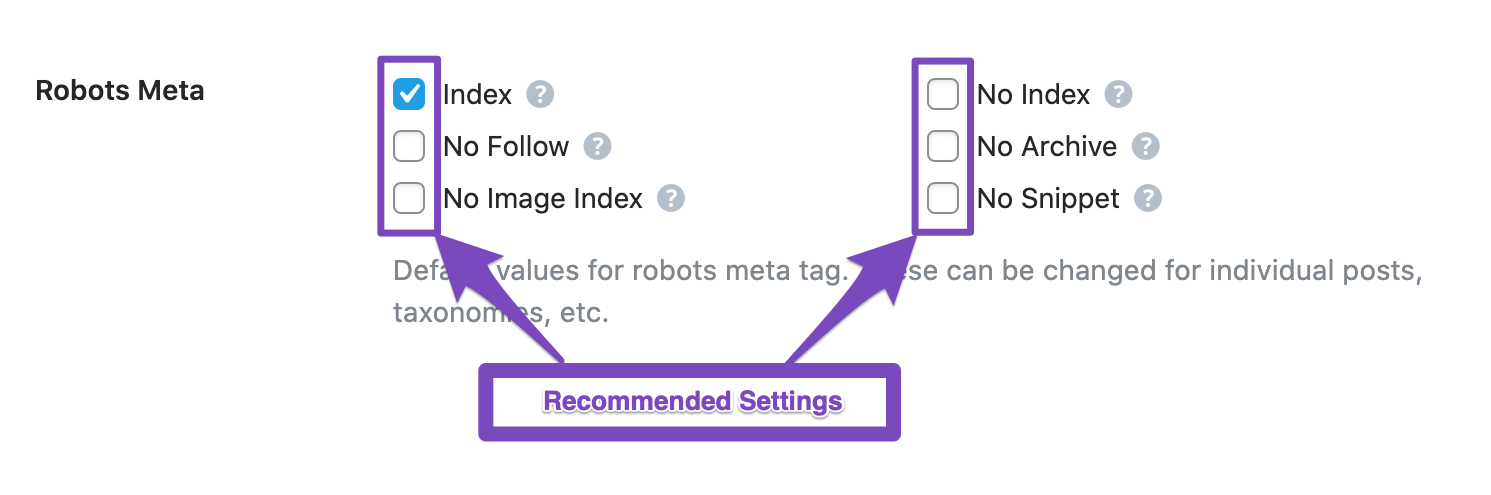
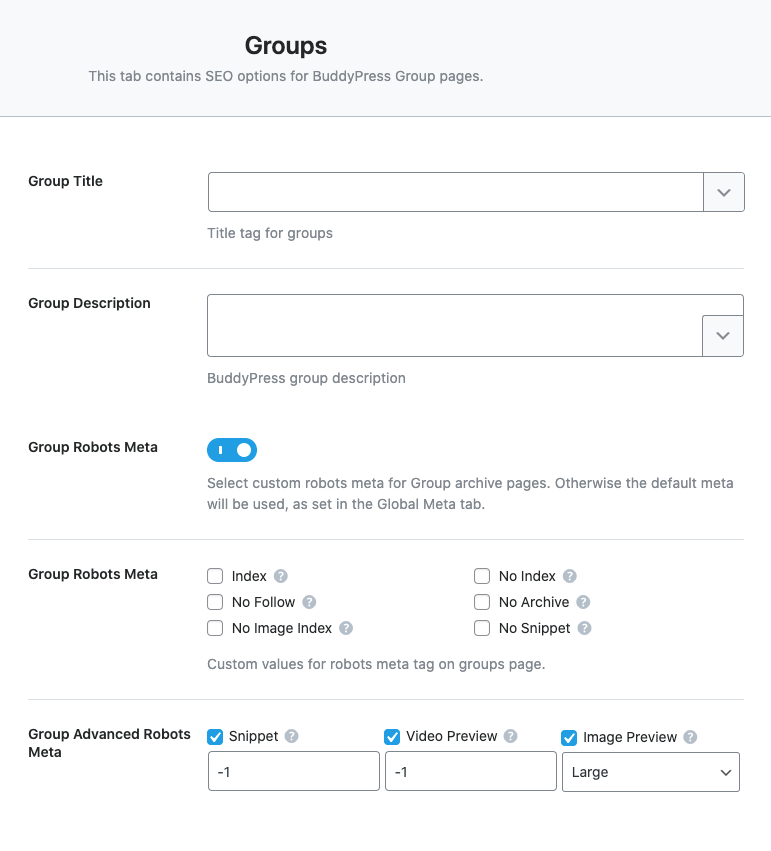
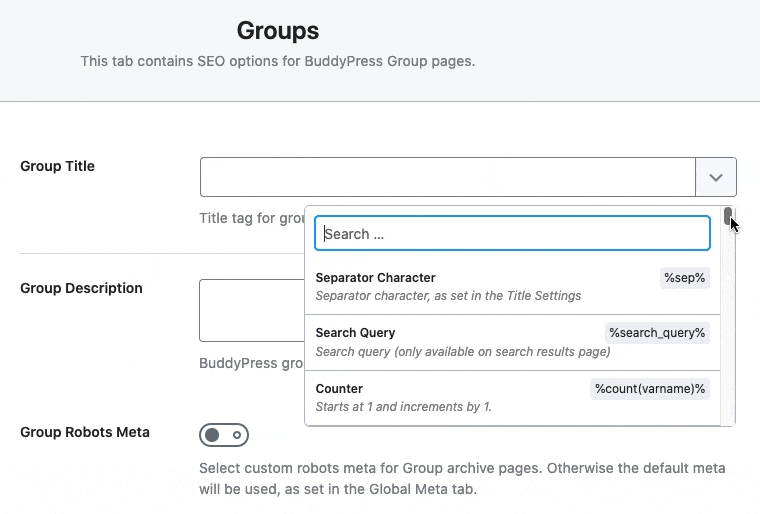
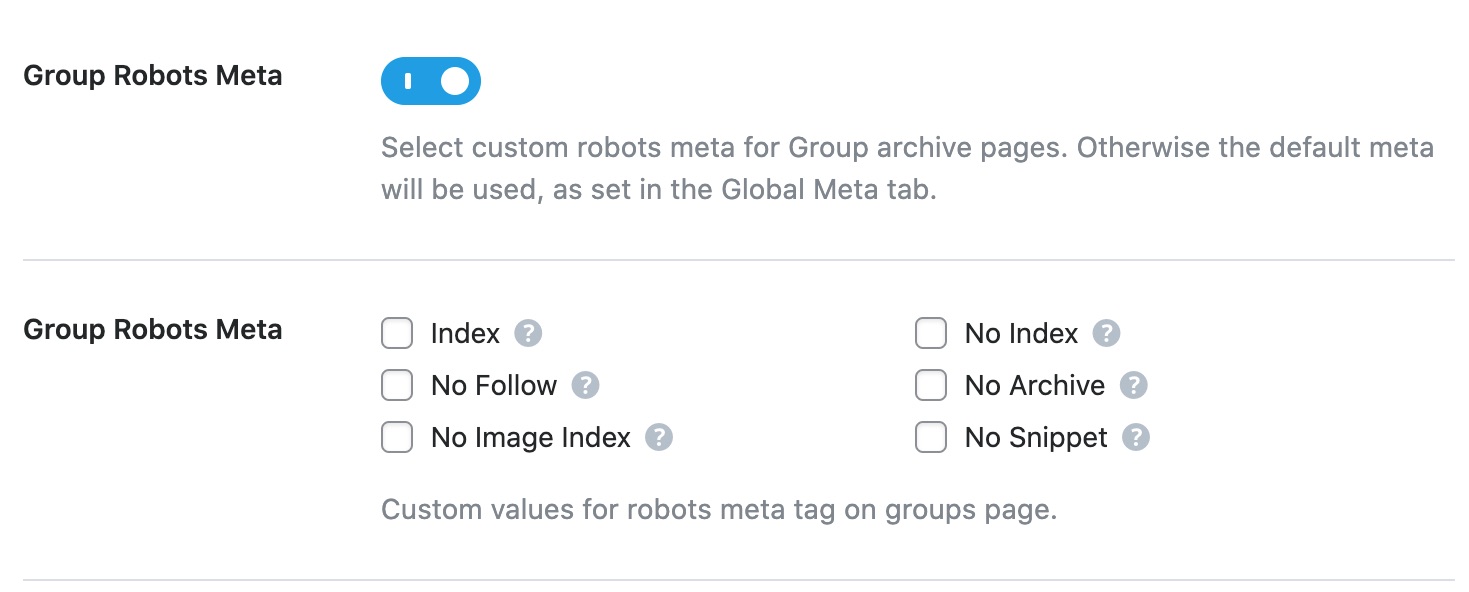
3.1 Roboter-Meta
Mithilfe der Robots-Meta-Tags können Sie Suchmaschinen Ihre Indexierungspräferenzen mitteilen. Während die Meta-Tags pro Beitrag festgelegt werden können, können Sie mit den hier verfügbaren Optionen Standardwerte für diese Tags festlegen.
Wenn Sie nicht ganz sicher sind, was diese Tags bedeuten, finden Sie hier eine kleine Erklärung.
Kein Index: Wenn Sie dies aktivieren, wird den Suchmaschinen mitgeteilt, dass Sie nicht möchten, dass dieser Beitrag indiziert wird.
Kein Archiv: Wenn Sie dies aktivieren, wird den Suchmaschinen mitgeteilt, dass Sie nicht möchten, dass zwischengespeicherte Versionen dieser Seite in den Suchergebnissen angezeigt werden.
Kein Ausschnitt: Durch die Aktivierung wird den Suchmaschinen mitgeteilt, dass sie kein Snippet unter dem Suchergebnis dieser Seite einfügen sollen.
Kein Folgen: Durch die Aktivierung wird den Suchmaschinen mitgeteilt, dass Sie nicht möchten, dass einem der Links auf dieser Seite gefolgt wird.
Kein Bildindex: Durch die Aktivierung wird den Suchmaschinen mitgeteilt, dass keine Bilder auf der Seite indiziert werden sollen.
Sie können auch eine kurze Beschreibung der Tags sehen, indem Sie mit der Maus über das „?“ fahren. neben ihnen.
Was die empfohlenen Einstellungen betrifft, empfehlen wir Ihnen, alle Einstellungen deaktiviert zu lassen. Die meisten Ihrer Beiträge profitieren von der Indexierung, und diejenigen, die Sie deindexieren möchten, können dies manuell in den Beitragseinstellungen tun.
Hier ist der Tooltip-Text, wenn Sie daran interessiert sind, den Inhalt zu lesen.
Index: Weist Suchmaschinen an, diese Seiten zu indizieren und in den Suchergebnissen anzuzeigen
Kein Index: Verhindert, dass Seiten indiziert und auf den Ergebnisseiten von Suchmaschinen angezeigt werden
Kein Folgen: Verhindert, dass Suchmaschinen den Links auf den Seiten folgen
Kein Archiv: Verhindert, dass Suchmaschinen zwischengespeicherte Links für Seiten anzeigen
Kein Bildindex: Diese Option verhindert, dass Bilder auf einer Seite von Google und anderen Suchmaschinen indiziert werden
Kein Ausschnitt: Verhindert, dass ein Snippet in den Suchergebnissen angezeigt wird
3.2 Meta für fortgeschrittene Roboter
Wie der Name schon sagt, enthält die Advanced Robots Meta einige der erweiterten Arten von Robots Meta, die Sie konfigurieren können. Sie helfen Ihnen zu steuern, wie Ihr Inhalt als Snippet in den Suchergebnissen angezeigt wird. Während Sie Advanced Robots Meta für jede Seite konfigurieren können, können Sie hier die Standardwerte festlegen.
Wir empfehlen, die Standardwerte beizubehalten. Wenn Sie jedoch Anpassungen vornehmen möchten, haben Sie drei Optionen zum Konfigurieren:
Ausschnitt: Geben Sie die maximale Textlänge in Zeichen für das Snippet Ihrer Seite an. Die Standardoption „-1“ teilt Google mit, dass eine beliebige Anzahl von Zeichen Ihrer Seite für das Snippet verwendet werden kann.
Video Vorschau: Geben Sie die maximale Dauer in Sekunden für eine animierte Videovorschau an. Die Standardoption „-1“ bedeutet, dass Sie kein Limit haben.
Bildvorschau: Geben Sie die maximale Größe der Bildvorschau für die Bilder auf dieser Seite an. Sie können eine der drei vordefinierten Optionen auswählen – groß, Standard und keine.
3.3 Noindex Leere Kategorie- und Tag-Archive
WordPress erstellt automatisch „Archiv“-Seiten für jede Kategorie, jedes Tag und andere Taxonomien, die Sie auf Ihrer Website verwenden. Eine Archivseite ist einfach eine Sammlung aller Beiträge (oder benutzerdefinierten Beiträge) in dieser Taxonomie, organisiert in Seiten.
Wenn Sie eine Reihe von Kategorien und Tags erstellt haben, diesen aber keine Beiträge zugeordnet sind, werden nicht nur leere Archivseiten erstellt, sondern diese werden auch indiziert.
Durch die Aktivierung dieser Option wird diesem Problem entgegengewirkt, da alle Archivseiten leerer Kategorie- und Tag-Seiten nicht indiziert werden. Wir empfehlen Ihnen, diese Option zu aktivieren.
3.4 Trennzeichen
Mit dieser Option können Sie das Trennzeichen festlegen, das im Titel Ihrer Beiträge verwendet wird. Es stehen mehrere Optionen zur Verfügung, und Sie können eine beliebige Option nach Ihren Wünschen auswählen.
Bei der Entscheidung, welches Trennzeichen Sie verwenden möchten, können Sie den folgenden Demotitel als Hilfe nutzen. Der Titel wird basierend auf dem von Ihnen gewählten Trennzeichen aktualisiert und hilft Ihnen bei der Auswahl des am besten aussehenden.
Idealerweise testen Sie die Wirkung des Trennzeichens auf Ihrer Website. Wenn Sie das möchten, dann Legen Sie ein beliebiges Zeichen als Trennzeichen fest und beobachten Sie dann Ihre CTR (Click-Through-Rate).). Ändern Sie nach einigen Wochen das Trennzeichen und beobachten Sie, ob sich die Rate verbessert.
Sie können auch ein benutzerdefiniertes Trennzeichen festlegen, indem Sie es in das letzte Feld eingeben.
Nachdem Sie Ihr Trennzeichen ausgewählt haben, können Sie es durch Einfügen in Ihren Titeln verwenden %sep in deinen Titeln.
3.5 Titel groß schreiben
Enabling this setting will capitalize the first character of each word in your post’s SEO title. For example, a title like das ist ein Beitrag wird werden Dies ist ein Beitrag. Wir empfehlen Ihnen, diese Einstellung zu aktivieren.
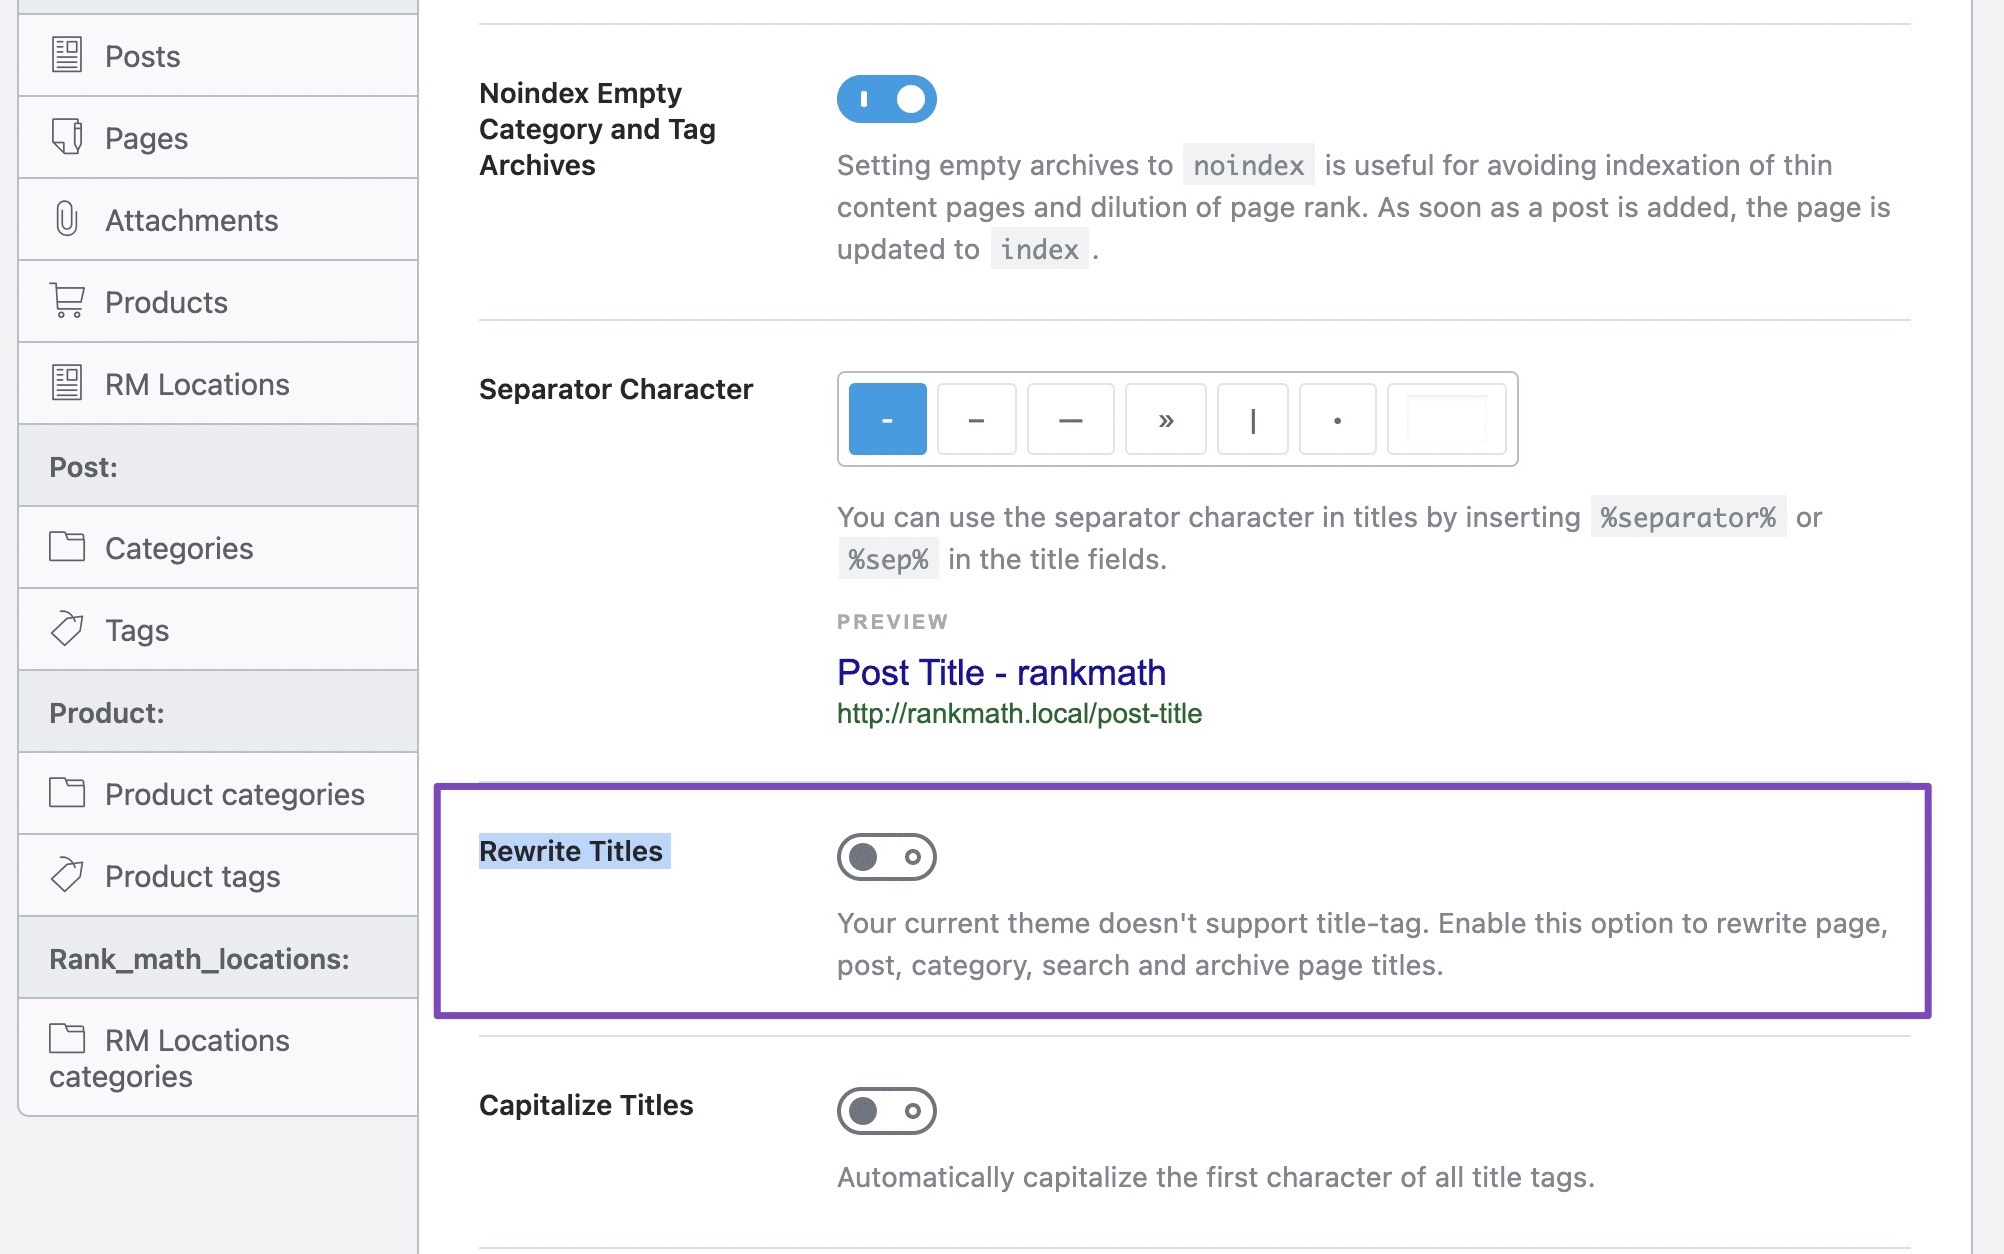
3.6 Titel neu schreiben
Wenn Ihr Theme dies nicht unterstützt Titel-Tagfinden Sie hier eine zusätzliche Option namens Titel neu schreiben.
Diese Option erscheint eher in Themes, die vor WordPress 4.1 gestartet wurden. Weil WordPress ab WordPress 4.1 eine Theme-Funktion namens Title-Tag eingeführt hat, die es Themes ermöglichte, Title-Tags zu den Seiten hinzuzufügen Etikett. Zuvor fügten Themes die Tags selbst hinzu, was zu Kompatibilitätsproblemen führte.
Für Themes, die kein Title-Tag unterstützen, können Sie diese Option aktivieren. Dann fügt Rank Math zwangsweise einen Titel zum Head-Tag im Quellcode der Seite hinzu, um sicherzustellen, dass der SEO-Titel Ihrer Seite mit dem übereinstimmt, was Sie mit Rank Math konfiguriert haben.
Notiz: Die Option „Umschreiben erzwingen“ ist nur sichtbar, wenn Ihr Theme kein Title-Tag unterstützt.
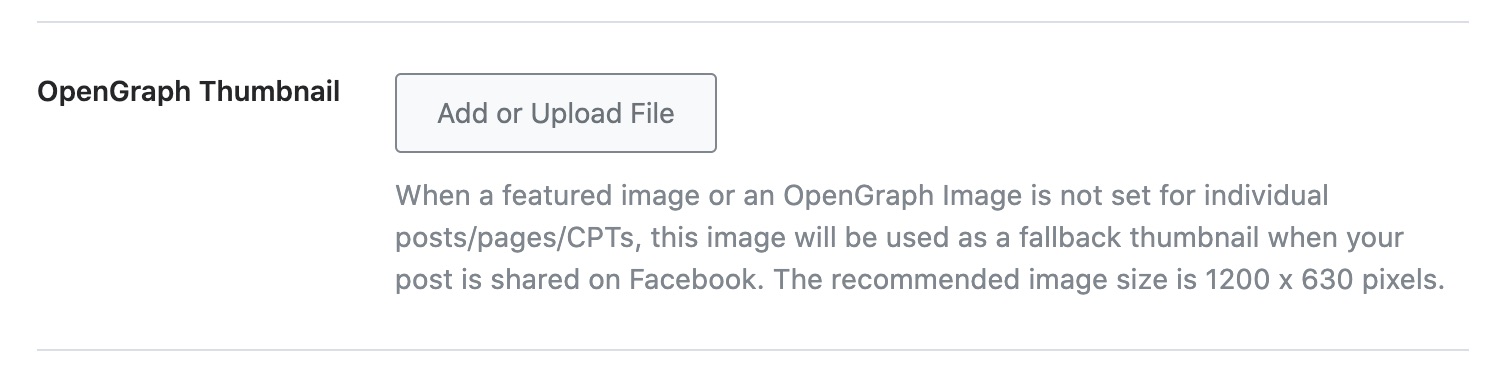
3.7 OpenGraph-Miniaturansicht
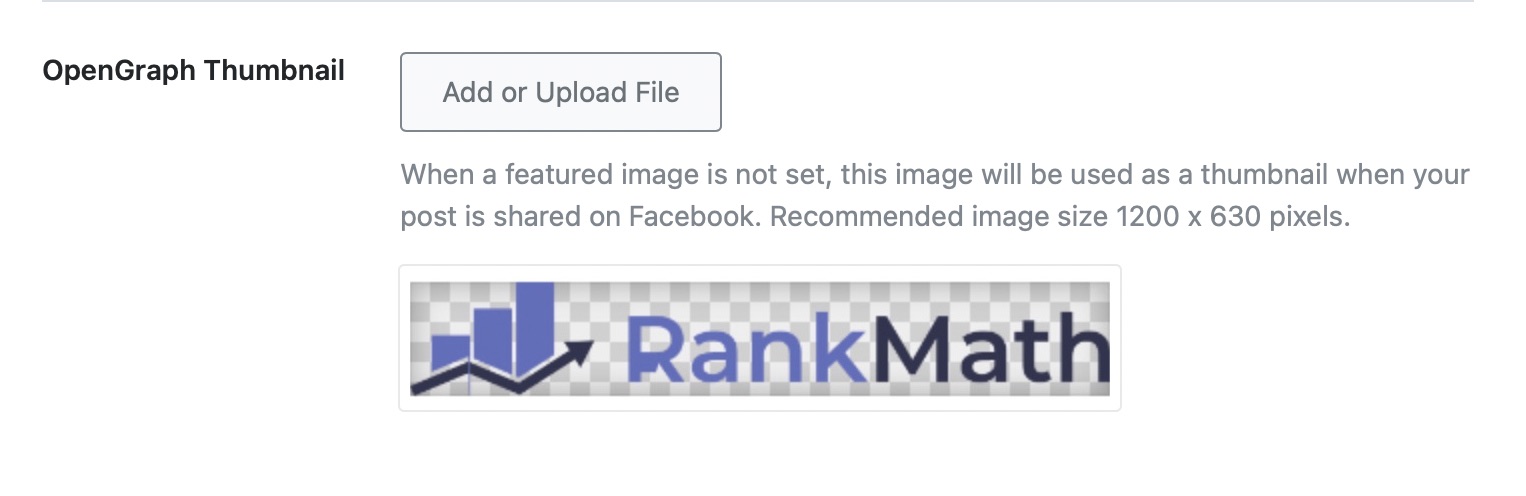
Mit dieser Option können Sie ein Standard-OpenGraph-Miniaturbild festlegen. OpenGraph-Tags werden von Facebook immer dann verwendet, wenn ein Beitrag auf Facebook geteilt wird. Wenn Sie ein Standard-OpenGraph-Miniaturbild einrichten, wird es als Ersatz-Miniaturbild für alle Ihre Beiträge betrachtet. Wenn Ihr Beitrag also kein vorgestelltes Bild/OpenGraph-Bildsatz hat, wird dieses Ersatz-Thumbnail verwendet, wenn der Beitrag auf Facebook geteilt wird.
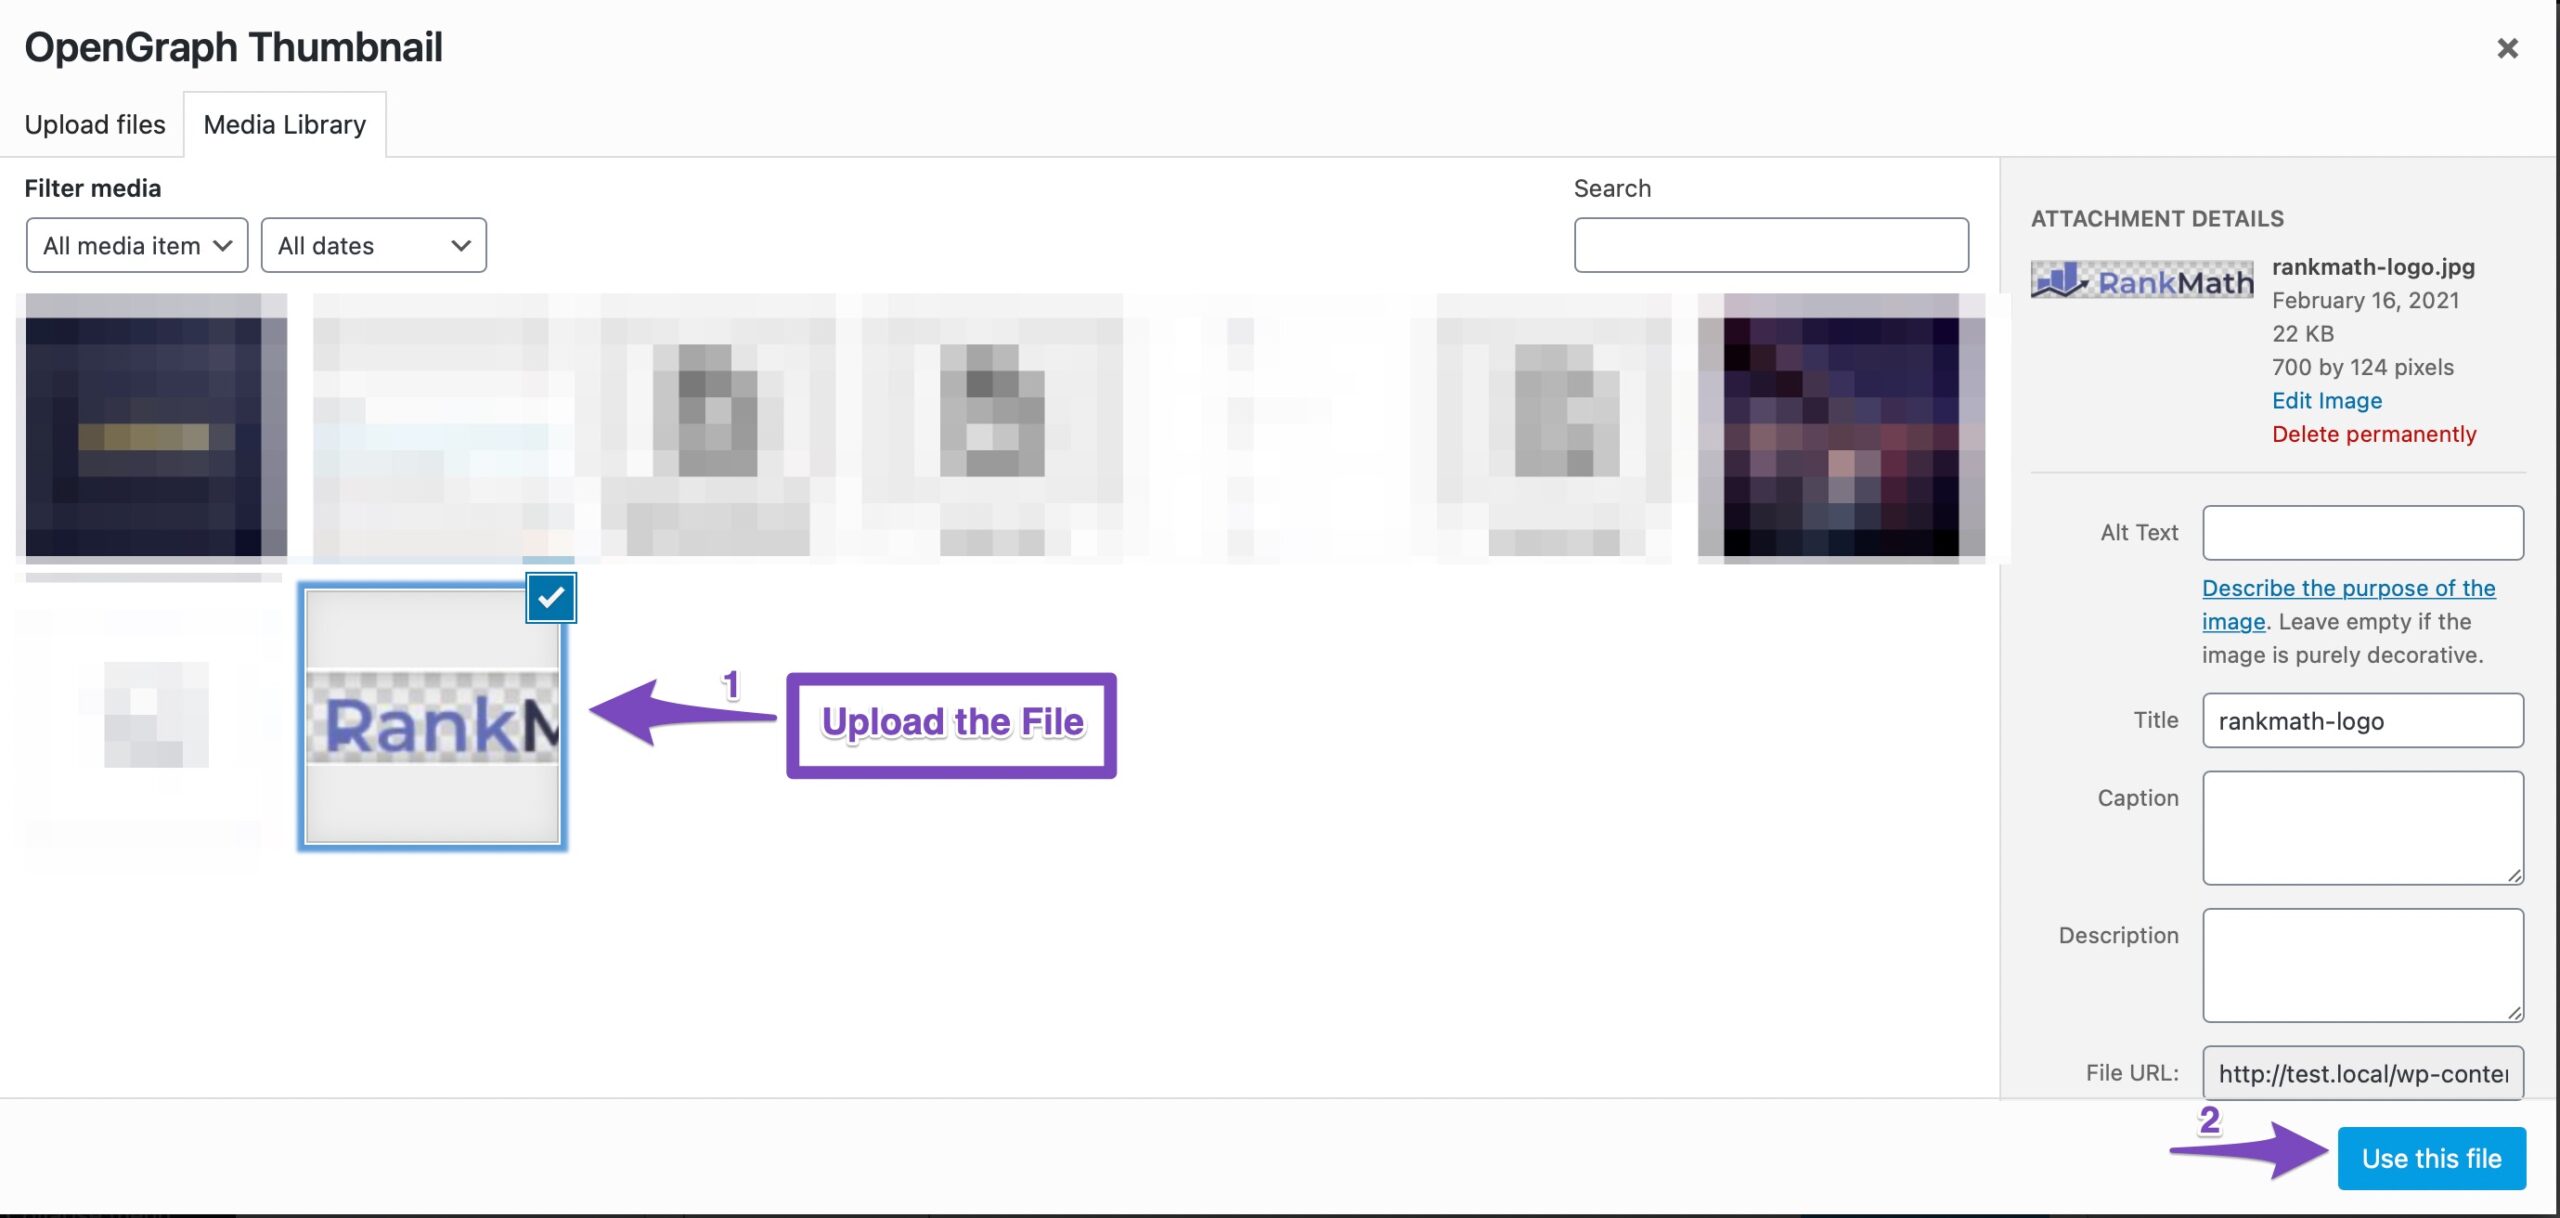
Um eine OpenGraph-Miniaturansicht festzulegen, klicken Sie auf die Schaltfläche „Datei hinzufügen oder hochladen“.
Der WordPress-Medienmanager wird geöffnet. Laden Sie eine Datei hoch, indem Sie sie per Drag & Drop auf den Manager ziehen oder ein bereits hochgeladenes Bild auswählen. Klicken Sie dann auf die Schaltfläche „Diese Datei verwenden“.
Das Bild wird nun neben der Einstellung angezeigt.
Hier haben wir das Logo von Rank Math zur Demonstration hochgeladen, Sie sollten jedoch ein ansprechendes Banner hochladen. Die empfohlenen Abmessungen für die OpenGraph-Miniaturansichten betragen 1200 x 630 Pixel.
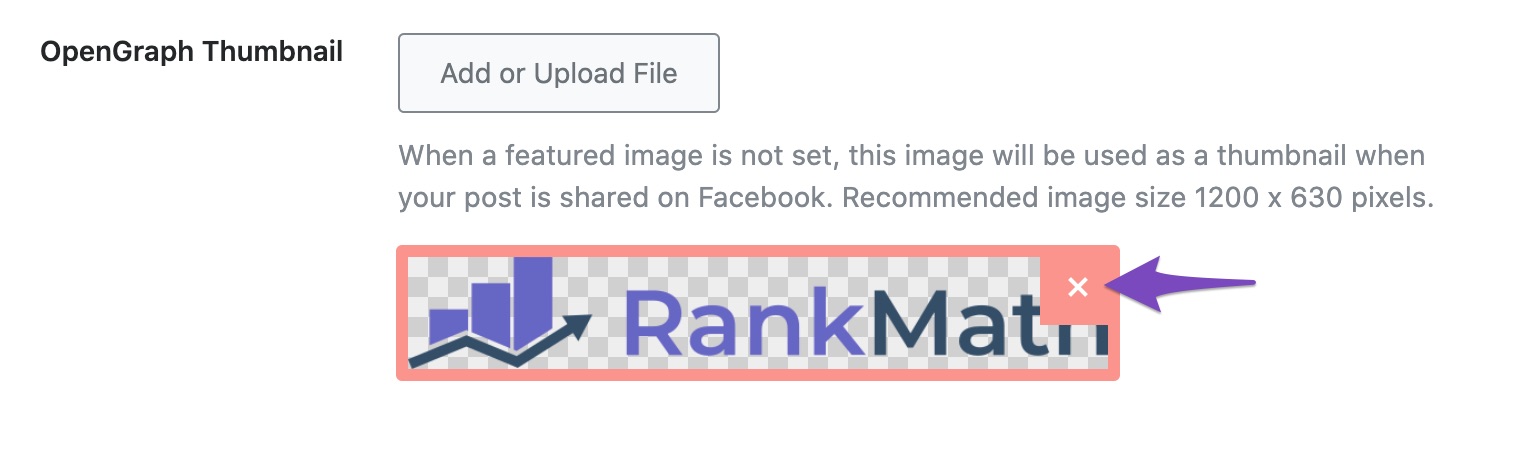
Wenn Sie das OpenGraph-Miniaturbild in Zukunft ändern möchten, bewegen Sie den Mauszeiger über das hochgeladene Miniaturbild. Sie werden auf dem Bild eine Überlagerung mit einem „X“ in der Ecke bemerken. Klicken Sie auf das X, um das Bild zu entfernen, und wählen Sie dann ein neues aus.
3.8 Twitter-Kartentyp
Mit dieser Option können Sie eine Standard-Twitter-Karte für Ihre Beiträge festlegen. Diese Karte wird verwendet, wenn Ihre Beiträge auf Twitter geteilt werden. Sie können eine der folgenden Einstellungen vornehmen:
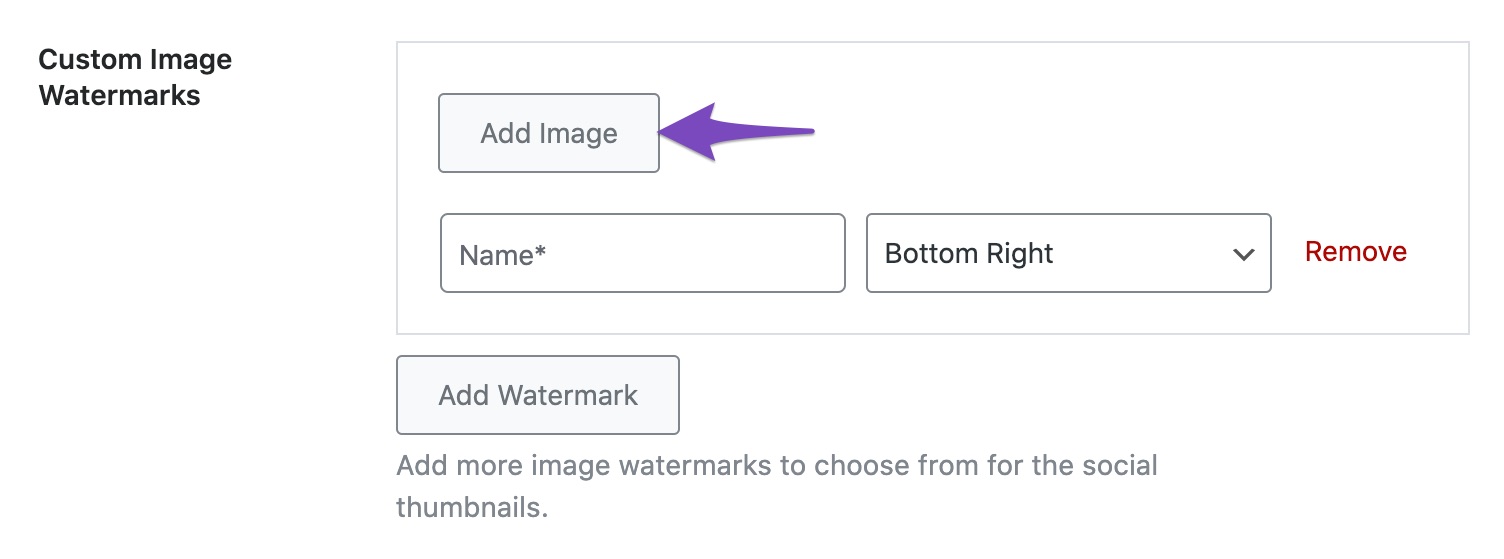
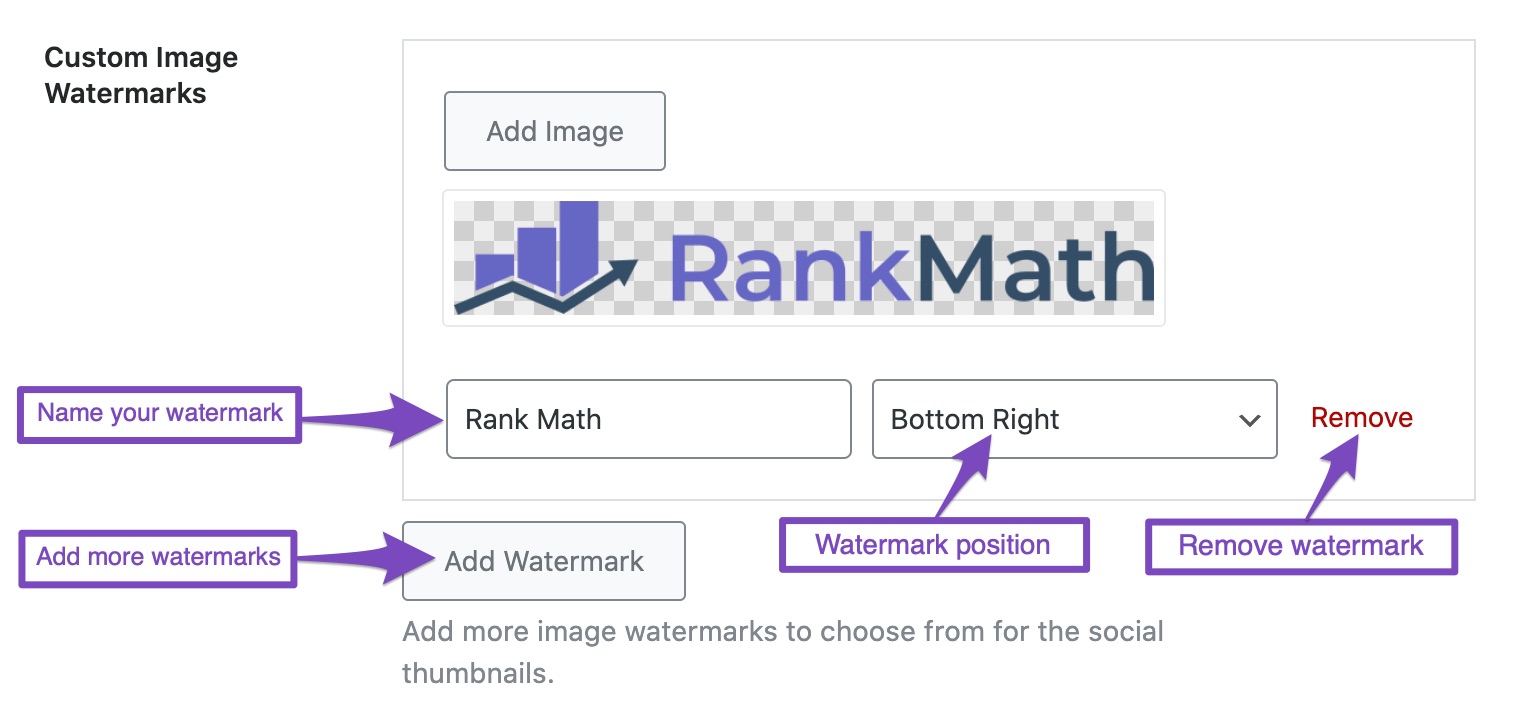
Mit der Option „Benutzerdefinierte Bildwasserzeichen“ können Sie zusätzlich zum Standard-GIF und dem Wiedergabesymbol Ihr eigenes Wasserzeichen in Rank Math erstellen. Um Ihr Wasserzeichen hinzuzufügen, klicken Sie auf Bild hinzufügen Taste.
Laden Sie im WordPress-Medienmanager Ihr Bild hoch und wählen Sie es aus, um es als Wasserzeichenbild zu verwenden. Geben Sie dann einen Namen für Ihr Wasserzeichenbild ein Name Klicken Sie auf das Textfeld und legen Sie in der Dropdown-Liste die Position fest, an der Ihr Wasserzeichen über Ihren Social-Sharing-Bildern erscheinen soll.
Mit können Sie weitere Bildwasserzeichen hinzufügen Wasserzeichen hinzufügen Option, und um ein Wasserzeichen zu entfernen, klicken Sie einfach auf Entfernen Option gegen das Wasserzeichen.
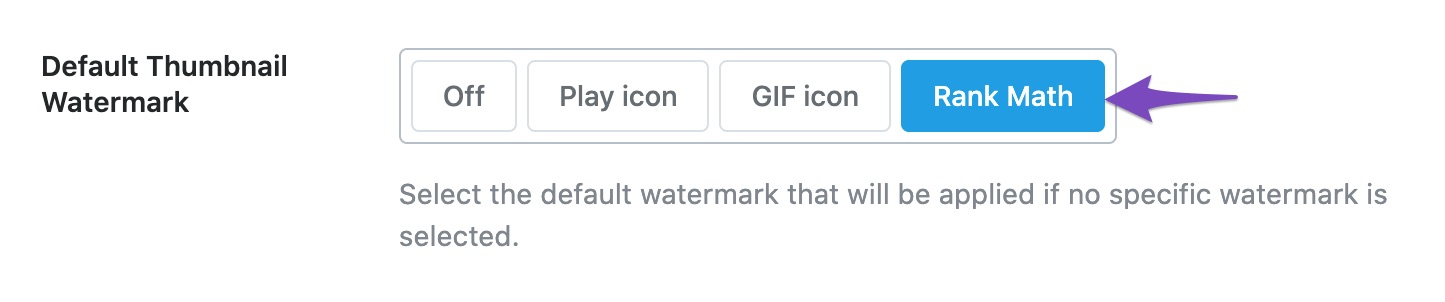
Mit der Option „Standard-Miniaturbild-Wasserzeichen“ können Sie ein Wasserzeichen als Ersatz festlegen, wenn in Ihrem Beitrag kein bestimmtes Wasserzeichen ausgewählt ist.
Wenn Sie mit der vorherigen Option ein benutzerdefiniertes Wasserzeichenbild erstellt haben, finden Sie das Wasserzeichen hier zusätzlich zum standardmäßigen Wiedergabesymbol und GIF-Symbol. Wählen Sie das Standard-Miniaturbild-Wasserzeichen aus, das Sie für alle Ihre Social-Sharing-Bilder hinzufügen möchten, und klicken Sie dann auf Änderungen speichern Taste.
Dies deckt alle Einstellungen im Abschnitt „Globale Meta“ ab. Fahren wir mit dem Abschnitt „Lokal SEO“ fort.
4 Lokale SEO-Einstellungen
Der Abschnitt „Lokal SEO“ enthält alle Einstellungen für lokale Unternehmen.
Wenn Sie den Abschnitt „Lokale Einstellungen“ konfigurieren, fügt Rank Math Ihrer Website die erforderlichen Metadaten hinzu, damit Google Ihre Website als lokale Unternehmenswebsite erkennt, und Google beginnt, Ihre Website in den SERPs für entsprechende Geschäftsanfragen anzuzeigen.
Der Ort SEO ist riesig und benötigt einen eigenen Führer. Sie können lernen, wie es geht Lokal SEO mit Rank Math.
5 Social-Meta-Einstellungen
Der Abschnitt „Social Meta“ enthält alle Einstellungen im Zusammenhang mit den Metadaten für soziale Medien. Hier finden Sie einen Überblick über alle Einstellungen im Abschnitt „Social Meta“.
Lassen Sie uns die einzelnen Einstellungen kurz erklären.
5.1 URL der Facebook-Seite
Geben Sie hier die URL Ihrer Facebook-Seite ein. Diese URL wird als Metadaten zu Ihren Seiten für OpenGraph hinzugefügt.
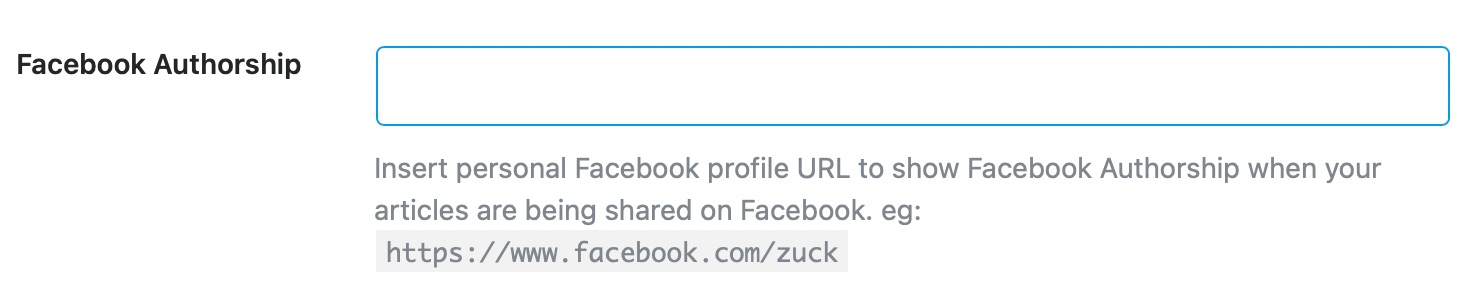
5.2 Facebook-Urheberschaft
Facebook unterstützt ein Facebook-Autorschafts-Tag, das zur Nennung von Autoren verwendet wird, wenn ein Beitrag auf Facebook geteilt wird.
Wenn Sie die Facebook-Autorenschaft für Ihre Website aktivieren möchten, geben Sie hier die URL Ihrer persönlichen Facebook-Seite ein.
Notiz: Möglicherweise hat Facebook die Urheberschaft inoffiziell eingestellt. Daher ist das Hinzufügen der URL Ihres Facebook-Profils in diesem Feld zur Einbindung des Open Graph-Tags völlig optional und hängt eher von Ihren persönlichen Vorlieben ab.
5.3 Facebook-Administrator
Geben Sie hier die numerische Benutzer-ID für Ihr Facebook-Profil ein. Sie können Ihre Benutzer-ID mithilfe von finden dieses Werkzeug. Sie können auch mehrere IDs eingeben, indem Sie diese durch Kommas trennen. Sie können dies auch überspringen und die Facebook-App-Einstellungen verwenden, die unten erläutert werden.
5.4 Facebook App
Enter the App ID of your Facebook App in this field. Facebook App ID is one of the basic tags that Facebook recommends using on all content types.
Facebook follows a caching system and stores the site’s metadata to speed up future requests (like someone sharing your post on Facebook). The cache typically refreshes every 30 days. In the meantime, if you make any visible changes to your page’s Open Graph title, description, or image, then it wouldn’t reflect when someone shares your post on Facebook.
Rank Math goes above and beyond to ping Facebook whenever your post gets updated. Consequently, Facebook clears your page’s cache and fetches the recent version of your page.
To take advantage of this Rank Math feature, you need to create a Facebook app (if you haven’t already created it, you can refer to this tutorial) and then add the Facebook App ID and Facebook Secret Key (in the following field).
Notiz: If you aren’t interested in scraping Facebook object cache for your pages, but want to get rid of the warning in Sharing debugger tool, then you can simply use Facebook’s default app ID (966242223397117).
5.5 Facebook Secret
If you’ve created a Facebook app, as we shared in the previous step, then enter the app’s secret key in this field.
5.6 Twitter Username
Enter your personal Twitter username in this field. This is used by Twitter for twitter:creator tags.
5.7 Additional Profiles
Um das hinzuzufügen gleich wie property for the Organization Schema, you need to include the Additional Profile URLs. You can add one URL per line.
5.8 Do You Need to Configure All These Settings
As you just saw, there are many options in the Social Meta section—more social networks than a business would reasonably be present on. It poses the question, do you need to configure all these social media options?
The answer is no. You do not need to configure all these options, especially if you’re not on a particular social media platform.
Different business types work with different social media. A business that does well on Instagram might not do well on LinkedIn and vice versa.
To be inclusive of all kinds of business and to offer maximum control over your website’s optimization, we have included all the popular social media channels. You can (and should) configure only the ones that you’re interested in and intend to use in your business, leave the rest blank.
That covers all the settings in the Social Meta section. Let us move to the next section, the Homepage section.
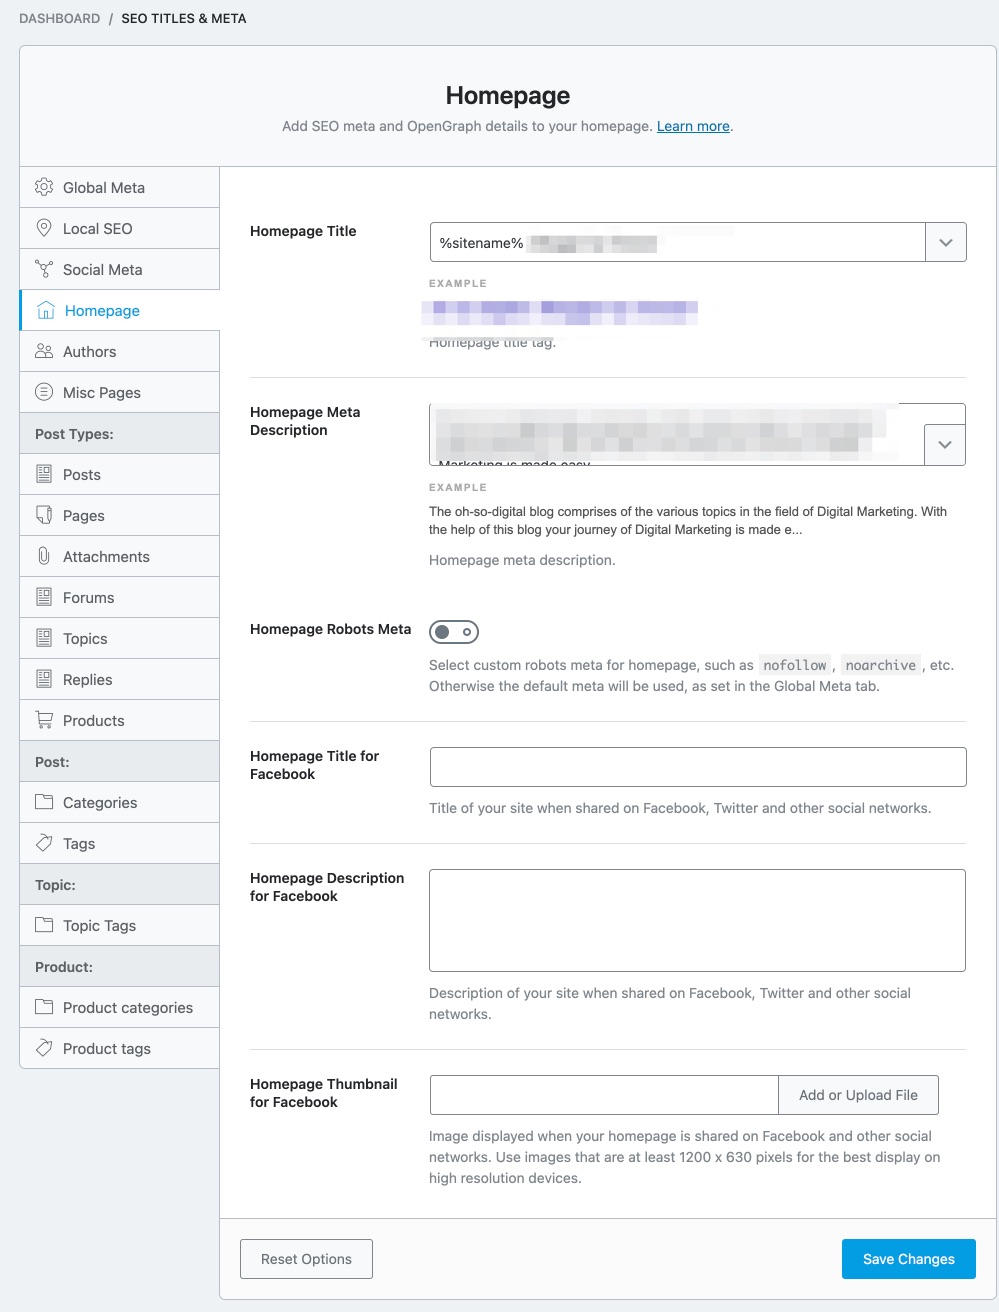
6 Homepage Titles & Meta Settings
As you probably guessed, the Homepage section contains all the Title and Meta settings related to the homepage. Here are all the options that you will see in this section.
Let us cover each of the sections and understand what it does.
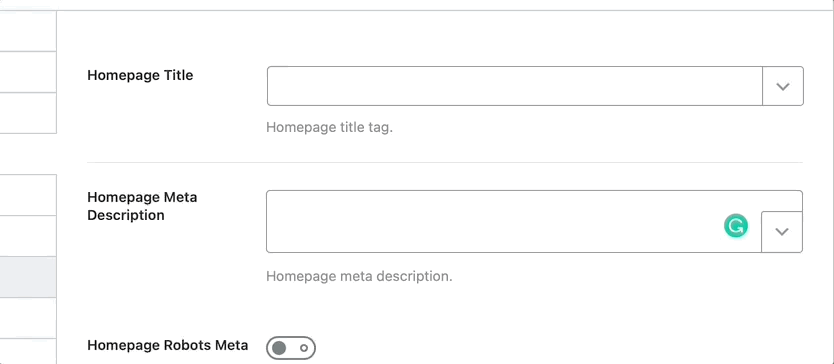
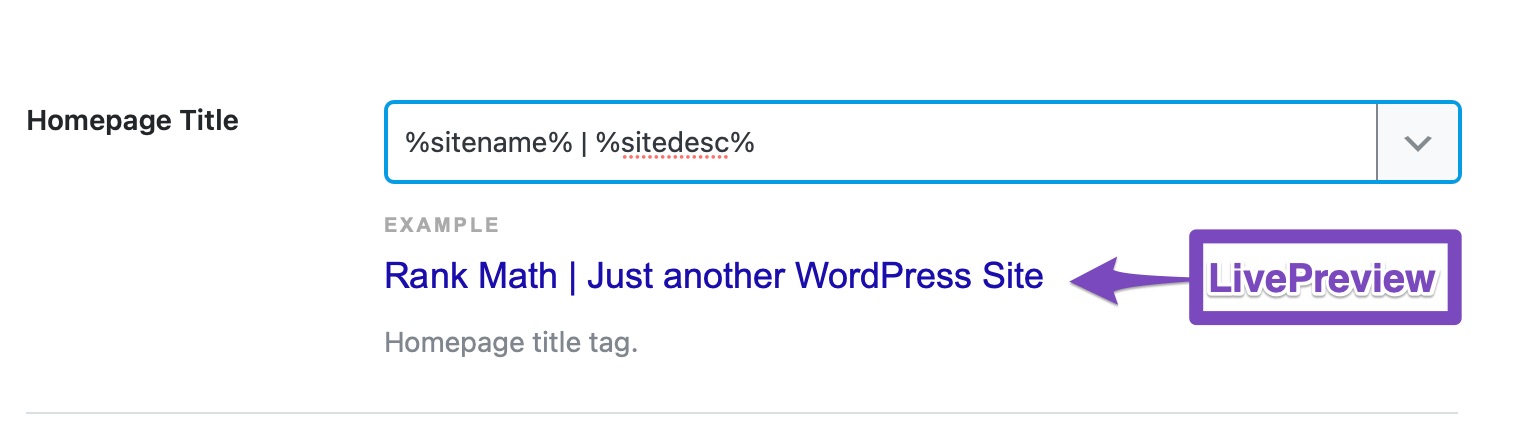
6.1 Homepage Title
Here you set the title of the homepage of your website. As you can probably understand, the title of your homepage is very important from an SEO perspective and thus needs to be set accordingly.
You can either set a static title, which won’t change unless you change it yourself, or create the ones with variables. The benefit of using variables is that your title will be automatically updated if you change any of the things that affect the variables.
A sample homepage title will be set by Rank Math using variables for demonstration. We recommend that you change. To see the list of all the variables you can use, click the drop-down icon at the end of the text area.
The example shared below the text area also acts as a real-time preview. When you update the title format, you will instantly see the change below.
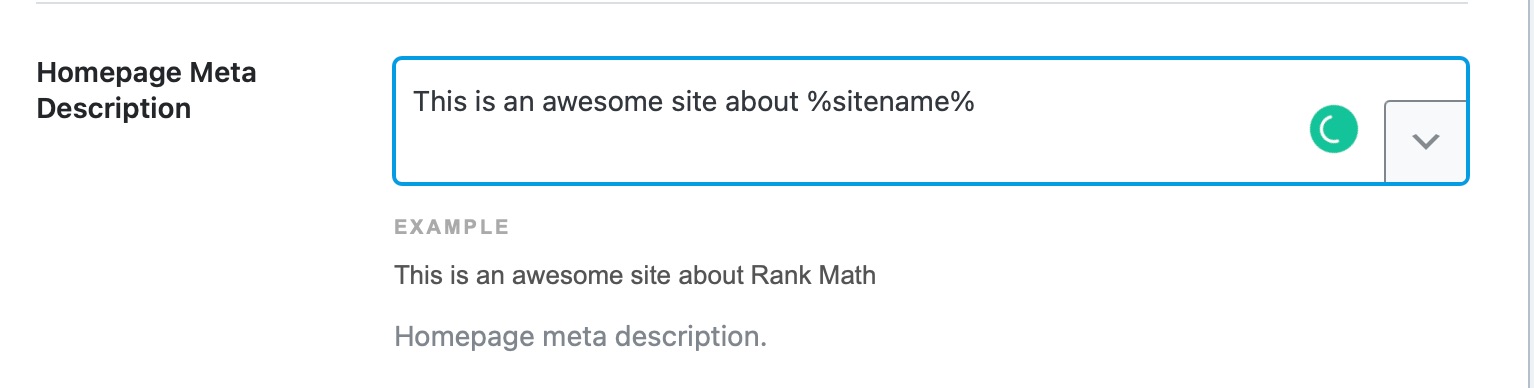
6.2 Homepage Meta Description
Here you can enter a meta description for your homepage. Similar to the Homepage Title, you can enter a static description or create a dynamic one using the supported variables.
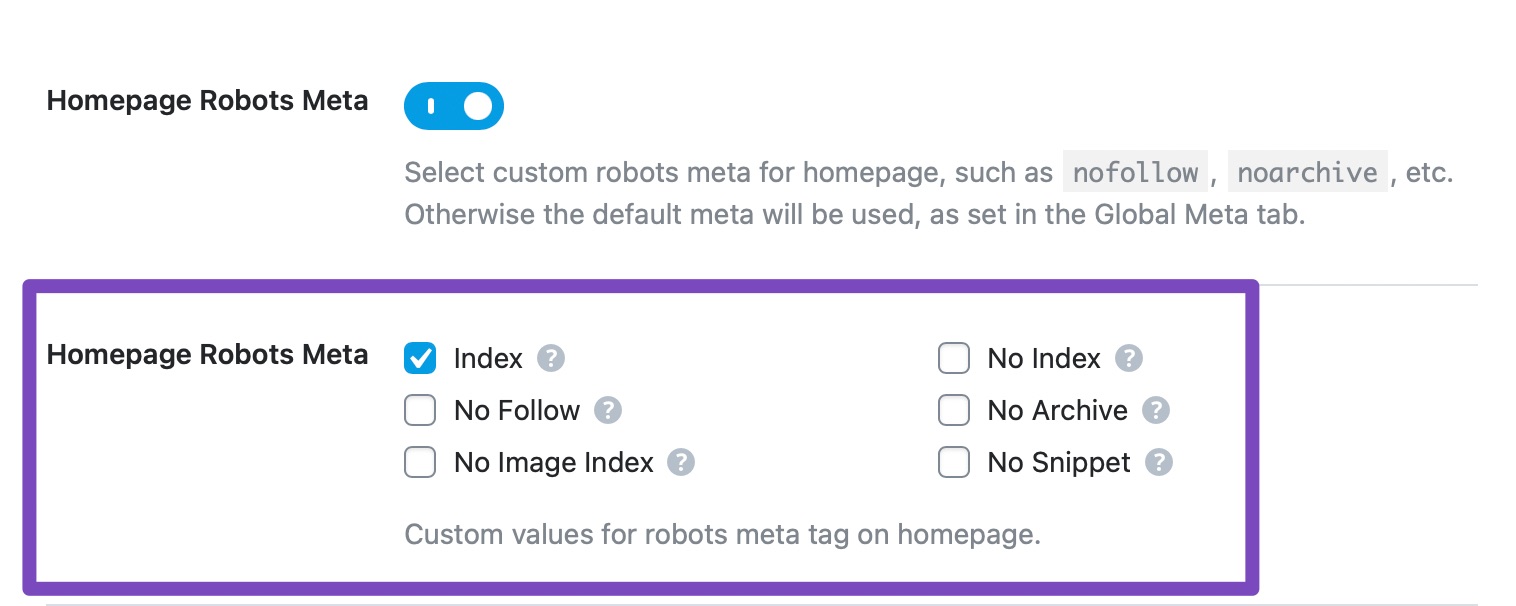
6.3 Homepage Robots Meta
This option lets you set the Robots Meta for your homepage. You can either choose the default settings you’ve set in the Global Meta section or choose custom settings for the homepage.
If you choose the Custom option, another set of settings will appear.
You can select any of the Robots Meta tags, and they will be used for your homepage only.
6.4 Homepage Advanced Robots
The Homepage Advanced Robots Meta allows you to control the snippet of your homepage in search results. You can use the options available here to set the Advanced Robots Meta, and they apply only to your homepage.
We recommend you to configure these options only if you’re fully aware of the changes you’re intended to make, else leave with the default setting.
6.5 Homepage Title for Facebook
As the setting name mentions, it sets the Homepage Title for Facebook. But, in reality, the title you set here will be used in the OpenGraph meta on your website. That means that any social networking website that uses the OpenGraph protocol will see this title when your homepage is shared there.
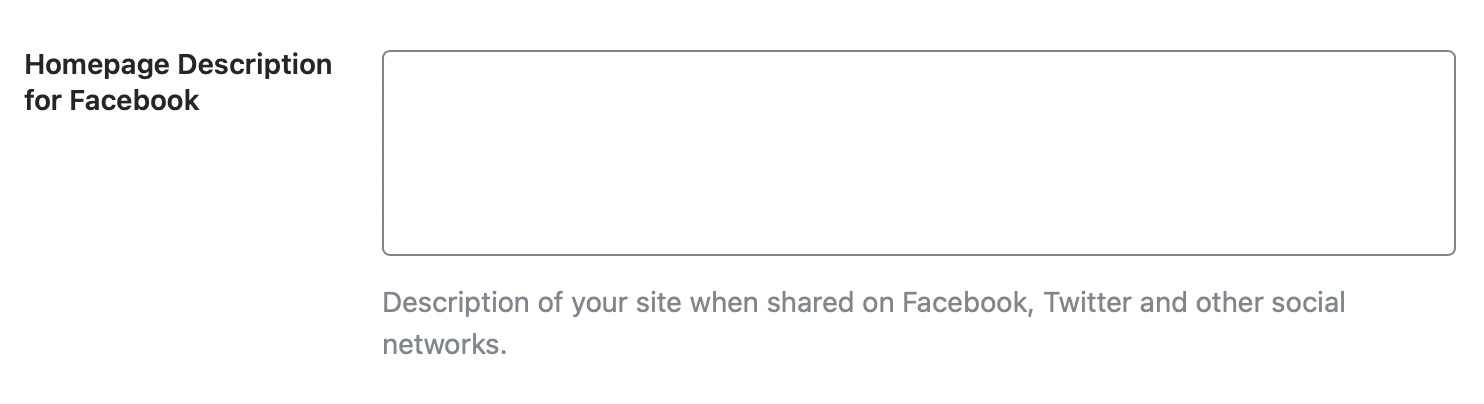
6.6 Homepage Description for Facebook
In the setting above, we set the title for your homepage. Here, you can set the description of the page. Just to remind you, this description will only be used when your page is being shared on social media.
6.7 Homepage Thumbnail for Facebook
Here you can choose the default thumbnail image that will be used when your homepage is shared on Facebook, Twitter, or other social networks.
This setting shouldn’t be confused with a similar setting that you set in the Global Meta section. There, you had set a default thumbnail for the pages of your website, while here, you are setting one for your homepage. The recommended resolution is 1200 by 630 pixels or above.
This covers all the settings in the Homepage section, let us move on to the next section, Authors.
7 Authors Titles & Meta Settings
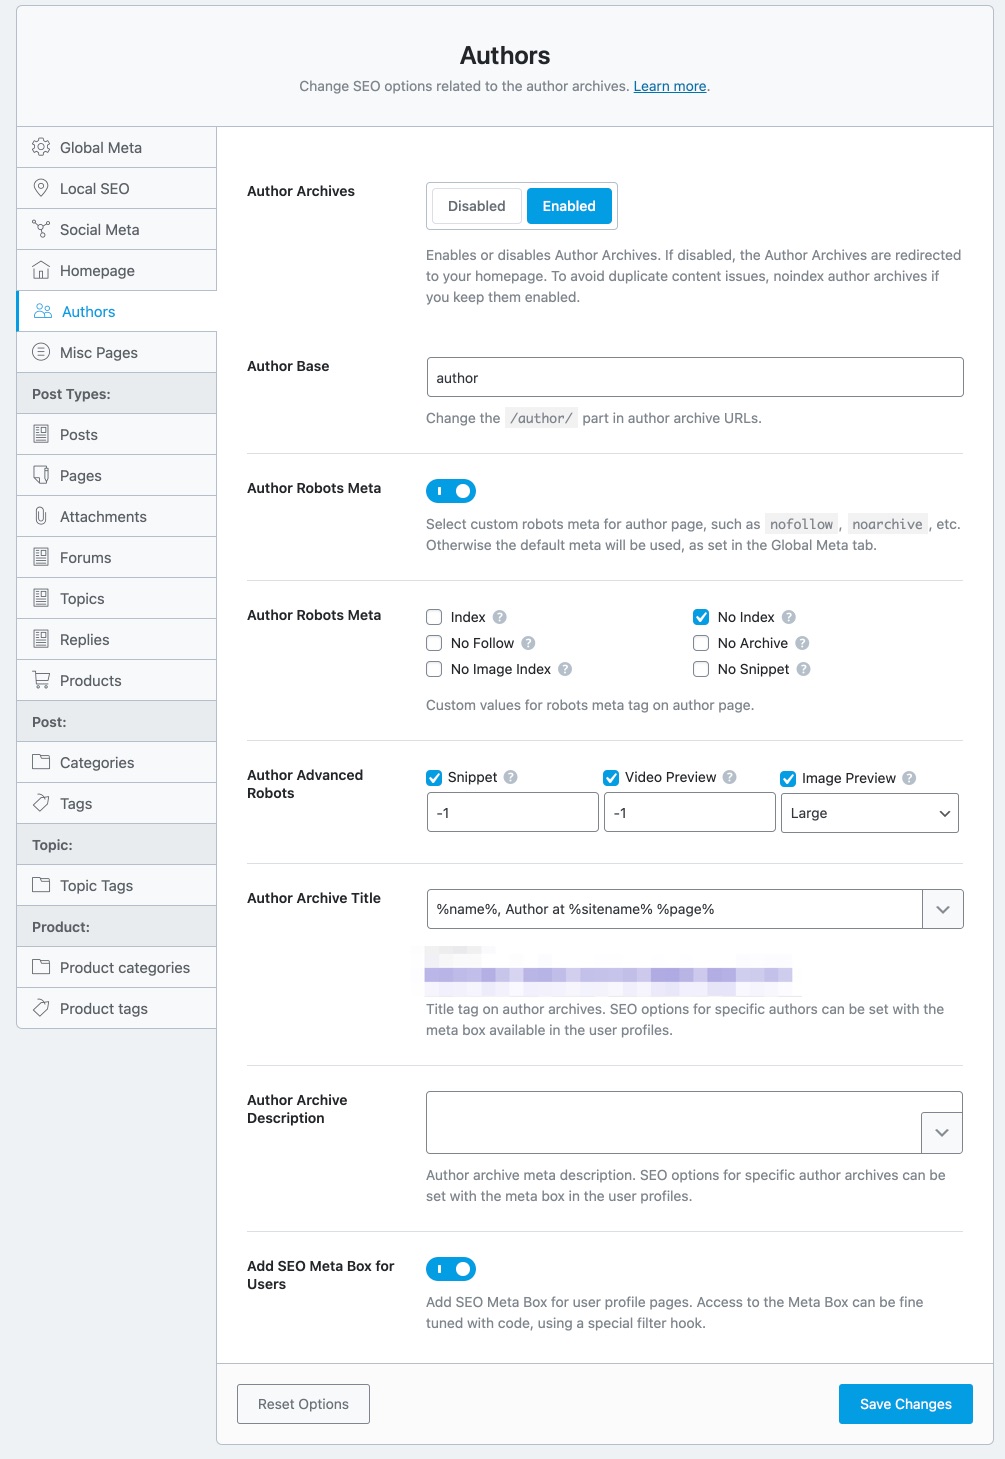
Just as WordPress creates category and date archives, WordPress also creates Author Archives. The Authors section contains all the settings that relate to the author archives. Here are all the available options.
Let us understand the impact of each of the settings in detail.
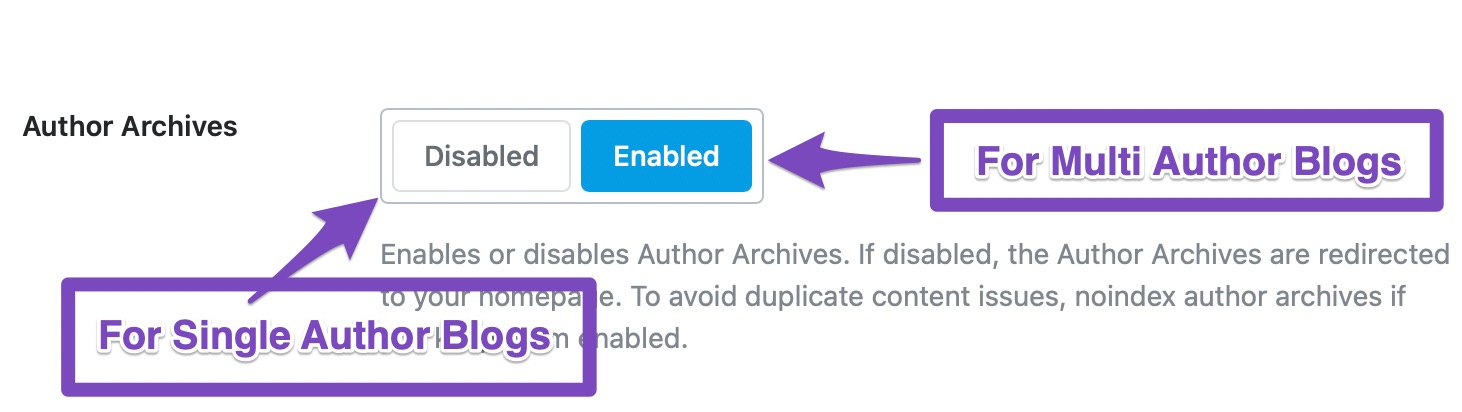
7.1 Author Archives
This option enables or disables the author archives entirely. Depending on how you set up your website and Rank Math, this option might be disabled for you. If that is the case, you will not see the rest of the settings, and you’ll need to enable Author Archives to see the rest of the settings.
For single-author blogs, there is no need to keep author archives enabled as it just leads to duplicate content. If you’re planning to add new authors later, you can keep Author Archives enabled but no-index them to avoid the same content being indexed more than once. We’ll show you how to do it a little later. Note that if you disable the Author Archives, then they will not magically disappear from your website, rather, they will be redirected to the homepage of your website.
7.2 Autorenbasis
By default, the author archive pages have the term “/author/” in them. For example, an author archive for a user might be www.mysite.com/author/author1.
This option lets you rename the “author” part to the text of your choice.
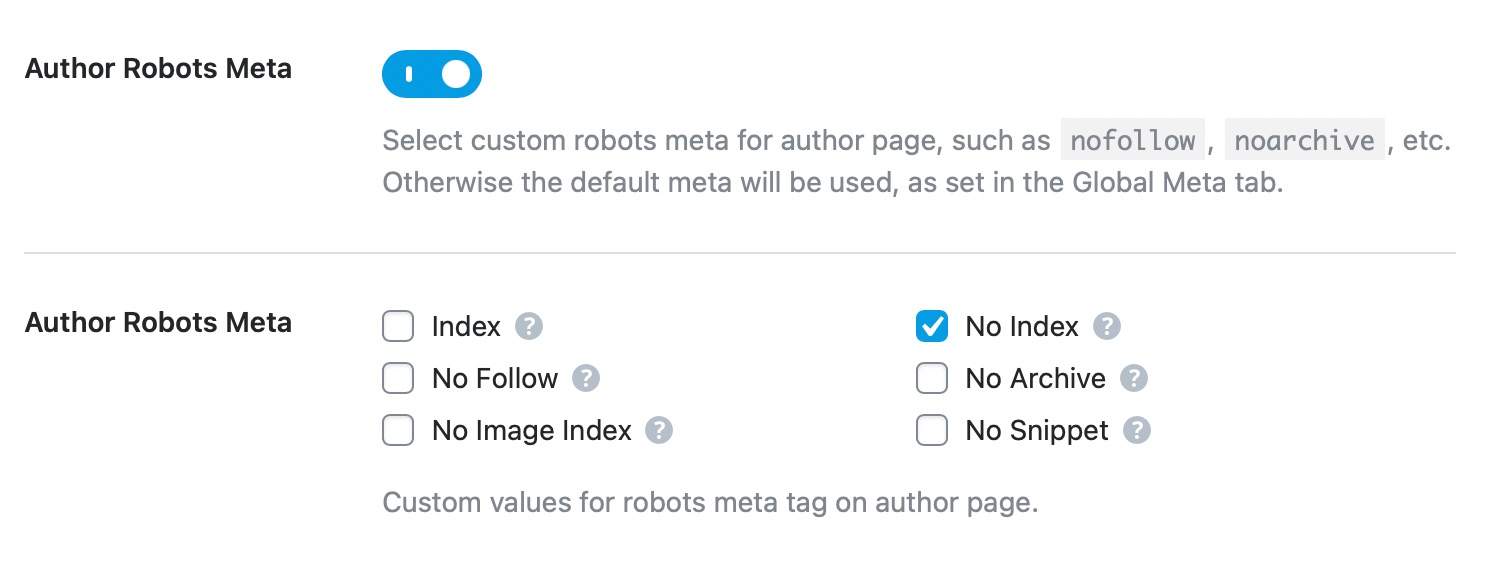
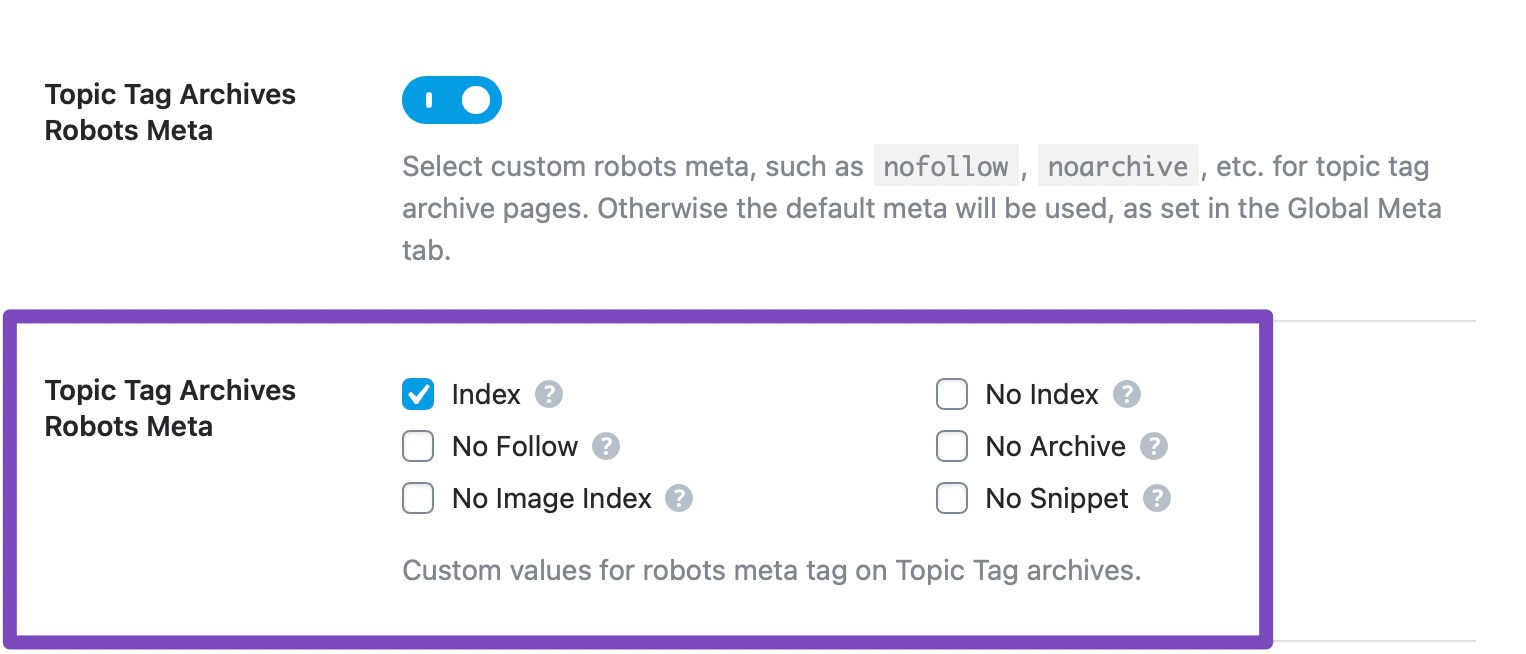
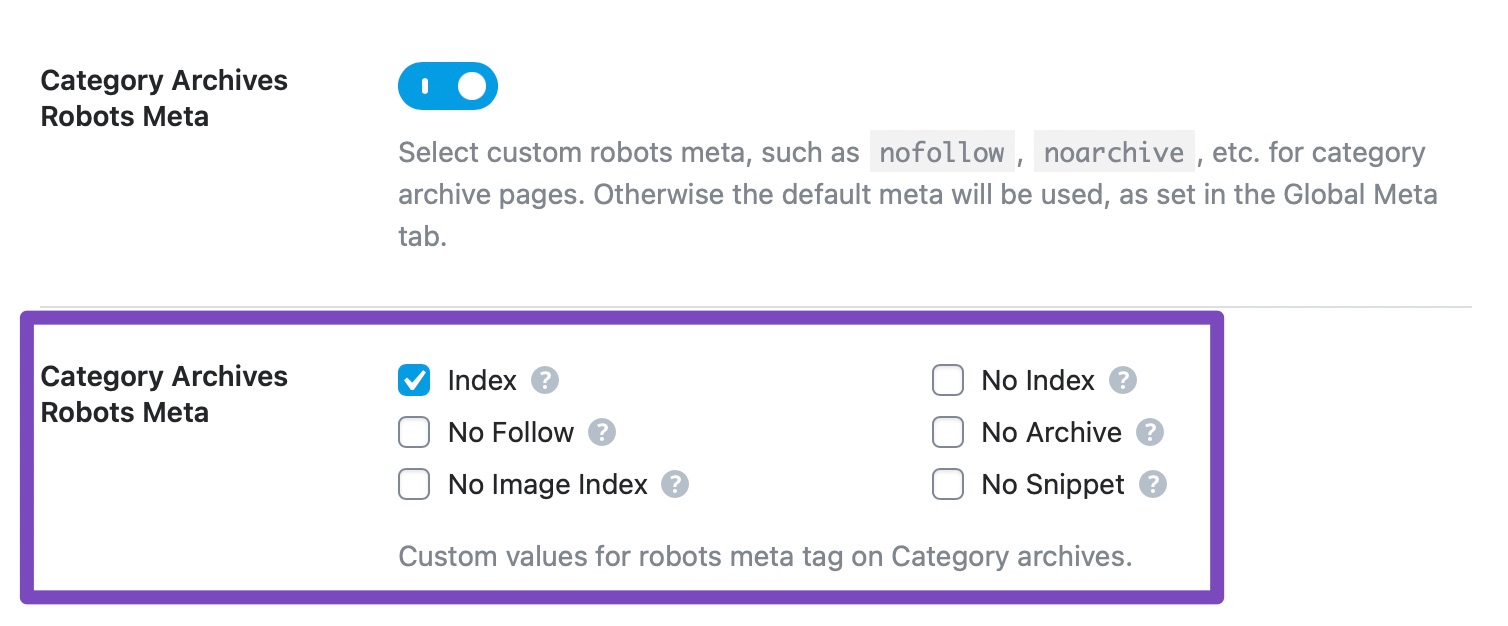
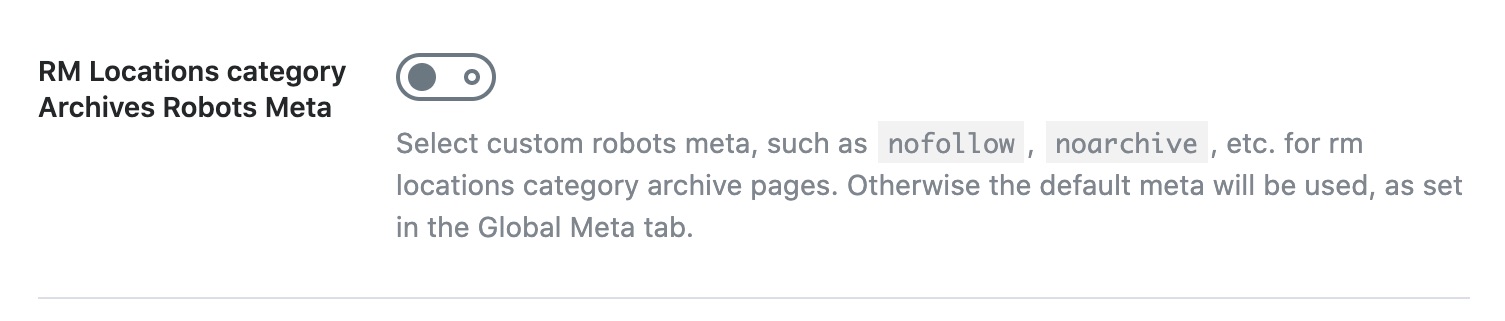
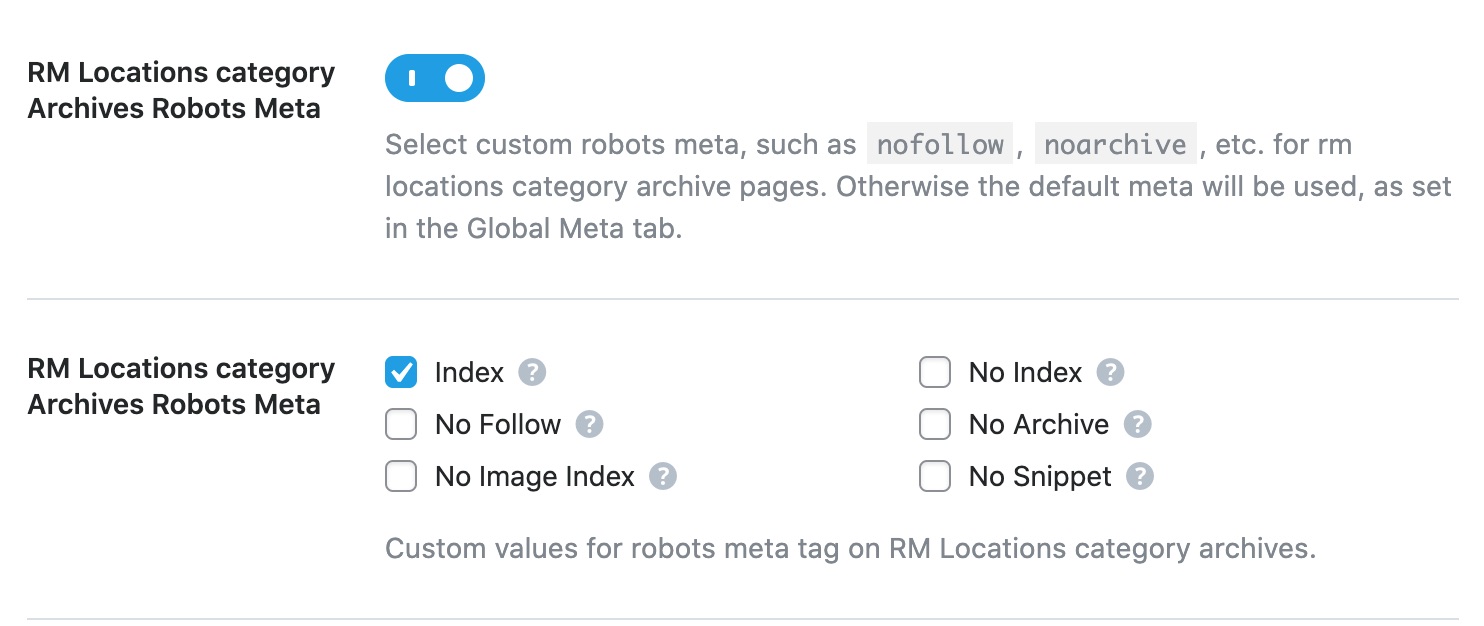
7.3 Author Robots Meta
This option lets you configure Robots Meta for author archives. You can either choose the default meta that you’ve set for your website, for your author archives too or choose Custom Meta.
If you choose the Custom option, new settings will appear below it.
You can then choose all the Meta Robot tags that you want to apply to your author archives. We would recommend that you at least No Index your author archives to avoid indexing duplicated content. You won’t get penalized for duplicate content, but it will waste your crawl budget.
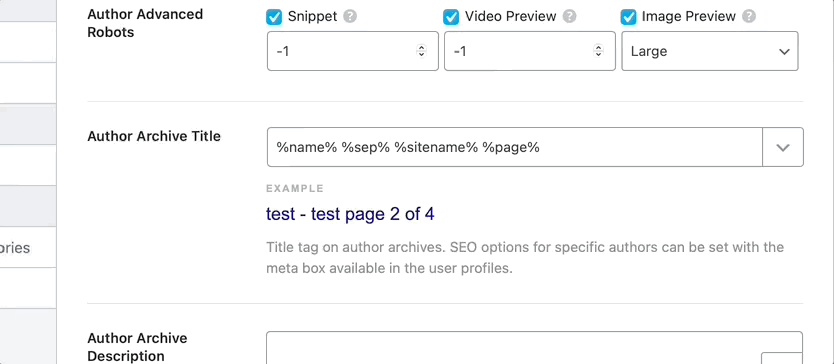
7.4 Author Advanced Robots
This option lets you configure the Advanced Robots Meta for all your archive pages. You can configure these meta directives to control how the snippets of your author pages should appear on search results.
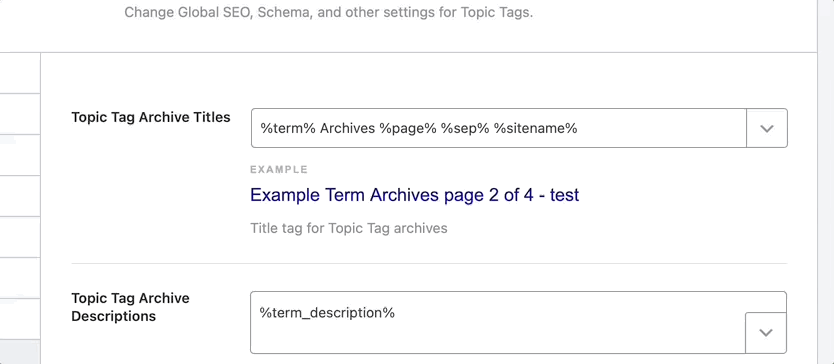
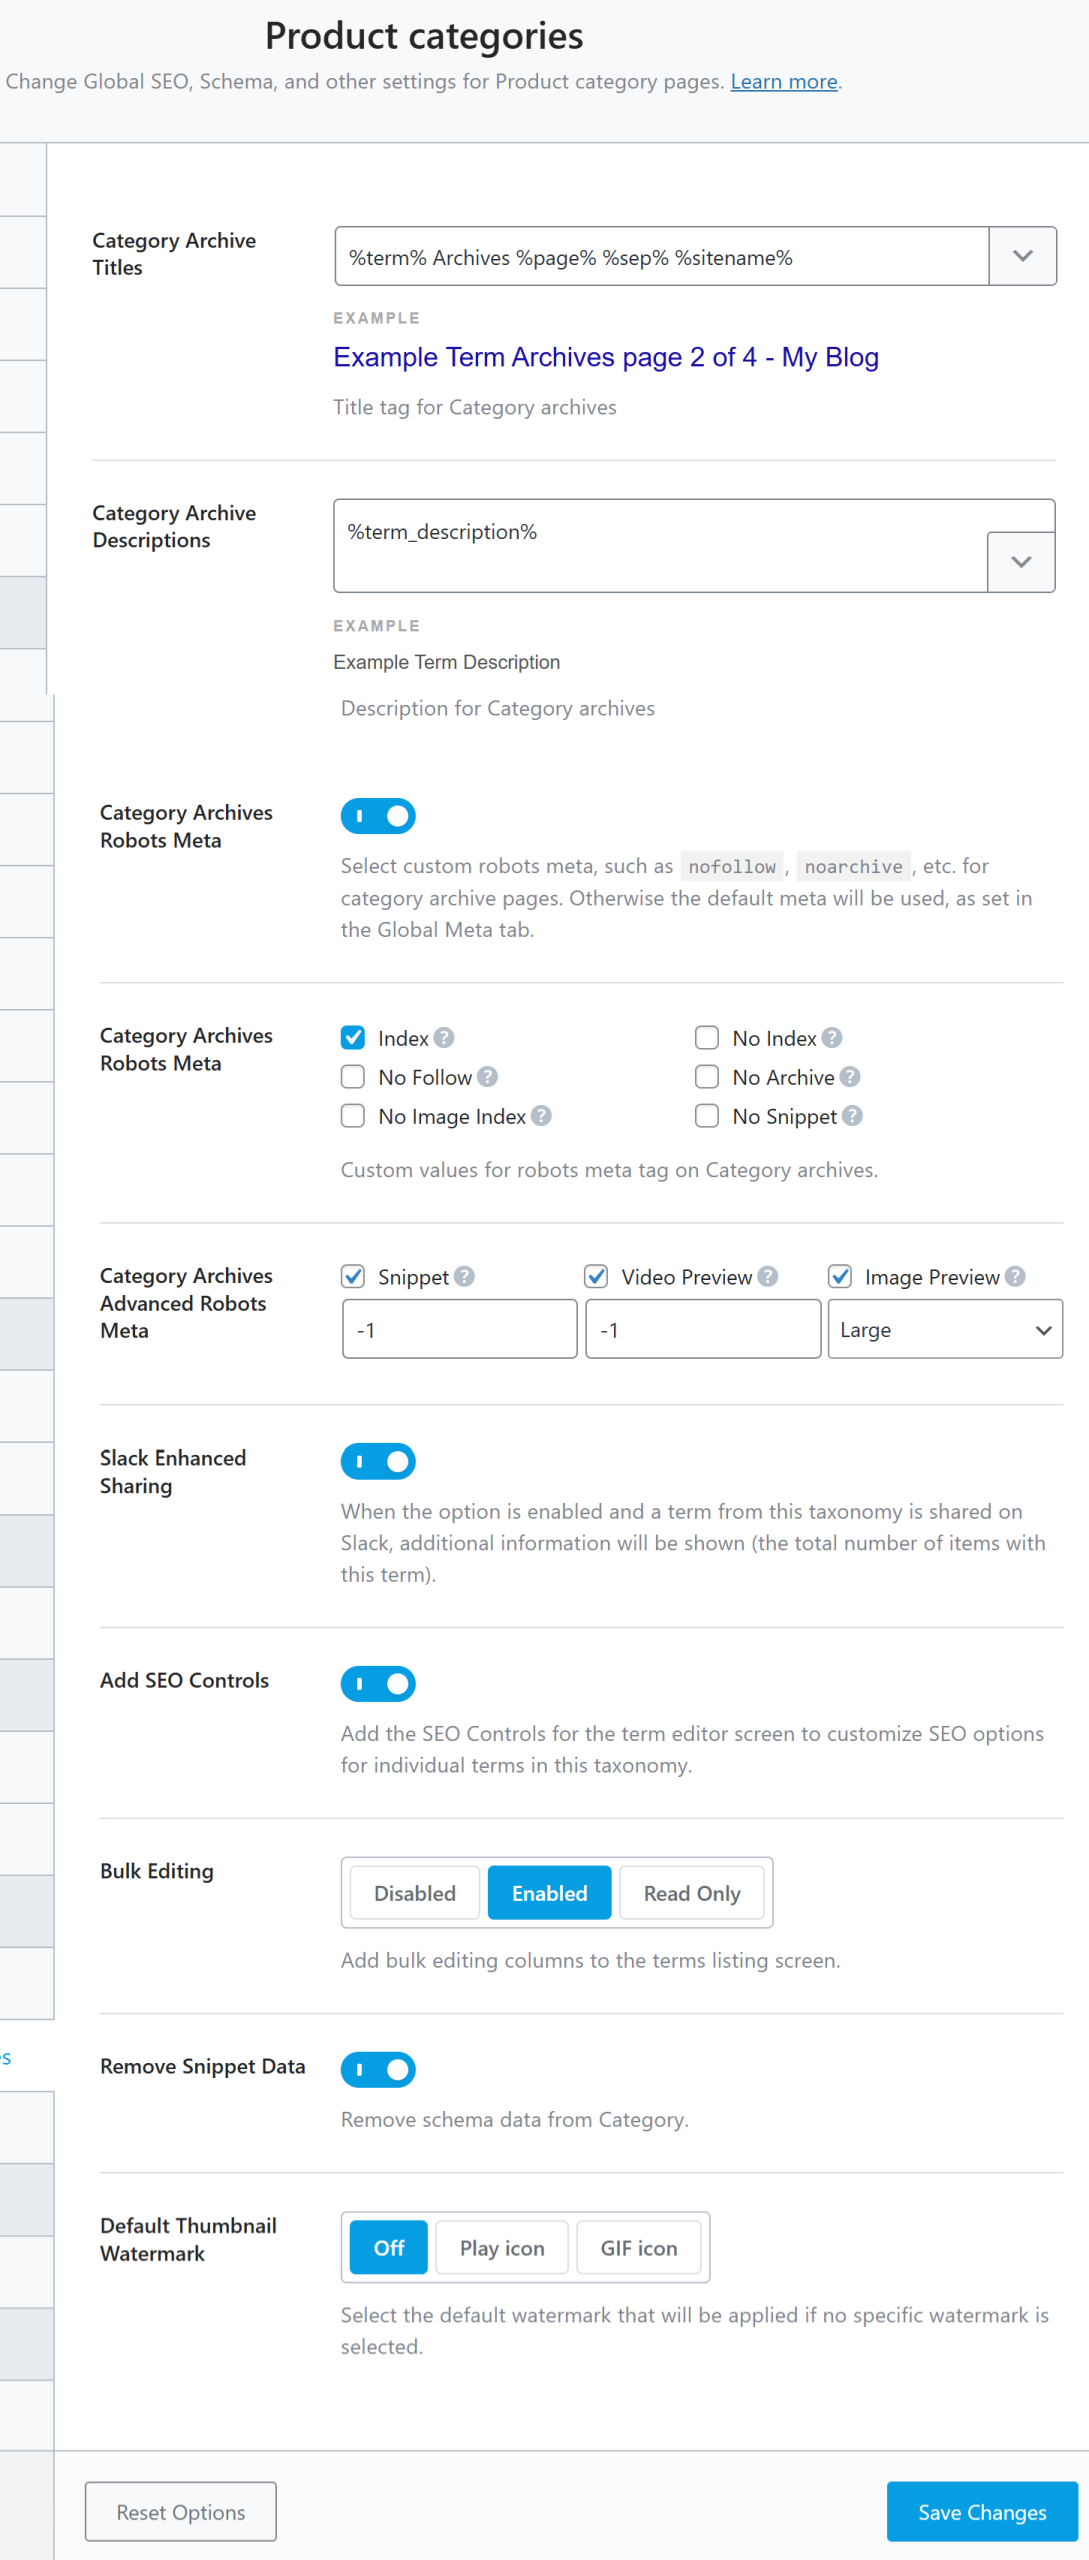
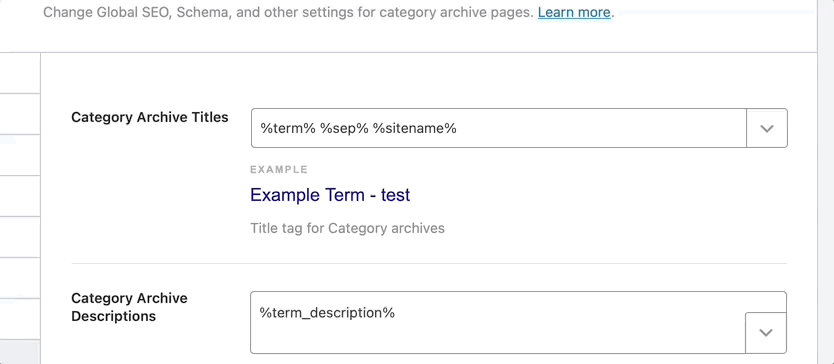
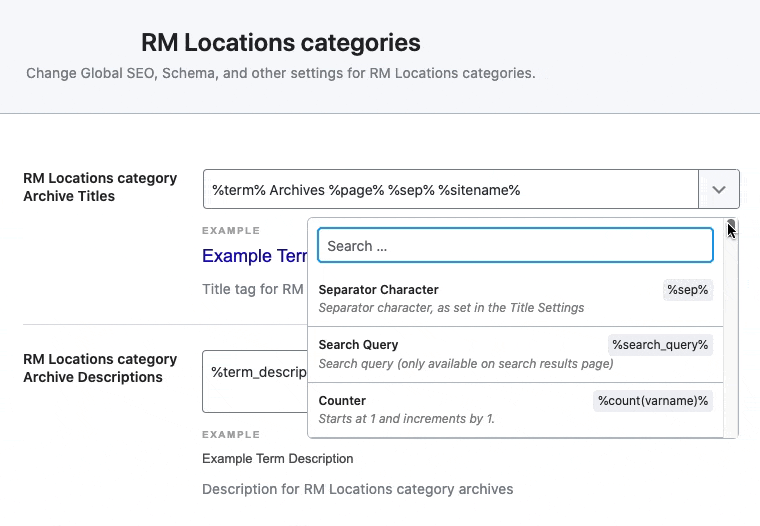
7.5 Author Archive Title
This option lets you create a template for author archive pages. You can enter static text or create a template based on variables. A sample template is already created for you to see.
To see all the available variables, click the drop-down button present on the top right of the text field. Here is an image showcasing all the variables. As you’ll see in the image, you can also type in some words to search through the variables.
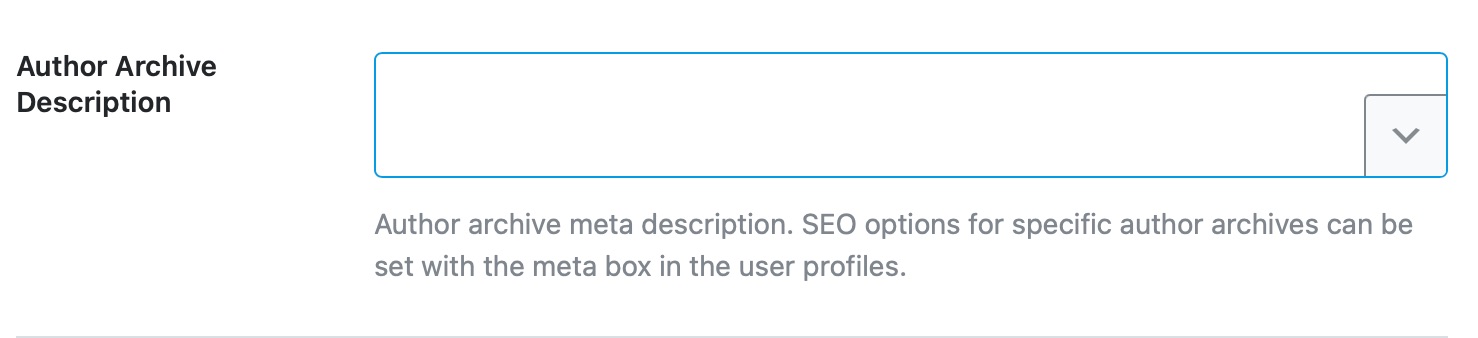
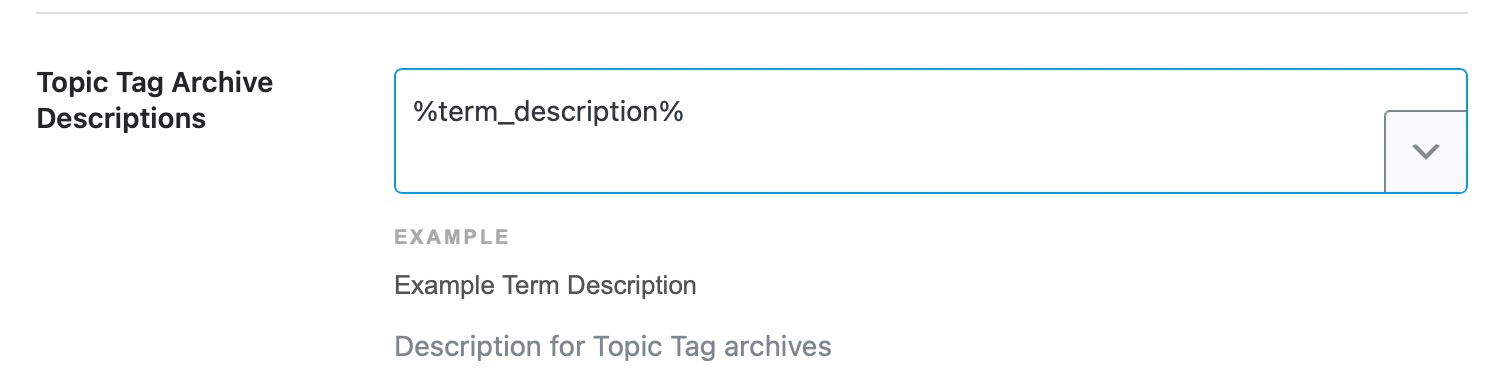
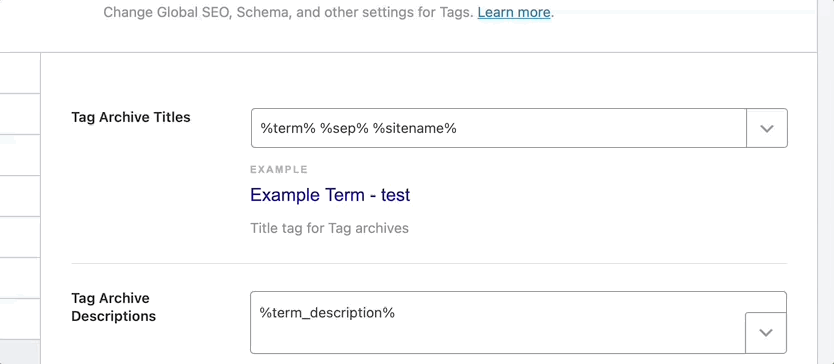
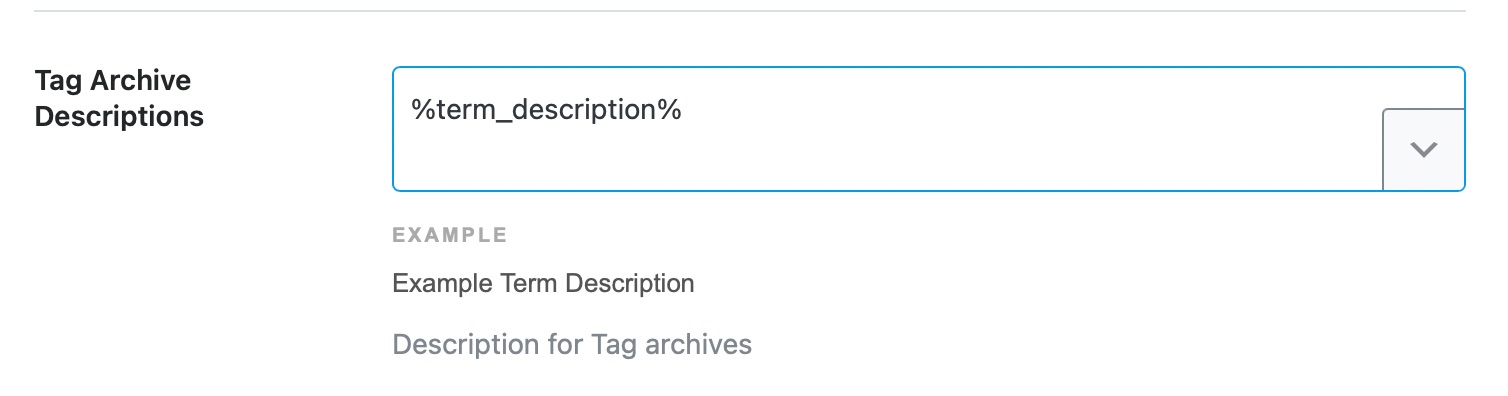
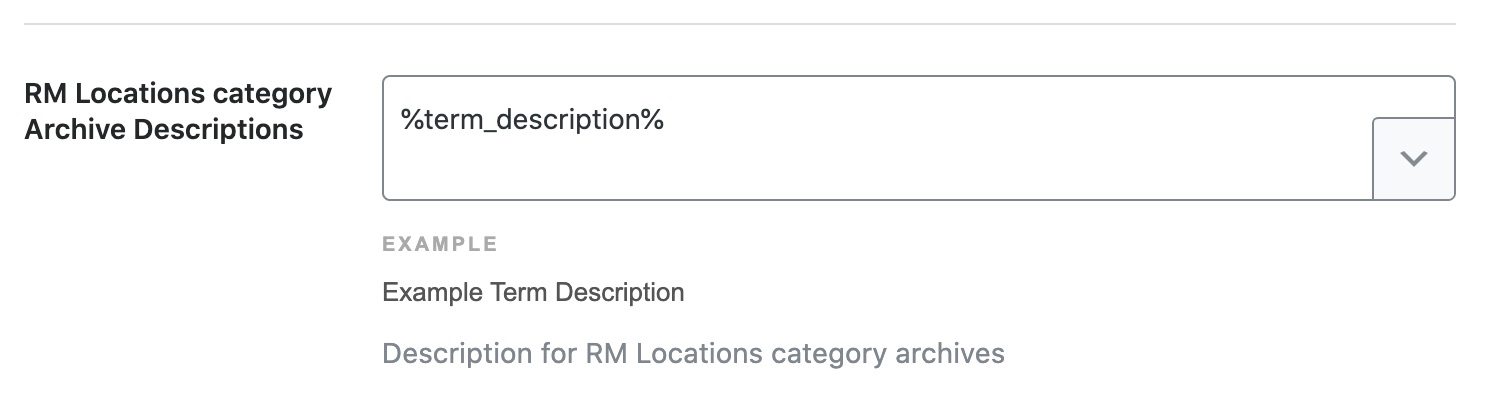
7.6 Author Archive Description
This option lets you create a description for the author archive pages. Similar to the Author Archive Title, you can enter static text or create a dynamic text using variables.
7.7 Slack Enhanced Sharing
This option is enabled by default and when you share your author pages on Slack, the link preview will include additional data such as the name of the author and count of posts associated with the author.
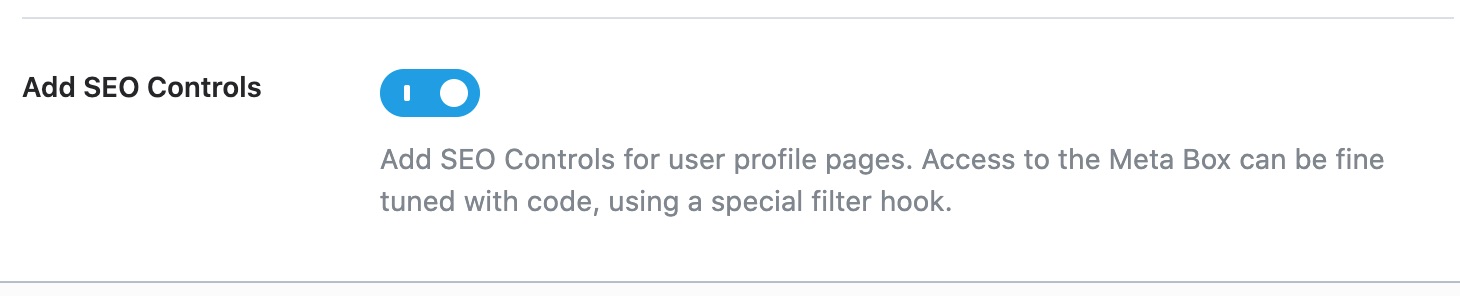
7.8 Fügen Sie SEO-Steuerelemente hinzu
This option adds an SEO meta box for user profile pages. What that does is give you an option to optimize your author page’s title, meta description, and social sharing meta on an individual level instead of using default settings for each of them. If you’re running an authority website with multiple authors, then you might find this useful.
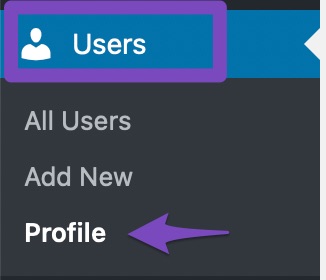
To see the Meta Box in action, head over to your user profile in WordPress by heading over to Users → Profile.
Once you’re on your profile page, you’ll have to scroll down until you see the familiar Rank Math Meta Box.
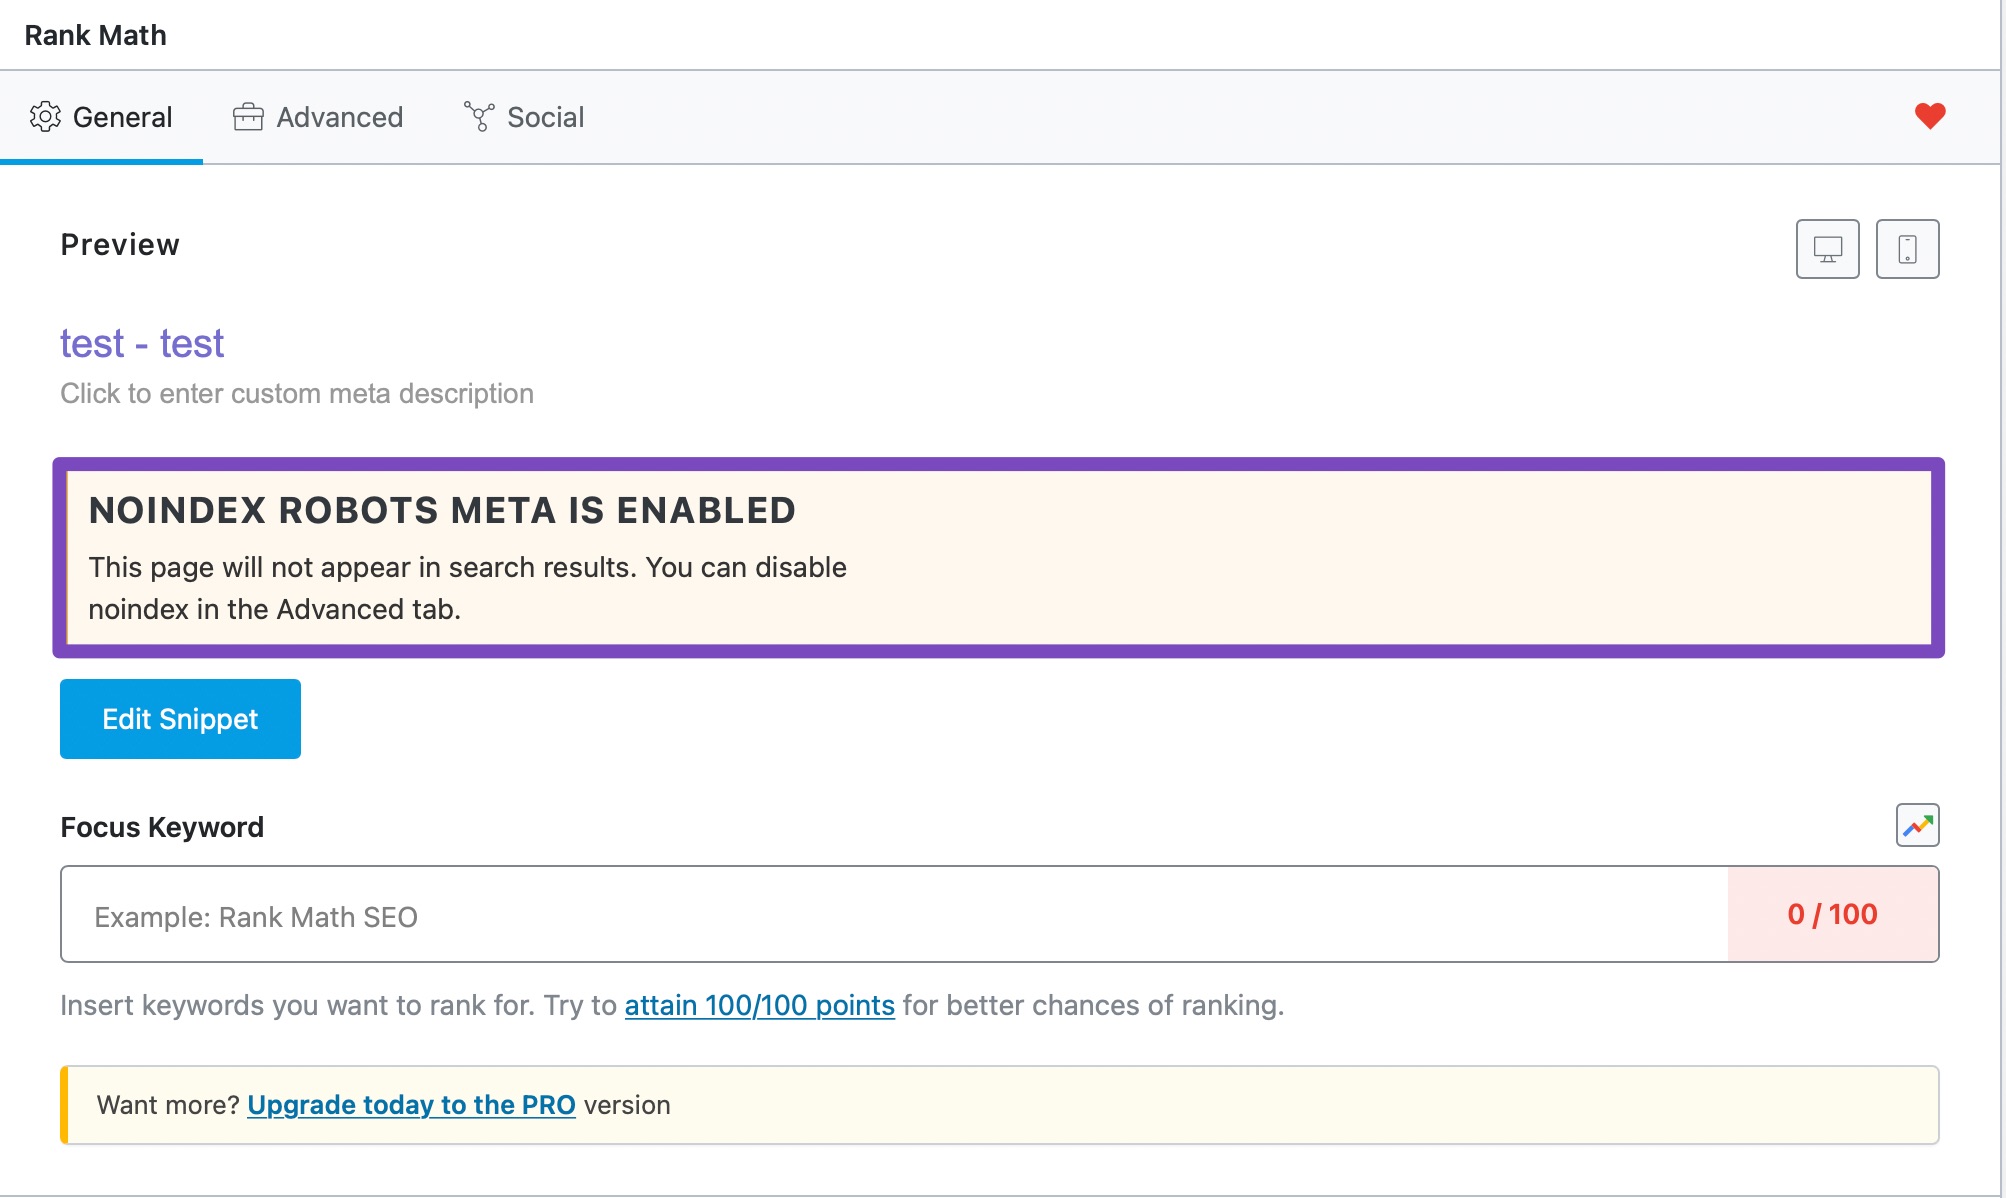
You might see a warning on the Meta Box similar to the one in the image below—which will also disable the Meta Box effectively.
If that’s the case, go back to the Author Robots Meta and see if you’ve set it up in a way that search engines won’t see or index Author Archives.
If your Author Robots Meta is set to default, then you might have no-indexed archives or all the pages on your website. Check the other settings to disable those settings first.
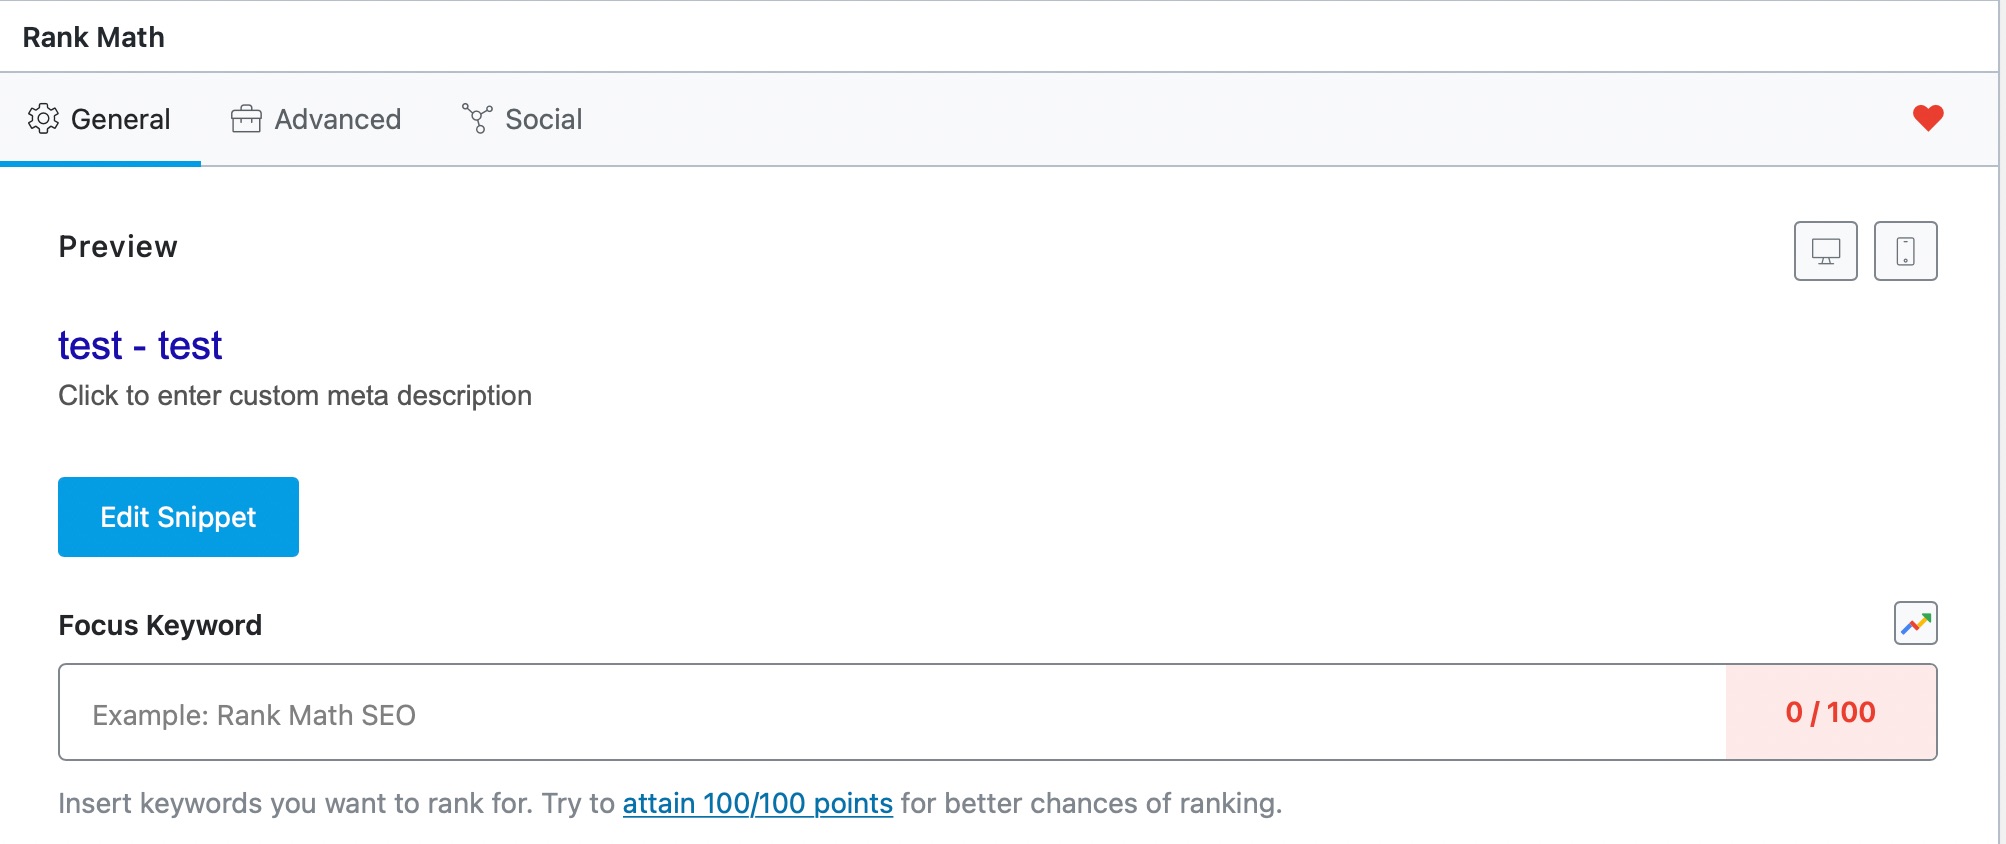
After making those changes, don’t forget to save your settings.
Then, when you come back to the snippet, you will see that all the options are enabled.
The optimization process that you would follow here would be the same as the one you follow while optimizing your posts. Rank Math’s Meta Box guide will help you in that process.
This covers all the settings in the Authors section. Let us discuss the next section.
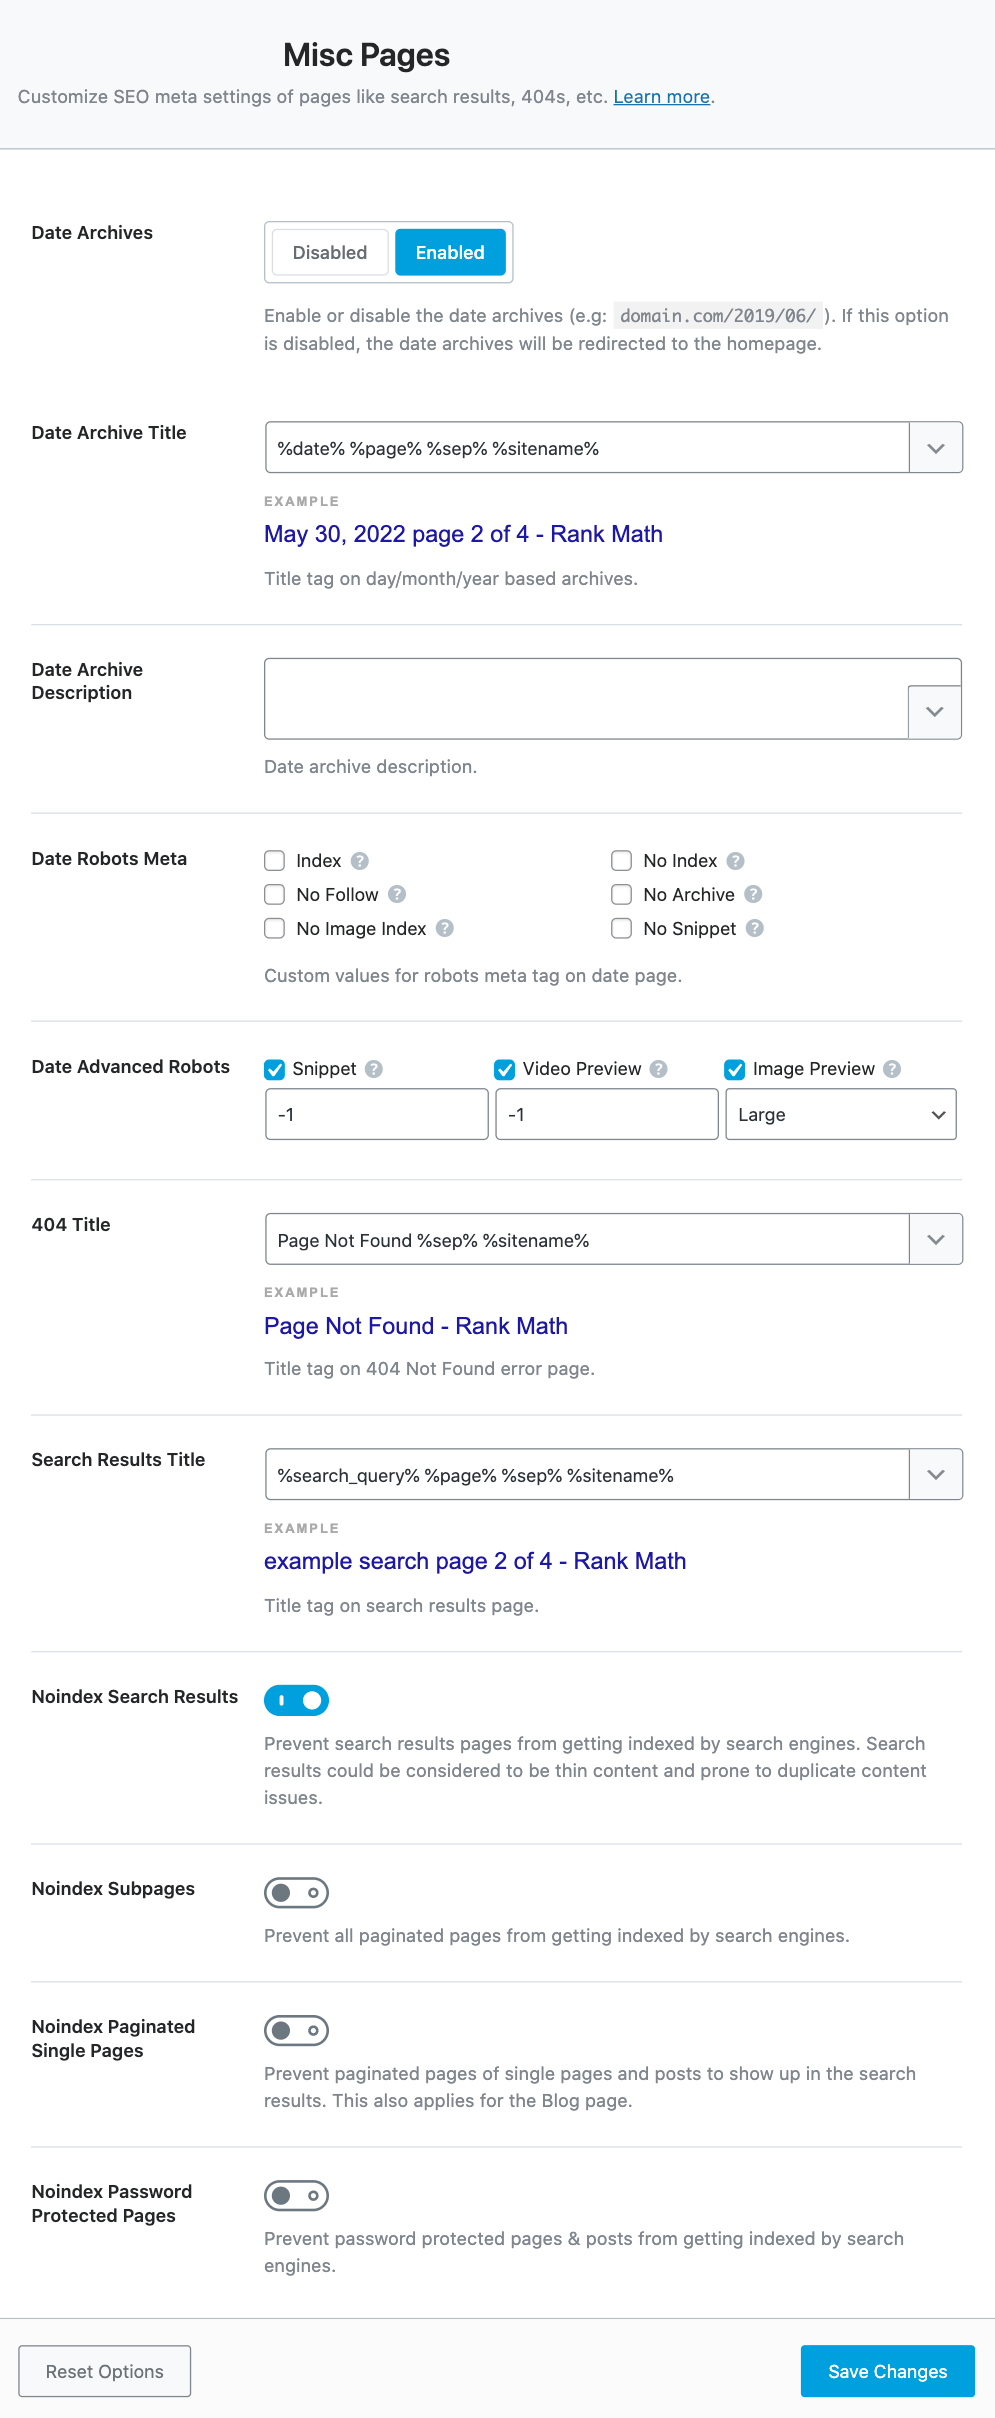
8 Misc Pages Titles & Meta Settings
We’ve already covered Global Pages, Local Pages, Homepage, Social Pages, and even Author Pages. The Misc Pages section contains all the settings for all the other pages in WordPress, like the search page, 404 page, and more. Here are all the settings in the Misc Pages section.
Let us discuss each of the settings one by one.
8.1 Date Archives
Date Archives are pages that WordPress creates, organizing your content by the dates they were published on. For example, website.com/2019/03/ would be a date archive page.
This option lets you enable or disable Date Archives completely from your website. Date Archives are useful only in certain situations, and on most websites, they should be disabled.
When you disable Date Archives, they don’t disappear from your website. They are redirected to your homepage instead.
Enabling the Date Archives opens up additional settings below it, which help you configure the date archives.
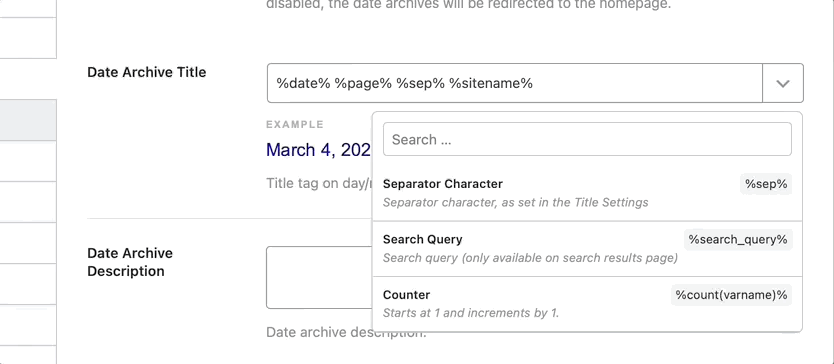
8.2 Date Archive Title
This option lets you create a title template for the Date Archive pages. You can either enter static text or create a dynamic template using variables. A sample template has been created for a demonstration.
To see the list of all available template variables, click the drop-down arrow on the top right of the field. You can either scroll to see a list of all variables or type in a few characters to filter the list to your desired variables.
8.3 Date Archive Description
This option lets you set a template for the description of date archive pages. You can either enter static text or create a dynamic template using variables.
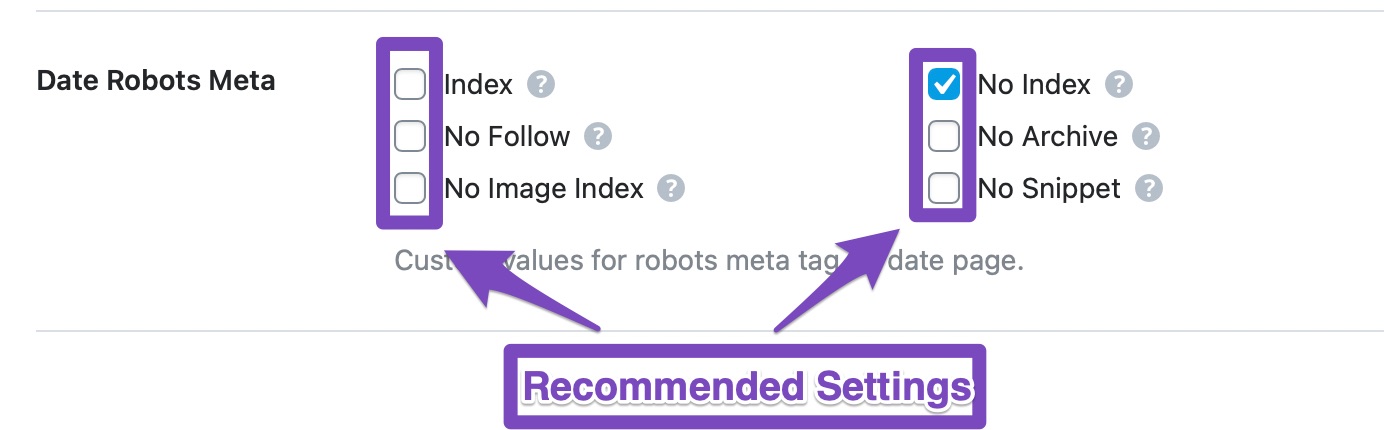
8.4 Date Robots Meta
As we mentioned, date archives are useful only in certain specific scenarios. Even if you decide to use them, you will face a duplicate content problem. To avoid that problem and to keep your crawl budget efficient, we would recommend that you No index your date archives.
8.5 Date Advanced Robots
This option lets you configure the Advanced Robots Meta for your data archives. These Robots Meta allow you to control how the snippet of your date archives should appear on search results.
8.6 404 Title
This option lets you create a template for the title of the 404 pages. A sample template is created, and the same variables that we’ve demonstrated above are accessible here as well.
8.7 Search Results Title
This option lets you create a title template for the search results page. The same set of variables are available to you, and you can create a static template or a dynamic one. There are also some variables that are only accessible on search pages, like %search_query%—use them if you like.
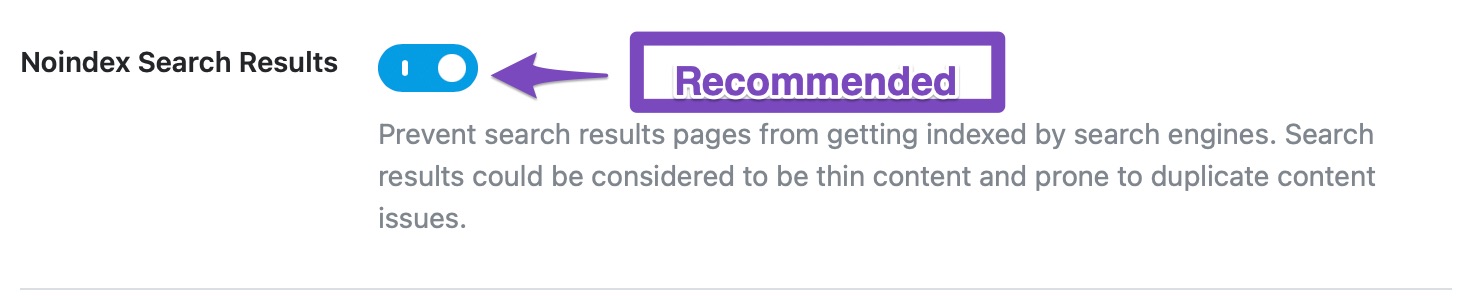
8.8 Noindex Search Results
This option lets you enable or disable the indexing of the search result pages. Search result pages are usually not heavy on content, and they will not be indexed anyway. So, we recommend that you turn this setting on and No index your search results pages.
8.9 Noindex Subpages
WordPress gives you the ability to split large posts and pages into multiple pages. For example, a post with URL yourwebsite.com/special-post can be split into multiple pages with URLs yourwebsite.com/special-post/2 und yourwebsite.com/special-post/3 and so forth.
Similar to posts and pages, archive pages can be paginated too. With this option, you can either enable or disable the no-indexing of archive subpages. Enabling this option will Noindex all the subpages, and they will not show up in the search results.
8.10 Noindex Paginated Single Pages
Enabling this option will Noindex the paginated pages of single pages and posts and all related paginated content will not be displayed in the search results.
Quick Note: The reason why post splitting became popular was that webmasters thought it provided a better user experience. But, users’ expectations have changed, and more users now expect all the content on the same page. As a result, Google has stopped supporting rel=next/prev for quite some time now. Here is a reference article stating that.
Bottom line, if you’re splitting content into multiple pages, then you should stop, and if there exists content on your website that is split into multiple pages, then it is the right time to merge them into a single page.
8.11 Noindex für passwortgeschützte Seiten
WordPress supports password-protected pages that you can use for a variety of purposes. This option lets you control whether you want password-protected pages to be indexed or not. We recommend that you enable this setting to noindex these pages.
This concludes all the options in the Misc Pages section. Let’s move on to the next section, the Posts section.
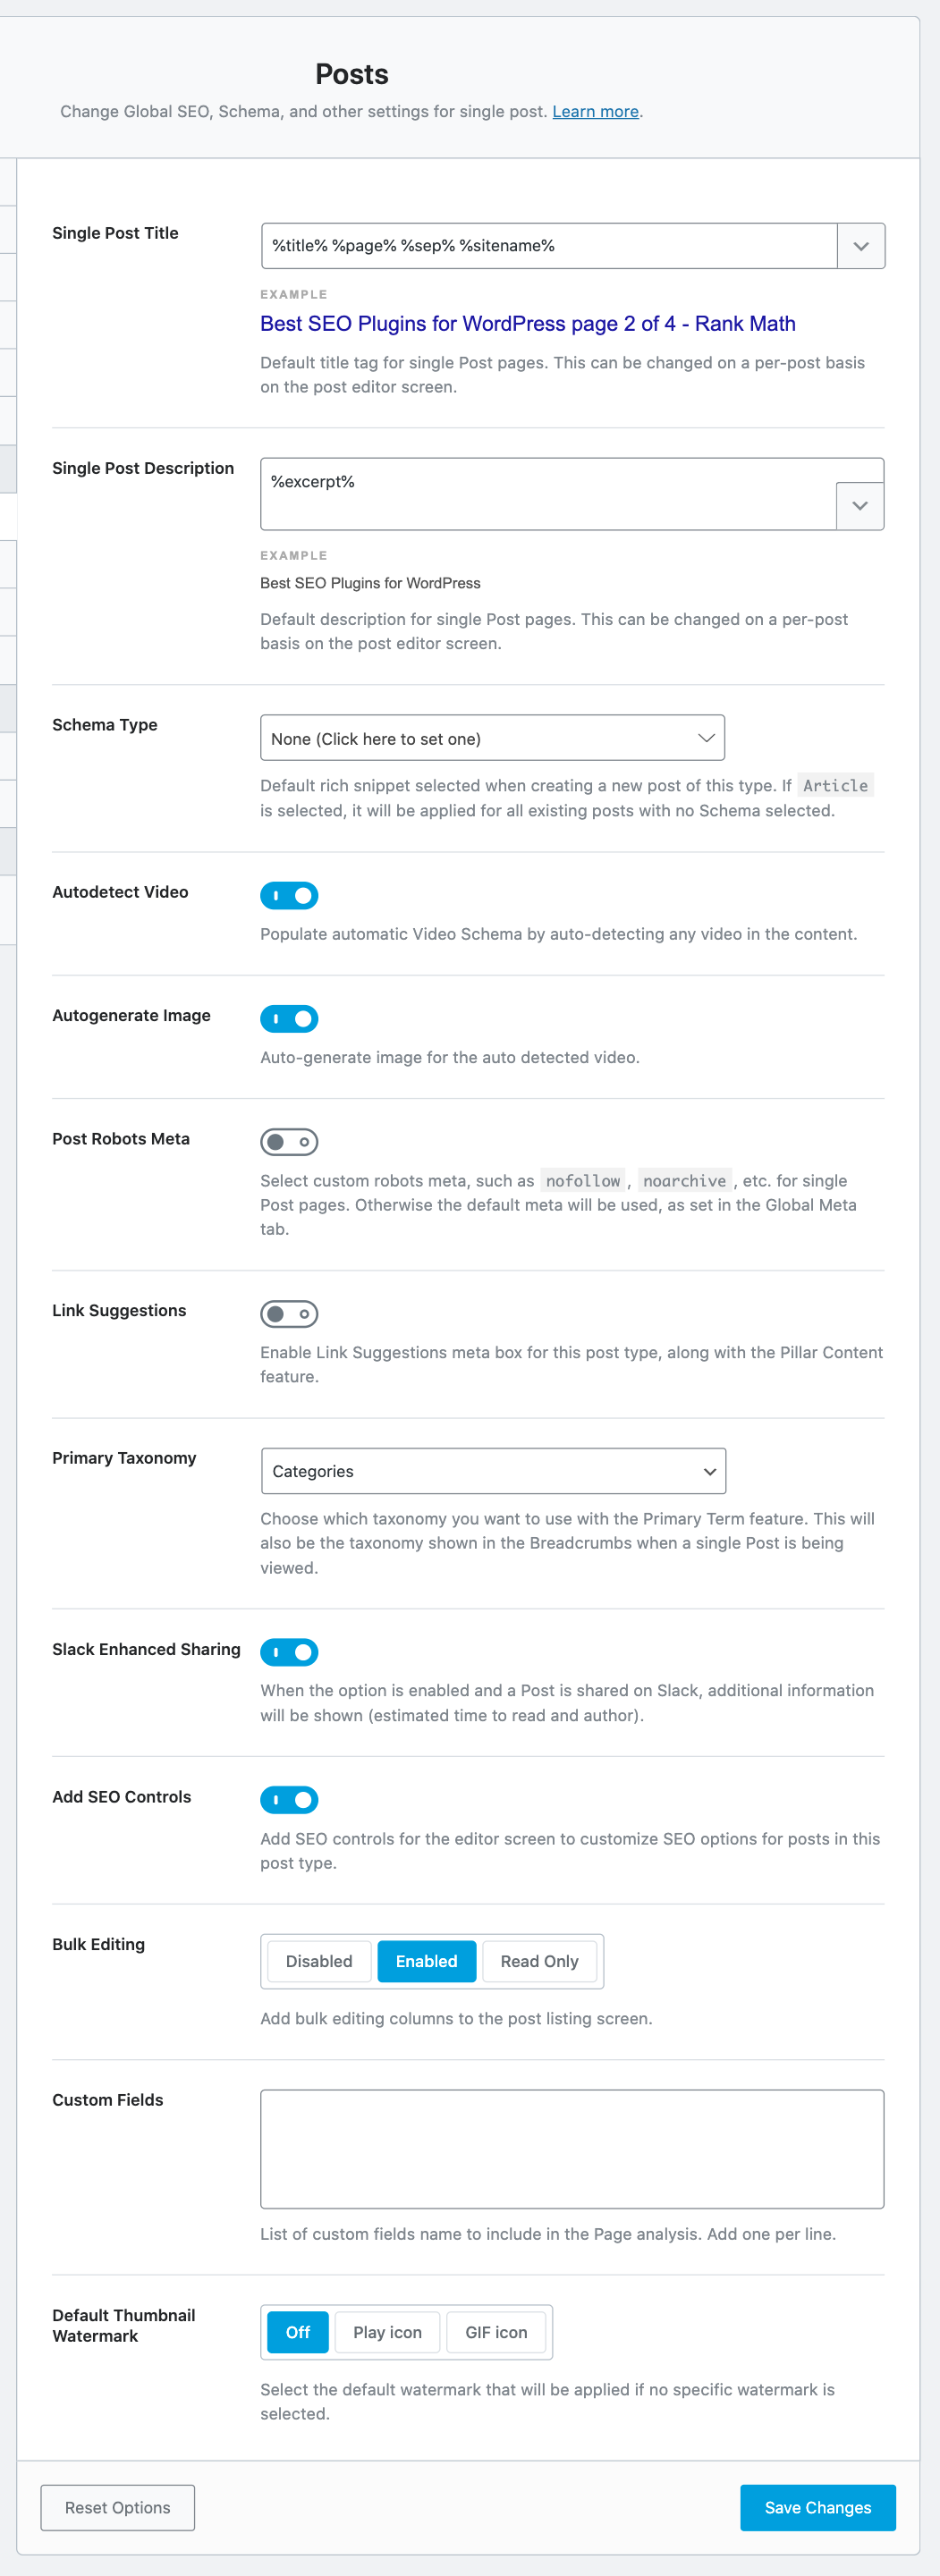
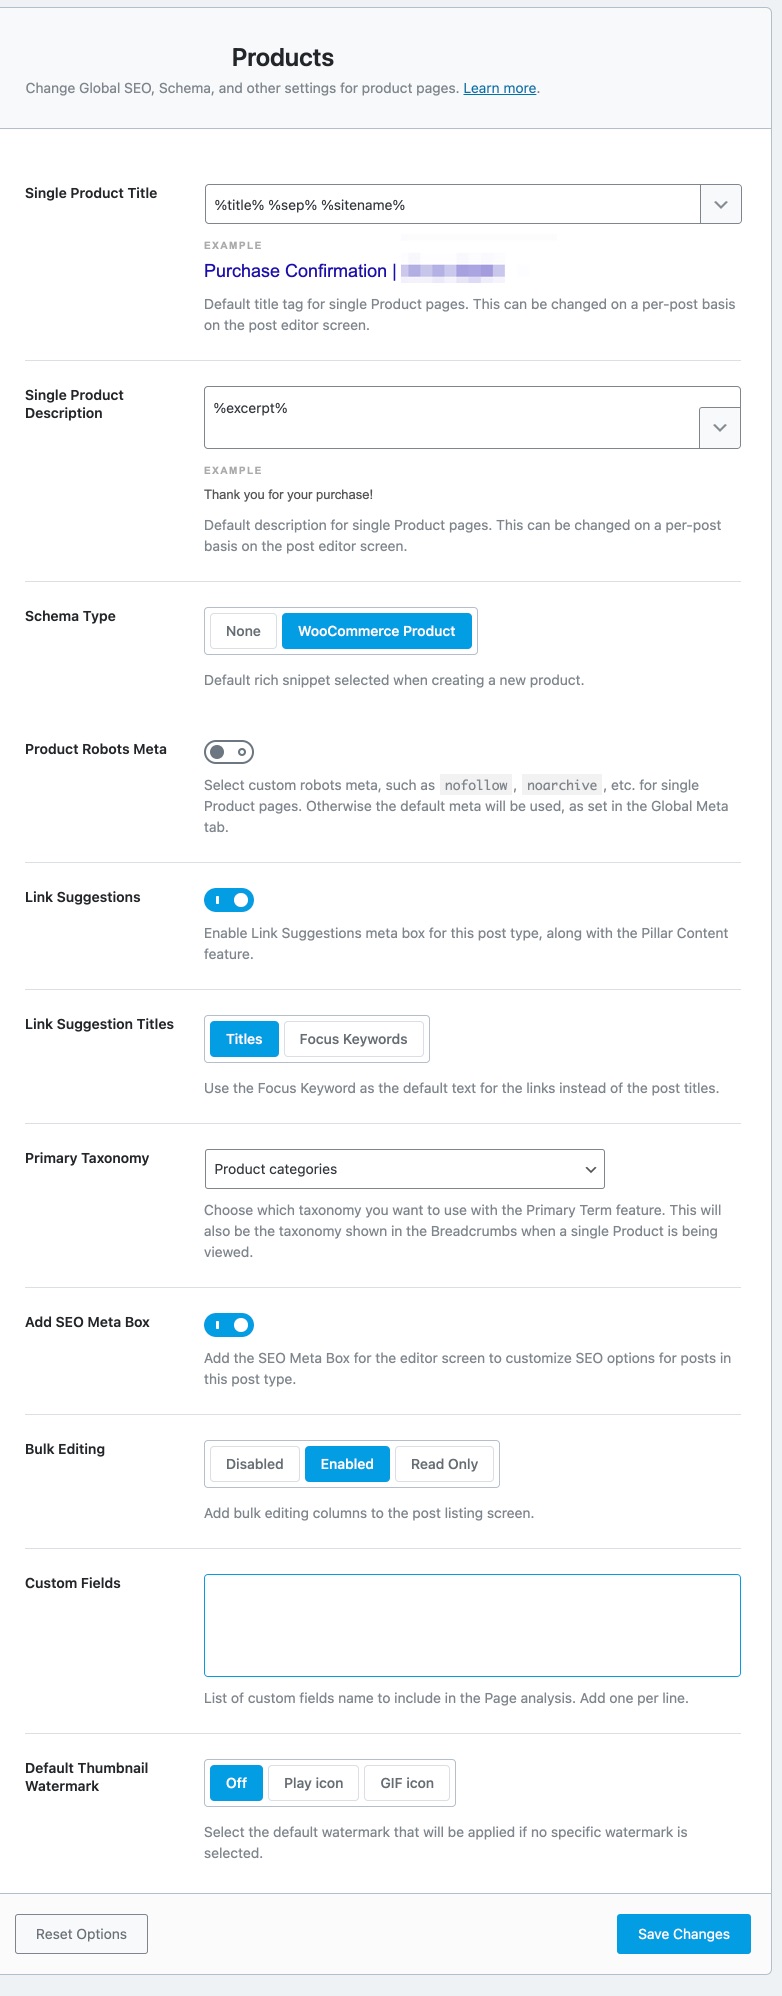
The Posts section deals with all the Title and Meta settings that affect your single posts. Again, all the settings inside the Posts section will help you create a default template that all your new posts will use, and you will be able to override each of these settings on a per-post level. Here are all the settings that you would see in the Posts section.
Let’s look at all the settings one by one.
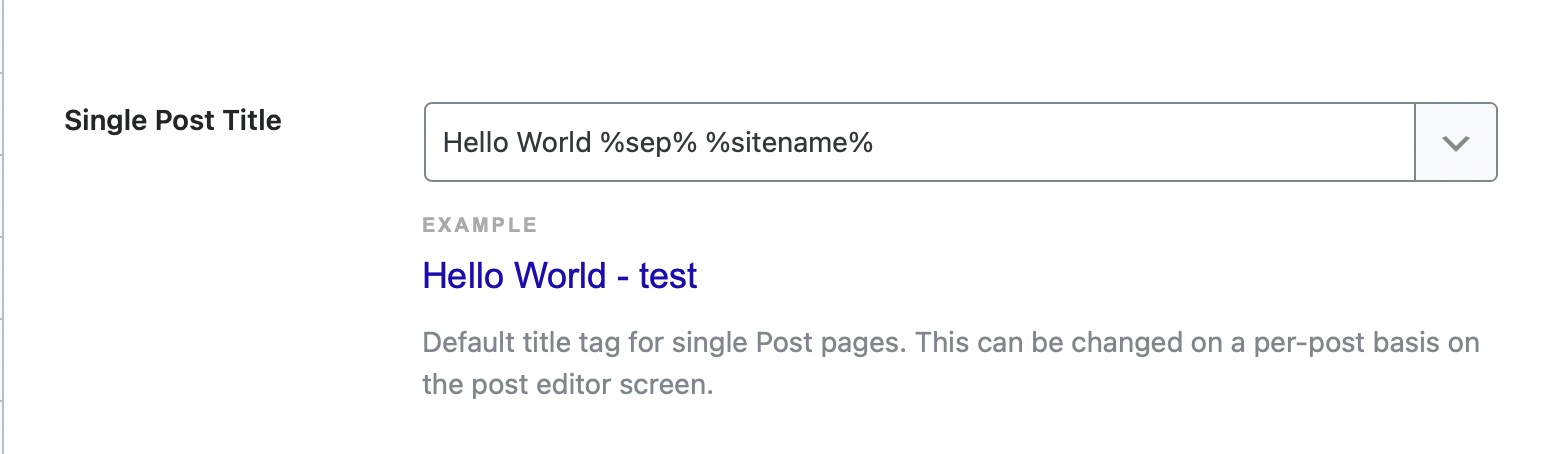
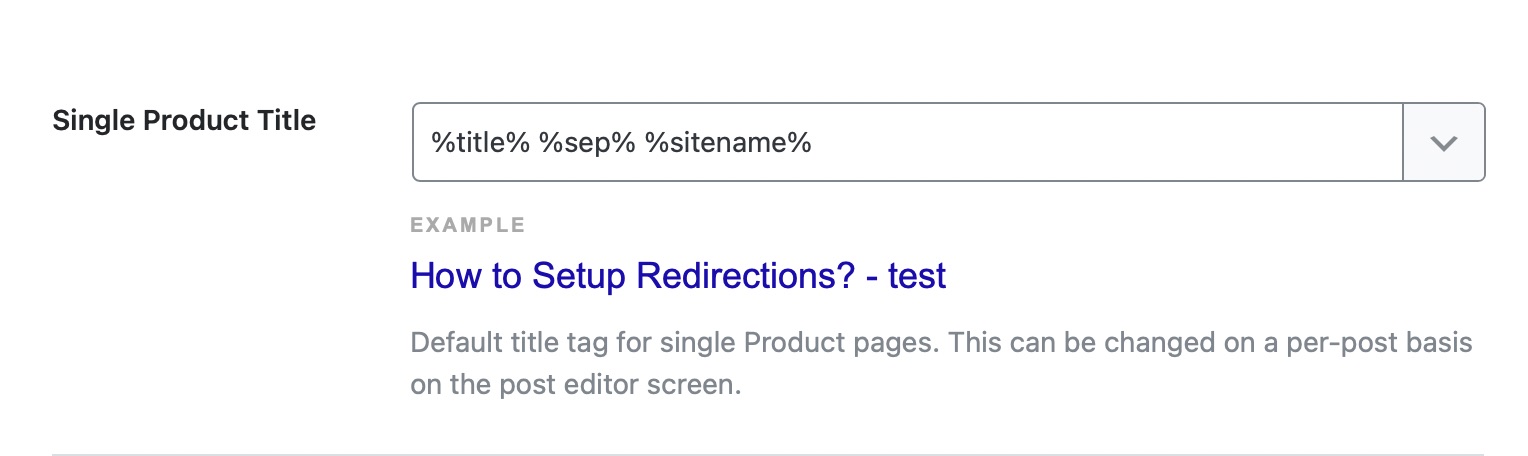
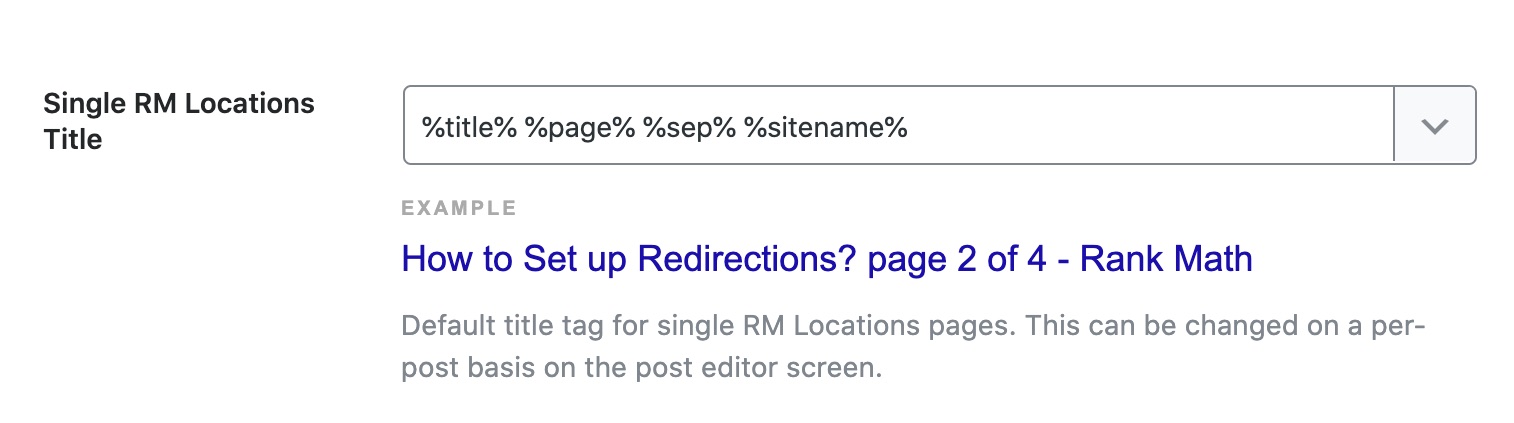
9.1 Single Post Title
This option lets you create a template for your Single Post Titles. There are many variables that you can use to create a template, and a sample template has been created for you to check out.
To check out all the available variables you can use, click the drop-down button at the end of the text area. You’ll see that there are plenty of variables available to use. You can also quickly locate any variable by typing out some keywords in the search bar. As you make any changes to the template, you’ll notice that the preview at the bottom of the field changes in real-time.
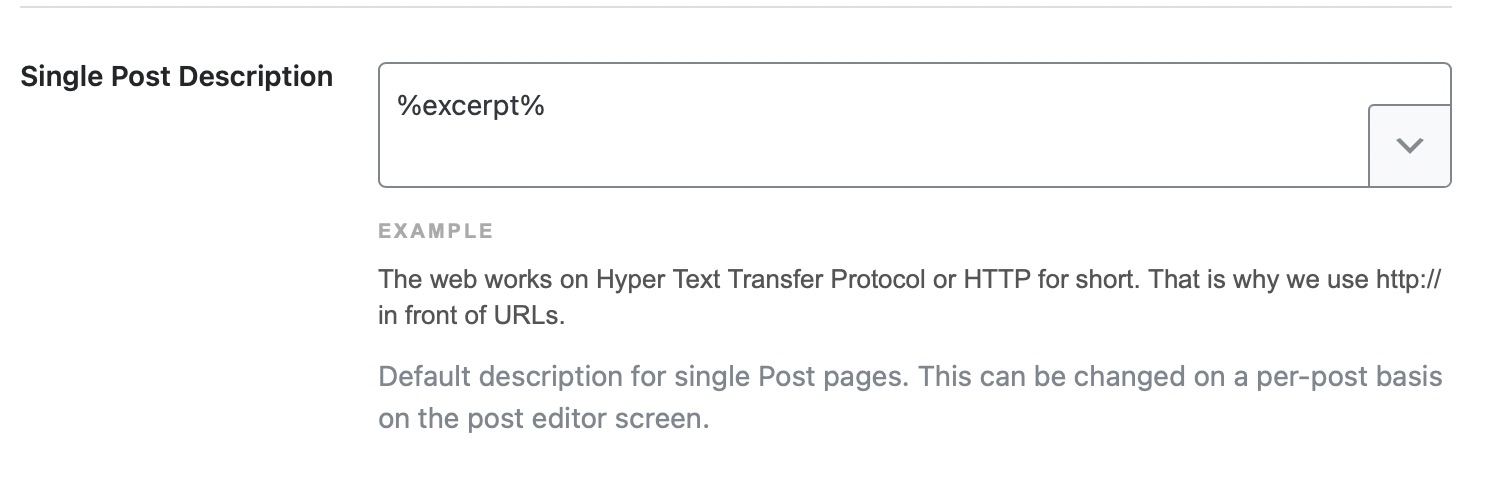
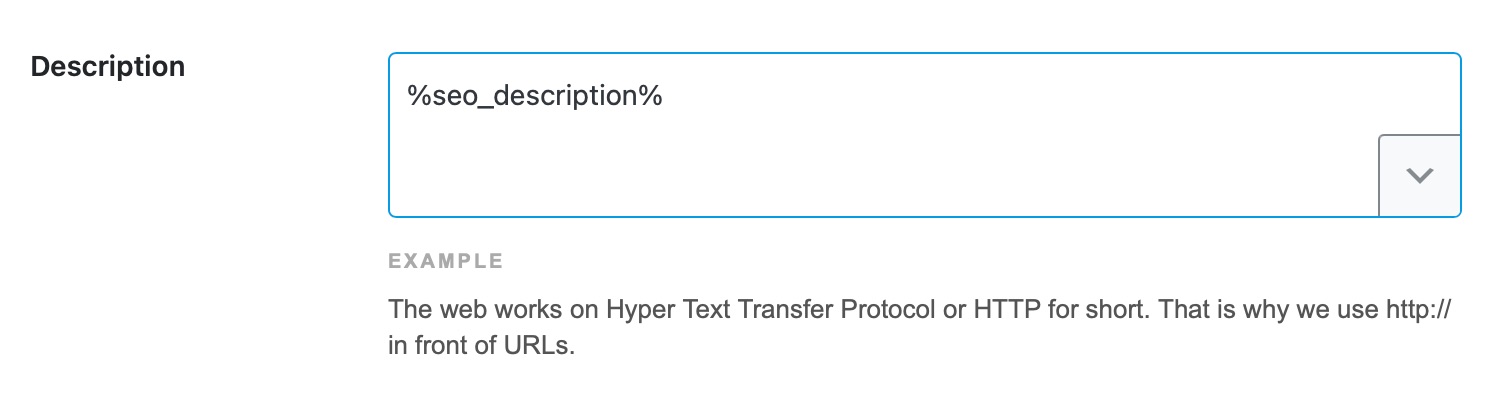
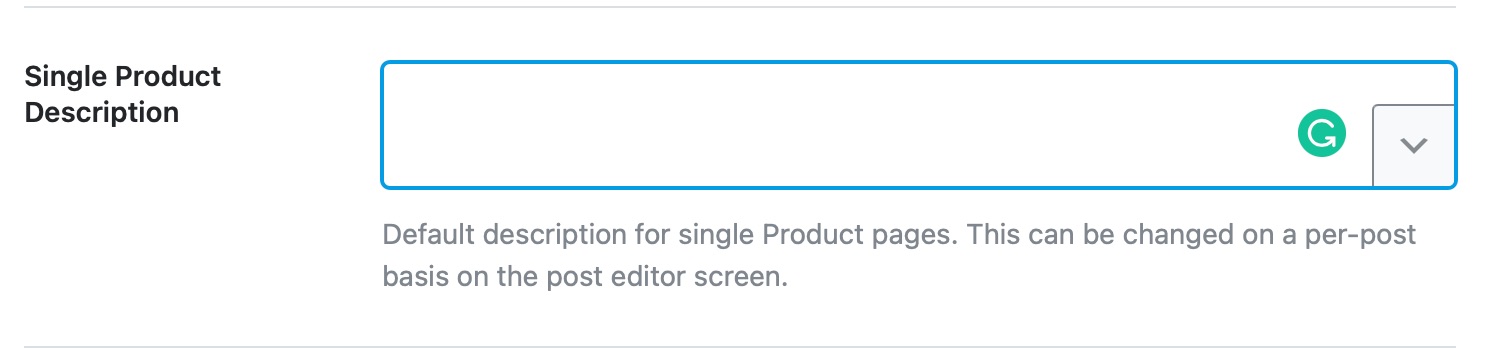
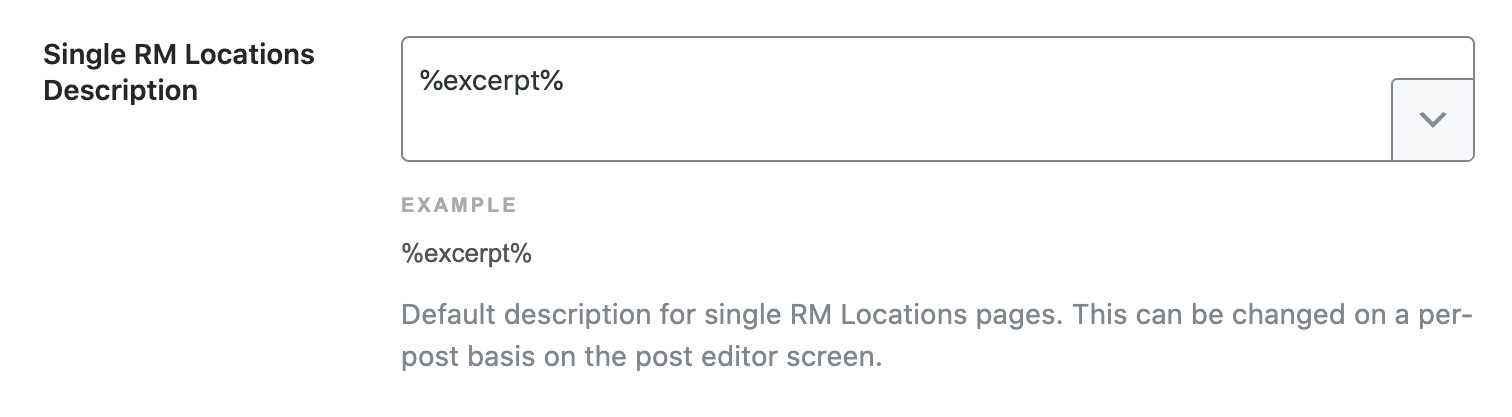
9.2 Single Post Description
This option lets you create a template for the description of your single posts. Similar to the Single Post Title, you have access to a bunch of variables that you can use in the text field.
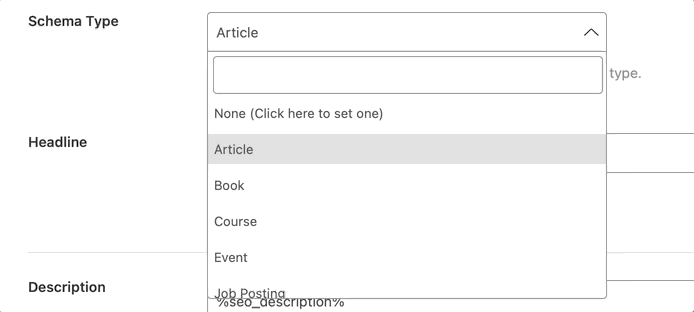
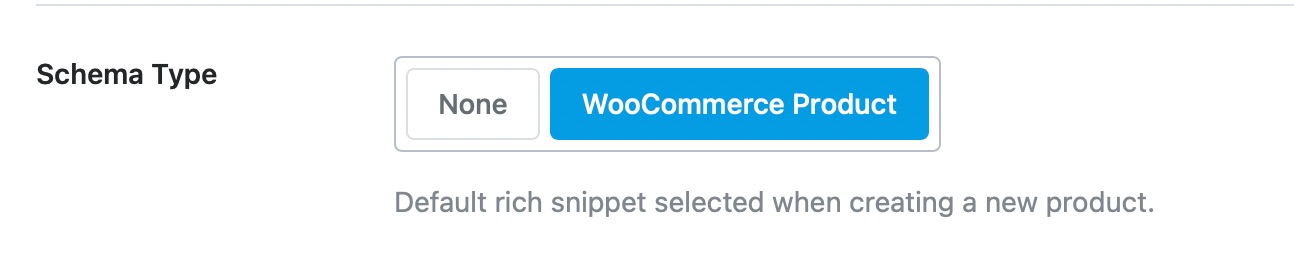
9.3 Schema Type
This option lets you set a default Schema for all your posts. If most of your new posts are about a similar topic, this saves you the hassle of setting a Schema again.
Click the drop-down menu to see the list of available Schema types. You can choose any one of the options or leave it at none to leave the Schema empty for new posts and set them manually.
9.4 Überschrift
This option lets you set up a Headline template for all your posts. You can use all the variables that we showed you in the settings above and create a new template or use the default one we’ve set up. Note: Headline and Description will only appear upon selecting a Schema Type.
9.5 Beschreibung
Here you can set a default description for all your posts. Similar to other settings, you can use variables to create a dynamic template. However, the default description that we’ve created should also work. Please note that most Schema types support the description field, except the Books Schema.
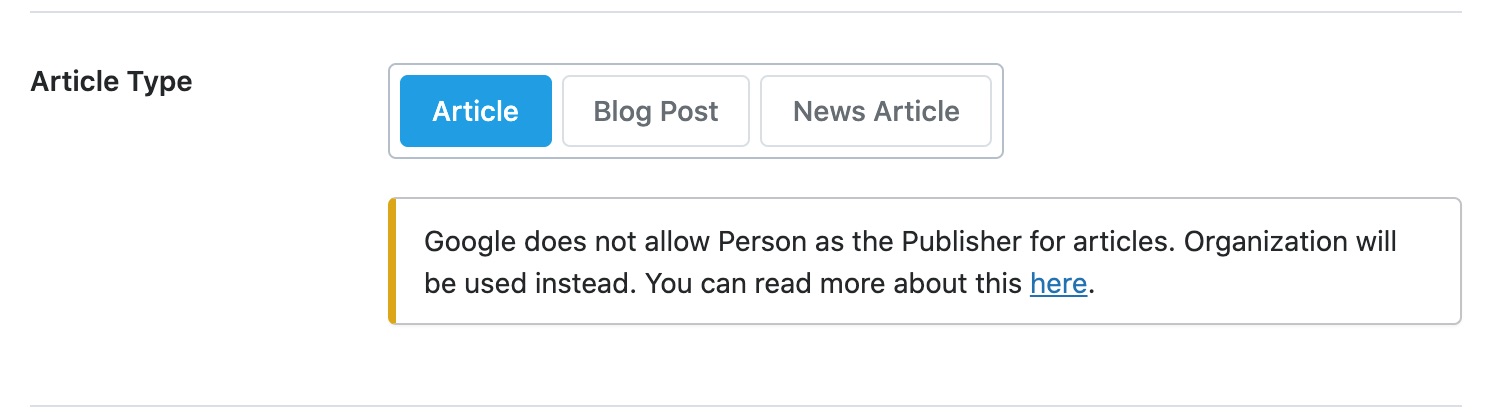
9.6 Article Type
This setting will only be visible if you select the Article Schema from the Schema Type setting mentioned above. Here, you will have 3 options to choose from.
Artikel
Blog Post
News Article
Generally, opinion pieces can be set up as Articles or Blog Posts with the assumption that articles are generally longer and more extensive pieces on a topic. A News Article has to report factual information and not mix opinion with facts. Choose the Article Type that suits your website the best.
Regarding the warning notice, the error is pretty self-explanatory, and you will only see it if you’ve set up your blog as a personal website. The reason behind it is that Google does not recommend that you use the Article Schema with the markup of an individual, rather an organization. Even if you’ve set up your blog as an individual, Rank Math will insert the markup of an organization to circumvent the error.
This option appears only if you enabled the previous option to Autodetect Video. When you enable Autogenerate Image option, Rank Math automatically generates an image for your autodetected video and includes it in the Video Schema and Video Sitemap.
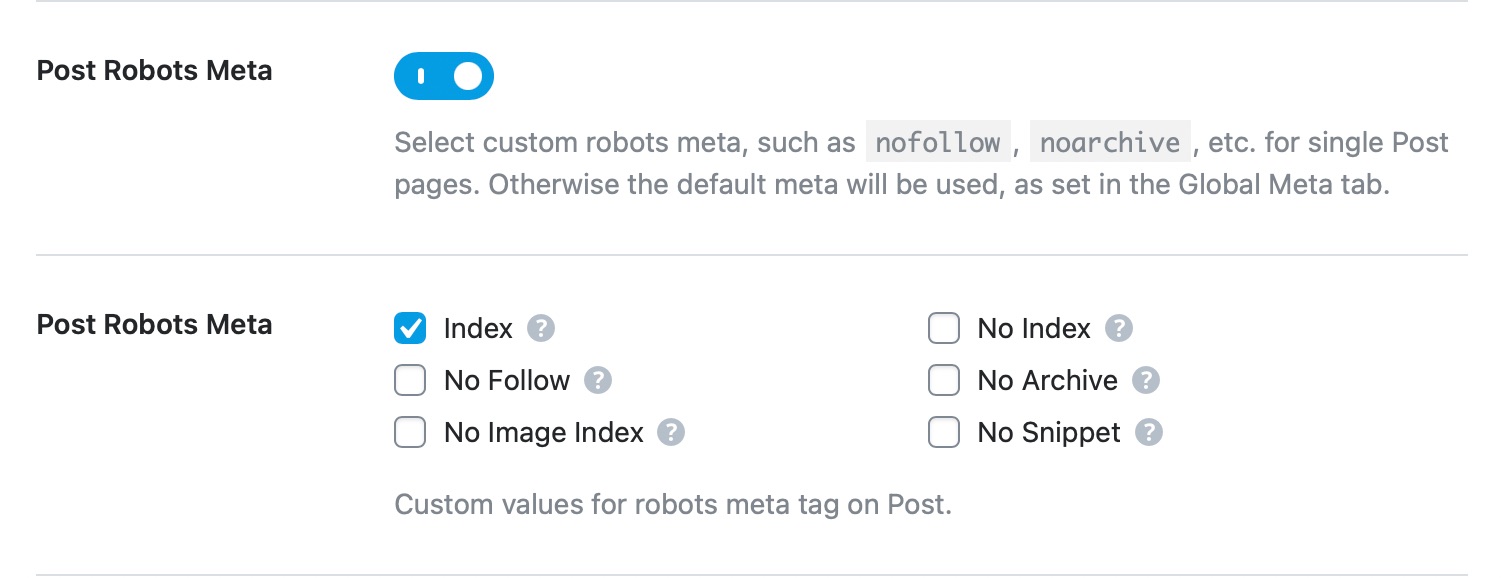
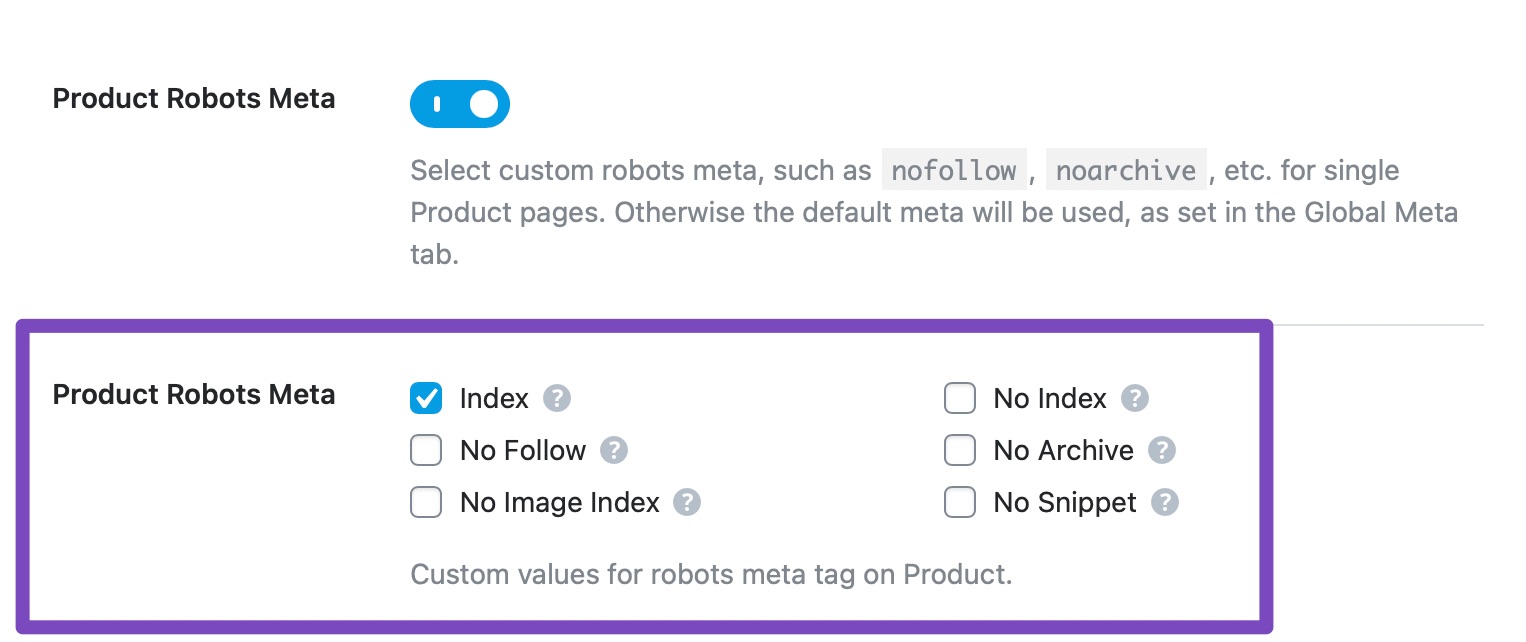
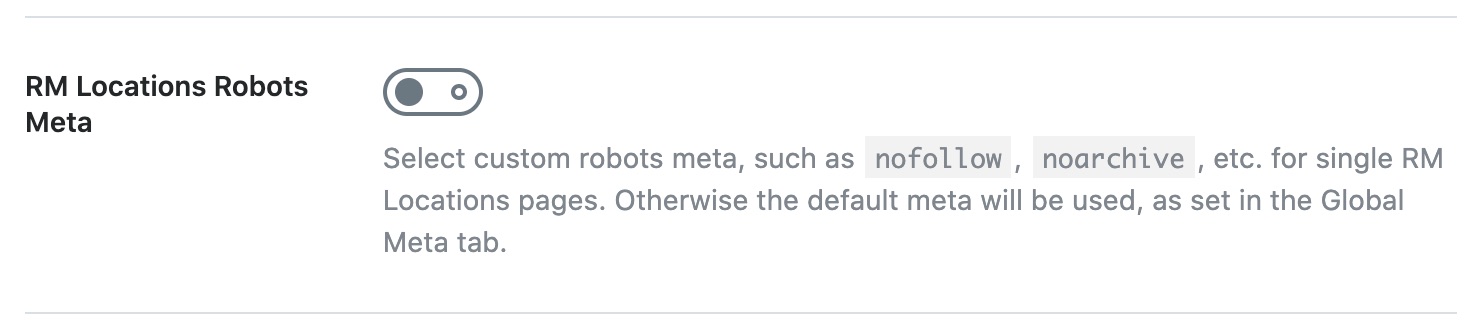
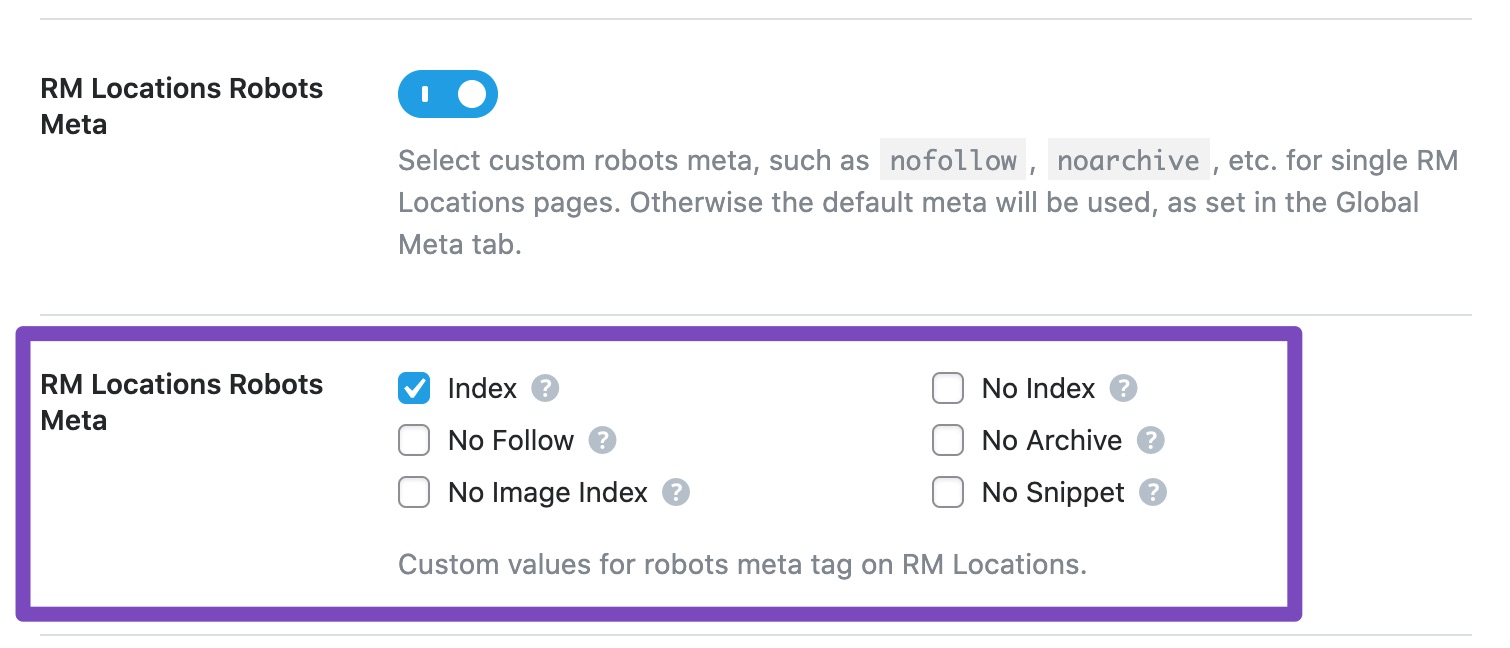
9.9 Post Robots Meta
This option lets you set the default Robots Meta for all your posts. You can either set it to use the default settings you configured in Global Meta or choose to set custom Robots Meta for your posts.
9.10 Post Robots Meta Custom Settings
If you select the custom option, the entire list of Meta Robots options appears just below the setting. You can then choose the Robots Meta tag, and it will be applied by default to all your new posts.
For posts, we would recommend that you keep all the options unchecked except for the Index Robots Meta tag.
9.11 Post Advanced Robots Meta
If you had selected the custom option for Post Robots Meta, you’d also be able to configure the Post Advanced Robots Meta. By configuring these meta directives, you can control how the snippet of your posts should appear in search results. We would recommend you leave these meta directives with the default values.
9.12 Linkvorschläge
This option will let you enable the Link Suggestions feature. The Link Suggestions feature is a pretty unique feature, and if you enable it, Rank Math will provide you with link suggestions when you are writing your posts.
Here is how the Link Suggestions feature appears in the Post Editor screen.
9.13 Link Suggestion Titles
The Link Suggestion Titles field will only be visible if you enable Link Suggestions. This option lets you configure how the link suggestions are fetched by Rank Math. You have 2 options to choose from.
Titles: Selecting this option will configure Rank Math to look for link suggestions based on the title of the current post
Fokus-Schlüsselwörter: Selecting this option will configure Rank Math to look for link suggestions based on the focus keyword of the particular post
Both options work great, and it is more about your writing style that will help you decide how to configure this option. We recommend that you try each of the options out for some time and then decide which one works for you.
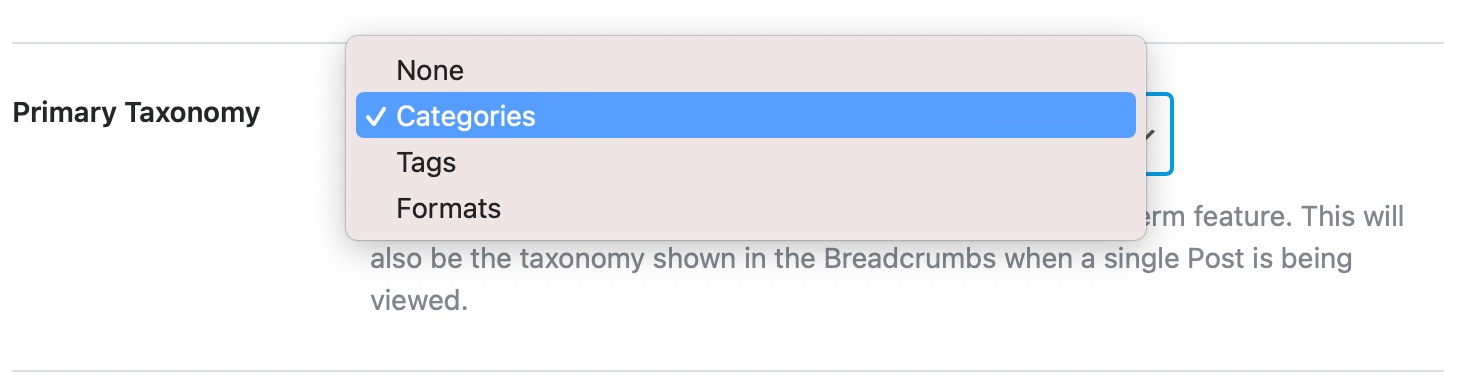
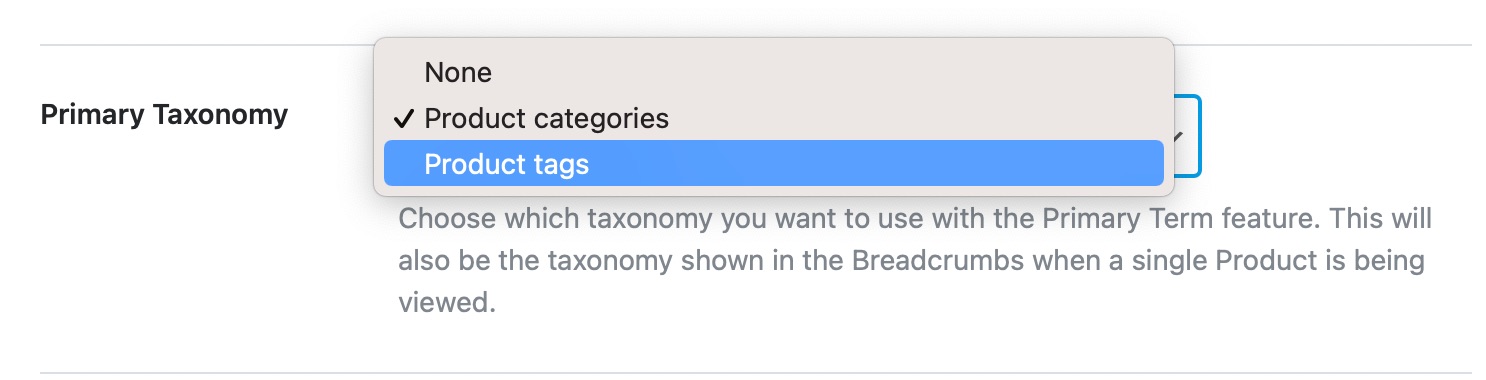
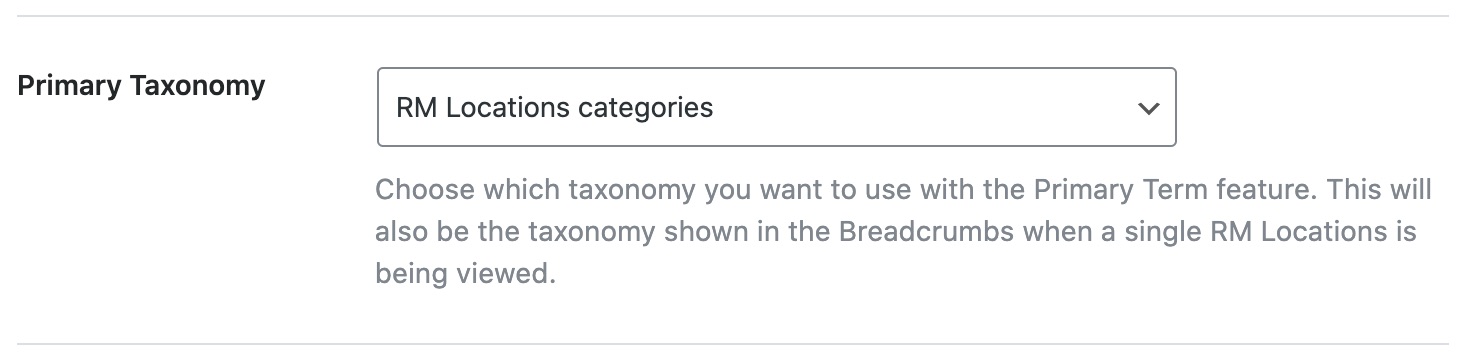
9.14 Primäre Taxonomie
This option lets you select the taxonomy that will be displayed in the breadcrumbs of your posts. Click on the setting to see all the available options and select the one that you prefer.
9.15 Slack Enhanced Sharing
Enabling this option will include additional data to your link previews shared on Slack such as the estimated time to read the post and the author of the post. This option is enabled by default.
9.16 Fügen Sie SEO-Steuerelemente hinzu
This option adds SEO Controls (Meta Box) to your posts. Using the SEO Meta Box, you can customize which of Rank Math’s diverse SEO features are enabled for the post, which in turn gives you total control over your SEO efforts. We recommend that you turn ON this setting.
If you already have a bunch of posts on your website when you first installed Rank Math, then this option will help you optimize them easily.
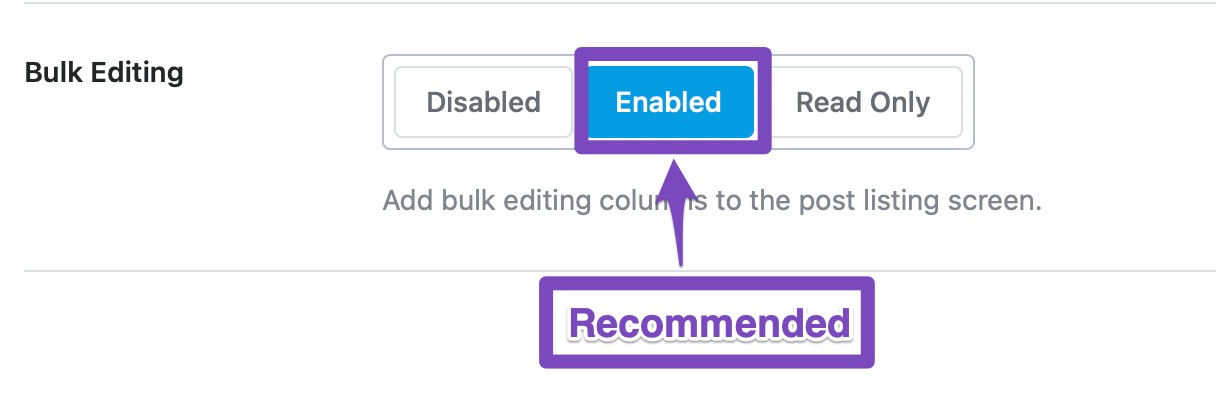
Enabling this feature introduces a bulk editing feature in your post listing screen, using which you can edit multiple posts in one go. There are 3 options to choose from
Disable: Disables the Bulk Editing Feature
Enabled: Enables the Bulk Editing feature with read and write options
Read Only: Enables the Bulk Editing feature with only read options
We recommend that you enable this setting with both read and write options if you already have a lot of posts to optimize. Otherwise, you can keep it in Read-Only mode.
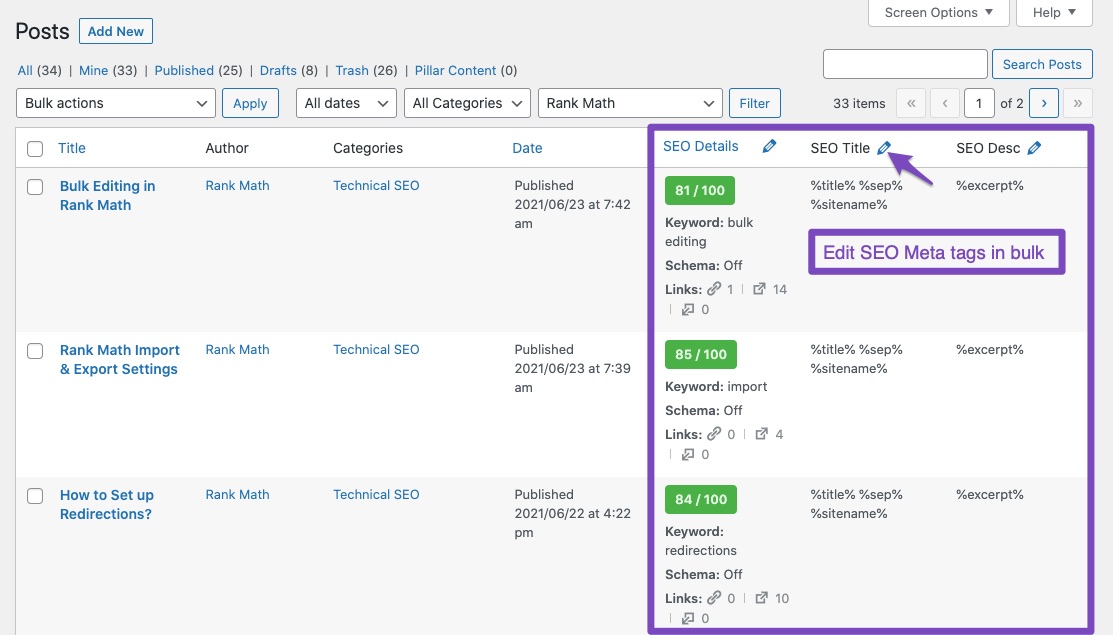
When Bulk Editing, you can notice additional columns are available on your post listing screen, such as:
SEO Details: Displays the focus keyword, Schema used, and the links count for each post
SEO-Titel: Displays the SEO Title set for the post
SEO-Beschreibung: Displays the SEO Description set for the post
A pencil icon appears at the top of each of these columns only in the Enabled Mode, where you’ve allowed Rank Math to both read and write. When you click the pencil icon, you’ll be able to edit the corresponding data for all the posts in the column. In this way, you can edit the SEO metadata for your old posts in bulk without having to open each post separately.
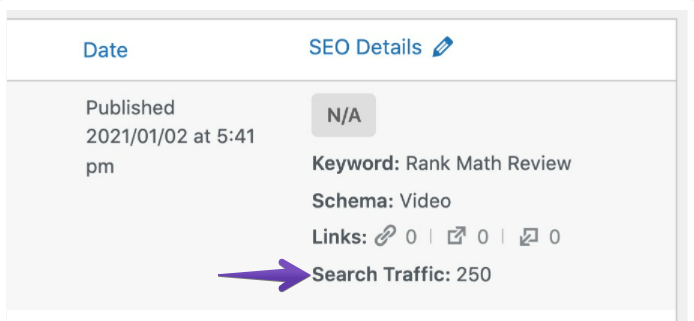
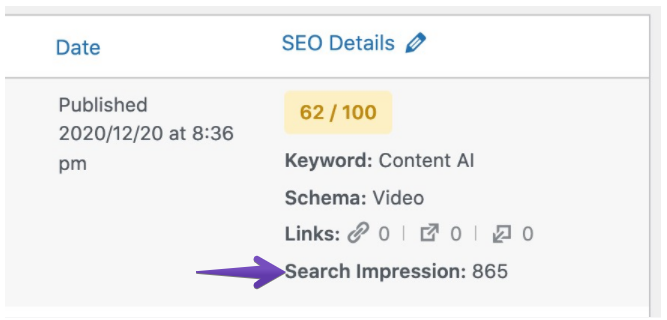
Rank Math makes it possible to see search traffic data in the SEO Details column for each post. But this particular feature is only available to premium users of Rank Math.
Note: To enable this you must ensure that the Analytics module from Rank Math is connected with both Google Analytics as well as Google Search Console. If Google Analytics is not connected and only the search console is configured with Rank Math’s Analytics, then it will only display search impressions for each post.
9.18 Custom Fields
You can add the list of custom fields used in the posts, one per line. Rank Math will look for the data inside these posts and include them for on-page SEO analysis to give you more relevant on-page SEO recommendations.
Notiz: Rank Math uses nur the core custom fields of the posts for on-page SEO analysis.
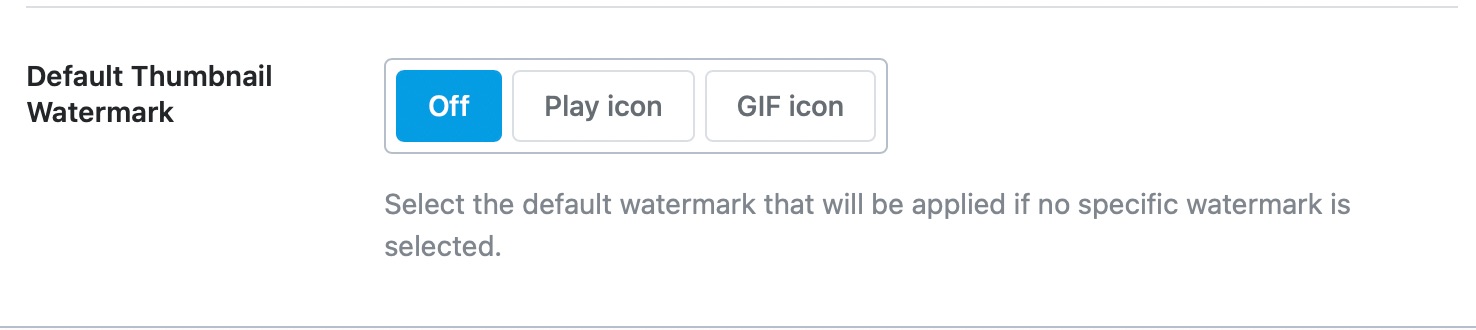
Set the default thumbnail watermark as either Play Icon or a GIF Icon. You can also set it as Off if you do not wish to add a watermark. If you have created any custom watermark under the Global Meta section, then it will also appear here for you to use.
This covers all the options in the Posts section. Let us cover the next section, which is the Pages section.
Notiz: The following sections will discuss similar options for the other post types. You can also quickly navigate to configuring titles and meta settings of taxonomies by clicking here.
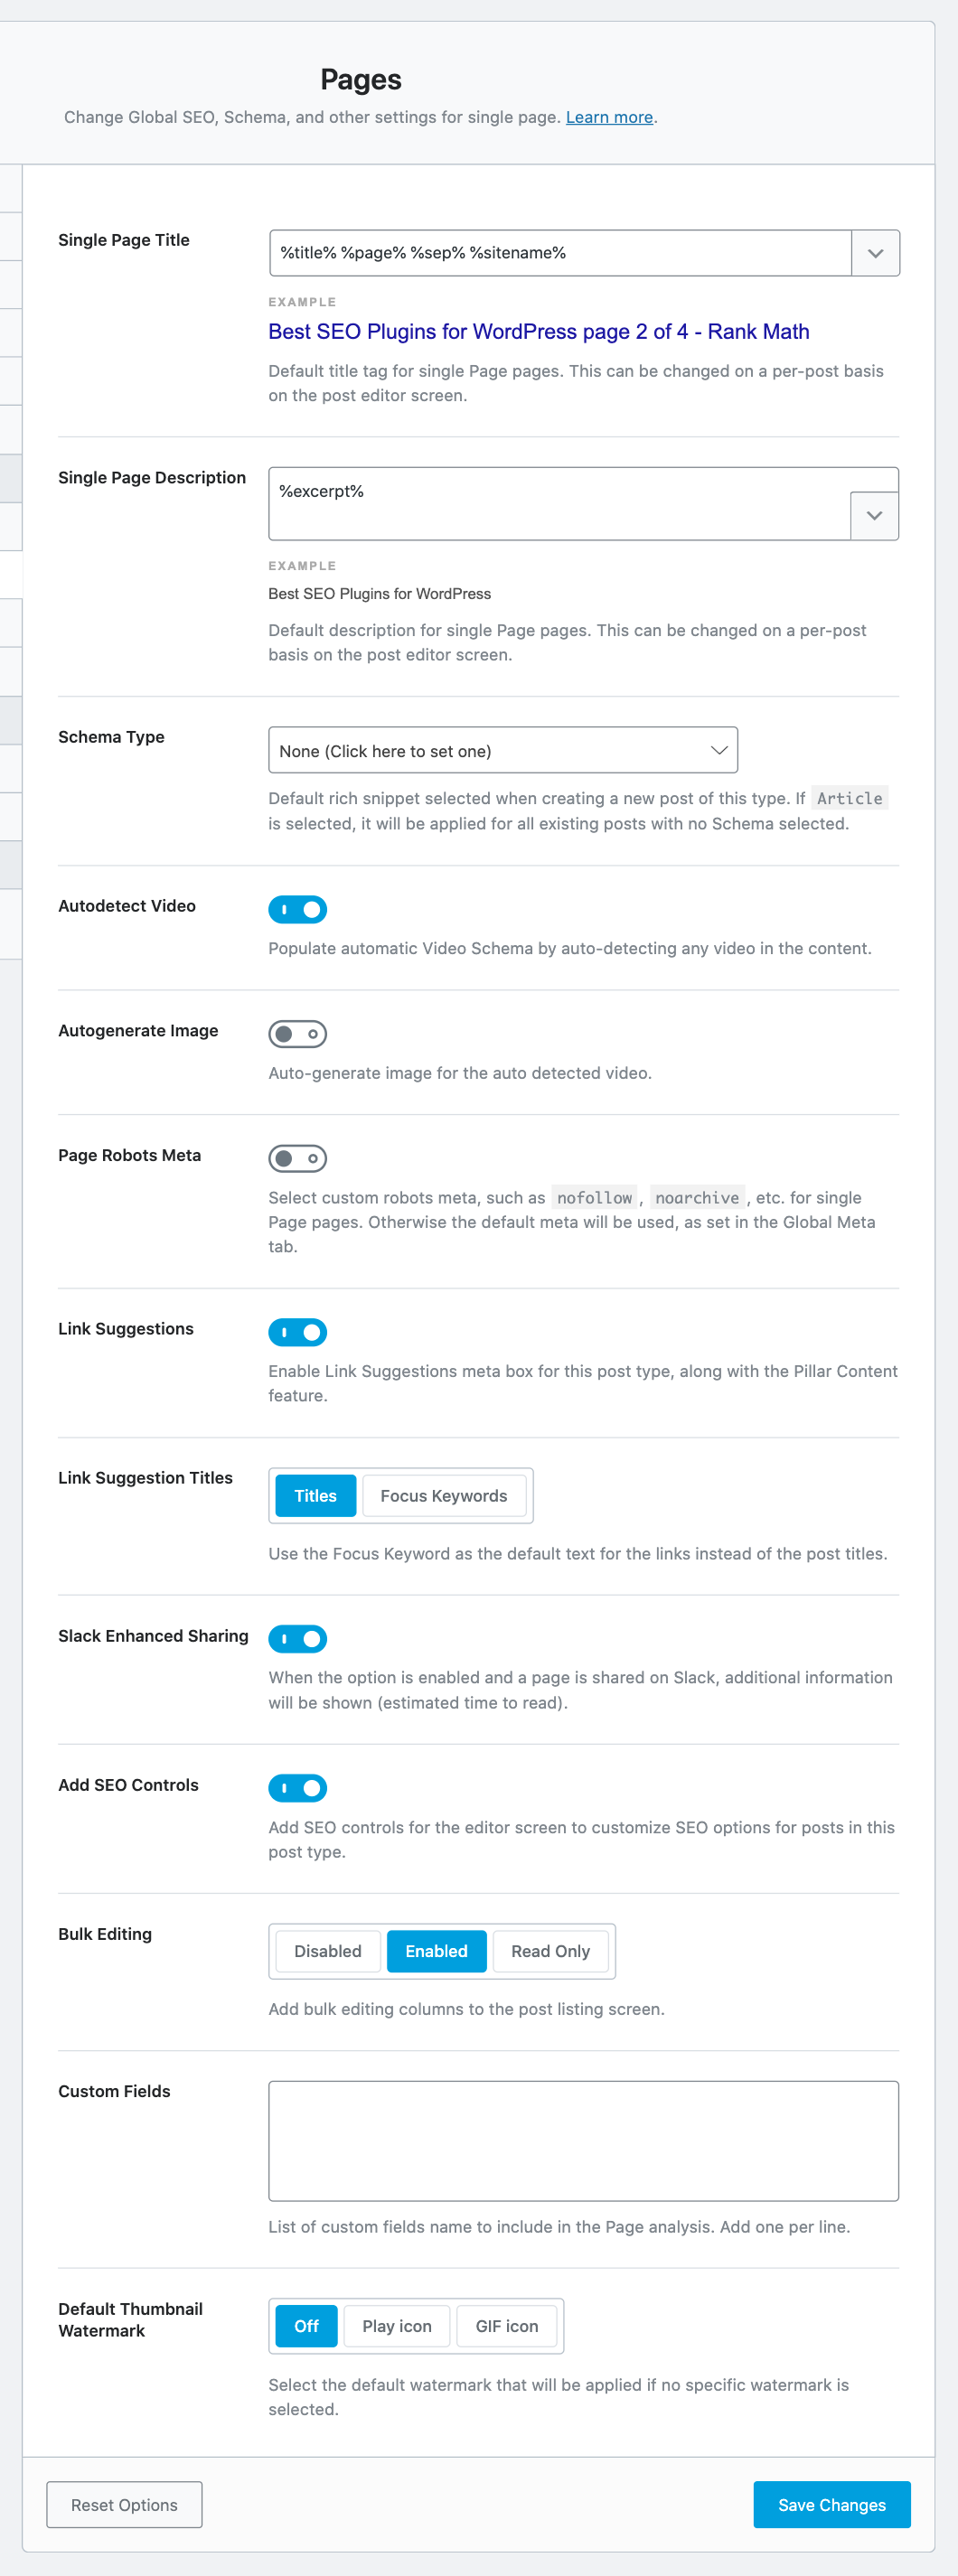
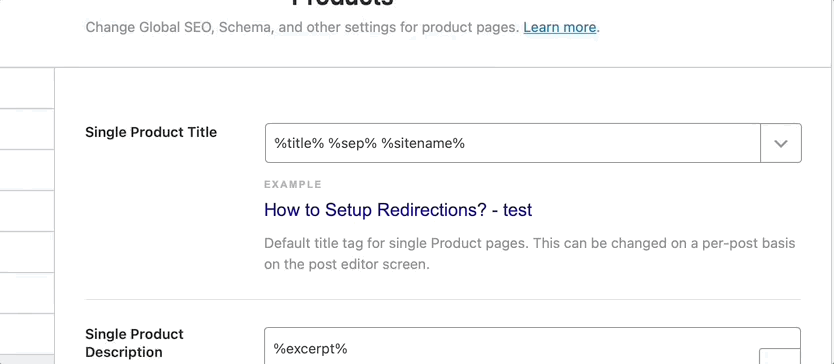
10 Seiten
As the name suggests, the Pages section holds all the Titles and Meta settings related to Pages. Here is an image showing all the settings available in this section.
Let us discuss each of the settings now.
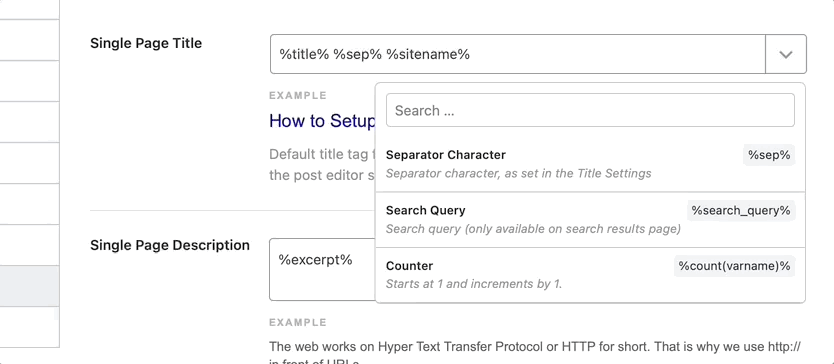
Single Page Title
This option lets you create a template for your Single Page Titles. There are many variables that you can use to create a template, and a sample template has been created for you to check out.
To see the list of all the variables at your disposal, click the drop-down button on the top right of the text field. You can then scroll through the list of variables, or filter them by typing characters on your keyboard—the preview below the text field updates in real-time as you make any changes to the template.
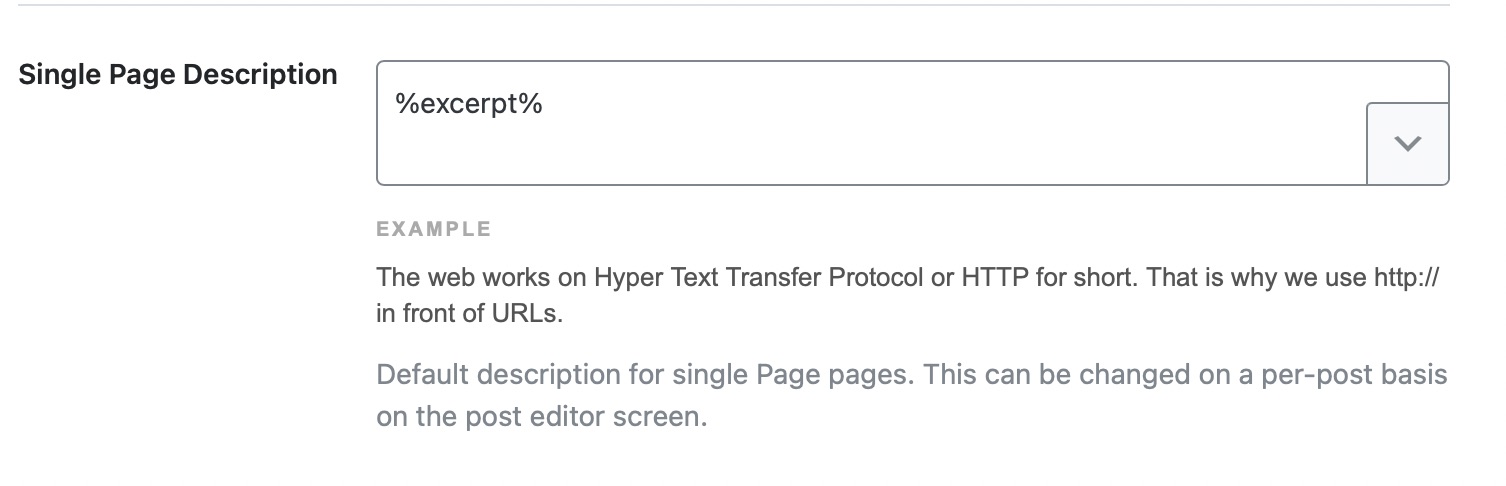
Single Page Description
This option lets you create a template for the description of your single pages. Similar to the Single Page Titles, you have access to a bunch of variables that you can use in the text field.
Schema Type
This option lets you set a default Schema for all your pages. If most of your new pages are about a similar topic, this saves you the hassle of setting a Schema again.
Click the drop-down menu to see the list of available Schema types. You can choose any one of the options or leave it at none to leave the Schema Type empty for new pages and set them manually.
Überschrift
Here you can set a Headline format to be used in the Schema Markup of your pages. As you saw with the other settings, you can use a bunch of variables to create a customized format or use a static one. A default format has been set too, which can also work for most scenarios.
Beschreibung
In this setting, you will set up a format that will be used as the default description for pages. We’ve already created a sample description, and you can use variables to customize the format, or simply create a static description.
Please note that the description field is not supported for the Buch Schema-Markup type. So, if you don’t see a description field, it is probably because you’ve selected the Book Schema as the default Schema Type.
Article Type
As its name suggests, the Article Type setting lets you choose the type of articles you’ll publish on your website. As you might have guessed, this option will only be visible if you select the Article Schema Type.
You will have 3 options to choose from.
Artikel
Blog Post
News Article
The differentiation between an article and a blog post is not very specific, but the general consensus is that shorter opinion pieces should be classified as blog posts, while longer pieces should be called articles. News articles, on the other hand, should only be reporting factual information. Choose the Article Type that fits well with the content you post.
This option appears only if you enable the Autodetect Video. When you enable Autogenerate Image option, Rank Math can automatically generate images for your videos to include them in Video Schema and Video Sitemap.
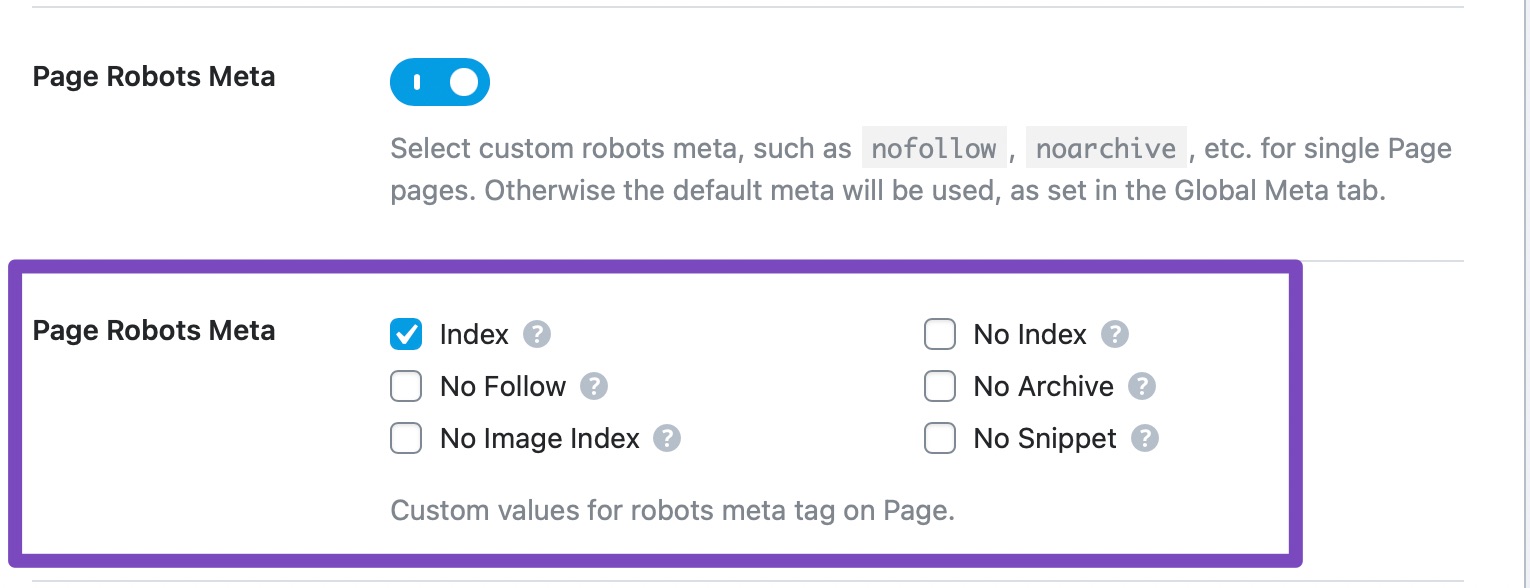
Page Robots Meta
This option lets you set a default Meta Robots Tag for your pages. You can either set it to use the default settings you’ve configured in the Global Meta section or set it up as a custom setting.
Page Robots Meta Custom Settings
If you select the custom option, the entire list of Meta Robots options appears just below the setting. You can then choose your custom Robots Meta directives, which will be applied by default to all your new pages.
Page Advanced Robots Meta
This option lets you configure the Advanced Robots Meta for all your pages. Using these meta directives, you can control how the snippet of your pages should appear in search results. A default configuration has been set for your pages, but you can always change them. You can also change these Advanced Robots Meta on a per-page basis inside the Meta Box.
Linkvorschläge
Rank Math intelligently scans the content on your pages as you write them and suggests internal linking options. With this setting, you can turn that feature ON or OFF.
Since most bloggers should use internal links for better SEO performance, we recommend that you turn this option ON.
Link Suggestion Titles
The Link Suggestion Titles field will only be visible if you enable Link Suggestions. This option lets you configure how the link suggestions are fetched by Rank Math. You have 2 options to choose from.
Titles: Selecting this option will configure Rank Math to look for link suggestions based on the title of the current page
Fokus-Schlüsselwörter: Selecting this option will configure Rank Math to look for link suggestions based on the focus keyword of the particular page
Both options work great, and it is more about your writing style that will help you decide how to configure this option. We recommend that you try each of the options out for some time, and then decide which one works for you.
Slack Enhanced Sharing
The Slack Enhanced Sharing option is enabled by default. When this option is enabled, it will include additional data to your link previews when shared on Slack such as the estimated time to read the page.
Fügen Sie SEO-Steuerelemente hinzu
This option adds SEO Controls (Meta Box) to your pages. Using the SEO Meta Box, you can customize which of Rank Math’s diverse SEO features are enabled for the page, which in turn gives you total control over your SEO efforts. We recommend that you turn ON this setting. You can learn more about Die Meta-Box von Rank Math here.
Massenbearbeitung
If you already have a bunch of pages on your website when you first installed Rank Math, then this option will help you optimize them easily.
Enabling this feature introduces a bulk editing feature in your page listing screen, using which you can edit multiple pages in one go. There are 3 options to choose from.
Disable: Disables the Bulk Editing Feature
Enabled: Enables the Bulk Editing feature with read and write options
Read Only: Enables the Bulk Editing feature with only read options.
We recommend that you enable this setting with both read and write options if you already have a lot of pages to optimize. Otherwise, you can keep it in Read Only mode.
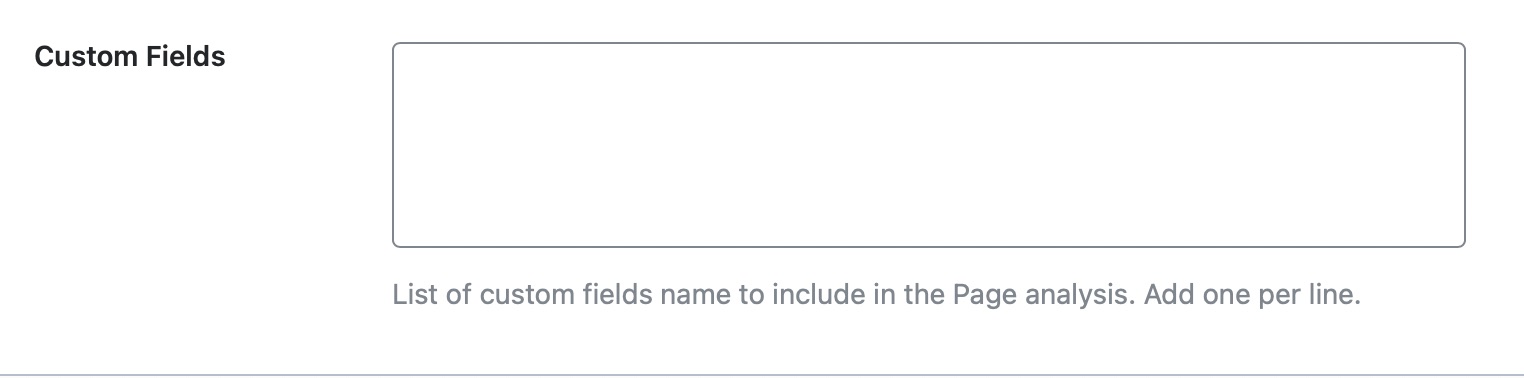
Custom Fields
You can add the list of custom fields used on your pages with each one on a new line, so that Rank Math can include the content from these fields for on-page SEO analysis.
Notiz: Rank Math uses nur the core custom fields of the pages for on-page SEO analysis.
Set the Default Thumbnail Watermark as either a Play Icon or a GIF Icon. You can also set it as Off if you do not wish to add a watermark. If you had created any custom watermark, it would also appear here for your use.
Let us now move on to the next section, the Attachments section.
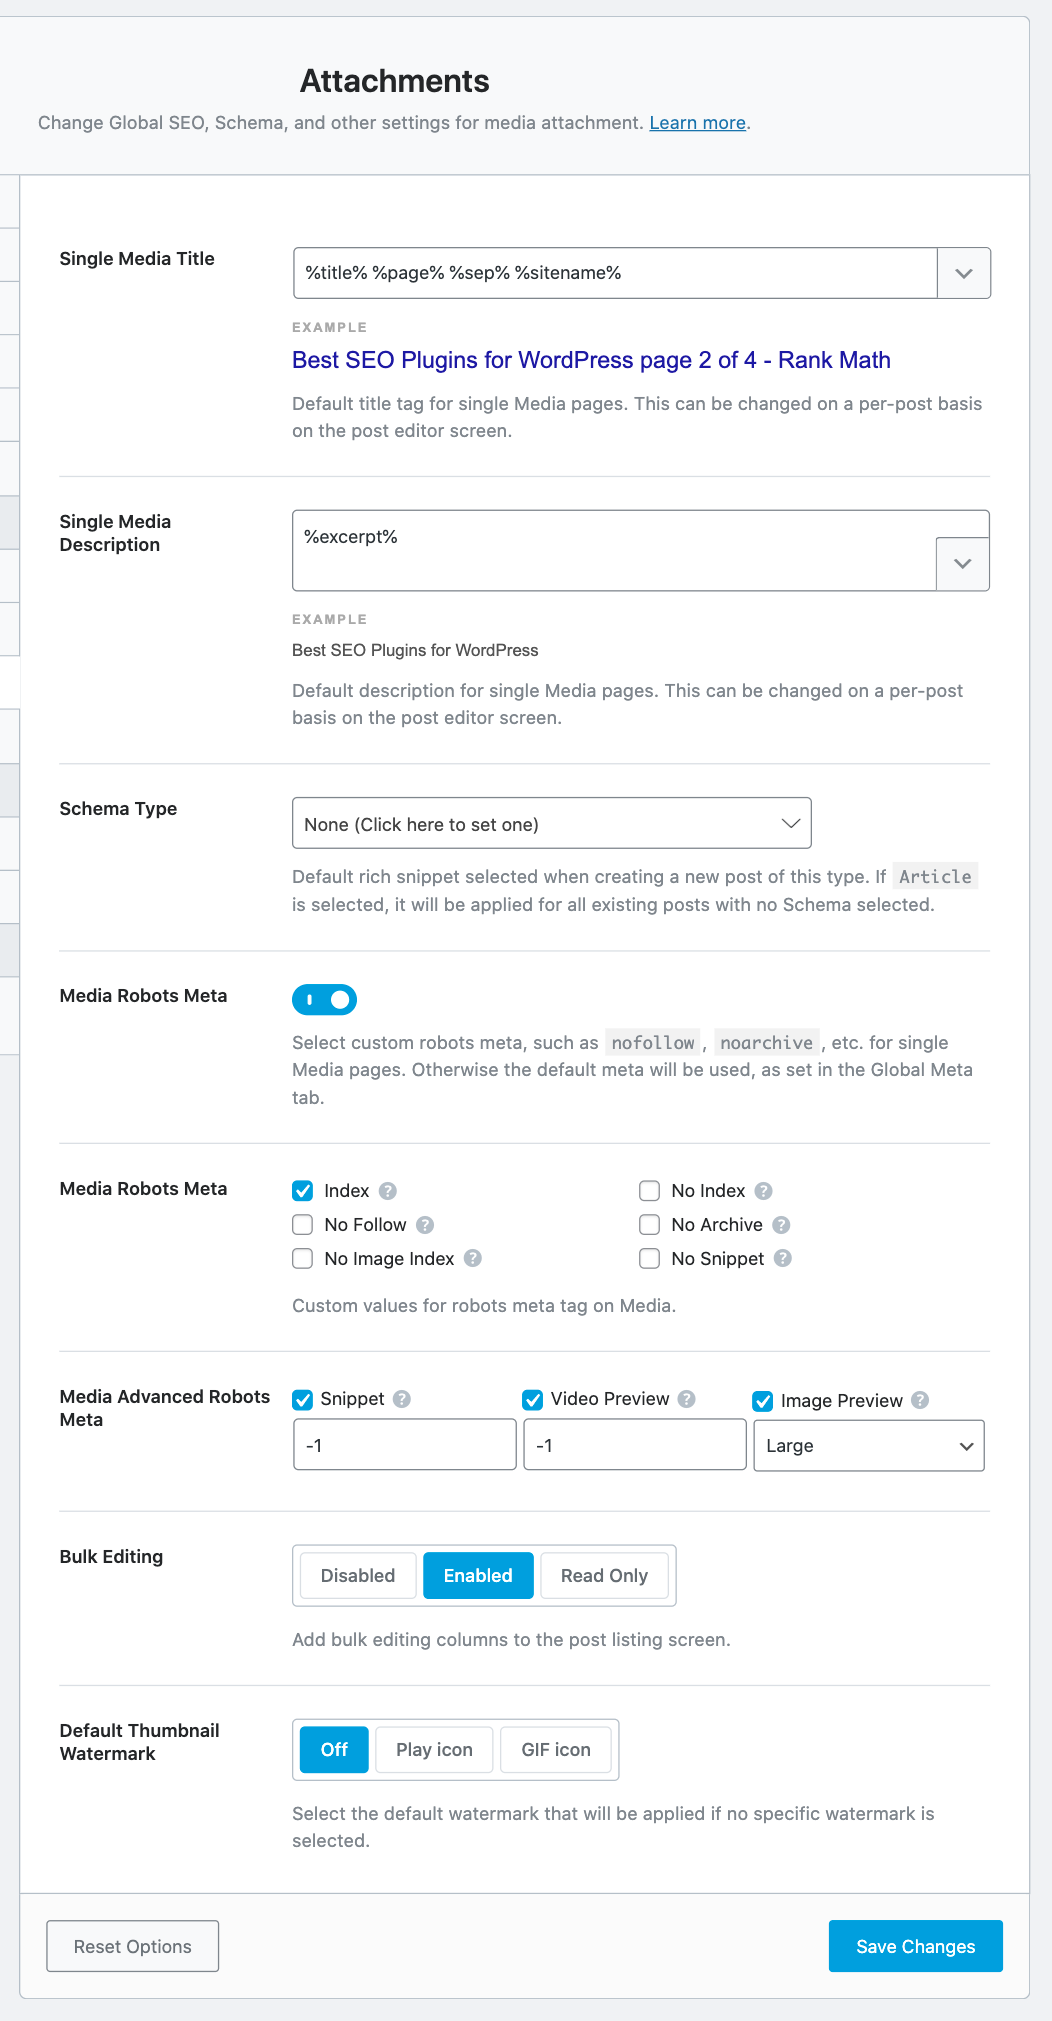
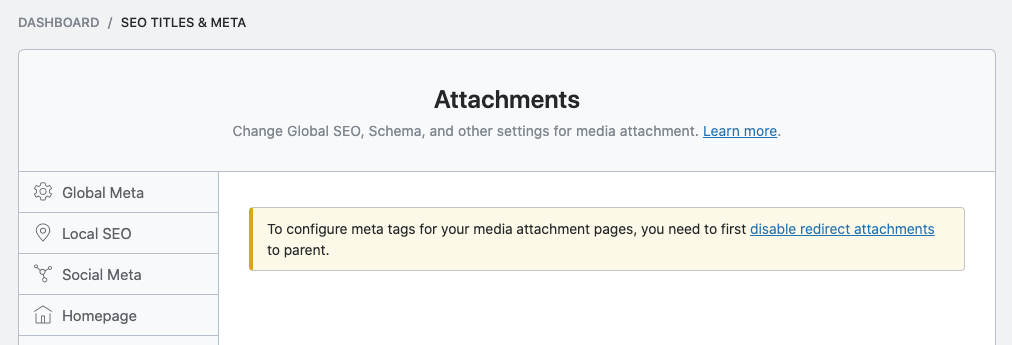
11 Attachments
The Attachments section contains all the settings that affect the Title and Meta settings of the media and attachments on your website. Here is a preview of all the settings available:
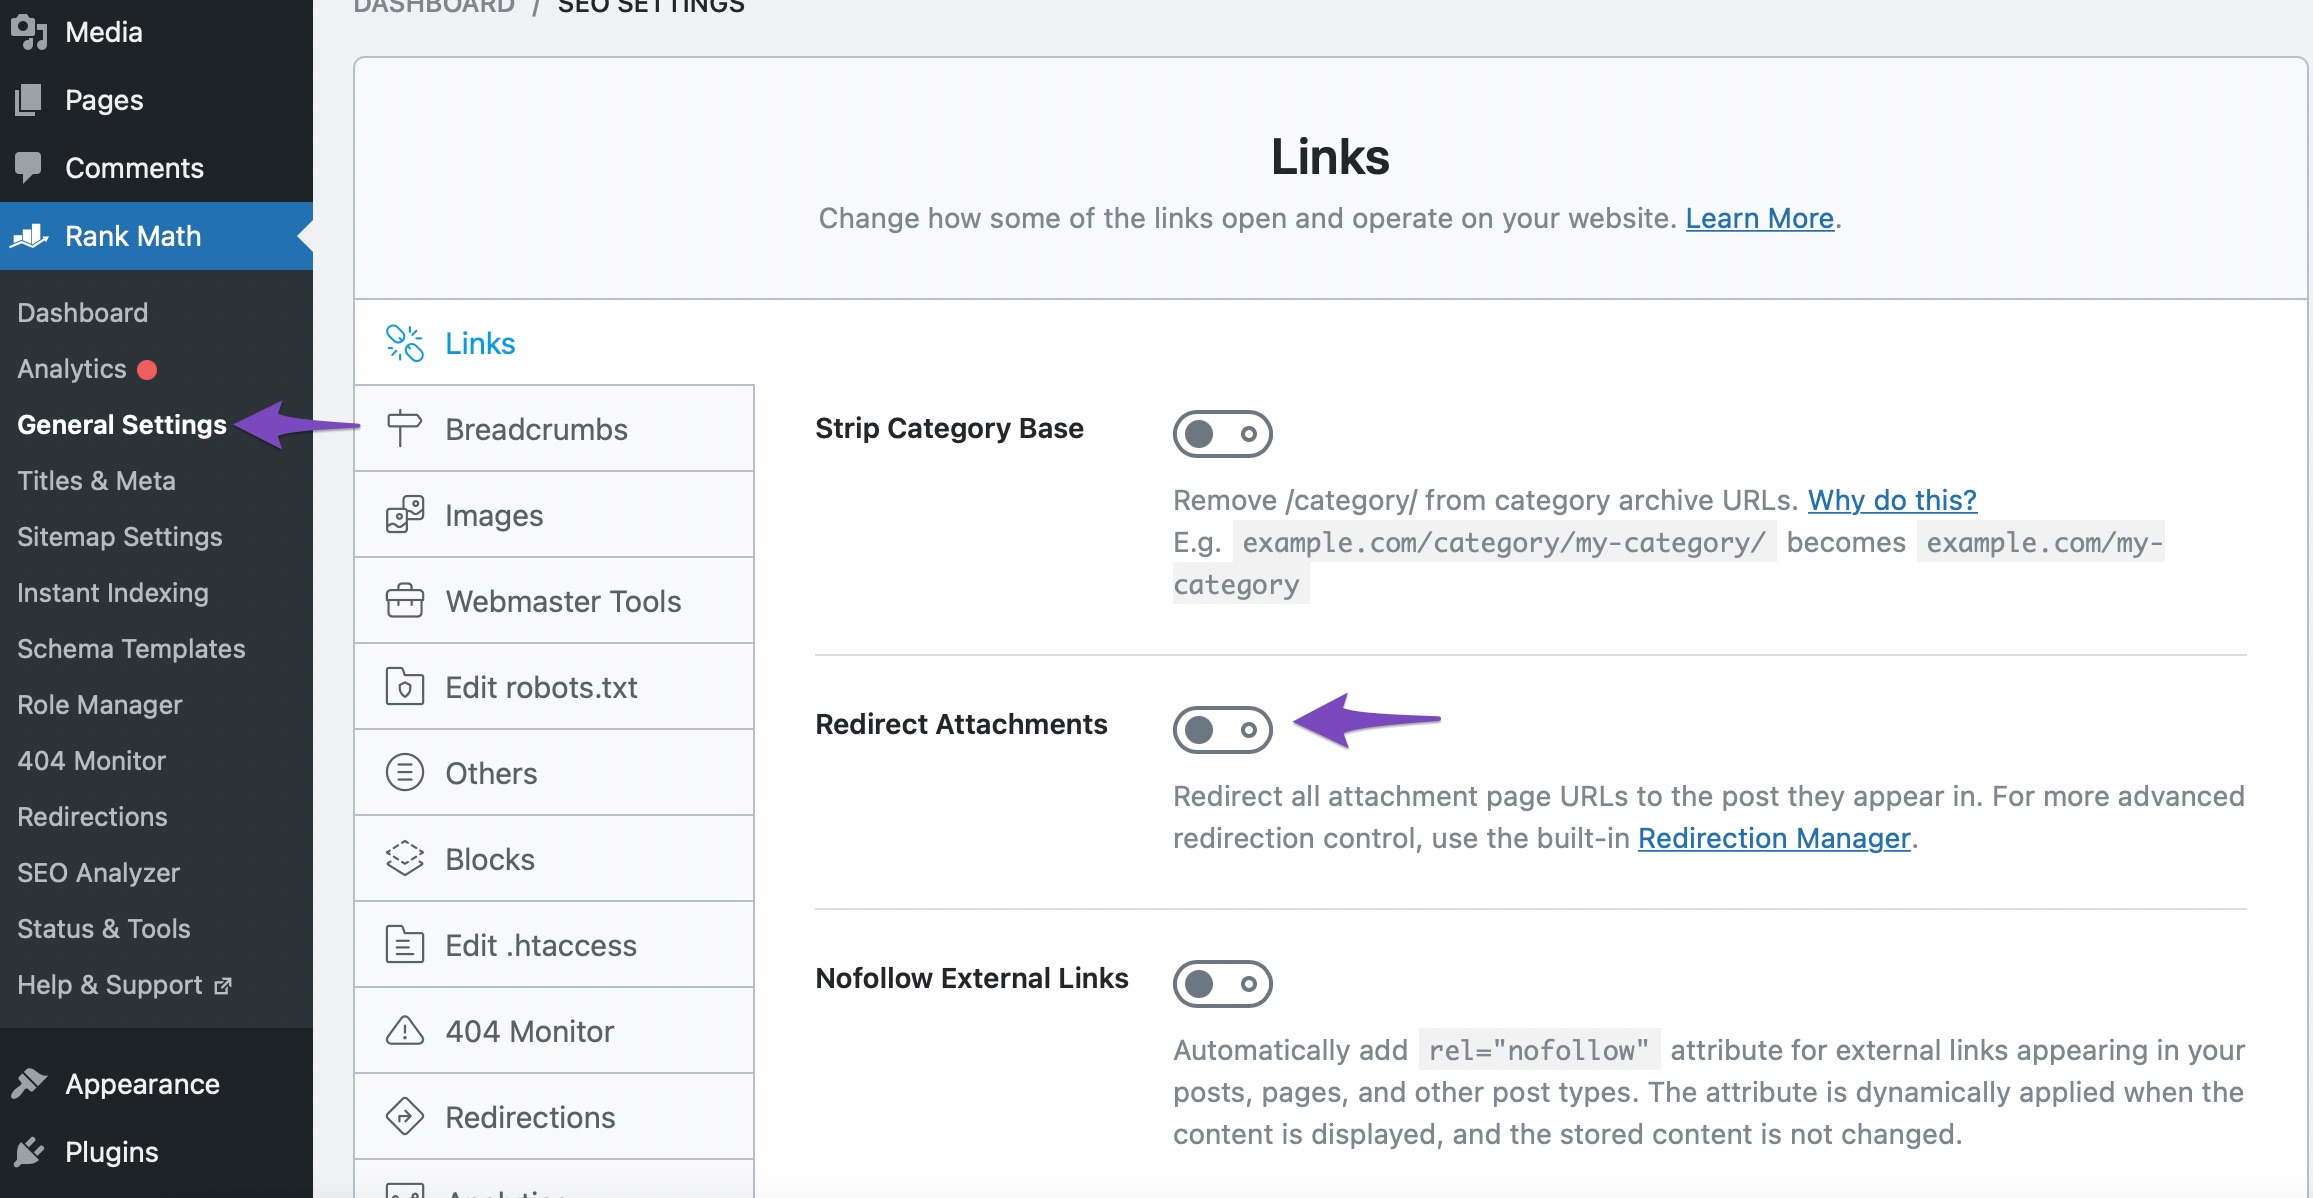
However, to configure attachment-related meta tags, we need to disable the redirection first.
To do this, go ahead to Rank Math SEO → General Settings → Links → Redirect Attachments → OFF and save your changes.
Now let us understand each of the settings in detail.
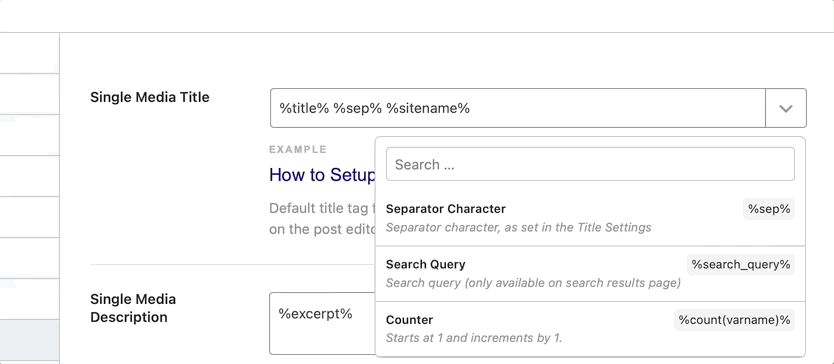
Single Media Title
This option lets you create a template that helps you give your media a title. You can enter a static text for the media titles, or use the supported variables to create a dynamic title. A sample title with a few variables is created by default.
To see a list of all the supported variables, click the drop-down button on the top right of the text field. You can scroll through the list of variables, or filter them by typing any characters on your keyboard. The preview below the text field updates in real-time so you can see how your created template will affect the title.
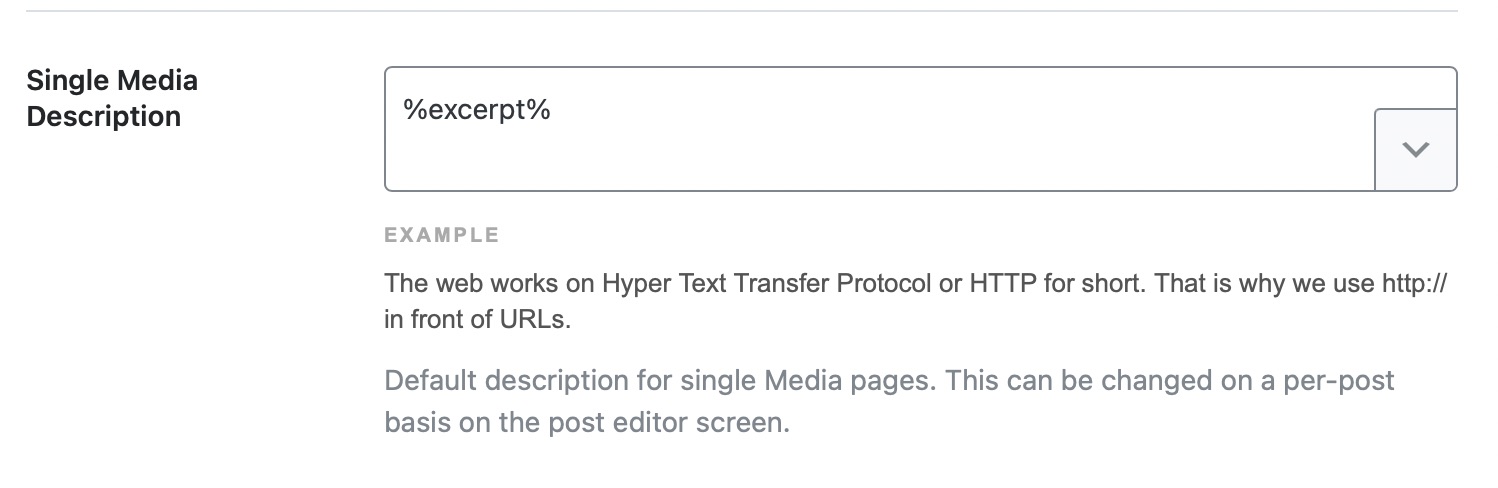
Single Media Description
This option lets you create a template that helps create a description for your media. You can enter a static text for the media description, or use the supported variables to create a dynamic one.
Schema Type
This option lets you select a default Schema to be associated with your media. Click the text field to see a list of all the supported Schema types, and select the one that describes your media the closest.
Überschrift
The Headline option will only appear if you select any Schema from the available options above. Here you can create a dynamic template for your media headlines using the variables we showed above, or a static one.
Beschreibung
Similar to creating a headline template, here, you will create a description template for your media. You have access to the variables to create a dynamic description or create a static one.
Note that the Description field is not supported for the Book Schema. So, if you don’t see the Description field, then check if you have the Book Schema Type selected.
Article Type
As you might have guessed, this option lets you select the article type your media would classify as. For obvious reasons, this field is only visible when you select the Article Schema in the Schema Type options.
There are 3 options to choose from. The Article and Blog Post types are similar and can be used interchangeably, while the News Article is limited to factual news reporting only.
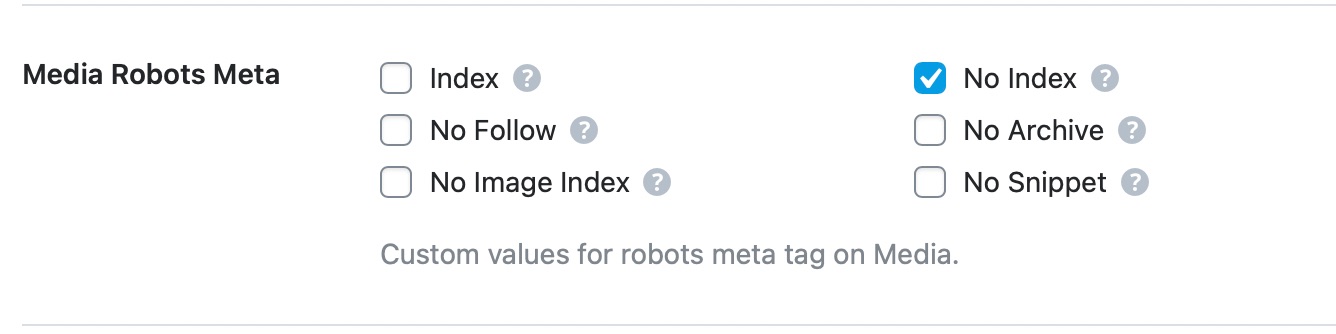
Media Robots Meta
This option lets you configure Meta Robots for your media. You can either choose the default Robots Meta to be used, which are configured in the Global Meta section, or choose the custom option.
If you choose the custom option, another set of settings will appear below it, which we’ve discussed below.
These options appear when you select the Custom Media Robots option and give you access to the specific settings for the Robots Meta for your media. Using the checkboxes, select all the directives that you would want to apply to your media.
Media Advanced Robots Meta
Along will the option to set custom Robots Meta, an option to configure Advanced Robots Meta also appears. You can change these Robots Meta to control how the snippets of your media pages should appear in search results.
Massenbearbeitung
This option enables the bulk editing for Media metadata and is particularly useful when you have tons of attachments on your website for which you need to optimize your meta.
Select the Default Thumbnail Watermark from this setting. You can either set it to Off, Play Icon, GIF, or any custom thumbnail you’ve created.
This covers all the settings in the Attachments section. Let us move on to the next section.
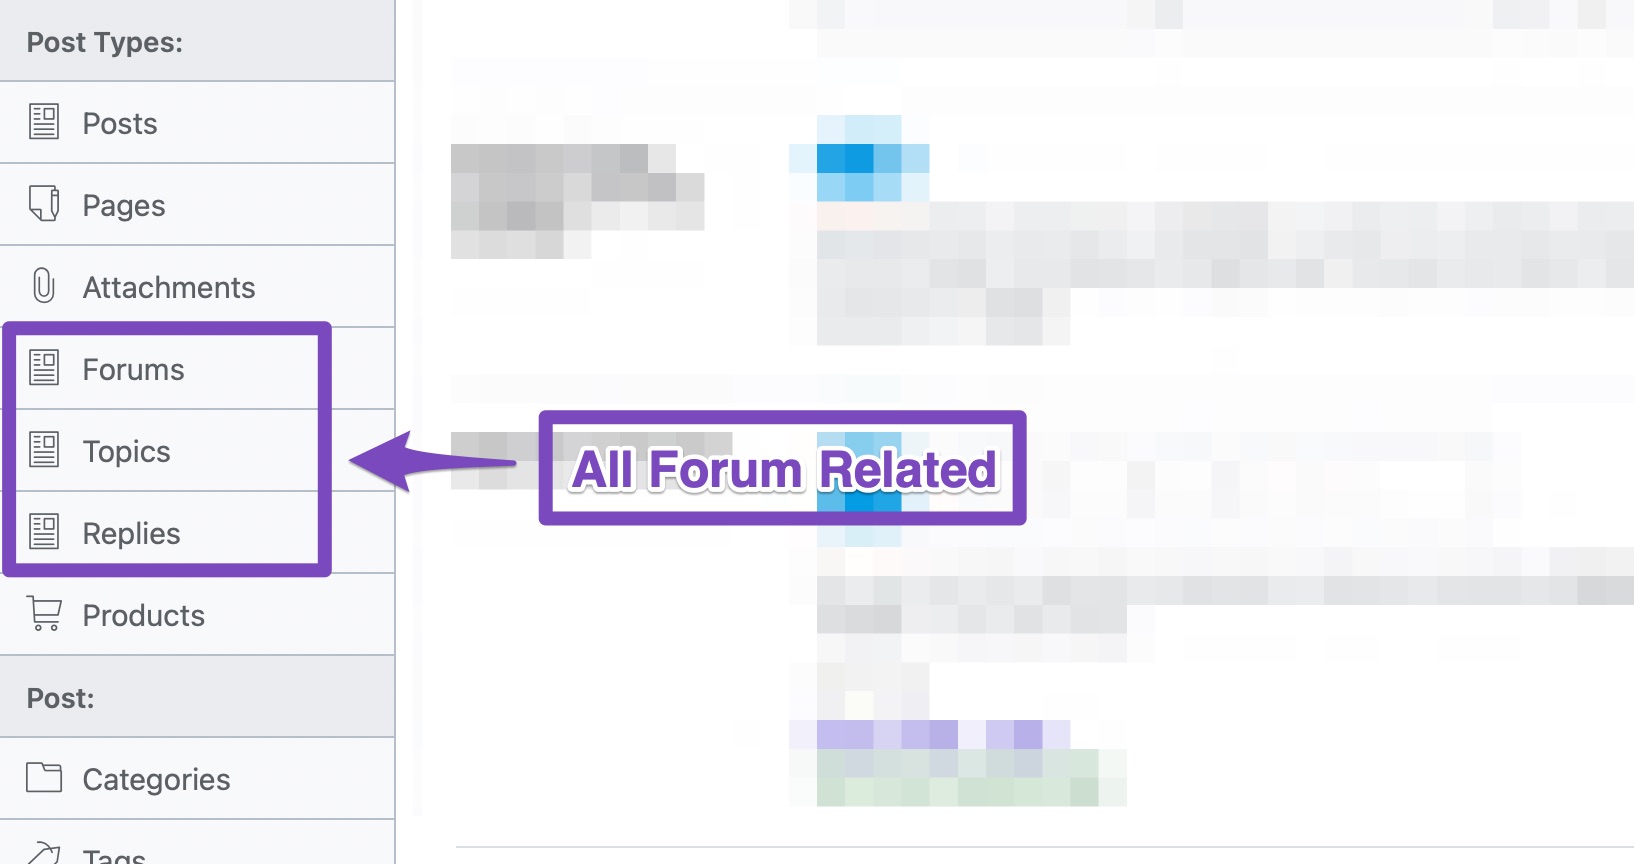
12 Forums
The Forums section deals with all Titles and Meta settings related to forums. You will see this section only if you have a forum plugin installed on your website that Rank Math supports. Currently, Rank Math supports bbPress, and support for more forums is in the works.
If you’ve installed bbPress but still don’t see this section, make sure that the bbPress module is enabled. Head over to WordPress-Dashboard →Rank Math-SEO.
From the list of modules available here, enable the bbPress module as shown below.
If you’ve just enabled the plugin, make sure to refresh the Rank Math’s settings page, and all the forum-related sections should pop right up.
There are 3 sections in the Titles and Meta Settings that are related to forums.
Forums, Topics, and Replies
Before getting into the settings, we would like to explain the difference between Forums, Topics, and Replies for better understanding.
Every forum will have some subtopics to discuss. Together with that, forums can also be about multiple things. For example, a gaming forum could have different topics for Sony, Nintendo, and Microsoft consoles.
In Rank Math’s context, these topics are called Forums. You can think of each forum as a separate section that includes multiple topics or threads.
The Topic would be about a specific topic or thread inside a forum.
Replies are responses to specific topics.
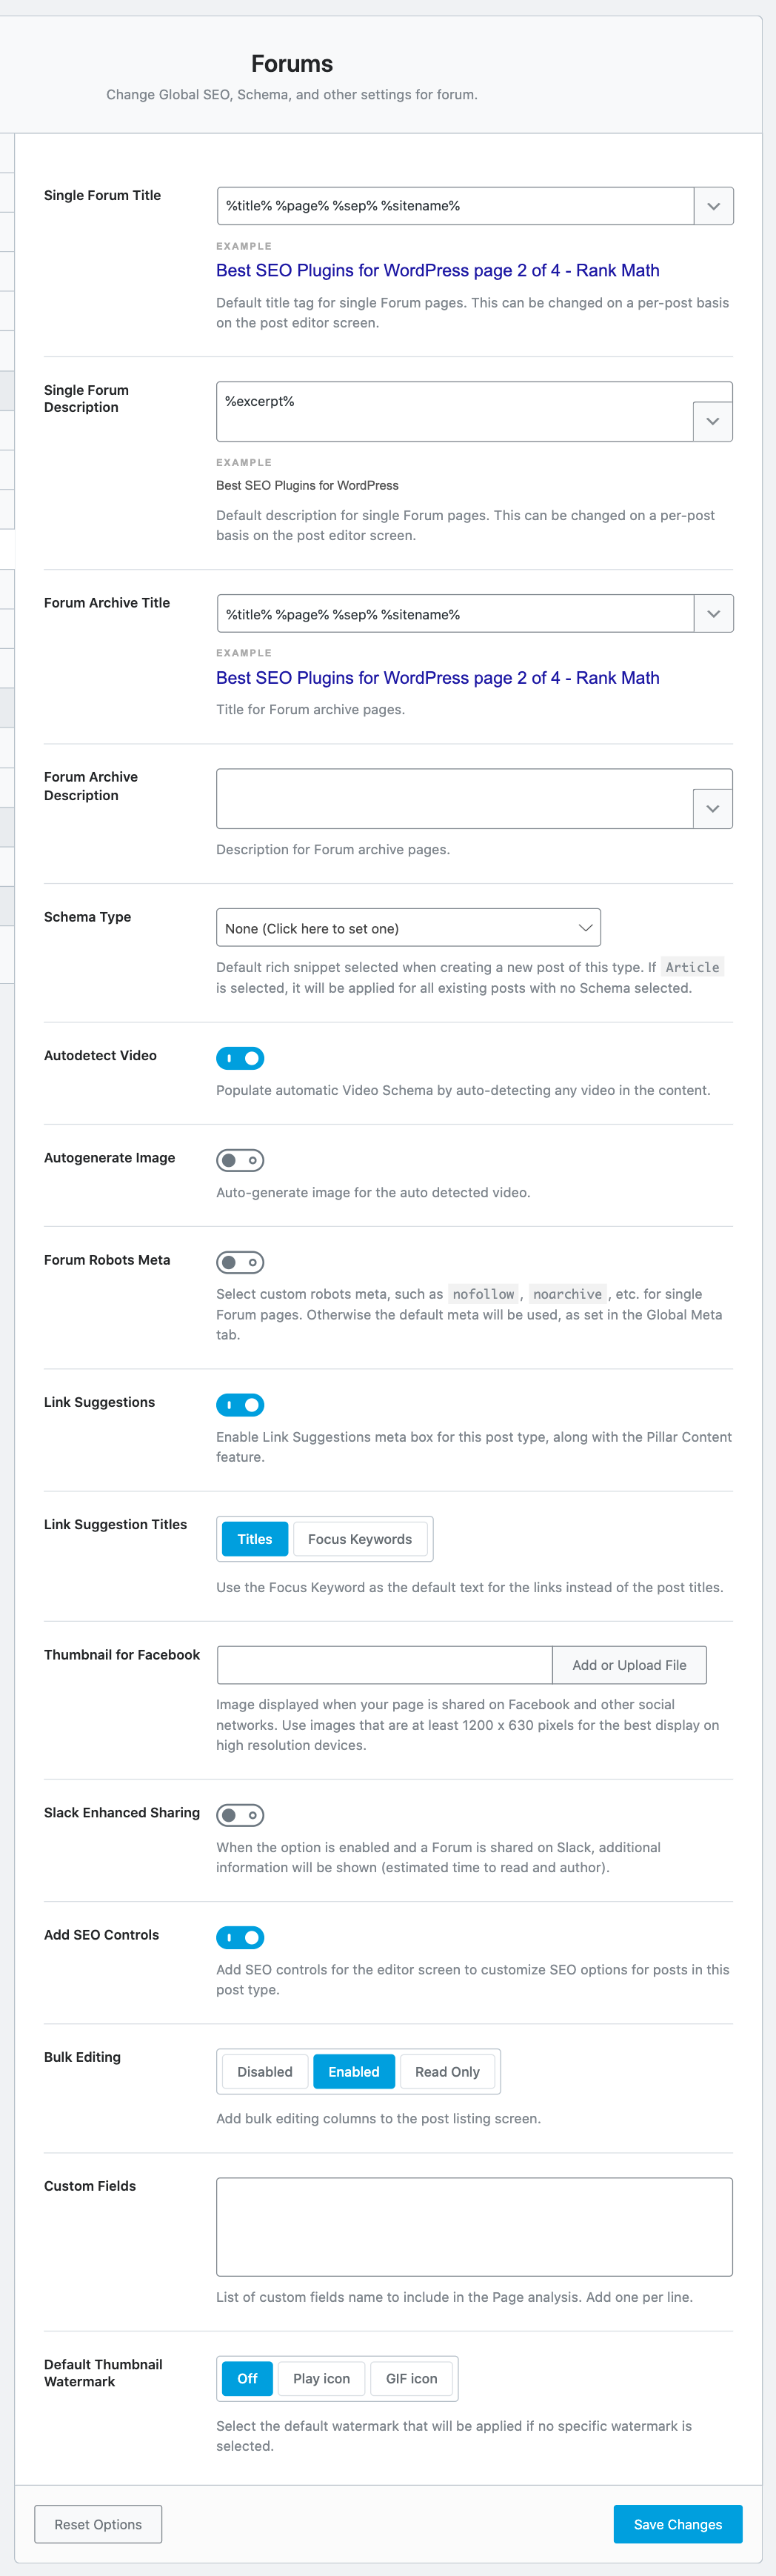
We’ll discuss each of the sections, starting with the Forums section. Here are all the settings that you should see in the Forums section.
Let us discuss each of the settings.
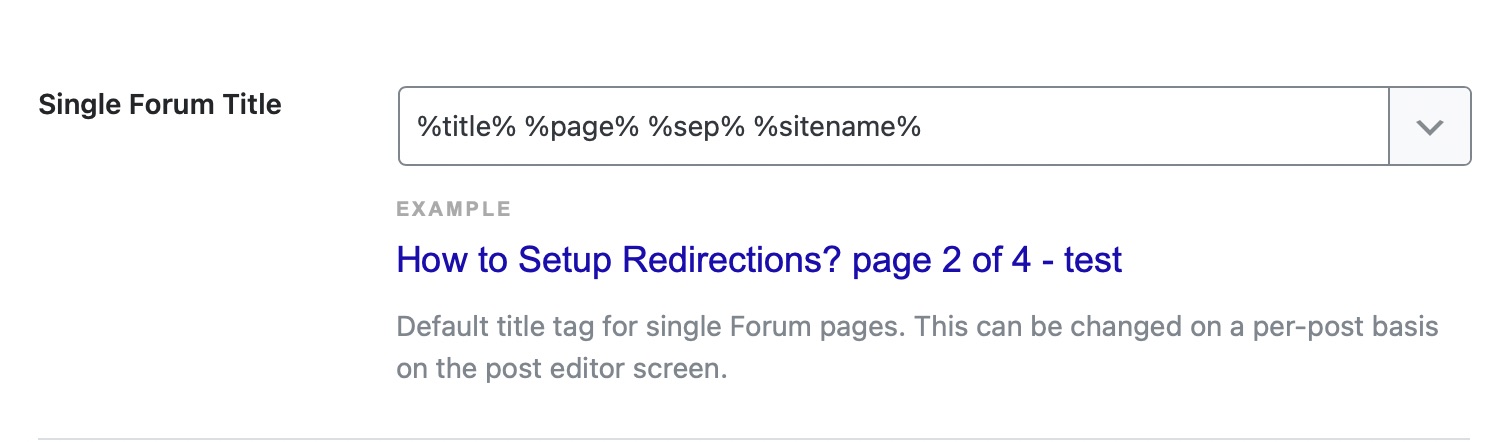
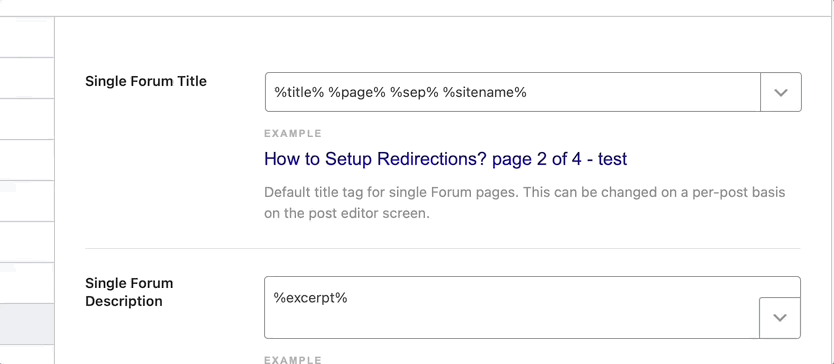
Single Forum Title
Here you can create a template that will be used to create the titles for your forum. You have access to plenty of variables to create a useful template of your choice, and a default one is even created for you.
To see all the variables available, click the drop-down button at the end of the text area. You can scroll to see all the variables, or type in a few keywords to filter the variables. Once you add or remove a few variables, the real-time preview will let you see how the template will appear in the actual forum. Please note that not all variables are supported in all areas. For example, the search query variable will only be supported on search pages.
Single Forum Description
This field lets you create a template for the forums’ descriptions. The same variables that you saw in the Single Forum Title are also available to use here. You can use those variables to define a dynamic template or use a static one.
Forum Archive Title
Here you can create the template that will be used to create the title of the forum archives. A sample template has already been created for you, and you can customize it using the variables we showed you above.
Forum Archive Description
In this field, you can create the template that will be used to create the descriptions for your forum archives. It is the same deal as all the other fields, either use the variables to create a template or create a static one.
Schema Type
Here you can select the Schema that will be used for the forums. There are plenty of options available, so choose the one that suits the topic of your forum the closest.
Überschrift
The Headline field appears only if you have selected a default Schema Type. Here, you can create a template that will be used to create the Headline to be used in Schema Markup. Similar to the other settings, you have access to a ton of variables to create the headline of your choice.
Beschreibung
The Description field will also appear only if you select a Schema in the Schema Type field, except for the Books Schema, as Descriptions are not supported for books.
Here, you will create a template that will be used to create Descriptions for your forums to be used in Schema Markup. A sample description should already be created, and you can customize it using variables.
Article Type
The Article Type setting appears only when you select the Article Schema from the Schema Type selection above, and it helps to define the type of article the forum post is. You have 3 options to choose from — Article, Blog Post, and News Article.
For forums, you can choose the Article or the Blog Post option. The News Article is specifically targeted for News Articles, and if you do have a news section on your forum, you can select the Article Type manually for those forums.
You can enable this option to allow Rank Math to automatically detect videos inside your forum pages and generate Video Schema. You should also enable the Schema module under WordPress-Dashboard →Rank Math-SEO to allow Rank Math to generate Video Schema.
This option will appear only if you have enabled the previous option. When you enable Autogenerate Image, Rank Math can automatically generate images for your auto-detected videos to include in Video Schema and Video Sitemap.
Forum Robots Meta
Here you can set the Robots Meta for your forums. You can choose the default setting, which means that forums will inherit your Global Robots Meta settings, or define custom settings for the forums. If you choose custom, then additional settings should appear below.
Forum Robots Meta Custom Settings
This setting shows up if you choose the Custom setting in the Forum Robots Meta option. As you can see, you can pick and choose the Robots Meta you want to apply to your forums. Unless it is a private forum, we would recommend that you keep all of these disabled.
Forum Advanced Robots Meta
The option to configure Advanced Robots Meta for your forum will appear only if you have chosen custom settings for Forum Robots Meta. You can choose the values for Advanced Robots Meta directives and control how the snippet of your forum pages should appear on search results.
Linkvorschläge
When Link Suggestions is enabled, Rank Math intelligently scans the content of your website and suggests links that you might want to link to from your current post, page, or forum. We absolutely recommend this feature to be enabled for posts and pages, but for forums, it depends. We recommend that you turn it on, and see if you use it often. If you do, keep it enabled, otherwise, disable it.
Link Suggestion Titles
The Link Suggestion Titles option is visible only when you enable Link Suggestions. This option lets you choose how Rank Math will primarily search for related content. You can use forum titles or the focus keywords for the forum.
Thumbnail for Facebook
This option lets you choose a default thumbnail for Facebook sharing. If any of the forums are shared on Facebook, and they do not have a custom thumbnail selected for Facebook, this image will be used instead. Here is how you set one.
Click the Add or Upload Button to open the WordPress Media Manager. Once it is open, choose the thumbnail image that you’d like to use, or upload. Once the image is uploaded and selected, click the “Choose this file” button.
The image should now show up just below the setting. Here, we’ve selected the Rank Math logo, but you can upload any image that fits your website.
You can also change the image after it’s set by clicking the “Add or Upload File” button again and choosing a different file.
Slack Enhanced Sharing
When this option is enabled, your forums when shared on Slack will include additional data in the link preview, such as the estimated time to read the forum page and the author. This option is disabled by default.
Fügen Sie SEO-Steuerelemente hinzu
Rank Math features a powerful Meta Box that helps you optimize your content for SEO, and you can learn more about it here. This option lets you enable or disable the Meta box for your forums.
Massenbearbeitung
Using Rank Math, you can edit the metadata of your forums in bulk, which can save you a lot of time. This feature might not be useful for a new website, but for websites that have a lot of old content, this feature can be invaluable.
Custom Fields
Use the Custom Fields option to add the name of any custom field you use inside your forums. If you’ve multiple custom fields to add, then add one per line, and Rank Math will look for the content inside these fields to include them in the on-page SEO analysis.
Notiz: Rank Math uses nur the core custom fields of the forums for on-page SEO analysis.
You can add the Default Thumbnail Watermark that will be applied if no particular watermark is selected.
This covers all the Forum related settings. Let us move to the next section.
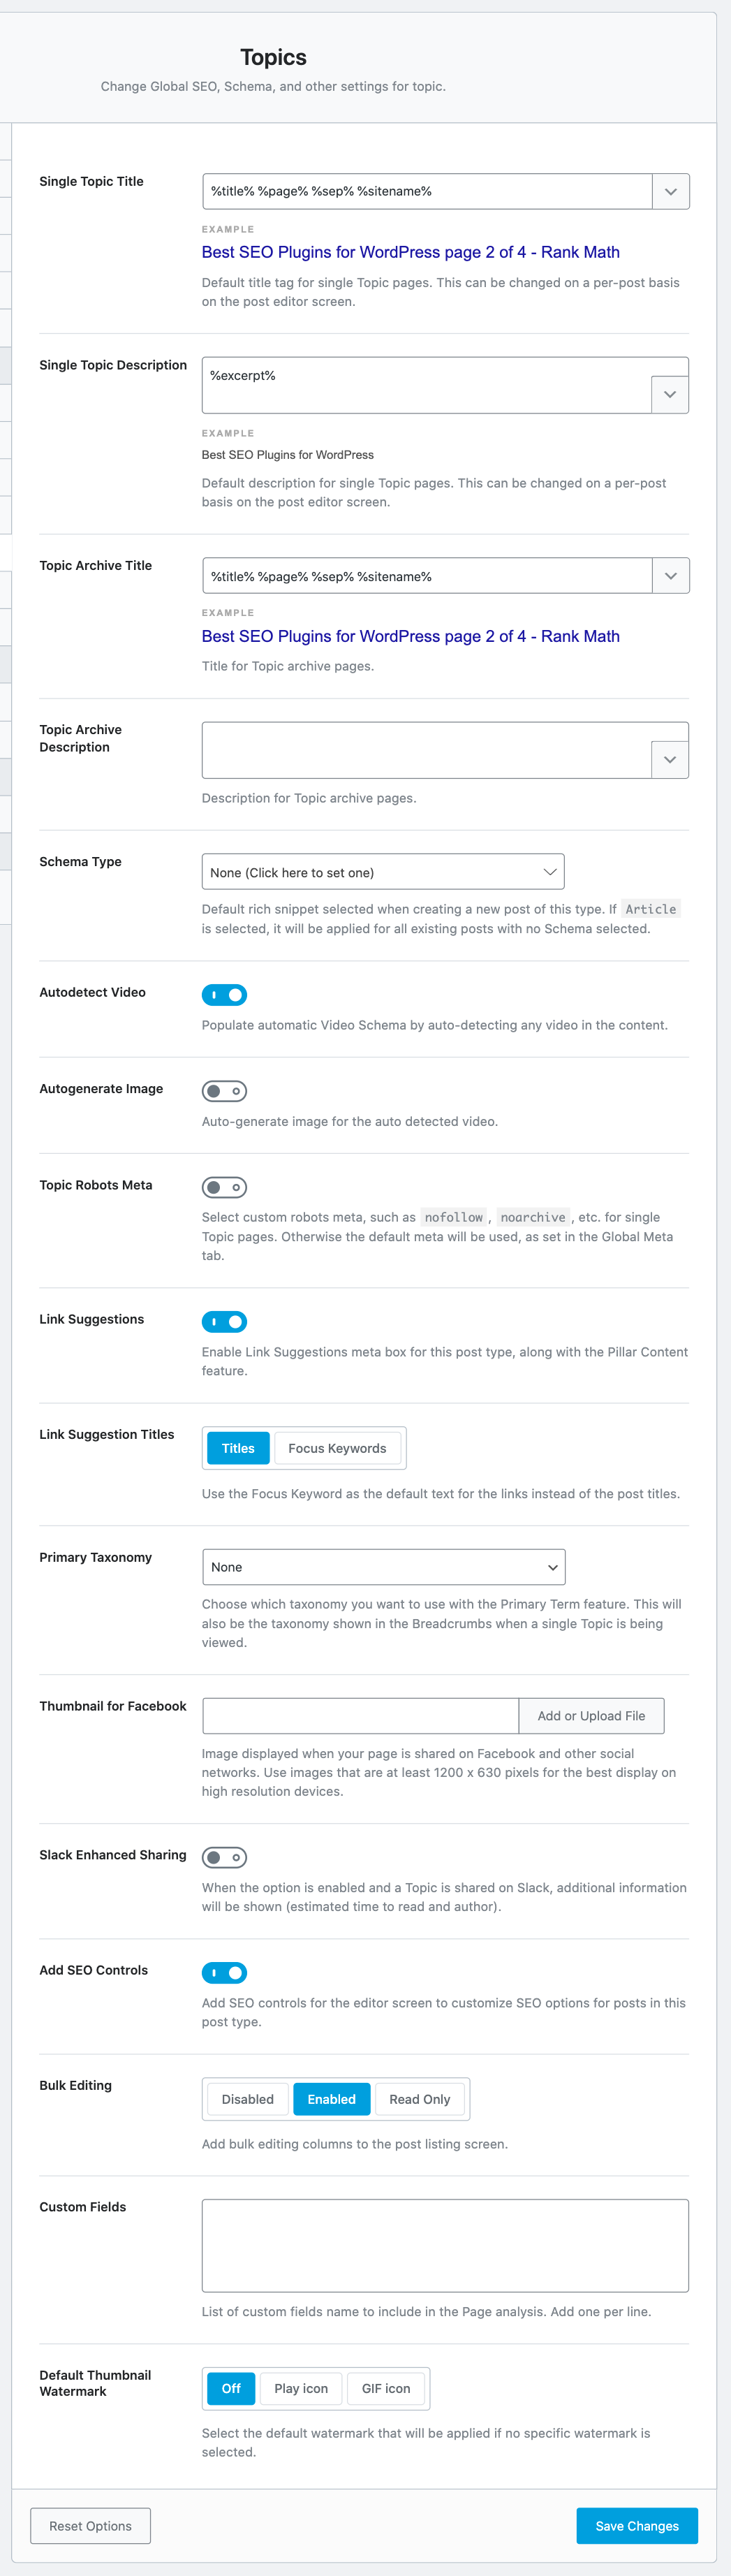
13 Topics
A Forum is a broad topic that can have multiple Topics under it, and the Topics section deals with the Tiles and Meta of exactly those. Here are all the settings that are available in the Topics section.
Let us understand each of the settings.
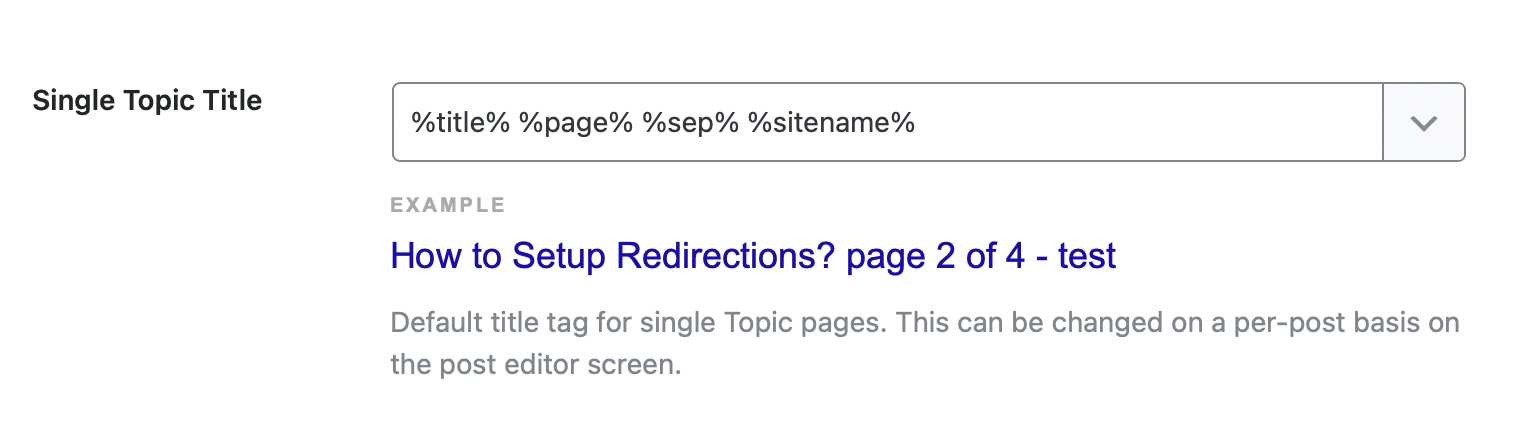
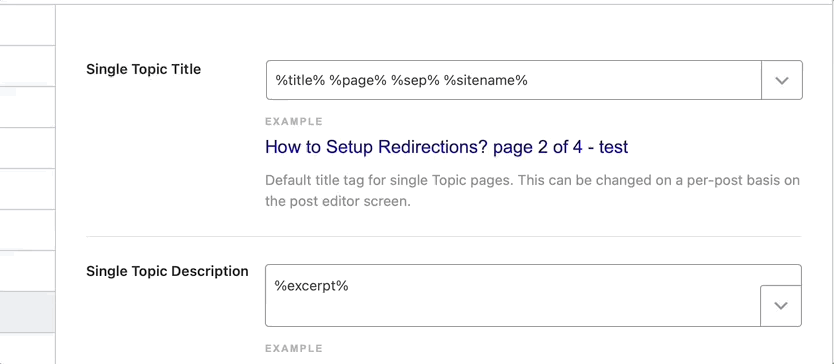
Single Topic Title
This setting is used to create a title format for the topics that will be created in the forum.
A sample title format should be visible to you, along with a live preview just below the setting.
To customize the title tag, you can use one of the many variables available. To see all the variables, click the drop-down at the edge of the text area.
You can scroll and see all the variables available, or type in keywords to filter the variables. As you make any changes, the real-time preview will also update, in real-time.
You should know that while there are a lot of variables available to choose from, some variables are supported only for specific pages. For example, the search query variable will only work for search pages. For any variable that has special requirements, a small notice has been added next to it.
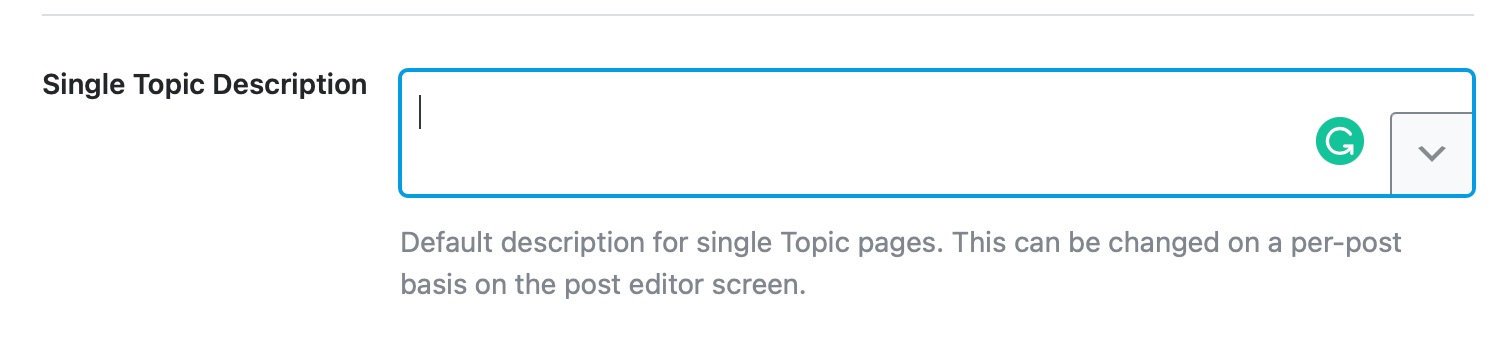
Single Topic Description
This field lets you create a template for setting the descriptions of topics. Similar to the Single Topic Title discussed above, you can use all sorts of variables to create a template.
Topic Archive Title
This field lets you create a title template for your topic archives. You have access to all the variables here as well, and a sample format should be already created for you. As you make any changes to the template, the preview below the text area will update in real-time.
Topic Archive Description
This option lets you create a template for topic archives. You can use the same variables we demonstrated above to create an optimized Topic Archive Description format.
Schema Type
Here you can choose the Schema that Rank Math should add to your topics. There are many options to choose from, and you should select the option that suits your Forum Topics the closest.
Überschrift
The Headline option only appears once you select a Schema from the Schema Type option. Here you can create the headline format that will be used in the Schema Markup for the topic. You have access to all kinds of variables, which you can see using the drop-down, and you can even create a static format if you prefer.
A sample Headline format should already be visible to you, and as you make any changes, the preview below the setting will give you an idea of how the headline will appear, in real-time.
Beschreibung
This option is also only visible when you select a Schema from the Schema Type options, with one exception. If you select the Books Schema, this field will not be visible, as it is not supported.
In this setting, you will create a template that will be used to create a description of the topics. You can choose from the many variables available to create a template, and combine them with static text as well. A live preview is available below the description, and it should update in real-time as you make any changes to the template.
Article Type
The Article Type setting will be visible only if you select the Article Schema from the Schema Type setting. Here, you have 3 options to choose from—Article, Blog Post, and News Article.
Article and Blog Post are quite similar and should be used for any opinionated content, while the News Article should only be used for factual news reporting.
For topics, the Article type or the Blog Post type option should serve better.
Enable this option to allow Rank Math to automatically detect videos inside your topic pages and generate Video Schema. For Rank Math to generate Video Schema, you must enable the Schema Modul durch Navigieren zu WordPress-Dashboard →Rank Math-SEO.
The Autogenerate Image setting will appear only if you have enabled the previous option. When you enable Autogenerate Image option, Rank Math can automatically generate images for your autodetected videos and includes them in Video Schema and Video Sitemap.
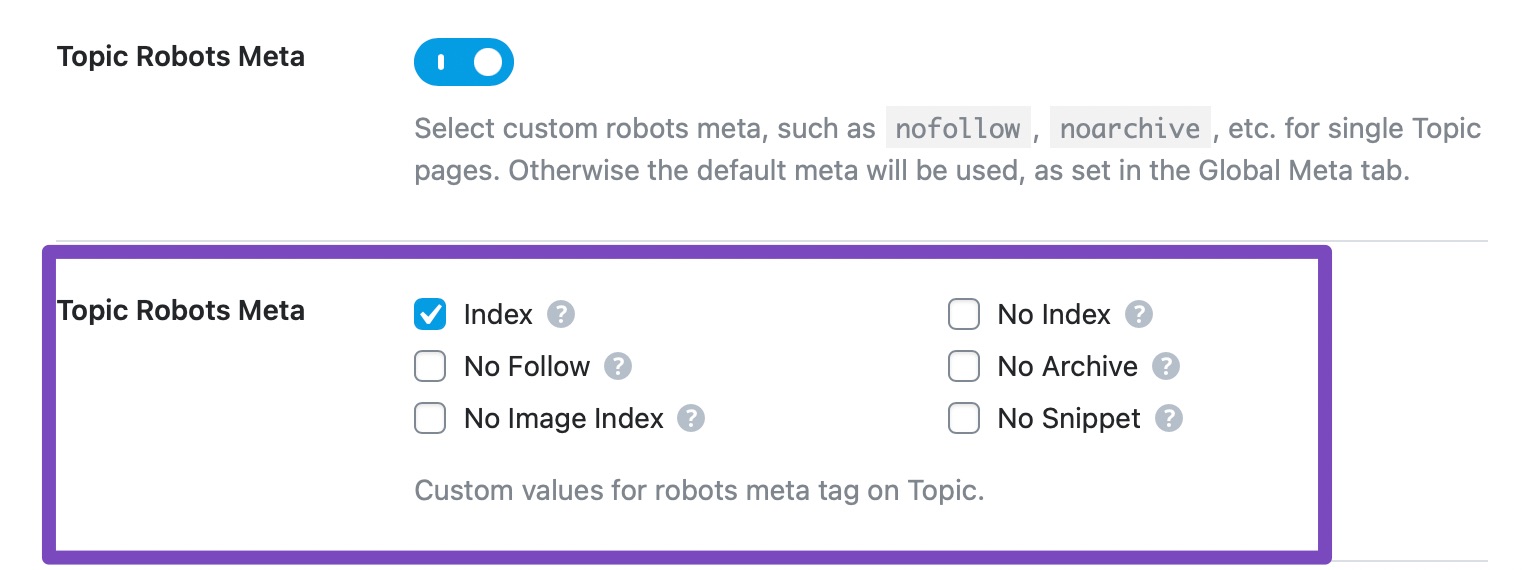
Topic Robots Meta
Here you can configure the Robots Meta that will be used for your forum topics. If you leave with the default option, then the Global Robots Meta will be used for the forum topics, and if you choose the custom option, a new set of settings will open up below it, which will let you select the Robots Meta manually.
Topic Robots Meta Custom Settings
This setting will appear, only if you select the Custom settings in the Topic Robots Meta setting, and it lets you configure a custom Robots Meta configuration for your topics. As you can see from the image, all the Robots Meta settings will become available to you as checkboxes, and you can select and enable the ones you like.
Topic Advanced Robots Meta
The Topic Advanced Robots Meta option appears, only if you had enabled custom settings for Topic Robots Meta. You can set the meta directives for snippet, video preview, and image preview to control how the snippet of your topic pages should appear on search results.
Linkvorschläge
Link Suggestions is a feature unique to Rank Math, which helps you take advantage of internal linking opportunities. When enabled, Rank Math will intelligently scan your content and suggest internal links based on the current post.
This feature is quite useful for blogs, but for forums, it depends on how the forum is set up and run. There is no harm in keeping this enabled even if you don’t use it for forums, so we suggest that you keep this enabled.
Link Suggestion Titles
This setting will be visible only if you enable this Link Suggestions feature.
This option configures how Rank Math looks for internal linking opportunities. There are 2 options to choose from; Titles and Focus Keywords.
If you select the Titles option, then Rank Math will look for internal linking opportunities based on the title of the topic. If the Focus Keywords option is selected, then Rank Math will make the search based on the focus keywords of the topic.
Since most of the content on a forum should be user-generated, and thus no focus keywords will be set, we recommend that you keep this setting configured with Titles.
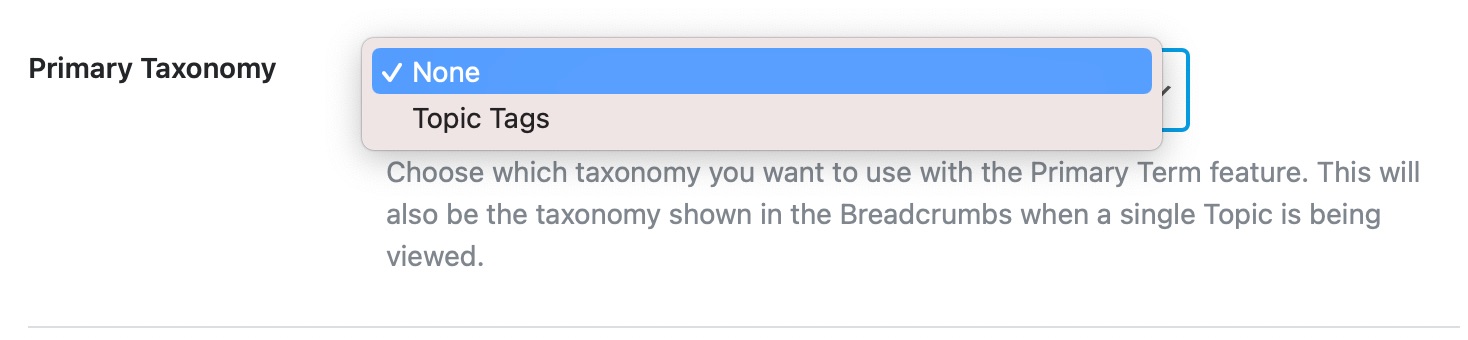
Primäre Taxonomie
Here you can select the Primary Taxonomy that will be applied to the topics that are created.
Thumbnail for Facebook
In this option, you will select the default thumbnail that will be used if a topic is shared on Facebook. Topics usually don’t have options to configure custom sharing images, and a user who is creating a topic won’t take time out to create a custom image. That is why it is important to create a default one. Click the “Add or Upload File” button to upload a thumbnail.
Slack Enhanced Sharing
When this option is enabled, your topics when shared on Slack will include additional data in the link preview, such as the estimated time to read the topic page and the author. This option is disabled by default.
Fügen Sie SEO-Steuerelemente hinzu
This option enables or disables the SEO Meta Box for topics. The SEO Meta Box hosts plenty of options to optimize your posts for SEO, and you can learn more about it here.
Massenbearbeitung
This option lets you configure or disable the bulk editing feature for topics. If you already have a lot of topics on your website when you installed Rank Math, then you should use the bulk editing feature to optimize them together. For new websites, we would recommend that you test it out first and see if you find it useful.
Custom Fields
If your topics include custom fields to display data on the frontend, then include them here with one per line. Rank Math will include the data from these fields for on-page SEO analysis to offer you more relevant on-page recommendations for your topics.
Notiz: Rank Math uses nur the core custom fields of the topics for on-page SEO analysis.
You can choose the Default Thumbnail Watermark that will be applied if no particular watermark is selected. The default watermark can be a Play Icon or a GIF Icon. You can set it Off if you do not want to use the setting. If you had created any custom watermark under the Global Meta section, it would also appear here.
14 Replies
Replies, in the context of forums, are the individual replies/responses that any topic in the forum will receive.
Since each reply can technically qualify as an individual piece of content, optimizing replies can fetch you a fair amount of traffic.
And that is what the Replies section is for. Here, you will configure all the Titles and Meta settings related to Replies in the forums. Here are all the settings that should be visible in the Replies section.
Let us discuss each setting in detail.
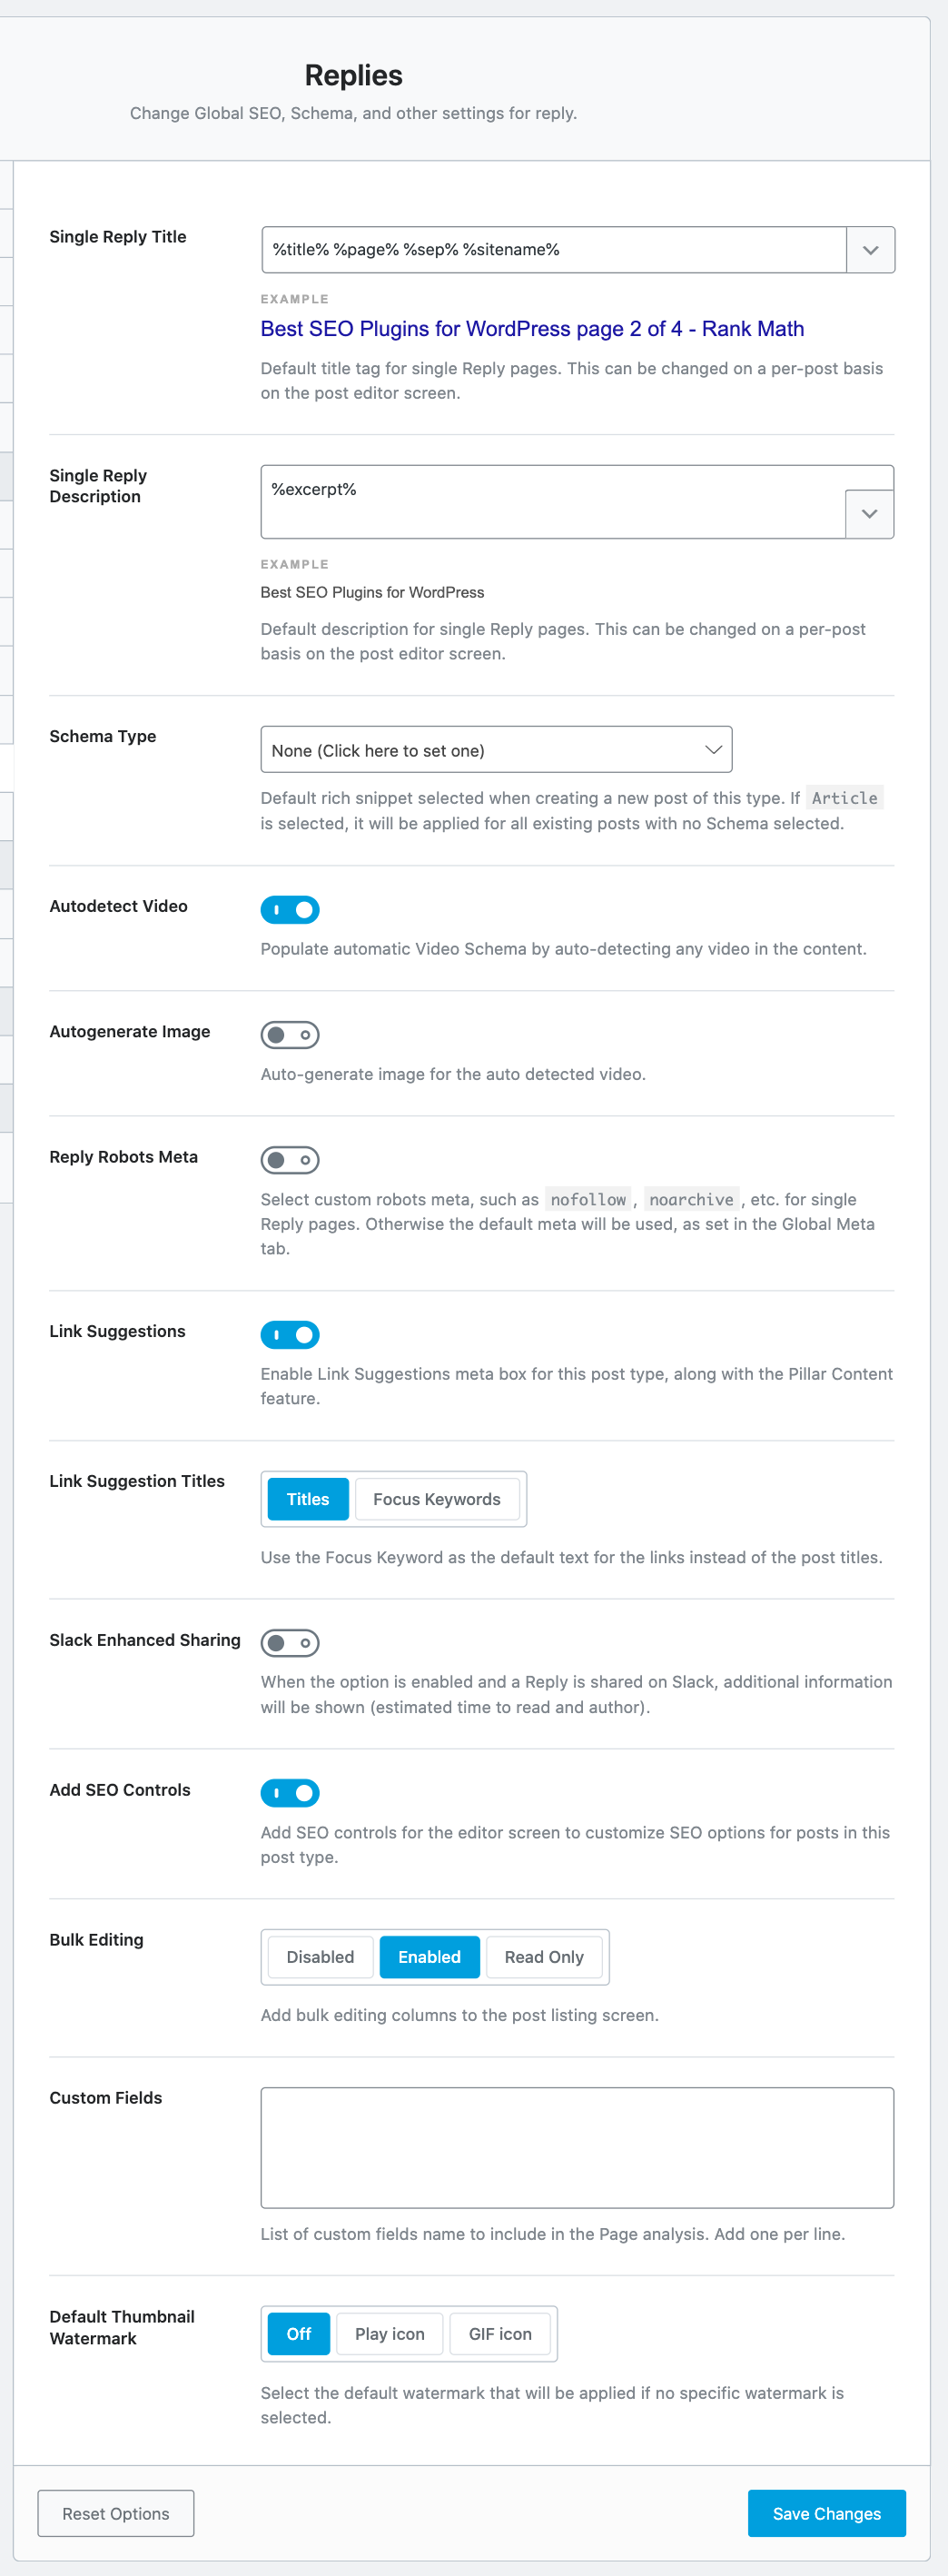
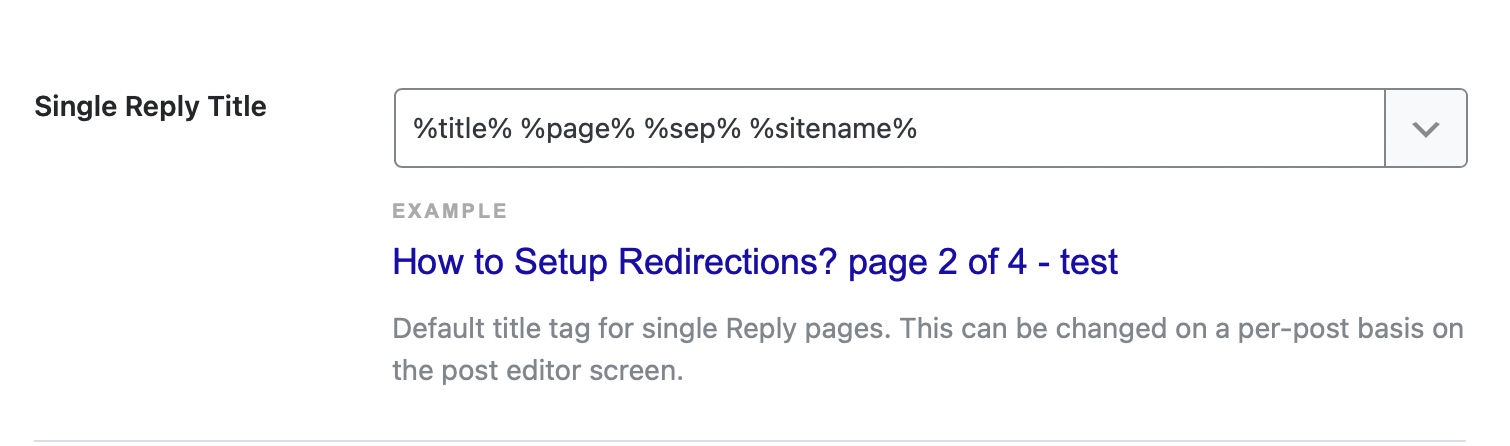
Single Reply Title
This setting is used to create the title format for the Replies that will be created in the forum.
A sample title format should be visible to you, along with a live preview just below the setting.
To customize the title tag, you can use one of the many variables available. To see all the variables, click the drop-down at the edge of the text area.
You can scroll and see all the variables available, and also type in keywords to filter the variables. As you make any changes, the real-time preview will also update, in real-time.
You should know that while there are a lot of variables to choose from, some variables are supported only for specific pages. For example, the search query variable will only work for search pages. For any variable that has special requirements, a small notice has been added next to it.
Single Reply Description
This field lets you create a template for setting the descriptions of replies. Similar to the Single Reply Title discussed above, you can use all sorts of variables to create a template.
Schema Type
Here you can choose the Schema that Rank Math should add to your Replies. There are many options to choose from, and you should select the option that suits your Topic Replies the closest.
Überschrift
The Headline option appears when you select a Schema from the Schema Type option. Here you can create the headline format that will be used in the Schema Markup for the reply. You have access to all kinds of variables, which you can see using the drop-down, and you can even create a static format if you prefer.
A sample Headline format should already be visible to you, and as you make any changes, the preview below the setting will give you an idea of how the headline will appear, in real-time.
Beschreibung
This option is also only visible when you select a Schema from the Schema Type option, with one exception. If you select the Books Schema, this field will not be visible, as it is not supported.
In this setting, you can create a template that will be used to create a description for the Replies. You can choose from many variables available to create a template, and combine them with static text as well. A live preview is available below the description, and it should update in real-time as you make any changes to the template.
Article Type
The Article Type setting will be visible only if you select the Article Schema from the Schema Type setting. Here, you have 3 options to choose from—Article, Blog Post, and News Article.
Article and Blog Post are quite similar and should be used for any opinionated content, while the News Article should only be used for factual news reporting.
For replies, the Article type or the Blog Post type option should serve better.
When you enable the Autodetect Video option, Rank Math can automatically detect videos inside your replies and automatically generates Video Schema. To generate the Video Schema, you must also have enabled the Schema module at WordPress-Dashboard →Rank Math SEO.
The Autogenerate Image setting appears only if you had enabled the previous setting to Autodetect Videos. When you enable the Autogenerate Image option, Rank Math can automatically generate thumbnail images for your videos and includes them in Video Schema and Video Sitemap.
Reply Robots Meta
Here you can configure the Robots Meta that will be used for your Topic Replies. If you choose the default option, then the Global Robots Meta will be used for the topic replies, and if you choose the custom option, a new set of settings will open up below it, which will let you select configure the Robots Meta manually.
Reply Robots Meta Custom Settings
This setting will appear only if you select the Custom settings in the Reply Robots Meta setting, and it lets you configure a custom Robots Meta configuration for your Replies. As you can see from the image, all the Robots Meta settings become available to you as checkboxes, and you can select to enable the ones you like.
Reply Advanced Robots Meta
This setting will appear only if you have chosen custom settings for Reply Robots Meta. You can configure the advanced meta directives for all your topic replies and control how the snippets of your topic replies should appear on search results.
Linkvorschläge
Link Suggestions is a feature unique to Rank Math, which helps you take advantage of internal linking opportunities. When enabled, Rank Math will intelligently scan your content and suggest internal links based on the current reply.
This feature is quite useful for blogs, but for forums, it depends on how the forum is set up and run. There is no harm in keeping this enabled even if you don’t use it for forums, so we suggest that you keep this enabled.
Link Suggestion Titles
This setting will be visible only if you enable this Link Suggestions feature.
This option configures how Rank Math looks for internal linking opportunities. There are 2 options to choose from; Titles and Focus Keywords.
If you select the Titles option, then Rank Math will look for internal linking opportunities based on the title of the reply. If the Focus Keywords option is selected, then Rank Math will search based on the focus keywords of the reply.
Since most of the content on a forum should be user-generated, and thus no focus keywords will be set, we recommend that you keep this setting configured on Titles.
Slack Enhanced Sharing
When this option is enabled, your replies when shared on Slack will include additional data in the link preview, such as the estimated time to read the reply and the author. This option is disabled by default.
Fügen Sie SEO-Steuerelemente hinzu
This option enables or disables the SEO Meta Box for replies. The SEO Meta Box hosts plenty of options to optimize your replies for SEO, and you can learn more about it here.
Massenbearbeitung
This option lets you configure or disable the bulk editing feature for replies. If you already have a lot of replies on your website when you installed Rank Math, then you should use the bulk editing feature to optimize them together. For new websites, we would recommend that you test it out first and see if you find it useful.
Custom Fields
If your replies include custom fields, then you can add them here, one per line. So that Rank Math can include them for on-page SEO analysis.
Notiz: Rank Math uses nur the core custom fields of the replies for on-page SEO analysis.
You can add the Default Thumbnail Watermark that will be applied if no particular watermark is selected. The default watermark can be a Play Icon or a GIF Icon. You can set it Off if you do not want to use the setting. If you’ve created any custom thumbnail watermark, it will also be listed here for your use.
This covers all the Titles & Meta settings related to Replies. Let us move on to the next section.
15 Downloads
The Downloads section deals with all the Titles and Meta settings related to Downloads. For obvious reasons, this section will only be visible to you if you’re using Easy Digital Downloads on your website.
Here are all the settings that you will see in the Downloads section.
Let us discuss each setting available here in detail.
Single Download Title
The Single Download Title setting lets you create a template that will be used to create the title of your downloads. You can use template variables to create a dynamic title or create a static one, or a mix of both.
To see all the variables, click the drop-down at the edge of the text area. You can scroll down and see all the variables available, and also type in keywords to filter the variables. As you make any changes, the real-time preview will also update, in real-time.
Single Download Description
This field lets you create a template for setting the descriptions of your downloads. You can also make use of the variables to create a description format. A sample template should be available for you, and you can use it as well. As you make any changes, the preview just below the setting should update in real-time.
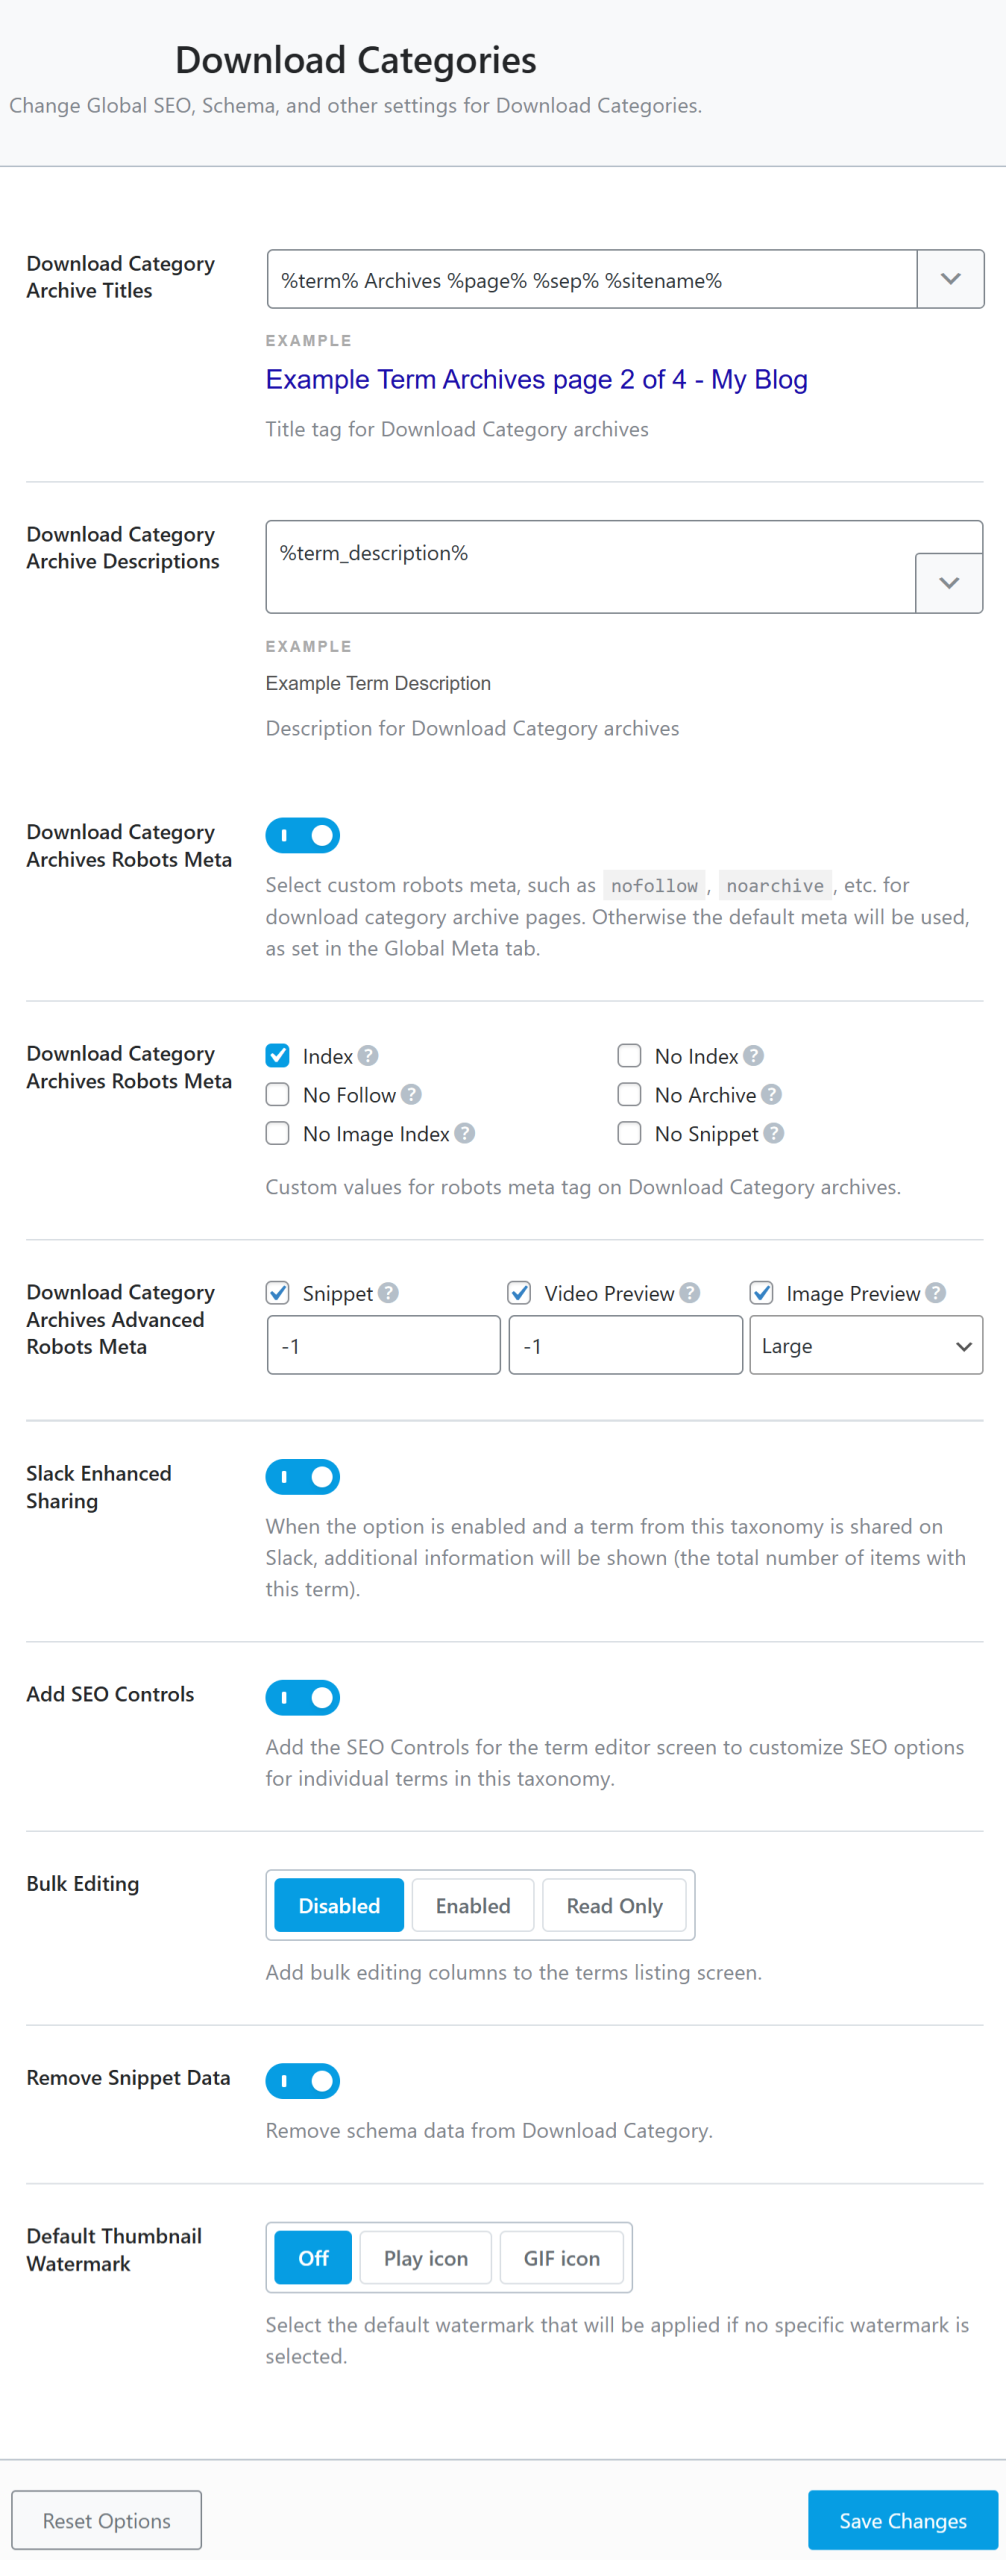
Download Archive Title
This option lets you create a template for the titles of your download archives. You can use the same variables we demonstrated above to create an optimized template. The real-time preview below the text area should help you visualize how the final template will turn out.
Download Archive Description
This option lets you create a template for the descriptions of your download archives. You can use the same variables we demonstrated above to create an optimized template.
Schema Type
This option lets you choose a Schema type. Since we’re dealing with products here (downloads in specific), the only 2 options are None or EDD Product. In essence, you can say that this option lets you enable or disable the Product Schema.
If you had enabled the previous option to Autodetect Video, you would find the option to Autogenerate Image appears below. When you enable this option, Rank Math automatically generates an image thumbnail from your video to use in Video Schema and Video Sitemap.
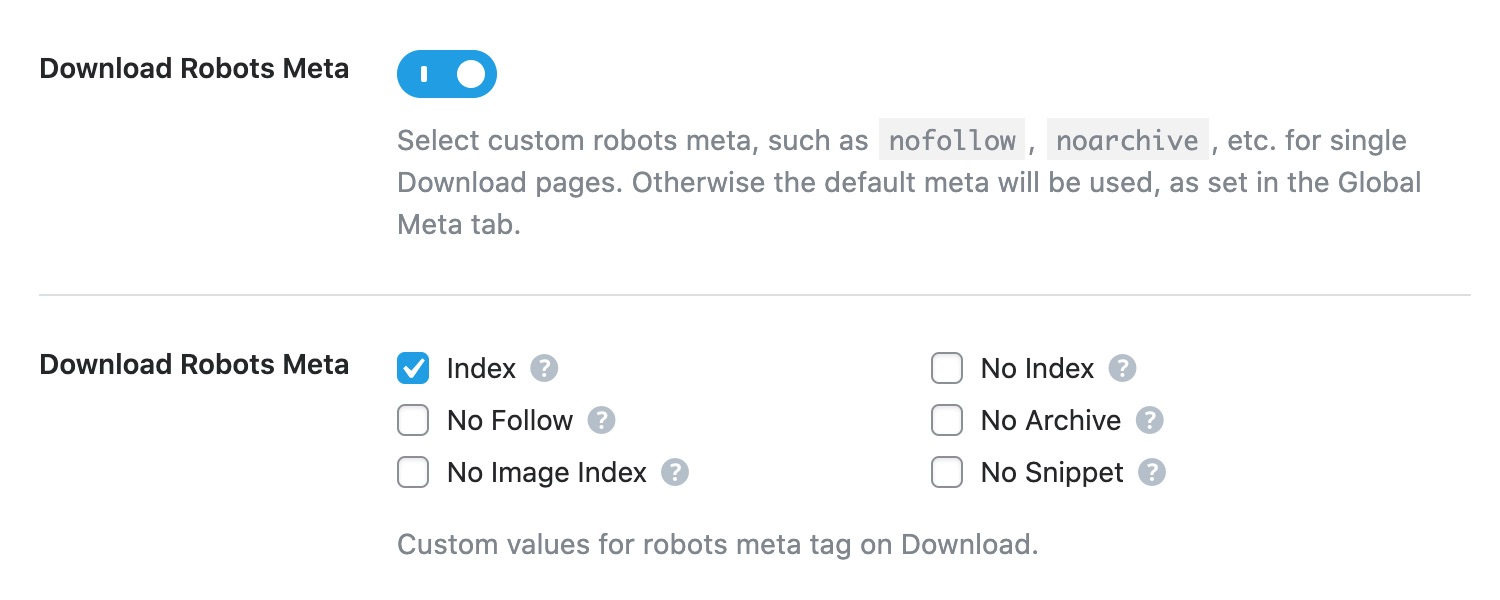
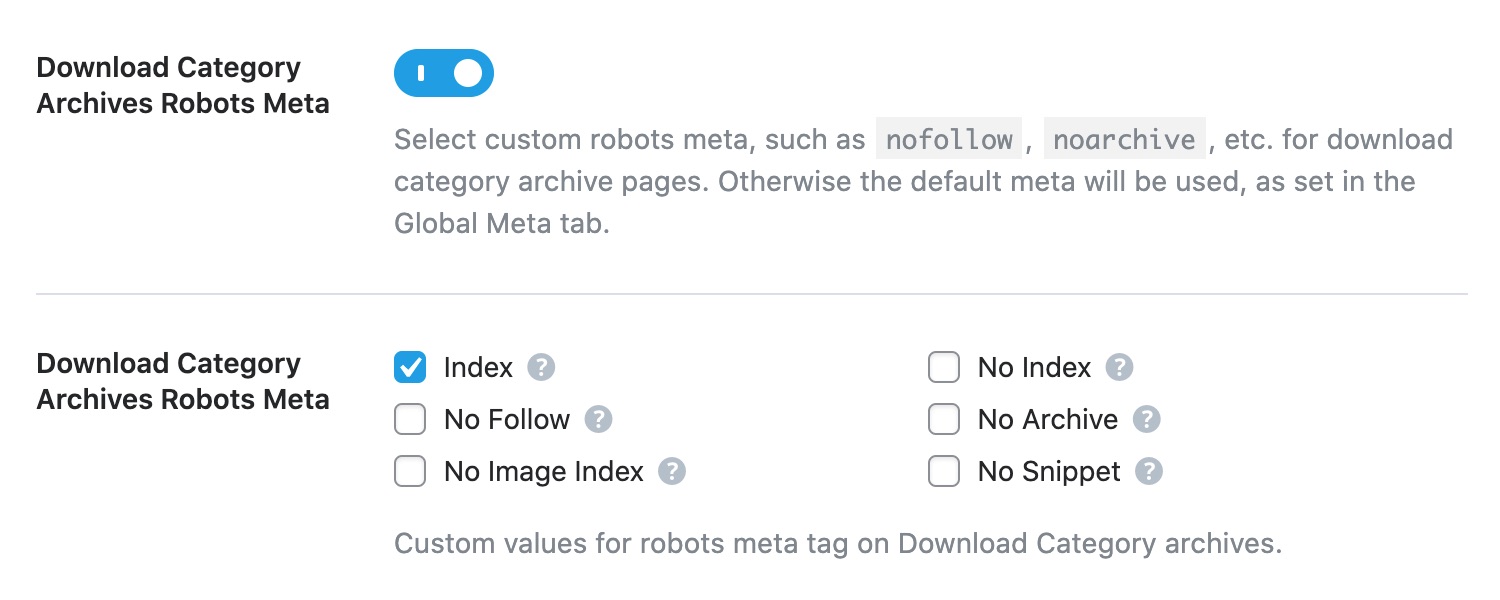
Download Robots Meta
Here you can set the Robots Meta for your downloads. You can either use the Global defaults by leaving with the default option or choose the Custom option to define custom settings.
Download Robots Meta Custom Settings
If you select the Custom option in the Downloads Robots Meta setting, additional settings will appear below it, which will let you define the Robots Meta specifically for downloads. As you can see from the image, all the Robots Meta directives are available, and you can simply check the ones you want to enable for your downloads.
Download Advanced Robots Meta
If you had selected custom settings for your Download Robots Meta, you’d also be able to configure the Advanced Robots Meta for all your download pages. You can set your own values for Snippet, Video Preview, and Image Preview meta directives. We recommend you to leave with the default configurations if you aren’t aware of the changes this could result in, as they control how the snippets of your download pages would appear in search results.
Linkvorschläge
Link Suggestions is a feature unique to Rank Math, which helps you take advantage of internal linking opportunities. When enabled, Rank Math will intelligently scan your content and suggest internal links based on the current digital download.
Link Suggestion Titles
This setting will be visible only if you enable this Link Suggestions feature.
This option configures how Rank Math looks for internal linking opportunities. There are 2 options to choose from; Titles, and Focus Keywords.
If you select the Titles option, then Rank Math will look for internal linking opportunities based on the title of the download. If the Focus Keywords option is selected, then Rank Math will search based on the focus keywords of the download.
Primäre Taxonomie
This option lets you select the Primary Taxonomy for the downloads. Click the drop-down and select the taxonomy most suitable for your downloads.
Thumbnail for Facebook
This option lets you select the default image for Facebook sharing. When any of your downloads are shared on Facebook, Facebook does not use the download image as the thumbnail. Instead, it looks for a specific image defined by the OpenGraph protocol.
Ideally, you should be configuring the sharing image for each of the downloads; Rank Math does have the functionality to do so. However, if you have a lot of downloads, it can take some time. In the meantime, you can set up a default sharing image.
Click the “Add or Upload File” button to upload a thumbnail. Remember, the ideal dimensions for the sharing image are 1200 pixels by 630 pixels. After uploading and selecting the image, click the “Use this File” button.
Slack Enhanced Sharing
This option is enabled by default and when your downloads are shared on Slack, your link preview will include additional data such as the price of the download.
Fügen Sie SEO-Steuerelemente hinzu
This option enables or disables the SEO Controls (Meta Box) for downloads. The Meta Box hosts many important features that will prove crucial when optimizing your downloads. Therefore, we recommend that you enable the Meta Box.
Massenbearbeitung
This option lets you configure or disable the bulk editing feature for downloads. If you already have a lot of downloads on your website when you installed Rank Math, then you should use the bulk editing feature to optimize them together.
Custom Fields
If your downloads use custom fields to display data on the frontend, then you can add these field names here, with each one in a new line. Rank Math can include data from these fields during on-page analysis.
Notiz: Rank Math uses nur the core custom fields of the downloads for on-page SEO analysis.
You can add the Default Thumbnail Watermark that will be applied if no particular watermark is selected. The default watermark can be a Play Icon or a GIF Icon. You can set it Off if you do not want to use the setting. If you’ve created a custom thumbnail under the Global Meta section, then it would appear here and be available for you to use.
This covers all the settings in the Downloads section. Let us move on to the next section.
16 Products
The Products section deals with all the Titles and Meta settings related to Products. For obvious reasons, this section will only be visible to you if you’re using a WordPress plugin that is designed to help sell products. Rank Math currently supports WooCommerce, while support for other plugins will be added in the future.
Here are all the settings that you will see in the Products section.
Single Product Title
This setting lets you create a template that will be used to create the title of your products. You can use template variables to create a dynamic title or create a static one, or a mix of both. While the standard variables give you access to the metadata, WooCommerce based variables give you access to the product data, which can help in creating optimized dynamic titles.
To see all the variables, click the drop-down at the edge of the text area.
You can scroll and see all the variables available, and also type in keywords to filter the variables. As you make any changes, the real-time preview will also update, in real-time.
You should know that while there are a lot of variables to choose from, some variables are supported only for specific pages. For example, the search query variable will only work for search pages. For any variable that has special requirements, a small notice has been added next to it.
Single Product Description
This field lets you create a template for setting the descriptions of your products. Similar to the Single Product Title discussed above, you can use all the available variables to create a template. A sample template should be available for you, and you can use it as well.
As you make any changes, the preview just below the setting should update in real-time.
Product Archive Title
This option lets you create a template for the titles of your product archives. You can use the same variables we demonstrated above to create an optimized template. The real-time preview below the text area should help you visualize how the final template will turn out.
Product Archive Description
This option lets you create a template for the descriptions of your product archives. You can use the same variables we demonstrated above to create an optimized template.
Schema Type
This option lets you choose a Schema type. Since we’re dealing with products here, the only 2 options are None or Product. In essence, you can say that this option lets you enable or disable the Product Schema.
If you had enabled the previous option to Autodetect Video, you would find the option to Autogenerate Image appears below. When you enable this option, Rank Math automatically generates an image thumbnail from your video to use in Video Schema and Video Sitemap.
Product Robots Meta
Here you can set the Robots Meta for your products. You can either use the Global defaults by leaving with the default option or choose the Custom option to define custom settings.
Product Robots Meta Custom Settings
If you select the Custom option in the Products Robots Meta setting, additional settings will appear below it, which will let you define the Meta Robots specifically for products. As you can see from the image, all the Robots Meta directives are available, and you can simply check the ones you want to enable for your products.
Product Advanced Robots Meta
If you had selected custom settings for your Product Robots Meta, you’d also be able to configure the Advanced Robots Meta for all your product pages. You can set your own values for Snippet, Video Preview, and Image Preview meta directives. We recommend you to leave with the default configurations if you aren’t aware of the changes this could result in, as they control how the snippets of your product pages would appear in search results.
Linkvorschläge
Link Suggestions is a feature unique to Rank Math, which helps you take advantage of internal linking opportunities. When enabled, Rank Math will intelligently scan your content and suggest internal links based on the current product.
This feature is quite useful for blogs, but for products and eCommerce stores, it depends on how the store is set up and run. As you can probably guess, internal linking is not the primary way users will discover your products, and search, site architecture, up-sells, cross-sells, and related products would be more important. However, there is no harm in keeping this enabled even if you don’t use it, so we suggest that you keep this enabled and see if you can find any value in it.
Link Suggestion Titles
This setting will be visible only if you enable this Link Suggestions feature.
This option configures how Rank Math looks for internal linking opportunities. There are 2 options to choose from; Titles, and Focus Keywords.
If you select the Titles option, then Rank Math will look for internal linking opportunities based on the title of the product. If the Focus Keywords option is selected, then Rank Math will search based on the focus keywords of the product.
How you will configure this option for your products will depend on what kind of products you’re selling and if you’re using the Link Suggestions feature in the first place. If you’ve got a variety of products in different categories, then the Focus Keywords option will be more useful (provided you’ve set up focus keywords for the products). If you have multiple products in multiple categories, then the Titles option would suit you better.
Primäre Taxonomie
This option lets you select the Primary Taxonomy for the products. Click the drop-down and select the taxonomy most suitable for your products.
Thumbnail for Facebook
This option lets you select the default image for Facebook sharing. When any of your products are shared on Facebook, Facebook does not use the product image as the thumbnail. Instead, it looks for a specific image defined by the OpenGraph protocol.
Ideally, you should be configuring the sharing image for each of the products; Rank Math does have the functionality to do so. However, if you have a lot of products, it can take some time. In the meantime, you can set up a default sharing image.
Click the “Add or Upload File” button to upload a thumbnail. Remember, the ideal dimensions for the sharing image are 1200 pixels by 630 pixels. After uploading and selecting the image, click the “Use this File” button.
Slack Enhanced Sharing
This option is enabled by default and when your products are shared on Slack, your link preview will include additional data such as the price of the product and its availability.
Fügen Sie SEO-Steuerelemente hinzu
This option enables or disables the SEO Meta Box for products. The Meta Box hosts many important features that will prove crucial when optimizing your products. Therefore, we recommend that you enable the Meta Box. To learn more about the Meta Box, you can refer to the dedicated guide we’ve written for it.
Massenbearbeitung
This option lets you configure or disable the bulk editing feature for products. If you already have a lot of products on your website when you installed Rank Math, then you should use the bulk editing feature to optimize them together. For new websites, we would recommend that you test it out first and see if you find it useful.
Custom Fields
If your products use custom fields to display data on the frontend, then you can add these field names here with each one in a new line. Rank Math can include data from these fields during on-page analysis.
Notiz: Rank Math uses nur the core custom fields of the products for on-page SEO analysis.
You can add the Default Thumbnail Watermark that will be applied if no particular watermark is selected. The default watermark can be a Play Icon or a GIF Icon. You can set it Off if you do not want to use the setting. If you’ve created a custom thumbnail under the Global Meta section, then it would appear here and be available for you to use.
This covers all the settings in the Products section. Let us move on to the next section.
RM Locations section contains all the Titles & Meta settings related to your business or organization’s location pages. This section will be available only if you had set your website as an Organization in the Rank Math-Setup-Assistent and enabled the Verwenden Sie mehrere Standorte option under Rank Math SEO → Titles & Meta →Lokales SEO.
Here are all the options available under the RM Locations section.
This option lets you create a template that helps you give your location page a title. You can enter a static text for the locations, or use the supported variables to create a dynamic title. A sample title with a few variables is created by default.
To see a list of all the supported variables, click the drop-down button on the top right of the text field. You can scroll through the list of variables, or filter them by typing any characters on your keyboard. The preview below the text field updates in real-time so you can see how your created template will affect the title.
This option lets you create a template that helps create a description for your location page. You can enter a static text, or use the supported variables to create a dynamic description for your location pages.
This option lets you create a template for the titles of your RM Locations archive pages. You can use the same variables we demonstrated above to create an optimized template. The real-time preview below the text area should help you visualize how the final template will turn out.
This option lets you create a template for the descriptions of your RM Locations archive pages. You can use the same variables we demonstrated above to create an optimized template.
This option lets you select a default Schema to be associated with your location pages. Click the text field to see a list of all the supported Schema types and select the one that describes your location page the closest.
The Headline option will only appear if you select any Schema from the available options above. Here you will create a dynamic template for the headlines of your location pages using the variables we showed above, or use a static one.
Similar to creating a headline template, here, you will create a description template for your location pages. You have access to the variables to create a dynamic description or create a static one.
Note that the Description field is not supported if you had chosen Book Schema.
As you might have guessed, this option lets you select the article type you would classify your location page as. For obvious reasons, this field is only visible when you select the Article Schema in the Schema Type option.
There are 3 options to choose from — Article, Blog Post, and News Article.
The Article and Blog Post types are similar and can be used interchangeably, while the News Article is limited to factual news reporting only.
You can enable this option to allow Rank Math to automatically detect videos inside your location pages and generate Video Schema. To allow Rank Math to generate Video Schema, you must also enable the Schema Modul durch Navigieren zu WordPress-Dashboard →Rank Math-SEO.
This option will appear only if you have enabled the previous option. When you enable Autogenerate Image, Rank Math can automatically generate images for your auto-detected videos inside location pages and includes them in Video Schema and Video Sitemap.
Here you can set the Robots Meta for your location pages. You can leave with the default setting, which means that your location pages will inherit your Global Robots Meta settings, or you can define your custom settings for the location pages. If you choose custom, then additional settings should appear below.
This setting will show up only if you have chosen the Custom setting in the RM Locations Robots Meta option. As you can see, you can pick and choose the Robots Meta you want to apply to your location pages.
The option to configure Advanced Robots Meta for your location pages will appear only if you have chosen custom settings for RM Locations Robots Meta. You can choose the values for Advanced Robots Meta directives to control how the snippet of your location pages should appear on search results.
When Link Suggestions is enabled, Rank Math intelligently scans the content of your website and suggests links that you might want to link to from your current location page. We absolutely recommend this feature to be enabled to see if you use it often. If you do, keep it enabled, otherwise disable it.
The Link Suggestion Titles option is visible only when you enable Link Suggestions. This option lets you choose how Rank Math will primarily search for related content. You can use the titles or focus keywords of your location pages.
This option lets you select the taxonomy that will be displayed in the breadcrumbs of your location pages. Click on the setting to see all the available options and select the one that you prefer. RM Locations, by default, uses the RM Locations categories taxonomy, and you can choose it here.
Here you can choose the default thumbnail image that will be used when your location pages are shared on Facebook, Twitter, or other social networks. The recommended resolution is 1200 by 630 pixels or above. Click the “Add or Upload File” button to upload a thumbnail.
Slack Enhanced Sharing
When this option is enabled, your locations when shared on Slack will include additional data in the link preview, such as the estimated time to read the page and the author. This option is disabled by default.
This option lets you enable or disable the SEO Controls for your location pages. The SEO Meta Box hosts plenty of options to optimize for SEO and allows you to add the required Local Business Schema to your location pages. You can learn more about it here.
This option lets you configure or disable the bulk editing feature for your location pages. If you have a number of location pages for your business, then you should use the bulk editing feature to optimize them together. For new websites with a limited number of pages, we would recommend that you test it out first and see if you find it useful.
If your location pages include custom fields to display data on the frontend, then you can add them here, one per line. So that Rank Math can include them for on-page SEO analysis.
Notiz: Rank Math uses nur the core custom fields of the location pages for on-page SEO analysis.
You can add the Default Thumbnail Watermark that will be applied if no particular watermark is selected. The default watermark can be a Play Icon or a GIF Icon. You can set it Off if you do not want to use the setting. If you’ve created any custom thumbnail watermark, it will also be listed here to use.
This covers all the Titles & Meta settings for location pages. Let us move on to the next section.
The Categories section affects the meta titles and descriptions of your categories. Here is an image showing all the options in the Categories section.
Let us understand the impact of each of the settings in detail.
18.1 Category Archive Titles
This option lets you create a template for creating meta descriptions for category archive pages. You can create a static template or create a dynamic one using variables.
To see all the variables you have access to, click the drop-down button on the top right of the text field. A drop-down menu will appear, which will contain all the variables. You can scroll to see all the variables, or filter them by typing any characters on your keyboard.
18.2 Category Archive Descriptions
This option lets you create a template for creating meta descriptions for category archive pages. You can create a static template or create a dynamic one using variables.
18.3 Kategorie-Archive Roboter Meta
This option lets you customize the Robots Meta for category archive pages. You can either leave them at the default settings to use the Global Robots Meta you’ve set, or you can set them to custom.
18.4 Category Archives Robots Meta Custom Settings
If you choose the custom option, another set of options will appear below it, which will allow you to pick specific Robots Meta tags.
18.5 Kategoriearchive Advanced Robots Meta
If you chose the custom settings in Category Archives Robots Meta, another set of options to configure the Advanced Robots Meta would also appear. You can configure the meta directives to control how the snippets of your category archives appear on search results.
18.6 Slack Enhanced Sharing
This option is enabled by default and when you share a term from this category taxonomy on Slack, the link preview will include additional data such as the number of items this term has got.
18.7 Fügen Sie SEO-Steuerelemente hinzu
This option adds an SEO Meta box on the page editor screen of category archives. Using the Meta box, you can customize the SEO settings for the different categories.
18.8 Massenbearbeitung
This option allows you to bulk edit the SEO title and description of your categories. It has three settings: Disabled, Enabled, and Read Only. When enabled, the WordPress category page will include fields to edit the SEO title and description. When set to Read Only, you can view these fields but cannot edit them.
Once enabled, you can head over to Beiträge → Kategorien using the Admin sidebar. You will see the SEO Title and SEO Disc (description) fields. Click the pencil-like Bearbeiten icon.
You can then proceed to edit your categories’ meta title and description in bulk. Once done, click Save All Edits.
18.9 Snippet-Daten entfernen
This option lets you keep or remove Schema related data from your category pages. If you’ve set your category pages to no-index, then you can remove the Schema data from your category pages as well, as they are not going to be indexed anyway.
Notiz: By default, this option will be enabled on all Product archive pages.
You can select the default watermark to be a Play Icon or a GIF Icon. You can set it Off if you do not want to use the setting. If you’ve created any custom watermark, it will also appear here for you to use.
This covers all the settings in the Categories section, let’s check out the next section — Tags.
Notiz: The following sections will have similar options for different taxonomies. You can also quickly navigate to saving your titles and meta settings by clicking here.
19 Stichworte
This section contains all the Titles and Meta settings related to your tag archives. Here are all the settings available in the tags section.
Tag Archive Titles
This option lets you create a template for creating titles for tag archive pages. You can create a static template or create a dynamic one using variables. A sample template has been created for reference.
To see all the variables you have access to, click the drop-down button on the top right of the text field. A drop-down menu will appear, which contains all the variables. You can scroll to see all the variables, or filter them by typing any characters on your keyboard. As you make any changes to the template, the preview below the text area will update in real-time, showing you how the title will look like.
Tag Archive Descriptions
This option lets you create a template for creating meta descriptions for tag archive pages. You can create a static template or create a dynamic one using variables.
Tag Archives Robots Meta
This option lets you customize the Robots Meta for your tag archive pages. You can either leave them at the default settings to use the Global Robots Meta or set them to custom settings.
Tag Archives Robots Meta Custom Settings
If you choose the custom option, another set of options will appear below it, which will allow you to pick the Meta Robots tags specifically.
Tag Archives Advanced Robots Meta
If you had chosen the custom option for Tag Archives Robots Meta, you’d also find another set of options to configure the Advanced Robots Meta for your Tag archive pages. You can configure these meta directives to control how the snippet of your tag archives appears on search results.
Slack Enhanced Sharing
This option is enabled by default and when you share a term from this tag taxonomy on Slack, the link preview will include additional data such as the number of items this term has got.
Fügen Sie SEO-Steuerelemente hinzu
This option adds an SEO Meta box on the tags page editor screen. Using the Meta box, you can customize the SEO settings for the different tags.
Massenbearbeitung
This option allows you to bulk edit the SEO title and SEO description of your tags. It has three options: Disabled, Enabled, and Read Only.
Disabled:This disallows you from bulk editing your SEO title and description
Enabled: This allows you to bulk edit your SEO title and description
Read Only: This allows you to view but not edit your SEO title and description
Snippet-Daten entfernen
This option lets you keep or delete Schema data from your tag archive pages. Since most websites will no-index tag archives, this option becomes less important.
Notiz: By default, this option will be enabled on all Product archive pages.
You can select the default watermark to be a Play Icon, GIF Icon, or any custom watermarks created. You can set it Off if you do not want to use the setting.
This covers all the settings in the Tags section. Let us move on to the Topic Tags section.
20 Topic Tags
The Topic Tags section lets you define the Titles and the Meta settings of the topic tag archives. As you probably guessed, this section is part of the forum-related settings that we mentioned when we discussed the Forums, Topics, and Replies settings. Similar to those settings, this section will also be visible only if you’re using a forum plugin on your website.
Here are all the settings that you would see in the Topic Tags section.
Let us discuss each of the settings.
Topic Tag Archive Titles
This setting lets you create a template for the titles of your topic tag archives.
A sample title format should be visible to you, along with a live preview just below the setting.
To customize the title template, you can use one of the many variables available. To see all the variables, click the drop-down at the edge of the text area.
You can scroll and see all the variables available, and also type in keywords to filter the variables. As you make any changes, the real-time preview will also update, in real-time.
You should know that while there are a lot of variables to choose from, some variables are supported only for specific pages. For example, the search query variable will only work for search pages. For any variable that has special requirements, a small notice has been added next to it.
Topic Tag Archive Descriptions
This field lets you create a template for setting the descriptions of topic tag archives. Similar to the Topic Tag Archive Titles option discussed above, you can use all sorts of variables to create a template.
Topic Tag Archives Robots Meta
Here you can configure the Robots Meta that will be used for your topic tag archives. If you choose the default option, then the Global Robots Meta will be used for the topic tag archive pages, and if you choose the custom option, a new set of settings will open up below it, which will let you select configure the Robots Meta manually.
Topic Tag Archives Robots Meta Custom Settings
As you can see from the image, all the Meta Robots settings become available to you as checkboxes, and you can select and enable the ones you like.
Topic Tag Archives Advanced Robots Meta
If you had set the custom option for Robots Meta, then you’ll also find another set of Advanced Robots Meta to configure for your topic tag archive pages. Here you can set the value for Snippet, Video Preview, and Image Preview meta directives.
Slack Enhanced Sharing
This option is enabled by default and when you share a term from this topic tags taxonomy on Slack, the link preview will include additional data such as the number of items this term has got.
Fügen Sie SEO-Steuerelemente hinzu
This option lets you enable or disable the SEO Meta Box for topic tag archives. The SEO Meta Box hosts plenty of options to optimize your topic tags for SEO, and you can learn more about it here.
Massenbearbeitung
The Bulk Editing option allows you to edit your SEO title and SEO description of your topic tags in bulk. It contains three options: Disabled, Enabled, and Read Only, and is only available when you enable Add SEO Controls.
Read Only allows you to view your SEO title and SEO description, but you cannot edit them. Enabled allows you to view and edit your SEO title and SEO description, while Disabled disallows you from editing them.
Snippet-Daten entfernen
This option lets you keep or remove Schema data from your topic tag archives. If you decide to no-index your topic tag archives, then you can decide to remove the Schema data as well.
Notiz: By default, this option will be enabled on all Product archive pages.
You can select the default watermark to be a Play Icon, GIF Icon, or any custom watermarks you’ve created. You can set it Off if you do not want to use the setting.
21 Download Categories
The Download Categories section lets you define the Titles and the Meta settings of the download categories archives. You’ll notice this section only if Easy Digital Downloads is installed on your website.
Here are all the settings that you would see in the Download Categories section.
Let us discuss each of the settings available in this section.
Download Category Archive Titles
This option lets you create a template for the titles of your download category archive pages. You can create a static template or create a dynamic one using variables. A sample template has been created for reference, which you can use as well.
To see all the variables you have access to, click the drop-down button on the top right of the text field. A drop-down menu will appear, which will contain all the variables. You can scroll to see all the variables, or filter them by typing any characters on your keyboard. As you make any changes to the template, the preview below the text area should update in real-time.
Download Category Archive Descriptions
This option lets you create a template for creating meta descriptions for download categories archive pages. Similar to the Download Category Archive Titles, you can create a static template or create a dynamic one using variables.
Download Category Archives Robots Meta
This option lets you customize the Robots Meta for download category archive pages. You can either leave them at the default settings to use the Global Robots Meta or set them to custom settings.
Download Category Archives Robots Meta Custom Settings
If you choose the custom option for Robots Meta, another set of options will appear below it, which will allow you to pick the Meta Robots tags specifically.
Download Category Archives Advanced Robots Meta
Once you choose the custom option in Robots Meta, you’ll also find another set of Advanced Robots Meta to configure. You can either leave with the default setting or configure your own set of values to control how snippets of your download category archive pages appear on search results.
Slack Enhanced Sharing
This option is enabled by default and when you share a term from this download categories taxonomy on Slack, the link preview will include additional data such as the number of items this term has got.
Fügen Sie SEO-Steuerelemente hinzu
This option lets you add SEO Controls on the download categories editor window. Whether you should use this option or not will depend on how you’ve configured Easy Digital Downloads on your website.
Massenbearbeitung
This option allows you to bulk edit the SEO title and SEO description of your download categories. It is only available when you enable Add SEO Controls and contains three options:
Disabled: Disallows you from bulk editing your SEO title and description
Enabled: Allows you to bulk edit your SEO title and description
Read Only: Allows you to view but not edit your SEO title and description
Snippet-Daten entfernen
This option lets you keep or remove the structured data from your download category archive pages. Again enabling or disabling this option depends upon how you’ve configured EDD and what pages you want to appear on search results. If you’ve set the download category archive pages to no-index, then you can prefer to remove your Schema data as well.
Notiz: By default, this option will be enabled on all Product archive pages.
You can select the default watermark to be a Play Icon, GIF Icon, or any custom watermarks you’ve created. You can set it Off if you do not want to use the setting.
This covers all the settings available in the Download Categories section. Let us move on to the next section.
22 Download Tags
If you’re using Easy Digital Downloads on your website, you’ll find the Download Tags section available here. This section would let you configure Titles and Meta settings for the download tag archives.
Here are all the settings that you would see in the Download Tags section.
Download Tag Archive Titles
This option lets you create a template for the titles of your download tag archive pages. You can create a static template or create a dynamic one using variables, and a sample template is already available for your reference.
To see all the variables you have access to, click the drop-down button on the top right of the text field. A drop-down menu will appear, which will contain all the variables. You can scroll to see all the variables, or filter them by typing any characters on your keyboard. As you make any changes to the template, the preview below the text area should update in real-time.
Download Tag Archive Descriptions
The option Download Tag Archive Descriptions lets you create a template for meta descriptions of download tags archive pages. You can also make use of the available variables to create a dynamic description.
Download Tag Archives Robots Meta
This option lets you customize the Robots Meta for download tag archive pages. You can either leave them at the default settings to use the Global Robots Meta or set them to custom settings.
Download Tag Archives Robots Meta Custom Settings
If you choose the custom option, another set of options will appear below the Robots Meta settings, which will allow you to pick the Meta Robots tags specifically.
Download Tag Archives Advanced Robots Meta
If you had chosen the Custom option for the Robots Meta settings, you’d also find the Advanced Robots Meta settings available to configure.
Slack Enhanced Sharing
This option is enabled by default and when you share a term from this Download tags taxonomy on Slack, the link preview will include additional data such as the number of items this term has got.
Fügen Sie SEO-Steuerelemente hinzu
The Add SEO Controls option lets you add the Rank Math SEO Meta Box to the download tag archive pages. Enabling or disabling this option completely depends on how you’ve configured Easy Digital Downloads on your website.
Bulk Settings
The Bulk Settings option allows you to edit your download tag’s SEO titles and descriptions in bulk. It contains three options and is only available when you enable Add SEO Controls.
Disabled: Disallows you from editing the SEO title and description
Enabled: Allows you to edit the SEO title and description
Read Only: Allows you to view but not edit the SEO title and description
Snippet-Daten entfernen
If you’ve set the download tag archive pages to no-index, then you may also choose to remove the snippet data. This option will remove the structured data added by Rank Math to the download tag archive pages.
Notiz: By default, this option will be enabled on all Product archive pages.
You can select the default watermark to be a Play Icon, GIF Icon, or any custom watermarks you’ve created. You can set it Off if you do not want to use the setting.
This covers all the settings available in the Download Tags section. Let us move on to the next section — Product Categories.
23 Product Categories
You might wonder that we already covered the Categories section, so why are we covering it again. There is a difference. The section that we covered earlier is meant for WordPress categories, namely posts and pages, and the Product Categories section is specifically for product categories available with WooCommerce.
Similar to the Products section, this section will only be visible and relevant if you’re using WooCommerce in your store. Here are all the settings inside the Product Categories section.
Let us look at all the options in detail.
Category Archive Titles
This option lets you create a template for the titles of your product category archive pages. You can create a static template or create a dynamic one using variables. A sample template should be available for your reference.
To see all the variables you have access to, click the drop-down button on the top right of the text field. A drop-down menu will appear, which will contain all the variables. You can scroll to see all the variables, or filter them by typing any characters on your keyboard. As you make any changes, the preview below the setting should update in real-time.
Category Archive Descriptions
This option lets you create a template for creating meta descriptions for product category archive pages. You can create a static template or create a dynamic one using variables similar to the Category Archive Titles.
Kategorie-Archive Roboter Meta
This option lets you customize the Robots Meta for product category archive pages. You can either leave them at the default settings to use the Global Robots Meta or set them to custom settings.
Category Archives Robots Meta Custom Settings
If you choose the custom option, another set of options will appear below it, which will allow you to pick the Meta Robots tags specifically. The different Robots Meta options will appear as checkboxes, and the selected ones will be applied to the product category archives.
Kategoriearchive Advanced Robots Meta
If you had chosen the custom option for the Robots Meta, you’d also find a set of options to configure Advanced Robots Meta, as shown below. You can either leave with the default setting or set your own values to control how the snippet of your product category archive pages should appear on search results.
Slack Enhanced Sharing
This option is enabled by default and when you share a term from this product categories taxonomy on Slack, the link preview will include additional data such as the number of items this term has got.
Fügen Sie SEO-Steuerelemente hinzu
This option lets you enable or disable the SEO Controls (Meta Box) for product categories. How you should configure this option will depend on how your store is set up and what pages you want to rank in the search engines.
Massenbearbeitung
The bulk editing setting lets you enable, disable, or view your SEO title and SEO description in bulk. It becomes available when you enable Add SEO Controls. The bulk editing settings contain three options:
Disabled: Disallows you from editing your SEO title and description
Enabled: Allows you to edit your SEO title and description
Read Only: Allows you to view your SEO title and description, but disallows you from editing them
Snippet-Daten entfernen
This option lets you enable or disable Rich Snippet data from product category archive pages. Again the decision to keep or remove Schema data from your product category archive pages will depend upon how you’ve set up your store.
Notiz: By default, this option will be enabled on all Product archive pages.
You can select the default watermark to be a Play Icon, GIF Icon, or any custom watermarks you’ve created. You can set it Off if you do not want to use the setting.
This covers all the settings in the Product Categories section, let’s check out the next section, the Product Tags.
24 Product Tags
The section above deals with product category pages, and this section deals with product tag pages. As expected, this section will also be visible only if you’re using WooCommerce. Here are all the settings in this section.
Let us understand each of the settings.
Tag Archive Titles
This option lets you create a template for the titles of your product tag archive pages. You can create a static template or create a dynamic one using variables. A sample template has been created for reference, which you can use as well.
To see all the variables you have access to, click the drop-down button on the top right of the text field. A drop-down menu will appear, which will contain all the variables. You can scroll to see all the variables, or filter them by typing any characters on your keyboard. As you make any changes to the template, the preview below the text area should update in real-time.
Tag Archive Descriptions
This option lets you create a template for creating meta descriptions for product tag archive pages. Similar to the Tag Archive Titles, you can create a static template or create a dynamic one using variables.
Tag Archives Robots Meta
This option lets you customize the Robots Meta for product tag archive pages. You can either leave them at the default settings to use the Global Robots Meta or set them to custom settings.
Tag Archives Robots Meta Custom Settings
If you choose the custom option, another set of options will appear below it, which will allow you to pick the Meta Robots tags specifically.
Tag Archives Advanced Robots Meta
Once you choose the custom option in Robots Meta, you’ll also find another set of Advanced Robots meta to configure. You can either leave with the default setting or configure your own set of values to control how snippets of your product tag archive pages appear on search results.
Slack Enhanced Sharing
This option is enabled by default and when you share a term from this product tags taxonomy on Slack, the link preview will include additional data such as the number of items this term has got.
Fügen Sie SEO-Steuerelemente hinzu
This option lets you add an SEO Controls (Meta box) on the product tags editor window. Whether you should use this option or not will depend on how you’ve structured your website.
Massenbearbeitung
This option lets you edit the SEO title and description of your product tags in bulk. It contains three options: Disabled, Enabled, and Read Only, and is only available when you have enabled Add SEO Controls.
Disabled: Disallows you from editing your SEO title and description
Enabled: Allows you to edit your SEO title and description
Read Only: Allows you to view your SEO title and description without editing them
Snippet-Daten entfernen
This option lets you keep or remove Schema data from your product tag pages. Again enabling or disabling this option depends upon how you’ve structured your website and what pages you want to appear on search results. If you’ve set the product tag archive pages to no-index, then you can prefer to remove your Schema data as well.
Notiz: By default, this option will be enabled on all Product archive pages.
You can select the default watermark to be a Play Icon, GIF Icon, or any custom watermarks you’ve created. You can set it Off if you do not want to use the setting.
This covers all the options available with the product tag archives section.
The RM Locations Categories section includes all the titles and meta settings for your RM Locations category archives. As you might have guessed, this section is a part of your Local SEO and would be available only if you’ve enabled Verwenden Sie mehrere Standorte unter Rank Math SEO → Titles & Meta → Local SEO.
Here is an image showing all the options in the RM Locations categories section.
This option lets you create a template for the titles of your RM Locations category Archives. A sample template should be already available for you, along with a preview below the setting.
You can customize the title template with the number of variables available. To see all the variables, click the drop-down at the right corner of the text area.
You can scroll and see all the variables available, or just type in keywords to filter the variables. As you make any changes, the real-time preview will also update, in real-time.
You should know that while there are a lot of variables to choose from, some variables are supported only for specific pages. For any variable that has special requirements, a small notice has been added next to it.
This option lets you create a template for creating meta descriptions for RM Locations category archive pages. You can create a static template or create a dynamic one using variables similar to the RM Locations Category Archive Titles.
This option lets you customize the Robots Meta for RM Locations category archive pages. You can either leave them with the default settings to use the Global Robots Meta settings or set them to custom settings.
RM Locations Category Archives Robots Meta Custom Settings PROFI
If you choose to go with custom settings, another set of options will appear below it, which will allow you to pick the specific Robots Meta. The different Robots Meta options will appear as checkboxes, and the selected ones will be applied to the RM Locations category archives.
RM Locations Category Archives Advanced Robots Meta PROFI
If you had chosen a custom option for the Robots Meta, you’d also find a set of options that will let you configure Advanced Robots Meta, as shown below. You can either leave with the default setting or set your own values to control how the snippet of your RM Locations category archive pages would appear on search results.
Slack Enhanced Sharing
This option is enabled by default and when you share a term from this RM Locations categories taxonomy on Slack, the link preview will include additional data such as the number of items this term has got.
This option lets you enable or disable the SEO Meta box for RM Locations categories. You can use the Meta Box to customize the SEO options for individual terms under RM Locations categories.
This option allows you to view and edit the SEO titles and descriptions of multiple RM Locations categories at once. It is available when you enable Add SEO Controls and has three choices:
Disabled: This option disallows you from editing your SEO title and description in bulk
Enabled: This option allows you to edit your SEO title and description in bulk
Read Only: This option allows you to view your SEO title and description without editing them
This option lets you enable or disable Snippet data from your RM Locations category archives. If you had set your RM Locations category archives to no-index, then you remove the Schema data, as well as they, are not going to be indexed in search engines.
Notiz: By default, this option will be enabled on all Product archive pages.
You can select the default watermark to be a Play Icon or a GIF Icon. You can set it Off if you do not want to use the setting. If you had created any custom watermarks, they would also appear here for you to use.
This covers all the settings in the RM Locations categories section, let’s check out the next section, the Groups.
26 Groups
This section includes all the titles and meta settings for the Groups created with BuddyPress. You can see the Groups section only if you’ve BuddyPress installed on your website.
If you’ve BuddyPress installed on your website but still unable to see this section, then ensure that you should also enable the BuddyPress module at WordPress-Dashboard →Rank Math-SEO. Here are all the settings available for you to configure under the BuddyPress Groups section.
Group Title
This option lets you create a template for the titles of your group pages. You can create a static template or create a dynamic one using variables.
To see all the variables you have access to, click the drop-down button on the top right of the text field. A drop-down menu will appear, which will contain all the variables. You can scroll to see all the variables, or filter them by typing any characters on your keyboard. As you make any changes, the preview below the setting should update in real-time.
Group Description
This option lets you create a template for creating meta descriptions for group pages. You can create a static template or create a dynamic one using variables similar to the Group Title.
Group Robots Meta
This option lets you customize the Robots Meta for Group archive pages. You can either leave them with the default settings to use the Global Robots Meta configurations or set them to custom settings.
Group Robots Meta Custom Settings
If you choose the custom option, another set of options will appear below it, which will allow you to pick the specific Robots Meta tags. The different Robots Meta options will appear as checkboxes, and the selected ones will be applied to the group archive pages.
Group Advanced Robots Meta
If you had chosen the custom option for the Robots Meta, you’d also find a set of options to configure Advanced Robots Meta, as shown below. You can either leave with the default setting or set your own values to control how the snippet of your group archive pages should appear on search results.
27 Speichern Ihrer Einstellungen
Once you’ve made any changes to the settings that you’d like to keep, you need to save your settings. The settings inside Rank Math don’t get saved automatically, and you have to manually save them for it to take effect.
If you navigate away from the settings area without saving your settings, Rank Math will also warn you of the same.
If you click Leave, then you will reach your destination, but all the changes since your last save will be lost, and there will be no way to bring them back.
This feature is quite useful in the case where you are just checking out the settings and do not want to save the settings. In those situations, just leave the settings area, and your changes will not be saved.
To actually save your settings, click the “Save Changes” button present at the bottom of each of the settings in the Titles and Meta Settings.
In a few seconds, the page will refresh, and your settings will be saved. Look for the confirmation message on the top of the screen to confirm.
Important Note: Once you save your changes, all your existing settings are overwritten permanently, and there is no way to revert to the earlier version of settings without a backup. Rank Math does offer a backup and import-export settings option that you should use before making changes to your settings to preserve your existing settings.
28 Zurücksetzen Ihrer Einstellungen
There can be many cases where you want to revert to the default settings in Rank Math. Maybe you were just experimenting, or maybe you wanted to configure Rank Math from scratch.
To cater to these scenarios, Rank Math has a built-in reset function that configures Rank Math back to its default settings. The button to reset your settings is present at the bottom of each setting page. Click it to reset your settings.
Rank Math will warn you before the actual reset takes place. If you’re unsure about this step, we recommend that you first take a backup of your settings.
If you click “OK”, the page will refresh, and in a few seconds, all the settings will be reset to their defaults. You should also see a confirmation message on the top of the page confirming the reset.
Important Note: The reset process does not reset the settings of just one of the sections, but all the sections in the SEO Titles and Meta Section. That means every change you’ve made to any of the sections will be lost and will be replaced with the default settings. Proceed with caution, and only if you know what you’re doing. Taking a backup of your existing settings never hurts.
29 Fazit
That’s it! We’ve covered all the settings in the Titles and Meta section of Rank Math. There were a lot of settings to understand and go through, and we hope that we were able to make the simple for you to understand. If you have any questions or have trouble configuring these settings, please get in touch with the support team by opening up a support ticket. The support staff is available 24x7x365 and will help you out to the best of their abilities.
Verwenden Sie Rank Math immer noch nicht?
Die Einrichtung dauert weniger als 5 Minuten, einschließlich des Imports von Ihrem alten SEO-Plugin!
Rank Math „Titel und Meta“ Optionen und Einstellungen
Rank Math 'Titel und Meta' Optionen und Einstellungen
In diesem Wissensdatenbank-Tutorial werden wir die Kachel- und Metaeinstellungen in Rank Math behandeln. Wie Sie wahrscheinlich wissen, spielen sie eine wichtige Rolle dabei, wie Suchmaschinen Ihre Inhalte wahrnehmen.